SlideShare a Scribd company logo
1 of 24
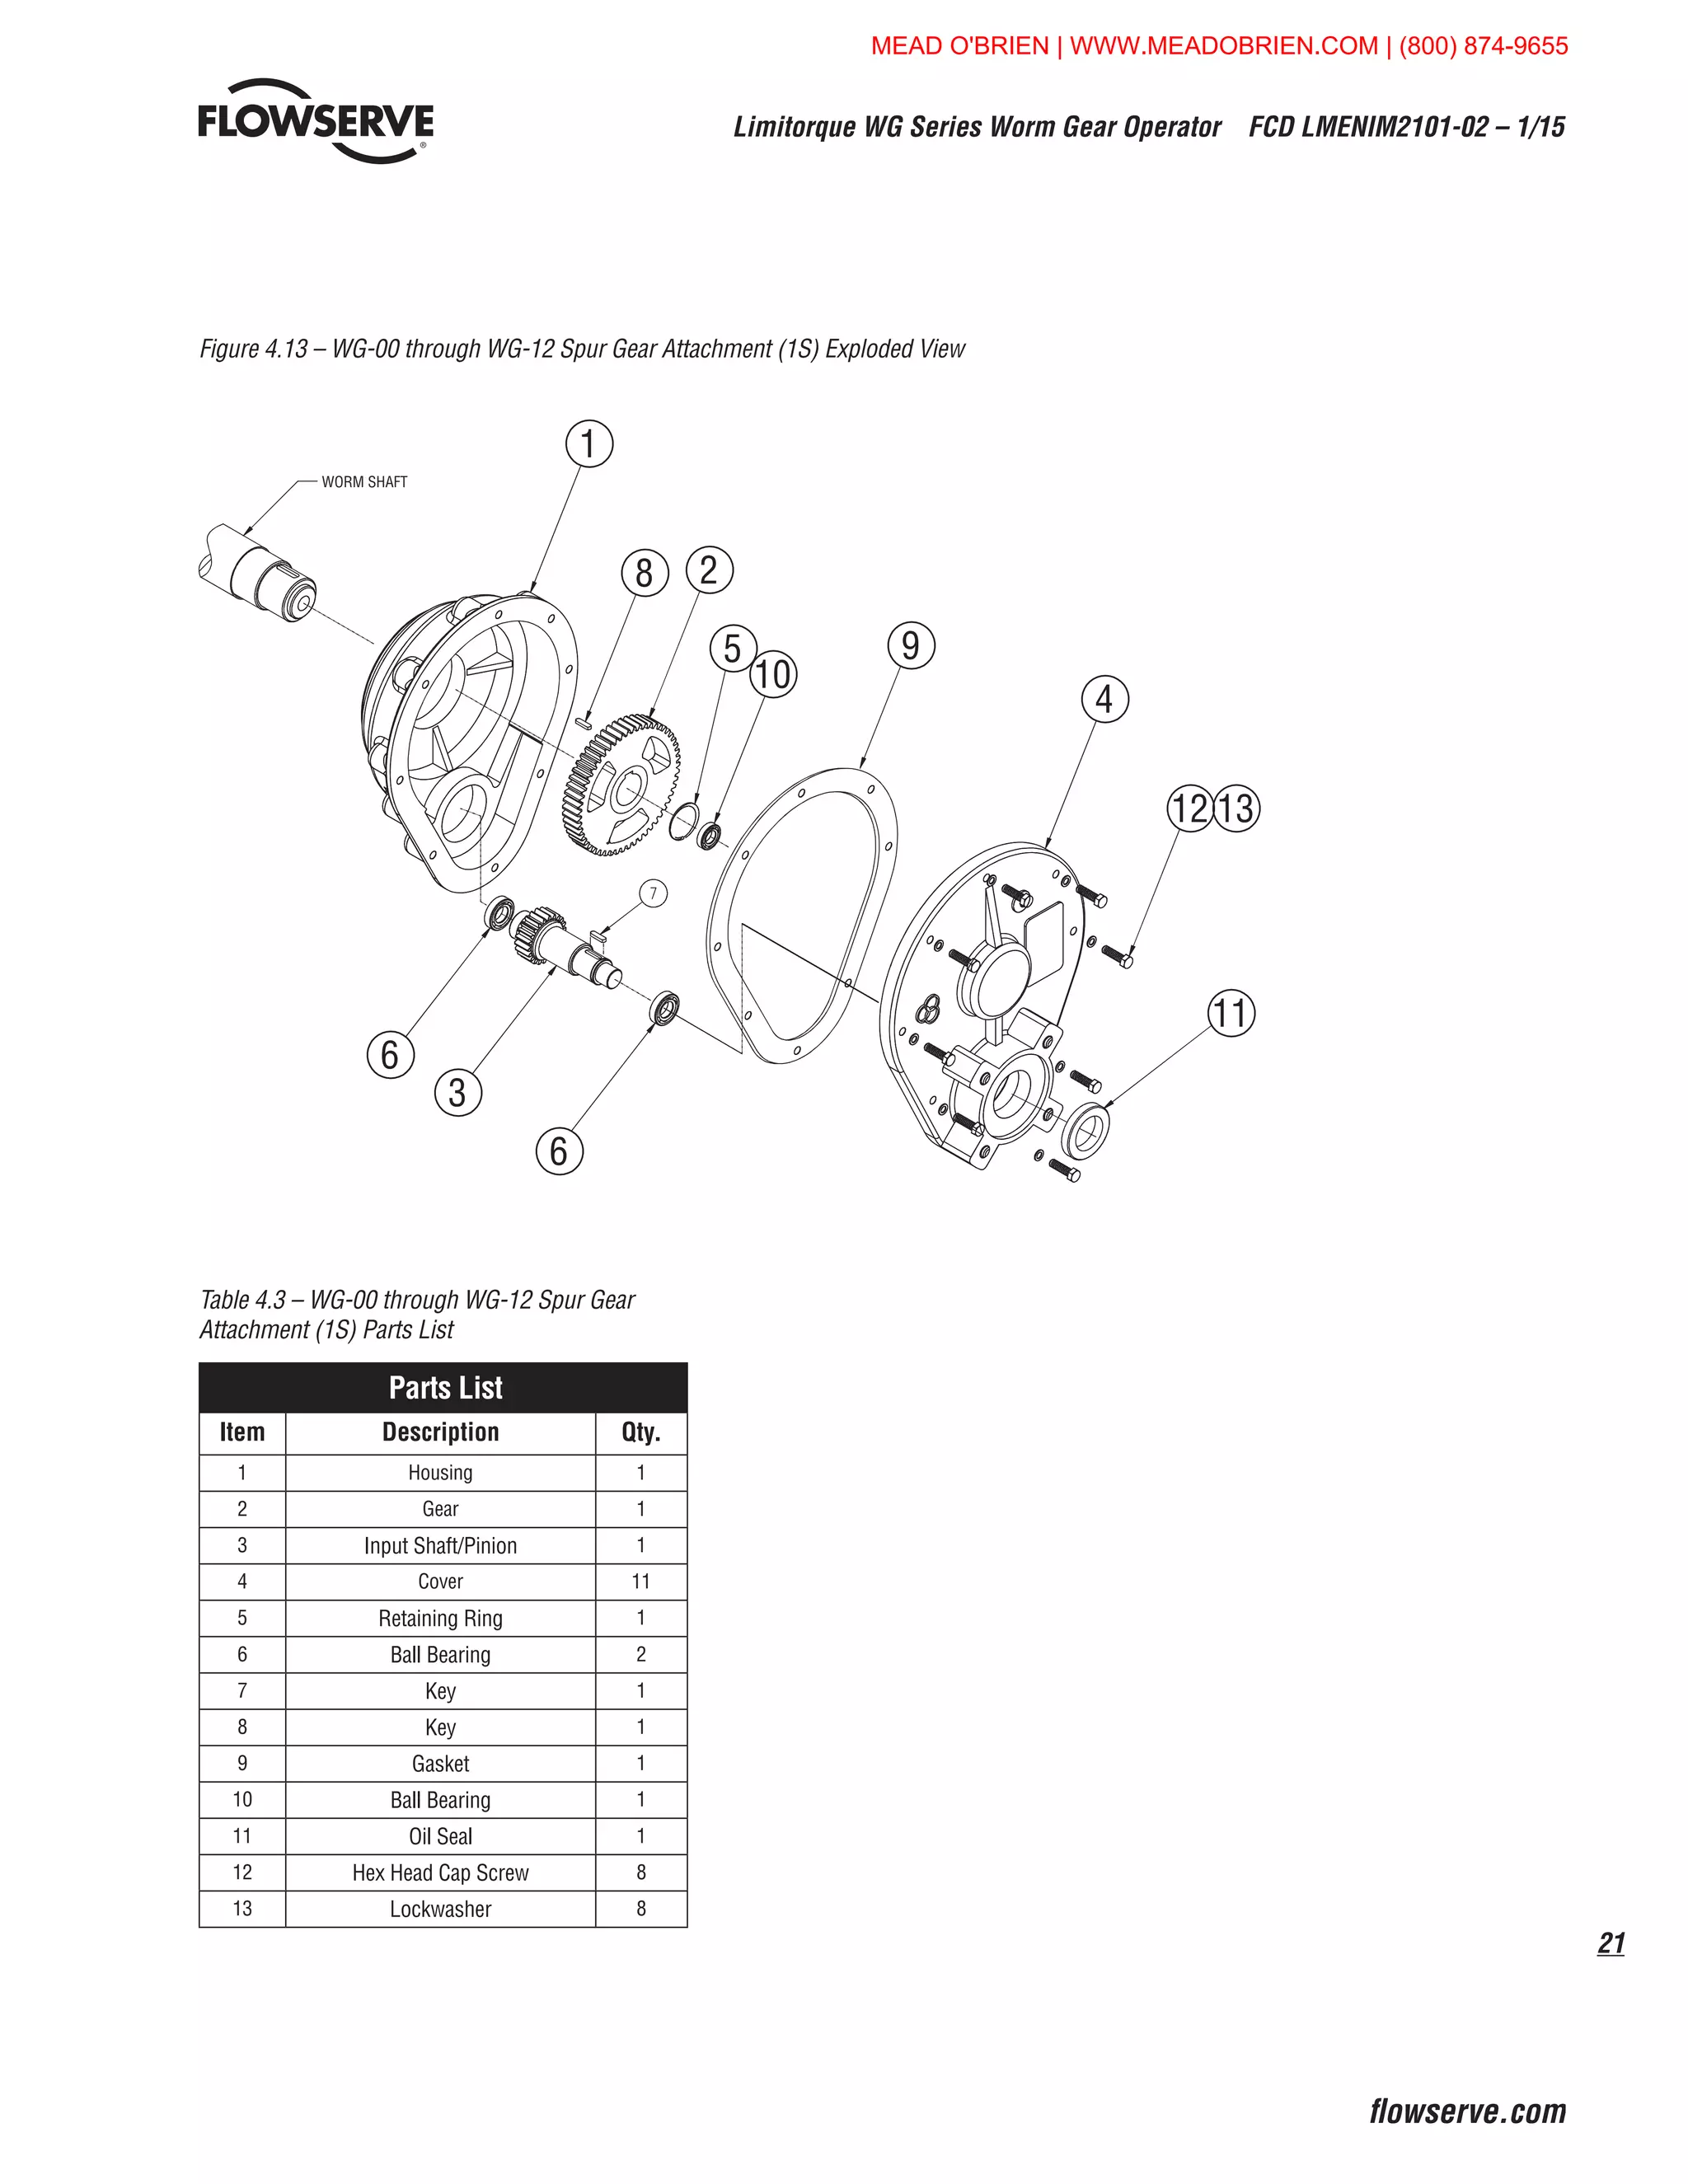
Download to read offline
Experience In Motion
USER INSTRUCTIONS
Installation
Operation
Maintenance
Limitorque®
WG Series
FCD LMENIM2101-02 – 1/15
MEAD O'BRIEN | WWW.MEADOBRIEN.COM | (800) 874-9655
Limitorque WG Series Worm Gear Operator  FCD LMENIM2101-02 – 01/15
2
Contents
1	Introduction	 4	
1.1 Purpose	 4
1.2 User Safety	 4
2	 Inspection, Installation and Mounting Procedures	 5
2.1 Initial Inspection and Storage Instructions	 6
2.2 Inspection and Recording	 6
2.3 Storage Procedure	 6
2.4 General Mounting Instructions	 7
2.5 Assembly Positions	 8
2.6 Setting Position Limit Stops - WG-00 Through 12	 9
3	Lubrication	 10
4	 Disassembly and Reassembly Instructions	 11
4.1 Safety Precautions	 11
4.2 Safety Practices	 12
4.3 WG-00 Through WG-35	 12
4.4 WG-04 Through WG-12	 16
4.5 Single Reduction Spur Gear Attachment (1S)	 20
4.6 Double Reduction Spur Gear Attachment (1SD)	 22
5	 How to Order Parts	 24
Figures
Figure 2.1 – Typical WG Exploded View	 5
Figure 2.2 – Assembly Position A	 8
Figure 2.3 – Assembly Position D	 8
Figure 2.4 – Setting Position Limit Stops	 9
Figure 4.1 – Splined Adapter Assembly 	 12
Figure 4.2 – WG-00 Through WG-35 Exploded View	 13
Figure 4.3 – WG-00 Through WG-35 Assembly View	 14
Figure 4.4 – WG-00 Through WG-35 Assembly View	 14
Figure 4.5 – WG-00 Through WG-35 Assembly View	 15
Figure 4.6 – WG-00 Through WG-35 Assembly View	 15
Figure 4.7 – WG-04 Through WG-12 Splined Adapter Assembly	 16
Figure 4.8 – WG-04 Through WG-12 Exploded View	 17
Figure 4.9 – WG-04 Through WG-12 Assembly View	 18
Figure 4.10 – WG-04 Through WG-12 Assembly View	 18
Figure 4.11 – WG-04 Through WG-12 Assembly View	 19
Figure 4.12 – WG-04 Through WG-12 Assembly View	 19
Figure 4.13 – WG-00 Through WG-12 Spur Gear Attachment (1S) Exploded View	 21
Figure 4.14 – WG-00 Through WG-12 Spur Gear Attachment (1SD) Exploded View	 23
MEAD O'BRIEN | WWW.MEADOBRIEN.COM | (800) 874-9655
3
Limitorque WG Series Worm Gear Operator  FCD LMENIM2101-02 – 1/15
flowserve.com
Tables
Table 3.1 – Lubricants	 10
Table 4.1 – WG-00 Through WG-35 Parts List	 15
Table 4.2 – WG-04 Through WG-12 Parts List	 19
Table 4.3 – WG-00 Through WG-12 Spur Gear Attachment (1S) Parts List	 21
Table 4.4 – WG-00 Through WG-12 Spur Gear Attachment (1SD) Parts List	 23
MEAD O'BRIEN | WWW.MEADOBRIEN.COM | (800) 874-9655
Limitorque WG Series Worm Gear Operator  FCD LMENIM2101-02 – 01/15
4
1	 Introduction
1.1	Purpose
The installation and maintenance manual (IOM) explains how to install and maintain the Flowserve Limitorque WG
operator. Information on installation, disassembly, reassembly, lubrication and spare parts is provided.
1.2	 User Safety
Safety notices in this manual detail precautions the user must take to reduce the risk of personal injury and damage
to the equipment. The user must read and be familiar with these instructions before attempting installation, operation
or maintenance. Failure to observe these precautions could result in serious bodily injury, damage to the equipment,
voiding of the warranty, or operational difficulty.
Safety notice is presented in this manual in three forms:
c	WARNING: Refers to personal safety. Alerts the user to potential danger. Failure to follow warning notices
could result in personal injury or death.
a	CAUTION: Directs the user’s attention to general precautions that, if not followed, could result in personal injury
and/or equipment damage.
NOTE: Highlights information critical to the user’s understanding of the operator’s installation and operation.
MEAD O'BRIEN | WWW.MEADOBRIEN.COM | (800) 874-9655
5
Limitorque WG Series Worm Gear Operator  FCD LMENIM2101-02 – 1/15
flowserve.com
Figure 2.1 – Typical WG Exploded View
c	WARNING: Do not manually operate the WG operator with devices other than the installed handwheel or wrench
nut. Using additive force devices (cheater bars, wheel wrenches, pipe wrenches, or other devices of this nature)
on the operator handwheel, wrench or wrench nut may cause serious personal injury and/or damage to the
operator or valve.
2	
Inspection,
Installation and
Mounting Procedures
MEAD O'BRIEN | WWW.MEADOBRIEN.COM | (800) 874-9655
Limitorque WG Series Worm Gear Operator  FCD LMENIM2101-02 – 01/15
6
2.1	 Initial Inspection and Storage Instructions
c	WARNING: Read this installation and maintenance manual carefully and completely before attempting to
store the operator. If an electric actuator is attached to the WG manual operator, be aware of the electrical
hazards. Consult the electric actuator installation and maintenance manual for guidance.
2.2 	 Inspection and Recording
Upon receipt of the operator, inspect the condition of the equipment, and record nameplate information.
1.	 Carefully remove operator from shipping carton or skid. Thoroughly examine the equipment for any physical
damage that may have occurred during shipment. If damaged, immediately report the damage to the transport
company.
2.	 A nameplate is attached to each operator with the following information:
• Operator size
• Assembly position
• Order number
• Serial number
• Customer tagging
	 Record this information for future reference, e.g., ordering parts, or obtaining further information.
2.3 	 Storage Procedure
NOTE: The following is the recommended storage procedure to retain maximum product integrity during storage.
Failure to comply with recommended procedure will void the warranty.
Storage (less than one year)
Store operators on wooden skids to protect the machined mounting flange. Place the wooden skids containing the
operators in a clean, dry, protected warehouse. If the operators must be stored outside, they must be covered in
polyethylene protection with silica gel crystals to absorb moisture. If an electric actuator is attached to the WG, refer
to the storage procedures in its respective manual for appropriate storage procedures. Rotate input shafts every three
months to mix the lubricant.
MEAD O'BRIEN | WWW.MEADOBRIEN.COM | (800) 874-9655
7
Limitorque WG Series Worm Gear Operator  FCD LMENIM2101-02 – 1/15
flowserve.com
2.4	 General Mounting Instructions
a	CAUTION: To avoid the potential for disengaging the worm gear segment, ensure that the pointer cap pointer is
oriented to the mid-point of the 90º valve travel. Full stroke rotation of the quadrant should not move the pointer
past the corresponding Open or Close ID marks on the housing cover.
The mounting instructions for the WG series worm gearboxes are outlined below. The WG-00 through WG-35 gearboxes
are designed with a bottom entry splined adapter. The WG-04 through WG-12 gearboxes are designed with a top entry
splined adapter. A separate set of instructions for each design is provided. See Section 2.4.1 for the WG-00 through WG-35
and Section 2.4.2 for the WG-04 through WG-12.
2.4.1	WG-00 through WG-35
1.	 Place the valve disk in the full closed position.
Note:	 If the Splined Adapter is already installed in the operator, go to step 6.
2.	 Remove the Pointer Cap (see Section 4 for removal instructions).
3.	 Turn the gearbox upside down so that the bottom of the housing is accessible.
4.	 Remove the Retaining Ring, and install the Splined Adapter.
Note:	 The notch in the Worm Gear at the Closed position must be aligned with the
	 keyway in the Splined Adapter.
5.	 Reinstall the Retaining Ring.
6.	 Place the gearbox in the upright position so that the top of the gearbox is accessible.
7.	 Mount the operator on the valve and bolt securely.
8.	 Rotate the input shaft to align the keyway of the Splined Adapter with the keyway of the
Valve Shaft and install the key.
9.	 Confirm that the gearbox Stop Screws are properly set for valve disk travel in both the Open and Close
directions of travel. See Section 2.6.
10.	Reinstall the Pointer Cap.
MEAD O'BRIEN | WWW.MEADOBRIEN.COM | (800) 874-9655
Limitorque WG Series Worm Gear Operator  FCD LMENIM2101-02 – 01/15
8
2.5	 Assembly Positions
2.4.2	WG-04 through WG-12
1.	 Place the valve disk in the full closed position.
2.	 Remove the Pointer Cap (see Section 4 for removal instructions).
Note:	 If the Splined Adapter is already installed in the operator, go to step 6.
3.	 Remove the Retaining Ring and install the Splined Adapter.
Note:	 The notch in the Worm Gear at the Closed position must be aligned with the keyway in the Splined Adapter.
4.	 Reinstall the Retaining Ring.
5.	 Mount the operator on the valve and bolt securely.
6.	 Rotate the input shaft to align the keyway of the Splined Adapter with the keyway of the Valve Shaft and install the key.
7.	 Confirm that the gearbox Stop Screws are properly set for valve disk travel in both the Open and Close directions of travel.
See Section 2.6.
8.	 Reinstall the Pointer Cap.
Figure 2.2 – Position A
Figure 2.3 – Position D
STANDARD ASSEMBLY POSITION
Clockwise Input Rotation –
Clockwise Output Rotation
OPTIONAL ASSEMBLY POSITION
Clockwise Input Rotation –
Counterclockwise Output Rotation
MEAD O'BRIEN | WWW.MEADOBRIEN.COM | (800) 874-9655
9
Limitorque WG Series Worm Gear Operator  FCD LMENIM2101-02 – 1/15
flowserve.com
2.6 	 Setting Position Limit Stops – WG-00 Through WG-12
Refer to Figure 2.4
1. 	 Loosen the Hex Nut (pc# 16) and turn it several turns to allow for stop screw adjustment.
2.	 Adjust the Stop Screw by turning it counterclockwise to back the screw away from the Worm Gear/Drive Sleeve (pc# 5).
3.	 Place the valve disk in the full closed position.
4.	 Turn the Stop Screw (pc# 15) in the clockwise direction until the end of the screw contacts the Worm Gear/Drive Sleeve.
5.	 Tighten the Hex Nut to secure the closed set position.
6.	 Move the valve disk to the full open position.
7.	 Follow steps 1 through 5.
a	CAUTION: If the valve is operated with an electric actuator/gear operator combination, and the valve is position-seated,
set the actuator limit switches to trip prior to engagement of the WG Worm Gear/Drive Sleeve with the Stop Screws.
Damage to the operator could result from the Worm Gear/Drive Sleeve contacting the Stop Screw under motorized
operation.
Note:	 The stops are adjustable to +/- 5º of total travel to allow for proper positioning
	 of the worm gear quadrant.
Figure 2.4 – Setting Position Limit Stops – WG-00 through WG-12
21
2
20 8
17
17 10
9
3
7
19
22
11
1
11
22
6
5
32
23
16
15
4
31 18
14 29
12
9
30
MEAD O'BRIEN | WWW.MEADOBRIEN.COM | (800) 874-9655
Limitorque WG Series Worm Gear Operator  FCD LMENIM2101-02 – 01/15
10
3	Lubrication
Flowserve Limitorque WG operators are shipped with the following lubricants:
Table 3.1 – Lubricants
Product Lubricant Soap Base Temperature Range
WG-00 through WG-10 Zenith LH 2 Calcium -40°C to 90°C (-40°F to 194°F)
NOTE: The lubricant should be checked every 18 months for manual operators.
a	CAUTION: Do not add a different lubricant to a Flowserve Limitorque operator unless it is of the same soap base
as the existing lubricant, or you have received the approval of the lubricant manufacturer.
Quantity
Limitorque operators are built to operate on the partial immersion principle. The primary concern regarding the amount
of lubricant is whether the “worm” is totally immersed in grease. This can be verified by the use of one or more of the
“fill” and “drain” plugs provided on the operator housing in most sizes.
Quality
When removing a “fill” or “drain” plug to inspect the lubricant level, remove a small amount and ensure that it is clean
and free of any contaminant, including water. Should dirt, water or other foreign matter be found, the operators should
be flushed with a commercial degreaser/cleaner which is non-corrosive and does not affect seal materials such as
Buna-N or Viton. Repack operator with fresh lubricant.
Consistency
The main gear box lubricant should be slightly fluid, approximating a standard NLGI-2 grade consistency or less.
Alternate lubricants may be used in place of the standard lubricants supplied by Flowserve, provided they are of a
formulation similar to those listed above for the respective product.
MEAD O'BRIEN | WWW.MEADOBRIEN.COM | (800) 874-9655
11
Limitorque WG Series Worm Gear Operator  FCD LMENIM2101-02 – 1/15
flowserve.com
4	Disassembly and
Reassembly Instructions
4.1	 Safety Precautions
c	WARNING: Read this Installation, Operation and maintenance manual carefully and completely before attempting
to install, operate or troubleshoot the Limitorque operator.
c	WARNING: Potential HIGH-PRESSURE vessel — be aware of high-pressure hazards associated with the attached
valve or other actuated device when installing or performing maintenance on the operator. Do not remove the
operator mounting bolts from the valve or actuated device unless the valve or device stem is secured or there is
no pressure in the line.
c	WARNING: For maintenance and/or disassembly of the operator while installed on the valve, ensure that the
operator is not under thrust or torque load. If the valve must be left in service, the valve stem must be locked in
such a way as to prevent any movement of the valve stem.
c	WARNING: Do not manually operate the operator with devices other than the installed handwheel. Using force
beyond the ratings of the operator and/or using additive force devices such as cheater bars, wheel wrenches, pipe
wrenches, or other devices on the operator handwheel may cause serious personal injury and/or damage to the
operator and valve.
c	WARNING: Do not exceed any design limitations or make modifications to this equipment without first consulting
Limitorque.
c	WARNING: Use of this product must be suspended any time it fails to operate properly.
a	CAUTION: If a motor actuator is driving the manual operator, do not operate the valve under motor operation
without first checking and setting the limit switch and checking for correct motor rotation.
a	CAUTION: Do not use replacement parts that are not genuine Flowserve Limitorque parts, as serious personal
injury and/or damage to the operator and valve may result.
MEAD O'BRIEN | WWW.MEADOBRIEN.COM | (800) 874-9655
Limitorque WG Series Worm Gear Operator  FCD LMENIM2101-02 – 01/15
12
4.2	 Safety Practices
The following checkpoints should be performed to maintain safe operation of the WG gear operator:
•	 Set up a periodic operating schedule on infrequently used valves.
•	 Ensure that the limit and/or torque switches on any electric actuator fitted to the WG worm gear operator are
correctly and appropriately adjusted.
4.3	 WG-00 Through WG-35
Refer to Figures 4.1 through 4.6.
Disassembly Instructions:
1.	 Place the operator upside down to access the mounting base.
2.	 Remove Retaining Ring (pc# 10) and Splined Adapter (pc# 4).
3.	 Return the operator to the upright position (mounting base down) and remove the Hex Head
Cap Screws (pc# 14), Pointer Cap (pc# 8) and O-rings (pc# 18  31).
4.	 Remove the Hex Head Cap Screws (pc# 12), Housing Cover (pc# 2) and Cover Gasket (pc# 21).
5.	 Remove the Input Flange (pc# 7), with Oil Seal (pc# 19) and Gasket (pc# 22), or remove the Spur Gear
Attachment (See Section 4.5 or 4.6).
6.	 Remove Worm Shaft (pc# 3) with Tapered Roller Bearing (pc# 11) from the Housing (pc# 1).
7.	 Remove the Tapered Roller Bearing (pc# 11) from the Worm Shaft (pc# 3), if required.
8.	 Remove the End Cap (pc# 6) and Gasket (pc# 22).
9.	 Remove the Tapered Roller Bearing (pc# 11).
10.	 Remove the Worm Gear/Drive Sleeve (pc# 5), O-Rings (pc# 17), and Thrust Washers (pc# 9).
11.	 Remove the Stop Screws (pc# 15) with Hex Nuts (pc# 16), Packing Seals (pc# 23) and O-rings (pc# 32).
Reassembly Instructions:
1.	 Install the Stop Screws (pc#15), including the O-Rings (pc# 32),
Packing Seals (pc# 23) and Hex Nuts (pc# 16).
2.	 Place the lower Thrust Washer (pc# 9) in the Housing (pc# 1).
3.	 Replace the lower O-Rings (pc# 17) in the base of the
Housing (pc# 1).
Note: 	 Lubricate all O-Rings before installation.
4.	 Install the Worm Gear/Drive Sleeve (pc# 5).
5.	 Install the Tapered Roller Bearing (pc# 11) into the
Housing bore on the End Cap side.
4
28 13
2
21
20
9
5
9
6 22 11
1710
(VARIES)
Figure 4.1 – Splined Adapter Assembly
MEAD O'BRIEN | WWW.MEADOBRIEN.COM | (800) 874-9655
13
Limitorque WG Series Worm Gear Operator  FCD LMENIM2101-02 – 1/15
flowserve.com
6.	 Install the End Cap (pc# 6) and Gasket (pc# 22).
7.	 Insert the Worm Shaft (pc# 3) into the Housing bore.
8.	 Install the Tapered Roller Bearing (pc# 11) onto the Worm Shaft in the Housing bore.
9.	 Replace the Oil Seal (pc# 19) in the Input Flange (pc# 7), if required.
10.	 Install the Input Flange (pc# 7) with Gasket (pc# 22) or install the Spur Gear Attachment (See Section 4.5 or 4.6).
Note: 	 Lubricate the worm gear mesh to replace lubricant lost during disassembly (see Lubrication, Section 3).
11.	 Place the upper Thrust Washer (pc# 9) on the Worm Gear/Drive Sleeve (pc# 5).
12.	 Replace the upper O-Ring (pc# 20) in the Housing Cover (pc# 2).
Note: 	 Lubricate all O-Rings before installation.
13.	 Install the Housing Cover (pc# 2) with Cover Gasket (pc# 21).
14.	 Replace the upper O-Ring (pc# 18) in the Housing Cover (pc# 2).
15.	 Replace the Pointer Cap O-ring (pc# 31) in the top of the Worm Gear/Drive Sleeve (pc# 5).
Note: 	 Lubricate all O-Rings before installation.
16.	 Install the Pointer Cap (pc# 8).
17.	 Turn the operator upside
down and insert the Splined
Adapter (pc# 4).
18.	 Install the Splined Adapter
Retaining Ring (pc# 10).
4
29 14
30 12
28 13
8
31
18
2
21
20 9
5
9
6
22
11
24 1
3
32
23
16
15
27
1328
11 22
19
7
17 17
10
(VARIES)
PC-7 IS REPLACED BY
OPTIONAL SPUR GEAR
ATTACHMENT, IF SUPPLIED
Figure 4.2 –
WG-00 through WG-35 Exploded View
MEAD O'BRIEN | WWW.MEADOBRIEN.COM | (800) 874-9655
Limitorque WG Series Worm Gear Operator  FCD LMENIM2101-02 – 01/15
14
21
2
20 8
17
17 10
9
3
7
31 18
14 29
12
9
30
17
17 10
9
3
7
19
22
11
1
11
22
6
5
32
23
16
15
4
Figure 4.3 – WG-00 through WG-35 Assembly View
Figure 4.4 – WG-00 through WG-35 Assembly View
MEAD O'BRIEN | WWW.MEADOBRIEN.COM | (800) 874-9655
15
Limitorque WG Series Worm Gear Operator  FCD LMENIM2101-02 – 1/15
flowserve.com
27
24
25
28 13
28 13
27
24
25
28 13
28 13
Parts List
Item Description Qty.
1 Housing 1
2 Housing Cover 1
3 Worm Shaft 1
4 Splined Adapter 1
5 Worm Gear/Drive Sleeve 1
6 End Cap 1
7 Input Flange VARIES
8 Pointer Cap 1
9 Thrust Washer 2
10 Splined Adapter Retaining Ring 1
11 Tapered Roller Bearing 2
12 Hex Head Cap Screw 8
13 Hex Head Cap Screw 4
14 Hex Head Cap Screw 4
15 Stop Screw 2
16 Hex Nut 2
17 Drive Sleeve O-Ring VARIES
18 Drive Sleeve O-Ring 1
19 Oil Seal 1
20 Drive Sleeve O-Ring 1
21 Cover Gasket 1
22 Gasket 2
23 Packing Seal 2
24 Pipe Plug/Grease Fitting 1
25 Eye Bolt 4
26 N/A
27 Key 1
28 Lock Washer 4
29 Lock Washer 4
30 Lock Washer 8
31 Pointer Cap O-Ring 1
32 Stop Screw O-Ring 2
Figure 4.6 – WG-00 through WG-35 Assembly View
Table 4.1 – WG-00 through WG-35 Parts List
Figure 4.5 – WG-00 through WG-35 Assembly View
MEAD O'BRIEN | WWW.MEADOBRIEN.COM | (800) 874-9655
Limitorque WG Series Worm Gear Operator  FCD LMENIM2101-02 – 01/15
16
4.4	 WG-04 Through WG-12
Refer to Figures 4.7 through 4.12
Disassembly Instructions:
1.	 Remove the Hex Head Cap Screws (pc# 14), Pointer Cap (pc# 8), Gasket (pc# 31) and O-ring1
(pc# 18).
2.	 Remove Retaining Ring (pc# 10) and Splined Adapter (pc# 4).
3.	 Remove the Hex Head Cap Screws (pc# 12), Housing Cover (pc# 2), Cover Gasket (pc# 21), and O-Ring (pc# 20).
Note: 	 Remove O-Ring (pc# 18) if applicable1
.
4.	 Remove the Input Flange (pc# 7) and Gasket (pc# 22), or remove the Spur Gear Attachment (See Section 4.5 or 4.6).
5.	 Remove Worm Shaft (pc# 3) with Tapered Roller Bearing (pc# 11) and Ball Bearing2
(pc# 26) from the Housing (pc# 1).
6.	 Remove the Tapered Roller Bearing (pc# 11) and Ball Bearing2
(pc# 26) from the Worm Shaft (pc# 3), if required.
7.	 Remove the End Cap (pc# 6) and Gasket (pc# 22).
8.	 Remove the Tapered Roller Bearing (pc# 11) and Ball Bearing2
(pc# 26).
9.	 Remove the Worm Gear/Drive Sleeve (pc# 5), O-Rings (pc# 17), and Thrust Washers (pc# 9).
10. 	 Remove the Stop Screws (pc# 15) with Hex Nuts (pc# 16), Packing Seals (pc# 23) and O-rings (pc# 32), if applicable.
Reassembly Instructions:
1.	 Install the Stop Screws (pc# 15), including the Hex Nuts (pc# 16),
Packing Seals (pc# 23) and O-rings (pc# 32), if applicable.
2.	 Place the lower Thrust Washer (pc# 9) in the Housing (pc# 1).
3.	 Replace the lower O-Rings (pc# 17) in the base of the Housing (pc# 1).
Note: 	 Lubricate all O-Rings before installation.
4.	 Install the Worm Gear/Drive Sleeve (pc# 5).
5.	 Install the Ball Bearing2
(pc# 26) and the Tapered
Roller Bearing (pc# 11) into the Housing bore
on the End Cap side.
6.	 Install the End Cap (pc# 6) and Gasket (pc# 22).
7.	 Insert the Worm Shaft (pc# 3) into the Housing bore.
8.	 Install the Ball Bearing2
(pc# 26) and the Tapered
Roller Bearing (pc# 11) onto the Worm Shaft in the
Housing bore.
9.	 Replace the Oil Seal (pc# 19) in the Input Flange (pc# 7), if required.
10. Install the Input Flange (pc# 7) with Gasket (pc# 22) or
install the Spur Gear Attachment (See Section 4.5 or 4.6).
Note: 	 Lubricate the worm gear mesh to replace lubricant lost during
	 disassembly (See Lubrication, Section 3).
14 29
1328
4
5
9
20
18
21
2
1230
8
31
10
(QTY VARIES
(VARIES)1
Figure 4.7 –
WG-04 through WG-12
Splined Adapter Assembly
MEAD O'BRIEN | WWW.MEADOBRIEN.COM | (800) 874-9655
17
Limitorque WG Series Worm Gear Operator  FCD LMENIM2101-02 – 1/15
flowserve.com
11. Place the upper Thrust Washer (pc# 9) on the Worm Gear/Drive Sleeve (pc# 5).
12. Replace the O-Rings (pc# 20) in the Housing Cover (pc# 2).
Note: 	 Lubricate the O-Rings before installation.
13. Install the Housing Cover (pc# 2) with the Cover Gasket (pc# 21).
14. Insert the Splined Adapter (pc# 4) into the Worm Gear/Drive Sleeve (pc# 5).
15. Install the Splined Adapter Retaining Ring (pc# 10).
16. Install the Pointer Cap (pc# 8), Gasket (pc# 31) and Drive Sleeve O-Ring1
(pc# 18).
1
	O-Ring (pc# 18) applies to WG-04 through -07 only. (Pc# 20), quantity of 2, applies to WG-75 through WG-12.
2
	Ball Bearing (pc# 26) applies to WG-55 thru -12 only.
14 29
1328 6
22
11
26
24
1
23
16
15
3
27
26 11
22
19
7
13 28
4
1717
9
5
9
20
18
21
2
1230
25
24
8
31
10
(QTY VARIES)
(QTY VARIES)
(VARIES)
(VARIES)
(VARIES)1
PC-7 IS REPLACED BY
OPTIONAL SPUR GEAR
ATTACHMENT, IF SUPPLIED
Figure 4.8 – WG-04 through WG-12 Exploded View
MEAD O'BRIEN | WWW.MEADOBRIEN.COM | (800) 874-9655
Limitorque WG Series Worm Gear Operator  FCD LMENIM2101-02 – 01/15
18
Figure 4.9 – WG-04 through WG-12 Assembly View
Figure 4.10 – WG-04 through WG-12 Assembly View
21
17 17 4 9
3
7
19
22
11
1
26
11
22
6
11
26
32
16
23
5
15
4
23
2
20 20 31 8
14 29
10 9
12 30
WG-04 THRU WG-07
ALTERNATE CONSTRUCTION:
STOP SLEEVE  O-RINGS
WG-04 THRU WG-07
ALTERNATE CONSTRUCTION:
SINGLE WORM SHAFT BEARING
WG-04 THRU WG-05
31
21
17 17 4 9
3
7
19
32
16
23
5
23
2
20 20 31 8
14 29
10 9
12 30
18
20
ALTERNATE CONSTRUCTION:
DRIVE SEAL O-RING  GASKET
WG-04 THRU WG-07
MEAD O'BRIEN | WWW.MEADOBRIEN.COM | (800) 874-9655
19
Limitorque WG Series Worm Gear Operator  FCD LMENIM2101-02 – 1/15
flowserve.com
Figure 4.12 – WG-04 through WG-12 Assembly View
Figure 4.11 – WG-04 through WG-12 Assembly View
Table 4.2 – WG-04 through WG-12 Parts List
Parts List
Item Description Qty.
1 Housing 1
2 Housing Cover 1
3 Worm Shaft 1
4 Splined Adapter 1
5 Worm Gear/Drive Sleeve 1
6 End Cap 1
7 Input Flange 1
8 Pointer Cap 1
9 Thrust Washer 2
10 Splined Adapter Retaining Ring 1
11 Tapered Roller Bearing 2
12 Hex Head Cap Screw 8
13 Hex Head Cap Screw VARIES
14 Hex Head Cap Screw 4
15 Stop Screw 2
16 Hex Nut 2
17 Drive Sleeve O-Ring 2
18 Drive Sleeve O-Ring VARIES
19 Oil Seal 1
20 Drive Sleeve O-Ring VARIES
21 Cover Gasket 1
22 Gasket 2
23 Packing Seal 2
24 Pipe Plug/Grease Fitting 2
25 Eye Bolt 4
26 Ball Bearing VARIES
27 Key 1
28 Lock Washer VARIES
29 Lock Washer 4
30 Lock Washer 8
31 Pointer Cap Gasket 1
32 Stop Screw O-Ring VARIES
25
27
24
1328
1328
24
T
25
27
24
1328
1328
24
MEAD O'BRIEN | WWW.MEADOBRIEN.COM | (800) 874-9655
Limitorque WG Series Worm Gear Operator  FCD LMENIM2101-02 – 01/15
20
4.5	 Single Reduction Spur Gear Attachment (1S)
Refer to Figure 4.13
Disassembly Instructions:
1.	 Remove the Socket Head Cap Screws and Input Flange (not shown) from the Cover (pc# 4).
2.	 Remove the Hex Head Cap Screws (pc# 12) and Cover (pc# 4).
3. 	 Remove all traces of the Cover Gasket (pc# 9).
4. 	 Remove the Input Shaft/Pinion (pc# 3) and Ball Bearings (pc# 6) from the Cover (pc# 4).
5. 	 Remove the Ball Bearing (pc# 10) and Retaining Ring (pc# 5) from the Worm Shaft.
6. 	 Remove Gear (pc# 2) and Key (pc# 8) from the Worm Shaft.
7. 	 Remove the Socket Head Cap Screws (not shown) which mount the Spur Gear Attachment to the
WG Gearbox and remove the Spur Gear Housing (pc# 1)
8. 	 If disassembly of the WG Gearbox is required, see Sections 4.3 or 4.4.
Reassembly Instructions:
1.	 Install the Spur Gear Housing (pc# 1) on the WG Gearbox, ensuring proper gasket is installed between
Gearbox and Spur Gear Housing (see Section 4.3 or 4.5).
2. 	 Install Gear (pc# 2) onto the WG Gearbox Worm Shaft with Key (pc# 8). Fasten with Retaining Ring (pc# 5).
3. 	 Install Ball Bearing (pc# 10) onto the Worm Shaft.
4. 	 Install Ball Bearing (pc# 6) into the Spur Gear Housing (pc# 1).
5.	 Install the Input Shaft/Pinion (pc# 3).
6. 	 Install Ball Bearing (pc# 6) onto the Input Shaft/Pinion (pc# 3).
7. 	 Replace the Cover Gasket (pc# 9).
8. 	 Replace the Oil Seal (pc# 11) in the Cover (pc# 4).
Note: 	 Lubricate the Spur Gearing. See Section 3.
9. Install the Cover (pc# 4), mounting with Hex Head Cap Screws (pc# 12).
10. Install the Input Flange (not shown) onto the Cover (pc# 4) using Socket Head Cap Screws (not shown).
Note: 	 Replace any worn or damaged O-Rings or Gaskets to ensure proper sealing and operation.
MEAD O'BRIEN | WWW.MEADOBRIEN.COM | (800) 874-9655
21
Limitorque WG Series Worm Gear Operator  FCD LMENIM2101-02 – 1/15
flowserve.com
Parts List
Item Description Qty.
1 Housing 1
2 Gear 1
3 Input Shaft/Pinion 1
4 Cover 11
5 Retaining Ring 1
6 Ball Bearing 2
7 Key 1
8 Key 1
9 Gasket 1
10 Ball Bearing 1
11 Oil Seal 1
12 Hex Head Cap Screw 8
13 Lockwasher 8
WORM SHAFT
1
9
4
12 13
11
6
3
6
8 2
5
10
Table 4.3 – WG-00 through WG-12 Spur Gear
Attachment (1S) Parts List
Figure 4.13 – WG-00 through WG-12 Spur Gear Attachment (1S) Exploded View
MEAD O'BRIEN | WWW.MEADOBRIEN.COM | (800) 874-9655
Limitorque WG Series Worm Gear Operator  FCD LMENIM2101-02 – 01/15
22
4.6	 Double Reduction Spur Gear Attachment (1SD)
Refer to Figure 4.14
Disassembly Instructions:
1. 	 Remove the Socket Head Cap Screws (pc# 19) and Input Flange (pc# 18) from the Cover (pc# 12).
2. 	 Remove the Hex Head Cap Screws (pc# 14) and Cover (pc# 12).
3. 	 Remove the Helical Gear/2nd
Set Pinion Subassembly.
4. 	 Remove all traces of the Cover Gasket (pc# 13).
5. 	 Remove the Input Shaft/Pinion Subassembly from the Cover (pc #12) by removing the Retaining Ring (pc# 16).
6. 	 Remove the Retaining Ring (pc# 4) and Ball Bearings (pc# 11) from the Input Shaft/Pinion (pc #9).
7. 	 Remove the Ball Bearing (pc# 8) from the 2nd
Set Pinion (pc# 5).
8. 	 Remove the Retaining Ring (pc# 4) and the Helical Gear (pc# 2) from the 2nd
Set Pinion (pc# 5).
9. 	 Remove the Retaining Ring (pc# 4) and the Helical Gear (pc# 2) from the Worm Shaft.
10. 	Remove the Socket Head Cap Screws (pc# 20) from the Spur Gear Housing (pc# 1) and remove the
Spur Gear Housing (pc# 1) from the WG Gearbox.
11. 	If disassembly of the WG Gearbox is required, see Sections 4.3 or 4.4.
Reassembly Instructions:
1.	 Install the Spur Gear Housing (pc# 1) on the WG Gearbox, ensuring proper gasket is installed between Gearbox
and Spur Gear Housing (See Section 4.3 or 4.4).
2.	 Install the Helical Gear (pc# 2) on the WG Gearbox Worm Shaft with two Keys (pc# 3). Fasten with Retaining
Ring (pc# 4).
3.	 Insert the Bushing (pc# 10) into the end of the Input Shaft/Pinion (pc# 9).
4.	 Install the Ball Bearings (pc# 11) and Retaining Ring onto the Input Shaft/Pinion (pc# 9)
5.	 Install the Input Shaft/Pinion with Ball Bearings (pc# 11) into the Cover (pc# 12) using Retaining Ring (pc# 16).
6.	 Install the Ball Bearing (pc# 6) in the Spur Gear Housing (pc# 1).
7.	 Assemble the Helical Gear (pc# 2) on the 2nd
Set Pinion (pc# 5) with two Keys (pc# 7). Fasten with Retaining
Ring (pc# 4).
8.	 Install the Ball Bearing (pc# 8) on the 2nd
Set Pinion (pc# 5).
9. 	 Install the Helical Gear/2nd Set Pinion Subassembly in
the Ball Bearing (pc# 6).
Note: 	 Lubricate the Spur Gearing. See Section 3.
10. 	Replace the Gasket Cover (pc# 13).
11. 	Install the Cover (pc# 12) with Input Shaft/Pinion Subassembly onto the Spur Gear Housing, ensuring proper mesh of
gear teeth on Input Shaft/Pinion (pc# 9) and Helical Gear (pc# 2), and alignment of Ball Bearing (pc# 8) with Cover (pc# 12).
MEAD O'BRIEN | WWW.MEADOBRIEN.COM | (800) 874-9655
23
Limitorque WG Series Worm Gear Operator  FCD LMENIM2101-02 – 1/15
flowserve.com
12. 	Replace the Oil Seal (pc# 15).
13.	 Install the Input Flange (pc# 18).
Note: 	 Replace any worn or damaged O-Rings or Gaskets to
	 ensure proper sealing and operation.
WORM
SHAFT
INPUT SHAFT/PINION
SUBASSEMBLY
HELICAL GEAR/2ND
SET PINION
SUBASSEMBLY
B
A
3
1
6
4
12
2
5
8
1
1
6
5
7
7
2
4
8
2
4
4
11
9
11
13
12
14 17
15
18
19
10
16
21
20 A
B
Parts List
Item Description Qty. Item Description Qty.
1 Spur Gear Housing 1 11 Ball Bearing 2
2 Helical Gear 2 12 Cover 1
3 Key 2 13 Gasket - Cover 1
4 Retaining Ring 3 14 Hex Head Cap Screw 8
5 2nd Set Pinion 1 15 Oil Seal 1
6 Ball Bearing 1 16 Retaining Ring 1
7 Key 2 17 Lockwasher 8
8 Ball Bearing 1 18 Input Flange 1
9 Input Shaft / Pinion 1 19 Socket Head Cap Screw 4
10 Bushing 1 20 Socket Head Cap Screw VARIES
Table 4.4 – WG-00 through WG-12 Spur Gear Attachment (1SD) Parts List
Figure 4.14 – WG-00 through WG-12 Spur Gear 		
	 Attachment (1SD) Exploded View
MEAD O'BRIEN | WWW.MEADOBRIEN.COM | (800) 874-9655
flowserve.com
Flowserve Corporation has established industry leadership in the design and manufacture of its products. When properly selected, this Flowserve product is designed to perform its intended
function safely during its useful life. However, the purchaser or user of Flowserve products should be aware that Flowserve products might be used in numerous applications under a
wide variety of industrial service conditions. Although Flowserve can (and often does) provide general guidelines, it cannot provide specific data and warnings for all possible applications.
The purchaser/user must therefore assume the ultimate responsibility for the proper sizing and selection, installation, operation and maintenance of Flowserve products. The purchaser/
user should read and understand the Installation Operation Maintenance (IOM) instructions included with the product, and train its employees and contractors in the safe use of Flowserve
products in connection with the specific application.
While the information and specifications contained in this literature are believed to be accurate, they are supplied for informative purposes only and should not be considered certified or as
a guarantee of satisfactory results by reliance thereon. Nothing contained herein is to be construed as a warranty or guarantee, express or implied, regarding any matter with respect to this
product. Because Flowserve is continually improving and upgrading its product design, the specifications, dimensions and information contained herein are subject to change without notice.
Should any question arise concerning these provisions, the purchaser/user should contact Flowserve Corporation at any one of its worldwide operations or offices.
© 2015 Flowserve Corporation, Irving, Texas, USA. Flowserve is a registered trademark of Flowserve Corporation.
Flowserve Corporation
Flow Control
United States
Flowserve Limitorque
5114 Woodall Road
P.O. Box 11318
Lynchburg, VA 24506-1318
Phone: 434-528-4400
Fax: 434-845-9736
England
Flowserve Limitorque
Euro House
Abex Road
Newbury
Berkshire, RG14 5EY
United Kingdom
Phone: 44-1-635-46999
Fax: 44-1-635-36034
Singapore
Limitorque Asia, Pte., Ltd.
12, Tuas Avenue 20
Singapore 638824
Phone: 65-6868-4628
Fax: 65-6862-4940
China
Limitorque Beijing, Pte., Ltd.
RM A1/A2
22/F, East Area, Hanwei Plaza
No. 7 Guanghua Road, Chaoyang
District
Beijing 100004, Peoples Republic of
China
Phone: 86-10-5921-0606
Fax: 86-10-6561-2702
India
Flowserve Limitorque
Plot No. #4, 1 A, Road No. 8, EPIP
Whitefield, Bangalore – 560066
Karnataka
India
Phone: 91-80-40146200
Fax: 91-80-28410286
Italy
Flowserve Limitorque
Fluid Power Systems
Via Rio Vallone 17
20883 Mezzago MB
Italy
Phone: 39-039-620601
Fax: 39-039-62060 213
Mead O’Brien, Inc.
10800 Midwest Industrial Blvd
St. Louis, Missouri 63132
(800) 874-9655
www.meadobrien.com
FCD LMENIM2101-02-AQ Printed in USA. January 2015
MEAD O'BRIEN | WWW.MEADOBRIEN.COM | (800) 874-9655

More Related Content

What's hot

F1014R 30L-50L jacketed systems
F1014R 30L-50L jacketed systemsF1014R 30L-50L jacketed systems
F1014R 30L-50L jacketed systemsStephen Martinelli
 
Jtc5 worm gear screw lifter,small mechanical worm gear screw jacks, stainless...
Jtc5 worm gear screw lifter,small mechanical worm gear screw jacks, stainless...Jtc5 worm gear screw lifter,small mechanical worm gear screw jacks, stainless...
Jtc5 worm gear screw lifter,small mechanical worm gear screw jacks, stainless...Jacton Electromechanical Co.,Ltd
 
Yamaha outboard l225 feto, l225tr service repair manual u 200132
Yamaha outboard l225 feto, l225tr service repair manual u 200132  Yamaha outboard l225 feto, l225tr service repair manual u 200132
Yamaha outboard l225 feto, l225tr service repair manual u 200132 fujsefkskemm
 
Inertia dynamics ac_motor_coupler_specsheet
Inertia dynamics ac_motor_coupler_specsheetInertia dynamics ac_motor_coupler_specsheet
Inertia dynamics ac_motor_coupler_specsheetElectromate
 
Kawasaki 80 z6 wheel loader service repair manual (serial no. 80c7 0101 and up)
Kawasaki 80 z6 wheel loader service repair manual (serial no. 80c7 0101 and up)Kawasaki 80 z6 wheel loader service repair manual (serial no. 80c7 0101 and up)
Kawasaki 80 z6 wheel loader service repair manual (serial no. 80c7 0101 and up)udfjjdjkskkemmd
 
Ds2 series 380 v servo driver
Ds2 series 380 v servo driverDs2 series 380 v servo driver
Ds2 series 380 v servo driverspectra-tw
 
YAMAHA 60FEDO OUTBOARD Service Repair Manual L: 407212 -
YAMAHA 60FEDO OUTBOARD Service Repair Manual L: 407212 -YAMAHA 60FEDO OUTBOARD Service Repair Manual L: 407212 -
YAMAHA 60FEDO OUTBOARD Service Repair Manual L: 407212 -jhsefnn kjsfem
 
Inertia dynamics wrapspring_dcb8s_specsheet
Inertia dynamics wrapspring_dcb8s_specsheetInertia dynamics wrapspring_dcb8s_specsheet
Inertia dynamics wrapspring_dcb8s_specsheetElectromate
 
Ed3 & ed4 sm installation & calibration v101
Ed3 & ed4 sm installation & calibration v101Ed3 & ed4 sm installation & calibration v101
Ed3 & ed4 sm installation & calibration v101tedjurca
 
Diesel_Gas_brochure
Diesel_Gas_brochureDiesel_Gas_brochure
Diesel_Gas_brochureJari Korpela
 

What's hot (14)

F1014R 30L-50L jacketed systems
F1014R 30L-50L jacketed systemsF1014R 30L-50L jacketed systems
F1014R 30L-50L jacketed systems
 
Cv repair spicer
Cv repair spicerCv repair spicer
Cv repair spicer
 
Rolomatic
RolomaticRolomatic
Rolomatic
 
Jtc5 worm gear screw lifter,small mechanical worm gear screw jacks, stainless...
Jtc5 worm gear screw lifter,small mechanical worm gear screw jacks, stainless...Jtc5 worm gear screw lifter,small mechanical worm gear screw jacks, stainless...
Jtc5 worm gear screw lifter,small mechanical worm gear screw jacks, stainless...
 
Yamaha outboard l225 feto, l225tr service repair manual u 200132
Yamaha outboard l225 feto, l225tr service repair manual u 200132  Yamaha outboard l225 feto, l225tr service repair manual u 200132
Yamaha outboard l225 feto, l225tr service repair manual u 200132
 
Inertia dynamics ac_motor_coupler_specsheet
Inertia dynamics ac_motor_coupler_specsheetInertia dynamics ac_motor_coupler_specsheet
Inertia dynamics ac_motor_coupler_specsheet
 
Roll o matic installation & maintenance guide rev2
Roll o matic installation & maintenance guide  rev2 Roll o matic installation & maintenance guide  rev2
Roll o matic installation & maintenance guide rev2
 
Kawasaki 80 z6 wheel loader service repair manual (serial no. 80c7 0101 and up)
Kawasaki 80 z6 wheel loader service repair manual (serial no. 80c7 0101 and up)Kawasaki 80 z6 wheel loader service repair manual (serial no. 80c7 0101 and up)
Kawasaki 80 z6 wheel loader service repair manual (serial no. 80c7 0101 and up)
 
Ds2 series 380 v servo driver
Ds2 series 380 v servo driverDs2 series 380 v servo driver
Ds2 series 380 v servo driver
 
YAMAHA 60FEDO OUTBOARD Service Repair Manual L: 407212 -
YAMAHA 60FEDO OUTBOARD Service Repair Manual L: 407212 -YAMAHA 60FEDO OUTBOARD Service Repair Manual L: 407212 -
YAMAHA 60FEDO OUTBOARD Service Repair Manual L: 407212 -
 
Wp series manual
Wp series manualWp series manual
Wp series manual
 
Inertia dynamics wrapspring_dcb8s_specsheet
Inertia dynamics wrapspring_dcb8s_specsheetInertia dynamics wrapspring_dcb8s_specsheet
Inertia dynamics wrapspring_dcb8s_specsheet
 
Ed3 & ed4 sm installation & calibration v101
Ed3 & ed4 sm installation & calibration v101Ed3 & ed4 sm installation & calibration v101
Ed3 & ed4 sm installation & calibration v101
 
Diesel_Gas_brochure
Diesel_Gas_brochureDiesel_Gas_brochure
Diesel_Gas_brochure
 

Similar to Limitorque WG Series Installation, Operation, and Maintenance

Caterpillar Cat 943 TRACK LOADER (Prefix 19Z) Service Repair Manual Instant D...
Caterpillar Cat 943 TRACK LOADER (Prefix 19Z) Service Repair Manual Instant D...Caterpillar Cat 943 TRACK LOADER (Prefix 19Z) Service Repair Manual Instant D...
Caterpillar Cat 943 TRACK LOADER (Prefix 19Z) Service Repair Manual Instant D...ti76cui
 
Caterpillar Cat 943 TRACK LOADER (Prefix 19Z) Service Repair Manual Instant D...
Caterpillar Cat 943 TRACK LOADER (Prefix 19Z) Service Repair Manual Instant D...Caterpillar Cat 943 TRACK LOADER (Prefix 19Z) Service Repair Manual Instant D...
Caterpillar Cat 943 TRACK LOADER (Prefix 19Z) Service Repair Manual Instant D...gua6982552kun
 
Caterpillar Cat 943 TRACK LOADER (Prefix 19Z) Service Repair Manual Instant D...
Caterpillar Cat 943 TRACK LOADER (Prefix 19Z) Service Repair Manual Instant D...Caterpillar Cat 943 TRACK LOADER (Prefix 19Z) Service Repair Manual Instant D...
Caterpillar Cat 943 TRACK LOADER (Prefix 19Z) Service Repair Manual Instant D...ting1499041267
 
Caterpillar Cat 249D Compact Track Loader (Prefix GWR) Service Repair Manual ...
Caterpillar Cat 249D Compact Track Loader (Prefix GWR) Service Repair Manual ...Caterpillar Cat 249D Compact Track Loader (Prefix GWR) Service Repair Manual ...
Caterpillar Cat 249D Compact Track Loader (Prefix GWR) Service Repair Manual ...gen78guozun
 
Caterpillar Cat 249D Compact Track Loader (Prefix GWR) Service Repair Manual ...
Caterpillar Cat 249D Compact Track Loader (Prefix GWR) Service Repair Manual ...Caterpillar Cat 249D Compact Track Loader (Prefix GWR) Service Repair Manual ...
Caterpillar Cat 249D Compact Track Loader (Prefix GWR) Service Repair Manual ...fjskekmdmdm1
 
Caterpillar Cat 249D Compact Track Loader (Prefix GWR) Service Repair Manual ...
Caterpillar Cat 249D Compact Track Loader (Prefix GWR) Service Repair Manual ...Caterpillar Cat 249D Compact Track Loader (Prefix GWR) Service Repair Manual ...
Caterpillar Cat 249D Compact Track Loader (Prefix GWR) Service Repair Manual ...jfksemmdm3e
 
Caterpillar Cat 249D Compact Track Loader (Prefix GWR) Service Repair Manual ...
Caterpillar Cat 249D Compact Track Loader (Prefix GWR) Service Repair Manual ...Caterpillar Cat 249D Compact Track Loader (Prefix GWR) Service Repair Manual ...
Caterpillar Cat 249D Compact Track Loader (Prefix GWR) Service Repair Manual ...f7usueijdkdmm3e
 
Caterpillar Cat 249D Compact Track Loader (Prefix GWR) Service Repair Manual ...
Caterpillar Cat 249D Compact Track Loader (Prefix GWR) Service Repair Manual ...Caterpillar Cat 249D Compact Track Loader (Prefix GWR) Service Repair Manual ...
Caterpillar Cat 249D Compact Track Loader (Prefix GWR) Service Repair Manual ...f8useudjkddmm2
 
Caterpillar Cat 249D Compact Track Loader (Prefix GWR) Service Repair Manual ...
Caterpillar Cat 249D Compact Track Loader (Prefix GWR) Service Repair Manual ...Caterpillar Cat 249D Compact Track Loader (Prefix GWR) Service Repair Manual ...
Caterpillar Cat 249D Compact Track Loader (Prefix GWR) Service Repair Manual ...f7useijdkdmdm
 
Caterpillar Cat 249D Compact Track Loader (Prefix GWR) Service Repair Manual ...
Caterpillar Cat 249D Compact Track Loader (Prefix GWR) Service Repair Manual ...Caterpillar Cat 249D Compact Track Loader (Prefix GWR) Service Repair Manual ...
Caterpillar Cat 249D Compact Track Loader (Prefix GWR) Service Repair Manual ...itj79143591
 
Caterpillar Cat 249D Compact Track Loader (Prefix GWR) Service Repair Manual ...
Caterpillar Cat 249D Compact Track Loader (Prefix GWR) Service Repair Manual ...Caterpillar Cat 249D Compact Track Loader (Prefix GWR) Service Repair Manual ...
Caterpillar Cat 249D Compact Track Loader (Prefix GWR) Service Repair Manual ...ufjskekdjdmw2
 
Caterpillar Cat 249D Compact Track Loader (Prefix GWR) Service Repair Manual ...
Caterpillar Cat 249D Compact Track Loader (Prefix GWR) Service Repair Manual ...Caterpillar Cat 249D Compact Track Loader (Prefix GWR) Service Repair Manual ...
Caterpillar Cat 249D Compact Track Loader (Prefix GWR) Service Repair Manual ...fusekddmm3e
 
Caterpillar Cat 249D Compact Track Loader (Prefix GWR) Service Repair Manual ...
Caterpillar Cat 249D Compact Track Loader (Prefix GWR) Service Repair Manual ...Caterpillar Cat 249D Compact Track Loader (Prefix GWR) Service Repair Manual ...
Caterpillar Cat 249D Compact Track Loader (Prefix GWR) Service Repair Manual ...fujskkmdmd
 
Caterpillar Cat 249D Compact Track Loader (Prefix GWR) Service Repair Manual ...
Caterpillar Cat 249D Compact Track Loader (Prefix GWR) Service Repair Manual ...Caterpillar Cat 249D Compact Track Loader (Prefix GWR) Service Repair Manual ...
Caterpillar Cat 249D Compact Track Loader (Prefix GWR) Service Repair Manual ...fujsekmdd8di
 
Caterpillar cat 249 d compact track loader (prefix gwr) service repair manual...
Caterpillar cat 249 d compact track loader (prefix gwr) service repair manual...Caterpillar cat 249 d compact track loader (prefix gwr) service repair manual...
Caterpillar cat 249 d compact track loader (prefix gwr) service repair manual...fjjskefkskem
 
HITACHI EX550-5 EXCAVATOR Service Repair Manual
HITACHI EX550-5 EXCAVATOR Service Repair ManualHITACHI EX550-5 EXCAVATOR Service Repair Manual
HITACHI EX550-5 EXCAVATOR Service Repair Manualhjdksmemd
 
HITACHI EX550-5 EXCAVATOR Service Repair Manual
HITACHI EX550-5 EXCAVATOR Service Repair ManualHITACHI EX550-5 EXCAVATOR Service Repair Manual
HITACHI EX550-5 EXCAVATOR Service Repair Manualnerftgfvg
 
Hitachi ex550 5 excavator service repair manual
Hitachi ex550 5 excavator service repair manualHitachi ex550 5 excavator service repair manual
Hitachi ex550 5 excavator service repair manualjmdms eekduui
 
Hitachi ex600 h 5 excavator service repair manual
Hitachi ex600 h 5 excavator service repair manualHitachi ex600 h 5 excavator service repair manual
Hitachi ex600 h 5 excavator service repair manualjmdms eekduui
 
HITACHI EX550-5 EXCAVATOR Service Repair Manual
HITACHI EX550-5 EXCAVATOR Service Repair ManualHITACHI EX550-5 EXCAVATOR Service Repair Manual
HITACHI EX550-5 EXCAVATOR Service Repair Manualjksndmde
 

Similar to Limitorque WG Series Installation, Operation, and Maintenance (20)

Caterpillar Cat 943 TRACK LOADER (Prefix 19Z) Service Repair Manual Instant D...
Caterpillar Cat 943 TRACK LOADER (Prefix 19Z) Service Repair Manual Instant D...Caterpillar Cat 943 TRACK LOADER (Prefix 19Z) Service Repair Manual Instant D...
Caterpillar Cat 943 TRACK LOADER (Prefix 19Z) Service Repair Manual Instant D...
 
Caterpillar Cat 943 TRACK LOADER (Prefix 19Z) Service Repair Manual Instant D...
Caterpillar Cat 943 TRACK LOADER (Prefix 19Z) Service Repair Manual Instant D...Caterpillar Cat 943 TRACK LOADER (Prefix 19Z) Service Repair Manual Instant D...
Caterpillar Cat 943 TRACK LOADER (Prefix 19Z) Service Repair Manual Instant D...
 
Caterpillar Cat 249D Compact Track Loader (Prefix GWR) Service Repair Manual ...
Caterpillar Cat 249D Compact Track Loader (Prefix GWR) Service Repair Manual ...Caterpillar Cat 249D Compact Track Loader (Prefix GWR) Service Repair Manual ...
Caterpillar Cat 249D Compact Track Loader (Prefix GWR) Service Repair Manual ...
 
Caterpillar Cat 249D Compact Track Loader (Prefix GWR) Service Repair Manual ...
Caterpillar Cat 249D Compact Track Loader (Prefix GWR) Service Repair Manual ...Caterpillar Cat 249D Compact Track Loader (Prefix GWR) Service Repair Manual ...
Caterpillar Cat 249D Compact Track Loader (Prefix GWR) Service Repair Manual ...
 
Caterpillar cat 249 d compact track loader (prefix gwr) service repair manual...
Caterpillar cat 249 d compact track loader (prefix gwr) service repair manual...Caterpillar cat 249 d compact track loader (prefix gwr) service repair manual...
Caterpillar cat 249 d compact track loader (prefix gwr) service repair manual...
 
HITACHI EX550-5 EXCAVATOR Service Repair Manual
HITACHI EX550-5 EXCAVATOR Service Repair ManualHITACHI EX550-5 EXCAVATOR Service Repair Manual
HITACHI EX550-5 EXCAVATOR Service Repair Manual
 
HITACHI EX550-5 EXCAVATOR Service Repair Manual
HITACHI EX550-5 EXCAVATOR Service Repair ManualHITACHI EX550-5 EXCAVATOR Service Repair Manual
HITACHI EX550-5 EXCAVATOR Service Repair Manual
 
Hitachi ex550 5 excavator service repair manual
Hitachi ex550 5 excavator service repair manualHitachi ex550 5 excavator service repair manual
Hitachi ex550 5 excavator service repair manual
 
Hitachi ex600 h 5 excavator service repair manual
Hitachi ex600 h 5 excavator service repair manualHitachi ex600 h 5 excavator service repair manual
Hitachi ex600 h 5 excavator service repair manual
 
HITACHI EX550-5 EXCAVATOR Service Repair Manual
HITACHI EX550-5 EXCAVATOR Service Repair ManualHITACHI EX550-5 EXCAVATOR Service Repair Manual
HITACHI EX550-5 EXCAVATOR Service Repair Manual
 

More from Mead O'Brien, Inc.

Intrusive vs. Non-Intrusive Electric Actuators: Which option is right for you...
Intrusive vs. Non-Intrusive Electric Actuators: Which option is right for you...Intrusive vs. Non-Intrusive Electric Actuators: Which option is right for you...
Intrusive vs. Non-Intrusive Electric Actuators: Which option is right for you...Mead O'Brien, Inc.
 
Industrial Boiler and Burner Limit Control Switches
Industrial Boiler and Burner Limit Control SwitchesIndustrial Boiler and Burner Limit Control Switches
Industrial Boiler and Burner Limit Control SwitchesMead O'Brien, Inc.
 
Metso Neles Flow Control Solutions: Valves, Actuation, and Automation
Metso Neles Flow Control Solutions: Valves, Actuation, and AutomationMetso Neles Flow Control Solutions: Valves, Actuation, and Automation
Metso Neles Flow Control Solutions: Valves, Actuation, and AutomationMead O'Brien, Inc.
 
How Your Steam Trap Selection Affects Your Bottom Line Profits: Inverted Buck...
How Your Steam Trap Selection Affects Your Bottom Line Profits: Inverted Buck...How Your Steam Trap Selection Affects Your Bottom Line Profits: Inverted Buck...
How Your Steam Trap Selection Affects Your Bottom Line Profits: Inverted Buck...Mead O'Brien, Inc.
 
Steam Trapping and Steam Tracing Equipment
Steam Trapping and Steam Tracing EquipmentSteam Trapping and Steam Tracing Equipment
Steam Trapping and Steam Tracing EquipmentMead O'Brien, Inc.
 
Metso Neles T5 Series Top Entry Rotary Ball Valves
Metso Neles T5 Series Top Entry Rotary Ball ValvesMetso Neles T5 Series Top Entry Rotary Ball Valves
Metso Neles T5 Series Top Entry Rotary Ball ValvesMead O'Brien, Inc.
 
Foxboro IMT23 Transmitter Operation, Configuration, and Calibration
Foxboro IMT23 Transmitter Operation, Configuration, and CalibrationFoxboro IMT23 Transmitter Operation, Configuration, and Calibration
Foxboro IMT23 Transmitter Operation, Configuration, and CalibrationMead O'Brien, Inc.
 
Water Cooled Portable Air Conditioners
Water Cooled Portable Air ConditionersWater Cooled Portable Air Conditioners
Water Cooled Portable Air ConditionersMead O'Brien, Inc.
 
Steam Conservation Guidelines for Condensate Drainage
Steam Conservation Guidelines for Condensate DrainageSteam Conservation Guidelines for Condensate Drainage
Steam Conservation Guidelines for Condensate DrainageMead O'Brien, Inc.
 
Neles NDX Intelligent Valve Positioner
Neles NDX Intelligent Valve PositionerNeles NDX Intelligent Valve Positioner
Neles NDX Intelligent Valve PositionerMead O'Brien, Inc.
 
Data Supplement for Kunkle Safety and Relief Products
Data Supplement for Kunkle Safety and Relief ProductsData Supplement for Kunkle Safety and Relief Products
Data Supplement for Kunkle Safety and Relief ProductsMead O'Brien, Inc.
 
Neles Triple Eccentric Disc Valve, Metal Seated with Flow Balancing Trim
Neles Triple Eccentric Disc Valve, Metal Seated with Flow Balancing TrimNeles Triple Eccentric Disc Valve, Metal Seated with Flow Balancing Trim
Neles Triple Eccentric Disc Valve, Metal Seated with Flow Balancing TrimMead O'Brien, Inc.
 
BIST (Built-in-Self-Test) Features for Electronic Valve Actuators
BIST (Built-in-Self-Test) Features for Electronic Valve ActuatorsBIST (Built-in-Self-Test) Features for Electronic Valve Actuators
BIST (Built-in-Self-Test) Features for Electronic Valve ActuatorsMead O'Brien, Inc.
 
Understanding & Solving Heat Transfer Equipment Stall
Understanding & Solving Heat Transfer Equipment StallUnderstanding & Solving Heat Transfer Equipment Stall
Understanding & Solving Heat Transfer Equipment StallMead O'Brien, Inc.
 
Automation in Industry: The People Make the Difference!
Automation in Industry: The People Make the Difference! Automation in Industry: The People Make the Difference!
Automation in Industry: The People Make the Difference! Mead O'Brien, Inc.
 
A Guide to Instrumentation for Ethanol Fuel Production
A Guide to Instrumentation for Ethanol Fuel ProductionA Guide to Instrumentation for Ethanol Fuel Production
A Guide to Instrumentation for Ethanol Fuel ProductionMead O'Brien, Inc.
 
Wireless Steam Trap Monitor: Theory of Operation
Wireless Steam Trap Monitor: Theory of OperationWireless Steam Trap Monitor: Theory of Operation
Wireless Steam Trap Monitor: Theory of OperationMead O'Brien, Inc.
 

More from Mead O'Brien, Inc. (20)

Intrusive vs. Non-Intrusive Electric Actuators: Which option is right for you...
Intrusive vs. Non-Intrusive Electric Actuators: Which option is right for you...Intrusive vs. Non-Intrusive Electric Actuators: Which option is right for you...
Intrusive vs. Non-Intrusive Electric Actuators: Which option is right for you...
 
Industrial Boiler and Burner Limit Control Switches
Industrial Boiler and Burner Limit Control SwitchesIndustrial Boiler and Burner Limit Control Switches
Industrial Boiler and Burner Limit Control Switches
 
Metso Neles Flow Control Solutions: Valves, Actuation, and Automation
Metso Neles Flow Control Solutions: Valves, Actuation, and AutomationMetso Neles Flow Control Solutions: Valves, Actuation, and Automation
Metso Neles Flow Control Solutions: Valves, Actuation, and Automation
 
Ashcroft Corrosion Guide
Ashcroft Corrosion GuideAshcroft Corrosion Guide
Ashcroft Corrosion Guide
 
How Your Steam Trap Selection Affects Your Bottom Line Profits: Inverted Buck...
How Your Steam Trap Selection Affects Your Bottom Line Profits: Inverted Buck...How Your Steam Trap Selection Affects Your Bottom Line Profits: Inverted Buck...
How Your Steam Trap Selection Affects Your Bottom Line Profits: Inverted Buck...
 
Steam Trapping and Steam Tracing Equipment
Steam Trapping and Steam Tracing EquipmentSteam Trapping and Steam Tracing Equipment
Steam Trapping and Steam Tracing Equipment
 
Metso Neles T5 Series Top Entry Rotary Ball Valves
Metso Neles T5 Series Top Entry Rotary Ball ValvesMetso Neles T5 Series Top Entry Rotary Ball Valves
Metso Neles T5 Series Top Entry Rotary Ball Valves
 
Foxboro IMT23 Transmitter Operation, Configuration, and Calibration
Foxboro IMT23 Transmitter Operation, Configuration, and CalibrationFoxboro IMT23 Transmitter Operation, Configuration, and Calibration
Foxboro IMT23 Transmitter Operation, Configuration, and Calibration
 
Water Cooled Portable Air Conditioners
Water Cooled Portable Air ConditionersWater Cooled Portable Air Conditioners
Water Cooled Portable Air Conditioners
 
VERIS Accelabar Flow Meter
VERIS Accelabar Flow MeterVERIS Accelabar Flow Meter
VERIS Accelabar Flow Meter
 
Steam Conservation Guidelines for Condensate Drainage
Steam Conservation Guidelines for Condensate DrainageSteam Conservation Guidelines for Condensate Drainage
Steam Conservation Guidelines for Condensate Drainage
 
Neles NDX Intelligent Valve Positioner
Neles NDX Intelligent Valve PositionerNeles NDX Intelligent Valve Positioner
Neles NDX Intelligent Valve Positioner
 
Data Supplement for Kunkle Safety and Relief Products
Data Supplement for Kunkle Safety and Relief ProductsData Supplement for Kunkle Safety and Relief Products
Data Supplement for Kunkle Safety and Relief Products
 
Hot Water for Industry
Hot Water for IndustryHot Water for Industry
Hot Water for Industry
 
Neles Triple Eccentric Disc Valve, Metal Seated with Flow Balancing Trim
Neles Triple Eccentric Disc Valve, Metal Seated with Flow Balancing TrimNeles Triple Eccentric Disc Valve, Metal Seated with Flow Balancing Trim
Neles Triple Eccentric Disc Valve, Metal Seated with Flow Balancing Trim
 
BIST (Built-in-Self-Test) Features for Electronic Valve Actuators
BIST (Built-in-Self-Test) Features for Electronic Valve ActuatorsBIST (Built-in-Self-Test) Features for Electronic Valve Actuators
BIST (Built-in-Self-Test) Features for Electronic Valve Actuators
 
Understanding & Solving Heat Transfer Equipment Stall
Understanding & Solving Heat Transfer Equipment StallUnderstanding & Solving Heat Transfer Equipment Stall
Understanding & Solving Heat Transfer Equipment Stall
 
Automation in Industry: The People Make the Difference!
Automation in Industry: The People Make the Difference! Automation in Industry: The People Make the Difference!
Automation in Industry: The People Make the Difference!
 
A Guide to Instrumentation for Ethanol Fuel Production
A Guide to Instrumentation for Ethanol Fuel ProductionA Guide to Instrumentation for Ethanol Fuel Production
A Guide to Instrumentation for Ethanol Fuel Production
 
Wireless Steam Trap Monitor: Theory of Operation
Wireless Steam Trap Monitor: Theory of OperationWireless Steam Trap Monitor: Theory of Operation
Wireless Steam Trap Monitor: Theory of Operation
 

Recently uploaded

STATE TRANSITION DIAGRAM in psoc subject
STATE TRANSITION DIAGRAM in psoc subjectSTATE TRANSITION DIAGRAM in psoc subject
STATE TRANSITION DIAGRAM in psoc subjectGayathriM270621
 
High Voltage Engineering- OVER VOLTAGES IN ELECTRICAL POWER SYSTEMS
High Voltage Engineering- OVER VOLTAGES IN ELECTRICAL POWER SYSTEMSHigh Voltage Engineering- OVER VOLTAGES IN ELECTRICAL POWER SYSTEMS
High Voltage Engineering- OVER VOLTAGES IN ELECTRICAL POWER SYSTEMSsandhya757531
 
Katarzyna Lipka-Sidor - BIM School Course
Katarzyna Lipka-Sidor - BIM School CourseKatarzyna Lipka-Sidor - BIM School Course
Katarzyna Lipka-Sidor - BIM School Coursebim.edu.pl
 
KCD Costa Rica 2024 - Nephio para parvulitos
KCD Costa Rica 2024 - Nephio para parvulitosKCD Costa Rica 2024 - Nephio para parvulitos
KCD Costa Rica 2024 - Nephio para parvulitosVictor Morales
 
Theory of Machine Notes / Lecture Material .pdf
Theory of Machine Notes / Lecture Material .pdfTheory of Machine Notes / Lecture Material .pdf
Theory of Machine Notes / Lecture Material .pdfShreyas Pandit
 
Triangulation survey (Basic Mine Surveying)_MI10412MI.pptx
Triangulation survey (Basic Mine Surveying)_MI10412MI.pptxTriangulation survey (Basic Mine Surveying)_MI10412MI.pptx
Triangulation survey (Basic Mine Surveying)_MI10412MI.pptxRomil Mishra
 
Mine Environment II Lab_MI10448MI__________.pptx
Mine Environment II Lab_MI10448MI__________.pptxMine Environment II Lab_MI10448MI__________.pptx
Mine Environment II Lab_MI10448MI__________.pptxRomil Mishra
 
Javier_Fernandez_CARS_workshop_presentation.pptx
Javier_Fernandez_CARS_workshop_presentation.pptxJavier_Fernandez_CARS_workshop_presentation.pptx
Javier_Fernandez_CARS_workshop_presentation.pptxJavier Fernández Muñoz
 
CME 397 - SURFACE ENGINEERING - UNIT 1 FULL NOTES
CME 397 - SURFACE ENGINEERING - UNIT 1 FULL NOTESCME 397 - SURFACE ENGINEERING - UNIT 1 FULL NOTES
CME 397 - SURFACE ENGINEERING - UNIT 1 FULL NOTESkarthi keyan
 
Robotics Group 10 (Control Schemes) cse.pdf
Robotics Group 10  (Control Schemes) cse.pdfRobotics Group 10  (Control Schemes) cse.pdf
Robotics Group 10 (Control Schemes) cse.pdfsahilsajad201
 
Artificial Intelligence in Power System overview
Artificial Intelligence in Power System overviewArtificial Intelligence in Power System overview
Artificial Intelligence in Power System overviewsandhya757531
 
multiple access in wireless communication
multiple access in wireless communicationmultiple access in wireless communication
multiple access in wireless communicationpanditadesh123
 
CS 3251 Programming in c all unit notes pdf
CS 3251 Programming in c all unit notes pdfCS 3251 Programming in c all unit notes pdf
CS 3251 Programming in c all unit notes pdfBalamuruganV28
 
Turn leadership mistakes into a better future.pptx
Turn leadership mistakes into a better future.pptxTurn leadership mistakes into a better future.pptx
Turn leadership mistakes into a better future.pptxStephen Sitton
 
Curve setting (Basic Mine Surveying)_MI10412MI.pptx
Curve setting (Basic Mine Surveying)_MI10412MI.pptxCurve setting (Basic Mine Surveying)_MI10412MI.pptx
Curve setting (Basic Mine Surveying)_MI10412MI.pptxRomil Mishra
 
TEST CASE GENERATION GENERATION BLOCK BOX APPROACH
TEST CASE GENERATION GENERATION BLOCK BOX APPROACHTEST CASE GENERATION GENERATION BLOCK BOX APPROACH
TEST CASE GENERATION GENERATION BLOCK BOX APPROACHSneha Padhiar
 
70 POWER PLANT IAE V2500 technical training
70 POWER PLANT IAE V2500 technical training70 POWER PLANT IAE V2500 technical training
70 POWER PLANT IAE V2500 technical trainingGladiatorsKasper
 
DEVICE DRIVERS AND INTERRUPTS SERVICE MECHANISM.pdf
DEVICE DRIVERS AND INTERRUPTS  SERVICE MECHANISM.pdfDEVICE DRIVERS AND INTERRUPTS  SERVICE MECHANISM.pdf
DEVICE DRIVERS AND INTERRUPTS SERVICE MECHANISM.pdfAkritiPradhan2
 
Robotics-Asimov's Laws, Mechanical Subsystems, Robot Kinematics, Robot Dynami...
Robotics-Asimov's Laws, Mechanical Subsystems, Robot Kinematics, Robot Dynami...Robotics-Asimov's Laws, Mechanical Subsystems, Robot Kinematics, Robot Dynami...
Robotics-Asimov's Laws, Mechanical Subsystems, Robot Kinematics, Robot Dynami...Sumanth A
 

Recently uploaded (20)

STATE TRANSITION DIAGRAM in psoc subject
STATE TRANSITION DIAGRAM in psoc subjectSTATE TRANSITION DIAGRAM in psoc subject
STATE TRANSITION DIAGRAM in psoc subject
 
High Voltage Engineering- OVER VOLTAGES IN ELECTRICAL POWER SYSTEMS
High Voltage Engineering- OVER VOLTAGES IN ELECTRICAL POWER SYSTEMSHigh Voltage Engineering- OVER VOLTAGES IN ELECTRICAL POWER SYSTEMS
High Voltage Engineering- OVER VOLTAGES IN ELECTRICAL POWER SYSTEMS
 
Katarzyna Lipka-Sidor - BIM School Course
Katarzyna Lipka-Sidor - BIM School CourseKatarzyna Lipka-Sidor - BIM School Course
Katarzyna Lipka-Sidor - BIM School Course
 
KCD Costa Rica 2024 - Nephio para parvulitos
KCD Costa Rica 2024 - Nephio para parvulitosKCD Costa Rica 2024 - Nephio para parvulitos
KCD Costa Rica 2024 - Nephio para parvulitos
 
Theory of Machine Notes / Lecture Material .pdf
Theory of Machine Notes / Lecture Material .pdfTheory of Machine Notes / Lecture Material .pdf
Theory of Machine Notes / Lecture Material .pdf
 
Triangulation survey (Basic Mine Surveying)_MI10412MI.pptx
Triangulation survey (Basic Mine Surveying)_MI10412MI.pptxTriangulation survey (Basic Mine Surveying)_MI10412MI.pptx
Triangulation survey (Basic Mine Surveying)_MI10412MI.pptx
 
Mine Environment II Lab_MI10448MI__________.pptx
Mine Environment II Lab_MI10448MI__________.pptxMine Environment II Lab_MI10448MI__________.pptx
Mine Environment II Lab_MI10448MI__________.pptx
 
Javier_Fernandez_CARS_workshop_presentation.pptx
Javier_Fernandez_CARS_workshop_presentation.pptxJavier_Fernandez_CARS_workshop_presentation.pptx
Javier_Fernandez_CARS_workshop_presentation.pptx
 
CME 397 - SURFACE ENGINEERING - UNIT 1 FULL NOTES
CME 397 - SURFACE ENGINEERING - UNIT 1 FULL NOTESCME 397 - SURFACE ENGINEERING - UNIT 1 FULL NOTES
CME 397 - SURFACE ENGINEERING - UNIT 1 FULL NOTES
 
Designing pile caps according to ACI 318-19.pptx
Designing pile caps according to ACI 318-19.pptxDesigning pile caps according to ACI 318-19.pptx
Designing pile caps according to ACI 318-19.pptx
 
Robotics Group 10 (Control Schemes) cse.pdf
Robotics Group 10  (Control Schemes) cse.pdfRobotics Group 10  (Control Schemes) cse.pdf
Robotics Group 10 (Control Schemes) cse.pdf
 
Artificial Intelligence in Power System overview
Artificial Intelligence in Power System overviewArtificial Intelligence in Power System overview
Artificial Intelligence in Power System overview
 
multiple access in wireless communication
multiple access in wireless communicationmultiple access in wireless communication
multiple access in wireless communication
 
CS 3251 Programming in c all unit notes pdf
CS 3251 Programming in c all unit notes pdfCS 3251 Programming in c all unit notes pdf
CS 3251 Programming in c all unit notes pdf
 
Turn leadership mistakes into a better future.pptx
Turn leadership mistakes into a better future.pptxTurn leadership mistakes into a better future.pptx
Turn leadership mistakes into a better future.pptx
 
Curve setting (Basic Mine Surveying)_MI10412MI.pptx
Curve setting (Basic Mine Surveying)_MI10412MI.pptxCurve setting (Basic Mine Surveying)_MI10412MI.pptx
Curve setting (Basic Mine Surveying)_MI10412MI.pptx
 
TEST CASE GENERATION GENERATION BLOCK BOX APPROACH
TEST CASE GENERATION GENERATION BLOCK BOX APPROACHTEST CASE GENERATION GENERATION BLOCK BOX APPROACH
TEST CASE GENERATION GENERATION BLOCK BOX APPROACH
 
70 POWER PLANT IAE V2500 technical training
70 POWER PLANT IAE V2500 technical training70 POWER PLANT IAE V2500 technical training
70 POWER PLANT IAE V2500 technical training
 
DEVICE DRIVERS AND INTERRUPTS SERVICE MECHANISM.pdf
DEVICE DRIVERS AND INTERRUPTS  SERVICE MECHANISM.pdfDEVICE DRIVERS AND INTERRUPTS  SERVICE MECHANISM.pdf
DEVICE DRIVERS AND INTERRUPTS SERVICE MECHANISM.pdf
 
Robotics-Asimov's Laws, Mechanical Subsystems, Robot Kinematics, Robot Dynami...
Robotics-Asimov's Laws, Mechanical Subsystems, Robot Kinematics, Robot Dynami...Robotics-Asimov's Laws, Mechanical Subsystems, Robot Kinematics, Robot Dynami...
Robotics-Asimov's Laws, Mechanical Subsystems, Robot Kinematics, Robot Dynami...
 

Limitorque WG Series Installation, Operation, and Maintenance

  • 1. Experience In Motion USER INSTRUCTIONS Installation Operation Maintenance Limitorque® WG Series FCD LMENIM2101-02 – 1/15 MEAD O'BRIEN | WWW.MEADOBRIEN.COM | (800) 874-9655
  • 2. Limitorque WG Series Worm Gear Operator  FCD LMENIM2101-02 – 01/15 2 Contents 1 Introduction 4 1.1 Purpose 4 1.2 User Safety 4 2 Inspection, Installation and Mounting Procedures 5 2.1 Initial Inspection and Storage Instructions 6 2.2 Inspection and Recording 6 2.3 Storage Procedure 6 2.4 General Mounting Instructions 7 2.5 Assembly Positions 8 2.6 Setting Position Limit Stops - WG-00 Through 12 9 3 Lubrication 10 4 Disassembly and Reassembly Instructions 11 4.1 Safety Precautions 11 4.2 Safety Practices 12 4.3 WG-00 Through WG-35 12 4.4 WG-04 Through WG-12 16 4.5 Single Reduction Spur Gear Attachment (1S) 20 4.6 Double Reduction Spur Gear Attachment (1SD) 22 5 How to Order Parts 24 Figures Figure 2.1 – Typical WG Exploded View 5 Figure 2.2 – Assembly Position A 8 Figure 2.3 – Assembly Position D 8 Figure 2.4 – Setting Position Limit Stops 9 Figure 4.1 – Splined Adapter Assembly 12 Figure 4.2 – WG-00 Through WG-35 Exploded View 13 Figure 4.3 – WG-00 Through WG-35 Assembly View 14 Figure 4.4 – WG-00 Through WG-35 Assembly View 14 Figure 4.5 – WG-00 Through WG-35 Assembly View 15 Figure 4.6 – WG-00 Through WG-35 Assembly View 15 Figure 4.7 – WG-04 Through WG-12 Splined Adapter Assembly 16 Figure 4.8 – WG-04 Through WG-12 Exploded View 17 Figure 4.9 – WG-04 Through WG-12 Assembly View 18 Figure 4.10 – WG-04 Through WG-12 Assembly View 18 Figure 4.11 – WG-04 Through WG-12 Assembly View 19 Figure 4.12 – WG-04 Through WG-12 Assembly View 19 Figure 4.13 – WG-00 Through WG-12 Spur Gear Attachment (1S) Exploded View 21 Figure 4.14 – WG-00 Through WG-12 Spur Gear Attachment (1SD) Exploded View 23 MEAD O'BRIEN | WWW.MEADOBRIEN.COM | (800) 874-9655
  • 3. 3 Limitorque WG Series Worm Gear Operator  FCD LMENIM2101-02 – 1/15 flowserve.com Tables Table 3.1 – Lubricants 10 Table 4.1 – WG-00 Through WG-35 Parts List 15 Table 4.2 – WG-04 Through WG-12 Parts List 19 Table 4.3 – WG-00 Through WG-12 Spur Gear Attachment (1S) Parts List 21 Table 4.4 – WG-00 Through WG-12 Spur Gear Attachment (1SD) Parts List 23 MEAD O'BRIEN | WWW.MEADOBRIEN.COM | (800) 874-9655
  • 4. Limitorque WG Series Worm Gear Operator  FCD LMENIM2101-02 – 01/15 4 1 Introduction 1.1 Purpose The installation and maintenance manual (IOM) explains how to install and maintain the Flowserve Limitorque WG operator. Information on installation, disassembly, reassembly, lubrication and spare parts is provided. 1.2 User Safety Safety notices in this manual detail precautions the user must take to reduce the risk of personal injury and damage to the equipment. The user must read and be familiar with these instructions before attempting installation, operation or maintenance. Failure to observe these precautions could result in serious bodily injury, damage to the equipment, voiding of the warranty, or operational difficulty. Safety notice is presented in this manual in three forms: c WARNING: Refers to personal safety. Alerts the user to potential danger. Failure to follow warning notices could result in personal injury or death. a CAUTION: Directs the user’s attention to general precautions that, if not followed, could result in personal injury and/or equipment damage. NOTE: Highlights information critical to the user’s understanding of the operator’s installation and operation. MEAD O'BRIEN | WWW.MEADOBRIEN.COM | (800) 874-9655
  • 5. 5 Limitorque WG Series Worm Gear Operator  FCD LMENIM2101-02 – 1/15 flowserve.com Figure 2.1 – Typical WG Exploded View c WARNING: Do not manually operate the WG operator with devices other than the installed handwheel or wrench nut. Using additive force devices (cheater bars, wheel wrenches, pipe wrenches, or other devices of this nature) on the operator handwheel, wrench or wrench nut may cause serious personal injury and/or damage to the operator or valve. 2 Inspection, Installation and Mounting Procedures MEAD O'BRIEN | WWW.MEADOBRIEN.COM | (800) 874-9655
  • 6. Limitorque WG Series Worm Gear Operator  FCD LMENIM2101-02 – 01/15 6 2.1 Initial Inspection and Storage Instructions c WARNING: Read this installation and maintenance manual carefully and completely before attempting to store the operator. If an electric actuator is attached to the WG manual operator, be aware of the electrical hazards. Consult the electric actuator installation and maintenance manual for guidance. 2.2 Inspection and Recording Upon receipt of the operator, inspect the condition of the equipment, and record nameplate information. 1. Carefully remove operator from shipping carton or skid. Thoroughly examine the equipment for any physical damage that may have occurred during shipment. If damaged, immediately report the damage to the transport company. 2. A nameplate is attached to each operator with the following information: • Operator size • Assembly position • Order number • Serial number • Customer tagging Record this information for future reference, e.g., ordering parts, or obtaining further information. 2.3 Storage Procedure NOTE: The following is the recommended storage procedure to retain maximum product integrity during storage. Failure to comply with recommended procedure will void the warranty. Storage (less than one year) Store operators on wooden skids to protect the machined mounting flange. Place the wooden skids containing the operators in a clean, dry, protected warehouse. If the operators must be stored outside, they must be covered in polyethylene protection with silica gel crystals to absorb moisture. If an electric actuator is attached to the WG, refer to the storage procedures in its respective manual for appropriate storage procedures. Rotate input shafts every three months to mix the lubricant. MEAD O'BRIEN | WWW.MEADOBRIEN.COM | (800) 874-9655
  • 7. 7 Limitorque WG Series Worm Gear Operator  FCD LMENIM2101-02 – 1/15 flowserve.com 2.4 General Mounting Instructions a CAUTION: To avoid the potential for disengaging the worm gear segment, ensure that the pointer cap pointer is oriented to the mid-point of the 90º valve travel. Full stroke rotation of the quadrant should not move the pointer past the corresponding Open or Close ID marks on the housing cover. The mounting instructions for the WG series worm gearboxes are outlined below. The WG-00 through WG-35 gearboxes are designed with a bottom entry splined adapter. The WG-04 through WG-12 gearboxes are designed with a top entry splined adapter. A separate set of instructions for each design is provided. See Section 2.4.1 for the WG-00 through WG-35 and Section 2.4.2 for the WG-04 through WG-12. 2.4.1 WG-00 through WG-35 1. Place the valve disk in the full closed position. Note: If the Splined Adapter is already installed in the operator, go to step 6. 2. Remove the Pointer Cap (see Section 4 for removal instructions). 3. Turn the gearbox upside down so that the bottom of the housing is accessible. 4. Remove the Retaining Ring, and install the Splined Adapter. Note: The notch in the Worm Gear at the Closed position must be aligned with the keyway in the Splined Adapter. 5. Reinstall the Retaining Ring. 6. Place the gearbox in the upright position so that the top of the gearbox is accessible. 7. Mount the operator on the valve and bolt securely. 8. Rotate the input shaft to align the keyway of the Splined Adapter with the keyway of the Valve Shaft and install the key. 9. Confirm that the gearbox Stop Screws are properly set for valve disk travel in both the Open and Close directions of travel. See Section 2.6. 10. Reinstall the Pointer Cap. MEAD O'BRIEN | WWW.MEADOBRIEN.COM | (800) 874-9655
  • 8. Limitorque WG Series Worm Gear Operator  FCD LMENIM2101-02 – 01/15 8 2.5 Assembly Positions 2.4.2 WG-04 through WG-12 1. Place the valve disk in the full closed position. 2. Remove the Pointer Cap (see Section 4 for removal instructions). Note: If the Splined Adapter is already installed in the operator, go to step 6. 3. Remove the Retaining Ring and install the Splined Adapter. Note: The notch in the Worm Gear at the Closed position must be aligned with the keyway in the Splined Adapter. 4. Reinstall the Retaining Ring. 5. Mount the operator on the valve and bolt securely. 6. Rotate the input shaft to align the keyway of the Splined Adapter with the keyway of the Valve Shaft and install the key. 7. Confirm that the gearbox Stop Screws are properly set for valve disk travel in both the Open and Close directions of travel. See Section 2.6. 8. Reinstall the Pointer Cap. Figure 2.2 – Position A Figure 2.3 – Position D STANDARD ASSEMBLY POSITION Clockwise Input Rotation – Clockwise Output Rotation OPTIONAL ASSEMBLY POSITION Clockwise Input Rotation – Counterclockwise Output Rotation MEAD O'BRIEN | WWW.MEADOBRIEN.COM | (800) 874-9655
  • 9. 9 Limitorque WG Series Worm Gear Operator  FCD LMENIM2101-02 – 1/15 flowserve.com 2.6 Setting Position Limit Stops – WG-00 Through WG-12 Refer to Figure 2.4 1. Loosen the Hex Nut (pc# 16) and turn it several turns to allow for stop screw adjustment. 2. Adjust the Stop Screw by turning it counterclockwise to back the screw away from the Worm Gear/Drive Sleeve (pc# 5). 3. Place the valve disk in the full closed position. 4. Turn the Stop Screw (pc# 15) in the clockwise direction until the end of the screw contacts the Worm Gear/Drive Sleeve. 5. Tighten the Hex Nut to secure the closed set position. 6. Move the valve disk to the full open position. 7. Follow steps 1 through 5. a CAUTION: If the valve is operated with an electric actuator/gear operator combination, and the valve is position-seated, set the actuator limit switches to trip prior to engagement of the WG Worm Gear/Drive Sleeve with the Stop Screws. Damage to the operator could result from the Worm Gear/Drive Sleeve contacting the Stop Screw under motorized operation. Note: The stops are adjustable to +/- 5º of total travel to allow for proper positioning of the worm gear quadrant. Figure 2.4 – Setting Position Limit Stops – WG-00 through WG-12 21 2 20 8 17 17 10 9 3 7 19 22 11 1 11 22 6 5 32 23 16 15 4 31 18 14 29 12 9 30 MEAD O'BRIEN | WWW.MEADOBRIEN.COM | (800) 874-9655
  • 10. Limitorque WG Series Worm Gear Operator  FCD LMENIM2101-02 – 01/15 10 3 Lubrication Flowserve Limitorque WG operators are shipped with the following lubricants: Table 3.1 – Lubricants Product Lubricant Soap Base Temperature Range WG-00 through WG-10 Zenith LH 2 Calcium -40°C to 90°C (-40°F to 194°F) NOTE: The lubricant should be checked every 18 months for manual operators. a CAUTION: Do not add a different lubricant to a Flowserve Limitorque operator unless it is of the same soap base as the existing lubricant, or you have received the approval of the lubricant manufacturer. Quantity Limitorque operators are built to operate on the partial immersion principle. The primary concern regarding the amount of lubricant is whether the “worm” is totally immersed in grease. This can be verified by the use of one or more of the “fill” and “drain” plugs provided on the operator housing in most sizes. Quality When removing a “fill” or “drain” plug to inspect the lubricant level, remove a small amount and ensure that it is clean and free of any contaminant, including water. Should dirt, water or other foreign matter be found, the operators should be flushed with a commercial degreaser/cleaner which is non-corrosive and does not affect seal materials such as Buna-N or Viton. Repack operator with fresh lubricant. Consistency The main gear box lubricant should be slightly fluid, approximating a standard NLGI-2 grade consistency or less. Alternate lubricants may be used in place of the standard lubricants supplied by Flowserve, provided they are of a formulation similar to those listed above for the respective product. MEAD O'BRIEN | WWW.MEADOBRIEN.COM | (800) 874-9655
  • 11. 11 Limitorque WG Series Worm Gear Operator  FCD LMENIM2101-02 – 1/15 flowserve.com 4 Disassembly and Reassembly Instructions 4.1 Safety Precautions c WARNING: Read this Installation, Operation and maintenance manual carefully and completely before attempting to install, operate or troubleshoot the Limitorque operator. c WARNING: Potential HIGH-PRESSURE vessel — be aware of high-pressure hazards associated with the attached valve or other actuated device when installing or performing maintenance on the operator. Do not remove the operator mounting bolts from the valve or actuated device unless the valve or device stem is secured or there is no pressure in the line. c WARNING: For maintenance and/or disassembly of the operator while installed on the valve, ensure that the operator is not under thrust or torque load. If the valve must be left in service, the valve stem must be locked in such a way as to prevent any movement of the valve stem. c WARNING: Do not manually operate the operator with devices other than the installed handwheel. Using force beyond the ratings of the operator and/or using additive force devices such as cheater bars, wheel wrenches, pipe wrenches, or other devices on the operator handwheel may cause serious personal injury and/or damage to the operator and valve. c WARNING: Do not exceed any design limitations or make modifications to this equipment without first consulting Limitorque. c WARNING: Use of this product must be suspended any time it fails to operate properly. a CAUTION: If a motor actuator is driving the manual operator, do not operate the valve under motor operation without first checking and setting the limit switch and checking for correct motor rotation. a CAUTION: Do not use replacement parts that are not genuine Flowserve Limitorque parts, as serious personal injury and/or damage to the operator and valve may result. MEAD O'BRIEN | WWW.MEADOBRIEN.COM | (800) 874-9655
  • 12. Limitorque WG Series Worm Gear Operator  FCD LMENIM2101-02 – 01/15 12 4.2 Safety Practices The following checkpoints should be performed to maintain safe operation of the WG gear operator: • Set up a periodic operating schedule on infrequently used valves. • Ensure that the limit and/or torque switches on any electric actuator fitted to the WG worm gear operator are correctly and appropriately adjusted. 4.3 WG-00 Through WG-35 Refer to Figures 4.1 through 4.6. Disassembly Instructions: 1. Place the operator upside down to access the mounting base. 2. Remove Retaining Ring (pc# 10) and Splined Adapter (pc# 4). 3. Return the operator to the upright position (mounting base down) and remove the Hex Head Cap Screws (pc# 14), Pointer Cap (pc# 8) and O-rings (pc# 18 31). 4. Remove the Hex Head Cap Screws (pc# 12), Housing Cover (pc# 2) and Cover Gasket (pc# 21). 5. Remove the Input Flange (pc# 7), with Oil Seal (pc# 19) and Gasket (pc# 22), or remove the Spur Gear Attachment (See Section 4.5 or 4.6). 6. Remove Worm Shaft (pc# 3) with Tapered Roller Bearing (pc# 11) from the Housing (pc# 1). 7. Remove the Tapered Roller Bearing (pc# 11) from the Worm Shaft (pc# 3), if required. 8. Remove the End Cap (pc# 6) and Gasket (pc# 22). 9. Remove the Tapered Roller Bearing (pc# 11). 10. Remove the Worm Gear/Drive Sleeve (pc# 5), O-Rings (pc# 17), and Thrust Washers (pc# 9). 11. Remove the Stop Screws (pc# 15) with Hex Nuts (pc# 16), Packing Seals (pc# 23) and O-rings (pc# 32). Reassembly Instructions: 1. Install the Stop Screws (pc#15), including the O-Rings (pc# 32), Packing Seals (pc# 23) and Hex Nuts (pc# 16). 2. Place the lower Thrust Washer (pc# 9) in the Housing (pc# 1). 3. Replace the lower O-Rings (pc# 17) in the base of the Housing (pc# 1). Note: Lubricate all O-Rings before installation. 4. Install the Worm Gear/Drive Sleeve (pc# 5). 5. Install the Tapered Roller Bearing (pc# 11) into the Housing bore on the End Cap side. 4 28 13 2 21 20 9 5 9 6 22 11 1710 (VARIES) Figure 4.1 – Splined Adapter Assembly MEAD O'BRIEN | WWW.MEADOBRIEN.COM | (800) 874-9655
  • 13. 13 Limitorque WG Series Worm Gear Operator  FCD LMENIM2101-02 – 1/15 flowserve.com 6. Install the End Cap (pc# 6) and Gasket (pc# 22). 7. Insert the Worm Shaft (pc# 3) into the Housing bore. 8. Install the Tapered Roller Bearing (pc# 11) onto the Worm Shaft in the Housing bore. 9. Replace the Oil Seal (pc# 19) in the Input Flange (pc# 7), if required. 10. Install the Input Flange (pc# 7) with Gasket (pc# 22) or install the Spur Gear Attachment (See Section 4.5 or 4.6). Note: Lubricate the worm gear mesh to replace lubricant lost during disassembly (see Lubrication, Section 3). 11. Place the upper Thrust Washer (pc# 9) on the Worm Gear/Drive Sleeve (pc# 5). 12. Replace the upper O-Ring (pc# 20) in the Housing Cover (pc# 2). Note: Lubricate all O-Rings before installation. 13. Install the Housing Cover (pc# 2) with Cover Gasket (pc# 21). 14. Replace the upper O-Ring (pc# 18) in the Housing Cover (pc# 2). 15. Replace the Pointer Cap O-ring (pc# 31) in the top of the Worm Gear/Drive Sleeve (pc# 5). Note: Lubricate all O-Rings before installation. 16. Install the Pointer Cap (pc# 8). 17. Turn the operator upside down and insert the Splined Adapter (pc# 4). 18. Install the Splined Adapter Retaining Ring (pc# 10). 4 29 14 30 12 28 13 8 31 18 2 21 20 9 5 9 6 22 11 24 1 3 32 23 16 15 27 1328 11 22 19 7 17 17 10 (VARIES) PC-7 IS REPLACED BY OPTIONAL SPUR GEAR ATTACHMENT, IF SUPPLIED Figure 4.2 – WG-00 through WG-35 Exploded View MEAD O'BRIEN | WWW.MEADOBRIEN.COM | (800) 874-9655
  • 14. Limitorque WG Series Worm Gear Operator  FCD LMENIM2101-02 – 01/15 14 21 2 20 8 17 17 10 9 3 7 31 18 14 29 12 9 30 17 17 10 9 3 7 19 22 11 1 11 22 6 5 32 23 16 15 4 Figure 4.3 – WG-00 through WG-35 Assembly View Figure 4.4 – WG-00 through WG-35 Assembly View MEAD O'BRIEN | WWW.MEADOBRIEN.COM | (800) 874-9655
  • 15. 15 Limitorque WG Series Worm Gear Operator  FCD LMENIM2101-02 – 1/15 flowserve.com 27 24 25 28 13 28 13 27 24 25 28 13 28 13 Parts List Item Description Qty. 1 Housing 1 2 Housing Cover 1 3 Worm Shaft 1 4 Splined Adapter 1 5 Worm Gear/Drive Sleeve 1 6 End Cap 1 7 Input Flange VARIES 8 Pointer Cap 1 9 Thrust Washer 2 10 Splined Adapter Retaining Ring 1 11 Tapered Roller Bearing 2 12 Hex Head Cap Screw 8 13 Hex Head Cap Screw 4 14 Hex Head Cap Screw 4 15 Stop Screw 2 16 Hex Nut 2 17 Drive Sleeve O-Ring VARIES 18 Drive Sleeve O-Ring 1 19 Oil Seal 1 20 Drive Sleeve O-Ring 1 21 Cover Gasket 1 22 Gasket 2 23 Packing Seal 2 24 Pipe Plug/Grease Fitting 1 25 Eye Bolt 4 26 N/A 27 Key 1 28 Lock Washer 4 29 Lock Washer 4 30 Lock Washer 8 31 Pointer Cap O-Ring 1 32 Stop Screw O-Ring 2 Figure 4.6 – WG-00 through WG-35 Assembly View Table 4.1 – WG-00 through WG-35 Parts List Figure 4.5 – WG-00 through WG-35 Assembly View MEAD O'BRIEN | WWW.MEADOBRIEN.COM | (800) 874-9655
  • 16. Limitorque WG Series Worm Gear Operator  FCD LMENIM2101-02 – 01/15 16 4.4 WG-04 Through WG-12 Refer to Figures 4.7 through 4.12 Disassembly Instructions: 1. Remove the Hex Head Cap Screws (pc# 14), Pointer Cap (pc# 8), Gasket (pc# 31) and O-ring1 (pc# 18). 2. Remove Retaining Ring (pc# 10) and Splined Adapter (pc# 4). 3. Remove the Hex Head Cap Screws (pc# 12), Housing Cover (pc# 2), Cover Gasket (pc# 21), and O-Ring (pc# 20). Note: Remove O-Ring (pc# 18) if applicable1 . 4. Remove the Input Flange (pc# 7) and Gasket (pc# 22), or remove the Spur Gear Attachment (See Section 4.5 or 4.6). 5. Remove Worm Shaft (pc# 3) with Tapered Roller Bearing (pc# 11) and Ball Bearing2 (pc# 26) from the Housing (pc# 1). 6. Remove the Tapered Roller Bearing (pc# 11) and Ball Bearing2 (pc# 26) from the Worm Shaft (pc# 3), if required. 7. Remove the End Cap (pc# 6) and Gasket (pc# 22). 8. Remove the Tapered Roller Bearing (pc# 11) and Ball Bearing2 (pc# 26). 9. Remove the Worm Gear/Drive Sleeve (pc# 5), O-Rings (pc# 17), and Thrust Washers (pc# 9). 10. Remove the Stop Screws (pc# 15) with Hex Nuts (pc# 16), Packing Seals (pc# 23) and O-rings (pc# 32), if applicable. Reassembly Instructions: 1. Install the Stop Screws (pc# 15), including the Hex Nuts (pc# 16), Packing Seals (pc# 23) and O-rings (pc# 32), if applicable. 2. Place the lower Thrust Washer (pc# 9) in the Housing (pc# 1). 3. Replace the lower O-Rings (pc# 17) in the base of the Housing (pc# 1). Note: Lubricate all O-Rings before installation. 4. Install the Worm Gear/Drive Sleeve (pc# 5). 5. Install the Ball Bearing2 (pc# 26) and the Tapered Roller Bearing (pc# 11) into the Housing bore on the End Cap side. 6. Install the End Cap (pc# 6) and Gasket (pc# 22). 7. Insert the Worm Shaft (pc# 3) into the Housing bore. 8. Install the Ball Bearing2 (pc# 26) and the Tapered Roller Bearing (pc# 11) onto the Worm Shaft in the Housing bore. 9. Replace the Oil Seal (pc# 19) in the Input Flange (pc# 7), if required. 10. Install the Input Flange (pc# 7) with Gasket (pc# 22) or install the Spur Gear Attachment (See Section 4.5 or 4.6). Note: Lubricate the worm gear mesh to replace lubricant lost during disassembly (See Lubrication, Section 3). 14 29 1328 4 5 9 20 18 21 2 1230 8 31 10 (QTY VARIES (VARIES)1 Figure 4.7 – WG-04 through WG-12 Splined Adapter Assembly MEAD O'BRIEN | WWW.MEADOBRIEN.COM | (800) 874-9655
  • 17. 17 Limitorque WG Series Worm Gear Operator  FCD LMENIM2101-02 – 1/15 flowserve.com 11. Place the upper Thrust Washer (pc# 9) on the Worm Gear/Drive Sleeve (pc# 5). 12. Replace the O-Rings (pc# 20) in the Housing Cover (pc# 2). Note: Lubricate the O-Rings before installation. 13. Install the Housing Cover (pc# 2) with the Cover Gasket (pc# 21). 14. Insert the Splined Adapter (pc# 4) into the Worm Gear/Drive Sleeve (pc# 5). 15. Install the Splined Adapter Retaining Ring (pc# 10). 16. Install the Pointer Cap (pc# 8), Gasket (pc# 31) and Drive Sleeve O-Ring1 (pc# 18). 1 O-Ring (pc# 18) applies to WG-04 through -07 only. (Pc# 20), quantity of 2, applies to WG-75 through WG-12. 2 Ball Bearing (pc# 26) applies to WG-55 thru -12 only. 14 29 1328 6 22 11 26 24 1 23 16 15 3 27 26 11 22 19 7 13 28 4 1717 9 5 9 20 18 21 2 1230 25 24 8 31 10 (QTY VARIES) (QTY VARIES) (VARIES) (VARIES) (VARIES)1 PC-7 IS REPLACED BY OPTIONAL SPUR GEAR ATTACHMENT, IF SUPPLIED Figure 4.8 – WG-04 through WG-12 Exploded View MEAD O'BRIEN | WWW.MEADOBRIEN.COM | (800) 874-9655
  • 18. Limitorque WG Series Worm Gear Operator  FCD LMENIM2101-02 – 01/15 18 Figure 4.9 – WG-04 through WG-12 Assembly View Figure 4.10 – WG-04 through WG-12 Assembly View 21 17 17 4 9 3 7 19 22 11 1 26 11 22 6 11 26 32 16 23 5 15 4 23 2 20 20 31 8 14 29 10 9 12 30 WG-04 THRU WG-07 ALTERNATE CONSTRUCTION: STOP SLEEVE O-RINGS WG-04 THRU WG-07 ALTERNATE CONSTRUCTION: SINGLE WORM SHAFT BEARING WG-04 THRU WG-05 31 21 17 17 4 9 3 7 19 32 16 23 5 23 2 20 20 31 8 14 29 10 9 12 30 18 20 ALTERNATE CONSTRUCTION: DRIVE SEAL O-RING GASKET WG-04 THRU WG-07 MEAD O'BRIEN | WWW.MEADOBRIEN.COM | (800) 874-9655
  • 19. 19 Limitorque WG Series Worm Gear Operator  FCD LMENIM2101-02 – 1/15 flowserve.com Figure 4.12 – WG-04 through WG-12 Assembly View Figure 4.11 – WG-04 through WG-12 Assembly View Table 4.2 – WG-04 through WG-12 Parts List Parts List Item Description Qty. 1 Housing 1 2 Housing Cover 1 3 Worm Shaft 1 4 Splined Adapter 1 5 Worm Gear/Drive Sleeve 1 6 End Cap 1 7 Input Flange 1 8 Pointer Cap 1 9 Thrust Washer 2 10 Splined Adapter Retaining Ring 1 11 Tapered Roller Bearing 2 12 Hex Head Cap Screw 8 13 Hex Head Cap Screw VARIES 14 Hex Head Cap Screw 4 15 Stop Screw 2 16 Hex Nut 2 17 Drive Sleeve O-Ring 2 18 Drive Sleeve O-Ring VARIES 19 Oil Seal 1 20 Drive Sleeve O-Ring VARIES 21 Cover Gasket 1 22 Gasket 2 23 Packing Seal 2 24 Pipe Plug/Grease Fitting 2 25 Eye Bolt 4 26 Ball Bearing VARIES 27 Key 1 28 Lock Washer VARIES 29 Lock Washer 4 30 Lock Washer 8 31 Pointer Cap Gasket 1 32 Stop Screw O-Ring VARIES 25 27 24 1328 1328 24 T 25 27 24 1328 1328 24 MEAD O'BRIEN | WWW.MEADOBRIEN.COM | (800) 874-9655
  • 20. Limitorque WG Series Worm Gear Operator  FCD LMENIM2101-02 – 01/15 20 4.5 Single Reduction Spur Gear Attachment (1S) Refer to Figure 4.13 Disassembly Instructions: 1. Remove the Socket Head Cap Screws and Input Flange (not shown) from the Cover (pc# 4). 2. Remove the Hex Head Cap Screws (pc# 12) and Cover (pc# 4). 3. Remove all traces of the Cover Gasket (pc# 9). 4. Remove the Input Shaft/Pinion (pc# 3) and Ball Bearings (pc# 6) from the Cover (pc# 4). 5. Remove the Ball Bearing (pc# 10) and Retaining Ring (pc# 5) from the Worm Shaft. 6. Remove Gear (pc# 2) and Key (pc# 8) from the Worm Shaft. 7. Remove the Socket Head Cap Screws (not shown) which mount the Spur Gear Attachment to the WG Gearbox and remove the Spur Gear Housing (pc# 1) 8. If disassembly of the WG Gearbox is required, see Sections 4.3 or 4.4. Reassembly Instructions: 1. Install the Spur Gear Housing (pc# 1) on the WG Gearbox, ensuring proper gasket is installed between Gearbox and Spur Gear Housing (see Section 4.3 or 4.5). 2. Install Gear (pc# 2) onto the WG Gearbox Worm Shaft with Key (pc# 8). Fasten with Retaining Ring (pc# 5). 3. Install Ball Bearing (pc# 10) onto the Worm Shaft. 4. Install Ball Bearing (pc# 6) into the Spur Gear Housing (pc# 1). 5. Install the Input Shaft/Pinion (pc# 3). 6. Install Ball Bearing (pc# 6) onto the Input Shaft/Pinion (pc# 3). 7. Replace the Cover Gasket (pc# 9). 8. Replace the Oil Seal (pc# 11) in the Cover (pc# 4). Note: Lubricate the Spur Gearing. See Section 3. 9. Install the Cover (pc# 4), mounting with Hex Head Cap Screws (pc# 12). 10. Install the Input Flange (not shown) onto the Cover (pc# 4) using Socket Head Cap Screws (not shown). Note: Replace any worn or damaged O-Rings or Gaskets to ensure proper sealing and operation. MEAD O'BRIEN | WWW.MEADOBRIEN.COM | (800) 874-9655
  • 21. 21 Limitorque WG Series Worm Gear Operator  FCD LMENIM2101-02 – 1/15 flowserve.com Parts List Item Description Qty. 1 Housing 1 2 Gear 1 3 Input Shaft/Pinion 1 4 Cover 11 5 Retaining Ring 1 6 Ball Bearing 2 7 Key 1 8 Key 1 9 Gasket 1 10 Ball Bearing 1 11 Oil Seal 1 12 Hex Head Cap Screw 8 13 Lockwasher 8 WORM SHAFT 1 9 4 12 13 11 6 3 6 8 2 5 10 Table 4.3 – WG-00 through WG-12 Spur Gear Attachment (1S) Parts List Figure 4.13 – WG-00 through WG-12 Spur Gear Attachment (1S) Exploded View MEAD O'BRIEN | WWW.MEADOBRIEN.COM | (800) 874-9655
  • 22. Limitorque WG Series Worm Gear Operator  FCD LMENIM2101-02 – 01/15 22 4.6 Double Reduction Spur Gear Attachment (1SD) Refer to Figure 4.14 Disassembly Instructions: 1. Remove the Socket Head Cap Screws (pc# 19) and Input Flange (pc# 18) from the Cover (pc# 12). 2. Remove the Hex Head Cap Screws (pc# 14) and Cover (pc# 12). 3. Remove the Helical Gear/2nd Set Pinion Subassembly. 4. Remove all traces of the Cover Gasket (pc# 13). 5. Remove the Input Shaft/Pinion Subassembly from the Cover (pc #12) by removing the Retaining Ring (pc# 16). 6. Remove the Retaining Ring (pc# 4) and Ball Bearings (pc# 11) from the Input Shaft/Pinion (pc #9). 7. Remove the Ball Bearing (pc# 8) from the 2nd Set Pinion (pc# 5). 8. Remove the Retaining Ring (pc# 4) and the Helical Gear (pc# 2) from the 2nd Set Pinion (pc# 5). 9. Remove the Retaining Ring (pc# 4) and the Helical Gear (pc# 2) from the Worm Shaft. 10. Remove the Socket Head Cap Screws (pc# 20) from the Spur Gear Housing (pc# 1) and remove the Spur Gear Housing (pc# 1) from the WG Gearbox. 11. If disassembly of the WG Gearbox is required, see Sections 4.3 or 4.4. Reassembly Instructions: 1. Install the Spur Gear Housing (pc# 1) on the WG Gearbox, ensuring proper gasket is installed between Gearbox and Spur Gear Housing (See Section 4.3 or 4.4). 2. Install the Helical Gear (pc# 2) on the WG Gearbox Worm Shaft with two Keys (pc# 3). Fasten with Retaining Ring (pc# 4). 3. Insert the Bushing (pc# 10) into the end of the Input Shaft/Pinion (pc# 9). 4. Install the Ball Bearings (pc# 11) and Retaining Ring onto the Input Shaft/Pinion (pc# 9) 5. Install the Input Shaft/Pinion with Ball Bearings (pc# 11) into the Cover (pc# 12) using Retaining Ring (pc# 16). 6. Install the Ball Bearing (pc# 6) in the Spur Gear Housing (pc# 1). 7. Assemble the Helical Gear (pc# 2) on the 2nd Set Pinion (pc# 5) with two Keys (pc# 7). Fasten with Retaining Ring (pc# 4). 8. Install the Ball Bearing (pc# 8) on the 2nd Set Pinion (pc# 5). 9. Install the Helical Gear/2nd Set Pinion Subassembly in the Ball Bearing (pc# 6). Note: Lubricate the Spur Gearing. See Section 3. 10. Replace the Gasket Cover (pc# 13). 11. Install the Cover (pc# 12) with Input Shaft/Pinion Subassembly onto the Spur Gear Housing, ensuring proper mesh of gear teeth on Input Shaft/Pinion (pc# 9) and Helical Gear (pc# 2), and alignment of Ball Bearing (pc# 8) with Cover (pc# 12). MEAD O'BRIEN | WWW.MEADOBRIEN.COM | (800) 874-9655
  • 23. 23 Limitorque WG Series Worm Gear Operator  FCD LMENIM2101-02 – 1/15 flowserve.com 12. Replace the Oil Seal (pc# 15). 13. Install the Input Flange (pc# 18). Note: Replace any worn or damaged O-Rings or Gaskets to ensure proper sealing and operation. WORM SHAFT INPUT SHAFT/PINION SUBASSEMBLY HELICAL GEAR/2ND SET PINION SUBASSEMBLY B A 3 1 6 4 12 2 5 8 1 1 6 5 7 7 2 4 8 2 4 4 11 9 11 13 12 14 17 15 18 19 10 16 21 20 A B Parts List Item Description Qty. Item Description Qty. 1 Spur Gear Housing 1 11 Ball Bearing 2 2 Helical Gear 2 12 Cover 1 3 Key 2 13 Gasket - Cover 1 4 Retaining Ring 3 14 Hex Head Cap Screw 8 5 2nd Set Pinion 1 15 Oil Seal 1 6 Ball Bearing 1 16 Retaining Ring 1 7 Key 2 17 Lockwasher 8 8 Ball Bearing 1 18 Input Flange 1 9 Input Shaft / Pinion 1 19 Socket Head Cap Screw 4 10 Bushing 1 20 Socket Head Cap Screw VARIES Table 4.4 – WG-00 through WG-12 Spur Gear Attachment (1SD) Parts List Figure 4.14 – WG-00 through WG-12 Spur Gear Attachment (1SD) Exploded View MEAD O'BRIEN | WWW.MEADOBRIEN.COM | (800) 874-9655
  • 24. flowserve.com Flowserve Corporation has established industry leadership in the design and manufacture of its products. When properly selected, this Flowserve product is designed to perform its intended function safely during its useful life. However, the purchaser or user of Flowserve products should be aware that Flowserve products might be used in numerous applications under a wide variety of industrial service conditions. Although Flowserve can (and often does) provide general guidelines, it cannot provide specific data and warnings for all possible applications. The purchaser/user must therefore assume the ultimate responsibility for the proper sizing and selection, installation, operation and maintenance of Flowserve products. The purchaser/ user should read and understand the Installation Operation Maintenance (IOM) instructions included with the product, and train its employees and contractors in the safe use of Flowserve products in connection with the specific application. While the information and specifications contained in this literature are believed to be accurate, they are supplied for informative purposes only and should not be considered certified or as a guarantee of satisfactory results by reliance thereon. Nothing contained herein is to be construed as a warranty or guarantee, express or implied, regarding any matter with respect to this product. Because Flowserve is continually improving and upgrading its product design, the specifications, dimensions and information contained herein are subject to change without notice. Should any question arise concerning these provisions, the purchaser/user should contact Flowserve Corporation at any one of its worldwide operations or offices. © 2015 Flowserve Corporation, Irving, Texas, USA. Flowserve is a registered trademark of Flowserve Corporation. Flowserve Corporation Flow Control United States Flowserve Limitorque 5114 Woodall Road P.O. Box 11318 Lynchburg, VA 24506-1318 Phone: 434-528-4400 Fax: 434-845-9736 England Flowserve Limitorque Euro House Abex Road Newbury Berkshire, RG14 5EY United Kingdom Phone: 44-1-635-46999 Fax: 44-1-635-36034 Singapore Limitorque Asia, Pte., Ltd. 12, Tuas Avenue 20 Singapore 638824 Phone: 65-6868-4628 Fax: 65-6862-4940 China Limitorque Beijing, Pte., Ltd. RM A1/A2 22/F, East Area, Hanwei Plaza No. 7 Guanghua Road, Chaoyang District Beijing 100004, Peoples Republic of China Phone: 86-10-5921-0606 Fax: 86-10-6561-2702 India Flowserve Limitorque Plot No. #4, 1 A, Road No. 8, EPIP Whitefield, Bangalore – 560066 Karnataka India Phone: 91-80-40146200 Fax: 91-80-28410286 Italy Flowserve Limitorque Fluid Power Systems Via Rio Vallone 17 20883 Mezzago MB Italy Phone: 39-039-620601 Fax: 39-039-62060 213 Mead O’Brien, Inc. 10800 Midwest Industrial Blvd St. Louis, Missouri 63132 (800) 874-9655 www.meadobrien.com FCD LMENIM2101-02-AQ Printed in USA. January 2015 MEAD O'BRIEN | WWW.MEADOBRIEN.COM | (800) 874-9655