According to the TP LINK ROUTER TECHNICAL SUPPORT NUMBER 1-800-204-6959 experts, there are few necessary Process for disable firewall in tplink router.
1. STEP BY STEP GUIDE TO DISABLE
FIREWALL IN TP LINK ROUTER
Firewall is basically used by users to have control over malicious user’s access to the Internet. Blocking up a PC
whose IP address is 192.168.1.100 to access the Internet from 00:00 to 06:00 is essential. According to the TP LINK
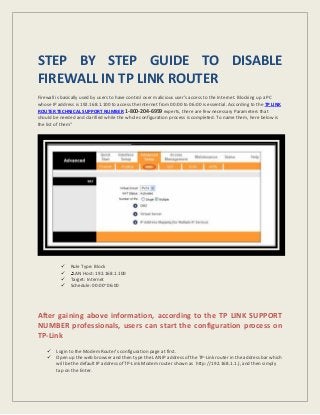
ROUTER TECHNICAL SUPPORT NUMBER 1-800-204-6959 experts, there are few necessary Parameters that
should be needed and clarified while the whole configuration process is completed. To name them, here below is
the list of them”
Rule Type: Block
LAN Host: 192.168.1.100
Target: Internet
Schedule: 00:00~06:00
After gaining above information, according to the TP LINK SUPPORT
NUMBER professionals, users can start the configuration process on
TP-Link
Login to the Modem Router’s configuration page at first.
Open up the web browser and then type the LAN IP address of the TP-Link router in the address bar which
will be the default IP address of TP-Link Modem router shown as http: //192.168.1.1.), and then simply
tap on the Enter.
2. The Firewall settings are simply based on the time of the modem and so it is essential to adjust the
modem’s time comprising with the PC.
Next, simply tap on the “System Tools-> Time Settings-> Get from PC-> Save” menu.
Get access to the Firewall -> LAN Host and then click on the Add New menu.
Select the IP Address which is located in the Mode field, and then enter a brief description about the rule
which you are setting up. For example if we take LAN network
Go to Firewall -> Schedule menu and then click on the “Add New” BUTTON.
Selection of the Day mode is required, and then simply enter a brief description of the rule which you are
setting up.
Next, go to Firewall -> Rule menu and then select the Enable Firewall.
You are required to tick on the “Allow” section and then click on the Save menu.
Click on the Add New button.
Type the name for the rule in the Description which you wish to.
Selection of a host directly from the LAN Host drop-down list is essential or simply chooses the “Add LAN
Host” option.
Select the Any Host menu just from the WAN Host drop-down list given in front of you.
Select the schedule just from the Schedule drop-down list or you can simply choose the “Add Schedule”
option.
Next, in the Action field, you are required to select the Deny menu to deny the entry.
Right in the Status field, a user needs to select Enabled menu to enable the entry.
In the Direction field, you are required to select OUT menu from the drop-down list for the direction.
In the Protocol section, you will come across four options: All, TCP, UDP, and ICMP.
Click Save.
One of the most promising reasons to get in touch at our tollfree TP LINK CUSTOMER SUPPORT services is that we
deliver highly customized TP Link support solutions at very reasonable prices. We make sure that users’ demand
related to TP link is surely mate within defined time period. So hurry up and get in touch with our expert
professionals working at our tech support department.