SlideShare a Scribd company logo
1 of 2
Download to read offline
P/N 3100331 ISSUE 2 © 2004
Installation Instructions for 1500 Series
Door Holder Extension Kits
Description
The Edwards 1500 Series Door Holder Extension Kits are used
where it is desired to hold doors open and where a standoff dis-
tance between the magnet assembly and the armature base is re-
quired. The extension rod kit can be used with Edwards 1504,
1505, 1508 and 1509 Series Door Holders. Parts from these door
holders are used with the extension kits to form a complete unit.
Specifications
Model Number Extension Range
1500-1 1 1/2" (38 mm) Fixed
1500-2 2" (51 mm) Fixed
1500-7 6.37 - 8.00" (162 - 203 mm)
1500-12 8.37 - 12" (213 - 305 mm)
Installation
c. Insert the extension rod into the armature base and secure
with #10-32 x 1 1/2" (38 mm) armature securing screw
(Figures 1 - 3).
d. Insert spherical bushings (supplied) and flat washers
(supplied with 1500-7 and 1500-12 only) into the
extension rod assembly as shown in Figure 2 or Figure 3,
as applicable. Secure catch plate in extension rod using
#10-32UNF x 1" (25 mm) securing screw (Figure 2).
e. For adjustable units only, adjust the extension length by
loosening the knurled locking nut, extending the rod to
the desired length and retightening the knurled locking
nut (Figure 2).
NOTE: Proper alignment of the catch plate and the
electromagnet helps ensure sufficient holding force.
f. Align the catch plate with the electromagnet by moving
the extension arm up or down and back or forth while
simultaenously adjusting the catch plate against the
magnet. There should be no gap between the catch plate
and the magnet.
g. After the desired extension length and contact alignment
have been achieved, perform the following (Figure 2):
1. Using a 5/32" (4 mm)Allen Wrench (supplied), lock
the extension arm into position by tightening the
armature securing screw (Figure 2). Do not
overtighten.
h. Perform an operational check of the Electromagnetic
Door Holder as outlined in the installation instruction
provided with the door holder.
2. For more detailed information on installation of the door
holders, see the instructions supplied with the door holder.
Figure 1. Armature Base Assembly
Cheshire, CT 06410 203-699-3300 (Ph)
203-699-3365 (Cust. Serv. Fax)
203-699-3078 (Tech. Serv. Fax)
WARNING
The extension kits project a significant distance from
the doors they are mounted on and should, therefore,
be mounted as high as possible to preclude interfer-
ence or personal injury.
1. Install the extension kit as follows.
a. Remove the #10-32 x 1 1/2" (38 mm) armature securing
screw and remove the catch plate from the armature base
(Figure 1).
b. Insert spherical bushings (removed in Step 1.a) as shown
in Figure 2 or Figure 3 as applicable. If bushings are
damaged, replace with bushings supplied with the door
holder extension kit.
#10-32 x 1 1/2” (38 mm)
Armature Securing Screw
(supplied with door holder)
Armature Base (supplied with door holder)
(2) Spherical Bushings
(supplied)
(2) Spherical Bushings
(supplied)
Extension Tube
Assembly
#10-32 UNF x 1“ (25 mm)
Screw (supplied)
Knurled Locking Nut
(2) Flat Washers
(supplied)
Catch Plate
(supplied with door holder)
#10-32 UNF Nut
(supplied)
Figure 2. Extension Rod Assembly (Adjustable 1500-7 and 1500-12 Model)
P/N 3100331 ISSUE 2
Catch Plate
(supplied with door holder)
Armature Base
(supplied with door holder)
(2) Spherical Bushings
(supplied)
Extension
Assembly
(2) Spherical Bushings
(supplied)
#10-32 UNF x 1" (25 mm)
Screw (supplied)
#10-32 UNF Nut
(supplied)
#10-32 x 1 1/2" (38 mm)
Armature Securing Screw
(supplied with door holder)
Figure 3. Extension Rod Assembly (Adjustable 1500-1 and 1500-2 Model)

More Related Content

More from JMAC Supply

More from JMAC Supply (20)

Bosch AI1 Data Sheet
Bosch AI1 Data SheetBosch AI1 Data Sheet
Bosch AI1 Data Sheet
 
Bosch AH-24WP-R Data Sheet
Bosch AH-24WP-R Data SheetBosch AH-24WP-R Data Sheet
Bosch AH-24WP-R Data Sheet
 
Bosch AEC-8I8O-EXT Data Sheet
Bosch AEC-8I8O-EXT Data SheetBosch AEC-8I8O-EXT Data Sheet
Bosch AEC-8I8O-EXT Data Sheet
 
Bosch AE774 Data Sheet
Bosch AE774 Data SheetBosch AE774 Data Sheet
Bosch AE774 Data Sheet
 
Bosch AE203R Data Sheet
Bosch AE203R Data SheetBosch AE203R Data Sheet
Bosch AE203R Data Sheet
 
Bosch AE101 Data Sheet
Bosch AE101 Data SheetBosch AE101 Data Sheet
Bosch AE101 Data Sheet
 
Bosch AE4 Data Sheet
Bosch AE4 Data SheetBosch AE4 Data Sheet
Bosch AE4 Data Sheet
 
Bosch AE1 Data Sheet
Bosch AE1 Data SheetBosch AE1 Data Sheet
Bosch AE1 Data Sheet
 
Bosch ACD-IC16K37-50 Data Sheet
Bosch ACD-IC16K37-50 Data SheetBosch ACD-IC16K37-50 Data Sheet
Bosch ACD-IC16K37-50 Data Sheet
 
Bosch ACD-IC2K37-50 Data Sheet
Bosch ACD-IC2K37-50 Data SheetBosch ACD-IC2K37-50 Data Sheet
Bosch ACD-IC2K37-50 Data Sheet
 
Bosch ACA-IC2K26-10 Data Sheet
Bosch ACA-IC2K26-10 Data SheetBosch ACA-IC2K26-10 Data Sheet
Bosch ACA-IC2K26-10 Data Sheet
 
Bosch 9208B Data Sheet
Bosch 9208B Data SheetBosch 9208B Data Sheet
Bosch 9208B Data Sheet
 
Bosch 7110XC Data Sheet
Bosch 7110XC Data SheetBosch 7110XC Data Sheet
Bosch 7110XC Data Sheet
 
Samsung Techwin SNB-1000 Data Sheet
Samsung Techwin SNB-1000 Data SheetSamsung Techwin SNB-1000 Data Sheet
Samsung Techwin SNB-1000 Data Sheet
 
Samsung Techwin SMT-4031 Data Sheet
Samsung Techwin SMT-4031 Data SheetSamsung Techwin SMT-4031 Data Sheet
Samsung Techwin SMT-4031 Data Sheet
 
Samsung Techwin SMT-4023 Data Sheet
Samsung Techwin SMT-4023 Data SheetSamsung Techwin SMT-4023 Data Sheet
Samsung Techwin SMT-4023 Data Sheet
 
Samsung Techwin SMT-3232 Data Sheet
Samsung Techwin SMT-3232 Data SheetSamsung Techwin SMT-3232 Data Sheet
Samsung Techwin SMT-3232 Data Sheet
 
Samsung Techwin SMT-3231 Data Sheet
Samsung Techwin SMT-3231 Data SheetSamsung Techwin SMT-3231 Data Sheet
Samsung Techwin SMT-3231 Data Sheet
 
Samsung Techwin SMT-2232 Data Sheet
Samsung Techwin SMT-2232 Data SheetSamsung Techwin SMT-2232 Data Sheet
Samsung Techwin SMT-2232 Data Sheet
 
Samsung Techwin SMT-1934 Data Sheet
Samsung Techwin SMT-1934 Data SheetSamsung Techwin SMT-1934 Data Sheet
Samsung Techwin SMT-1934 Data Sheet
 

Recently uploaded

Recently uploaded (20)

What Are The Drone Anti-jamming Systems Technology?
What Are The Drone Anti-jamming Systems Technology?What Are The Drone Anti-jamming Systems Technology?
What Are The Drone Anti-jamming Systems Technology?
 
Partners Life - Insurer Innovation Award 2024
Partners Life - Insurer Innovation Award 2024Partners Life - Insurer Innovation Award 2024
Partners Life - Insurer Innovation Award 2024
 
Strategize a Smooth Tenant-to-tenant Migration and Copilot Takeoff
Strategize a Smooth Tenant-to-tenant Migration and Copilot TakeoffStrategize a Smooth Tenant-to-tenant Migration and Copilot Takeoff
Strategize a Smooth Tenant-to-tenant Migration and Copilot Takeoff
 
TrustArc Webinar - Stay Ahead of US State Data Privacy Law Developments
TrustArc Webinar - Stay Ahead of US State Data Privacy Law DevelopmentsTrustArc Webinar - Stay Ahead of US State Data Privacy Law Developments
TrustArc Webinar - Stay Ahead of US State Data Privacy Law Developments
 
presentation ICT roal in 21st century education
presentation ICT roal in 21st century educationpresentation ICT roal in 21st century education
presentation ICT roal in 21st century education
 
Boost Fertility New Invention Ups Success Rates.pdf
Boost Fertility New Invention Ups Success Rates.pdfBoost Fertility New Invention Ups Success Rates.pdf
Boost Fertility New Invention Ups Success Rates.pdf
 
Strategies for Unlocking Knowledge Management in Microsoft 365 in the Copilot...
Strategies for Unlocking Knowledge Management in Microsoft 365 in the Copilot...Strategies for Unlocking Knowledge Management in Microsoft 365 in the Copilot...
Strategies for Unlocking Knowledge Management in Microsoft 365 in the Copilot...
 
HTML Injection Attacks: Impact and Mitigation Strategies
HTML Injection Attacks: Impact and Mitigation StrategiesHTML Injection Attacks: Impact and Mitigation Strategies
HTML Injection Attacks: Impact and Mitigation Strategies
 
Workshop - Best of Both Worlds_ Combine KG and Vector search for enhanced R...
Workshop - Best of Both Worlds_ Combine  KG and Vector search for  enhanced R...Workshop - Best of Both Worlds_ Combine  KG and Vector search for  enhanced R...
Workshop - Best of Both Worlds_ Combine KG and Vector search for enhanced R...
 
Exploring the Future Potential of AI-Enabled Smartphone Processors
Exploring the Future Potential of AI-Enabled Smartphone ProcessorsExploring the Future Potential of AI-Enabled Smartphone Processors
Exploring the Future Potential of AI-Enabled Smartphone Processors
 
Advantages of Hiring UIUX Design Service Providers for Your Business
Advantages of Hiring UIUX Design Service Providers for Your BusinessAdvantages of Hiring UIUX Design Service Providers for Your Business
Advantages of Hiring UIUX Design Service Providers for Your Business
 
Apidays Singapore 2024 - Building Digital Trust in a Digital Economy by Veron...
Apidays Singapore 2024 - Building Digital Trust in a Digital Economy by Veron...Apidays Singapore 2024 - Building Digital Trust in a Digital Economy by Veron...
Apidays Singapore 2024 - Building Digital Trust in a Digital Economy by Veron...
 
Mastering MySQL Database Architecture: Deep Dive into MySQL Shell and MySQL R...
Mastering MySQL Database Architecture: Deep Dive into MySQL Shell and MySQL R...Mastering MySQL Database Architecture: Deep Dive into MySQL Shell and MySQL R...
Mastering MySQL Database Architecture: Deep Dive into MySQL Shell and MySQL R...
 
A Year of the Servo Reboot: Where Are We Now?
A Year of the Servo Reboot: Where Are We Now?A Year of the Servo Reboot: Where Are We Now?
A Year of the Servo Reboot: Where Are We Now?
 
2024: Domino Containers - The Next Step. News from the Domino Container commu...
2024: Domino Containers - The Next Step. News from the Domino Container commu...2024: Domino Containers - The Next Step. News from the Domino Container commu...
2024: Domino Containers - The Next Step. News from the Domino Container commu...
 
How to Troubleshoot Apps for the Modern Connected Worker
How to Troubleshoot Apps for the Modern Connected WorkerHow to Troubleshoot Apps for the Modern Connected Worker
How to Troubleshoot Apps for the Modern Connected Worker
 
Understanding Discord NSFW Servers A Guide for Responsible Users.pdf
Understanding Discord NSFW Servers A Guide for Responsible Users.pdfUnderstanding Discord NSFW Servers A Guide for Responsible Users.pdf
Understanding Discord NSFW Servers A Guide for Responsible Users.pdf
 
How to Troubleshoot Apps for the Modern Connected Worker
How to Troubleshoot Apps for the Modern Connected WorkerHow to Troubleshoot Apps for the Modern Connected Worker
How to Troubleshoot Apps for the Modern Connected Worker
 
Handwritten Text Recognition for manuscripts and early printed texts
Handwritten Text Recognition for manuscripts and early printed textsHandwritten Text Recognition for manuscripts and early printed texts
Handwritten Text Recognition for manuscripts and early printed texts
 
Tech Trends Report 2024 Future Today Institute.pdf
Tech Trends Report 2024 Future Today Institute.pdfTech Trends Report 2024 Future Today Institute.pdf
Tech Trends Report 2024 Future Today Institute.pdf
 

Edwards Signaling 1500-2 Installation Manual

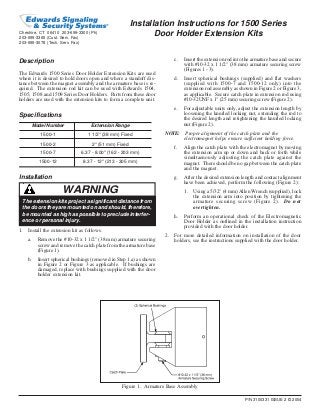
  • 1. P/N 3100331 ISSUE 2 © 2004 Installation Instructions for 1500 Series Door Holder Extension Kits Description The Edwards 1500 Series Door Holder Extension Kits are used where it is desired to hold doors open and where a standoff dis- tance between the magnet assembly and the armature base is re- quired. The extension rod kit can be used with Edwards 1504, 1505, 1508 and 1509 Series Door Holders. Parts from these door holders are used with the extension kits to form a complete unit. Specifications Model Number Extension Range 1500-1 1 1/2" (38 mm) Fixed 1500-2 2" (51 mm) Fixed 1500-7 6.37 - 8.00" (162 - 203 mm) 1500-12 8.37 - 12" (213 - 305 mm) Installation c. Insert the extension rod into the armature base and secure with #10-32 x 1 1/2" (38 mm) armature securing screw (Figures 1 - 3). d. Insert spherical bushings (supplied) and flat washers (supplied with 1500-7 and 1500-12 only) into the extension rod assembly as shown in Figure 2 or Figure 3, as applicable. Secure catch plate in extension rod using #10-32UNF x 1" (25 mm) securing screw (Figure 2). e. For adjustable units only, adjust the extension length by loosening the knurled locking nut, extending the rod to the desired length and retightening the knurled locking nut (Figure 2). NOTE: Proper alignment of the catch plate and the electromagnet helps ensure sufficient holding force. f. Align the catch plate with the electromagnet by moving the extension arm up or down and back or forth while simultaenously adjusting the catch plate against the magnet. There should be no gap between the catch plate and the magnet. g. After the desired extension length and contact alignment have been achieved, perform the following (Figure 2): 1. Using a 5/32" (4 mm)Allen Wrench (supplied), lock the extension arm into position by tightening the armature securing screw (Figure 2). Do not overtighten. h. Perform an operational check of the Electromagnetic Door Holder as outlined in the installation instruction provided with the door holder. 2. For more detailed information on installation of the door holders, see the instructions supplied with the door holder. Figure 1. Armature Base Assembly Cheshire, CT 06410 203-699-3300 (Ph) 203-699-3365 (Cust. Serv. Fax) 203-699-3078 (Tech. Serv. Fax) WARNING The extension kits project a significant distance from the doors they are mounted on and should, therefore, be mounted as high as possible to preclude interfer- ence or personal injury. 1. Install the extension kit as follows. a. Remove the #10-32 x 1 1/2" (38 mm) armature securing screw and remove the catch plate from the armature base (Figure 1). b. Insert spherical bushings (removed in Step 1.a) as shown in Figure 2 or Figure 3 as applicable. If bushings are damaged, replace with bushings supplied with the door holder extension kit.
  • 2. #10-32 x 1 1/2” (38 mm) Armature Securing Screw (supplied with door holder) Armature Base (supplied with door holder) (2) Spherical Bushings (supplied) (2) Spherical Bushings (supplied) Extension Tube Assembly #10-32 UNF x 1“ (25 mm) Screw (supplied) Knurled Locking Nut (2) Flat Washers (supplied) Catch Plate (supplied with door holder) #10-32 UNF Nut (supplied) Figure 2. Extension Rod Assembly (Adjustable 1500-7 and 1500-12 Model) P/N 3100331 ISSUE 2 Catch Plate (supplied with door holder) Armature Base (supplied with door holder) (2) Spherical Bushings (supplied) Extension Assembly (2) Spherical Bushings (supplied) #10-32 UNF x 1" (25 mm) Screw (supplied) #10-32 UNF Nut (supplied) #10-32 x 1 1/2" (38 mm) Armature Securing Screw (supplied with door holder) Figure 3. Extension Rod Assembly (Adjustable 1500-1 and 1500-2 Model)