John deere z335 e z trak mower (s.n.010001-) service repair technical manual (tm140319)
1. TM140319 - Z335E, Z355E ZTrak Mower (S.N. 010001-)
Remove Engine
Remove Engine
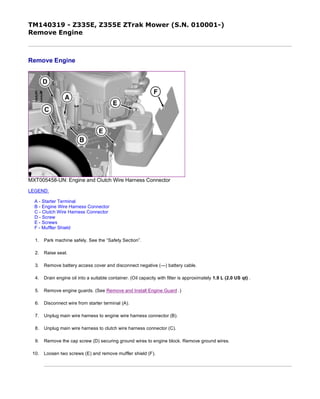
MXT005458-UN: Engine and Clutch Wire Harness Connector
LEGEND:
A - Starter Terminal
B - Engine Wire Harness Connector
C - Clutch Wire Harness Connector
D - Screw
E - Screws
F - Muffler Shield
1. Park machine safely. See the “Safety Section”.
2. Raise seat.
3. Remove battery access cover and disconnect negative (—) battery cable.
4. Drain engine oil into a suitable container. (Oil capacity with filter is approximately 1.9 L (2.0 US qt) .
5. Remove engine guards. (See Remove and Install Engine Guard .)
6. Disconnect wire from starter terminal (A).
7. Unplug main wire harness to engine wire harness connector (B).
8. Unplug main wire harness to clutch wire harness connector (C).
9. Remove the cap screw (D) securing ground wires to engine block. Remove ground wires.
10. Loosen two screws (E) and remove muffler shield (F).
页码,1/5(W)w
11/23/2019file://C:ProgramDataService ADVISORTempTM140319_09001faa82f4310a.html
2. 11.
CAUTION:
Avoid Injury! Fuel vapors are explosive and flammable:
Do not smoke while handling fuel.
Keep fuel away from flames or sparks.
Shut off engine before servicing.
Cool engine before servicing.
Work in a well-ventilated area.
Clean up spilled fuel immediately.
MXT005459-UN: Fuel and Vent Line
LEGEND:
G - Fuel Line
H - Clamp
I - Vent Line
Remove fuel line (G) from clips.
12. Disconnect hose clamp (H) and slide fuel line off hose barb on fuel pump. Plug the fuel line.
13. Remove vent line (I) from barb fitting.
页码,2/5(W)w
11/23/2019file://C:ProgramDataService ADVISORTempTM140319_09001faa82f4310a.html
3. 14.
MXT005460-UN: Throttle Cable Clamp
LEGEND:
J - Clamp
Loosen retaining clamp (J) for the throttle cable. Disconnect cable.
15.
MXT005461-UN: Belts
LEGEND:
K - Mower Drive Belt
L - Clutch Sheave
M - Hole
N - Idler Sheave
O - Traction Drive Belt
P - Engine Sheave
Pull mower drive belt (K) toward rear of machine. Remove belt from clutch sheave (L).
16.
页码,3/5(W)w
11/23/2019file://C:ProgramDataService ADVISORTempTM140319_09001faa82f4310a.html
4. CAUTION:
Avoid Injury! Spring is under tension. Wear eye protection and gloves.
Insert a 3/8 inch. ratchet or breaker bar into the square hole (M) on the idler arm. Rotate the spring-loaded idler arm to
relieve belt tension on the idler sheave (N). Remove the traction drive belt (O) from the idler sheave. Release the
spring tension from the arm and remove the tool.
17. Remove the traction drive belt from the engine sheave (P).
18.
CAUTION:
Avoid Injury! Be prepared to support clutch if there is sudden release of clutch from engine
crankshaft.
MXT005462-UN: Idler arm and pulley removed for clarity.
LEGEND:
Q - Bolt
R - Bolts
Remove bolt (Q) and washer securing electric clutch and engine sheave assemblies to engine output shaft. Remove
electric clutch.
19. Remove the drive sheave and key from the engine crankshaft.
20. Remove four bolts (R) securing engine to frame.
21. Remove engine.
页码,4/5(W)w
11/23/2019file://C:ProgramDataService ADVISORTempTM140319_09001faa82f4310a.html
5. TM140319 - Z335E, Z355E ZTrak Mower (S.N. 010001-)
Install Engine
Install Engine
MXT005462-UN: Idler arm and pulley removed for clarity.
LEGEND:
R - Bolts
Q - Bolt
1. Set engine in machine frame.
2. Install 4 engine mounting bolts (R). Tighten bolts to specification.
3. Install the key and drive sheave onto the engine output shaft.
4. Install the electric PTO clutch assembly so that the anti-rotation pin is in the slot. The PTO clutch pin must be able to
move freely within the slot.
5. Secure electric PTO clutch with washer and bolt (Q). Tighten bolt to specification.
6.
Item Measurement Specification
Engine Mounting Cap Screws Torque 48 N·m
(35 lb-ft)
Item Measurement Specification
PTO Clutch Bolt Torque 68 N·m
(50 lb-ft)
页码,1/5(W)w
11/23/2019file://C:ProgramDataService ADVISORTempTM140319_09001faa82f4318b.html
6. CAUTION:
Avoid Injury! Spring is under tension. Wear eye protection and gloves.
MXT005461-UN: Belts
LEGEND:
K - Mower Drive Belt
L - Clutch Sheave
M - Hole
N - Idler Sheave
O - Traction Drive Belt
P - Engine Sheave
Place traction drive belt (O) on engine sheave (P) and transmission sheaves. Insert a 3/8 in. drive wrench in hole (M) in
drive belt tensioner arm. Rotate the tensioner arm until the drive belt can be placed on idler pulley sheave (N).
Carefully release the tension arm to the relaxed position.
7. Place mower deck drive belt (K) in position on clutch sheave (L).
页码,2/5(W)w
11/23/2019file://C:ProgramDataService ADVISORTempTM140319_09001faa82f4318b.html
7. 8.
MXT005460-UN: Throttle Cable Clamp
LEGEND:
J - Clamp
Attach throttle cable to hole in throttle control. Route cable housing through cable clamp (J). Adjust cable and tighten
clamp. (See Adjust Throttle and Choke Cable, V-Twin .)
9.
CAUTION:
Avoid Injury! Fuel vapors are explosive and flammable:
Do not smoke while handling fuel.
Keep fuel away from flames or sparks.
Shut off engine before servicing.
Cool engine before servicing.
Work in a well-ventilated area.
Clean up spilled fuel immediately.
页码,3/5(W)w
11/23/2019file://C:ProgramDataService ADVISORTempTM140319_09001faa82f4318b.html
8. MXT005459-UN: Fuel and Vent Line
LEGEND:
G - Fuel Line
H - Clamp
I - Vent Line
Connect vent line (I) to barb fitting.
10. Remove plug from fuel line and connect to the fuel pump fitting with hose clamp (H).
11. Place fuel line (G) inside clips.
12.
MXT005458-UN: Engine and Clutch Wire Harness Connector
LEGEND:
A - Starter Terminal
B - Engine Wire Harness Connector
C - Clutch Wire Harness Connector
D - Screw
E - Screws
页码,4/5(W)w
11/23/2019file://C:ProgramDataService ADVISORTempTM140319_09001faa82f4318b.html
9. F - Muffler Shield
Position muffler shield (F) in place over screws (E). Tighten screws.
13. Install screw (D) securing ground wires to engine block.
14. Connect the main wire harness to clutch wire harness connector (C).
15. Connect the main wire harness to engine wire harness connector (B).
16. Connect wire to the starting motor terminal (A).
17. Install the engine guard.
18. Fill crankcase with engine oil.
19. Connect negative (—) battery cable.
Item Measurement Specification
Oil with Filter Capacity 1.9 L
(2 qt)
JK79365,000053B-19-20151112
页码,5/5(W)w
11/23/2019file://C:ProgramDataService ADVISORTempTM140319_09001faa82f4318b.html
10. TM140319 - Z335E, Z355E ZTrak Mower (S.N. 010001-)
Remove Upper Blower Housing
Remove Upper Blower Housing
1. Remove air cleaner cover and air cleaner elements.
2. Remove screws securing the rotating screen to the fan.
3. Remove screws holding the upper blower housing to the engine block.
4. Remove upper blower housing.
MX00654,0000054-19-20120206
页码,1/1(W)w
11/23/2019file://C:ProgramDataService ADVISORTempTM140319_09001faa8198ab39.html
11. TM140319 - Z335E, Z355E ZTrak Mower (S.N. 010001-)
Install Upper Blower Housing
Install Upper Blower Housing
IMPORTANT:
Avoid Damage! Upper blower housing must be assembled so that the slot in the blower housing aligns with the
ridge in the air intake. Failure to assemble correctly will prevent the air filter from sealing and cause engine
damage.
Install in reverse order of removal.
Tighten blower housing screws to specification.
Item Measurement Specification
Blower Housing Screws Torque 9 N•m
(80 lb.-in.)
MX00654,0000055-19-20120206
页码,1/1(W)w
11/23/2019file://C:ProgramDataService ADVISORTempTM140319_09001faa8198ab3a.html
12. TM140319 - Z335E, Z355E ZTrak Mower (S.N. 010001-)
Changing Engine Oil and Filter
Changing Engine Oil and Filter
1. IMPORTANT:
Operating in extreme conditions may require more frequent service intervals:
Engine components may become dirty or plugged when operating in extreme heat, dust or other
severe conditions.
Engine oil can degrade if machine is operated constantly at slow or low engine speeds or for
frequent short periods of time.
Run engine to warm oil.
2. Park machine safely on level surface. See the “Safety Section”.
3. IMPORTANT:
Dirt and contamination can enter engine when checking oil level. Clean area around dipstick before
loosening or removing.
MXAL42828-UN: Dipstick
Clean area around dipstick (A) to prevent debris from falling into crankcase.
4. Disconnect oil drain hose (B) from the side of the engine.
5. Remove the oil drain cap (C). Carefully lower the quick oil drain into an approved container.
页码,1/2(W)w
11/23/2019file://C:ProgramDataService ADVISORTempTM140319_09001faa82e8665f.html
13. 6.
MXAL42829-UN: Oil Filter
Wipe dirt from around oil filter (D). Place a drain pan under oil filter, and remove filter.
7. Wipe up any dripped oil from oil filter on engine pan.
8. Put a light coat of fresh, clean oil on the new filter gasket.
9. Install replacement oil filter by turning oil filter to the right (clockwise) until the rubber gasket contacts filter base.
Tighten filter an additional one-half turn.
10. After oil has drained, install the drain cap (C) and attach drain hose assembly (A) to side of engine.
11. Add oil no higher than FULL mark on dipstick. Begin with specification. Do not overfill.
12. Tighten dipstick.
13. Start and run engine at idle to check for leaks. Stop engine. Fix any leaks before operating.
14. Check oil level. Add oil if necessary.
15. Wipe up any and all surfaces of any oil drippings.
Item Measurement Specification
Engine Oil Capacity 1.6 L (1.75 qt) (approximate)
OUMX258,0000BBA-19-20151104
页码,2/2(W)w
11/23/2019file://C:ProgramDataService ADVISORTempTM140319_09001faa82e8665f.html
14. Thank you very much for
your reading. Please Click
Here. Then Get COMPLETE
MANUAL. NO WAITING
NOTE:
If there is no response to
click on the link above,
please download the PDF
document first and then
click on it.
15. TM140319 - Z335E, Z355E ZTrak Mower (S.N. 010001-)
Cleaning Air Intake Screen and Engine Fins
Cleaning Air Intake Screen and Engine Fins
CAUTION:
Avoid Injury! Compressed air can cause debris to fly a long distance.
Clear work area of bystanders.
Wear eye protection when using compressed air for cleaning purposes.
Reduce compressed air pressure to specification.
IMPORTANT:
Avoid Damage! An obstructed air intake screen can cause engine damage due to overheating. Keep air intake screen and other
external surfaces of the engine, including cooling fins, clean at all times to allow adequate air intake.
1. Park machine safely. See the “Safety Section”.
2. Clean air intake screen on top of engine and external surfaces with rag, brush, vacuum, or compressed air.
Item Measurement Specification
Air Pressure 210 kPa
(30 psi)
OUMX258,0000BBB-19-20151104
页码,1/1(W)w
11/23/2019file://C:ProgramDataService ADVISORTempTM140319_09001faa82e86706.html
16. TM140319 - Z335E, Z355E ZTrak Mower (S.N. 010001-)
Cleaning Engine Shroud
Cleaning Engine Shroud
CAUTION:
Avoid Injury! Compressed air can cause debris to fly a long distance.
Clear work area of bystanders.
Wear eye protection when using compressed air for cleaning purposes.
Reduce compressed air pressure to specification.
IMPORTANT:
Avoid Damage! An obstructed air intake screen can cause engine damage due to overheating. Keep Air intake screen and other
external surfaces of engine, including cooling fins, clean at all times to allow adequate air intake.
CAUTION:
Avoid Injury! Touching hot surfaces can burn skin. The engine, components, and fluids will be hot if the engine has
been running. Allow the engine to cool before servicing or working near the engine and components.
1. Park machine safely. See the “Safety Section”.
2. Clean air intake screen and external engine surfaces (see Cleaning Air Intake Screen and Engine Fins in ENGINE Section).
3.
Item Measurement Specification
Air Pressure 210 kPa
(30 psi)
页码,1/3(W)w
11/23/2019file://C:ProgramDataService ADVISORTempTM140319_09001faa82e86707.html