SlideShare a Scribd company logo
1 of 24
Download to read offline
A2.2 Arion 640-510 – 09.2008 – GB
Cylinder head and valves
Locally made tool
Injector coupling puller
A = 23 mm
B = 15 mm
C = 50 mm
D = 20 mm
E = 22 x 250 mm
F = 180 mm (Subhead)
134hsm06 Fig. 1
Rocker caliper
A = 3 mm
B = 15 mm
C = 50 mm
324hsm97 Fig. 2
F
E
C
D
B
A
C
B
A
Arion 640-510 – 09.2008 – GB A2.3
Cylinder head and valves
Inspecting valve bridges
– Clean the valve bridges and check they are not
damaged.
– Measure the boreholes of the valve bridges (A) and
check that the gap between one bore and another does
not exceed the value specified.
Maximum gap between bores...............................0,1 mm
134hsm07 Fig. 3
Inspecting the rocker pin
Note: Mark the location of the rockers when removing
in order to facilitate refitting.
– Remove the caps (A) only to change them or to clean
the rocker axis.
– Disassemble and search for traces of wear or damage.
Change all parts which are damaged or non compliant
with specifications.
134hsm08 Fig. 4
Outer diameter of the axis ................19,962 - 20,038 mm
Wear limit..........................................................19,91 mm
134hsm09 Fig. 5
A
A
A2.4 Arion 640-510 – 09.2008 – GB
Cylinder head and valves
Inner diameter of the rocker..............20,065 - 20,115 mm
Wear limit..........................................................20,16 mm
134hsm10 Fig. 6
Inspecting the rockers
– Remove and clean the rockers (A). Mark them for
refitting.
134hsm11 Fig. 7
– Measure the outer diameter of the rockers. If it is below
the value recommended, change it.
Specified value:
Rocker outer diameter ..........................31,61 - 31,64 mm
– Measure rocker clearance in the bore.
Specified value:
Bore diameter
(in the block) .........................................31,70 - 31,75 mm
Rocker and borehole clearance................0,06 - 0,13 mm
– Check the head on the rocker journals. If it is flat or
concave, change the rocker and check the camshaft
lobes.
134hsm12 Fig. 8
A
Arion 640-510 – 09.2008 – GB A2.5
Cylinder head and valves
Measuring valve shrinkage
Measurements must be made at a maximum distance of
3 mm from the edge of the valve head.
– Compare the measurements (A) between the 2 inlet
and exhaust valves. Check that the gap does not exceed
the value specified.
Note: If a cylinder has uneven valve wear, check the
gap of boreholes on valve bridges.
Specified value:
• Intake valve
Shrinkage in the cylinder head .................0,77 - 1,27 mm
Wear limit............................................................1,77 mm
• Exhaust valve
Shrinkage in the cylinder head .................0,81 - 1,31 mm
Wear limit............................................................1,81 mm
Maximum gap for a pair of valves per
cylinder........................ .........................................0,3 mm
131hsm33 Fig. 9
Cylinder head flatness
– Check cylinder head flatness using a precision rule and
a set of shims. Check along the length, across and in
diagonal in several locations.
Specified value:
Maximum acceptable straightness error over the entire
length or width ....................................................0,08 mm
Maximum acceptable straightness error over the entire
length of 150 mm................................................0,03 mm
Note: If the straightness error exceeds the values
specified, rectify or change the cylinder head.
132hsm05 Fig. 10
A
A2.6 Arion 640-510 – 09.2008 – GB
Cylinder head and valves
Measuring cylinder head thickness
– Measure the cylinder head's thickness between the
parting of the cylinder head cover riser and the
combustion reaching.
Specified value:
New cylinder head ............................104,87 - 105,13 mm
Minimum acceptable cylinder head thickness 104,24 mm
Maximum ripple depth ......................................0,012 mm
Maximum material which can be removed when rectifying
0,76 mm
Note: If the cylinder head thickness is below the
minimum acceptable, do not rectify. Change the
cylinder head.
Important: Check cylinder head flatness using a
precision rule and a set of shims.
Valve guide measurement
– Measure wear on the valve guides.
Specified value:
Diameter of the valve guide borehole...............................
7,025 - 7,051 mm
Clearance between rod and guide
– Intake.................................................0,012 - 0,064 mm
– Exhaust..............................................0,025 - 0,077 mm
Wear limit between stem and guide....................0,15 mm
132hsm06 Fig. 11
132hsm07 Fig. 12
Arion 640-510 – 09.2008 – GB A2.7
Cylinder head and valves
Measuring the valve seat bore in the
cylinder head
If the dimensions of the boreholes do not comply with the
values specified, machine the cylinder head according to
the values.
Specified value:
• Seat insert valve borehole
– Exhaust
A. 36,436 - 36,462 mm.
B. Reference 2,34 mm.
C. 8,715 - 8,785 mm.
D. 38 - 42°.
E. Maximum radius 0,5 mm.
– Intake
A. 37,436 - 37,462 mm.
B. Reference 2,8 mm.
C. 9,715 - 9,785 mm.
D. 38 - 42°.
E. Maximum radius 0,5 mm.
Changing the outer diameter of seat insert valve
boreholes.
– Exhaust..........................................36,487 - 36,513 mm
– Intake.............................................37,487 - 37,513 mm
Measuring the valve springs
Check spring tension using a spring compression device.
Idle length .........................................................46,15 mm
Specified value:
Height comrpessed, spring tension............................. .46
mm from 18 to 27 N
Spring compressed at 166 N ............................37,21 mm
Spring compressed at 356 N ............................27,01 mm
132hsm08 Fig. 13
131hsm34 Fig. 14
A2.8 Arion 640-510 – 09.2008 – GB
Cylinder head and valves
Measuring the valves
– Clean and inspect the valves, the valve stems, the tips
of the stems and the retaining groove (A).
Specified value:
• Valve head diameter
– Intake.................................................36,87 - 37,13 mm
– Exhaust..............................................35,87 - 36,13 mm
Note: The intake valves have a larger outer diameter
and are recognized by a raised letter "O".
131hsm35 Fig. 15
131hsm36 Fig. 16
• Valve stem diameter
– Intake.................................................6,987 - 7,013 mm
– Exhaust..............................................6,984 - 7,000 mm
• Maximum ovalization
– Inlet and exhaust ...........................................0,038 mm
131hsm37 Fig. 17
A
0
Arion 640-510 – 11.2014 – EN A2.9
Cylinder head and valves
Check of the belt and the tensioner
spring
– Loosen and remove the tensioner belt.
– Loosen the tensioner and plot a mark (A).
– Measure 21 mm from (A) and make a mark (B).
– Using a torque wrench, align the 2 marks.
– The spring's tension must be 1,8 to 2,2 daN·m.
– Change the tensioner if required.
251msm04 Fig. 18
A
B
A2.10 Arion 640-510 – 09.2008 – GB
Cylinder head and valves
Removing the alternator and its bracket
– Disconnect the battery.
– Disconnect the alternator connections.
– Remove the alternator (A).
– Loosen the fastening screws on the bracket (B) and
pull it.
260hsm00 Fig. 21
Description
1 Pneumatic braking version (175 A alternator).
A B
1
Arion 640-510 – 09.2008 – GB A2.11
Cylinder head and valves
260msm00 Fig. 22
Description
2 Pneumatic braking version (120 A alternator).
260msm01 Fig. 23
Description
3 Version without air braking (120 and 175 ampere alternator).
A
B
2
B
A
3
A2.12 Arion 640-510 – 09.2008 – GB
Cylinder head and valves
Refitting the alternator and bracket
– Refit the alternator bracket (B).
– Tighten the screws to a torque of 7 daN.m.
– Refit the alternator (A).
Note: If the alternator pulley was removed, tighten the screw at a torque of 5 daN.m.
Removing the viscouc coupling
– Remove the screws from the radiator nozzle (A).
Note: The viscous coupler thread on the hub is a left-
hand thread.
– Using a pin wrench, hold the hub (B) and loosen the
viscous coupler (C) and remove it.
Refitting the viscous coupling
Note: The viscous coupler thread on the hub is a left-
hand thread.
– Refit the viscous coupler (C) on the hub (B).
– Using a pin wrench, tighten the viscous coupler at a
torque of 9 daN.m.
253hsm00 Fig. 24
C
B
A
Arion 640-510 – 09.2008 – GB A2.13
Cylinder head and valves
Removing the fan hub and bracket
251hsm29 Fig. 25
– Loosen the drive belt using the tensioner (A) and
remove it.
– Remove the hub of the viscous coupler (B).
– Remove the (C) pulley.
– Remove the pulley hub and its bracket (D).
Refitting the fan hub and bracket
– Refit the fan bracket and hub (D). Tighten the screws to
a torque of 7 daN.m.
– Refit the viscous coupler pulley (C) and hub (B).
Tighten the screws to a torque of 7 daN.m.
– Position the belt. Tighten the belt using the tensioner
(A).
C
B
D
A
A2.14 Arion 640-510 – 09.2008 – GB
Cylinder head and valves
Removing the turbocharger
Important: Let the exhaust circuit cool down before
removing the turbocharger.
Note: Carefully clean the outside of the turbocharger
and the surrounding area.
– Remove the air intake and exhaust ducts.
– Remove the coolant ducts (A).
– Disconnect electrical connections.
– Disconnect the oil inlet duct on the level of the oil filter
head (B).
– Disconnect the oil return duct (C).
– Unscrew the 4 screws (D) of the exhaust manifold and
remove the turbocharger.
Refitting the turbocharger
Important: Fill the oil return hole with clean motor oil
and turn the turbocharger by hand.
– Position the turbocharger onto the exhaust manifold
with a new gasket. Tighten the screws (D) to a torque of
7 daN.m.
– Connect the oil, air and coolant ducts.
– Connect the electric connections.
142hsm04 Fig. 26
142hsm00 Fig. 27
142hsm05 Fig. 28
D
C
A
B
Arion 640-510 – 09.2008 – GB A2.15
Cylinder head and valves
Removing the turbocharger rod
linkage
Note: Proceed with caution when tightening or
loosening the linkage screws as the screws are
fragile.
– Remove the screw (A) from the actuator linkage.
– Remove the screw (B) from the turbocharger linkage.
– Remove the linkage.
142hsm06 Fig. 29
Refitting the turbocharger linkage
Note: Proceed with caution when tightening or
loosening the linkage screws as the screws are
fragile.
– Position the linkage on the flat of the turbocharger axis
and the actuator.
– Tighten the screws (A) and (B) by hand.
– Use a wrench to hold the linkage. Tighten the
screws (A), (B) to a torque of 0,7 daN.m.
– Check that the linkage moves freely.
Otherwise readjust.
Important: Initialize the turbocharger module using
Métadiag© 2007.
142hsm07 Fig. 30
142hsm08 Fig. 31
A
B
A
B
A2.16 Arion 640-510 – 09.2008 – GB
Cylinder head and valves
Removing the exhaust manifold
– Remove the turbocharger (the turbocharger can be
removed with the exhaust manifold).
– Remove the oil return hose (C).
– Remove the exhaust manifold (A).
– Remove the exhaust connecting sleeves (B). Check
the sleeves.
142hsm09 Fig. 32
142hsm10 Fig. 33
Refitting the exhaust manifold
– Refit the exhaust connecting sleeves.
– Use centering studs to refit the exhaust manifold.
– Tighten the screws (D) of the cylinders 3 and 4 initially
at a torque of 7 daN.m.
142hsm11 Fig. 34
A C
B
D
Arion 640-510 – 09.2008 – GB A2.17
Cylinder head and valves
Removing the cooler and ducts
"EGR"
– Remove the screws (A). Remove the exhaust duct
"EGR" (B).
– Remove the cooling duct (C) by removing the screw (D)
and collar (E).
– Remove the cooler "EGR".
– Remove screw (G). Remove the coolant ducts (F).
Refitting the cooler and ducts "EGR"
– Refit the coolant duct (F). Replace the seals if required.
– Refit the cooler "EGR". Tighten the screw (G) to a
torque of 3,5 daN.m.
– Refit the coolant duct (C). Refit the collar (E).
– Tighten the screw (D) to a torque of 3,5 daN.m.
142hsm12 Fig. 35
142hsm13 Fig. 36
142hsm14 Fig. 37
A
C
E
B
D
G
F
A2.18 Arion 640-510 – 09.2008 – GB
Cylinder head and valves
254hsm02 Fig. 39
Removing the thermostat cover
– Remove the screws (A). Remove the cover.
– Mark the position of the thermostats and remove them.
Refitting the thermostat cover
– Change the gaskets of the thermostats (B).
– Position the thermostats at their original location.
– Refit the cover. Tighten the screws (A) to a torque of
4,7 daN.m.
254hsm03 Fig. 38
A
A
B
Arion 640-510 – 09.2008 – GB A2.19
Cylinder head and valves
254hsm05 Fig. 41
Removing the thermostat manifold
– Remove the screws from the coolant duct (A).
– Remove the screws (B) from the manifold and remove
the manifold.
Refitting the thermostat cover
Note: Replace the seals.
– Refit the air intake manifold (C). Tighten the screws (B)
to a torque of 7 daN.m.
– Position the coolant ducts (A) on the cylinder head.
Tighten the screws (D) to a torque of 7 daN.m.
254hsm04 Fig. 40
A
B
A
A
C
B
D
A2.20 Arion 640-510 – 09.2008 – GB
Cylinder head and valves
Removing the cylinder head cover
– Remove the caps (A) and the screws (B) from the cylinder head cover.
133hsm01 Fig. 42
– Remove the rocker cover (C).
133hsm00 Fig. 43
A
B
C
C
Arion 640-510 – 09.2008 – GB A2.21
Cylinder head and valves
133hsm03 Fig. 45
Refitting the cylinder head cover
Important: change the sealing gasket (A) whenever
removing the cylinder head cover.
– Fit the cylinder head cover (B).
– Fit the screws (C) and the O-rings (D). Tighten to
0,7 daN.m.
– Fit the caps (E).
133hsm02 Fig. 44
A
E
C
D
B
Thank you very much for
your reading. Please Click
Here. Then Get COMPLETE
MANUAL. NO WAITING
NOTE:
If there is no response to
click on the link above,
please download the PDF
document first and then
click on it.
A2.22 Arion 640-510 – 09.2008 – GB
Cylinder head and valves
Removing the rocker arm assembly
– Install the 6 locally made U-bolts (A) to hold the
rockers. See page 2 Locally made tool.
– Untighten the screws (B) and (C). Loosen the screws
on the flanges (D).
– Remove the bearings *1.
– Removing the valve rocker shaft assembly and push
rods (E). Mark the location of the rockers when removing
in order to facilitate refitting. Remove the bridges (F).
134hsm13 Fig. 46
134hsm14 Fig. 47
134hsm15 Fig. 48
D
A
B
C
A
E
F
Arion 640-510 – 09.2008 – GB A2.23
Cylinder head and valves
Refitting the rocker shaft
Important: Loosen the rocker adjustment screws to
prevent damaging the rocker axis.
– Fit the bridges (A) while positioning the hole (B) on the
exhaust manifold side.
– Fit the rocker arm assembly.
– Lubricate the rockers using clean motor oil.
– Coat the screws (C), (D) lightly with Loctite (243).
– Fit the shim (E) and locking screw (D).
– Fit a new O-ring (F). Fit the bearing (G) and screw (C).
– Fit the flanges of the rocker arm assembly. Tighten the
screws (H) to a torque of 6 daN.m.
– Remove the U-bolts.
– Tighten the screws (C), (D) to a torque of 3 daN.m.
134hsm16 Fig. 49
134hsm17 Fig. 50
134hsm18 Fig. 51 134hsm19 Fig. 52
A
B
A
C
G
F
D
E
H
A2.24 Arion 640-510 – 09.2008 – GB
Cylinder head and valves
Adjusting the valve rockers
Note: This check must be performed on a cold engine.
– Remove the plastic cover covering the rotation hole (A)
and the timing hole (B).
– Use tool n°60 05 005 528 to turn the engine in the
running direction, until cylinder 1 (timing side) reaches
top dead center of its compression stroke.
– Fit the timing gauge n° 60 05 005 576.
Note: If piston n°1 is at tope dead center of its
compression stroke, the rockers have play.
134hsm20 Fig. 53
– Check and adjust the rockers.
Inlet valves: 0,36 mm.
Exhaust valves: 0,46 mm.
– If adjusting the rockers is required, loosen the locknut
(D). Turn the adjustment screw (C) until the shim slides
with a slight resistance. Hold the adjustment screw (C).
Tighten the nut (A) to a torque of 2,7 daN.m.
– Check clearance.
134hsm21 Fig. 54
B
A
D
C

More Related Content

More from fhsejkdkmen

Massey ferguson gc2410 compact tractors parts catalogue manual
Massey ferguson gc2410 compact tractors parts catalogue manualMassey ferguson gc2410 compact tractors parts catalogue manual
Massey ferguson gc2410 compact tractors parts catalogue manualfhsejkdkmen
 
Massey ferguson gc2400 compact tractors parts catalogue manual
Massey ferguson gc2400 compact tractors parts catalogue manualMassey ferguson gc2400 compact tractors parts catalogue manual
Massey ferguson gc2400 compact tractors parts catalogue manualfhsejkdkmen
 
Massey ferguson gc2310 tractor (prior sn jna25201) parts catalogue manual (pa...
Massey ferguson gc2310 tractor (prior sn jna25201) parts catalogue manual (pa...Massey ferguson gc2310 tractor (prior sn jna25201) parts catalogue manual (pa...
Massey ferguson gc2310 tractor (prior sn jna25201) parts catalogue manual (pa...fhsejkdkmen
 
Massey ferguson gc2310 tractor (eff sn jna25201) parts catalogue manual
Massey ferguson gc2310 tractor (eff sn jna25201) parts catalogue manualMassey ferguson gc2310 tractor (eff sn jna25201) parts catalogue manual
Massey ferguson gc2310 tractor (eff sn jna25201) parts catalogue manualfhsejkdkmen
 
Massey ferguson gc2300 tractor (prior sn jna25201) parts catalogue manual (pa...
Massey ferguson gc2300 tractor (prior sn jna25201) parts catalogue manual (pa...Massey ferguson gc2300 tractor (prior sn jna25201) parts catalogue manual (pa...
Massey ferguson gc2300 tractor (prior sn jna25201) parts catalogue manual (pa...fhsejkdkmen
 
Massey ferguson gc2300 tractor (eff sn jna25201) parts catalogue manual
Massey ferguson gc2300 tractor (eff sn jna25201) parts catalogue manualMassey ferguson gc2300 tractor (eff sn jna25201) parts catalogue manual
Massey ferguson gc2300 tractor (eff sn jna25201) parts catalogue manualfhsejkdkmen
 
Massey ferguson 8680 combine parts catalogue manual
Massey ferguson 8680 combine parts catalogue manualMassey ferguson 8680 combine parts catalogue manual
Massey ferguson 8680 combine parts catalogue manualfhsejkdkmen
 
Massey ferguson 1750 m compact tractor parts catalogue manual
Massey ferguson 1750 m compact tractor parts catalogue manualMassey ferguson 1750 m compact tractor parts catalogue manual
Massey ferguson 1750 m compact tractor parts catalogue manualfhsejkdkmen
 
Massey ferguson 1660 compact tractor parts catalogue manual
Massey ferguson 1660 compact tractor parts catalogue manualMassey ferguson 1660 compact tractor parts catalogue manual
Massey ferguson 1660 compact tractor parts catalogue manualfhsejkdkmen
 
Massey ferguson 1643 compact tractor parts catalogue manual
Massey ferguson 1643 compact tractor parts catalogue manualMassey ferguson 1643 compact tractor parts catalogue manual
Massey ferguson 1643 compact tractor parts catalogue manualfhsejkdkmen
 
Massey ferguson 1552 compact tractor parts catalogue manual
Massey ferguson 1552 compact tractor parts catalogue manualMassey ferguson 1552 compact tractor parts catalogue manual
Massey ferguson 1552 compact tractor parts catalogue manualfhsejkdkmen
 
Claas axos 340 310 (type a22) tractor service repair manual
Claas axos 340 310 (type a22) tractor service repair manualClaas axos 340 310 (type a22) tractor service repair manual
Claas axos 340 310 (type a22) tractor service repair manualfhsejkdkmen
 
Claas atles 946 926 rz (type a01) tractor service repair manual
Claas atles 946 926 rz (type a01) tractor service repair manualClaas atles 946 926 rz (type a01) tractor service repair manual
Claas atles 946 926 rz (type a01) tractor service repair manualfhsejkdkmen
 
Claas arion 640 c (type a20) tractor service repair manual
Claas arion 640 c (type a20) tractor service repair manualClaas arion 640 c (type a20) tractor service repair manual
Claas arion 640 c (type a20) tractor service repair manualfhsejkdkmen
 
Claas arion 630 c (type a20) tractor service repair manual
Claas arion 630 c (type a20) tractor service repair manualClaas arion 630 c (type a20) tractor service repair manual
Claas arion 630 c (type a20) tractor service repair manualfhsejkdkmen
 
Claas arion 630 (type a19) tractor service repair manual
Claas arion 630 (type a19) tractor service repair manualClaas arion 630 (type a19) tractor service repair manual
Claas arion 630 (type a19) tractor service repair manualfhsejkdkmen
 
Claas arion 620 c (type a20) tractor service repair manual
Claas arion 620 c (type a20) tractor service repair manualClaas arion 620 c (type a20) tractor service repair manual
Claas arion 620 c (type a20) tractor service repair manualfhsejkdkmen
 
Claas arion 620 (type a19) tractor service repair manual
Claas arion 620 (type a19) tractor service repair manualClaas arion 620 (type a19) tractor service repair manual
Claas arion 620 (type a19) tractor service repair manualfhsejkdkmen
 
Claas arion 610 c (type a20) tractor service repair manual
Claas arion 610 c (type a20) tractor service repair manualClaas arion 610 c (type a20) tractor service repair manual
Claas arion 610 c (type a20) tractor service repair manualfhsejkdkmen
 
Claas arion 610 (type a19) tractor service repair manual
Claas arion 610 (type a19) tractor service repair manualClaas arion 610 (type a19) tractor service repair manual
Claas arion 610 (type a19) tractor service repair manualfhsejkdkmen
 

More from fhsejkdkmen (20)

Massey ferguson gc2410 compact tractors parts catalogue manual
Massey ferguson gc2410 compact tractors parts catalogue manualMassey ferguson gc2410 compact tractors parts catalogue manual
Massey ferguson gc2410 compact tractors parts catalogue manual
 
Massey ferguson gc2400 compact tractors parts catalogue manual
Massey ferguson gc2400 compact tractors parts catalogue manualMassey ferguson gc2400 compact tractors parts catalogue manual
Massey ferguson gc2400 compact tractors parts catalogue manual
 
Massey ferguson gc2310 tractor (prior sn jna25201) parts catalogue manual (pa...
Massey ferguson gc2310 tractor (prior sn jna25201) parts catalogue manual (pa...Massey ferguson gc2310 tractor (prior sn jna25201) parts catalogue manual (pa...
Massey ferguson gc2310 tractor (prior sn jna25201) parts catalogue manual (pa...
 
Massey ferguson gc2310 tractor (eff sn jna25201) parts catalogue manual
Massey ferguson gc2310 tractor (eff sn jna25201) parts catalogue manualMassey ferguson gc2310 tractor (eff sn jna25201) parts catalogue manual
Massey ferguson gc2310 tractor (eff sn jna25201) parts catalogue manual
 
Massey ferguson gc2300 tractor (prior sn jna25201) parts catalogue manual (pa...
Massey ferguson gc2300 tractor (prior sn jna25201) parts catalogue manual (pa...Massey ferguson gc2300 tractor (prior sn jna25201) parts catalogue manual (pa...
Massey ferguson gc2300 tractor (prior sn jna25201) parts catalogue manual (pa...
 
Massey ferguson gc2300 tractor (eff sn jna25201) parts catalogue manual
Massey ferguson gc2300 tractor (eff sn jna25201) parts catalogue manualMassey ferguson gc2300 tractor (eff sn jna25201) parts catalogue manual
Massey ferguson gc2300 tractor (eff sn jna25201) parts catalogue manual
 
Massey ferguson 8680 combine parts catalogue manual
Massey ferguson 8680 combine parts catalogue manualMassey ferguson 8680 combine parts catalogue manual
Massey ferguson 8680 combine parts catalogue manual
 
Massey ferguson 1750 m compact tractor parts catalogue manual
Massey ferguson 1750 m compact tractor parts catalogue manualMassey ferguson 1750 m compact tractor parts catalogue manual
Massey ferguson 1750 m compact tractor parts catalogue manual
 
Massey ferguson 1660 compact tractor parts catalogue manual
Massey ferguson 1660 compact tractor parts catalogue manualMassey ferguson 1660 compact tractor parts catalogue manual
Massey ferguson 1660 compact tractor parts catalogue manual
 
Massey ferguson 1643 compact tractor parts catalogue manual
Massey ferguson 1643 compact tractor parts catalogue manualMassey ferguson 1643 compact tractor parts catalogue manual
Massey ferguson 1643 compact tractor parts catalogue manual
 
Massey ferguson 1552 compact tractor parts catalogue manual
Massey ferguson 1552 compact tractor parts catalogue manualMassey ferguson 1552 compact tractor parts catalogue manual
Massey ferguson 1552 compact tractor parts catalogue manual
 
Claas axos 340 310 (type a22) tractor service repair manual
Claas axos 340 310 (type a22) tractor service repair manualClaas axos 340 310 (type a22) tractor service repair manual
Claas axos 340 310 (type a22) tractor service repair manual
 
Claas atles 946 926 rz (type a01) tractor service repair manual
Claas atles 946 926 rz (type a01) tractor service repair manualClaas atles 946 926 rz (type a01) tractor service repair manual
Claas atles 946 926 rz (type a01) tractor service repair manual
 
Claas arion 640 c (type a20) tractor service repair manual
Claas arion 640 c (type a20) tractor service repair manualClaas arion 640 c (type a20) tractor service repair manual
Claas arion 640 c (type a20) tractor service repair manual
 
Claas arion 630 c (type a20) tractor service repair manual
Claas arion 630 c (type a20) tractor service repair manualClaas arion 630 c (type a20) tractor service repair manual
Claas arion 630 c (type a20) tractor service repair manual
 
Claas arion 630 (type a19) tractor service repair manual
Claas arion 630 (type a19) tractor service repair manualClaas arion 630 (type a19) tractor service repair manual
Claas arion 630 (type a19) tractor service repair manual
 
Claas arion 620 c (type a20) tractor service repair manual
Claas arion 620 c (type a20) tractor service repair manualClaas arion 620 c (type a20) tractor service repair manual
Claas arion 620 c (type a20) tractor service repair manual
 
Claas arion 620 (type a19) tractor service repair manual
Claas arion 620 (type a19) tractor service repair manualClaas arion 620 (type a19) tractor service repair manual
Claas arion 620 (type a19) tractor service repair manual
 
Claas arion 610 c (type a20) tractor service repair manual
Claas arion 610 c (type a20) tractor service repair manualClaas arion 610 c (type a20) tractor service repair manual
Claas arion 610 c (type a20) tractor service repair manual
 
Claas arion 610 (type a19) tractor service repair manual
Claas arion 610 (type a19) tractor service repair manualClaas arion 610 (type a19) tractor service repair manual
Claas arion 610 (type a19) tractor service repair manual
 

Recently uploaded

(办理学位证)(Toledo毕业证)托莱多大学毕业证成绩单修改留信学历认证原版一模一样
(办理学位证)(Toledo毕业证)托莱多大学毕业证成绩单修改留信学历认证原版一模一样(办理学位证)(Toledo毕业证)托莱多大学毕业证成绩单修改留信学历认证原版一模一样
(办理学位证)(Toledo毕业证)托莱多大学毕业证成绩单修改留信学历认证原版一模一样gfghbihg
 
call girls in G.T.B. Nagar (DELHI) 🔝 >༒9953330565🔝 genuine Escort Service 🔝✔️✔️
call girls in  G.T.B. Nagar (DELHI) 🔝 >༒9953330565🔝 genuine Escort Service 🔝✔️✔️call girls in  G.T.B. Nagar (DELHI) 🔝 >༒9953330565🔝 genuine Escort Service 🔝✔️✔️
call girls in G.T.B. Nagar (DELHI) 🔝 >༒9953330565🔝 genuine Escort Service 🔝✔️✔️9953056974 Low Rate Call Girls In Saket, Delhi NCR
 
办理学位证(MLU文凭证书)哈勒 维滕贝格大学毕业证成绩单原版一模一样
办理学位证(MLU文凭证书)哈勒 维滕贝格大学毕业证成绩单原版一模一样办理学位证(MLU文凭证书)哈勒 维滕贝格大学毕业证成绩单原版一模一样
办理学位证(MLU文凭证书)哈勒 维滕贝格大学毕业证成绩单原版一模一样umasea
 
907MTAMount Coventry University Bachelor's Diploma in Engineering
907MTAMount Coventry University Bachelor's Diploma in Engineering907MTAMount Coventry University Bachelor's Diploma in Engineering
907MTAMount Coventry University Bachelor's Diploma in EngineeringFi sss
 
UNIT-IV-STEERING, BRAKES AND SUSPENSION SYSTEMS.pptx
UNIT-IV-STEERING, BRAKES AND SUSPENSION SYSTEMS.pptxUNIT-IV-STEERING, BRAKES AND SUSPENSION SYSTEMS.pptx
UNIT-IV-STEERING, BRAKES AND SUSPENSION SYSTEMS.pptxDineshKumar4165
 
Call Girl Service Global Village Dubai +971509430017 Independent Call Girls G...
Call Girl Service Global Village Dubai +971509430017 Independent Call Girls G...Call Girl Service Global Village Dubai +971509430017 Independent Call Girls G...
Call Girl Service Global Village Dubai +971509430017 Independent Call Girls G...kexey39068
 
Call Girls Vastrapur 7397865700 Ridhima Hire Me Full Night
Call Girls Vastrapur 7397865700 Ridhima Hire Me Full NightCall Girls Vastrapur 7397865700 Ridhima Hire Me Full Night
Call Girls Vastrapur 7397865700 Ridhima Hire Me Full Nightssuser7cb4ff
 
Independent Andheri Call Girls 9833363713
Independent Andheri Call Girls 9833363713Independent Andheri Call Girls 9833363713
Independent Andheri Call Girls 9833363713Komal Khan
 
VIP Kolkata Call Girl Kasba 👉 8250192130 Available With Room
VIP Kolkata Call Girl Kasba 👉 8250192130  Available With RoomVIP Kolkata Call Girl Kasba 👉 8250192130  Available With Room
VIP Kolkata Call Girl Kasba 👉 8250192130 Available With Roomdivyansh0kumar0
 
如何办理(UQ毕业证书)昆士兰大学毕业证毕业证成绩单原版一比一
如何办理(UQ毕业证书)昆士兰大学毕业证毕业证成绩单原版一比一如何办理(UQ毕业证书)昆士兰大学毕业证毕业证成绩单原版一比一
如何办理(UQ毕业证书)昆士兰大学毕业证毕业证成绩单原版一比一hnfusn
 
꧁༒☬ 7042364481 (Call Girl) In Dwarka Delhi Escort Service In Delhi Ncr☬༒꧂
꧁༒☬ 7042364481 (Call Girl) In Dwarka Delhi Escort Service In Delhi Ncr☬༒꧂꧁༒☬ 7042364481 (Call Girl) In Dwarka Delhi Escort Service In Delhi Ncr☬༒꧂
꧁༒☬ 7042364481 (Call Girl) In Dwarka Delhi Escort Service In Delhi Ncr☬༒꧂Hot Call Girls In Sector 58 (Noida)
 
Russian Call Girls Delhi Indirapuram {9711199171} Aarvi Gupta ✌️Independent ...
Russian  Call Girls Delhi Indirapuram {9711199171} Aarvi Gupta ✌️Independent ...Russian  Call Girls Delhi Indirapuram {9711199171} Aarvi Gupta ✌️Independent ...
Russian Call Girls Delhi Indirapuram {9711199171} Aarvi Gupta ✌️Independent ...shivangimorya083
 
What Could Cause A VW Tiguan's Radiator Fan To Stop Working
What Could Cause A VW Tiguan's Radiator Fan To Stop WorkingWhat Could Cause A VW Tiguan's Radiator Fan To Stop Working
What Could Cause A VW Tiguan's Radiator Fan To Stop WorkingEscondido German Auto
 
UNOSAFE ELEVATOR PRIVATE LTD BANGALORE BROUCHER
UNOSAFE ELEVATOR PRIVATE LTD BANGALORE BROUCHERUNOSAFE ELEVATOR PRIVATE LTD BANGALORE BROUCHER
UNOSAFE ELEVATOR PRIVATE LTD BANGALORE BROUCHERunosafeads
 
UNIT-V-ELECTRIC AND HYBRID VEHICLES.pptx
UNIT-V-ELECTRIC AND HYBRID VEHICLES.pptxUNIT-V-ELECTRIC AND HYBRID VEHICLES.pptx
UNIT-V-ELECTRIC AND HYBRID VEHICLES.pptxDineshKumar4165
 
原版工艺美国普林斯顿大学毕业证Princeton毕业证成绩单修改留信学历认证
原版工艺美国普林斯顿大学毕业证Princeton毕业证成绩单修改留信学历认证原版工艺美国普林斯顿大学毕业证Princeton毕业证成绩单修改留信学历认证
原版工艺美国普林斯顿大学毕业证Princeton毕业证成绩单修改留信学历认证jjrehjwj11gg
 
2024 TOP 10 most fuel-efficient vehicles according to the US agency
2024 TOP 10 most fuel-efficient vehicles according to the US agency2024 TOP 10 most fuel-efficient vehicles according to the US agency
2024 TOP 10 most fuel-efficient vehicles according to the US agencyHyundai Motor Group
 

Recently uploaded (20)

(办理学位证)(Toledo毕业证)托莱多大学毕业证成绩单修改留信学历认证原版一模一样
(办理学位证)(Toledo毕业证)托莱多大学毕业证成绩单修改留信学历认证原版一模一样(办理学位证)(Toledo毕业证)托莱多大学毕业证成绩单修改留信学历认证原版一模一样
(办理学位证)(Toledo毕业证)托莱多大学毕业证成绩单修改留信学历认证原版一模一样
 
call girls in G.T.B. Nagar (DELHI) 🔝 >༒9953330565🔝 genuine Escort Service 🔝✔️✔️
call girls in  G.T.B. Nagar (DELHI) 🔝 >༒9953330565🔝 genuine Escort Service 🔝✔️✔️call girls in  G.T.B. Nagar (DELHI) 🔝 >༒9953330565🔝 genuine Escort Service 🔝✔️✔️
call girls in G.T.B. Nagar (DELHI) 🔝 >༒9953330565🔝 genuine Escort Service 🔝✔️✔️
 
办理学位证(MLU文凭证书)哈勒 维滕贝格大学毕业证成绩单原版一模一样
办理学位证(MLU文凭证书)哈勒 维滕贝格大学毕业证成绩单原版一模一样办理学位证(MLU文凭证书)哈勒 维滕贝格大学毕业证成绩单原版一模一样
办理学位证(MLU文凭证书)哈勒 维滕贝格大学毕业证成绩单原版一模一样
 
907MTAMount Coventry University Bachelor's Diploma in Engineering
907MTAMount Coventry University Bachelor's Diploma in Engineering907MTAMount Coventry University Bachelor's Diploma in Engineering
907MTAMount Coventry University Bachelor's Diploma in Engineering
 
UNIT-IV-STEERING, BRAKES AND SUSPENSION SYSTEMS.pptx
UNIT-IV-STEERING, BRAKES AND SUSPENSION SYSTEMS.pptxUNIT-IV-STEERING, BRAKES AND SUSPENSION SYSTEMS.pptx
UNIT-IV-STEERING, BRAKES AND SUSPENSION SYSTEMS.pptx
 
Call Girl Service Global Village Dubai +971509430017 Independent Call Girls G...
Call Girl Service Global Village Dubai +971509430017 Independent Call Girls G...Call Girl Service Global Village Dubai +971509430017 Independent Call Girls G...
Call Girl Service Global Village Dubai +971509430017 Independent Call Girls G...
 
Call Girls Vastrapur 7397865700 Ridhima Hire Me Full Night
Call Girls Vastrapur 7397865700 Ridhima Hire Me Full NightCall Girls Vastrapur 7397865700 Ridhima Hire Me Full Night
Call Girls Vastrapur 7397865700 Ridhima Hire Me Full Night
 
Independent Andheri Call Girls 9833363713
Independent Andheri Call Girls 9833363713Independent Andheri Call Girls 9833363713
Independent Andheri Call Girls 9833363713
 
VIP Kolkata Call Girl Kasba 👉 8250192130 Available With Room
VIP Kolkata Call Girl Kasba 👉 8250192130  Available With RoomVIP Kolkata Call Girl Kasba 👉 8250192130  Available With Room
VIP Kolkata Call Girl Kasba 👉 8250192130 Available With Room
 
如何办理(UQ毕业证书)昆士兰大学毕业证毕业证成绩单原版一比一
如何办理(UQ毕业证书)昆士兰大学毕业证毕业证成绩单原版一比一如何办理(UQ毕业证书)昆士兰大学毕业证毕业证成绩单原版一比一
如何办理(UQ毕业证书)昆士兰大学毕业证毕业证成绩单原版一比一
 
꧁༒☬ 7042364481 (Call Girl) In Dwarka Delhi Escort Service In Delhi Ncr☬༒꧂
꧁༒☬ 7042364481 (Call Girl) In Dwarka Delhi Escort Service In Delhi Ncr☬༒꧂꧁༒☬ 7042364481 (Call Girl) In Dwarka Delhi Escort Service In Delhi Ncr☬༒꧂
꧁༒☬ 7042364481 (Call Girl) In Dwarka Delhi Escort Service In Delhi Ncr☬༒꧂
 
sauth delhi call girls in Connaught Place🔝 9953056974 🔝 escort Service
sauth delhi call girls in  Connaught Place🔝 9953056974 🔝 escort Servicesauth delhi call girls in  Connaught Place🔝 9953056974 🔝 escort Service
sauth delhi call girls in Connaught Place🔝 9953056974 🔝 escort Service
 
Hot Sexy call girls in Pira Garhi🔝 9953056974 🔝 escort Service
Hot Sexy call girls in Pira Garhi🔝 9953056974 🔝 escort ServiceHot Sexy call girls in Pira Garhi🔝 9953056974 🔝 escort Service
Hot Sexy call girls in Pira Garhi🔝 9953056974 🔝 escort Service
 
Russian Call Girls Delhi Indirapuram {9711199171} Aarvi Gupta ✌️Independent ...
Russian  Call Girls Delhi Indirapuram {9711199171} Aarvi Gupta ✌️Independent ...Russian  Call Girls Delhi Indirapuram {9711199171} Aarvi Gupta ✌️Independent ...
Russian Call Girls Delhi Indirapuram {9711199171} Aarvi Gupta ✌️Independent ...
 
What Could Cause A VW Tiguan's Radiator Fan To Stop Working
What Could Cause A VW Tiguan's Radiator Fan To Stop WorkingWhat Could Cause A VW Tiguan's Radiator Fan To Stop Working
What Could Cause A VW Tiguan's Radiator Fan To Stop Working
 
Call Girls In Kirti Nagar 📱 9999965857 🤩 Delhi 🫦 HOT AND SEXY VVIP 🍎 SERVICE
Call Girls In Kirti Nagar 📱  9999965857  🤩 Delhi 🫦 HOT AND SEXY VVIP 🍎 SERVICECall Girls In Kirti Nagar 📱  9999965857  🤩 Delhi 🫦 HOT AND SEXY VVIP 🍎 SERVICE
Call Girls In Kirti Nagar 📱 9999965857 🤩 Delhi 🫦 HOT AND SEXY VVIP 🍎 SERVICE
 
UNOSAFE ELEVATOR PRIVATE LTD BANGALORE BROUCHER
UNOSAFE ELEVATOR PRIVATE LTD BANGALORE BROUCHERUNOSAFE ELEVATOR PRIVATE LTD BANGALORE BROUCHER
UNOSAFE ELEVATOR PRIVATE LTD BANGALORE BROUCHER
 
UNIT-V-ELECTRIC AND HYBRID VEHICLES.pptx
UNIT-V-ELECTRIC AND HYBRID VEHICLES.pptxUNIT-V-ELECTRIC AND HYBRID VEHICLES.pptx
UNIT-V-ELECTRIC AND HYBRID VEHICLES.pptx
 
原版工艺美国普林斯顿大学毕业证Princeton毕业证成绩单修改留信学历认证
原版工艺美国普林斯顿大学毕业证Princeton毕业证成绩单修改留信学历认证原版工艺美国普林斯顿大学毕业证Princeton毕业证成绩单修改留信学历认证
原版工艺美国普林斯顿大学毕业证Princeton毕业证成绩单修改留信学历认证
 
2024 TOP 10 most fuel-efficient vehicles according to the US agency
2024 TOP 10 most fuel-efficient vehicles according to the US agency2024 TOP 10 most fuel-efficient vehicles according to the US agency
2024 TOP 10 most fuel-efficient vehicles according to the US agency
 

Claas arion 640 (type a19) tractor service repair manual

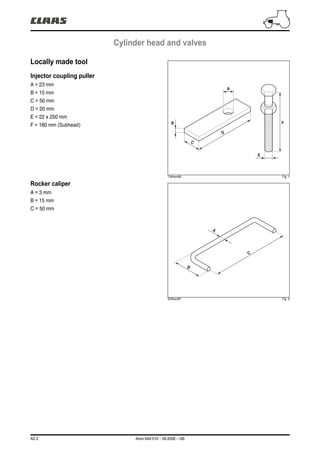
  • 1. A2.2 Arion 640-510 – 09.2008 – GB Cylinder head and valves Locally made tool Injector coupling puller A = 23 mm B = 15 mm C = 50 mm D = 20 mm E = 22 x 250 mm F = 180 mm (Subhead) 134hsm06 Fig. 1 Rocker caliper A = 3 mm B = 15 mm C = 50 mm 324hsm97 Fig. 2 F E C D B A C B A
  • 2. Arion 640-510 – 09.2008 – GB A2.3 Cylinder head and valves Inspecting valve bridges – Clean the valve bridges and check they are not damaged. – Measure the boreholes of the valve bridges (A) and check that the gap between one bore and another does not exceed the value specified. Maximum gap between bores...............................0,1 mm 134hsm07 Fig. 3 Inspecting the rocker pin Note: Mark the location of the rockers when removing in order to facilitate refitting. – Remove the caps (A) only to change them or to clean the rocker axis. – Disassemble and search for traces of wear or damage. Change all parts which are damaged or non compliant with specifications. 134hsm08 Fig. 4 Outer diameter of the axis ................19,962 - 20,038 mm Wear limit..........................................................19,91 mm 134hsm09 Fig. 5 A A
  • 3. A2.4 Arion 640-510 – 09.2008 – GB Cylinder head and valves Inner diameter of the rocker..............20,065 - 20,115 mm Wear limit..........................................................20,16 mm 134hsm10 Fig. 6 Inspecting the rockers – Remove and clean the rockers (A). Mark them for refitting. 134hsm11 Fig. 7 – Measure the outer diameter of the rockers. If it is below the value recommended, change it. Specified value: Rocker outer diameter ..........................31,61 - 31,64 mm – Measure rocker clearance in the bore. Specified value: Bore diameter (in the block) .........................................31,70 - 31,75 mm Rocker and borehole clearance................0,06 - 0,13 mm – Check the head on the rocker journals. If it is flat or concave, change the rocker and check the camshaft lobes. 134hsm12 Fig. 8 A
  • 4. Arion 640-510 – 09.2008 – GB A2.5 Cylinder head and valves Measuring valve shrinkage Measurements must be made at a maximum distance of 3 mm from the edge of the valve head. – Compare the measurements (A) between the 2 inlet and exhaust valves. Check that the gap does not exceed the value specified. Note: If a cylinder has uneven valve wear, check the gap of boreholes on valve bridges. Specified value: • Intake valve Shrinkage in the cylinder head .................0,77 - 1,27 mm Wear limit............................................................1,77 mm • Exhaust valve Shrinkage in the cylinder head .................0,81 - 1,31 mm Wear limit............................................................1,81 mm Maximum gap for a pair of valves per cylinder........................ .........................................0,3 mm 131hsm33 Fig. 9 Cylinder head flatness – Check cylinder head flatness using a precision rule and a set of shims. Check along the length, across and in diagonal in several locations. Specified value: Maximum acceptable straightness error over the entire length or width ....................................................0,08 mm Maximum acceptable straightness error over the entire length of 150 mm................................................0,03 mm Note: If the straightness error exceeds the values specified, rectify or change the cylinder head. 132hsm05 Fig. 10 A
  • 5. A2.6 Arion 640-510 – 09.2008 – GB Cylinder head and valves Measuring cylinder head thickness – Measure the cylinder head's thickness between the parting of the cylinder head cover riser and the combustion reaching. Specified value: New cylinder head ............................104,87 - 105,13 mm Minimum acceptable cylinder head thickness 104,24 mm Maximum ripple depth ......................................0,012 mm Maximum material which can be removed when rectifying 0,76 mm Note: If the cylinder head thickness is below the minimum acceptable, do not rectify. Change the cylinder head. Important: Check cylinder head flatness using a precision rule and a set of shims. Valve guide measurement – Measure wear on the valve guides. Specified value: Diameter of the valve guide borehole............................... 7,025 - 7,051 mm Clearance between rod and guide – Intake.................................................0,012 - 0,064 mm – Exhaust..............................................0,025 - 0,077 mm Wear limit between stem and guide....................0,15 mm 132hsm06 Fig. 11 132hsm07 Fig. 12
  • 6. Arion 640-510 – 09.2008 – GB A2.7 Cylinder head and valves Measuring the valve seat bore in the cylinder head If the dimensions of the boreholes do not comply with the values specified, machine the cylinder head according to the values. Specified value: • Seat insert valve borehole – Exhaust A. 36,436 - 36,462 mm. B. Reference 2,34 mm. C. 8,715 - 8,785 mm. D. 38 - 42°. E. Maximum radius 0,5 mm. – Intake A. 37,436 - 37,462 mm. B. Reference 2,8 mm. C. 9,715 - 9,785 mm. D. 38 - 42°. E. Maximum radius 0,5 mm. Changing the outer diameter of seat insert valve boreholes. – Exhaust..........................................36,487 - 36,513 mm – Intake.............................................37,487 - 37,513 mm Measuring the valve springs Check spring tension using a spring compression device. Idle length .........................................................46,15 mm Specified value: Height comrpessed, spring tension............................. .46 mm from 18 to 27 N Spring compressed at 166 N ............................37,21 mm Spring compressed at 356 N ............................27,01 mm 132hsm08 Fig. 13 131hsm34 Fig. 14
  • 7. A2.8 Arion 640-510 – 09.2008 – GB Cylinder head and valves Measuring the valves – Clean and inspect the valves, the valve stems, the tips of the stems and the retaining groove (A). Specified value: • Valve head diameter – Intake.................................................36,87 - 37,13 mm – Exhaust..............................................35,87 - 36,13 mm Note: The intake valves have a larger outer diameter and are recognized by a raised letter "O". 131hsm35 Fig. 15 131hsm36 Fig. 16 • Valve stem diameter – Intake.................................................6,987 - 7,013 mm – Exhaust..............................................6,984 - 7,000 mm • Maximum ovalization – Inlet and exhaust ...........................................0,038 mm 131hsm37 Fig. 17 A 0
  • 8. Arion 640-510 – 11.2014 – EN A2.9 Cylinder head and valves Check of the belt and the tensioner spring – Loosen and remove the tensioner belt. – Loosen the tensioner and plot a mark (A). – Measure 21 mm from (A) and make a mark (B). – Using a torque wrench, align the 2 marks. – The spring's tension must be 1,8 to 2,2 daN·m. – Change the tensioner if required. 251msm04 Fig. 18 A B
  • 9. A2.10 Arion 640-510 – 09.2008 – GB Cylinder head and valves Removing the alternator and its bracket – Disconnect the battery. – Disconnect the alternator connections. – Remove the alternator (A). – Loosen the fastening screws on the bracket (B) and pull it. 260hsm00 Fig. 21 Description 1 Pneumatic braking version (175 A alternator). A B 1
  • 10. Arion 640-510 – 09.2008 – GB A2.11 Cylinder head and valves 260msm00 Fig. 22 Description 2 Pneumatic braking version (120 A alternator). 260msm01 Fig. 23 Description 3 Version without air braking (120 and 175 ampere alternator). A B 2 B A 3
  • 11. A2.12 Arion 640-510 – 09.2008 – GB Cylinder head and valves Refitting the alternator and bracket – Refit the alternator bracket (B). – Tighten the screws to a torque of 7 daN.m. – Refit the alternator (A). Note: If the alternator pulley was removed, tighten the screw at a torque of 5 daN.m. Removing the viscouc coupling – Remove the screws from the radiator nozzle (A). Note: The viscous coupler thread on the hub is a left- hand thread. – Using a pin wrench, hold the hub (B) and loosen the viscous coupler (C) and remove it. Refitting the viscous coupling Note: The viscous coupler thread on the hub is a left- hand thread. – Refit the viscous coupler (C) on the hub (B). – Using a pin wrench, tighten the viscous coupler at a torque of 9 daN.m. 253hsm00 Fig. 24 C B A
  • 12. Arion 640-510 – 09.2008 – GB A2.13 Cylinder head and valves Removing the fan hub and bracket 251hsm29 Fig. 25 – Loosen the drive belt using the tensioner (A) and remove it. – Remove the hub of the viscous coupler (B). – Remove the (C) pulley. – Remove the pulley hub and its bracket (D). Refitting the fan hub and bracket – Refit the fan bracket and hub (D). Tighten the screws to a torque of 7 daN.m. – Refit the viscous coupler pulley (C) and hub (B). Tighten the screws to a torque of 7 daN.m. – Position the belt. Tighten the belt using the tensioner (A). C B D A
  • 13. A2.14 Arion 640-510 – 09.2008 – GB Cylinder head and valves Removing the turbocharger Important: Let the exhaust circuit cool down before removing the turbocharger. Note: Carefully clean the outside of the turbocharger and the surrounding area. – Remove the air intake and exhaust ducts. – Remove the coolant ducts (A). – Disconnect electrical connections. – Disconnect the oil inlet duct on the level of the oil filter head (B). – Disconnect the oil return duct (C). – Unscrew the 4 screws (D) of the exhaust manifold and remove the turbocharger. Refitting the turbocharger Important: Fill the oil return hole with clean motor oil and turn the turbocharger by hand. – Position the turbocharger onto the exhaust manifold with a new gasket. Tighten the screws (D) to a torque of 7 daN.m. – Connect the oil, air and coolant ducts. – Connect the electric connections. 142hsm04 Fig. 26 142hsm00 Fig. 27 142hsm05 Fig. 28 D C A B
  • 14. Arion 640-510 – 09.2008 – GB A2.15 Cylinder head and valves Removing the turbocharger rod linkage Note: Proceed with caution when tightening or loosening the linkage screws as the screws are fragile. – Remove the screw (A) from the actuator linkage. – Remove the screw (B) from the turbocharger linkage. – Remove the linkage. 142hsm06 Fig. 29 Refitting the turbocharger linkage Note: Proceed with caution when tightening or loosening the linkage screws as the screws are fragile. – Position the linkage on the flat of the turbocharger axis and the actuator. – Tighten the screws (A) and (B) by hand. – Use a wrench to hold the linkage. Tighten the screws (A), (B) to a torque of 0,7 daN.m. – Check that the linkage moves freely. Otherwise readjust. Important: Initialize the turbocharger module using Métadiag© 2007. 142hsm07 Fig. 30 142hsm08 Fig. 31 A B A B
  • 15. A2.16 Arion 640-510 – 09.2008 – GB Cylinder head and valves Removing the exhaust manifold – Remove the turbocharger (the turbocharger can be removed with the exhaust manifold). – Remove the oil return hose (C). – Remove the exhaust manifold (A). – Remove the exhaust connecting sleeves (B). Check the sleeves. 142hsm09 Fig. 32 142hsm10 Fig. 33 Refitting the exhaust manifold – Refit the exhaust connecting sleeves. – Use centering studs to refit the exhaust manifold. – Tighten the screws (D) of the cylinders 3 and 4 initially at a torque of 7 daN.m. 142hsm11 Fig. 34 A C B D
  • 16. Arion 640-510 – 09.2008 – GB A2.17 Cylinder head and valves Removing the cooler and ducts "EGR" – Remove the screws (A). Remove the exhaust duct "EGR" (B). – Remove the cooling duct (C) by removing the screw (D) and collar (E). – Remove the cooler "EGR". – Remove screw (G). Remove the coolant ducts (F). Refitting the cooler and ducts "EGR" – Refit the coolant duct (F). Replace the seals if required. – Refit the cooler "EGR". Tighten the screw (G) to a torque of 3,5 daN.m. – Refit the coolant duct (C). Refit the collar (E). – Tighten the screw (D) to a torque of 3,5 daN.m. 142hsm12 Fig. 35 142hsm13 Fig. 36 142hsm14 Fig. 37 A C E B D G F
  • 17. A2.18 Arion 640-510 – 09.2008 – GB Cylinder head and valves 254hsm02 Fig. 39 Removing the thermostat cover – Remove the screws (A). Remove the cover. – Mark the position of the thermostats and remove them. Refitting the thermostat cover – Change the gaskets of the thermostats (B). – Position the thermostats at their original location. – Refit the cover. Tighten the screws (A) to a torque of 4,7 daN.m. 254hsm03 Fig. 38 A A B
  • 18. Arion 640-510 – 09.2008 – GB A2.19 Cylinder head and valves 254hsm05 Fig. 41 Removing the thermostat manifold – Remove the screws from the coolant duct (A). – Remove the screws (B) from the manifold and remove the manifold. Refitting the thermostat cover Note: Replace the seals. – Refit the air intake manifold (C). Tighten the screws (B) to a torque of 7 daN.m. – Position the coolant ducts (A) on the cylinder head. Tighten the screws (D) to a torque of 7 daN.m. 254hsm04 Fig. 40 A B A A C B D
  • 19. A2.20 Arion 640-510 – 09.2008 – GB Cylinder head and valves Removing the cylinder head cover – Remove the caps (A) and the screws (B) from the cylinder head cover. 133hsm01 Fig. 42 – Remove the rocker cover (C). 133hsm00 Fig. 43 A B C C
  • 20. Arion 640-510 – 09.2008 – GB A2.21 Cylinder head and valves 133hsm03 Fig. 45 Refitting the cylinder head cover Important: change the sealing gasket (A) whenever removing the cylinder head cover. – Fit the cylinder head cover (B). – Fit the screws (C) and the O-rings (D). Tighten to 0,7 daN.m. – Fit the caps (E). 133hsm02 Fig. 44 A E C D B
  • 21. Thank you very much for your reading. Please Click Here. Then Get COMPLETE MANUAL. NO WAITING NOTE: If there is no response to click on the link above, please download the PDF document first and then click on it.
  • 22. A2.22 Arion 640-510 – 09.2008 – GB Cylinder head and valves Removing the rocker arm assembly – Install the 6 locally made U-bolts (A) to hold the rockers. See page 2 Locally made tool. – Untighten the screws (B) and (C). Loosen the screws on the flanges (D). – Remove the bearings *1. – Removing the valve rocker shaft assembly and push rods (E). Mark the location of the rockers when removing in order to facilitate refitting. Remove the bridges (F). 134hsm13 Fig. 46 134hsm14 Fig. 47 134hsm15 Fig. 48 D A B C A E F
  • 23. Arion 640-510 – 09.2008 – GB A2.23 Cylinder head and valves Refitting the rocker shaft Important: Loosen the rocker adjustment screws to prevent damaging the rocker axis. – Fit the bridges (A) while positioning the hole (B) on the exhaust manifold side. – Fit the rocker arm assembly. – Lubricate the rockers using clean motor oil. – Coat the screws (C), (D) lightly with Loctite (243). – Fit the shim (E) and locking screw (D). – Fit a new O-ring (F). Fit the bearing (G) and screw (C). – Fit the flanges of the rocker arm assembly. Tighten the screws (H) to a torque of 6 daN.m. – Remove the U-bolts. – Tighten the screws (C), (D) to a torque of 3 daN.m. 134hsm16 Fig. 49 134hsm17 Fig. 50 134hsm18 Fig. 51 134hsm19 Fig. 52 A B A C G F D E H
  • 24. A2.24 Arion 640-510 – 09.2008 – GB Cylinder head and valves Adjusting the valve rockers Note: This check must be performed on a cold engine. – Remove the plastic cover covering the rotation hole (A) and the timing hole (B). – Use tool n°60 05 005 528 to turn the engine in the running direction, until cylinder 1 (timing side) reaches top dead center of its compression stroke. – Fit the timing gauge n° 60 05 005 576. Note: If piston n°1 is at tope dead center of its compression stroke, the rockers have play. 134hsm20 Fig. 53 – Check and adjust the rockers. Inlet valves: 0,36 mm. Exhaust valves: 0,46 mm. – If adjusting the rockers is required, loosen the locknut (D). Turn the adjustment screw (C) until the shim slides with a slight resistance. Hold the adjustment screw (C). Tighten the nut (A) to a torque of 2,7 daN.m. – Check clearance. 134hsm21 Fig. 54 B A D C