1. Mobile Robot for Weeding
Tommy Ertbølle Madsen & Hans Lavdal Jakobsen
Master Thesis Project
January 31st
2001
Department of Control and Engineering design
Technical University of Denmark
2. Supervisor: Associate professor Ph.d. Torben Sørensen
This project is made by
Tommy Ertbølle Madsen
Student ID: c948429
tommy@ertboelle.dk
Mechanical and control engineering.
Has participated in the development of
the BinderWrapTM
round bale wrapper.
www.binderwrap.dk
Hans Lavdal Jakobsen
Student ID: c928543
hans@miditec.com
Electro and control engineering.
Has developed the musicians software
EarMasterTM
in his company MidiTec.
www.earmaster.com
3. Agricultural robot
3
Abstract
The goal with this master thesis has been to develop an autonomous
agricultural vehicle. The decisions regarding the design of mechanics,
electrics and software are discussed and the experimental results are
presented.
The environmental impact of agricultural production is very much in
focus, while the competition demands high efficiency. Some years
ago, weeding was done manually without the use of pesticides. With
the development of an autonomous agricultural vehicle with sensors
for weed detection, it will again be possible to avoid the use of
pesticides.
The vehicle uses high precision GPS (RTK), encoders, compass, and
tilt sensors, to position itself and follow waypoints.
We have developed a module based software system and identified 12
areas of the system (modules) that have each been enclosed in
separate dll's with well defined interfaces. The modules include
interfaces to sensors, low-level and high-level controllers and more.
By using hardware timers, it has been possible to develop a real-time
control system using Windows98.
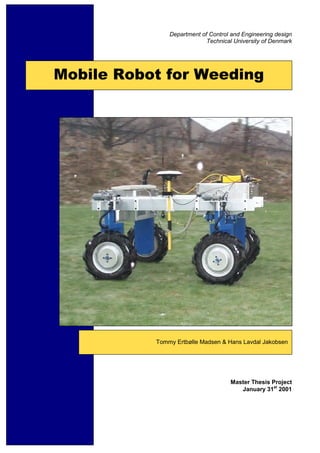
A vehicle suitable for research under field conditions has been
developed. The vehicle has 4-WD and 4-WS, which makes it possible
to test different steering strategies. The vehicle is specially designed
for in-row driving; this has been achieved with the use of in-wheel
motors. The vehicle can drive in row crops with a row distance down
to about 250 mm and with 500 mm high crops.
4. Agricultural robot
4
Synopsis
Målet med dette speciale har været at udvikle et autonomt
landbrugskøretøj. Beslutningerne omkring udviklingen af mekanik,
elektronik og software er beskrevet og resultaterne er fremlagt og
diskuteret.
Landbrugsproduktionens miljøbelastning er meget i fokus i dag og
samtidig øges kravene betydeligt til erhvervets konkurrenceevne. For
år tilbage blev ukrudtet i marken fjernet manuelt uden brug af
pesticider. Med udviklingen af et autonomt landbrugskøretøj med
sensorer for detektering af ukrudt vil det igen blive muligt at undgå
brugen af pesticider.
Køretøjet er udstyret med højpræcisions GPS (RTK), enkodere,
kompas og tiltsensorer for at kunne positionere sig selv og følge en
specificeret rute.
Vi har udviklet et modulbaseret softwaresystem og identificeret 12
dele af systemet (moduler), som hver er placeret i en dll med en
veldefineret grænseflade. Modulerne består af drivere til sensorer,
lavniveau og højniveau regulatorer mm.
Ved at bruge hardware timere har det været muligt at udvikle et
realtidskontrolsystem under operativsystemet Windows98.
Der er udviklet et køretøj specielt til forskning under mark vilkår.
Køretøjet har firehjulstræk og styring på alle fire hjul, hvilket gør det
muligt at undersøge forskellige styringsstrategier som f.eks. for- eller
baghjulsstyring. Konstruktionen er lavet specielt med henblik på at
kunne køre mellem afgrøderækkerne, dette er opnået ved brugen af
navmotorer. Køretøjet kan køre i afgrøder med ned til ca. 250 mm
mellem rækkerne og i ca. 500 mm høje afgrøder.
5. Agricultural robot
5
Preface
In this project we have focused on:
- Making a vehicle with optimum design for agricultural use: cross-
country, large ground clearance and slim wheel and transmission
design for in-row driving.
- Making a flexible hardware and software design. The vehicle is
designed for further experiments and not for commercial use. The
design opens up possibility for testing sensors, new weeding
technologies and high precision in-row field steering.
- Getting experimental results with RTK/GPS, because we had the
chance to borrow the (so far expensive) equipment. RTK/GPS is a
promising new technology for high precision agriculture.
During the development of mechanics, electronics and software we
have focused on making the vehicle flexible. The choice of
technology for the various functions has big impact on functionality,
flexibility and performance.
During the development process we have had safety in the back of our
minds and put an effort in eliminating or reducing the risks concerning
an autonomous vehicle.
We have been under time pressure all the way; just to get the vehicle
driving. This has forced us to cut corners in some areas, especially the
control engineering area.
Thanks to:
Associate Professor Torben Sørensen for your help with robotics and
for not setting limits for our goal.
Professor Christian Boe for your help with design methods and
mechanical reviews.
Associate Professor Nils Andersen for letting us draw on your
experiences with autonomous vehicles.
Deputy head of department Svend Christensen, head of research unit
Martin Heide-Jørgensen and senior scientist Henning Tangen Søgaard,
Department of Agricultural Engineering for ideas and encouragement.
Ph.d. student Anna B.O. Jensen, National Survey and Cadastre for
borrowing us the GPS equipment and giving valuable support.
MSc Henrik Holm, Department of Product Development for help with
electronics.
Thomas Thriges foundation for economical support.
Our wives Karen and Birgitte for support and understanding (!)
6. Agricultural robot
6
1. Introduction 8
1.1. PROJECT DESCRIPTION.............................................................8
1.2. STATE-OF-THE-ART.................................................................10
1.3. ANALYSES AND PRODUCT SPECIFICATION ...........................12
2. THE OVERALL PRINCIPAL CONCEPT............................15
2.1. TRACTION ...............................................................................15
2.2. STEERING ................................................................................16
2.3. DIMENSIONS............................................................................17
2.4. CONTROL ARCHITECTURE ....................................................19
2.5. MOTORS AND POWER SUPPLY................................................25
2.6. SUMMARY OF THE OVERALL CONCEPT CHOSEN ..................26
3. THE MECHANICAL DESIGN...............................................27
3.1. STEERING AND DRIVE GEAR...................................................27
3.2. WHEEL MODULE.....................................................................31
3.3. CHASSIS...................................................................................49
3.4. ASSEMBLY...............................................................................63
3.5. SUMMARY................................................................................65
4. COMPUTER AND INTERFACE...........................................66
4.1. ELECTRICAL POWER WIRING.................................................66
4.2. CONTROL CONNECTIONS .......................................................67
4.3. HARDWARE HANDLING OF ERRORS.......................................72
4.4. COMPUTER INTERFACE..........................................................76
4.5. COMPUTER POWER SUPPLY ...................................................78
4.6. COMPUTER MONITOR.............................................................80
5. SOFTWARE MODULES ........................................................82
5.1. SOFTWARE MODULES OVERVIEW..........................................82
5.2. MAIN APPLICATION ................................................................87
5.3. ENCODERS MODULE ...............................................................89
5.4. THE GPS MODULE .................................................................95
5.5. ORIENTATION MODULE........................................................100
5.6. POSITION MODULE................................................................110
5.7. VISION MODULE....................................................................113
5.8. VISION TASK PLANNER .........................................................119
5.9. WAYPOINT MODULE.............................................................120
5.10. PATH MODULE ....................................................................121
5.11. CONTROLLER......................................................................123
5.12. MOTOR CONTROLLER MODULE.........................................128
5.13. THE MOTOR OUT MODULE.................................................134
5.14. TIMER MODULE ..................................................................137
6. TEST RESULTS .....................................................................139
6.1. LOW LEVEL CONTROLLER ...................................................139
6.2. HIGH LEVEL CONTROLLER ..................................................143
7. Agricultural robot
7
7. RECOMMENDATIONS ....................................................... 151
7.1. HARDWARE........................................................................... 151
7.2. SOFTWARE ............................................................................ 152
7.3. CONTROL ENGINEERING...................................................... 152
8. CONCLUSION....................................................................... 154
9. LITERATURE........................................................................ 156
9.1. PRIMARY LITERATURE......................................................... 156
9.2. SECONDARY LITERATURE.................................................... 156
9.3. PATENTS................................................................................ 158
9.4. PRODUCT MANUALS ............................................................. 158
9.5. PRODUCT SALES MATERIAL................................................. 158
APPENDIX 1-5 IN SEPARATE VOLUME
CD-ROM WITH VIDEO, CAD MODEL, SOURCE CODE AND OTHER
MATERIAL IN THE BACK OF THIS VOLUME.
8. Agricultural robot
8
1.1.1.1. Introduction
1.1. Project description
This project is based on ideas from Svend Christensen, DJF, proposed
at the conference "Technology in the Primary Agriculture" 1999
arranged by the Danish Agricultural and Veterinary Research Council
[HIGHTECH].
Motivation
Today the environmental impact of agricultural production is very
much in focus and the demands to the industry is increasing. The
production of agricultural products is growing and the competition is
getting bigger, therefore the farmer has to be very efficient to be able
to compete. At the same time the demands, for less use of pesticides
and fertilizers, from the consumer and the legislation are increasing.
Therefore the farmers have to use high technology in the fields for
weeding, spraying, etc., earlier weeding were done manually but today
it is neither profitable or possible to get a sufficient number of
labourer for this job.
In this project, an autonomous agricultural vehicle, for test and
development of sensors, tools and information technology in the field,
is going to be developed.
Problem statement
Development and construction of an autonomous robot for weed
control in row crops e.g. sugar beets or maize. The robot can be
divided into four main modules:
1. A vehicle as a platform for carrying e.g. weeding tools for in-
row weeding. The vehicle could be equipped with the control
modules described below.
2. A control unit, with input from Vision, GPS, and other
necessary sensors, are providing the vehicle and the tools with
the necessary control signals.
3. A GPS module that provides the vehicle with its global
position in real time.
4. A vision system detecting the position of the crop relative to
the vehicle position.
The main goal of this project is the development of the vehicle and the
control unit, with possibility of using different sensor technologies.
We want to test the vehicle and control unit and show that the robot is
capable of following a path under field conditions.
The vehicle
The autonomous vehicle should be developed to test different sensor
systems and tools in the field. The vehicle should be able to work
under field conditions, where the vehicle can be disturbed by
irregularities, when following a specified path.
Figure 1.1 Precision farming
9. Agricultural robot
9
The control unit
The control software is intended to be executed on a PC physically
attached to the vehicle. Interface cards, the serial and parallel ports
will be used for communication with the peripherals.
The control software is going to be developed with a high level
programming language and is going to work on a Windows operating
system. This is chosen because of our expertise in this area, the
flexibility, and the large number of available interface cards with
drivers.
The control of motors and the higher-level path control are intended to
be solved with classical methods as e.g. PID control.
The GPS module
From the National Surveys and Cadastre, Denmark we were offered
the possibility of borrowing RTK/GPS equipment, which is able of
giving a precision on 1 to 5 cm with a 5 Hz frequency. This sensor
method had earlier been abandoned because of the very high price, but
with the possibility of borrowing the equipment, testing RTK/GPS is
made one of the main goals.
Vision
The development of the vision system is not a primary goal.
Therefore, we want to make the vision system simple and it should
just be able to recognize spots on the ground with good contrast to the
ground. It should be possible to replace this simple module with more
advanced modules for crop recognition in the field.
Related topics
Many interesting topics, like alternative energy sources, power
consumption, data collection, surveillance of the robot from the farm,
etc., can be investigated related to the development of an agricultural
weeding robot. Each of these topics can be subject to years of research
and will therefore not be dealt with in detail in this project. The
different problems and tasks, which we will not have the time to
investigate, will be listed in “Recommendations”, page 151.
Project plan
To be able to reach our goal, it is necessary to plan the activities
carefully. The time for the project is 3/4 of a year distributed over one
year. The first 6 months are on half time and the last 6 months on full
time. A timetable is made for the project, were the start points and
durations of the main activities are listed, see appendix 1.1.1 and
Figure 1.2.
The analysis stage started with brainstorming, literature study and
meetings with people, who have know-how about and interest in the
topic for this project. Then the project statement is detailed and a
specification for the robot were made and the synthesis is started. The
search for principle concepts is made parallel with the vision software.
In August the first CAD drawings are made and the control
architecture is determined. The workshop starts making the parts in
September and the vehicle is ready for assembly in late October.
The first tests should have begun primo November. Unfortunately, the
assembly and tests of the robot was delayed because we had
Figure 1.2 Timetable for the
project.
10. Agricultural robot
10
Analysis
Main
functions
Part
functions
and means
Principle
structure
Quantitative
structure
Part design
-Material
-Dimensions
-Finish
Overall
design
Criteria's
Principle
structure
underestimated the time necessary in the workshop. Therefore, more
of the documentation has been made parallel with the development of
the robot and the first outdoor tests did not begin until primo January.
Because the test started so late, we have not had time for optimising
the controllers, which we had chosen.
Means (Tools and resources)
Tools
In the project we have mainly used methods for systematically design
of industrial products (Figure 1.3) and classical control methods
lectured at IKS.
Most of the design has been done with help from different computer
tools. The software is developed in Delphi and the mechanical design
is detailed with Pro-Engineer. For calculations Matlab, Excel and
Win-Beam have been used.
Resources
From the start, we had identified different departments and people,
who could help us with know how. The Department of Control and
Engineering Design (IKS), the IKS-workshop, the Department of
Agricultural Engineering (DJF), Department of Automation (IAU),
the Department for Product Development (IPU), National Cadastre
and Survey (KMS), see appendix 1.1.2.
The budget for master projects is very limited, but because this project
can be used for further research, it has been possible to get the
necessary economical resources. The robot is the property of IKS,
who has paid most of the robot, in addition Thomas B. Thriges
Foundation has given 22.000,- kr to the project (Appendix 1.2.2-3).
1.2. State-of-the-art
This paragraph will describe the current technological level for
precision farming in row crops. The content is based on a literature
study (appendix 1.2.1.d and literature list), internet study and
information from DJF.
State-of-the-art commercial products
So far autonomous in-row vehicles for weed control have not been
commercialised, but control systems for controlling the implements
towed by the tractor are available. Some products can also control the
tractor in the row, but it still needs to be monitored carefully by the
driver. The technology used in these commercial products is computer
vision and ultrasonic sensors.
Vision and ultrasonic sensors
The first company to launch vision control is Eco-Dan A/S, who has
developed a system called Advanced Tool Control (ATC), see Figure
1.4. The system consists of two dedicated vision cameras and a
dedicated microprocessor for manipulating the pictures and generating
the control signal for positioning the implement sideways. The system
makes it possible for one man to manoeuvre a cultivator with a
precision of +/- 3 cm with speeds up to 8 – 10 km/h in the field.
Figure 1.3 Product synthesis
model [TJALVE]
Figure 1.4 Advanced Tool Control
from Eco-Dan (between the tractor
and the cultivator)
11. Agricultural robot
11
John Deere and Danfoss/Reichardt have developed a system using
ultrasonic sensors. We do not know the precision of this system, but it
is mainly for relieving the driver when following swaths and not for
high precision control in row crops, see Figure 1.5.
DGPS in precision farming
The last few years DGPS with a precision of 1 – 2 m has become quite
popular for yield monitoring. The concept is that the combine
equipped with DGPS makes a yield map and this information together
with soil analyses from the field helps the farmer to differentiate the
amount of fertilizer used in the field. In this way the farmer can
optimise the use of fertilizer. He also gets a better overview of his
production, which can help him to make the right decisions about the
use of his fields.
RTK/GPS
So far, high precision GPS like RTK has not been used commercially
in the agricultural industry for controlling the position of vehicles or
implements.
The development of a RTK/GPS reference system in Denmark is
going very fast at the moment. Already now it is possible to subscribe
to a service delivering the reference signals via the GSM net, then it is
not necessary to set up a local base station (www.gpsnet.dk). This is a
large step towards commercial agricultural use of high precision GPS.
Crop sensors
Hydro has developed a sensor to detect the amount of nitrogen in the
crop. The sensor is an optical sensor that can measure the amount of
chlorophyll in the crop, which gives a good estimate of the nitrogen
level. The sensor is mounted on the roof of the tractor and connected
to a computer, which controls the amount of fertilizer to be spread.
Research results
This paragraph only describes the most relevant research result we
have found in relation to our project. An exhaustive list of the
literature studied can be found in the literature list.
Vision
Test results from California research on spot spraying and
identification of weeds and crops are not very convincing. 24.2% of
the tomatoes were sprayed and 52.4% of the weeds were not sprayed
[TOMATO]. It is very difficult to identify the different species and it
will take years of research to make a satisfactory identification.
DGPS
At Stanford University an automatic tractor guidance system using
carrier-phase differential GPS has been developed [GPSTRAC]. They
use four GPS antennas on the roof of a tractor to measure both the
position and attitude of the tractor. Very good results have been
achieved in the field following non-linear trajectories with a controller
using a priori information about the trajectory.
Figure 1.5 John Deere Pilot
System
Figure 1.6 The Fieldstar
precision farming concept.
12. Agricultural robot
12
At the Institute of Agricultural and Environmental Engineering,
IMAG-DLO, the Netherlands researchers have experimented with
controlling the lateral movement of the implement using RTK/DGPS.
The tests showed an average error of 1 cm at an average speed of 3.6
km/h [GPSIMP].
Off-road and agricultural vehicles
Analogies and comparable products can often provide useful
information and give ideas for generating concepts. Therefore, other
off-road and agricultural vehicles have been examined to see if this
could give some help. In appendix 1.2.1.a-c some of the examined
products can be seen.
1.3. Analyses and Product
Specification
In this paragraph the different life stages of the product are identified
and analysed and the demands, criteria’s and comments are
summarized in a product specification, appendix 1.3.5.a-b.
In the product specification solutions are delimited from not solutions
(demands) and a yardstick for the solution is specified (criteria’s). It is
important to go through all life stages and remember all the
stakeholders to specify the product right. The product specification is
a management tool for controlling, that the right product is designed.
On the other hand, the product specification should only set the
relevant and necessary constraints for the product. The specification is
not a static paper, but can be altered during the design process in
dialogue with the relevant persons.
As the solution is designed in detail, it can be necessary to add
additional demands and criteria’s to the specification or make a sub
specification. If e.g. a modular design is chosen, it can be necessary to
make individual specifications for each module, because the other
modules sets additional demands and criteria’s to the design.
Identification of life stages
This product is only for research purposes and is therefore not going
through all the life stages of a "normal" product. The life stages of this
product are: design, industrial design, production, service, use,
transport, destruction. Use is divided into: input, output, users,
environment and safety.
Background material for the Product Specification
The product specification is based on input from literature, DJF and
our own knowledge about agriculture and particularly field conditions.
Some of the demands and criteria's have been determined from the
beginning (appendix 1.3.1-1.3.4) others have been identified but have
not been answered until later in the project.
The paragraphs below are comments referring to the product
specification in appendix 1.3.5.a-b.
Design
The 3/4-year available for this project is the main constrain on the
design stage.
Figure 1.7 Identify the life stages
of a product.
Figure 1.8 Cornfield sown with
double distance (250 mm) between
the rows for mechanical weeding.
13. Agricultural robot
13
Industrial design
This is not a commercial product, which should appeal to a customer.
However, future students could also be seen as customers and it is
important that the robot will make students enthusiastic and wanting
to work in this area. Therefore, the robot should appear as a
functional, high tech and innovative product.
Production
This robot is a prototype for research and the budget is limited,
therefore many processes and materials are not economical to use. The
robot should be built at the IKS workshop, which is specialized in
making prototypes and small batch production. The main
qualifications are:
• High precision metalwork
• Mass reducing processes (several high precision CNC
machines)
• Welding
• Press brake bending in sheet metal
Service
The robot should be easy to service and parts should be easy to
replace. Students, researchers and technical staff at the institute will
carry out the work.
Use
The robot is for research in methods for sustainable weed control and
control engineering.
The vehicle should be able to operate at a speed about 0.5 – 1 m/s and
drive for about 2 – 4 hours between recharging.
The precision of the vehicle must be within ±5 cm to drive without
damaging crops in cornfields. In crops with bigger row distance the
demand is not so high. But if the vehicle is driving precisely, then it
will be easier to control the tool or maybe it will not even be necessary
to control the tool relative to the vehicle.
The dimensions of the vehicle should make it capable of driving in
row crops with 500 mm between the rows. The clearance between the
vehicle chassis and the ground should be 500 mm to allow corn to
pass below the vehicle.
The vehicle should be able to turn with a small turning radius on the
headlands. It is not a demand that it should be able to turn as sharply
as on Figure 1.9.
-Input
The vehicle should be able to use RTK/GPS position for steering in
rows in e.g. cornfields or beet fields. It is also wanted to test the
vehicle using vision.
-Output
The vehicle should be capable of carrying different tools for weed
removal or data collection in the fields.
-Users
The users are primarily students and researchers with expert
knowledge. It should be easy to access the different components and
test different tools and sensors. The software should be modular, so
that test of different controllers and sensors does not require changing
all the software.
Figure 1.9 Very low turning
radius.
Figure 1.10 The ideal soil
structure.
14. Agricultural robot
14
-Environment
The vehicle should be able to operate in fields after sowing. The
machine is made for Danish conditions and for test purposes, therefore
the fields are assumed nearly level with maximum gradients on about
10%. The ideal field is shown on Figure 1.10, but the conditions can
vary a lot.
The vehicle should be able to operate both in rainy and sunny weather.
It is therefore important to enclose parts, which can be damaged by
water and dust.
-Safety
It is very important, that the vehicle is safe to work with, so that
people are not injured. Secondary it is important that the vehicle is not
damaged or is causing damage to the surroundings.
There is no special rules concerning the use of mobile robots and since
this robot is not for commercial use the general rules do not have to be
meet [DEMKO]. We do however want to look at the general safety
problems of autonomous vehicles and to make the developed vehicle
as safe as possible.
Transport
It should be possible to transport the robot on a car trailer or in a van.
Destruction
Electronics should be removed disposed separately, but the disposal
does not give rise to any special demands to the vehicle design.
Figure 1.11 The vehicle will be
exposed to different weather
conditions.
15. Agricultural robot
15
A
2. The overall principal
concept
This chapter will document the considerations made about the
principles of the vehicle and the choice of concept for the mobile
robot. The principles considered is: traction, steering, dimensions,
power supply and control architecture.
2.1. Traction
The traction methods have big influence on the steering and terrain
properties, cost and power consumption of the vehicle.
Wheels, tracks, feet or air cushion
Feet would not be feasible for this robot; hence, the technology is not
mature.
An air cushion will damage the crop and raise a lot of dust, which will
cover the crop and set very high demands to the dust tightness of the
vehicle.
Tracked tractors are quite common on big farms with big fields and
little need for road transportation, because of low ground pressure and
very good drawbar pull performance on soft and loose soil. These
properties are not so important for the mobile robot, where important
properties are steering precision, low power consumption and low
cost. To develop tracks for the robot would also be too big a task for
this project.
Wheels are inexpensive and because of the little need for drawbar pull
and load carrying capacity the bigger sinkage and ground pressure is
of little importance. The soil conditions in fields after sowing are also
normally good for wheeled vehicles and therefore wheels are chosen
for traction (appendix 2.1.1).
FWD, RWD or All-WD
The choice of which wheels should be driving depends on the steering
strategy, which will be discussed in following passage. In this
passage, some general things about front, rear and all wheel drive will
be addressed.
The diagram on Figure 2.3 shows the possible climbing versus the
friction coefficients and it can be seen that 4-WD gives the best grip.
This is because the whole weight of the vehicle creates traction
between wheels and road. The second best is rear 2-WD, because a
part of the weight on the front wheels is on the rear wheels, when
driving up hill. [AB86]
On Figure 2.4 a towed wheel is shown being towed over an obstacle.
The momentum equation around the point A shows that it is necessary
with a big force Ft to lift the normal force on the wheel Fg. As it can be
seen the force will be infinite, when the height of the obstacle is as
high as the wheel radius. The maximum force for a driving wheel is
equal to the force Fg, when the obstacle is higher than the wheel
radius. However, if the obstacle is so high, the wheel will have no grip
unless it is pushed against the obstacle. To get the best terrain
Figure 2.1 Ground pressure of
tracked vehicle
Figure 2.2 Ground pressure of
wheeled vehicle.
Figure 2.3 Climbing capability of
vehicles with FWD, RWD and All-
WD.
Figure 2.4 A towed wheel passing
an obstacle.
16. Agricultural robot
16
performance it is necessary with 4-WD, were all wheels helps the
vehicle to overcome obstacles. (Appendix 2.1.3.c and 2.3.3.a)
2.2. Steering
It is important for the vehicle to be able to steer very precisely in the
crop rows and also to make as little damage as possible to the crop. In
the following advantages and disadvantages of different steering
strategies will be discussed.
Differential steering
The principle of differential steering is to make a difference between
the speeds of the wheels on the left hand side compared to the speeds
of the wheels on the right hand side. The difference in speed will
make the vehicle turn. It makes a big difference to use this method on
an all-wd vehicle compared to a 2WD vehicle, which will be
discussed in the following paragraph.
All-wd
Differential steering is often used for vehicles that should be very
maneuverable in difficult terrain. A vehicle using this steering method
can turn on the spot and the method is often seen on earth moving
equipment like skid steer loaders Figure 2.5. The transmission is also
simple to construct, because the wheels in one side is turning at the
same speed and the position and orientation of the wheels are fixed.
This indicates that it could be a possible solution for a weeding robot,
but the method also has some major disadvantages. In a turn the
vehicle also turns around a vertical axis through the center of the
vehicle, which means that the wheels have to slide sideways. This
uses a lot of power to turn the vehicle. The method is also unsuitable
for dead reckoning because of the excessive slip, which makes
odometer data useless. Damage to the crop is also likely to happen.
The wheels will dig out viable weed seeds, which will germinate.
Because of these disadvantages we have chosen not to use differential
steering all-wd (skid steering). (Appendix 2.1.2.a-d)
2-wd
When using 2WD differential steering one or more castor wheels
support the vehicle. A vehicle using this steering method can turn on
the spot. The method is often used in robotics for e.g. AGV´s because
of the very good maneuverability. But because of the castor wheels it
is not suitable for off-road driving.
When the vehicle is turning, it has to drag the castor wheels. Even a
small obstacle will demand a big force from the driving wheels,
because of the momentum arm from the turning center to the castor
wheel.
We have made some tests with a small trolley with castor wheels on a
lawn and on paved ground, see appendix 2.1.3.d. The tests showed
that it is necessary with a force 2 – 3 times bigger than the normal
force from the driving wheels, to drag the castor wheels in a turn.
This steering method is not chosen because of its poor off-road
characteristics. (Appendix 2.1.3.a-d)
Figure 2.5 Skid steer loader.
Figure 2.6 Principle of All-WD
differential steering.
Figure 2.7 Robot with 2WD
differential steering.
Figure 2.8 Principle of 2WD
differential steering.
17. Agricultural robot
17
Articulated steering
The principle of articulated steering is to change the angle between the
front axle and the rear axle of a vehicle. The disadvantage of this
method is that there is little space for tools between the front and rear
axle. Poor stability in turns can also be a problem, because of the
transversal movement of the center of gravity. An advantage is the
simplicity of the construction and good capability of following rows,
see appendix 2.1.4.
Changing heading of wheel(s)
This is the principle that most road vehicles use for steering. When the
forces on a vehicle are ignored, Ackerman describes the ideal relation
between the angles of the outside and inside wheel in a turn. If the
relation between the wheel angles follows the Ackerman equation,
geometrically induced tire slippage will be eliminated. (Centripetal
forces are ignored and therefore this only apply for very low turning
speeds in practice) The low geometrically induced tire slippage is
important to get good odometer data and steer precisely.
The Ackerman criterion is very difficult to implement mechanically,
because it is highly non linear. Therefore on most vehicles the steering
angles only approximate the Ackerman criterion for small steering
angles. However, deviations from Ackerman do not necessarily mean,
that the steering geometry is not optimal under real driving conditions
at higher speeds.
If the vehicle is not all-wd, it has the same problems as the model with
castor wheels. It is necessary with big forces to turn, when a towed
wheel hits an obstacle. If the wheels, which are used for steering, are
towed, they can have problems with getting a grip in loose soil for
turning the vehicle. This will give wheel slippage a low steering
precision.
If the vehicle has all-wd it will have very good off-road properties.
The vehicle can steer on just one axle or all axles. If the weeding robot
can steer on all axles it will be possible to obtain a very small turning
radius. The wheels will in a stationary turn follow the same tracks if
the steering of the rear and front wheels are symmetric about the
middle of the vehicle (Figure 2.11). Therefore, the vehicle needs very
little space between the rows to follow the rows precisely.
The disadvantage of steering on all wheels is that the construction and
control become more complex.
Because of the possibility of good odometer data, precise steering and
small turning radius, all-wheel Ackerman steering have been chosen.
2.3. Dimensions
Four wheels placed in each corner of a rectangle with the length
parallel to the crop rows have been chosen for the vehicle. This
configuration gives a good stability and the rear wheels can run in the
tracks of the front wheels, which decreases the rolling resistance. The
configuration can be seen on Figure 2.11.
Other possible wheel configurations are shown in appendix 2.3.1.d.
The symmetric placement of the wheels and the choice of 4WS and
4WD, give the possibility of making transmission and steering gear in
four identical modules. This will make the mechanical design faster
and especially the construction in the workshop will be faster and less
expensive because of fewer different parts. Planning, interpretation of
Figure 2.9 Tractor with articulated
steering and the steering principle.
Figure 2.10 Principle of Ackerman
steering.
Figure 2.11 Placement of wheels
on the robot.
18. Agricultural robot
18
drawings and adjustment of machines is time consuming in the
workshop and therefore it is important to keep the number of different
parts low. This modular concept will then consist of a chassis with 4
identical "wheel modules".
Gauge
There are several constraints on the dimensions of the vehicle. It
should be able to drive in crop rows, with 500 mm between the rows
e.g. sugar beet. There is also focus on weeding in cornfields. Weeding
is possible when the row distance is increased to 250 mm Therefore it
would be advantageous that the vehicle could drive in cornrows, with
250 mm between the rows. Beets are broad-leaved and therefore the
wheels should not get too close to the row centre and damage the
beets.
This means that the gauge should be either 500 mm or 1000 mm. If
the gauge is 750 mm or 1250 mm the wheels will get to close to the
row centre in beets, a even bigger gauge will make the vehicle too
difficult to transport and handle in general. The ground clearance on
500 mm makes it necessary to make the gauge 1000 mm, because the
centre of gravity else will be placed very high compared to the gauge
and make the vehicle unstable.
Another possibility is to make the gauge adjustable, but we have
judged, that a fixed gauge on 1000 mm. will cover the necessary row
widths sufficiently.
Placement of tools and loads
The tools should be placed in the most stable position with the best-
defined distance to the ground. The best position is in the middle of
the wheelbase, where obstacles and irregularities will cause minimum
movement of the tool.
Tools
This test vehicle should be able to be tested, with a big variety of tools
for weeding, spraying, collection of crop data and soil samples, etc.
This type of vehicle is not intended for cultivating etc., which is much
more efficient with conventional tractors. Therefore this vehicle is not
designed for big drawbar pull, but just to be able to transport itself,
tool and a load of e.g. herbicides, under the conditions given in the
field.
DJF has proposed some tool concepts, which the vehicle should be
able to operate with.
Spot sprayer
The idea is to identify the individual weeds and spray the weed leaves,
without polluting the bare ground or the crop. This principle has also
been used for spraying railway tracks for weeds, which is a simpler
task, because all vegetation must be sprayed.
Rotating hoe
As shown on Figure 2.15 this tool consist of a rotating hoe, which is
synchronized with the forward speed and the position of the crop.
The tool will be able to remove weed between the crops without the
use of herbicides. The disadvantage is the power consumption of the
tool and possible influence on the steering of the vehicle.
Figure 2.12 Necessary wheel
gauge for in-row driving in corn
and beet fields.
Figure 2.13 Possible areas for
attaching tools
Figure 2.14 Spot sprayer
Figure 2.15 Rotating hoe
19. Agricultural robot
19
Wheelbase
A short wheelbase improves the manoeuvrability of the vehicle, but
also makes it harder to control. Our goal is to make the vehicle
flexible, therefore the wheelbase is chosen so, that it will just leave
room for the tools and give the best manoeuvrability.
The rotating hoe and the space for rotation of the wheels limit the
wheelbase to minimum 1000 mm, see Figure 2.16. This wheelbase
also allow for leave raisers on the wheels to prevent damage to the
crop.
Ensuring ground contact
The wheels should always have contact to the ground to improve
traction and steering and to make the tools follow the ground in a
better defined way. On road vehicles, different spring-damper systems
are used for this purpose. On this low speed off-road vehicle, it is not
necessary with more damping than the tyres can provide. However, to
make the wheels follow the ground there has to be a longitudinal pivot
joint between the front and the rear axle. On Figure 2.16 the front axle
can turn about a longitudinal axis, because of the rotational joint in the
middle of the front axle.
2.4. Control Architecture
Sensors
GPS system
During our initial investigations, we found that an affordable GPS
system was not precise enough (the precision of DGPS is 1-5m). To
get a satisfactory precision of 1-5 cm it would require a carrier-phase
differential GPS (also called RTK) equipment priced at about DKK
300.000.
Therefore we decided not to use GPS, but later we got the possibility
to borrow such equipment from the National Survey and Cadastre
Denmark. Read more in “The GPS Module”, page 95.
Orientation
It is very important to know the orientation of the vehicle, not only the
heading but also the tilt in both directions. For example, the GPS only
returns the position of the GPS antenna. We need to know the roll,
pitch, and compass angles to convert the antenna position to the
control point. The compass angle (yaw) is also important to steer the
vehicle.
To find the orientation of the vehicle different sensors can be used.
We have considered various technologies with various technical pros
and cons, but as our budget is limited, the price is also an important
factor:
Gyroscope.
A gyro can measure the orientation of all three axes. A gyro is
sensitive to the rotation of earth (unless they have build-in
compensation) and they all have to be initialized in a known
orientation. The advantage is that it is not sensitive to accelerations.
Figure 2.16 Dimensions
20. Agricultural robot
20
The cheapest solution we could found was the electronic dual-axis
“Micro gyro 100” from www.gyration.com which in the spring 2000
was priced US$450.
Accelerometers
There are various technologies to measure acceleration. By measuring
the angular rate on three axes, it can find the orientation relative to the
orientation when it was initialised. This is similar to a gyro and some
manufacturers market accelerometers as electronic gyros.
GPS
With a GPS antenna we get the position in three dimensions. Having
three GPS antennas it is possible to calculate the orientation of all
three axes. It requires several meters between the antennas and high
precision GPS such as carrier-phase differential GPS with a precision
of 1-5 cm. The price for this solution is extremely high. Results with 4
antennas on an autonomous guided tractor can be found in
[GPSTRAC].
Magnetometer
The field of the earth can be measured with a 3-axis magnetometer.
The measurement is influenced by the magnetic declination and
deviation caused by local magnetic fields. (Read more about these
errors on page 100). We were recommended to use products from the
companies Billingsley and Bartington by people connected to the
“Ørsted” project. Their products were however quite expensive and
we found other solutions for example the Vector 2x from
www.precisionnav.com at only US$ 50.
To calculate the heading from a magnetic field it is required to have
data from an inclinometer (tilt-sensor).
Inclinometer
An inclinometer measures the angle of gravity on two axes. We found
an optical inclinometer from www.usdigital.com priced at US$ 75. It
is based on a damped pendulum with a quadrature encoder and
measures an absolute angle of gravity.
Solution
From Precision Navigation (www.precisionnav.com) we also found
another module than the one mentioned above. It is an all-in-one
product that perfectly suits our needs. It was priced at a reasonable
$345 that with academic discount became $245. It contains a 3-axis
magnetometer and a fluid based tilt-sensor. It compensates for tilt
internally, and via the RS232 interface we can read compass and 2
axis tilt data. Read more in the “Orientation module”, page 100.
Vision
So far the most successful way to find plants it is to use a camera.
Usually it would look at the infrared spectrum in which plants show
up clearly from the background. There are already systems in use that
can detect plants but the technology to separate weed from crop is not
yet convincing.
At the “Department of Control and Engineering Design” they already
had a cmos camera used in previous vision projects so there was not
very much for us to decide. It does however not look at the infrared
21. Agricultural robot
21
spectrum and therefore it can only detect “paper plants” with good
contrast to the background.
However, a cmos camera is the best technology for use in control
applications. Read more in the “Vision module” on page 113.
Motor feedback
We need to get speed and position feedback from the motors to
control them.
Tachometer
A tachometer returns the current speed and is therefore useful for
speed control. To get the position of the motor we need to integrate
the tachometer output. As the speed output is an analogue signal, it is
sensitive to noise. The noise will also be integrated and the result is a
position error. The integration will typically be done with a computer
sampling the analogue signal through an AD converter. The sample
and hold and quantification of the signal will also introduce a position
error.
Encoders
An alternative is encoders, which read the current position of the
motor. An absolute encoder always knows its position i.e. it does not
have to be initialised. An incremental encoder sends pulses to a
counter and thus the position is always relative. This can be solved by
using an index marking that resets the counter at a certain position. An
encoder is excellent to get the position, but deriving speed from
counter values introduce a quantification error. Especially at low
speed and at high sample rates there might only be a few counter
values between two samples to derive the speed from.
For the steering motors, we need to know the absolute position. An
absolute encoder from www.usdigital.com is US$ 270 while an
incremental encoder with index from the same company is US$ 48.
However when including the cost to interface four of them with the
PC it is US$275 for the absolute encoder and US$136 for the
incremental encoder.
For the drive motors a tachometer could be used, as we are mainly
interested in controlling speed and not the position. For the dead
reckoning system, we do however need to know the travelled distance
and with the integration errors described above we have chosen
incremental encoders. From www.usdigital.com we found an
incremental encoder that could produce 8192 counts per revolution
which is enough to get a good precision when deriving speed. Read
more about this in the “Encoders module” on page 89.
Hardware
Distributed control
For data communication in commercial or industrial applications, the
CAN-Bus is often used when having a large number of sensors
supplying data for a large number of units. The CAN-bus is a
distributed network system. All units connected to the bus have access
to all data on the bus. A sensor will send data on the bus with a
priority and a unique ID. All other receivers can then decide if they
22. Agricultural robot
22
will use this data or not. The advantage is that the cabling is simple as
only one set of cables will connect all units. The disadvantage is that
you need a microcontroller for all units interfacing to the bus. This
makes it expensive unless you buy a large quantity.
Centralized control
A cheap and flexible solution is to wire all control signals to interface
cards in a PC. All connections between sensors and the users of sensor
data are made by the PC and all calculations are made in the software.
In this way it is very easy to make modifications as they only have to
be changed in one place. The PC also gives great possibilities to make
an informative interface to the user.
We have chosen to use a PC as this vehicle is going to be used as a
base for many future projects.
Navigation
Manual control
The vehicle should be easy to manoeuvre manually. A cheap, simple
and well-known solution is to use a PC game joystick. The keyboard
could also be used, but as the keys only offer on/off position it is
difficult to control the speed and turning rate precisely. We have
therefore chosen to use a joystick. In addition a modern PC joystick
often offers extra sliders and buttons that can be used by the user to
control and activate special functions such as turning sensitivity,
sideways driving, etc.
Automatic control
Position
We borrow the GPS equipment and therefore the vehicle must be able
to drive without that. A typical way of getting the position when no
absolute position sensor is available is to use encoder and compass
data in a dead reckoning system. The dead reckoning continuously
calculates the position of the vehicle by summating wheel distances
and vehicle headings. With a well designed dead reckoning system we
are able to use and test the vehicle no matter if the GPS is present or
not. The only difference will be the actual precision of the position.
Path
The robot should be able to follow a list of waypoints. It could for
example be a list of crop positions generated when sowing. The
waypoints could however also be generated by the on-board vision
system the calculates the position of the plants it sees on the fly.
The vehicle should not necessary drive the direct way between two
waypoints. Especially it might not be possible for it to turn sharp
enough to go directly to the next waypoint. This could happen at the
end of a crop row where it should turn 180° and go back with the next
row.
Position control
There are many methods to let a vehicle follow a path. We have
chosen to use a simple solution to start with. The method is often used
when an AGV should follow a line on the ground using optical
sensors.
23. Agricultural robot
23
Motor control
We need to control the absolute position of the steering motors. As the
friction to the ground vary a lot there must be an integrator in the
controller to be sure that it can reach the wanted position. We have
decided to use PI controllers
For the Honda drive motors we need a speed control and as the rolling
resistance (including climbing hills) varies a lot there must be an
integrator to use its power potential.
Software
The software should be as flexible as possible and it should be easy
for other projects to continue our work without having to start from
the beginning. Software code made by others is especially difficult to
understand and to develop further, because all people have their own
programming style and preferred programming language. Especially
when considering the risk of hidden errors in the code, few people
would therefore wish to develop new code directly in the code from
previous projects.
To avoid this problem we decided to make a module based software
system. All the software functionality should be divided into a number
of logical modules that are each compiled into separate DLL’s. The
DLL’s should have a standardized interface just like all Windows
drivers. Each DLL can therefore be replaced by another DLL with the
same interface, without affecting the functionality of the rest of the
system. A replacement DLL can even be programmed in any
programming language.
It is therefore easy to modify and develop the system without needing
to consider and understand completely what is going on in the other
modules.
Identifying modules
In the first phases of the development we had divided the software
system into 5 modules. The overview of the structure is shown in
appendix 5.0b modules. We soon realized that this was not enough
and we therefore added 7 more modules.
In the following sections we will argue for the choice of the final set
of modules.
Hardware
It should be possible to replace the attached hardware (sensors and
DA converters) without affecting the other parts of the system.
Therefore there should be a module functioning as the driver for each
hardware part. This requires the following modules to be made:
Hardware Module Input Output
DA
converter
IO card
MotorsOut.dll Control signals
(values)
Control voltages and
directions to motors
Encoders Encoders.dll Counter values
from quadrature
decoder
interface cards
Steering motor angles
Drive motor speeds
Drive motor
distances
GPS GPS.dll Data from GPS
on the RS232
Global position of
vehicle origin.
24. Agricultural robot
24
port.
Compass
Tilt
Orientation.dll Data from the
electronic
compass on the
RS232 port.
Orientation and
rotation matrix from
vehicle frame to
global frame.
Camera Vision.dll Images from
camera
Position of objects in
the image.
Position
The current position of the vehicle could be relevant to use by several
other parts of the system. Therefore we have made a module that
calculates the position of the vehicle based on data from the encoders,
compass and GPS modules. The position module handles the dead
reckoning calculations and it should also work if GPS is not present:
Module Input Output
Position.dll Sensor data from
Encoders.dll, GPS.dll
and Orientation.dll
Current position of the
vehicle.
Task planning
The vision module needs a task planner to handle what should happen
when it no longer sees objects (crops) that the vehicle should follow.
This has been placed in a separate module.
Waypoints should be handled by a database; we have placed that in its
own module.
The calculation of a path based on waypoints is a task that can be
complex and it has therefore also been placed in its own module. The
following modules have been identified:
Module Input Output
Visiontask.dll Position of objects on
the ground from
Vision.dll and the
vehicle position from
Position.dll
Waypoints.
Waypoints.dll Waypoints added by the
user or by the vision
task-planner, or from a
database.
Waypoints in sequential
order.
Path.dll Waypoints Path segments
Controllers
The control of the vehicle can be divided in two areas: the low level
control of the motors and the high level control of the vehicle position
and direction. Therefore we have placed this functionality in two
modules:
Module Input Output
Controller.dll Reference: Path
segments that the
vehicle should follow
Drive motor speeds and
steering motor angles.
25. Agricultural robot
25
Feedback: Position and
orientation of vehicle.
MotorCTRL.dll Reference: Drive motor
speeds and steering
motor angles from
Controller.dll
Feedback: Drive motor
speeds and steering
motor angles from
Encoders.dll
Control signals for
MotorOut.dll
Timing
The timing of the controllers and task planners and the sharing of
processor resources should be handles centrally and not by the
modules individually. Therefore we have made a module that takes
care of this:
Module Input Output
Timer.dll The user specify what
modules should be
controlled, the rate (Hz)
and the priority.
Calls the specified DLL’s
A graphical overview of all the modules and their connections can be
found in appendix 5.0. The detailed description of the modules can be
found in chapter 5 (page 82 ff.)
2.5. Motors and power supply
Motors
The motors for the vehicle must be easy to control, supply and to
install. It is also preferred, that they can be used indoors for test. DC-
motors best meet the above demands. DC-motors can be used indoors
and be supplied by battery. Power amplifiers and gears for DC-motors
are off-the-shelf products, which makes it a flexible and easy to install
solution.
Power supply
The vehicle should be completely autonomous and therefore have its
own power supply. The power supply should be able to drive DC-
motors and the computer. Batteries where chosen for the vehicle,
because it is the easiest to install and should be able to deliver power
for 2 – 4 hours of testing, without getting to heavy
Figure 2.17 The chosen
mechanical modular concept with
4-WD and 4-WS. 4 identical wheel
modules (red ring).
26. Agricultural robot
26
2.6. Summary of the overall concept
chosen
The modular vehicle concept is based on:
• 4WS
• 4WD
• Capable of overcoming obstacles
• DC motor technology
• Batteries for power supply
The vehicle will be designed with 4 identical corners consisting of a
wheel module connected to the chassis.
The control architecture is based on:
• 12 software modules placed in separate DLL’s
• RTK/GPS for position data
• 3-Axis magnetometer with roll and pitch sensor
• Vision
Figure 2.18 Focus will be on
RTK/GPS for position data and a
3-axis magnetometer with roll and
pitch sensor for attitude data.
27. Agricultural robot
27
3. The mechanical design
In this chapter, the mechanical design will be done on basis of the
principal decisions made in the previous chapter. First, the steering
and drive gear principal for implementing 4-WD and 4-WS on the
vehicle will be determined. In the second paragraph, the wheel module
will be designed. Then the chassis will be designed and finally the
assembly of the mechanical parts of the vehicle will be discussed.
Overall demands and criteria's for the mechanical design:
• In-row driving in fields with a ground clearance on minimum
500 mm
• Space for different types of tools and sensors
• Possible to implement and design within this project.
• Protection of electronics etc.
• Flexibility
3.1. Steering and drive gear
In this paragraph, the principles for mechanically implementing the
overall principle of 4-WS and 4-WD will be determined.
Ackerman steering
The principal steering concept chosen is 4-ws and Ackerman steering,
because of flexibility, possibility of good odometer data, good steering
precision and a small turning radius.
The Ackerman steering geometry is shown on Figure 3.1 and the
relation between the wheel angles are given in the formula below.
mmLmmB
L
B
iu 1000,1000,cotcot ≈≈=− δδ
Formula 3.1 shows that the relation between the wheel angles is non-
linear and a function of the wheel base (L) and the kingpin gauge (B).
The dimensions of the vehicle have been chosen and the very large
width compared to the length makes the difference between the wheel
angles big even at minor steering angles, see Figure 3.1. This makes it
difficult to design the steering gear to avoid geometrically induced tire
slippage, which will result in poor odometer data and inaccurate
steering.
Implementing 4-WS Ackerman steering
The demands and criteria's for a good solution for the steering gear is:
• Good compliance with the Ackerman theorem.
• Acceptable play or backlash.
• Safe and reliable.
The following principles have been investigated (Appendix 3.1.3 –
3.1.4.b).
Motor to position each wheel
A motor and a gear or a linear actuator can be placed on each wheel to
change the wheel heading.
Figure 3.1 Ackerman steering.
Formula 3.1
Figure 3.2 Each wheel is
controlled by separate motors (top
view).
Figure 3.3 Conventional steering
mechanism.
28. Agricultural robot
28
Advantages:
With closed loop computer control it should be possible to get very
good compliance with Ackerman. Changes of steering strategy e.g.
sideways steering or change of dimensions, is easily done in software.
If the construction allows it, it will be possible to rotate the steering
angle 360O
. The flexibility of this method would be a big benefit for
research in field steering. The mechanical design will not be very
complicated and time can be saved in the workshop. The solution is
very compact and connections are made with electrical wires. This
makes it less complicated to design the chassis, because there are
fewer constraints on the design.
Disadvantages:
There is no mechanical link between the steering wheels, but because
it is working in the field at low speed, the safety risk is considered
very small. It is expensive to buy all the electronic and mechanical
components. There can be problems with getting the wheels to follow
the Ackerman in real time and then geometrically induced tire
slippage will not be avoided [BERN].
Steering rod
A conventional steering gear, which is used on most road vehicles,
where a steering rod connects the steering wheels, Figure 3.3.
Advantages:
Driving forward, the wheels are always well aligned and the
geometrically induced slip is very small. Only one input is necessary
to control the steering.
Disadvantage:
The steering gear has good compliance with Ackerman for small
steering angles on vehicles with a typical length/width ratio around 2.
In appendix 3.1.5.a-d different structures of this type of steering gear
is investigated. A typical result is shown on Figure 3.4 and it can be
seen, that for this vehicle, the steering gear have very poor compliance
with Ackerman. The outer wheel angle VR and the geometrical angle
ϕ is the input and the inner wheel angle VL is the output. Different
geometries have been calculated in Matlab, but a fairly simple
solution, with good compliance with Ackerman, have not been found.
It is though possible to get good compliance with Ackerman, see
Figure 3.5 [MECH99]. These mechanisms are however very complex
and takes up a lot of space.
Guide way or special designed guide wheels
A guide way with the wanted path is moved linear by an actuator, so
that the wheel angle will be correct, see Figure 3.6; a. This could also
be done with a wheel designed to make the steering wheels assume the
right angles, see Figure 3.6; b.
Advantages:
It is possible to get good compliance with Ackerman.
Disadvantages:
It is difficult to design and to make the mechanism operate properly
with little friction and little play or backlash.
Figure 3.4 Matlab plots showing
the results for the conventional
steering gear.
Figure 3.5 Mechanism for
Ackerman steering.
Outer wheel in turn [degrees]
Innerwheelinturn[radians]
/2
29. Agricultural robot
29
a. b.
Differential gear
It is possible to design a differential gear, to give the rotation wanted
to steer each wheel according to Ackerman, see Figure 3.7 [DIFF98]
Advantages:
Good compliance with Ackerman and good alignment of the wheels.
The wheels are also connected mechanically.
Disadvantages:
The mechanical design is very complicated and a project in itself. It
will be difficult and time consuming to make in the IKS workshop.
This could prevent us from reaching our objective.
Connection of front and rear axle steering gear
The following principles have been investigated.
Connection by steering rods
Rods connect the rotation of the kingpin of the front and rear wheels,
see Figure 3.8.
Advantages:
Can be made of standard components.
Disadvantages:
The joints must be placed so that the steering angle is not changed,
when the front axle turns a little because of obstacles. The connections
will take up a lot of space.
Steering motors for each wheel
Each wheel has its own steering wheel connected to the kingpin.
Advantages:
Sideways movement will make it possible to position and orientate the
vehicle more precisely in the rows. The method is very flexible,
because the steering strategy is implemented in software. Electrical
wires are very flexible to place.
Disadvantages:
The component price will be high and the control of the vehicle will
be more complex.
Wire connection
Wires connect the kingpins.
Advantages:
Big flexibility of placement of connection and simple to implement
Disadvantages:
Might give problems with backlash and play.
Hydraulic connection
Hydraulic motors or actuators are used to control the steering.
Advantages:
The play could be very small and the hoses are very flexible to place.
Figure 3.6 Guide way and guide
wheel.
Figure 3.7 Ackerman compliance
achieved with differential gear.
Figure 3.8 Connection of the front
and rear wheels with steering rods.
30. Agricultural robot
30
Disadvantages:
Hydraulic components are quite expensive and it will be necessary to
have a pump running to give oil to the system.
Choice of 4 wheel steering principle
After having investigated the different possibilities of implementing
Ackerman and to connect the steering of the front and rear wheels, we
have chosen to use 4 motors for steering. This gives the best possible
flexibility, because all the options are in software. This will give
opportunity for a large variety of tests of steering methods in the field.
It will be possible to test front, rear and all-wheel steering. The point,
which the wheels turns around, can be placed anywhere and not just
on a line including the front axle, rear axle or the centre point of the
vehicle.
This will be a very good possibility for the control department to gain
experience with control of autonomous terrain vehicles.
Design of the driving transmission
Transmission and motor
Because of the big ground clearance on 500 mm and the wheel
diameter on 350 mm to 500 mm, it is complicated to make a
transmission to a common motor, see Figure 3.9. A common motor
will also make it necessary with differential gears between the front
wheels, the rear wheels and the front and rear axle. This will be very
expensive, heavy, complicated and decrease the efficiency of the
transmission.
Another possibility is to use a motor to drive each wheel and then,
with closed loop computer control, control the speed of each wheel
according to its turning radius. This principle has been chosen for
transmission and motor.
Wheel module
The wheel module now have its own steering motor and drive motor,
which makes the system very flexible. With both drive and steering
gear in the same unit, we will have very few constraints on the chassis
design and better opportunities for optimising it for experimental use.
Figure 3.9 The dashed lines
indicate the necessary ground
clearance.
31. Agricultural robot
31
3.2. Wheel module
In this part, the mechanical concept of the wheel module will be
designed in detail. The overall principal and quantitative structures of
the vehicle have been determined. Now the modules (wheel modules
and chassis module) should be detailed and the interface between the
modules must be determined.
Quantitative structure
The wheel module consists of a wheel with drive motor, steering
motor and sensors for both motors.
Because of the demand for a big ground clearance and a very slim
wheel construction to drive between the crop rows, the kingpin have
been placed above the wheel centre, the steering mechanism is said to
have zero offset, see Figure 3.10.
This structure has many advantages. There is minimum feedback of
forces into the steering system. The steering movement on one wheel
have minimum influence on the steering of the other wheels. Zero
kingpin offset also leads to minimum power requirement for steering,
see page 40. If the kingpin was placed on the side of the wheel, the
steering motors would have to deliver a constant moment to hold the
direction, which would lead to failure of the motors.
The disadvantage is that the big distance between the bearings and the
load attack point will give bigger bearing forces, but this is not a
significant problem.
Forces on the wheel module
When designing a mechanical system, it is necessary to look at two
scenarios; the normal operating conditions and the worst-case
conditions.
Under normal conditions, the system should be able to perform as
specified and it can be important to look at deflections and dynamics.
Under worst-case conditions, it is important to realize, that it is
impossible or not economical to avoid failure under all conditions. It
is important to foresee, what can happen to the system and design the
system to fail in the best way. The most important thing is to try to
avoid danger to people and secondary to design the system to have
inexpensive parts fail, e.g. a screw.
Mechanical design is always a trade-off between conflicting interests,
for example low weight and high strength. This vehicle has to have
low weight to minimize the energy consumption and cost for motors
and batteries.
On Figure 3.11 the forces acting on the wheel module are shown. In
the next two paragraphs, the normal and worst-case forces are
estimated and then in the third paragraph the forces are updated
because the choice of motors limits the allowable forces.
Figure 3.10 Placement of kingpin
with zero offset.
Figure 3.11 Forces reacting on the
wheel module.
32. Agricultural robot
32
Normal working conditions
The forces under normal working conditions are mainly due to the
weight of the vehicle, the traction from motors and the steering of the
wheels.
The force Fx is mainly due to traction, µ is the estimated rolling
coefficient:
N
kg
g
m
F s
m
x 18425.081.9
4
300
4
2 ≈××≈××= µ
The force Fy is mainly due to the centripetal force during turning. As
the centripetal force increases the resulting force is coming closer to
the outside wheels in the turn. Therefore, the whole force will be on
the outside wheels just before the vehicle will turn over. Below the
forces are assumed to be equally distributed between all 4 wheels:
N
m
kg
r
Vm
F s
m
turn
y 312
1
)2(
4
312
4
22
≈×≈×=
The force Ft is mainly due to the gravity:
N
kggm
F s
m
t 765
4
81.9312
4
2
≈
×
≈
×
=
Worst-case conditions
We have estimated the worst-case condition the vehicle should be able
to manage, without damage.
Fx, worst case
If the vehicle hits an obstacle with a velocity of 1 m/s, see Figure 3.12.
We assume, this will lead to a deformation of the tyre ∆s = 25 mm and
a linear decrease of speed, which will give an average speed Vave = 0.5
m
/s. This is just an estimate and will depend a lot on the inflation rate
of the tyre and the tyre material. The time to decelerate the vehicle
would then be:
s
m
V
s
t
s
m
ave
05.0
5.0
025.0
≈≈
∆
=
The deceleration:
220
05.0
1
s
ms
m
st
V
a ≈≈
∆
∆
=
The resulting force:
kNkgamF s
m
caseworstx 620300 2, ≈×≈×=
(This could also have been found by an energy approach)
This assumption is not very accurate and depends a lot on the inflation
rate of the tyres, but it gives a hint about the size of the forces.
Fy, worst case
The vehicle is lifted up in one side or tilting, see Figure 3.13. The
maximum static force will be:
Figure 3.12 Deformation of the
tyre, when hitting an obstacle with
1 m/s.
Figure 3.13 Forces if the vehicle is
tilted.
33. Agricultural robot
33
kN
kg
g
m
F s
m
caseworsty 5.181.9
2
300
2
2, ≈×≈×=
It is unlikely, that the vehicle will be exposed to big forces in the Fy
direction.
Ft, worst case
The vehicle is lifted and dropped.
The forces when falling from h = 0.25 m height is calculated using an
energy approach, but with the same assumptions as for Fx, worst case.
kN
m
m
kg
s
hg
m
F
s
m
worstcaset 4.7
025.0
25.081.9
4
300
4
2
, ≈
××
≈
∆
××
=
Honda, maximum impact
Later in the design process, we have chosen to use in-wheel motors
from Honda, on page 34. The maximum allowable impact shock on
the motors is shown on Figure 3.14 [HONDA]. The motor can nearly
handle the forces calculated earlier, but it will be the motor maximum
impact shock forces, that the vehicle should be designed for. The
working area for this vehicle is in the green field on Figure 3.14.
Because the dynamic forces are difficult to estimate, the vehicle will
be designed for a worst-case force: Ft, worst case = Fx, worst case = 4 kN.
Drive transmission
Demands and criteria's for a good drive system:
• DC motor power: the vehicle should be able to drive in a field
with loose soil, at 1 m/s.
• Slim construction capable of driving in row crops
• Capable of driving outdoors. Protected against rain and dust,
minimum IP541
• Little play or backlash
• Low complexity
A lot of research has been done to investigate the possible drive
solutions, which are available on the market and suitable for this
vehicle. We have made inquiries to many distributors of drives, but
also to users as e.g. wheelchair manufacturers (see “Literature” on
page 159). In appendix 3.2.3 a number of different principles are
listed. Two principles have been investigated further and are described
below. The rest of the principles would require too much work both to
design and to produce in the workshop.
DC-motor with worm gear
The motor construction principle is shown on Figure 3.15.
On Figure 3.15; a, the wheel is carried from one side, which makes the
bearing forces bigger. However, it is easier to align the bearings.
On Figure 3.15; b, the wheel is carried by a fork, this gives a better
distribution of forces in the frame and lower bearing forces. The fork
solution will spoil the look of the vehicle.
1
Appendix 3.2.32
Figure 3.14 Maximum allowable
impact shock on the Honda motors
Figure 3.15 Design using motors
with worm gears.
a. b.
34. Agricultural robot
34
Common for the two solutions are that the gear bearings cannot
handle the radial forces and therefore two bearings have to be used.
This makes it necessary with a coupling between the wheel axle and
the gear axle, because they cannot be aligned perfectly. Misalignment
courses big internal forces and leads to failure. Another possibility is a
special bracket for the motor, which will allow the motor to move a
little.
The dc-motor with worm gear can be supplied by UB-Let, who
manufacture wheel chairs and other lightweight transportation
equipment (www.ublet.dk). UB-let can also supply the power
amplifier to drive the 24V dc-motor, which will make this choice
fairly inexpensive.
Worm gears have a preferred direction of rotation, which make them
less suitable for the robot, where two motors always will rotate against
the preferred direction. Another disadvantage is the very low
efficiency of motor and worm gear.
There are no standard velocity sensors for this type of motor and gear,
so a bracket must be made for a sensor.
Honda in-wheel motor
From Honda we found an in-wheel brushless dc-motor, with build in
gear and brushless dc-motor controller, see Figure 3.16. With the
Honda motor, it is possible to design a very slim and compact
construction, see Figure 3.17. Below is a list of additional features:
• Speed controlled by a 0-5V signal.
• Overall battery-to-shaft efficiency exceeds 85% (Honda),
which is important on a battery-powered vehicle.
• Support loads up to 400 kg.
• Sealed against all kinds of weather.
• Fits into 8" wheel rims
The fewer parts will allow us to design the drive faster and save work
in the workshop.
The disadvantages of the Honda solution are the price and that we
need to mount an external velocity sensor. The total solution with 4
motors will cost about 8.000 DKK more than the worm gear dc-motor
solution, but the work saved in the workshop and the better overall
solution can easily justify the choice of the Honda in-wheel motor.
Choice of motor size and gear ratio
To find the necessary motor size we have to estimate the weight of the
vehicle and the rolling resistance in the field.
The gross weight of the vehicle is estimated to approximately 312 kg
including a tool weight on 25 kg, a 100 kg payload and 60 kg
batteries, see appendix 3.3.2.
The rolling resistance is very hard to determine. In the Honda manual
a rolling resistance coefficient on µ = 0.085 is suggested for off-road
(unpaved surface) applications. Some literature [KØRTEK] suggest
rolling resistance coefficients as high as 0.35 for 0.5 m diameter tyres
on sand and 0.1 to 0.15 on firm soil. In agricultural notes rolling
coefficients for tractors on up to 0.15 to 0.25 under very difficult
conditions are found [KVL96].
The shaft torque can be calculated by Formula 3.2, which do not
consider gradients. In the table below the maximum rolling
coefficients possible, for the different interesting models of the Honda
motor, are calculated.
Figure 3.16 Look at the inside of a
Honda in-wheel motor.
Figure 3.17 Part of the motor is
placed inside the wheel rim(top
view).
35. Agricultural robot
35
2
8.9)(.)(085.0 ×××
=
mdiatirekgweight
torqueShaft
The tire diameter used is 0.48 m.
Motor Shaft torque [Nm] Weight [kg] µµµµmax
Rated: 18 312 0.098DDW 2015 J
Max: 42 312 0.22
Rated: 50 312 0.27DDW 2020 J
Max: 101 312 0.55
The Honda DDW 2015 should be able to do the job, because the need
for a payload on 100 kg is uncertain and could be used only under
good conditions. The DDW2020 is also 38 mm longer which will
make it more difficult to drive in crop rows. Tima A/S, the importer of
the Honda motors, can deliver the DDW 2015 J and it is chosen to buy
this model.
Wheel
The wheels for the vehicle should have a good grip under field
conditions on bare soil. The wheel rim must be minimum 8" to fit the
Honda motor.
With an 8" rim the outside diameter of the wheel of approximately
420 mm and a rated speed of 80 rev/min, we get the following vehicle
speed:
h
kmmdiatirespeedshaft
h
kmV 3.6
1000
6014.3).()(min
)(
1
=
×××
=
−
The vehicle speed is 6.3 km/h at rated output shaft speed. This is
much more than the wanted 3.6 km/h and therefore the smallest
diameter wheels should be chosen to give the biggest tangential force.
From Texas, who manufacture garden equipment, we were offered 4
8" rim wheels with tractor tyres at a very low price. The ledges on the
tyres make the tyre diameter 480 mm. and the width is 110 mm.
Sensor for the drive motor
To control the speed of the Honda motors and to get odometer data for
the position of the vehicle, we need a sensor on the motors. The
Honda motor has a pulse signal, which gives 4 pulses/revolution x
reduction ratio. The reduction ratio for the DDW 2020 J is 1:9.3,
which leads to 37.2 pulses/revolution. This gives to little position
information (40.5 mm/pulse) and far to little information for deriving
velocity feedback. Therefore an encoder from US-Digital is chosen,
see Figure 3.18. US-Digital has a big selection of low cost encoders
with computer interface cards for the ISA-BUS. We cannot get an
encoder, which will fit the 20 mm diameter output shaft on the motor
and there is no access to the motor shaft on the back of the motor.
Therefore a 1" encoder is chosen and a bushing is made for installing
the encoder to the output shaft, see Figure 3.192
. The bushing has an
easy running fit and is normally clamped between a flange on the
motor shaft and the hub, see Figure 3.22. It is also secured with a
2
Appendix 3.2.7.c-d and drawing 1.1.3.3.
Formula 3.2
Figure 3.18 Encoder for the
Honda motor shaft.
Formula 3.3
Figure 3.19 Encoder mounted on
the output shaft by means of the
aluminium bracket (1) and bushing
(2).
1.
2.
1.
36. Agricultural robot
36
screw, so that the bushing with the encoder cannot move if the hub is
removed.
The encoder is without index and gives 8192 pulses/rev., which makes
it possible to get good position measurements and derive good speed
measurements. Read more in “Encoders module” on page 89.
The encoder is fitted to the Honda motor, with an aluminium bracket,
see Figure 3.193
.
Wheel rim
The wheel rim delivered by Texas have a centred rim plate, which will
make the motor with encoder and hub wide and not make the best
possible use of the in-wheel design. We have chosen to make a new
rim plate, which will allow us to make a very slim and optimal design
for driving in narrow crop rows.
Special demands and criteria's for the wheel rim design:
• Easy access to the encoder and the air valve on the inner tube.
• High stiffness
• Good alignment
• Protection of the encoder
Attaching the wheel rim to the shaft
To get easy access to the encoder and the air valve, we have chosen to
fit a hub to the shaft to easily screw the wheel on and off, see Figure
3.204
.
The motor has a splined shaft with a thread in the end. This makes it
simple to attach the hub with a key and a screw in the shaft end, to
prevent the wheel from falling off. To use a key length on 33 mm is
enough to transmit the maximum shaft torque to the wheel5
. Because
of reversing of the rotation direction, there is a risk that the screws can
loosen [Decker]. Putting loctite on the thread before assembly
prevents this.
An alternative solution is to use a Taperlock clamp element to attach
the wheel instead of using a hub. This solution is good for reversing
applications, but is more expensive and difficult to fit..
Hub
The hub hole is designed with an easy running fit (H7/f8) to fit the
motor shaft, see Figure 3.21. Tolerances from the Danish Standard
[DS96] are used for the key/spline and the spline measure is 5H9.
The wheel rim is aligned with the hub with an easy running fit
(H7/f7). The wheel rim is screwed on by M10 x 16 screws6
.
The hub is made out of one piece in st37 by turning, drilling and
broaching.
Design of the wheel rim plate
The new wheel rim plate has the shape of hollow truncated cone, see
Figure 3.227
. This design is chosen to make space for the hub and the
encoder and to give the rim good stiffness. In collaboration with the
workshop, we have chosen to make the rim plate of two parts, which
3
Appendix 3.2.7.c-d and drawing 1.1.3.2.
4
Appendix 3.2.7.a-d
5
Appendix 3.2.7.b
6
Appendix 3.2.7.g and drawing 1.1.3.1
7
Appendix 3.2.7.e-f and drawing 1.1.3.4 – 1.1.3.4.2
Figure 3.20 New rim plate design.
Figure 3.21 Section drawing of the
hub.
37. Agricultural robot
37
are welded together. An alternative solution could be to use a press,
but this would require a special tool.
The part with the shape of a truncated cone is made by rolling. The
centre hole in the plate has a H7 fit to align the rim and the hub. The 4
holes for screwing the rim to the hub have big clearances, because
they are not used for alignment.
The rims were originally made of two parts spot-welded together.
Welding the parts on the outside makes the new rim and then the old
rim plate is removed by turning. The new rim plate is welded on and
surfaced on a lathe to align the wheel.
The new rim plate is 4 mm thick and the material is st37, the plate are
know subjected to bigger bending moments, because it is not in the
centre of the rim. Therefore, the thickness is increased with one mm
and the plate has no holes like the old rim plate. The rolling of the
plate welded to the centre plate also increases the strength
significantly.
It is necessary to protect the encoder against sand and small stones.
When the rim is attached to the hub, it is only necessary to put a strip
of foam rubber around the circumference of the motor to make a
complete seal, between the motor and the rim.
Motor frame, Part design
The motor frame is the part connecting the Honda motor and the
kingpin.
Demands and criteria's for the motor frame design in addition to those
mentioned on page 33:
• High stiffness
• Little deflection
• Suitable for wiring
Forces
On Figure 3.23 the moments M and the reactions R in the frame,
caused by the force Fx, is shown. The force Fx, worst-case is the force
causing the biggest moments in the frame, because of the distance
from the kingpin to the point of attack. Since Fx, worst case is a worst-case
force, we assume, that it will not occur at the same time as any of the
other worst-case forces. The normal force from the weight of the
vehicle is small compared to Fx, worst case and is ignored.
The vertical frame beam is exposed to both torsional loading τ,
bending loading M and shear loading R.
Structure
When looking at Figure 3.24 it is obvious to make a U-profile
(channel cross-section) to attach the motor to. The U-profile makes
the construction very slim and the profile with round edges will not
easily damage the crop.
Attaching the motor frame to the kingpin
On Figure 3.268
three different solutions for connecting the motor
frame to the kingpin are shown.
8
Appendix 3.2.9.a-c
Figure 3.22 The final solution.
Figure 3.23 Reactions and
moments in the motor frame.
Figure 3.24 Motor attached in a
U-profile (cut out side view).
38. Agricultural robot
38
Solution (a) uses a taper-lock, which can handle big forces and
moments and is good for aligning. The solution will be quite heavy
and not leave much room for wiring.
Solution (b) is assembled with screws and a small tap is made for
aligning the parts. This solution is not so complicated, easy to
assemble and the screws could be dimensioned for overload
protection. The solution does not leave room for the wires.
Solution (c) is the final solution, where the motor frame is bolted to a
flange on the kingpin. The top of the motor frame is made of a 5 mm
plate, which is supported by a bended plate, see Figure 3.25. This
solution is easy to assemble and leaves good room for wiring. A hole
is made in the centre of the plate to align it with a tap in the centre of
the kingpin.
After welding the motor frame it is machined on a lathe, were it is
going to be assembled with the kingpin, so the motor frame can be
fitted straight.
Screw dimensions
The screws should be able to handle the worst-case forces on the
wheel and the pretension of the screws. The force contribution from
the worst-case force is calculated on Figure 3.27. By taking the
momentum around point A the force Fx can be found. It is found that it
is necessary with M10 screws and that the flange on the kingpin has to
have a 14 mm long thread to avoid damage to the thread9
.
Dimensions
To find the dimensions of the motor frame, we have used beam theory
to estimate the stresses.
First, it was tried to design the U-profile as an open channel, see
Figure 3.28. The load P does not go through the elastic axis of the
beam and hence the beam is subjected to torsion as well as bending
[ROARK].
Resolving the load P into an equal and parallel load P´ and a twisting
couple T solve the problem. The load P’ passes through the flexural
centre Q. The twisting couple T is equal to the moment of P about Q.
The flexural stresses due to P´ is found and the stresses due to T are
found and superimposed giving the stresses due to the actual loading.
The formulas were written in a Matlab *.m file and it was found, that
it is necessary with a thickness on 6 mm10
. An open channel section is
not very good, when the beam is subjected to torsion, which gives the
biggest contribution to the stresses.
9
Appendix 3.2.11.d
10
Appendix 3.2.11.a-c
Figure 3.25 Motor frame solution.
Figure 3.26 Assembly solutions for motor frame and kingpin.
Figure 3.27 Screw connection of
kingpin and motor frame.
Figure 3.28 Open channel.
a. b. c.
39. Agricultural robot
39
The channel section is closed by a plate from the top plate to the
motor, this makes the top part a closed section, see Figure 3.25; 2. The
beam is calculated as a thin-walled rectangular tube, see Figure 3.29.
A thin-walled rectangular tube with 3 mm thick walls is found to have
a normal stress on 8 N
/mm
2
under worst-case conditions. Because the
bottom part of the beam still have a channel section and to be safe, it
is decided to have a thickness of 3 mm.
At the bottom corners of the frame, some metal plates are welded on
to improve the stiffness, make the frame look better and to protect the
motor, see Figure 3.25; 1. The frame is open in the bottom to allow
dirt to fall out.
The top plate Figure 3.25; 4 is made of 5 mm. steel plate, because the
section is not closed at the bottom.
The drawings for the motor frame are 1.1.2 – 1.1.2.5. A drawing with
dimensions of the sheet metal plates before bending are generally not
made because the machining allowances are not well defined. The
dimensions are based on the knowledge of the technicians in the IKS
workshop. Drawing 1.1.2.2.1 are however, an attempt to make such a
drawing based on data from "Hoischen Technisches Zeichnen"
[HOISCHEN], but the drawing were not to much use in the workshop.
Wiring
The wires from the Honda motor and encoder should go up through
the closed frame and out through a 21 mm hole, with rubber
protection, in the plate to reinforce the channel section, Figure 3.25; 2.
The wires will then come out through the hole (3), where the wires
will go into a flexible conduit to protect the wires.
Avoid damage to crop leaves
If the vehicle is going to drive in cornrows, a lot of corn will be
damaged and driven over by the wheels. This can be avoided if a
metal tube is bend around the wheels to push the corn to the sides, see
Figure 3.30. Such a device can easily be made and mounted to the
motor frame.
Steering mechanism
The principle for the steering mechanism is shown on Figure 3.10.
Demands and criteria's for a good implementation of the steering
principle:
• DC motor power: the vehicle should be able to steer in a field
with loose soil, at 1 m/s.
• Low cost
• Capable of driving outdoors. Protected against rain and dust,
minimum IP 54
• Little play or backlash
• Low complexity
Transmission and control loop
In this paragraph the machine elements for implementing the steering
mechanism will be chosen and the right dimensions will be calculated.
Figure 3.29 Closed channel
Figure 3.30 A metal tube is
screwed to the motor frame and
bend around the wheel to push the
corn to the sides, to avoid the corn
being run over by the wheel.
Figure 3.31 Assumed tire print.
40. Agricultural robot
40
Power requirements
It is necessary to estimate the torque needed to steer the vehicle. Many
parameters influence the power requirements as for example caster
angle and camber angle. However, here the kingpin is vertical and just
above the wheel centre and this removes many of the normal
parameters. A convenient method, for calculating the maximum
torque required for steering, is to calculate the torque necessary to
steer on dry and clean concrete under stationary conditions
[TRACTORS]. This is usually the heaviest steering load.
Nm
m
Ne
A
I
WfT 19
8
)1.0(
7.0750
2
20
≈×≈+=
f = 0.7, effective friction coefficient
I0 = polar moment of inertia of tire print
e = 0, kingpin offset
A = tire print area
The exact shape of the tire print is not known and are therefore
assumed to be circular, with a diameter equal to the nominal tire
width, see Figure 3.31.
Steering motor
Demands and criteria's for choosing steering motors.
• Price
• Power requirement 19 Nm
• Intermittent service
• 24 V DC power supply, because the Honda motors have made
it necessary to have 24 V power supply.
• The steering response (velocity) should be minimum 90 degrees
/s
with a 19 Nm load
• Output shaft, which is easy to attach the kingpin to.
• Possibility of attaching encoder to the motor or gear
From NLB we have got at catalogue of inexpensive gear motors used
for mechanical engineering in general e.g. in the automotive and
agricultural industry. The motors have worm gears and are protected
up to IP 40, see Figure 3.32.
The disadvantages of these motors are the low efficiency, preferred
direction of rotation and that only torque loads are allowed on the
gears.
The worm gears are self-locking, which can be both good and bad for
this application. The advantage is that it might make the control less
sensitive to terrain irregularities. The disadvantages are, that it can
cause stability problems, but the risk should be small for relatively
slow control systems [SERVO]. Another problem is, that the strength
of the gear is not very high and the gear could be damaged by big
torque loads on the kingpin.
To control the motors it is necessary with a power amplifier and a
sensor to give position feedback. Some of the motors have a feedback
option, but the resolution is only 4.6 degrees/pulse and there is no
index to initialise the system.
A list of possible solutions is shown in appendix 3.2.14.
The motor 403 939 AR from the 0277(SW2K) series is chosen;
because it meets the above demands, see the motor characteristics on
Figure 3.32 Steering motor
dimensions
Figure 3.33 Motor characteristics
41. Agricultural robot
41
a:
b:
Figure 3.33. The gear strength of this motor is specified to 25 Nm.
This solution have some drawbacks, but have been chosen because of
the very low price at 357,- DKK. We will then try to compensate for
the drawbacks in the mechanical and electrical design and in the
software. The motor should be built in, so that it can be easily
replaced if the gear breaks or problems occur with the self-locking
worm gear.
The shaft is splined and is easy to make adaptations for, see Figure
3.34; a. Opposite the main drive, there is a additional drive possibility,
which can be used for sensors, see Figure 3.34; b.
The wiring diagram for the motor is shown on Figure 3.35. The two
capacitors are used as interference suppression filters, but when
connected to a pulse width modulated amplifier the capacitors will get
very hot and melt. After having melted the capacitors on one motor,
they were removed on the 3 other motors.
Steering motor power amplifier
To control the steering motors it is necessary to amplify the control
signal from the computers D/A converter to the power level required
for driving the motors.
Our demands and criteria's for choosing power amplifier are:
• Linear
• 4-quadrant control
• Min. 12 Amps
• Low power consumption
• Low cost
• Motor protection, current limitation
For power requirements up to a few hundred watts, transistor
amplifiers are widely used, but the power losses are significant. To
minimize the power loss PWM (Pulse Width Modulation) amplifiers
are used, these amplifiers can be used for very high powers. The
principal of the PWM method is to switch battery voltage on and off
with a high frequency (kHz sampling rate). The average output DC-
voltage is controlled by adjusting the pulse width [SERVO].
Because of our requirement for low power consumption, we have
chosen to use PWM amplifiers for controlling the steering motors.
UB-Let can supply inexpensive 70A PWM 4-quadrant amplifiers from
Curtis Instruments Inc., dedicated for wheelchairs, which seem
suitable for this vehicle, see Figure 3.36.
The amplifier can be programmed to be linear and to limit the current
to max. 20A. The 20A current limit is a little to high, but in the
software we also have the capability to check whether the motor is
turning or not, when it should. This information can also be used for
protection of the motors. The amplifier is easy to build in and is
protected by a rugged die-cast housing. The amplifier seems ideal for
the vehicle and 4 amplifiers are bought from UB-Let.
Coupling
The gear bearings can only handle torques and can therefore not be
used to support the kingpin. Since it is not possible to align the motor
shaft and the kingpin perfectly, it is necessary to use a coupling
between the motor shaft and the kingpin.
Demands and criteria's for choosing the right type of coupling:
• Little backlash
• Able to transmit a torque on 25 Nm
Figure 3.34 The adaptation
possibilities.
Figure 3.35 Motor diagram.
Figure 3.36 Curtis 1228 amplifiers
42. Agricultural robot
42
b
a
• High torsional stiffness
• Low price
• Compact
• Parallel misalignments up to 0.25 mm
• Easy to adapt
Different coupling principles are investigated, see appendix 3.2.16.a-c
and two types are chosen as the best for this application, see Figure
3.37.
The Oldham coupling is chosen because it has zero backlash, smaller
dimensions, higher torsional stiffness and very small restoring forces,
which leads to low bearing loads.
Clamp style shaft attachment is chosen because it is best for
applications with reversing torque and vibrations. The discs are of
acetal, because this gives higher torsional stiffness and long backlash-
free life, compared to nylon discs. “Thro' bored” hubs are chosen,
because they have 2-3 times longer backlash-free life, due to a
protective coating, with lower abrasion factor.
It is difficult to follow the selection guide in the Oldham coupling
documentation totally because the duty time and the reversing torque
are very difficult to estimate, see appendix 3.2.17. If the maximum
torque (19 Nm) and a duty time on 3 hours are estimated, it will be
necessary with a size 57 coupling, which is very expensive. Therefore,
we have only looked at the static break torque and the peak torque and
estimated, that a size 33 will be able to do the job. The properties of a
size 33 coupling are static break torque on 53 Nm and a peak torque
on 9.0 Nm (The coupling should sustain minimum 106
peak torque
reversals). This size of coupling might also give a better overload
protection of the gear even though the static break torque is twice the
strength of the gear. Another possibility of overload protecting the
gear is to tighten the clamps so that torques higher than 25 Nm will
make the gear shaft slide in the coupling clamp [OLDHAM].
Sensor for the steering motors
To control the steering angle of each wheel, it is necessary to have
position feedback on the kingpin, gear or motor. Encoders are optimal
for position feedback. The most common are incremental quadrature
encoders, which can only give a relative position and the direction.
Here we want to measure the absolute steering angle and therefore we
need an encoder with an index. US-digital, who also supplies the drive
motor encoders, has an encoder with index and a resolution of 2048
counts per revolution. The encoders are quick and easy to assemble
and protected by a rugged housing, see Figure 3.38. They can be
supplied for shafts diameter from 2 mm. to 1" and are easy to align.
They can also supply a PC ISA-BUS interface card for 4 encoders,
which will make the implementation simple. We had first made a
layout for a prototype card for interfacing the encoders, but this is
nearly as expensive and could cause many problems.
The solution from US-Digital is the best and cheapest solution we can
find and the encoders and interface cards are chosen. See “Encoders
module” on page 89.
Figure 3.37 a; Oldham coupling,
b; jaw coupling
Figure 3.38 Assembly of encoder
to the kingpin.
43. Agricultural robot
43
1.2.
3.
4.
5.
6.
Placement of the encoders
The placement of motor, gear, coupling and kingpin with bearings are
given by the nature of the machine elements, we are using. There are
several possibilities for building in the encoders, which can be seen on
Figure 3.39. Position 1, 2 and 3 have some common disadvantages.
• The possibilities of replacing the motor and gear are
constrained.
• Because of backlash in the gear and elasticity in the gear and
the coupling, there will be errors on the steering angle
feedback to the controller.
The advantages of position 1 and 2 are easy access to the encoder and
simple wiring.
Positions 5 and 6 also have common disadvantages:
• Difficult access to the encoder.
• It is necessary with a very big diameter encoder, which will be
more expensive.
Position 4 has the advantage, that an inexpensive encoder can be used
with only 10 mm diameter through hole. The encoder will be
measuring directly on the kingpin, which will give the best
measurement. A drawback is that the construction has to be designed
to give good access to the encoder and possibility of suitable wiring.
The encoders are built in at position 4 and are ordered with a 10 mm
diameter through shaft hole, 2048 counts/rev, index and centring tool.
Bearings
The kingpin has to be fitted in two bearings.
Forces
The radial forces acting on the kingpin bearings are shown on Figure
3.40. The worst case loads must be transmitted to the chassis through
the kingpin bearings.
The worst-case horizontal load on the wheel module is Fx, worst-case = 4
kN and the worst case axial load is Ft, worst-case = 4 kN.
The radial bearing forces is calculated by using the formulas for
momentum equilibrium. The length from the wheel centre to the lower
bearing is estimated to l = 250 mm. and the length between the
bearings is s = 100 mm. The sign of the horizontal reactions F1 and F2
is not important.
kN
m
mkN
s
lF
F x
10
1.0
25.04
1 ≈
×
≈
×
=
kN
m
mmkN
s
slF
F x
14
1.0
)1.025.0(4)(
2 ≈
+×
≈
+×
=
The vertical load Ft, worst-case is only going to be carried as axial load of
one of the bearings.
caseworstta FF −= ,
If the vehicle is lifted, the axial load on the bearings, from the weight
of a wheel module, must be carried.
Figure 3.39 Placement of encoders
Figure 3.40 Bearing forces
Figure 3.41 Self lubricating slide
bearings.