1. Page 1 of Factsheet 1
Cambridge & Huntingdon Palliative Care Group
Last Reviewed: October 2004
Review Date: October 2006
FACTSHEET 1 ON PALLIATIVE CARE
SETTING UP AND USING A SYRINGE DRIVER
Graseby MS26
The following information applies to the use of Graseby MS26 syringe drivers. Please
consult Specialist advice if using MS16 or MS18 syringe drivers.
Setting up an MS26 Syringe Driver
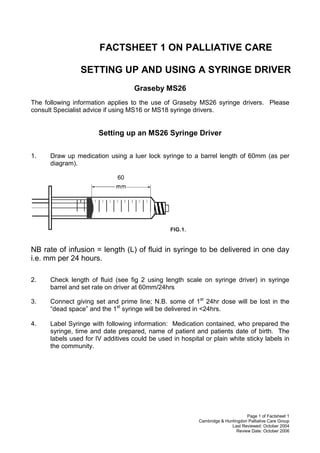
1. Draw up medication using a luer lock syringe to a barrel length of 60mm (as per
diagram).
FIG.1.
NB rate of infusion = length (L) of fluid in syringe to be delivered in one day
i.e. mm per 24 hours.
2. Check length of fluid (see fig 2 using length scale on syringe driver) in syringe
barrel and set rate on driver at 60mm/24hrs
3. Connect giving set and prime line; N.B. some of 1st
24hr dose will be lost in the
“dead space” and the 1st
syringe will be delivered in <24hrs.
4. Label Syringe with following information: Medication contained, who prepared the
syringe, time and date prepared, name of patient and patients date of birth. The
labels used for IV additives could be used in hospital or plain white sticky labels in
the community.
60
2. Page 2 of Factsheet 1
Cambridge & Huntingdon Palliative Care Group
Last Reviewed: October 2004
Review Date: October 2006
FIG. 2.
5. Insert battery into the driver. The battery compartment is in the back of the driver
and has a sliding cover. An alarm sounds for a few seconds when the battery is
inserted correctly.
Press and hold down the start/boost button. The motor will run for about 8 seconds
at the end of which the alarm will sound until button released. (While the motor is
running you can feel the lead screw turning)
Release start button. The driver is now running.
The indicator light should now be flashing (one flash in 25 secs), if it is not flashing
change the battery. Each battery will last for about 50 deliveries.
There is no stop button on the driver, remove battery to stop.
6. Slide actuator back as far as it will go. Position the syringe in the driver. The
flange of the syringe fits into a slot on the top of the driver - see FIG.2. The
syringe plunger needs to be fitted into the driver actuator by pressing the white
button and sliding the actuator along until it rests securely against the end of the
plunger - see FIG.3.
FIG.3.
Flange and Slot
Plunger
Actuator
3. Page 3 of Factsheet 1
Cambridge & Huntingdon Palliative Care Group
Last Reviewed: October 2004
Review Date: October 2006
7. Secure the syringe in position with the rubber securing strap (Fig. 2).
8. Slide the plastic cover over the driver (the plastic cover must be placed so that the
hole is aligned with boost button).
9. Insert cannula subcutaneously (wherever possible use Teflon avoiding metal). DO
NOT SITE IN OEDEMATOUS AREAS. Upper chest or upper arms are best site
(avoid upper arm if adjacent to breast surgery).
10. Connect giving set to cannula, (if not already attached).
11. Cover site with semi permeable film dressing and secure tubing with non-allergenic
tape.
12. Check site and rate of infusion regularly. If there are signs of inflammation re-site,
and change the giving set.
13. When the drug infusion has completed, or the prescribed drug dosage is altered,
draw up drugs in a new syringe and insert as before, then label: there is no need to
change the line. As long as the battery has not been removed there is no need to
press the start/boost button.
The alarm will sound:
• Immediately after battery insertion
• On holding the boost button down for >9 seconds
• When syringe has discharged
• If cannula blocked or line kinked
• If malfunction
Remember:-
• Always use a luer lock syringe.
• Always set the Rate of Administration at 60mm/24hrs.
• Some of the first 24hr dose will be lost in the “dead space” resulting in the contents of
the first syringe being delivered in <24 hours.
• Always check drug compatibility (refer to Factsheet No. 3). Never mix more than 3
drugs in a syringe, with the exception of antisecretory agents (refer to factsheet No. 3).
ANY PROBLEMS SEEK SPECIALIST ADVICE.
The Attending Doctor Must Prescribe:-
1. Each drug to be used in the syringe and its 24 hour dose.
2. Driver setting of 60mm/24hrs.
3. The diluent (WATER OR SODIUM CHLORIDE 0.9% FOR INJECTION) volume.
4. Page 4 of Factsheet 1
Cambridge & Huntingdon Palliative Care Group
Last Reviewed: October 2004
Review Date: October 2006
4. Where symptoms are uncontrolled a bolus stat dose of medication should be
prescribed to be administered at the time of commencement of the syringe driver.
5. Appropriate ‘prn’ subcutaneous doses of each drug contained within the syringe
also to be prescribed.
The Administration Record
The nursing staff have responsibility for the administration record. The date and start time
for each syringe as well as the dose of each drug must be documented. The site viability
should be assessed prior to starting a new syringe. Syringe driver check is to be carried
out regularly and documented.
Avoid subcutaneous pump in patients with bleeding tendency (seek advice).
Monitoring Syringe Drivers in Use
Regular checks on syringe driver operation must be built into the daily nursing routine.
They should include checks for:-
• Signs of precipitation in the syringe
• Correct rate of administration
• Volume of drugs left in the syringe
Integrity of the administration line, cannula and syringe driver
Why NOT to use the “Boost” Facility:
The Graseby MS26 syringe driver incorporates a ‘Boost Button’. If pressed a small bolus
dose of the drugs in the syringe to be administered.
1 press of the boost button = 0.25mm travel (1
/240
th
total daily dose)
THE USE OF THE BOOST BUTTON IS NOT RECOMMENDED AS THE DOSE
DELIVERED IS NOT A THERAPEUTIC DOSE.
If the Boost Button is used - Remember:-
• Extra doses of all drugs in the syringe will be given.
• The non-therapeutic dose administered will be insufficient to control symptoms and
should be used as a sign that the prescription may need to be amended.
• Repeated use of the boost button will result in the syringe lasting <24hrs.
• For appropriate additional dose see Factsheet 2.
5. Page 5 of Factsheet 1
Cambridge & Huntingdon Palliative Care Group
Last Reviewed: October 2004
Review Date: October 2006
Syringe driver trouble shooting
1. Driver not functioning: Flat battery
Battery in wrong way round
Blocked cannula
Start/Boost button not pressed
2. Driver functioning but light
not flashing: Battery low
3. Alarm sounding: Syringe empty
Kinked tubing/cannula blocked
Driver malfunction
4. Infusion too slow: ?Site inflamed/cannula blocked
?Tubing kinked
?Syringe and tubing still connected
?Syringe plunger accurately in place
5. Infusion too fast: Check rate setting and calculation
6. Inflammation at cannula site: Infection/inflammation. Re-site
cannula and change giving set
7. Recurrent site inflammation: Review drugs;
?reduce concentration of irritant drug
?change to alternative drug
Seek Specialist Advice
N.B. Patient and/or carers should be instructed how to replace battery. A spare battery
should be left at the house.
IF IN DOUBT SEEK SPECIALIST ADVICE