Beginners Guide to TikTok for Search - Rachel Pearson - We are Tilt __ Bright...
Adobe Connect 7.5 To 8.0 Transition Guide[1]
1. Adobe Connect 8
Transition Guide for 7.5 Users
Table of contents
Adobe® Connect™ 8 has a simpler and more intuitive user interface that makes it even easier to run, present, and
1: What’s Changed for
Presenters and Hosts
participate in meetings. This guide is intended to help you quickly make the transition to using Adobe
2: Adobe Connect 8 Connect 8’s new interface and features.
Quick Reference for
Participants It’s divided into two sections:
• What’s Changed for Presenters and Hosts
• What’s Changed for Participants
The presenters and hosts section is a tour of the major changes in Adobe Connect 8 and goes into some detail.
The participants section is designed as a quick visual overview of key interface changes and new features. If
you’re a host or presenter, you can send this sheet out to your meeting participants to help them quickly find
their way.
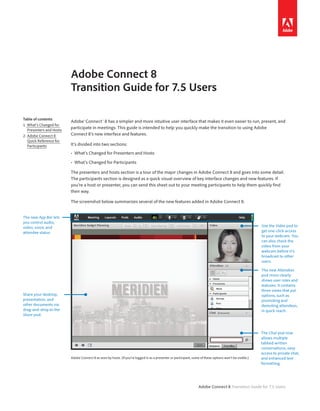
The screenshot below summarizes several of the new features added in Adobe Connect 8.
The new App Bar lets
you control audio,
video, voice, and Use the Video pod to
attendee status. get one-click access
to your webcam. You
can also check the
video from your
webcam before it’s
broadcast to other
users.
The new Attendees
pod more clearly
shows user roles and
statuses. It contains
three views that put
Share your desktop, options, such as
presentation, and promoting and
other documents via demoting attendees,
drag-and-drop to the in quick reach.
Share pod.
The Chat pod now
allows multiple
tabbed written
conversations, easy
access to private chat,
Adobe Connect 8 as seen by hosts. (If you’re logged in as a presenter or participant, some of these options won’t be visible.) and enhanced text
formatting.
Adobe Connect 8 Transition Guide for 7.5 Users
2. What’s Changed for Presenters and Hosts?
User Interface Improvements
Using the App Bar – Click the Speaker icon to turn your speakers on/off. Use the Speaker Icons menu to
mute the audio of the conference and adjust the volume of the meeting audio. Click the Microphone icon
to turn your microphone on. Click the Webcam icon to start your webcam.
Host only Use the Webcam Icons menu to enable/disable participants’ webcams. Switch the meeting to single-speaker
mode or enable audio for participants through the new Audio menu.
Click the Raise Hand Settings menu icon to access status settings. These include Raise Hand, Agree,
Disagree, and Step Away.
Host only Meeting Layout buttons have been eliminated from the user interface. Create, access, and manage meeting
layouts through the Layouts menu in the App Bar.
Adobe Connect 8 Transition Guide for 7.5 Users 1
3. Accessing Contextual Menus – Access pod options through contextual menus, located in each pod’s
upper-right corner. Hosts can choose to Hide or Maximize pods from the contextual pod menus.
Host only Consolidated Preferences – Adobe Connect 8’s centralized preferences panel lets hosts quickly access and
optimize meeting settings in one location (Meeting > Preferences).
Adobe Connect 8 Transition Guide for 7.5 Users 2
4. The functionality available in the Present menu has been reorganized in the interface. Changing the host’s User
Role, enabling/disabling the Presenter Only Area, and switching to Prepare Mode can now be done from the
Meeting menu. The options related to showing/hiding the host’s cursor have moved to the Preferences dialog
(Meeting > Preferences).
Host only Accessing the Presenter Only Area – Icons for enabling/disabling the Presenter Only area have been
eliminated. The Enable Presenter Only Area option is now available in the Meeting menu.
Share Pod
Screensharing – When you open the Share pod, you’ll see a prominent Share My Screen button. Other
options, such as Share Document and Share Whiteboard are still available from the Share My Screen buttons menu.
Adobe Connect 8 Transition Guide for 7.5 Users 3
5. Drag-and-Drop Sharing – You can now share files by dragging them into the Share pod. All participants can
make the Share pod full-screen by default. If presenters want they can “force” their view, so that it’s what all
participants see, by selecting Force Presenter View from the Share pod’s contextual menu.
Whiteboard Enhancements – The Whiteboard tools are now located in a horizontal row in the upper-left of
the pod. From a shared document, click the Draw button to add the Whiteboard as an overlay.
You can add text to shapes by double-clicking the shape. When you’re using the whiteboard overlay over an
Adobe® PDF document, you can now zoom in or out and pan a shared PDF document by using the controls
provided by the PDF Viewer toolbar. The overlayed whiteboard drawings will also zoom and pan appropriately.
Adobe Connect 8 Transition Guide for 7.5 Users 4
6. Attendees Pod
Participant management has been integrated in the Attendees pod (formerly known as the Attendee List pod),
primarily through three views that put key functionality in easy reach.
Host only Enabling Audio – Enable Audio For Participants has moved to the Audio menu in the App Bar.
Host only Attendee View
In Attendee View, you can promote/demote one or more selected attendees via drag-and-drop. You can also
promote/demote attendees, and enable/disable attendees’ microphones and webcams through the mouse-
over controls.
Starting Private Chats – If private chat is enabled for the meeting, attendees can start private chats using
mouse-over controls.
Attendee Status View
Switching to Attendee Status View, you have access to an overview of all the participants’ status settings
categorized into Raise Hand, Agree, Disagree, and Stepped Away.
Adobe Connect 8 Transition Guide for 7.5 Users 5
7. Host only Breakout Room View
You can now create and manage breakout rooms by clicking the Breakout Room View icon at the top of the
pod. New breakout rooms can be created within the Attendees pod by using the Create a New Breakout Room
icon . Attendees of the main menu can be automatically and randomly assigned to breakout rooms by
clicking the Evenly Distribute From Main icon .
You can assign attendees to a breakout room via drag-and-drop or through the mouse-over controls.
Choose Broadcast Message from the contextual pod menu to send a message to all breakout sessions.
Once participants are in a breakout room, they can send messages to hosts by choosing the Send Message to
Hosts option at the bottom of the Attendees pod.
Adobe Connect 8 Transition Guide for 7.5 Users 6
8. Chat Pod
Tabbed Conversations – It’s now possible to have private chats between participants in separate tabs.
Presenters and hosts can also chat among themselves as a group in separate tabs.
Private Chats – Hosts can enable private chats for all participants by selecting Enable Private Chat in Meeting
> Preferences. All attendees can then start private chats directly from the Attendees pod. Initiate private chats
by hovering over the Attendees list and choosing with whom to chat. Then select Start Private Chat from the
mouse-over controls. The private chat opens in its own tab in the Chat pod.
Another way to start a chat with other hosts, attendees, or presenters is by selecting Start Chat With from the
contextual pod menu.
Formatting Text – Use the contextual pod menu to select one of eight colors for your text before you type a
message. Other attendees see this color change in the active chat. You can modify text size from here as well.
Unlike changes to text color, changes to text size don’t alter the appearance of that text on other attendees’
screens.
Adobe Connect 8 Transition Guide for 7.5 Users 7
9. Notes Pod
Formatting Text – Use the Notes pod formatting icons to apply formatting changes to Notes text. These icons
include bold, italic, and underline. You can also change text color and text size, and create bulleted lists.
Changes to both text size and color in the Notes pod will be seen by all participants.
Exporting Notes – To retain formatting, export your notes as a Rich Text Format (RTF) file by choosing
Export Note > Save as RTF from the contextual pod menu.
Keyboard Shortcuts* – Adobe Connect 8 supports standard keyboard shortcuts for text formatting, for
example:
• Bold: Ctrl+B in Windows; Cmd+B on the Mac
• Italic: Ctrl+I in windows; Cmd+I on the Mac
• Underline: Ctrl+U in Windows; Cmd+U on the Mac
* Some shortcuts are not supported by all browser/OS combinations.
The Q&A Pod
The Q&A pod makes it easier to handle questions during meetings between multiple presenters. You no longer
need to link the Q&A pod to a Chat pod; it is now visible to all attendees. The Q&A pod features two views:
Participant View and Presenter View .The Participant View displays questions with answers, while the
Presenter view allows management of questions and answering them. Presenter view is only available to
presenters and hosts. Click a question in the Presenter View to delete or assign the question to a presenter or
host. With a question selected, click the Public icon or the Private icon in the lower-right of the Q&A
pod to answer the question publicly or privately.
Adobe Connect 8 Transition Guide for 7.5 Users 8
10. Improved Keyboard Accessibility
The interface is now completely navigable by keyboard.* Shortcuts include:
• Moving through the main menu: Ctrl+Space in Windows; Cmd+Space on the Mac
• Navigating through the pods: Ctrl+F6 in Windows; Cmd+F6 on the Mac
• Accessing the contextual pod menus: Ctrl+F8 in Windows; Cmd+F8 on the Mac
• Moving between options within a pod: Tab key (Windows and Mac)
Other examples of keyboard shortcuts include entering the chat text entry box (Ctrl+; in Windows, Cmd+; on
the Mac) and Raising Hand (Ctrl+E in Windows, Cmd+E on the Mac). As previously noted, Adobe Connect 8
also has numerous keyboard shortcuts in the Notes pod.
* Some shortcuts are not supported by all browser/OS combinations.
Enhanced Screen Reader Accessibility
The Adobe Connect 8 interface is now friendly to screen reader users. It exposes all key properties of interface
elements like identity, operation, and state to screen readers. Images and icons have alternative text
descriptions that can be read by screen readers. This is applicable to almost the entire interface including the
notifications and error dialogs. These improvements are all built on top of the existing functionality, like the
real-time captioning extension.
Host only Passcode Protection
If enabled by the account administrator, Adobe Connect 8 lets you control meeting access by setting a
room-specific passcode. From the Create New Meeting wizard in Adobe Connect Central, select the Users must
enter room passcode checkbox and enter a passcode. Participants are prompted to enter this room passcode
during login. You can later reset these passcodes as needed.
Adobe Connect 8 Transition Guide for 7.5 Users 9
11. Host only Adobe Connect Desktop
Adobe Connect Desktop is a new Adobe® AIR®-based application that’s available as an optional, free download. Hosts
can use it to create and manage meetings, e-mail participants, create contact groups, and quickly view recordings.
Installing Adobe Desktop Connect – Before installing Adobe Desktop Connect, first verify that you have
AIR 2.0 installed. If not, you can get the free application at http://get.adobe.com/air. Then, download the
installer from http://www.connectusers.com/downloads. Run the installer and click through the various
installation options. After the End-user License Agreement, if you agree to the terms, you’ll go to the login
screen. Add the server, user name, and password, and check the appropriate boxes, such as save password or
log in automatically. Then click log in to access Adobe Desktop Connect.
Click the Meeting Rooms contextual pod menu to create a meeting. Enter the information and click Create.
Next, add participants, conferencing information, and meeting access details. Click the Advanced tab at the
upper-right of the screen to access more details about the meeting.
Managing Recordings – Within Adobe Desktop Connect, you can view your recordings by clicking the
Recordings button at the top of the window. In the navigation pane on the left side of the window, click My
Meetings. This will list all of your recorded meetings, ordered by date. You can see recording durations at the
far right of each listing.
Click Search Recordings to find a particular recording. You can choose to search titles and descriptions or content.
Adobe Connect 8 Transition Guide for 7.5 Users 10
12. Adobe Connect 8 Quick Reference for Participants
This page gives you an overview of Adobe Connect 8’s interface changes
and several of its new features.
Click here to turn your speakers on/ If the meeting’s host has enabled
off. Use the Speaker Icons menu to these features, start your
mute the audio of the conference or microphone or webcam with one
adjust the meeting’s volume. click on these icons. Set your Attendee Status from the App Bar by
selecting options such as Raise Hand, Agree,
Disagree, or Step Away.
Access an overview of all
participants’ status
settings by switching to
the Attendee Status View.
If your host enables this
feature, you can start
private chats directly from
the Attendees pod. Use
mouse-over controls to
choose with whom you
want to chat and then
select Start Private Chat.
The private chat then
opens in its own tab in the
Chat pod.
Adobe Connect 8 Transition Guide for 7.5 Users