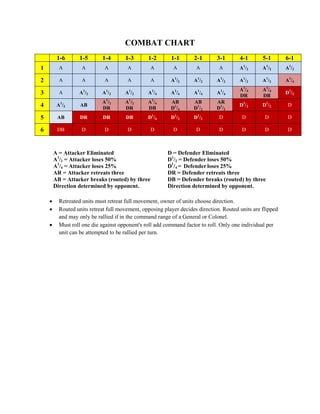
This document provides a combat chart that outlines the results of combat between an attacker and defender at different stages of a battle. The chart shows the outcomes as the attacker and defender's strength changes from 1-6 units. The outcomes include one side being eliminated, losing troops, retreating, or breaking based on the unit numbers. It also provides notes on retreating and routing units and how they can potentially be rallied.
1. COMBAT CHART
1-6 1-5 1-4 1-3 1-2 1-1 2-1 3-1 4-1 5-1 6-1
1 A A A A A A A A A1
/2 A1
/2 A1
/2
2 A A A A A A1
/2 A1
/2 A1
/2 A1
/2 A1
/2 A1
/4
3 A A1
/2 A1
/2 A1
/2 A1
/4 A1
/4 A1
/4 A1
/4
A1
/4
DR
A1
/4
DB
D1
/2
4 A1
/2 AB
A1
/2
DR
A1
/2
DR
A1
/4
DB
AB
D1
/4
AB
D1
/2
AR
D1
/2
D1
/2 D1
/2 D
5 AB DR DR DB D1
/4 D1
/2 D1
/2 D D D D
6 DB D D D D D D D D D D
A = Attacker Eliminated D = Defender Eliminated
A1
/2 = Attacker loses 50% D1
/2 = Defender loses 50%
A1
/4 = Attacker loses 25% D1
/4 = Defender loses 25%
AR = Attacker retreats three DR = Defender retreats three
AB = Attacker breaks (routed) by three
Direction determined by opponent.
DB = Defender breaks (routed) by three
Direction determined by opponent.
Retreated units must retreat full movement, owner of units choose direction.
Routed units retreat full movement, opposing player decides direction. Routed units are flipped
and may only be rallied if in the command range of a General or Colonel.
Must roll one die against opponent's roll add command factor to roll. Only one individual per
unit can be attempted to be rallied per turn.