
Recommended
Recommended
More Related Content
What's hot
What's hot (20)
Similar to Hyundai Sonata 2005 Electrical Troubleshooting Manual OCR.pdf
Similar to Hyundai Sonata 2005 Electrical Troubleshooting Manual OCR.pdf (16)
Recently uploaded
Recently uploaded (20)
Hyundai Sonata 2005 Electrical Troubleshooting Manual OCR.pdf
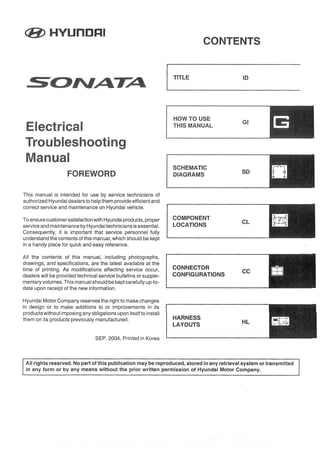
- 1. CONTENTS TITLE ID HOW TO USE GI THIS MANUAL ' SCHEMATIC' so FOREWORD DIAGRAMS This manual is intended for use by service technicians of authorized Hyundai dealers to help them provide efficient and correct service and maintenance on Hyundai vehicle. To ensure customersatisfaction with Hyundaiproducts, proper COMPONENT CL serviceandmaintenancebyHyundaitechniciansisessential. LOCATIONS Consequently, it is important that service personnel fully understand the contents of this manual, which should be kept in a handy place for quick and easy reference. All the contents of this manual, including photographs, drawings, and specifications, are the latest available at the time of printing. As modifications affecting service occur, CONNECTOR dealers will be provided technical service bulletins or supple— CONFIGURATIONS mentary volumes. This manual should be kept carefully upto- date upon receipt of the new information. CC Hyundai Motor Company reserves the right to make changes in design or to make additions to or improvements in its products without imposing any obligations upon itself to install them on its products previously manufactured. HARNESS ' HL LAYOUTS SEP. 2004, Printed in Korea All rights reserved. No part of this publication may be reproduced, stored in any retrieval system or transmitted in any form or by any means without the prior written permission of Hyundai. Motor Company.
- 2. INTRODUCTIQN....___..... ....... .....I.....................‘.....Gl-1 SYMBOLS......'. ................. .................-...............................GI-B TROUBLESHOOTING INSTRUCTIONS........................................Gl-3
- 3. GM INTRODUCTION (1) HOW TO USE TH S MANUAL 036-1 STARTING SYSTEM System code/ System name STARTING SYSTEM(1/ R Component symbol BATTERY BO-DY . Wire COiOF GROUND GROUND FLYWHEEL NETIC mating/3W 'obmtl u a» yonmnmrsm p axwmawgnor U z OVERRUNNING CLUTCH 1 EMO3 PHOTO 08 Picture number m m . fiéiig’rfisiatm « a ’ 5 3 } . at .{ws 2,3; «a» i . u fit: a a ram . . Eetxxmfipe 4.2: See Ground Distribution “W" SWITCH . for component locafions Harness classification Connector - @ classification number Connector terminal- number 9 Distinguish harnesstrom'lnarness
- 4. cal-2 HOW TO USE THIS MANUAL INTRODUCTION (2) 5935-2 ‘- STARTING SYSTEM STARTING SYSTEM(2) M05 M06 M11 M13 Connector i __ Unused 1 2 [1 Hit: 4“ II4 3 * 1h @conflguratlins____+ I14 3 [I 2 @I]4-pin 5 6 * 8 9 10 4 I 3 I 2 I 1 * .k 8 I 7 6 5J1 (componen s) n I J L . ; / KET__090IL_04F_W KET_090II;1OM_W . KUM_AR_04F;W KET__090H_10F__W M67 M81 ' 2 1 BLANK BLANK AMP_PLM2_02F_,B EZDESOBB Explanation of connector code . M05 : Connector manufacturer :Terminal series number : The number of connector terminals I I I I :Connector distinguishing YFemale PinzF Male Pin : M C L O U D ) / . ' Br (Brown) -—+——/ , G (Green) 9 :Connector color abbreviations I Gr (Gray) EZLOQOI|_(_)____ __ L (Blue) R (Red) / / w (White) a b C d e Y (Yellow) EGI02
- 5. cI-s INTRODUCTION (3) HOW TO USE THEE MANUAL. Pages by system!Name of Schematic diagram ° Each page is consisted of circuits by system. This schematic diagram includes the path of electricity flow, connection condition for each switch, and the function of other relevant circuits at once. It is applicable to real service work. ° It is very important to understand relevant circuits exactly before troubleshooting diagnosis. °Circuits by system depends upon part number and are indicated on schematic diagram index. Connector contiguraton (components) °The connector figure of consisted parts in the schematic diagram by system is indicated on the last page of schematic diagram. olt shows the front of the connector on the harnessside with not connecting the components to harness connector. The number of terminal being in use is in accordance with-the way obtaining number and unused terminal is marked with (r). Connector contigurat'ons (connection between harnesses} a When connecting the harness with connector between harnesses, it shows female and male connectors and indicates them on the connector configurations group. EM02 I'_""'—""I I""'""""—'I 109l876 5 4 3 2 t 1|2|3 4|51><|6|7 2221I20191817I161514131211 11|12I1314I15|16|t7|18|192 CO E0 10 O I'D _ L [‘0 I0 Component locations ° To find the components easily, component locations diagram is indicated with "PHOTO NO“ on the lower of component name. “To make it easy. to distinguish connectors, the connector in the picture is indicated being installed in the vehicle. PHDTO 03 Oconnscron VIEW - nuusenine onosn Female Male Remarks Locking point . - it is not the shape of the connector housing, but the connector pin that distinguishes between mate or female connectors. When numbering female and male connectors, refer to the numbering order in the following table. Some connectors may not follow this method of numbering order. For individual detailed numbering, Pin I Housing 1—; l:'l refer to the CONNECTOR 3 2 1 1 2 3 CONFIGURATIONS. 6 5 4 4 5 6 Numbered in order from upper right to lower left Numbered in order from upper left to lower right NQTE UNLEEE UTHEEWISE STATE, ALL CONNECTGE VIEWS ARE FROM THE TERMiNAL SiDE OF THE CGNNECTOR. EGIOS
- 6. Gl-4 INTRODUCTION (4) HOW TO USE THIS MANUAL circuit schematics. WIRE COLOR ABBREVIATIONS The following abbreviations are used to identify wire colors in the CONNECTOR IDENTIFICATION Symbol Color of wire Symbol Color of wire B Black 0 Orange Br Brown P Pink . G Green R Bed I Gr Gray W White L ' Blue Y Yellow Lg Light Green Pp Purple T Tan Ll Light Blue the color of the cOlor of background stripe Harness Layouts. ' ‘ ’ * ” / 1Black stripe with yellow ground (2 colors) ® IjAFINESS CLASSIFICATION _ .. Electrical wiring cOnnectors are classified accOrding to the wiringparts in the Harness name-5' ' ' Location Engine harness Engine compartment Main, Floor, Roof, Sunroof, Seat warmer ext. harness Passenger cOmpartment, Floor,Roof Control, Injector harness Engien compartment, Passenger compartment Tail gate, Tail gate ext. harness Tail gate Air bagharness, A/C harness :Under crash pad and Floor Door harness Door * It depends on vehicles, it is necessary to check the harness name symbol on the harness layouts for detailed symbol. A connector identification symbol consists of a wiring harness location classification symbol corresponding to a wiring harness location and number corresponding to the connector. These connector locations can be found in the HARNESS LAYOUTS. For example: E 10 -1 Number corresponding to sub-connector (Serial Number) Number corresponding to main connector (Serial Number) Symbol indicating wiring harness (Engine wiring harness) NOTE Connectors which connect each wiring harness are represented by the following symbols. For example: M R O 1 T—Number corresponding to main connector (Serial Number) Rear wiring harness Main wiring harness JUNCTION BLOCK IDENTIFICATION A junction block identification symbol consists of a wiring harness location classification symbol corresponding to a wiring harness location and number corresponding to the connector in the junction block. For example: . IIP- A Connector name Abbreviation of the word "Passenger compartment junction block“ EG|04
- 7. Gl-5 INTRODUCTION (5) HOW TO USE THIS MANUAL HARNESS LAYOUTS Harness layouts show the routing of the major wiring harnesses, the in—line connectors and the splices between the major harnesses. These layouts will make electrical troubleshooting easier. M37 M13 M29 Mos-3 M09-1,2 M006 203 M15 M16 201 ' ' M14 __ M30 .1 Passenger ” 5 ‘ 2 4 .5 Eompartmentk egg” ”in“ unction Bloc f } (IIP-E,F,G,H,J) 9' SM07 it}: :‘I 202 ... u smoa i7? Ml01 M23 rat J M41 1,4. M21 ' is: ‘ M22 MM04 1l g) rli M32 1 MM03 h v ‘ MM01 fj/ VIEW'B' ‘ =1! MM02 SM01 SM02 G14 G12 M25-1,2,‘3 M26 M31 M34 M35 M005 M02 M03-1,2 MIO4 MI06 M|03 MI05 M004 EGIOS
- 8. Gl-6 , How To use THIS MANUAL SYMBOLS (1) 3:: Symbol Meaning 3::- Symbol Meaning .33:- Symbol Meaning 33:" Symbol Meaning K Male 01 Sh h t i h a conne 0" OWSt e name 0 BBC connector . . . A solid line means the entire 10 Mics-2 .(____. on the component iocation index I; Thls represents RF! (Rad'o L Double filament component is shown. C Tn Femalet for reference. L Frequency Interference) A (it: com?!) or Indicates the number of D Shleid'f‘g gourd a Wire. N corresponding terminal. W The Shieldmg '3 always M- E (Only relevant terminal on the l connected to ground. P Single filament A broken line indicates only g a mi corresponding SChemaTIC dlagrami 2 part Of the component is O 3 1 E35 The dashed-line means each of shown. R - ~ two wires connect with same .1 connector E35 0 . n m ( ) ill D Diode c This means the connector ' g T ‘ connects directly to the B A wavy line means the c This is a connector showing component. — ‘ _ ' I wire is broken but 3 the tornlng Wires. 0 Led diode 0 is to be continued. N D . E W” Wire insulation is yellow 0 T . M _ , . with a red strip. 0 E Zener d'Ode This Indicates the connector w G n . . From 52 P J»! ‘ CW9“? to a toad (pigtatl), Current path is continued on Wired directly to the com- the same page or another 3 “0”a “S P . r H 0 O ponent. I page-The arrow shows the t. . _ _ . “f 4-—--- ower supp led at a times. NPN NPN direction of current flow. a You should look for the “A" Name TR N To M002 in the marked position. E CaPaCiiy R O - w PNP PNP E ‘This indicates a screw terminal R A. W'ie “megs to another K ‘ — cucwt. The Wire is shown on the component. . . . . N again on that Circuit which _ E Name of Circuit the arrow is pointing. These swrtches move F This means power is supplied (E5 together: T ' Wire choices for options or mm the ignition 0“ posmon. N a dashed line shows a ~ . different models are labeled u This means the short bar 2, mechanical connection Th' d b l d t d and shown With a “choice" connects to other fuses. A between them. _'3 groun syrn O ( 0 an bracket like this. 3 . [d t'f' t' n L 3 lines overiapping the com- en ' 'Ca ‘0 c ponent) means the housing a Splices are numbered and E . Current rating 0 of the component is attached L L shown as a dot with circle. ‘3 Switch (1 contact point) to a metal part of the vehicle. (I: "___“ The exact location and con- 0 E L nection of these splices may 2 - 8 va amon vehicles. C . srop " ' The name of the component ry g P 0 1"} e m f ; appears next to its upper right G Th' b h 0 fi .. corner. R '3 sym 0' means t e and W 5 Control battery power at all times 3 .. — i g 0 K—_‘— of the wire is attached to a E g “‘5' Heater Shows the number of pictures hi metal part of the vehicle. 0 B for component location. 9 ".- R E GOG some
- 9. Gl-7 SYMBOLS (2) HOW TO USE THlS MANUAL 33:" Symbol Meaning :3: Symbol Meaning Sensor _ Condenser G E N E Ft A L C , G . O E Sender “F," Speaker 0 N N E E N R T A S L s i Y C. Injector llél Horn, Buzzer, Siren, 0 O Chime Bel! M L P 0 N E N Solenoid Normally open contact T S S This is a relay shown with no Y current flowing through its coil. 1:; When a current flows through M E coil, contact will toggle. B L 0 Motor A L Y - Diode interior relay Battery ' . . . Resustance Interior relay EGIOT
- 10. Gl-8 TROUBLESHOOTING INSTRUCTIONS (1) HOW TO USE THIS MANUAL TROUBLESHOOTING INSTRUCTIONS TROUBLESHOOTING PROCEDURES The following five-step troubleshooting procedure is recommended. 1. Verify the customer's complaints Turn on all the components in the problem circuit to check the accuracy of the customer's complaints. Note the symptoms. Do not begin disassembly or testing until you have narrowed down the probable causes. 2. Read and analyze the schematic diagram Locate the schematic for the problem circuit. Determine how the circuit is supposed to work by tracing the current paths from the power source through the system components to ground. If you do not understand how the circuit should work, read the circuit operation text. Also check other circuits that share with the problem circuit. The name of circuits that share the same fuse, ground, or switch, for example, are referred to on each diagram. Try to operate any shared circuits you did not check in step 1. lf the shared circuit works, the shared wiring is okay, and the cause must be within the wiring used only by the problem circuit. lf several circuits fail at the same time, the fuse or ground is a likely cause. 3. Inspect the circuit] component with the problem isolated Make a circuit test to check the diagnosis you made'In step 2. Remember that a logical simple procedure'Is the key to efficient troubleshooting-:-Narrow down the probable causes using the troubleshobting hints and system diagnbsis charts. Test for the most likely cause of failure first. Try to make tests at points that are easily accessible. 4. Repair the problem Once the problem is found, make the necessary repairs. 5. Makesure the circuit works Repeat the system check to be sure you have repaired the problem. If the problem was a blown fuse, be sure to test allot the circuits on that fuse. TROUBLESHOOTING EQUIPMENT VOLTMETER AND TEST LAMP Use a test lamp or a voltmeter on circuits without solidstate units and use a test lamp to check for voltage. A test lamp is made up of a 12~volt light bulb with a pair of leads attached. After grounding one lead, touch the other lead to various points along the circuit where voltage should be present. When the bulb goes on, there is voltage at the point being tested. CAUTION A number of circuits include solid-state modules, such as the Engine Control Module(ECM), used with computer command control injection. Voltage in these circuits should be tested only with a 10—megaohm or higher impedance digital. Never use a test iamp on circuits that contain solid state modules. Damage to the modules may result. A voltmeter can be used in place of a test lamp. While a test lamp shows whether the voltage is present or not, a voltmeter indicates how much voltage is present. SELF-POWERED TEST LAMP AND OHMMETER Use a self-powered test lamp or an ohmmeter to check for continuity. The ohmmeter shows how much resistance there is between two points along a circuit. Low resistance means good continuity. KGIOB
- 11. GI-9 HOW TO USE THIS MANUAL TROUBLESHOOTING INSTRUCTIONS (2) CAUTION Never use a self-powered test lamp on circuits that contain solid state modules. Damage to these modules may result. An ohmmeter can be used in place of a self— ~powered test lamp. The Ohmmeter shbws how much resistance there Is between two points along a circuit. Low resistance means good continuity. Circuits which include any solid—state devices should be tested only with a 10—megaohm or higher impedance digitalmultimeter. When measuring resistance with a digital multimeter, the battery negative: terminal should be disconnected. Otherwise, there may be incorrect readings. Diodes and SHORT FINDER solid- state devices In a be circuit can make an ohmmeter give a false reading . _ _ , - . To find out if a component is affecting a measurement take one reading A short fInder Is avaIlable to locate a short to ground. The short finder creates a reverse the leads and take a second reading pulsing magnetic field in the shorted circuit and shows you the location of the if different the solid—state device is affecting the measurement. short “"0t body trIm or sheet metal. TROUBLESHOOTING TEST ‘8 we: ‘ t fi . S E L F - .s POWERED 1. TESTING.FOR VOLTAGE i, This test measures voltage in a circuit. When testing for voltage at a con- nector, you do not have to Separate the two halves of the connector. Instead, probe the connector from the back(backprobe). Always check both sides of the connector beCause dirt and corrosion between its contact surfaces can cause-electrical problems. JUMPER WIRE WITH FUSE A. Connect one lead of a test lamp or voltmeter to a ground. if you are using Use a jumper wire with a fuse to by~ ~pa'ss an open circuit. a voltmeter be sure it is the voltmeters negative test lead you have con— nected to ground. A Jumper wire is made up of an in— —|ine fuse holder connected to a set of test leads 8 Connect the other lead of the test lamp or voltmeter to a selected test This tool Is available with small clamp connectors providing adaption to most con» point(connector or terminal). ”GCIOIS without-damage. C. If the testlam‘p glows, there is voltage present. if you are using a ‘ voltmeter, note the voltage reading. A loss of more than 1 volt from CAUTION specification-indiCates a problem. Do net use a fusetwith a higher rating thanthe specified fuse that protects the circuilt being tested. Do not use this tool in any situation to substitute an input or output at the solid-state controlmodule,such as ECM, TCM, etc. EGIos
- 12. Gl-10 How To USE THIS MANUAL TROUBLESHOOTING INSTRUCTIONS (3) 3. TESTING FOR SHORT T0 GROUND 5565-3 A. Disconnect the battery negative terminal. Connect one lead of a self—powered test lamp or an ohmmeter to the fuse terminal on the load Side. B. C. Connect the other lead to a ground. D. Beginning near the fuse block move the harness from Side to Side. . Continue this proceedure(about six inches apart) while watching the I SW'TCH self-powered test lamp or Ohmmeter. . When the self-powered test lamp glows, or ohmmeter registers, there is a Short to a ground in the wiring near that point. * ‘ TEST LAMP 2%. o R ' VOLTMETEFI Battery disconnected “It FUSE BOX ‘ (Fuse removed) 2. TESTING FOR CONTINUITY A. Disconnect the battery negative terminal. B. Connect one lead of a Self-powered test lamp or ohmmeter to one end of 5 A SWITCH the part of the circuit you wish to test. if you are using an ohmmeter, hold ' the leads togetherand adjust the ohmmeter to read zero ohms. C. Connect the other lead to the other end. D. If the self—power test lamp glows, there is continuity. lt you-are uSing an ohmmeter, low or. zero resistance meansgood continuity. oad . ‘ disconnected SOLENOID 4P; EG|30
- 13. GI~11 TROUBLESHOOTING INSTRUCTIONS (4) HOW TO USE THIS MANUAL 4. TESTING FOR A SHORT WITH A SHORT FINDER lTI . Remove the blown fuse. Leave the battery connected. . Connect the short finder-across the fuse terminals. . Close all switches in series in thecircuit that is being testing. . Turn on the short circuit locator. It sends pulses of current to the short. This creates a pulsing magnetic field around the wiring between the fuse box and the short. . Beginning at the fuse box, slowly move the short finder along the circuit wiring. The meter will show current pulses through sheet metal and body trim. As long as the meter is between the fuse and the short, the needle will move with each current pulse. Once the meter is moved past the-point of the short, the needle will stop moving. Check around this area to locate the cause of the short circuit. Battery disconnected gFUSEBOX - Fuse removed) SHORT HNDER Pulsing é g magnetic field METER ‘ ‘ti SWITCH tit i G Move meter Pulsing ' along wire é g magnetic ' field < é—Short to ground - SOLENOID _ V Needle stops moving here EGI‘H
- 14. AIR BAG SYSTEM (SRS).............................................................. SD5694 ANTI-LOCK BRAKE SYSTEM (ABS)............................................30588-1 ATM SHIFT LOCK CONTROL SYSTEM........................................30452-1 AUDIO SYSTEM .....30951-1 AUTOMATIC TRANSAXLE CONTROL 3Y3TEM...............;...........30450-1 BACK-UP LAMPS 8 BACK WARNING SYSTEM...........................30925-1 . BODY CONTROL MODULE (BCM) SYSTEM..,.................;............30952-1 BLOWER & A/C CONTROLS (AUTO)............................................30971-1 BLOWER & A/C CONTROLS (MANUAL)......................................30971-5 CHARGING SYSTEM...................................................................30873-1 ‘ COOLING SYSTEM ...........30253-1 COURTESY & TRUNK ROOM LAMPS..........................................30929-1 DATA LINK DETAILS...................................................................30200-1 DAYTIME RUNNING LIGHTS.......................................................30958-1 DIGITAL CLOCK 8 CIGARETTE LIGHTER (POWER'OUTEET).....30945-1 ELECTRO CHROME MIRROR......................................................30851-1 ELECTRONIC POWER STEERING SYSTEM................................30583-1 ELECTRONIC STABILITY PROGRASM (ESP) SYSTEM...........5;...SD589-1 FRONT FOG 3 REAR FOG LAMPS.............................................30924-1 FUEL FILLER DOOR & TRUNK LID OPENER...............................30312-1 FUSE 3 RELAY INFORMATION................................4...................30100-1 GLASS & OUTSIDE MIRROR DEFOGGER...................................30879-1 GROUND DISTRIBUTION.............................................................30180-1 HEAD LAMPS.......................................................'......................30921-1 HEAD LAMP LEVELING DEVICE.................................................30922-1 HEAD LAMP WASHER.................................................................30923-1 HORNS........................................................................................30983-1 ILLUMINATIONS............._.............................................................30941-1 IMMOBILIZER CONTROL SYSTEM..............................................30954-1 INDICATORS & GAUGES...............,.............................................30940-1 KEYLESS ENTRY & BURGLAR ALARM SYSTEM........................30814-1 MFI CONTROL SYSTEM..............................................................30313-1 PASSENGER COMPARTMENT FUSE DETAILS...........................30120-1 POWER DISTRIBUTION...............................................................30110-1 POWER DOOR LOCKS................................................................SD813-1 POWER OUTSIDE MIRRORS.......................................................SD876-1 POWER OUTSIDE MIRROR FOLDING SYSTEM...........................30378-1 POWER SEAT..............................................................................30380-1 POWER WINDOWS...................'...................................................30824-1 SEAT WARMER...........................................................................30889-1 STARTING SYSTEM.................................................................... SD360—1 STOP LAMPS...............'................................................................30927-1 SUNROOF....................................................................................30318-1 TAIL, PARKING 3 LICENSE LAMPS..........................,.................30928-1 TURN & HAZARD LAMPS............................................................30925-1 YEHICLE SPEED SENSOR...........................................................30433-1 WIPER 8 WASHER......................................................................30981-1
- 15. SD100-1 FUSE & RELAY INFORMATIONS (1) FUSE 8: RELAY ENFORMATIONS LAYOUT PASSENGER COMPARTMENT JUNCTEON BLOCK < FRONT > 5 llllllwc;- IIEjEjiflIfi;IIE]EJE]IIIIEjE. f“mam . 3 Illfllfl } IIIIIIIIIIIIIIIIII: H 1 7H (MAW) .—““‘——. “ ; - l E - - I I I E I . . . REAR POWER BLOWER DEFCGGER WINDOW RELAY RELAY RELAY 15A) (20 30A) (16 ].:| (36 10A) (28 .. (35 1010(27 10A) (19 25A) Q5 Q4 30A) (26 10A) (18 10A) 04 Q3 15A) (25 10A) (17 5. (32 1519(24 30A) (31 15A) (23 10A) (30 15A) (22 20A) (29 10A) (21 15A) (13 '0 O E rn :0 0 0 Z Z :11 g 0 2'” a > < REAR > ( — 4 . : I I mm f . . . . . l l l . @ n n j LOCK IE..- I . " DOOR UNLOCK RELAY TRUNK RELAY §.EE..@..E.3 § . . . . . . . . . . § . m Em.EIII 'T—l' i f H 1 " — . - i a 3; [El-IE1... 5 ; Vila» >< USE THE DESIGNATED-FUSE ONLY E2RFOO1A
- 16. 80100-2 FUSE 8: RELAY INFORMATIONS FUSE & RELAY INFORMATIONS (2) CIRCUIT FUSE (A) . CIrcwt Protected 1 15A (SPARE) " “' ' '''' 2 15A Seat warmer switch 3 10A BCM, Sunroof control module, Electro chrome mirror 4 10A EPS module, High blower relay Active incar & humidity sensor 5 20A CigaretteILghter 4 . 6 15A (SPAREz ' ' ' 7 10A Illumination lamps Right: License lamp, Rear combination lamp, Head lamp, Glove box lamp 8 10A Front fog lamp relafleft: License lamp, Rear combination lamp, Head lamp 9 10A Head lamp washer relay, Right head largo let/cling actuator 10 10A DRL control module, Head lamp relay, AQS & ambient sensor, Left head lamp leveling actuator 11 25A Wiper & washer . ,. 12 10A A/C control module 13 15A SRS controlmodule, PAB switch . 14 20A Front accessory socket, Rear power outlet 15 10A Digital clock, Audio, ATM key lock control module, Power outside mirror & mirror folding 16 25A Safey window module 17 15A (SPARE) 18 10A ATM key lock control module 19 25A Power window main switch, Left rear power Window switch 20 30A Power window main switch, Right pgwen window switch 21 20A Audio amp . 22 20A. Door lock/unlock relay 23 10A Hazard switch, Hazard relay 24 30A Power seat manual switch (RHD) 25 10A instrument cluster ’ 26 10A Hazard switch 27 10A BCM, instrument cluster, Yaw rate sensor, ESP switch 28 15A (SPARE) 29 10A Burglar alarm relay 30 15A LSPARE) 31 15A Rear fog lamp relay 32 15A Trunk lid relay, Fuel filler door & turnk lid switch 33 15A (SPARE) 34 30A Power seat manual switch . 35 10A . Sport mode switch, Key solenoid " 36 1OA ' A/C Control module, Outside mirror & mirror folding motor POWERCQNNECTORJ 15A . Audio _ POWER CONNECTORZ 15A B,CM Digital clock, Instrument cluster, A/C control module, Courtesy lamps >:< USE THE DESIGNATED FUSE ONLY E2RFOO1B
- 17. SD100-3 FUSE& RELAY INFORMATIONS(3) FUSE 8: RELAY INFORMATIONS ENGINE COMPARTMENT JUNCTlON BLOCK LAYOUT <FRONT> ._____ ' ' HEAD HEAD ENGlNE - LAMP LAMP START CONTROL ~ E E E E RELAY RELAY RELAY RELAY MDPS (LOW) (HIGH) 100A ABS.1 ABS.2 I/P 3+1 BLOWER IGN.2 ECU _ RLY 20A 40A 40A 40A 30A ALT 150A CONTROL RELAY PUMP RELAY >.<- USE THE DESIGNATED FUSE ONLY E2RF001C
- 18. SD100-4 FUSE 8: RELAY INFORMATIONS (4) FUSE & RELAY INFORMATIONS CIRCUIT Description (A) . Circuit Protected ABS.1 40A ABS/ESP control module, Multipurpose check connector ABS.2 20A ABS/ESP control module, Multipurpose check connector l/P B+1 40A Fuse 23,24,30, 31, 32, 33, 34, 35 RR HTD 40A Defogger relay BLOWER 40A Blower relay EXISIEBLE P/WDW 40A ' , Power Windowrelay, Fuse 16 IGN.2 40A Start relay, Ignition switch (IG2, START) ECU RLY 30A - -. Engine control relay l/P B+2 30A Power connector 1/2, Fuse 21, 22 lGN.1 30A , ignition switch.,(ACC lG1) ALT 150A = FUSIBLE LlNK (ABS. 1, ABS.2, RR HTD, BLOWER) MDPS 100A . (SPARE) 1 HORN 15A Horn relay? 1 2 TAIL LAMP 20A Tail lamp relay 3 ECU 10A PCM t; V V 4 MDPS 10A (SPARE) . 5 DRL 15A Siren relay, DRL control module 6 FR FOG 15A Front icig lamp relay - 7 A/CON 10A A/C relay . 8 F/PUMP 20A Fuel pL‘Imp relay 9 DIODE . '- (SPARE) . 10 ATM '20A . ATM control relay 11 STOP 15A Stop lamp SWItch FUSE 12 H/LP LO RH 15A ' (SPARE) 13 SUN ROOF 15A Sunroof control module 14 H/LP WASHER 20A Head lamp washer motor ' 15 H/LP Hl 20A Head lamp relay (High) 16 ECU 10A (SPARE) 17 _SNSR.2 15A Oxygen sensor,:_FI'.Iel pump relay 18 SNSR.1 15A Mass air flow sensor, Crankshaft/Camshaft position sensor, Oil control valve, SMATRA 19 SNSR.3 10A A/C relay, Cooling fan relay, injectors 20 B/UP 10A Back- -up lamp switch, Pulse generator, Vehicle speed sensor 21 IGN COIL 20A ignition coils, condenser 22 ECU 10A PCM ' 23 H/LP LO 20A Head lamp relay (Low) 24 ABS 10A ABS/ESP control module, Multipurpose check connector >.'<- USE THE DESIGNATE- FUSE ONLY E2RFOO'ID
- 19. SD100-5 FUSE & RELAY INFORMATIONS(5) FUSE & RELAY INFORMATIONS LAYOUT <:REA$3> JE02 I I I - " I I “ : +_ @ I - I - I - I - I E I ll fl fl l fl l i fl Hi all“!!! Hi EIIEIEE II Ifllfllfll M EIIEIIH El Efllfllflfl II IHIHIIH I! Hfllfllll I! E E - IIIEIE! HI I I I Z J I I ll 2 EZRF001E
- 20. SD100-6 FUSE & RELAY INFORMATIONS (6) FUSE 8: RELAY INFORMATIONS PASSENGER COMPARTMENT RELAY BOX (ICM BOX) LAYOUT n H ‘ II II n , II n n _ ; III II ‘ n h u II II RLY7 RLY 6 RLY 5 RLY 4 RLY 3 RLY 2 RLY 1 RELAY NAME RELAY NO RELAY NAME 1 RR FOG 2 DEAD LOCK 3 Not used 4 Not used . 5 HAZARD 6 BURGLAR ALARM 7 BURGLAR HORN E2RF001F
- 21. SD‘I‘IOn-‘I POWER DISTRIBUTION (1) POWER DISTRI 208 COOLING FAN RELAY ZOB BODY START GENE GROUND SOLENOID 3.0R 3.09 3.0? Iii?— _ "D ' _ ‘2’QfiEM31 3.0a 3.0P B c / To Ignition Switch 5) 5.03 3.00 3.0L E2RF002A
- 22. SD110-2 POWER DISTRIBUTION (2) POWER DISTRIBUTION 3 JE01 61 MODULE PASSENGER COMPARTMENT JUNCTION BLOCK 3.0G 3.0W 3.0W 2.0W 2.0R 2.0R 4 _ _ _1g E20 / / MULTIPURPOSE CHECK CONNECTOR 9 IIP-K 2.0FI “ESP 3‘ CONTROL From Ignition Switch (5) , 0M- _,PARTMENT IJUNCNON IBLOCK 0.756 - * fl u MODULE : f : : : : : : : : : f : : § 87 37/EM02 0.5G 0.756. 0.5Y 0.5G 0.5G use/w 0.5G/W 0.5L 0.5L/W 34fixEM02 0.5G . 15/E20 . MULTIPURPOSE CHECK CONNECTOR E41 ABS STOP EAkjUP TRANSAXLE FULSE I-IEHICL PCM CONTROLLAMP LAMP RANGE GENERATOR GENERATOR SPEED MODULE SWITCH SWITCH SWITCH 'A‘ ' ' SENSOR . ' EZRFOOZB
- 23. 8 POWER DISTRIBUTION (3) 110-3 I ' ENGINE l. ,COM- .. 3-1: _I. PARTIVIENT : -. HJUNCTION I “BLOCK . I I i I ' I ‘ a a I i I I I I I I I ' I ' n ' I " I ' n ' ll ' I ' I I I H I ' a I I ' I I i I I ' - I a . - ~ -- . 52 86 35 1 JCD1 1.25P 0.53r 0.5L 0.5L 0.5R 0.5R 0.5Bf 0.5L 0.75P 0.53 0.58 0.53 0.53 2.5L 2§§EM21 . 0.5L , .34. 039 “N”? 44x?” I N: , _' MASS CANISTER CAMSHAFT CRANKSHAFT SMATR COOLING INJECTOR INJECTOR INJECTOR I . " '_ _ AIR FLOW PURGE POSITION POSITION CONTROL (IMMOBILIZER FAN #1 #3 #2 . #4 .. . SENSOR SOLENOID SENSOR SENSOR VALVE RELAY J VALVE '. ' ' . :E2RFOOZC
- 24. . SOHO-4 POWER DISTRIBUTION (4) POWER OISTRIBUTION . : ENGINE . , _ _ H:-. :PARTMENT ~ FromEngine" * IJUNCTION ControlRelay(3) :BLOCK F/PUMP , .- LP HILP HI STOP HILP LO 1 FUSE FUSE FUSE WASHER FUSE FUSE FUSE . 20A 15A 15A; ' 20A 20A 15A 20A a / v v v 20A / V / V l , .t 3 I l 'IGN COIL i _ i . FUSE a I .H .w L I l ’ ' I _ " I . - - - " I I = - - - l I n n - fl u . : ' I I ' I I I A I I I I I I I I l l I l I I I I - ,_ ._ -x I - _ _. -l , HEAD HEAD . LAMP LAMP I RELAY RELAY : (HIGH) (LOW) , -_ _........ K . . _ _ _ . . = . _ . . _ . . _ . . . _ . I v ; _ _ . . - _ . . _ _ _ _ _ l ‘ “'23' “ “ " " ” " 2 ’ 2 JE02 . 1.25m 1.25L '_ _ ' ' ' ‘ 3Q, ‘ ‘ ' ‘ ' ’STOWEMH 30'” _ , ‘ 1.25Gr . _ . 11:5R‘MF81 " . .' 2.0P 2.03 2.0R 2.0G 1.25P 0.50 0.50 1.25Gr 1.25L 0.75310 2.00 1.25L ', SQKMFOT ~~ ‘ ' PASSSENGEH .- . 1~25G' COMPARTMENT . 3 JUIgCTION . . - _ BL GK 2 E62 ' .. / C51 1 3|: C514_1_Cs{I A_ . . ' I I I I . ‘ I : I i I . . I . . : . i . , . I i . l' 53 I ‘ - I'éNI'T'ION IGNITION IGNITION IGNI'TI'ON C5N-- OXYGEN SUNROOF ' COIL #1 COIL #2 COIL #3 COIL #4 DENSER SENSOR SENSOR CONTROL _ , _ _ __v (UP) (DOWN) MODULE PASSSENGER -. . 3 - — . COMPARTMENT RELAY Box . E2RF002D
- 25. a 'L I I V .- SD110-5 POWER DISTRIBUTION (5) - POWER DISTRIBUTION From IGN Fusible'Link-(:1) A ' 3.0R 3.0P IGNITION SWITCH E 3.0H 3.06 3.0L ‘ 3.00 3.0G Défai c {Filiséi - éé'Stér’I'ihg-SySIem ‘ E2FIFOO2E 11
- 26. SD110-6 I POWER DISTRIBUTION MEMO MEMO 12
- 27. 5 SD120-1 " ' PASSENGER COMPARTMENT FUSE DETAILS - - . -'=-~. ' -- ' . * 3 ; 'r»* ¢LZWTL I i ” ; t ~ . .‘5v; . _ - : . _ , , 3 =1; :2' - " ‘ -- " , - .JUNCRON . FUSE1 FUSES . " . ' - ' - FUSE4 .BLOCK : 15A 10A - . . - . . - , _ 1 A _ A 10A . ' I : v v v : I ' I : ' I : '. BLOWER : . IRELAY . I I l 1 : . III- I- =- n- I! a : ' .. .. .. .. .. _ - - / .. .. - .. - .. .. - .. .. / .. .. .. .. ~.*.'.7_~.;.'...-.§§ 4.45;... .. '.4--....-...;-.;.-.-.'..a'...' .:...--.."_'- ..-..'_' .. a; L; ..'....'... )— .. .. - .. .. .. .. .. ..é.___.__“.m__________:>é__..________ .. -I 5 IlP-L 20 ' “ " ' —1§ llP-D 14 IlP-J 8 IlP-D 12 llP-B llP-K 4 18 ‘ 7 ‘ 1 - Not used ' > f 0.5P 0.30 0.30 30233 0.85R 0.3G/B 0.30 0.50 0.5L 2.0w 2.0L 0.3R 0.5L 0.30 “NF“ 14§§MF51 §EM02 ‘ 1' 1: 0.5P ' :-_ __ '_ ' 0.50/3 0.5Gr . _ .. 0.5P 0.3P 0.85W/B I 2.0Gr ii _— ' M21-1 _ A , (Auto) M100 M22-2 .' I I “(£2214 13‘(_M_anual) . " _ I . l ' l ’ If ‘ 1‘ = : SUNROOF E ECTR BCM RGHT A/C ~ LEFT AOS ELECTRONIC ACTIv .2. _ ' ‘ CONTROL CHROME HEAD LAMP CONTROL HEAD LAMP AMBIENT FUNCTION POWER INCAR & MODULE MIRROR LEVELING MODULE LEVELING SENSOR SWITCH STEERING HUMIDITY ; . 1 _- WARMER WARMER ACTUATOR ACTUATOR MODULE SENSOR -. ' ; SWITCH SWITCH A ‘ ‘ - . . I ' I E2RF003A - - _ 13 , ‘ ‘ .
- 28. . _- - 39120-2 ' PASSENGER COMPARTMENT FUSE DETAILS PASSENGER COMPARTMENT FUSE DETAILS (2) - [HOT IN ON OR START § IUJPASSENGER r - JCOMPARTMENT l " IJUNCTION I : BLOCK : FUSE 28I . I 15A l I l ' I l I I I I... _ _ r . . - . . a . . _ _ ' _ _ . ; . - — " . r . . s . _ - _ _ ' _ - / . . _ _ — — — ; - - _ — . . . . . . . l 5 IlP-J 16 "PE. 10 Not used I Not used I: .v I . ' - . " I " INSTRUMENT f‘} II II. : - . 1.251. 1256/0 1,250 0.50/3 1.250/B 9.3G/B 0.3G/B 0.5G I. I CLUSTER I -' ' IJ F40 1 M14 - ,. I: / r .' REAR FRONT - = -' I POWER ACCESSORY MOB-3 I fI - .~_ -' -- I OUTLET SOCKET ‘ "3 ' 3 M81 ‘ T _ CONNECTOR 0.50/8 0.50/8 0.5G/B 036/8 05l 0.5L 0.3L 0.85R 0.36/0 0.3P _ SEATBELT ' ' REMINDER FUNCTION INDICATOR SWITCH ’ xfli‘g'A . TM POWER S INSTRUMENT ATM KEY HAZARD BCM STEERING LIGHTER CLOCK KEY LOCK OUTSIDE OUTSIDE CONTROL CLUSTER LOCK SWITCH ANGLE - I . . CONTROL MIRROR MIRROR& MODULE CONTROL SENSOR SENSOR - - . MODULE FOLDING MIRROR MODULE ‘ . MODULE; FOLDING SWITCH I . ~ . _v . E2RF0033 _ . 14 . ' "
- 29. L r 30120-3 PASSENGER COMPARTMENT FUSE V '. PASSENGER COMPARTMENT FUSE DETAiLS (3) . ETAELS - -_ . - |HOT AT ALL TIMES] ' ' HOT IN START 'IIJUNCTsON ' I :BLOCK : I I : I I I I I I I I I I I . I I '- ~ -.1 fl ' ' ' I " ‘ _ _ f I I '- ‘r = _. 1 I - E I _ "I. ‘r - 5. a I . I . -- :1 . I I 3 l > ' _ I ' ' ' ' i ‘- I ............_‘~ ..---__-_-__ :y. hgx‘z-_._.._=.. 7 IlP-A 6 llP-D 0.50/8 0.53r/B 0.56/13 VF See Illuminations 11§7—_______—______—15§5FR11 do u, .:»r‘1nm)A/1 m v m m g m «a! a m ‘13:???” ( 0.5Br/B 0.5Y/B 0.5G/B . V See ' Starting System 7 12-JE1 “ u m “ . “ H M — — ' 5 f 9 V 13:53311 ‘ 0.53/0 0.5L/O 0.5Br/B 0.50 0.5Y/B 0.58r/B 0.56/8 0.56/3 ~ - _ ‘ EeRFoosc '
- 30. 50120-4 PASSENGER COMPARTMENT FUSE DETAILS (4) PASSENGER COMPARTMENT FUSE DETAILS |HOT AT ALL TIMES] J 2.0L 2.0P 255mm IOMFDII 2.0L 2.0P SAFETY WINDOW MODULE POWER WINDOW SWITCH 2.00 7 IIP~J MAIN SWITCH MF71 LEFT REAR POWER WINDOW 2.0R .. 2.0R 51951_ __ __ _ j§§§MF41 2.0R I 2.0R RIGHT FRONT POWER WINDOW SWITCH SWITCH /FD12 0.50/ B 0.5L 0.3P (O AIC CONTROL . MIRROR 8: MIRROR MODULE FOLDING MOTOR M21-1 (Auto) M22-2 (Manual) /. IlP-C u — L 0.3P 0.3Y ~QI=IJII1 1 / LEFT OUTSIDE 0.3P 0.3P lP-L FD02 z. RIG-FIT OUTSIDE MIRROR & MIRROR FOLDING MOTOR I 10 3.0P 3.0P ANTENNA 2.0L §MF21 MODULE WINDS DEFOGGER I/P-K Mil IELD PARTMENT JUNCTION BLOCK PASSENGER CO 16 EZRFOOBD
- 31. _ .. 80120-5 -- PASSENGER COMPARTMENT FUSE DETAILS (5) " |HOT AT ALL TIMESI r OWER E15A _ _ _ _ . — - _ ~ _ . _ . _ . - 11 __§§;_:::: ' f " " " ' : " " 4 - -' 1.25Gr 0.58r/O 0.5Br 0.56 0.5Gr 0.5Y 0.5L _ 9/M05 __ - DATA LINK CONNECTOR 0.5L 0.5L 0.85P M21-1(Auto) - 2 M22—2 Manual 7/$508 3 /. ( Bl-G T- L "351' l—JMENT A/C 5ACK C's-CURRY CLOCK CLUSTER CONTROL WARNING INDICATOR ‘- " MODULE BUZZER 0.5Y/B 0.5Y/B 0.5Y 0.5Y K‘MF11 k F902 0.5Fl DOOR WARNIN SWITCH £_______.__.__.__._ 3 § 0.5R/O 0.5R/O 0.5R 19§i________1515§FD01 3‘ZMF01 ‘ 0.5R/O 0.5R/O 0.5R .V. ,3 3% « > - ’ < 6 & 3 JOIONT CONNECTOR ASSEMBLY SWITCH ' EERFOOBE
- 32. SD120~6 - PASSENGER COMPARTMENT FUSE DETAILS . PASSENGER COMPARTMENT FUSE DETAILS (6) . ' IHOT AT ALL TIMES] ' I : ” PASSENGER -. _ . _ co - , I . _ 4 -. “ ; -. . - - . _ r .. “ ' , . . :PARTMENT , _ . . . " . a . _ .. _. _. ._ I _. . .. -- _ . ,JUNCTION 20“ ' — - ' . .. . .._..A -_ . I A -jj- "i ‘ 30A » ' 15A.- ' I 85 “~39 I S,S ; ' .-- " 1 ' +1; 5 i 1 I I : i I " “ i ' I I I I _ I__ ______I : . _ TH‘UNKLID ; . I _ j' '. RELAY _ I ——_‘§é — i- v- I. % _---:-——_ u- — I- — III I- I- I- u- I- - i- _ l - 11 IIP—C 9 7 liP—J . . ,_ . 1.25W/B 1.25W/B _ 0.85P 2.0Y/B 2.0G 1.25P _ I - : v . - -v Notused 12x§MF41 25§Fso1 8’§FDO1 . ' -1- 14k 15j§MI=41 ‘ 2.0Y/B 2.0L 1.25P , . __ HAZARD KEY .A 1 I: - SWITCH SOLENOID ' I I s I. 25s02 _ ‘ . - 1.25W/B 1.25W/B I 0.85:. 0.85L 0.850 0.5Y I. - ' I. - V ' w. - - '. ' .52): , y “53' “’55? I - I“ ' I' . - - i ‘5': ‘v . ~z§§ . A RELAY Box ._j=11j FUEL V FILLER DOOFI 8: . . I 3.3” a- - .a .. SWITCH MANUAL TRUNK LID - _ . SWITCH SWITCH I - I _ " , . E2RF003F ' 18 ' ,
- 33. ' _ SD130~1 . GROUND DISTRIBUTION (1) a . H, - . . T- PASSENGER _ COMPARTNIENT . LEFT ,. i _ RELAY 30x LEFT SIDE A038: HEAD LAMP COOLING - - - '- RIGHT HEAD LAMP WASHER REPEATER AMBIENT LEVELING LEFT FAN - - - .. FRONT WASHER LEVER COOLING- BATTERY L_AM§__ §E_NSOR ACTQAJOR H0315 RELAY FOG LAMP RELAY gENsor-z {513151 _I_~§S_Ej’_ _ _ . - i -_ I . I I / ' 5 E72 . . 1.253 0.753 0.53 0.53 0.53 1.253 0.753 1.253 0.753 1.253 1.253 0.53 50W 50W - . — 6§5EE01 - 0.53 ' .. .. 7/EE01 5 1 2 5 E55 ' .- ' - v JOINT CONNECTOR . i 8 3 4 7 E55 . 1.253 . 2.03 0.53 0.53 0.753 . . a 0 . . ._ BODY ":- _.=__ _ T“ GROUND 5.07 RIGHT 608 1- - HEAD LAMP [DE HEAD . Z .l _ . LEVELING REPEATEH LAMP .-'_ .-- . ' .- ' = ACTUATOR LAMP .' . . H . E2RFOO4A . 19 1'
- 34. SD‘I30-2 DISTRIBUTION GROUND DISTRIBUTION (2) CRUISE CLUTCH VEHICLE MASS AIR KNOCK WINDSHIELD BRAKE PEDAL SPEED FLOW SENSOR ABS CONTROL ESP CONTROL WIPER DEFOGGER OIL LEVEL POSITION PCM SENSOR SENSOR SH_IE_LP TCM MODULE MODULE MOTOR SWITCH SENSOR SWITCH I : I MULfiPUHPOSE E i . ' CHECK .2. I - ‘,' CONNECTOR . "I / “m ' ' 1 3f 37 z _ _ _ 5 / “ “Kw ' 1 3 5 C44 2 C12 : n 1 4 E22 1 4 E41 1 E20 5 E64 2 E46 2 E32 II---1 2.03 2.03 2.03 0.53 0.53 0.53 1.253 1.253 1.253 3.03 2.03 3.03 2.03 2.03 2.03 2.03 2.03 0.53 053 e . O 0'10 011 0‘13 0‘14 20 _ 3231:0043
- 35. ' SD130-3 .- . GROUND DISTRIBUTION (3) GROUND DISTRIBUTION DRIVER ATM = REAR FOG HEAD LAMP MULTI- TRIP SEAT KEY LOCK LAMP DIGITAL WASHER FUNCTION INSTRUMENT MODE BUCKLE CONTROL ,PASSENEEEEOMEARTMEEIJUNEI'QNFLQ‘EK - SWITCH CLOCK SWITCH SWITCH CLUSTER MODULE ‘ - DATA LINK CONNECTOR { _ _ _ _ _ _ _ _ _ _ ' § _ ~ , / 7 /- 5 4 mos MOS-2 8 MOB-3 }. - 0.33 0.53 0.33 0.53 0.53 0.53 0.53 0.53 0.53 0.53 '4 - . 5§§MA11 " . ' PASSENGER ‘ 0‘53 0353 COMPARTMENT . RELAY BOX. 3 . 13 : 4 17_ . 13 _-~ _13 _11 20 M87 3' ' “ ' ' ~ ' JOINT : CONNECTOR i _I I :l __ ___ ______________ _______ __-___L_________- _ _ _ " - - - . 9 7 2 , 3 3 1 10 M87 . 5 M9“ .. " ' 0.53 .; 55‘QMF81 ' 0.53 0.33 0.53 0.53 0.353 0.33 0.853 0.53 0.53 1.253 0'53 0353 0353 0'53 125B ' . . . .~ To Ground J , (325) (5) 20 MOB-1 . .5. , . i . _ ' ' _ I ii" 0 O . -" . " . _ _ H -. ___ . . ~ .. ._ ._. ‘L 3 . ; :— -.- ~ - :- PASSENGER MULTIFUNCTIO ASHER RHEOSTAT HEAD INSTRUMENT 3.17 G18 ' - COMPARTMENT SWITCH UNIT LAMP CLUSTER . JUNCTION _, SWITCH LEVELING BLOCK " _ . . _ . SWITCH . ' . E2RF004C ._ 21 ~ ~. . .
- 36. GROUND DISTRIBUTION . . . SD130-4 GROUND-DISTRIBUTION (4) . ELECTRONIC ELECTRONIC r POWER SPORT POWER SEAT BELT A/C CONTROL STEERING MODE STEERING REMINDER MODULE (Auto) MODULE SWITCH MODULE MAT “ - I . - ‘ Q-‘Nvfi‘k- I - r E _ I - 25 ' _2_6 M21-1 8VM70 2VM26 1 A07 7 0.53 0.53 0.753 0.753 0.753 0.33 3.03 0.53 SRS AIC CONTROL : CIGARETTE SMATRA PAB CONTROL - MODULE (Manual) LIGHTER (IMMOBILIZER) SWITCH MODULE ” FRONT M I ' ACCESSORY - . SOCKET / “xv" V 1 M22-1 26 M22—2 2 M14 3 M72 ' ' 0.53 0.53 . * - 30§§EM21 8§§EM11 22;’EM02 2g§_____§§§MA-I1 ’ ' 2.03 0.53 0.53 0.53 1.253 0.33 0.53 1.253 0.53 0.853 0.853 0.853 3.03 0.53 0.53 1.253 1.253 ,- . - O 0 e I. __:_ . (3.21 G24 G30 . .1 .a G19 . _ ' E2RF004D f. ' 22
- 37. SD130—5 GROUND DISTRIBUTION (5) GROUND DISTRIBUTION POWER OUTSIDE FUEL MIRROR 8c: FILLER MIRROR DOOR 8: FOLDING TRUNK LID S SWJTP 5‘/D05 0.38r 0.58 2.03 0.58 7 D19 12 .D03 I POWER WINDOW MAIN - - .SWITCH LEFT OUTSIDE MIRROR & MIRROR SAFETY FOLDING WINDOW MOTOR M_O_DyLE ACTUATOR LEFT REAR LEFT REAR DOOR LOCK ACTUATOR SWITCH DOOR SLIDE LIMIT SWITCH 1$S07 13$” POWER SEAT MANUAL SWITCH -"'—"—"i‘-‘”-”' ’ - ' - - " '1‘ .5.”- RECLINING DRIVER“ I SEAT LIM T SWITCH . ._..l . _ . I Ifisosq 1Y309 ,4 F301 ELECTRO CHROME 0.38 WEBER 1.258 1.258 i MF01 / 3 0 3 ' 2 2 / 7 / 8 0-33 2-03 0-33 0-53 2.03 1.253 1.253 1.253 1.253 1.253 1.253 2.03 ’QFDH From _ _ _ _ _ _ _ _ _ _ _ _ _ _ _ _ _ _ Ground(G17) (3) 52:;— 3'1: A 0.33 2.03 0.53 0.53 2.03 0.353 mgr-“001 2.03 3 301 EEK/ER DOORLOCK OVERHEAD CONSOLE ASSEMBLY 0.58 0.58 0.58 0.58 1.258 0.58 M107 [‘0 M110 2 fi r s - m l - - - _..»_ — SUNROOF RIGHT CONTROL VANITY MODULE LAMP 23 E2RFOO4E
- 38. SD130-6 GROUND DISTRIBUTION FUEL FILLER ACTUATOR 1.258 GROUND DISTRIJBU'EIZO.N,(6) : I LEFT REAR .-. HIGH- ., FUEL FUEL POWER MOUNTED SENDER 8c PUMP WINDOW STOP FUEL PUMP MOTOR SWITCH LAMP SHIELD I 0.53 . 9§§FOII 0.53 0E‘53 ~ 2.03 0.53 4 2_ F15 . WARNING —_MODI_ILE RIGHT REAR DOOR SWITCH 0.58- RIGHT REAR DOOR LOCK ' 0.33 0.53 5K;— _ _10.5 0.53 ‘33- Z. RIGHT REAR POWER I ACTUATOR SWI 0.53 NDOW TCH 332' PASSENGER POWER WINDOW SWITCH PASSENGER DOOR LOCK ACTUATOR RIGHT FRONT SEAT WARNER LAMP (OUT) 8 304 . 2 POWER OUTLET 2VF40 8‘3. 1 0.33 1.253 JOINT CON- NECTOR " "2 312 0.33 0.853 '4 F802 LEFT REAR LEFT REAR RIGHT REAR COMBINATION COMBINATION COMBINATION LAMP (IN) LAMP (IN) 1.258 1 R02 0.858 RIGHT REAR COMBINATION LAMP (OUT) 1.258 0.858 0.858 0.858 I’,R04 0.58 RIGHT LICENSE LAMP 0.58 1 R11 1.258 32311 2.08 4:1 G31 24 E2RF004F
- 39. SDZOO-‘l DATA LINK DETAILS DATA LINK DETAILS (1) [HOT AT ALL ' ""' " '“ " PASSENGER COM- PARTMENT JUNCTION BLOCK JOINT PHOTO CONNECTOR 32 PHOTO 42 0.5P - i A ; gee Vehicle eecl Sensor , ' p V To Multipurpose 0'5Y check connector (2) PHOTO 63 0.3V G17 PHOTO 40 I 0.5W ., . . M05 I U 0 ‘ PCM K-Lme ‘b DATA UNK CONNECTOR Vehicle PHOTO 31 Speed Ground Ground . CAN HIGH 9 K—Line BodysK—Line Code Save CAN LOW Memory Power .. ' ” u u s _ j 0.5Y 0.50 PHOTO 29 _., , { / 0.5w 0.5Y 32/ mm 0.5L ' 0.5L/B 0.50 0.50 53/ JEO1 PHOTO 7 . B c ’ To Multipurpose To Multipurpose check connector (2) check connector (2) gaggle [IN—cue 30 33's PCM N F! ' NTROL NTROL PHOTO 40 MODULE MODULE ‘ PHOTO 22 PHOTO 50 PHOTO 22 Wow-241 [PHOTO 24| PHOTO 51 25 ,2 f saoosA
- 40. _’ _. ‘ _ 30200—2 ' IATA LINK DETAILS DATA LINK DETAILS (2) ' " IHOT AT ALLTIMEg WOT IN ONOR START jemoz 1;” 2- PHOTO 63 2.0a 2.0W k — —§45‘~EM°2 ' _ I 0.5G '- I: - . MULTIPURPOSE _ _ 2 . . - CHECK CONNECTOR y . ' 0 r PHOTO 25 ’ ' ‘ I ' ‘ ‘ Memory Power Ground = 1 2 IIII _ 1 0 3 . ’ - From Data Link Memory Power ‘ ' PCM K-Line Ground - ' I ' Connector(1) I Body K4313 . a 20 ~ 18 16 15.. 13 - 'I . .II . - - I 1 K-Iine ON/START _ I A , 0.5L . . . . - . 2 2.03 2.03 ‘ _ I 'I _ ' o . - ggggmooum —_- . A = ' ‘~ W.PHOTO47 G11 PHOTO 24 2'6 2- . 2 .2 - , . .
- 41. SD200-3 DATA LINK DETAILS DATA LINK DETAILS (3) C44 94 93 92 91 90 .89 :1: 87 86 85 84 83 32 81 80 79 78 77 76 75 74 72 71 70 89 * 87 88 65 54 83 82 61 60 59 58 57 55 55 a: 53 52 1k. 3': 48 47 1k 1k :1: ~k 42 41 40 39 38 37 35 35 34 33 a: :1: 30 28 27 26 25 24 23 22 21-1120 19 18 17 15 15 14 13 12 11 1o 9 8 , AMP__PCU__94F_B E22 25_ E41 .1 1 1' _. l | IT I5I6I'kI8I9I10I11I12 *I14I15I II5I6I*I8I9I10I11I12I13I14I15I16I*I18I*I20I*I*I*|*I*I I1 I 2 I 3 I 4 I16I17I18I19|20l~k|22 *I*I*.I261 I1 I 2 I 3 I 4 | I26I27I28I29I30I31I*I*I'*I35I36I37I*I*I40I*I*I*I44I*I46I J / 1 | /II "J / l | / I_I_ - . 1..“ KET_D!AGH20F_B_BRK_B BOS_ABS_26F_B_L BOS_ESP_46F_B_L M05 M21—1 M33-A I I I1 1| “ I {—1 L4 L] L] LJ m M I...) Lu! I * * 5 5 4 3 = a 2 1 I - l - - l - 1 1 1 0 9 8 7 8 5 4 3 2 1 13 12 * 10 9 * 'k 6 * 4 3 2 1 * *7 * 1 3 1 2 1 1 a: 9 . ' . ' 24239921201918171615141312 k 1 26 2 5 2 4 2 3 2 2 2 1 2 0 1 9 1 8 1 7 1 6 15 14 m n n n n n n n n n n I |_| I J ' MLX_0BDII_16F_B_SEN AMP_O407_26F_W_HP AM'Pmo4omm24m M66. M70 M74 /1 . _ .- *|*110|918|7|5|5I4I31211 I71 9 9 0 1:1 :1 1:1 1 : : 3 ’ m 1::1 4 3 I 2 1 BLANK 24I23|22I21|20I 1: I18|17I18| * |14I13 9 ° 9 0 1 8 I k I 6 I 5 AMP_ABG__24F_B_ECU AMPm040M2m08FmB AMP__040_07FEB 27 5:- E2RFOOSC
- 42. SD200-4 . DATA LINK DETAILS MEMO MEMO 28
- 43. “' * 30253-1 COOLING SYSTEM .- ‘ ' COOLlNG SYSTEM (1) . . n ' ~ «e.- _ A “ _ *9 " . . 205’ 15B JUNCT10N ‘ PHOTO? ' 2' , / '- ,F}§?f: - COOUNG = FAN . FUSiBLE - ALINK 60A __ ,,_ 8.0W BATTERY ' .' -- _ ' PCM _¢ T _ PHOTO 22 . - : f; -' ' C44 ' ~. - ' PHOTOQ .- . , 15122 606 0.5P , ‘ ‘ 203 .. " COOLING JCO1 ‘ I' . . ‘ . 2 FAN MOTOR ENGINE ' .-: L -; =200W) COMPARTMENT JUNCTION T. , BLOCK _ Bd I T PHOTO1 ' .. GROUND Goa _ -' ' ‘ _ E2RF010A-
- 44. SD253-2 COOLING SYSTEM COOLING SYSTEM (2) C44 93 92 91 90. 89 76 75 74 '5 71 * s I * * 47 * * a: -k g 25 24 8 f AMP_PCU_,94F_B E12-1 E12-2 E14 “1‘ I l - - ' "‘ BLANK ' 2 - 9 4 “ KET_311B_03F_B ‘KET_'3121|WP_01F_B KET_3725_.04F_B 30 E2RFO1OB.
- 45. .- . , $313-1 MFI CONTROL SYSTEM MFI CONTROL SYSTEM (1) : PHOTO 7 7 203 see” f .. . StartingSystem - M. ' w w x u w my}? BATTERY 0.53 2.06 9...; 7‘ | PHOTO 053 2.0G 29 . " " " | ' .' - - 0.5BI 2.0G 8 7’EMF71 . , 2.0a PHOTO 29 203 ..- 0.3P j; ENGINE Ta COMPARTMENT a a See Data Link Details JEOZ See liluminations ‘1'. T '5‘ ' _ — — . _ .. J 1 - -' _9_ M30—3 " - 1 MULTIFUNCTION SWITCH 0.53 PHOTO 33 a ” : . I ', .‘ BODY PHOTO ‘ " 626 82 33- ._ aw ‘ " ' L, .3' . " N I -, - T . GD 23 ' H -‘ E2RFOJ1A {D o. ,~,44xx:w,..4, i r . ‘ -
- 46. ~ SD313-2 MFI CONTROL SYSTEM IVIFI CONTROL SYSTEM (2) I PHOTO 7 - — - — — — — . — _ . _ . . . _ _ _ _ - — — . — . — — _ . — _ _ . _ . _ . _ — — . . . . _ . _ _ _ . w . . _ . - — u - _ . _ _ m _ _ — — , 77 7(With lmmo.) 43(With Immo.) 30(WIIh lmmo.) 76(With mmO.) " 74' J00? ' 76(W/O lmmo.) 30(W/O lmmo.) 43(W/O lmmo.) 7(W/O lmmo.) , _’ 2.0P(With lmmo.) 2.0B(WIth lmmo.) 2.0R(With lmmo.) 2.0G(With lmmo.) 0.50 050 125p 2.0G(W/O lmmo.) 2.0R(W/O lmmo.) 2.0B(W/O lmmo.) =2.0P(W/O Immo.) IGNITION _ IGNITION 1 C54 COIL #4 COIL #2,. . CONDENSER PHOTO PHOTO PHOTO13 17 17 1 C51-4 1 051-3 1 C51-2 2 - - -1 - - 2 C46 1.25R/B(With lmmo.) 1.25G(With Immo.) 1.25W(With lmmo.) 1.25Y With lmmo.) ‘V’ V’ ‘V’ 1.25Y(W/O lmmo.) 1.25W(W/O Immo.) 1.256(W/O lmmo.) 1.25FI/B W/O Immo.) : : : : . : : : : .* 1 , ——-~—-o~———-O—+-——O-—~m—— 1—-w—0mmm~nO~~ —— ' ‘ 1.25FI/B(With lmmo.) 1.25G(With lmmo.) 1.25W(With Immo.) 1.25Y(With lmmo.) 0.59/3 0 5R 0.5Y 0.53;, 0.533“ 0 SW ‘ " 1.25Y(W/O lmmo.) ‘1.25W(W/O lmmo.) 1.25G(W/O‘Immo.) 1.25R/B(W/O immo.) j. .' I l 7(With Immo.) 73(With Immo'.) 29(With Immo.) 51(With lmmo.) " - "51(W/O lmmo.) 29(W/O lmmo.) 43(W/O lmmo.) 7(W/O lmmo.) 39 38 94 C44 ./ " " “ " " " “ " / ' " " " “ " " > ' " " " “ ' / . " " " — "SéhSOkfif ground ‘ “‘Z'ZZZ': . . - _ _ _ _ _ _ _ _ _ I 37 4O 21 0.53r . ' " _ I - ~ _ _ _ . . _ _ - - ”'ENGINE 0.5GNV 0.5L/W I I ,COMPARTMENT . _ - _ _ _ _ _ _ _ _ _ _ ¢ ”JUNCTIONBLOCK PHOTO 7 0.5I3r . 0.5V 0.53 CRUISE CLUTCH _, PEDAL POSITION SWITCH (Closed with clutch pedai AlC PRESSURE TRANSDUCER PHOTO 11 GM E2RF011B 32
- 47. Z ' 39313-3 _ MFI CONTROL SYSTEM ‘ . . - MFI CONTROL SYSTEM (3) m3: 9 % { , m “22;” h a . ‘ . m COMPARTMENT JUNCTION BLOCK PHOTO 7 2. (21- _ .MmdeK-{V' . wow 1! n ) * MMMM RT: ‘« M- ’ ”1.3;“; #3.? .b w». - V w W Rx M. . MASS AIR 1 0 2 0 FLOW - - CANISTER SENSOR PURGE SOLENOID VALVE PHOTO 18 CAMSHAFT POSITION SENSOR PHOTO 0.5R 0.5G/O 0.50 0.5G . G09 PHOTO 23 1- - ' 0.5G/B 0.5L 0.56. 0.53 «gum My“ 0.5YIO 0.5G/W = - ' 0.5w 0.5a 0.5L/R 0.5Y 0.5P/B 0.53/0 380i! MWMM M M... has - ' 3 Mg: gifiv‘Mfi-5g- :. Em ' g}! '§“ $50» 8f“ . . “5‘ wanfioefiwa w km“... w- ' - 52950110 , _ . . - t ' ' I. . - ‘ , .
- 48. 30313-4 MFl CONTROL SYSTEM MFl CONTROL SYSTEM (4) HOT lN ON OR START 0.3P JOINT ONNECTOR D STOP LAMP SWITCH —P"'°T° 39 PHOTO 58 : Closed with brake pedal depressed : Open with brake pedal depressed To Multifunction Switch (1) JOINT CONNECTOR 0.5L/W 0.5L PHOTO 29 ‘q EM2'1 ENGINE M: COMPARTMENT -, JUNCTION BLOCK PHOTO 7 POM PHOTO 22 0.5Gr/B O.SBr/B _ , . ENGINE C'OOLANT v See Vehicle See Electronic See Charging See Coollng TEMPERATURE See Blower & A/C Controls Speed Sensor/ . Power Steering System Sysgem SENSOR 8: SENDER Electronic Stability ' system pHo-ro 18 Program(ESP) System] -- Anti-Lock Brake System (ABS) -' E2RF011D 34 '
- 49. §Q313-5~ - « MFICONTROL SYSTEM-.15) ;;’ ~; MFI CONTROL SYSTEM C01 KUM_WTS_O3F_B SUM_,090||WP_03F_GFLR C06 fl map 999 AMP_MOSWP_06F_B_I PKD_MP150_02F_B KET_090WP_02F_B_L . C28—1 KUM_,NDWP__O2F_GI' C28-2 @ ‘ KUM_NDWP_O2F_Gr 028-4 AMP_JPT__O2F_B 028-3 C29 ‘- C30 0 Q29 99-! El 69990 I: ' O KUM__NDWP_02F_Gr KUM_ND1NP_02F_Gr AMP_JPT_03F_B_32 KST_SLK28_05F_B_CODEB C44 94 93 92 91 90 89 87 84 83 1.582”- '81" 80519 78 77-~ 76 75' 74 72 71 70 69 * 67-= 66 65 .1 62' 61" “60 "59 58 57 56 55 * 53 52 4 0 3 9 38 37 36 35 34 33 -k 30 28 27 26 25 24 23 € 2 2 21‘ ‘3' 18 17 ”1'6 15 14 13 12 11 10‘ - I fl . I E I ” fl AMP_PCU_94F_B ' KUM_N1AWP_O4F_B KET_090l|WP__O4F__B KET_090I!WP_02F_B_VER 051-2 I - I III—II (8) KET_090|!WP_02F_B_VEF{ 35 E2RFO11E
- 50. MFI CONTROL SYSTEM ' FULL CIRCUIT DIAGRAMS SD313-5—1 MFI CONTROL SYSTEM HN ASSOCMTEDFUNCRON RN ASSOCMTEDFUNCRON 1 POWERGROUND 45 - BATEFIY VOLTAGE AFTER 47 APS 2 SUPPLY 2 IG.KEY SUPPLY DTP, APT. POWER STEERING m B B B FI/B W Y G B P W P P Br L R O YIO L/O Y Gr/E L/w G/W W/B PIB . Br Y B P G L L P/B 5/0 L/R Y w R L/O ‘00 GM L Y/O P 3 POWER GROUND SENSOR SUPPLY r .. . . - . I 2mm . mmwmmmm 49- T ' T 1 T ' T 1 ' f7:_‘%fififl$flm fiw L?7 - _ J 4 wmwmwmmm m I I I I A I 1‘ - ' ' I ' I ' I ‘ I I (DSUSE JUNcnON 1 1 1. r1 2fm3 c I I 1 l I I I I , 15A IIEILOCK See Emmi; -. II 3 32 5 ECU GROUND 51 IG. COIL FOR CYL.1 (WITH IMMO.) I I I I I I I I I M NO Controls B 1' ‘ " ' " ' " " '" " ' ‘” '1 COOLING 5 MEMORY POWER 52 POWER STEERING SENSOR SIGNAL FI figgem ’ I FRONT WHEEL 45111 7 IG.COILFOR CYL 4(WITH IMMO.) 53 VEHICLE SPEED SENSOR SENOSR I ; I IENGWE SENSOR /~ COMPAHF _ I ECU IMENT - .. 9 SENSOR GROUND 55 WHEELSPEED SENSOR IND(+) ' FUSE 'GN IJUNCRON Goa ‘ I 10A $835 i .BLOCK 10 INPUTMASS AIR FLOW METER 55 WHEEL SPEED SENSOR IND (-) I / A“. - - - - 20A / A I... .. - .. _ .. .. - .. SNSR.2 SNSR.1 SNSR.3 : $355575 & R 11 TPS 2 FOR ETC 57 APTGROUND 03 I $1n I Gauges 12 APS 2GROUND FOR ETC 55 CRUISE CONTROLSWITCH I " ‘ ' T ' T I m m n O N ' A ~— : 19131511111110” : I : ‘T 2 1 5 cos 13 APS2 FOR ETC 59 CRUISECONTROL swGROUND ISTAFIT L01 I 313* 3:11 I (1 TI 14 ENG.COOLANTTEMP.SIGNAL 50 A/CONREQUESTSWITCI—I n A . I I ‘ 1‘ ’ 1 '_ _ _ £121 . 1 1 1' : 15 ENG.COOLANTTEMP.SIGNAL 51 ALTERNATOR (FR) 1. ' 5 M03 [‘1 I‘"I ‘I r1 1 1 1 n ' ' 2 1 C514 2 1 05173 P ' II I I I 1 1 1111 I I 1 ' 15 02 SENSOR UPSTREAM GROUND 52 A/CON COMPRESSOR SWITCH :7. l . || || : 155832 ESEBLE 583E131; $55331” FUEL PUMP ‘ Qéfi? I R 17 02SENSOR UPSTREAM 55 FUELCONSUMPTION SIGNAL 4 . #2 #3 I “WA ALINK 40A LINK 30A ENGINECONTROL RELAY V2“ RELAY V1011 NC RELAY : 2 1 3 029 I- — - - - — - — - — — - - - - - — - — E - - - — — — —I 18 INTAKE AIR TEMP SENSOR 54 ENGINE CONTROL RELAY CONTROL 1 1 ‘ 1 C M L - - - - - - _ - - - - _ _ 7 - - _ _ _ - - - - - - - - - - _ - - - - - - _ - - - - - - - - - - - - - - - - - . u 1 2 m 5 1 2 3 0 m r1 11W i 4 1 5 2 3 6 0 % 5 2 4 6 3 1 E 2 9 : 1 9 mammmmmRHC % “WMGMNmWWWWW 2 1 C514 2 1 C514 _ _( _, 6/8 I11 1; II"I 'Ir-Il : I I [ 1 r1 r-II r ' I ‘1 r1 r1” 1 'l ['1' IF“?! BATTERY I I 1 coz I I 1 : I I I | I l I 20 APS I FOR ETC 55 CWT ACTUATOR CONTROL SIGNAL _ . I I I LL al N E , [a $N ‘ 65 i I l E g I _§;2§p 2 2 I 21 KNOCKSENSORGROUND 57 CANETERPURGESOLDMMDVALVE _ I I ' 22 KNOCK SENSOR SIGNAL 55 - ::- CON- #4 #1 J R 1951MPREATURE EEEE‘ENI ggsggRANGLE : ETC ACCEL POSITION SENSOR ' G 9 DENSER V FUEL AIC T SENOSR TEMPERATURE '_______ECEETRO'NIE$HRI§TFLESV§TEM______ 23 WSSUPPLY 69 11111103112511”10' 'GN'T'O" 0011‘ 5091’ T COMPRESSOR SENSOR& SENDER GROUND 24 APSISUPPLY 7o FUELPUMPRELAYCONTROL cs1-1,2,3,4 . I 25 INJECTOR FOR CYL.1 71 ETC OUTPUTI . _ 25 INJECTOR FOR CYL.3 72 ETCOUTPUT2 .;. .' 27 INJECTOR FOR CYL.4 75 IG.COIL FOR CYL.3(WITHIMMO.) ' 25 INJECTOR FOR CYL2 74 BFIAKETEST SWITCH 29 IG. COIL FOR CYL.2(WITH IMMO.) 75 IMMO. DATA LINK POWER STEERING SENSOR 75 DIAGNOSTIC K—LINE m GROUND 77 CAN"mGH" _ 31 - 1 73 CAN"LOW" W w W Y Br/B LIO uw L Y/O BB 0 G WIS L/w Br L G Gr G G/B G/O R O Y R G713 P W Br Gr B W/B P B Gr/B BIO 6/0 32 . 79 CW,SENSOR GROUND 33 NOTUSED 50 CMPSENSOR : 34 NOT USED 31 CKP SENSOR GROUND 1' A/C PRESSURETRANSDUCER 52 CKP SENSOR E36 - 35 ' Q SIGNAL 53 BFIEAKE LIGHTSWITCH r-I . v ‘ . 35 NOT USED 54 CLUTCHSWITCH INPUT 2 _ - See_ Vehlcle n 37 OILTEMO.SENSOR GROUND 55 THROTTLEPOSITION SENSOR SIGNAL CRUISE CLUTCH I I ‘7 Speed V V PEDAL posmou : E 911501 38 02 SENSOR DOWNSTREAM 86 ENGINE SPEED SIGNAL OUTPUT SWITCH I I 02SENSOR DOWNSTREAM 57 A/CON COMP. RELAY CONTROLSIGNAL 7—“ m l l GROUND 88 - 1 1 4o OILTEMP. SENSOR SIGNAL 59 CRUISE CONTROLLAMP 41 TPSI SIGNAL 90 CRUISE CONTROL SET LAMP 42 TPSGROUND 91 NOTUSED O O B B B B L Br L B O O L L . 43 - 92 MIL IND. fl: ' . g E 3 5 4 M303 44 - 95 O2SENSORHEATERUPSTREAM .J — . . _ _ _ _ _ _ _ . . .... = = I I 3 % a 4 1 2 m 5 3 4 1 2 m 7 I ‘ I % 94mwmmmmmMWMM I } , ; ; ; I 12c2511 2c2531 2C28-41 2C2821 2C2o 21c25 152341230 1 - " 11 “I 1“ .. 11 “I 1 3 2E61 1 5 22911 1 .____ ' __.__ ' __ _ '1 _ I' l‘ E20 M05 M70 E62 M72 MOS-1 MOS-1 mos-2 MOB-1 MOS-1 MOB-3 5" r11 5" I... I?" fl F1 ”—1 #1 fl rfl l 1'" ('1'"1 "l ( 4 % F171??? I E—fi T I .1 I J I I I I I I I I _ I 4 . __ . rm 'l m rn IT: I“! rh I‘H r11 r1 rh RH rh rh , U I I 15 2 3 11 5 3 1 5 10 5 10 15 15 12 -_L T: E H ; CRUISEREMOCONI , , 7 cm L _ § W ¥ fl _ _ - _ 4 MULTIPURPOSE DATA LINK EPS STOP LAMP SMATRA INSTRUMENT CLUSTER INJECTOR INJECTOR INJECTOR INJECTOR CANISTER OIL MASS AIR FLOW OXYGEN OXYGEN POWER STEERING A/c PRESSURE STEERING WHEEL cagcx CONNECTOR MODULE SMNTCH IMMBHJZER #1 #3 #4 #2 GE CONTROL SENSOR SENSOR SENSOR PRESSURESENSOR TRANSDUCER C44 CONNECTOR SgtEEOfl) VALVE (UP) (DOWN) M05 M70 E52 mos-1 mos-2 cza-1,2,a,4 020 C30 C45 C47 E61 E31 I ,. ,_ _ L I 53;; E5551: I “-47—; CI I h_nl I I h_i I EEEIIIEEHHII [ E l - W EflIIIiEiEIIIIEIIEm III-IIEEE] TIT—WIRE E2RFO11G
- 51. SD313-6 MFIICONTROL SYSTEM (6) MFI CONTROL SYSTEM 051-3’ KET_090|IWP_02F_B__VER KETEOQOIIWP_02F_B_VER KET_58X_01 F_Gr E29 6’60" " "0 AL AL AL AL AL l_J / AMPfl070WP_06F__B E31 ml E36 ; KET_,250DL_02F_W KUM_NMWP_'04M__BA. KET_SWP_04M_B YAZ__O40WP_03F_B E61 YAZ‘_040WP_-03F_B ‘ KET_090||WP_O2F_B F35 l'.'-'I I - I W Y0 > #91} 4, A“; KET__SWP_06F_B I L J I MLX_OBD1|_16F_”B__SIN MOB-1 EH: 6T5 10198|7 4|3 *|1 go|19|18|17|16|15|14|13|12|11 AMP_040M2__20F_B M03-2 "*Léfi1‘ 8[7 6 514.3 2111‘ 16L15|14|13L12|11|10‘ljjr ' AMP_O4OM2_,1BF_B rTLFT. 6 5 4 | 3 2 1 1 1_25l11l10|918l7 AMP_040M2_12F_B BLANK 36 E2RF011F
- 52. 30360-1 STARTING SYSTEM (1) STARTING SYSTEM 2GB 0 >934"! ain‘xm‘e‘ z , v a»: no: .(...w::‘23f§ ~ .< q,U(.é’ x: c, ,m-m. ’5) :1 v V w . M5 :é “02.15“ in w :3': a: *1 " / JEO1 62' JE02 75 JEO'! 3.0P BATTERY 0 SB PASSENGER ' 'COM- . PARTMENT ‘ " :SHIELD RELAY BOX . ,GROUND PHOTO 37 I - I 20R 2.0w : . 2.05 0.53/0 I _ .. .l FLYWHEEL ' A MAGNETIC 1A 5502 PHOTO 8 208 IGNITION LOCK SWITCH 0.56r PHOTO 39 o 9 ,. Bony __ OVERRUNNING GOG GROUND ” CLUTCH. . ‘ PHOTO 9 I EZRFOOQA 37 ‘ -
- 53. 30360—2 STARTING SYSTEM STARTINGSYSTEM (2) T we E10 554 BLANK 1 KET,SSD_10F_B_A AMP_PLM2_O1F_B KET_090|II_O2F_W_L M03 ' M33-C . 2 . _ 5‘ 4- 3 * 1 BLANK 1 * 1 9 1 6 1 5 * 1 1 5 4 KUM_DSD_06E__W AMP_040|II_24F_“GR M91-2 .1 7 6 5 > < l 4 3 2 1 BLANK BLANK 18 17 15 15 14 13 12 11 10 931-51“?: AMP_0925_18F_W 38 E2RFOOQB
- 54. - . ~ 50373—1 . J CHARGING SYSTEM f, -. ' CHARGING SYSTEM (1) 1 ? ; : " A ' IHOTATAugnMEs : '13 ;' ' - ' $$%%W~ PASSENGER ‘;{g‘ ' . 203 203 1253 $33: '- ‘J - 0.5Gnr 0-? _- ENGINE - - _ ' COMPARTMENT . ' MZZZJUNCTION . . :2» I'f‘f‘fi'égi BLOCK ‘2‘ q. * ' PHOTO? j ‘ - - . 203 1 ‘ v ; [ = ' ” : GENERATOR - G BODY - G 0 GROUND . E2RF008A
- 55. SD373-2 CHARGING SYSTEM CHARGING SYSTEM(2) C32 C44 '94 93 92 91 99 '99 * 87 86 85 84 33 32 81 so 79 79 77 76 75 .. ' n 72 71 7o 59 9: 5'7 66 55 54 53 52 61 so 59 58 57 55 55 1c 53 a ? ” .*"' 49 2447 'k a"; a: a: 42 41 4o 39 39 37 36 35 34 35 2: 1:. 1L Ax 28' 27 25 25 24 923 22 21 2o 19 1817 15 15 14-13 12 11 1o 9 a . SUM_ALTWP__03F_B KUM_DSD;06F_W 12]11|10’9|8|7 AMP~04OM2_12F_B AMP_PCU_94F_B M03 MOB-3 M33¥A fifi 1 ‘21—? 1 ' ~ u u u ~ 3 2 5 5 4 l 3 2 1 1 1 1 0 9 8 7 6 4 24 2322 21 2019 18|17161514 1312 n fi l - I m l ‘ l n l — l r ' l l — l m l — I AMP__040|I|_24F_W 40 E2RFOOBB
- 56. ' a -. SD436~1 VEHICLE SPEED SENSOR . VEHICLE SPEED SENSOR (1) : IHOT IN NOR STARTI I I unman- -vmmu ”.1..- H....90.... I E NG E N E II I- 31.": ' 0.5L 0.3Y 0.3Y l " VEHICLE _- SPEED a) - SENSOR PHOTO 21 . '~ ' 0.3Y . ' . 1-. I / I __ I _ I .1001 15/EM21 . . . 0.513 . .1 GINE . PHOTO 29 _ _ _... _ . _- COMPARTMENT ._ _. - _ -' gJUNCTION . - - . {BLOCK 0.5Y 0.3Y 0.3Y O_.3Y 0.3Y _ . ._ 21 JE01 PHOTOT I, _ 5 - . 91 6Amos . _ _ PCM . " 2'3}LOCK DATA LINK . -- p CONNECTOR . ' 1 Q HOTO 22 CONTROL ._ II I T MODULE PHOTO 31 I_ I- I I G09 PHOTO 23 -. ' — 2._ PHOTO 49 - - ' - _ E2HF032A II' 41 '
- 57. SD436-2 VEHICLE SPEED SENSOR (2) VEHICLE SPEED SENSOR C12 ‘ .0901 AL AL - - AMP_JPT_,03F__B_S1 94 93 92 91 89 87 86 85 84 83 82 81 80 79 78 77 72 71 7O 69 67 65 64 63 62 61 60 59 58 57 56 55 28 27 26 25 23 21 20 19 18 17 16 15 14 13 12 11 73 " H ” H “ I I AMP__PCU__94F_B * * 6 5 4 3 2 1 * * * 1 3 1 2 1 1 * 9 AMP_O70_14F_W __i___II—II______ MLX_OBD||_16F,.B_S|N MOB-1 F, 1 M21-2 WC?! H ~10[9 2J7 6|5 413 *]1 1 0 9 8 7 6 5 4 3 2 1 20b9L18|17|16[15h4|13[12|11 21 2019 * 17 * 15 * '* 12 AMP_04OM2_20F_B L J 9 8 7 . - 4132 201918: i3h41312111o n ['1 n I"! r1 F! H ['1 13—1211 AMP_040Ill_20F_W M70 4 3|2_1 8 1 * } 6 1 : AMP_040M2_08F_G r BLANK AMP_O407_22F_W BLANK 42 EZRF032B '
- 58. {73V ' ' ‘ SD450-1 AUTOMATIC TRANSAXLE CONTROL SYSTEM (1) LOT IN ON OR START I See Indicator & Gauges ' 0.3L EM11 m ' ' 0.5L 10 fl JEOZ ee Illuminations 0.5L EM02 PHOTO 6 See Starting System 5 ' See ATM Shift Lock Control " - .'- ' , 0.5H 0.5Gr 0.58/0 0.5G 0.5L. . ' . See _ ‘ = Indicator 3 . . & Gauges See Iliuminations ' - 29¢ __________2§§§~______19_§§EM02 ,- . 0.3L PHOTO - -. .-" ., 63 ' - .,- . 30 EM01 . - " 0.5L 0.5Y 0.5L O.SGNV 43 27 45 JE02 "“Z‘I——'——""".7"““".". _ """‘1‘9‘”"'"1‘1Jcm 1 1 7 0.5G/O 1.253 1.2513 1.258 ? 524 292045 A— A N,- E2HEO21A
- 59. ' 30450-2 ' AUTOMATEC TRANSAXLE CONTROL SYSTEM ' ' AUTOMATIC TRANSAXLE CONTROL SYSTEM (2) 0 HOT AT ALLTIMESI . - T ' ‘EE ENGINE COMPARTMENT CTION 0 0 I - g_'__~=- - FromB/UP ' - __ _. i f ” Fuse 10A(1) : a Ground _ _‘ ‘. ‘ . . . Distribution , u: .' . '_ I Qé-"H—"hxé 2112:2213 2122:2211-£13112:2122222122221::_ .2122222: 3”“- ’ . 47 JE01 53 54 59 58 89 JCO1 .' 2.03 0.56. 1.25m 1.25P 2.0a 2,0Gr 2_0P 0_5R f ATM 0.5G/W 0.50 0.50 0.5G/W . " .' ‘ SOLENOID _,_ ‘ 19 _ _ . ‘ a , ‘ . . GOG E, . _ ' V: ._ .. PHOTOS "' ' ' ‘ ' 0.75G 0.75Y 0.75P 0.75w 0.753r 0.75L ’ 0.750 0.5L/O 0514 0.5L PULSE PULSE 0.5Br/B ' . _, . GENERATOR 'A' GENERATOR 'B' . I PHOT019 PHOTO19 . . ’ ‘ ’ 4 l‘ -. ' E2RE021B 4 4 . ' _ _ _ - - I _ .
- 60. 30450-3 _ AUTOMATIC TRANSAXLE CONTROL SYSTEM AUTOMATIC TRANSAXLE CONTROL SYSTEM (3) C08 C09 1, ‘r BLANK 4940 KET_SSD_.03F_B_A KET_SSD_10F_B_A KET_SSD_12F_B C15 C45 M40 - * 5 8 * 5 6 5 5 5 4 * * 5 1 m 4 9 - - - * * * * * * 38 * 36 4 3 2 1 6 ' 6 ” * * * * * * * * * AL AL * * 1 2 1 1 1 0 9 8 7 6 1 1 1 0 9 l 8 l 7 6 5 L __J KET_SSD_03F_Gr_B : ‘ AMP_TCU_60F_B KET_090|I_11F_W EZREOZ'IC 45
- 61. SD450—4 AUTOMATIC TRANSAXLE CONTROL SYSTEM MEMO . MEMO 46 _._-
- 62. ATM SHIFT LOCK CONTROL SYSTEM - 1 30452-1 ATM SHIFT LOCK CONTROL SYSTEM (1) ‘ | OT 1N ON OR STAHTI 1 HOT AT ALL TIMES | OT 1N ON on START] | HOT IN ACC OR ON 1 H : ' - - 0'“ 0.3L 1250/13 0.5Y 0.5Y - -. 1 KEY -. _ - -! SOLENOID . : PHOTO 40 - ' I - . i ' - ' “ { Z ' _ _ _ _ " _ _ _ " _ / _ ' _ _ _ ‘ ‘ 12 19 10 JE02 PHOTO 7 , ' 0.59 0.50 0.5L . . - - ' .- 0.50/3 0.5Br 0.5L ._ , 15 >17 2527 2635111101 PHOTO 53 ,. . 13 EM02 I O'SUO O'3G 0.3Br 0'30 ‘ Tfaen§:;?emggrt1igol S stem 4 _ .7. ._ 5 1 y 2_ 10 5 6 M01 ' . ATM ‘ KEY LOCK ;cONTROL : MODULE PHOTO 49 MODE SWITCH PHOTO 54 Speed Sensor PHOTO 57 (3'19 9-17 PHOTO 40 ' ‘ E2RF023A
- 63. SD452-2 ATM SHIFT LOCK CONTROL SYSTEM (2) ATM SHIFT LOCK CONTROL SYSTEM C09 M01 48 6 5 4 m _4 14 13 12 “ 11 10 KELSSDJOF—B—A KET”2500L—04F—W 9 1'1 AMP_070_14F_W 4: 3 . —“‘ 2 1 BLANK BLANK 11110 9|8|7 6 5 KET_250_02 F_W kETjQOILJ1F_W - E2RF0233
- 64. - SD563-1 ELECTRONIC POWER STEERING SYSTEM - - ~ . ELECTRONIC POWER STEERING SYSTEM (1) f I HOTIN ON ' .- ' :PASSENGER i ’ ' COMPARTMENT , JUNCTION --:;-_ _ 3 IBLOCK ELECRONIC ‘ PHOTO 32 POWER 1 STEERING .. SOLENOID . " ' PHOTO 20 0.50 0.53 can 27r""""““““""'“““26§¢Emm I ' PHOTO 63 . 0.30 0.33 ‘ I PHOTO 54 / M70 ‘ ‘I ’ w ' "3“?" _PH°TO 58 13’ i 215 EM01 PHOTO 63 0.33 0.5Lg 0.50 0.5L 0.5P . . .. 1 [M05 , ' ' ’ ‘ PCM DATA/LINK ' ' ' :2 mil; PHOTO 22 CONNECTOR ' . . N “may? PHOTO 31 620 PHOTO 57 .. SEW - 38;? .; 32% _ .. PHOTO 24 PHOTO 24 _ . , _. E2RI=057A ' 49 ' ~
- 65. SD563-2 ELECTRONIC POWER STEERING SYSTEM ELECTRONIC POWER STEERING SYSTEM (2) (:12 C44 - _ 89 * 87 86 85 84 83 82 8 1 8 0 79 78 77 67 66 65 64 63 62 61 60 59 58 57 56 55 I 94 93 92 9'1" 72 71 7o 69 31-368 01 w 28 27 26 25 24 23 22 "21' 20 19 18 17 16 15 14 13. 12 11 AMP_JPT_03F_B_S1 AMP_PCU_94F_B 7 5 7 4 - 5 2 - “ - * 3 0 E “ - 9 a " l l E41 ” I " . I | 5 6 * 8 9 1 D 1 1 1 2 1 3 1 4 1 5 1 6 * 1 8 * 2 0 * * * * * 1 2 3 4 W3M***3537**4o***44*45 .. h / I I / 'i E22 —: | I U B M W "J / I 1 / 1 ! I... BOS_ABS_26F_B_L KUM_NMWP__02F_B BOS,ESP_46F_B_L M70 BLANK ' , 4 3 l 2 ' 1 ' BLANK BLANK ' 8 l * ‘ l 6 I 5 A _};7AMP_040M21_08I=_B: ' ' E2RF057B 5O
- 66. AIR BAGSYSTEM('SRS)-'-(1)‘-‘ * -- . . IHOT IN ON OR START] 3:PASSENGER jCOMPARTMENT MULTEFUNCTION SWITCH PHOTO 33 .ele‘fa' - ” t u m - " '="“H . w .::x m}; , H _ 3 WW, , ” H V , ‘ Q, M81 PHOTO 58 SEATBELT REMiNDER INDICATOR PASSENGER AIR BAG PHOTO 45 25%MA11 PHOTO 54 0.58 0.5W/O 0.5R “333-0 M56 } SRS fCONTROL , MODULE ; PHOTO 51 Diagnosis _ _ _ _ _ _ _ _ _ _ . . . . . . _ . . . _ Z . . _ _ _ _ _ _ _ _ _ ‘ : / 14 M66 0.5Y DRIVER SEAT BUCKLE SWITCH §é§$%%%i'i5 _ PHOTO 71 [ SWiTCH 8 IIP-E PH0T071 PASSENGER 1‘COiViPiliFiTiiilENT A ' JUNCTION 3/MA11 . PHOTO 54 See Data Link Details 0.58 13 M05 / Air Bag | 0.58 DATA LINK . * CONNECTOR - 7 1. -, _ . f __ g: j: PHOT031 G17 PHOTO 40 . 6:24 . (3E4 PHOTO 52 _ _ 51 . .. E2FiF026A
- 67. BAG SYSTEM SR3 SD569—2 AIR BAG SYSTEM (SRS) (2) ~ PASSENGER PASSENGER SIDE CURTAIN AIRBAG AIR BAG PHOTO 71 PHOTO 83 _ A09 A13 ' ' "- 0.50/B 0.5P/B 0.5W/B 0.5Gr _ 0.5G/R 0.5Y 0.5L 0.5Br - - ' . _ .5 _ .1“ _. - . ;_;" CONTROL _ . . _ _ __. =2 ._ . _ MODULE PHOTO 51 . . . . — . ~ — . 0w , _ , {LOW £ _ _ _ _ _ _ _ _ . _ . _ _ 26 Law ‘ High . . , . ( _ . . . _ _ . _ _ _ _ £ _ _ _ _ _ . . . _ _ _ ) ( . _ _ _ _ . _ _ _ 23 22 20 0.5G 0.5L 0.50 0.5Y/O 0.53/0 0.5G 0.50 0.5L 0.5Y 0.5R 0.5Br 0.5G ;. 14;5______13J/§EM21 95_______8/§EM01 PHOTO 29 PHOTO 63 0.5G 0.5L 0.5L 0.5G ' PASSENGER PASSENGER FRONT SEAT BELT IMPACT PRETEN- SENSOR SIONER PHOTO 10 PHOTO 79 ' . . E2RF0263 52
- 68. AIR BAG SYSTEM {SR8} §9569-—3 AIR BAGSYSTEM (SR5) (3) A01 A02IA03 A04 I‘x 16l15|14|13|12l11l10l9l*|*l*l*l4|3]2l1 21 ‘ f- [2:1 [2:3 : 3 ] [2:] CZ] [ : 3 I I I ] E l I I 32‘31l30l29l28l27l26l25l*l23|*l*|20l19|18|17 3 E + 3 L / AMP_ABG£32F__B_ECU AMP_ABAG_02F__Y YAZ_O40_02F_Y A05 A08 A09 A10 ; 5% E ”HELEN” ' - j @® @® 6 5 4. 3 2 1 ' YAZ_O40_02F_Y _ - YAZ_04DW'P;I’§_02F_Y_GH u YAZ_04OWP_02F_Y_GH AMP_ABAG_06F_Y A11 A121A13 E17 HUS—EU“ 2 1 ._ '-T—' * * 4 3 2 1 AMP_ABAG_06F_.Y -' APL_ABG_,02F__Y YAZ_ABAG_02F_GH YAZ_ABAG_02F,,GH M05 Mos-2 Mos-3 M61 I r r ti—F 1 F EH: 1 * * 6 5 4 3 2 1 * * * 1 3 1 2 1 1 * 9 617 6 5|4 3 2L 16115|14|13|12111|101* 6 5 4 | 3 2 1 12]11]10|9 |6|7 YAZ_040WP_021=_,Y_GH AMP_MQS__04F_Y AMP_ABG_24F_B_ECU J Li I . _ ., ' MLX_OBDII_16F_B_SIN AMP;Q40M2_16F_B AMP_040M2_12F__B YAZ__040_‘04F_Y M62 . M64 ' M66 M93 A E—T': * *l10|9|8|7|6|5|4[3}211 —| E : E l I 2 ! ['22:] l 2 ! : 3 @® 24123[22|21|20| 9: l18|17|16| a: |14|13 3 * 1 J . . u I KUM_CDR_O3F_W 53 E2RF0260
- 69. SD569-4 AIR BAG SYSTEM (SR3! MEMO MEMO 54
- 70. SOSSS-T ANN-LOOK ANTI—LOCK BRAKE SYSTEM (ABS) (1) IHOT IN ON OR START] IHOT AT ALL TIMES] ENGINE COMPARTMENT 53 C44 0.5P —————————— “ STOP LAMP SWITCH >See Stop @: Cicaselfigwith brald<e —PHOT0 39 Lam S 99 a epresse p .2 Open with brake pedal depressed A ________ 9§W PHOTO 63 4 EMOZ 0 SB 0 5Y 0.5R 0 5L 0 36/0 7 / MF11 _HOTO 63 2 . _ _ _ _ _ '____1_’/’§E45 2 _ _ _ _ _ _ _ _ _ 1§§E49 039/0 1 §F26 LEFT FRONT RIGHT FRONT LEFT REAR RIGHT REAR WHEEL SENSOR WHEEL SENSOR WHEEL SENSOR WHEEL SENSOR PHOTO 1 PHOTO 5 PHOTO 82 PHOTO 32 E2RFO‘19A 55
- 71. SD588-2 ANTI-LOCK BRAKE SYSTEM (ABS) (2) ANTI-LOCK BRAKE SYSTEM {ABS} [HOT IN ON OR STARTI 0.756 GT1RHOToa-24, PHOTO 25 MULTIPURPOSE CHECK CONNECTOR / _ _ _ _ _ _ _ _ _ _ _ _ _ _ _ _ _ _ _ _ _ _ _ _ _ _ _ _ _ _ _ _ _ _ _ _ _ _ _ _ _ _ _ _ _ _ _ _ _ _ _ _ _ _ _ _ _ _ _ _ _ _ _ _ _ _ 15 E20 62 66 JE02 PHOTO 31 0-5G DATA LINK CONNECTOR 34§§EM02 PHOTO 63 1 N05 0.5G _ 0.75G 0.5P 5 3.0w 37/ EM02 ~ ’ 21 , EMOTPHOTO 63 POT AT ALL TIMESI VALVE RELAY TO ENGINE COMPAHTMENT JUNCTION BLOCK ABS CONTROL MODULE PHOTO 24 5 6 ‘ E2RF019I'3
- 72. 30588-3 . ANTI-LOCK BRAKE SYSTEM (ABS) (3) E20 1161171181191201*1221*11:1a:1261 .1 l1121-314115'51*18191101111121*1141151 .J I I I T / I | /L| KET_DIAG_20F_BHBRKH_B BDS_ABS_26F_B_L 552 H BLANK 2 1 4 3 KET_090|IWP_,02F__B KET__090|IWP_02F_B KET_250DL_O4F_W F25 _F26 M05 I. I I .I ' ' a: :1: 6 5 4 3 2 :1: 1k :1: 131211 :1: 9 k J I LA I YAZ_090I|_02M__W__R YAZ,0901|__02M_W_B_ MLX_OBDIL1 6F_B_SIN mos-2 mos-3 1 RF 1 1 W—F 1 817 6 514 3 211 6 5 413 2 1 BLANK 161151141131121-111101*. .- AMP_040M2_16F_B 12111110191817 AMP_O40M2_12F_B 57 " E2RFO1QC
- 73. §_l_3588-4 ANTI-LOCK BRAKE SYSTEM (ABS) MEMO ; ' 13,9 ,., . MEMO 53
- 74. .- w- '- £95894 . _. ELECTRONIC STABILITY PROGRAM (ESP) SYSTEM (1) . ' COMPARTMENT I: . y .- -_ . JUNCTION f_ 3"") ' " See Illuminations = .' _____ 4M81 " .‘ - -g .JOINT ESP VDC) ‘ . 050 0.3L :ICONNECTOR SWITCH ' 7' PHOTO 58 PHOTO 30 _ .' , n ’ _‘ . 1 .1 INSTRUMENT ; a :' . CLUSTER ‘ ; I PHOTO 35 f ,. . _; TO Steering ,-. " - ., -2' - An [e Sensor 2 .' “ g ( ) See lliuminations . ' -. 33:;{_____________ ________ - _______ __________,____________________________5_§::EM02 _‘ _ O _ ._ - . - 0.5L 0.50 05w PHOTO63 -. 36 _ _ _ _ _ _ _ _ _ _ T_IheeI_Spieeq_ _-i sen'Sor o tpui-(FFI . , l ' _ _ _ _ _0_;5jN PHOTO 63 . ' . . - 4 EMOZ "'31. IT . 0.3W f "Hugs/MFH . . .‘ I _ . 0.3w PHOTO 63 QE45 _ _ _ _ - — 2 . ‘ See Vehicle Speed Sensor ,6F26 fI . '7 LEFT FRONT RIGHT FRONT ' LEFI' REAR RIGHTREAR ' ' WHEEL SENSOR WHEEL SENSOR WHEELSENSOR WHEEL SENSOR ' PHOTO 1 PHOTO 5 ' PHOTO 32 PHOTO 32 . . - . . ., E2RFO22A '. ' ' 59 , -_
- 75. ‘ A W ~ ELECTRONIC STABILITY PROGRAM (ESP) SYSTEM , ‘ ELECTRONIC STABILITY PROGRAM (ESP) SYSTEM (2) , _ "‘- HOT AT ALL TIMES 13 IIP-C 0-5Y - . IPASSENGER T'COMPARTMENT iJUNCTION .Box I PHOTO 32 11 M05 ' DATA LINK ' CONNECTOR 3 M05 0.3W/B 0.3P/B 0.3G/B 0.3R/B 0.3I3r/B 0.5w 0.5Y 6 " ‘ T "'To “ " ‘ " “ /MP71PI-IOT029 0'5W : Closed with brake / V / 9v . 8 / 1.25L pedal depressed : Open with brake " pedal depressed K ‘ 9;______“________.____85EM02PHOTOS _ . 0.3W/B 0.3P/B 0.3G/B 0.3R/B 0.3I3r/B 0.3P 0.5Y OM OM 0.5Y See Stop . >Lamps JOINT , 'CONNECTOR _ ‘3 "" PHOTO 61 E57 15¢L___Z¢L_____¢ ____1_4«EM02 , . .. .. p 4 _. _ - _L ._ CONNECTOR ‘ 0.3Br/B . m . - = -. PHOT061 . . f. - ~ 0.5w . , 22/EM01 ' . ' PHOTO 63 _ -' . . 0.56 '.._ ; -~ ‘- - ‘ 0.5W/B 0.5P ' 0.5G/B ‘ ESP ' CONTROL . MODULE _ E2RF022B 60 . .
- 76. ELETY PROGRAM (ESP) SYSTEM _ IHOTATAUJHMEQ ' ' SD589-3 ELECTRONIC STABILITY PROGRAM (ESP) SYSTEM (3) [HOT IN ON OR STARTI ,z: PHOTO 25 MULTIPURPOSE CHECK CONNECTOR 15 E20 DATA LINK PHOTO 31 CONNECTOR 1 M05 ' MI 20 '. "_- 0.5G 34 EM02 HOT06 0.7561 , I' 0.5P 21 EMCH HOTOB CONTROL MODULE PHOTO 24 0.5L 0.5G 37 . EMOZ ' ~ 203 303 31 J 7‘ 5 -1,HOT024 - ' u , A . . J . _ . - - ‘ ‘ E2RF0220 '_ :_ ' s1 _.
- 77. §_I_3589-4 ELECTRONIC STABILQ'Y’PROGRAMESP) SYSTEM (4) E20 E41 I .1 TI - 1T {Inlllfl " , ' [1 '2'3‘4JEL6HF319|1o|11|12113|14|15|16|*hBPWzoI-klvclirL*|*| Eel27|28129l30l31|*I*I*135|36l37Fk1*Mel* l* I* |44|*l46l r / r1 / ' fl KET_D|AG_20F__B_BRK_B BOS_ESP_46F_B_L : E62 F19 1 1L 99+0 2 1 060 4 3 KET_OQOIIW§_02F_B V I ; 1 - :KET_090IIWP_02F_B KET_2SODL_O4F_W ' AMP_MQSWP_06F_B_1 F25 ' iF26: F33 [_J I I 1 BLANK YAZ__090| l_02M_W__R I“ YAZ“090||_02M_W_R AMP_PLM1_01F_B M05 .3 . . Mos-2 W T _. , 1' 1 4 2 1 : . * 61:12: 9 817 6 SM 3 2|1 * * * * k j 16|15|14|13I12111|10|* l I MLX_OBDI!_16F_B_S'IN ' ‘ " ’3” AMP_040M2_16F_B MOB-3 M58 1 . 'M74 r 1 5% 6 5 4 1 3 2 1 2 * [ : 9 ] BLANK . 12711|1ol9|8|7 ~ 2 * 5 I 4 3 ' - ‘ T AMPi040M2~12F_'_B’ ' ' ’ I I KET_090|II_06F_G BSH_040_07F__B EZRF022D 62
- 78. FUEL FILLER DOOR 8: TRUNK LID OPENER IIHOT AT ALL TIMES|_ 16 1.25P 0.5W 35'“ _ _ _ _ _ _ _ _ _ _ _ 3 1 FD01 HOTO 29 0.513 FUEL FILLER ACTUATOR HOTO 88 21;; F001 PHOTO 2 . { , _ x seem ‘ r.)-M 0;} MF71 H'OTO 29 0.5W 0.5L 1.25R 15,2:MF71 . PHOTO 29 1.25R N // 5:FR11 PHOTO 89 1.25? See Courtesy & Trunk Room Lamps 2:5 RR” PHOTO 91 remocon is depressed, trunk is opened with grounded BCM.) HOTO 5 63 ' " ‘ E2RF053A
- 79. ‘D06 KET_2SODL_04F_W FUEL FILLER DOOR & TRUNK LID OPENER (2) ' F34 KET_250_02F;W M33-B AMP_040!|E_20F_W M33-C AMP_040|||__24F_GR KET_090||_02F_Gr_T BLANK 6 4 ' E29F053E3
- 80. ‘ ‘ SD813-1 i POWER DOOR LOCKS fl , , -- POWER DOOR LOCKS (1) * Note A i and 7 ' ' . it This is the direction shown with door lock relay operating. . When door unlock relay operates, arrow has r. " _ the opposite direction. -. . .- 'K ' ' “ "' "" ’ I" ' T PHOTO 4O . ;1_:- ;- , To. To 7 From From G17 a. .1" . BrlveKLeLt Rear Passenger/Right Rear Driver/Left Rear Passingir/Right Rear _? - .. . , oor oc oor 00 Door Lock Door 00 > M91-1 Actuator (2),(3 Actuator (2), 3) Actuator (2), 3) Actuator (2 ,(3) _ , -_ ‘ ‘ 2/ 57-1; 0.5R U N -.1 git.“ ‘i‘ T0 T0 -: = . r Driver/Left Rear Passenger/RightRear ‘ . Door Lock Door Lock , .- ‘ Actuator (3) Actuator"(3) -_ - ~_ '- - - , ' ::. 625(LHD) G§9(LHD) ‘ s: f c;- - - 629(RHD) PHOTO 79 625mm) PHOTO 79 fi. , - -_ . E2RF036A 65
- 81. 30313-2 POWER DOOR LOCKS(2) POWER DOOR LOCKS 21 j FD01 PHOTO 29 6'25 PHOTO 79 To Door From 0'38; 0'30 O'3Y To Door From Unlock Door Lock , Unlock Door Lock Relay (1) Relay (1) 6/lMF71 Relay (1) Relay (1) PHOTO 29 c A 1§§_____3’§MF61 D 0.5W 0.5Gr 0.3Br 0.30 0.3Y 0.5Br/o 0.5P/B 0.3L 4;: _ _ _3 MF5111” 35E. _ _ JJR _ _ .. fijl‘ _ - _ _ -5’§_ _ -4’QFD01 0.5Br/O 0.5P/B 0.3L PHOTO 29 3§§___1/____6_2 0.5W 0.5Gr 0.3l3r 0.30 0.36 O.SBr/O DRIVER DOOR LOCK ACTUATOR PHOTO 74 _ ONNECTOR 3: PHOTO 75 _ _ _ . . . 0.30 -12/' 0.30 x _ _5_/ =§MF11 ‘ PHOTO 63 LFDOZ PHOTO 62 5”§FD11 55~§FD12 PHOTO 79 PHOTO 79 -- 0.513 0.58 053- 175 F902 PHOTO 62 G25 PHOTO 79 0.53 DOOR LOCK PASSENGER ACTUATOR PHOTO 78 To Door From Unlock Door Lock Relay (1) Relay (1) A C 0.5W 0.5Gr 2V ' “ "RE"‘ ' 0.5W 0.5Gr 10 0.3P 7QMF61 PHOTO 29 0.3P 3};F011 PHOTO 79 To Door Unlock Relay (1) Relay (1) A 0.5Br/o 0.5P/B 0.3W/O 10%” _ _9_,/.£MF41 10% MF11 PHOTO 63 0.5Br/O L 0.5P/B 0.3W/O 2» ' _ “11,6"‘ ‘ ' 20,};s PHOTO 79 0.58r 0.5P 0.3W/O 11 From Door Lock V 9'29 PHOTO 79 . E2RF0363
- 82. POWER I 00R LOCKS POWER IGOR LOCKS (3) Born .- _ J PHOTO 50 RHD .- . ' i : u mm 8 M33-A 2 M33-B 3 Tulsa—A 10 M333 From 10 From 11 M3343 Fuse 22(1) F ( 1 ) Fuse 22 (1) 0.3Br 0.30 From From Door From Door From Door From Door Fuse 22 Lock Relay _ Lock Relay F Lock Relay Lock Relay (1) (1) (1) ,- (1) 0 53 A 0.3L 0.30 0.3V 0.33 (1) ' nfiuwlzj‘qlsjhwn F B . 05R A 2/ B PHOTO / “Fm W0 29 PHOTO 63 /‘ / , A PHOTO 29 0'3 / F - 1 / __ _. ._ _3_/MF51 20/MF81 10AM 81 0.5Gr/3 0.5P/3 0.5(3r/B 0.5P/B 10Q MF11 0.53 0.5Gr 0.3Br 0.30 0.3G 9 A 3 A MF51 6QMFH 0.53 0.5(3r 0.3P PHOTO 63 /_____/. J PHOTO 11§§___9_,4‘QMF41 0.5Gr/B 0.53/3 0.3L ‘ 0.30 0.3Y -29 . 21E- _ _ _LC‘Q _ _ _Gj§ _____5.51”: _4j§FDO1 . 4;;- - -1Q; - - '31:;F011 0.5Gr/B 0.5P/3 0.3W/O PHOTO 29 2£1“; LR. 61k 51% £32F002 _HOTO ——— ——— ———— —— - 79 _._._ ___ PHOTO 62 4 Q; 1}; 3{§FD12 0.53 321 0.5er 0.33r 0.30 036 001-31 0.5 322 05 0.3L 0.30 0.3Y 902.3 0.53 0.5Gr 0.33 PHOTO 79 (With (W/O Dead Lock) G/B (With P/B (W/O Dead Lock) 05G 05p 0'3W/O Dead 02:1 Dead 022 1 Lock) 3 _ _ _ _7_ _ _ _ .... m g. 4 (Wlth Dead Lock) 7 Lock) 5 _ _ _ _ 1 ______2 4 (With Dead Lock) 7 5 1 D45 1 3 7 343 a .0 DRIVER . r , . r , ‘ RIGHT REAR DOOR DOORLOCK LOCK . ACTUATOR ACTUATOR v _ _ _ _ V ' _ _ _ _ _ 2 5 D01? (W/O Dead Loc):k) 6 D46 . 021 With Dead Lock 0.5w 0.53r/o 0.33 0.53r 0.33 (W/O Dem; / 2/ 5” FD12 Lock 3/FDO2 5/FD11 /_ _ _ _ _ _ / 0.3W ‘V’ “ “ “ _ H T 7 (With Dead JOINT PHOTO 79 came 0.53 o o 9 LDC“) iCONNECTOR 0-5Br/0 10W W41 . J x 3;;FD01 ' ' PHOTO 75 4;; MF51 PHOTO 6 D11 __ PHOTO 63 _ _ _ To 0.53 0.53r/o 63 0.5W -- 2.03 0.58r/O I - FDOZ PHOTO 62 Door Unlock . _ 3, Relay (1) D c 21Q; FD01 D To To 2.08 Door Unlock ”7-" Door Unlock Relay (1) 625 PHOTO 79 Relay (1) 95 (3'29 PHOTO 79 . I ,..-' EZRFOSBC 67 =
- 83. POWER DOOR LOCKS SD813-4 POWER DOOR LOCKS.(4) . ‘ D01 002 . D03 1304 ‘ 7 ‘ 7 m 7 ‘ 7 ‘ 7 ‘ m ‘ 7 ‘ 7 ‘ 7 n ‘ 7 ‘ 7 ‘fl ‘ 7 ‘ l l 6 5 4 3 2 1—“ 4 * [ g m - A A 2 a; A JQQQ QQQQQQQ ||14131211l10 9 8 7" 1110 918|~k 6 5 W . I._.l ‘L J / AMP_11OWP_O7F_B_DR ' >- AMP_110WP_07F_B_«_DR KET_090|H_14F_W KET_'090|II_HF_W D35 D36 M33-A ' x—l l _ l l““'"l ‘ 11 1o 9 8 7 6 7 ‘ 7 ‘ 7 ‘ 7 ‘ 7 ‘ 7 ‘ 7 ‘ 7 ‘ 7 ‘ 7 ‘ 7 ‘ 7 ‘ 7 ‘ 7 ‘ @QX AQQQG QQQQQQ 24 23 29 21 2019 16151413 AM P_1 10WP_07F_B_DR AMP_110WP_O7F_B__.DR AM P_0401||_‘24 F_W M33-B * 11109 8 7 6 . 24232221 * 1918I~k 1615 * 1312 AMP_o'210111'_'“2'c_11=_w‘ AMP_040¥I1_24F_Gr D01-a(RHD) D'02-a(RHD) A D21 D22 {Lasama «88213191 [999990 AMP_‘|10WP_07F_B_DF{ AMP.__110WP_07F__B__DFI AM P__025WP_07 F_B — AM:_025WP_07F_B D46 D45 aafiagah Jk AL 3.4L AL 1L Jk ‘ a “76‘76‘7 " 78‘ 79‘7 o 1 L A k A L A L J L A L __./ AMP_025WP_07F_B E2RF0360 AMPf025W P_07F_B 68
- 84. " _ ' SD814—1 KEYLESS ENTRY 8: BURGLAR ALARM SYSTEM KEYLESS ENTRY 8: BURGLAR ALARM SYSTEM (1) - ' . MOT AT ALL TIMES PASSENGER .COMPARTMENT .ICOMPARTMENT - IJUNCTION :JUNCTION See Turn & See Starting Hazard Lamps System V 1251. 30§5EM11 ' PHOTO 29 7 i7 1.25L M33—c 8 M33—A 23 M33-C ;_ PHOTO . ._ PASSENGER 0.3Br 0.30 0.3Y 0.5P 50 . - - - ' COMPARTMENT - 8 M914 RELAY BOX winnaéinnfifixmm )- - PHOTO 29 . JOINT - 0.3Br 0.30 0.3Y 0.30 0.3Y 0.3L 0.3W/O 53 0,3,: 29 1} M81 CONNECTOR , 6§‘~L____5_’A"~L_;___4§§FDO1 5?‘ __.....4..5‘L___§.’5§FDOZ 3§5FD12 3§§FD11 302§EM02 ' _ . PHOTO PHOTO PHOTO " 79 0.3P 79 63 ---- _ 3 1 M81PHOTO 3 2-” SECURITY ”35 $0“) INDICATOR _ - 0.5Y/O PHOTO 43 u' * .- 255§EM02 ' _ . PHOTO 63 E33 _ , 0.33 0.38 - HORN PHOTO 12 ' 2.08 0.513 5212s 5Q i , PHOTO 33%“ . , 533 21§§F001 17,V3FDOZ 0,53 79 053 PHOTO12 1 .__. V, - PHOTO 29 - PHOTO 02 . . 1.253 _ ' 2.03 0.53 ‘ - ' " o 0 I “ 3°- . GM"PHOTO12 J I 0'25 PHOTO79 0'29 PHOTO79 0‘25—PHOTO 79 I I' I... I - I _- I EZHFOBSA
- 85. 80814-2 ' KEYLESS ENTRY 81 BURGLAR ALARM SVSTEM KEYLESS ENTRY & BURGLAR ALARM SYSTEM (2) D01 D02 036 r—I m f—l '_| r"! '_"‘ WGGE‘GQE $66069“ 0‘ L J L J L J L A L J L J L J L J k A L J L J L J L J L 1 L.__J Lm—J L....J AM P_1 10WP_,07F__B_DR _ AM Pg 1GWPJNF__B_DR AM P‘110WP__07F_B__DFI AMP_1 1OWPMO“?F_“B_DR E33 . E51 M33—A M33—B MLX_HORN_02F_B_FlLT KUM_NMWP_01F_B AMP_O4OHI_24F___W ‘ AMP_O4OI||_20F_W M33-C ' M73 3 " 1191-2 7 6 5 I > < J 4 3 2 1 flag-Mlaklaalai _ 18 17 16 15 14 13 12 11 10 9 8 AMP;040Ill-_-24F_GR - AMP_0925_18F_W [5291:0638 70
- 86. 7 30816-4 — ' SHHHOOP . ~. SUNROOF (1) . .f HOT INON : i [T ' K 1.2SGr . ._ _ .' - . . ' ,.,: - - ' - j. '- T '.'..' ~ . ' fiEM'” PHOTO 29 __ 0.5P * .. t mm PHOTO 29 ' . . - :_ V. _ 5 ' ” ” " " " ” " ” " " " " 1 § 5 M F 0 1 P H O T 0 3 8 PHOTO 38 :MOOULE 1.253 PHOTO 57 ' o . (3'25 PHOTO 79 . , - . ‘ E2HFO4OA
- 87. SD815—2 SUNROOF SUNROOF (2) M104 M110 .. _, ‘ ”1'2 [a a 1}} BLANK BLANK 4 3,[|* 1[*54 3F KET_090||_04 KETm090|l_06F_Gr 72 E2HF04OB
- 88. _ SD824fl1 POWER WINDOWS .I-f' . _ POWER WINDOWS (1) f .- ._ ., -. _ |HOT AT ALLTIMESI See Power .. _ .. _ ...... .. - See Door Locks x—A-“x PASSENGER COMPARTMENT . JUNCTION BLODK PHOTO 75 . y c mamdirfiy‘ :KHL‘a-E . ~‘ wrdaii 3w.”- ’EW" .3 V " ”a“ "9??” ' ' -'5'=!- z-a§=s-:¢-3§-xswaas«,: ‘ “ dogfi’z'v'fi)‘ "‘ $271552? use); xii , z=2=zzxw~§ "'inysLS-sip' zéymfiu; 5' a"; :;.s£’:§.tm.z§;’g Azup‘gmfifrfix l - - x- “um-r “mum?“ Vngégzzyim' w.»- ENE” '.'X5m<;w( ' :efi= xm“fi*h 5&3; . 5:.» sown l - ..; ' 0.50/3 2.0R 2.0P 2.00 2.0L :;)§n;§ ~1="3 . “a _, 2.0L .0.3Gr/B ToJoint 25%! m___________§7q:2’;FDO1 ; ‘ I I Connector TO Left Rear PHOTO 29 ' (M81)(2) Power Window 0.36r/B . _ -.- Switch(2) .3 " ' ' 5 V MF51 1 m - 0.3Gr/B PHOTO 29 I . . I . .. Q - ‘ = - - .- . , “$1“ ”5% - g; '1'c -' . -':- . " "a 3?? :§ PHOTO 50 -: . r_. ' ' 625 PHOTO 79 _ - . ' E2RF039A _ 73 .
- 89. SD824-2 POWER WINDOWS POWER WINDOWS(2) . From Fuse 19(1) ' i POWER WINDOW MAIN SWITCH PHOTO 76 From Fuse 20 1 M81 PHOTO 58 E" “'"'"‘.JOINT l ICONN- I L IECTOR 8 " " “ 9 “"1'0 M81 20p 2.0Gr 2.0R 2.0Fl 2.0R r ' T — T ‘ T ‘ T N _ _ _ . . _ _ _ - _ _ _ _ _ . . . . _ _ _ _ _ . . _ _ _ _ _ . . . . / _ _ _ _ _ _ _ _ _ _ / . _ _ _ _ _ _ / ' " " “ ' - V — — " " “ ' “ “ / 38 / 3 9 / 34V, 35 / 26 3 6 / 37/FD01 15 MF71 19 18/ MF41 From See Power 2.0R — PHOTO 29 PHOTO _ _ _ _4 PHOTO 2.0P Fuse19(1) Door Locks , 29 V 63 2.0W 2.0R 2.0Br - See 2.0Y 2.0R 2.0G lsllfitraninations 2-053 2-06“ 0.3Br/O 0-39 llluminations 4 See Illuminations ‘ ‘ ‘6§FD11 {H302 V g s ' PHOTO 79' 2° _ PHOTO 62 PHOTO 79 0.3L PHOTO 81 See See illuminations Illuminations LEFT REAR POWER 0-53 - ' PASSENGER POWER ' RIGHT REARPOWER WINDOW MOTOR WINDOW MOTOR 4 WINDOW MOTOR _ I - _-; 2-. “=- PHOTO 77 PHOTO so . 629 PHOTO79 7 4 . - E2RF039B
- 90. ' KELnufisgw KET_090¥LO8F_W FCLSENSOFLDZF PUWER WENDOWS POWERWINDOWS(3) “ .. D03 004 D14 . 6 5 4 fi 4 * ---————' 2 1. 141312111|101 3110 9181* 6 5; .. . KET__090I|__11F__W FCI_SENSOR_OBF_B FCI__SENSOR_O2F 031 032 D33 FCIWSENSOFLOZF M33~c 1 1 1 0 9 8 7 6 24232??1* 19 , AMP_O4OIII_24F_GF1 - ' BLANK BLANK 7 5 - EERF03QC
- 92. ' ELECTRO CHROME MIRROR 50851-1 .. . ELECTRO CHROME MIRROR (1) ' ' HOT INON |HOTINON OR STARTI 1‘ .1 ‘ [ PASSENGER . 1 ‘ COMPARTMENT JUNCTION . I, BLOCK ‘ .. P H 0T0 “2:51;“I ‘ ,' ' . TRl'qéSéAXLE . " BACK-UP LAMP ‘ :1 0'5P SWITCH SWITCH . ‘ ' ' . pHoTo 20 PHOTO19 U1 / I I I I I I I I I _ ; l / / :3 MF01 PHOTO 38 . . . ‘ A x - 1.2513 1.253 10.5P ' M102 ‘ 0.5L '--. . ‘1 I ' ; 35%gwém5'fifiaééfiwkflgfd . 7 . W I 5§kEM11 PHOTO 29 = .. 3§§MF71 PHOTO 29 > - ',1 _. 0.33 0.3P ' 0.3L 1 .1 . 2§,MI=01 PHOTO 33 . 0.3L , i. ' - ELECTRO > . CHROME MIRROR . I - PHOTO 55 .15} ' PHOTO 79 ' 625 E2FIF052A
- 93. 30851-2 ELECTRO CHROME MIRROR (2) ELECTRO CHROME MIRROR 009 KET_SSD__10F__B_A AMP_EJWP__02F__B BLANK KET_TLCWP_03F_W 78 E2RF052B
- 94. 50876—1 _ _ ' POWER OUTSIDE MERRORS POWER OUTSIDE MIRRORS (1) . {HOT IN ACC OR ON| SELECTOR . '- ' "‘ 97- '7' ' 1 - SWlTCH POSITION . . _ . , a ; POSITEON MIRROR SELECT " I See Power Outside SWITCH ' ' Mirror Folding System V ' .- . 0.3L - f 2 _ _ - . .. Refer to the table above for continuity between terminals 1"? ’Mmfifiqfié PHOTO “36 Y (LBW/B ____3g§§______15_5§n=002 PHOT062 v 0.3P 0.3W 0 3UB . _ . J, 0.3Y 0.3W/B _ _ __ _ _ _ _ _ 32 "”""3?§§‘“"3§§§Fno1 PHOT029 - . . ' _ S. ‘_15- ' " :' :1: gLEFT OUTSIDE / _ _ . 21vFDO1 :_MIRROR&MIRROR -' ~- PHOTO 29 c , - . 0 . .9. . . . . .x. . . . . . . . , M W _. : . _ . . I ' _ = : . '4' .g's=%3= _ . PHOTO 79 G25 . _ E2RFOB7A ' - 79 ' - J i » - » . - _ - . - - . . .
- 95. SD876-2 POWER OUTSIDE MIRRORS POWER OUTSIDE MIRRORS (2) Dos I. I. .. . D17 D18 3: J 1::L E l [ q4l3|2|1fi BLANK -: 4L312l1 4|3l2|1 J I L l l ; M71615] {swam l8|7lal=~J AM P_040M1_08 F_B ~ ‘ 3 AM P__O40M1_OSF_B AM P__,O4OM1_08 F_B E2RF037B so
- 96. ' I I SD878- POWER OUTSIDE MIRROR FOLDING SYSTEM (1) POWER OUTSIDE MIRROR FOLDING SYSTEM lHOT AT ALL TIMES] |HOT IN ACC OR ON| JUNCflON BLOCK PHOTO36 ' i ‘ k r r ' V 2;“, ‘ 37:2: . «5E5!. :55. Swan. «36 - P.“ --‘-" QSGflB 11V 12,/,FD01 PHOTO 29 QSGflB OSGVB QSRK) 8Q _ _ _ _9_§§FD02 PHOTO 62 0.3Gr/B % R MIRROR FOLDING MODULE PHOT075 3/D17 . 3/D18 .- "'LEFT OUTSIDE RIGHT OUTSIDE MIRROR & MIRROR MIRROR & MIRROR 21 FDO1 PHOTO 29 H I FOLDING MOTOR FOLDING MOTOR 2,03 ' I, PHOTO 75 PHOTO 77 ~. I . ‘ : 31mg g, 33 i ' ’ G25 PHOTO79 EZRF038A 31 . ‘ ,.
- 97. 30878-2 POWER OUTSIDEMIRROR FOLDING SYSTEM (2) POWER OUTSIDE MIRROR FOLDING SYSTEM D05 ‘ ' D 4 | 3 ‘ 2 1 1 $171615“! AMP_040M1_08F_B D17 4 3 2 1 8 7 6 * AMP_040M1_08F_B D18 r———.J 4 | 3 | 2 | 1 l I l8|~7|6|*| AMP_040M1__08F_B D19 *l5l 4 KET__070II_08F_W_PCB 82 EZRFOSBB
- 98. - 30879-1 .I.._ GLASS 8: OUTSIDE MIRROR DEFOGGER (1) GLASS 8: OUTSEDE MIRROR DEFOGGER - ,I -, f 2.0L . 2.0G . 1/§MF21 PHOTO 63 ' PHOTO 27 2.08 21 FD01 2.08 .. 0 625 PHOTO 79 I G13 PHOTO 24 629 PHOTO 79 A 83 PHOTO 7? @TA PASSENGER COMPARTMENT See Charging Sysetm ”mu ; « krmwxua A?" , 3:224” .~ ‘ (mafia; ’« 2.» x. , » I m - 2;:- :51? nu. 0.3P ,. . . E2RFO42A
- 99. 30879-2 GLASS & OUTSIDE MIRROR DEFOGGER (2) GLASS & OUTSIDE MIRROR DEFOGGER 8 4 . D17 D18 F30 I I 1:1 I IIII I a I 2I1 1 L I 7 I 6 I * I 2 AMP—04°MIR—OBF43 KUM_NMWP_02F_BI - KET_GLASS_02F_B_ANT ._ M214 IIIIII M22-2 ‘13 12 * 10 9 * * 6 * 4 3 2 1 3 2 1 9 8 7 6 5 4 3 2 1 126 25 2 4 2 3 22 21 420.19 18 17 16 15 14 6 5 4 AMP;0407_26F_W_HD K ET_0407_26F__W """ E2RF0428
- 100. POWER SEAT 30380-1 . POWER SEAT (1) .- 1 ' AT ALL TIMES] -. . , p ) » PASSENGER . ‘ ' . e w e COMPARTMENT ‘ ' JUNCTION ' 'BLOCK MF41PHOT063. . _ - 2.0Y/B ~v;», PHOTO -' 2.0L .71 2 F302 PHOTO 71 = 2.0LT . . - . . ' I, - MW. m / .. .. 5 803-2 . . ' ' " " ' - -. s -_ .- . ' ' ' POWER ' " - = ' ; - - - ; ; _ SEAT MANUAL SWITCH PHOTO 73 ' 5V303-1 1k, " ' ' ' ' " Z1V303-2 1V ‘ ‘ ‘2§,503-1 3 h/sos-z 4V303-1 2V" ' ‘ “ 5V503-2 6V "' " '" "7b ""3"}, " "ER/$034 8§/ ‘ ‘ ‘ " “7%,2303-2 10§/So3-1 . 1.25m. 1.25Y/R 2.0Br 2.0w 1.253 1.253 2.0L/B 2.0L/W 2.03/3 2.0R/Y 1.253 1.253 2.0Y 2.03 1.25G/R 1.253r/Y .-' . . R/Vuu'QVSfii RECLIGNIN 72 HEIGHT. . ADJUSTER ADJUSTER ADJUSTER MOTOR _ _ MOTOR MOTOR , - 1- -, " '- -- 5‘5a01(LHD) . -:' I. ..F502(RHD) PHOTO 71 . 2.03 ; I ' E2RF027A .‘:-_=_' . - -. -. _' 85 ' '
- 101. SD880-2 POWER SEAT POWER SEAT (2) 803-1 303-2 506 307 4. ‘* .F<;4u,m . 2 41 1 “NM" 7 6 5 1o 9‘ 817 3 2 jcmoé‘oéa CR08F004 ‘ CR02FD12 . CR03F005 $09 ‘ s12 s13 515 f“‘ II 1 1 3 2 “CRSSr—‘oéé fl} CR02M053 CR02M053 CH02FO12 86 _ E2RF027B
- 102. SEAT WARMER SD889-1 E2RF058A ions fions t ma ina u See Illum See lllum 1 1 PHOTO 63 F502 PHOTO 7 302 $02 F502 PHOTO 7 629 PHOTO 79 25R 1 14 MF51 1 1 0.85W/B 2 258 8 0.853 F ; s w m s m a w n m fi g . 5 . g m 1 m w a n n a ? £ 2 3 ” . 3 i . it“? . m a m w m fi m m w a s is ” M W Q W W . . . to 0.5Gr 3 / L . 1.253 3 Ions ions t t ma ina See lllum See lllum . 3 3 . “ . 8 & 3 . . . x N .5: um.» 9:02.. 5 , 9 4 m m 3 5 . 3 3 . . M a» .... PHOTO 71 1 PHOTO 79 F501 0 S F801 PHOTO 71 HOT IN ON .25R 1 G25 1 2 1.253 8 0.853 . a: ( I x w , E M . . — Y / B ¢ 5 3 5 3 m m E . S u
- 103. SD889—2 SEAT WARM ER SEAT WARMER (2) .1 F13 F14 - $01 302 141W: 1 ~ ' j ‘1 1—1 'l r‘: l7 1 1 3 2 1 '3 2 1 ”6 * | 4 3 "6 * | 4 3 | | W W KET_090I!|_06F_Y - ' ‘ KE'II'fOQOI||_06F_L CROSF026 CR03F026 ' E2RF0583 as
- 104. A SD921-1 HEAD LAMPS . . HEAD LAMPS (1) ‘ - HOT IN ON ' WOT AT ALL TIMES] §EM11 PHOTO 29 / _ ‘ _ _ _ _ _ _ _ _ _ _ _ _ _ . _ _ _ ' ~ _ . ~ _ ' . a 9 47 4O JE02 0.5P/B EM11PHOTO 29 ' K PHOTO 36 20§EM21 _ . a . --._ _PASSENGER PHOTO 29 35 xEMOZ ‘ 1.- , , , -- 2: .' ._ f f COMPARTMENT . PHOTO 63 ‘3” ? _ ' _ -. ': 0.5Gr/O 0.75R 0.750 0.7512 0.750 0.5(3r . 3 MOB-3 2 15(LHD 2(LHD ””ilNSTRU- . 1 ~; “ : 14(RHD) M30-1 . ' _ . ~ . __ - ' 1 : 7‘: _ j " w MULTI- _ __-- - ~ ._ . m M _- :- FUNCTION ‘ 1 . _ :- ; __ - . , ; _ S SWITCH ". ~ .. _ 11_- . . ; _ _ - ' ' ; ' = ; ' r = i " r ] ” ' ; 'PHOTO .‘ f . 95w?” 8' 0.753 I 1 9.8513 -. '. . . .7 PHOTO 57 9.20 (565 PHOTOQ 1567 PHOTO12 ' > = ' G17 PHOT040 , - - 9. ‘ E2RFO43A .
- 105. 90 SD921-2 HEAD LAMPS HEAD LAMPS (2) E03 MOB-1 MOB-3 W n f 1 1o|9 8|7 615 M3211 6 5 4 [ 3 2 1 .. 2o|19[18|17|16|15|1zfl13|12[11 12]11|10|9 [“317 KUM_NMWP_06F_B , KUM_NMWP_06F_B - AMP_040M2_20F_B AMP_O4OM2_12F_B M30—1 ‘ M33-C 111098 7 6 * 24232221 * 1918I* 1615 a: 1312 I I'll ["1 H I"! F1 ['1 “ J D 1“! 1‘1 4 3 1 1 1 0 ; KET_0509_18F_W . AMPiO40IlI;20F__W AMP_040!|!_24F_GR E2RF04313
- 106. ~ .1 30922-1 _ HEAD LAMP LEVELING'DEVICE 7 , ' HEAD LAMP LEVELING DEVICE (1) '' ‘ 501 HOT AT ALLTIMES] HOTINON " . ,JUNCTION ‘ BLOCK ‘ ‘ PHOTO 7 _ 0.5L 2§§EM11 , , — . 0.5L PHOTO 29 _ - ' . 0.3G/B _ _ _ _ ____________ (______________ I: ,. 45 68 16 _ -- 2.013 0.53 0.50/8 0.5I3r See _.= , :;,.- ‘ llluminations _ :I._ 12§5EM21 PHOTO 29 vii-... . / A A 234xEMO2 PHOTO 63 .._I ' I- , _ See Illuminations L: , 1' , ' _ . : 0.56r ' " - 2o§§EM11 * i ' . - ' - PHOTO 29 '4’ 17 EM01 __ ' A 0-5Gr T PHOTO 63 r'I m m < > m u r — r " 23> 9 : ' U ...-l. N 01 DJ ACTUATOR PHOTO 7 " - ‘ A ‘ PHOTOS Gog: . -. -- - - x. . - E2RF044A
- 107. 30922.2 HEAD LAMP LEVELING DEVICE (2) HEAD LAMP LEVELING DEVICE E16 AMP_025WP_03F_B AMP_O25WP_03F_B M46 “4.1.3. KUM,CDFL05F_,W BLANK 9 2 - ' E2RF044B
- 108. ' 30923-1 ' HEAD LAMP WASHER ' ; ,:_ HEAD LAMP WASHER (1) ‘ -_A S. . IHOT ATALLTIME§I _ HOT IN ON I. '1" "‘ PASSENGER EEM02 PHOTO 63 . . . .. COMPARTMENT . -. .. 1 a . _; , _ JUNCTION I ' ' HEAD 4 LAMP WASHER _ RELAY [PHOTO10] See Illuminations ll. ‘ Z 5.M33-C PHOTO 50 J EM01 HEAD _ f LAMP WASHER PHOTO 30 14(LHD) ; - “ 13(RHD L%g’m . ,. ; 1 4,:4-3; MULTlFUNCTlON SWlTCH PHOTO 33 A 17(LHD) man-1 . A ._ ' . 16(RHD) . ‘ . ‘ - ,n ' E2RF050A -. ‘ 93 a;
- 109. 30923-2 HEAD LAMP WASHER:(2) _, E73 ' HEAD LAMP WASHER M30—1 M33-B 9 8 2 1 7 * * * * k 17 11 10 AMPHJPT__02F_B ‘ KET_58W_06F_W KET_0509_18F_W AM P__04OIII_2OF_W 333-0” M88 :1 1% ‘ , = 3 1 ; , , ”Er * 11109 8 7 6 5 4 3 _::::_1 BLANK -24239991*1918|17=1615 * * 5|4 3 AMP_040ll|_24F_GFI KET_090|II_060F_Gr E2RFOSOB
- 110. .3 I $0924- FRONT FOG & REAR FOG LAMPS -- ._ FRONT FOG & REAR FOG LAMPS (1) h "57]; - " IHOT AT ALL TIMES l l I : __ ' _ . _. , I PHOTO 7 . See Tail;Parking. 1 . P — LicenseLamps : I A . . . T . T I .._....... c } - . . _ . . . . . . . . . . _ . . . . _ . . ' _ _ _ _ _ _ _ ' . . - ‘ - - r’ _ _ . . _ _ _ . . . . . . . . . . . . . . . . . . - _ . . _ _ . . . . . . . . . . . . - . . . . . . . . _ _ _ ' - ________________ 1501 14 JE02 ‘ goo 0.75R _ . _ . . . . . . . . . . . . . _ _ _ _ _ _ _ _ . . . _................_.__ _ 7 R f‘ T: 2.00 7§jems1 Q; 12}? 14_~~,’/’EM11 O 5 :T T " 2.00 PHOTO 29 0.50/3 PHOTO 2-9 3.: .' PASSENGER .A ‘ COMPARTMENT ' gEM21 PHOTO 29 ; 0.3L(LHD) . ' _ - 0.5L(RHD) . . A . .» :7 0.5W/B 0.858 2.013 I. .- TO Multifunction _ _ -: Switch(2) i ' - Mi?BCM . ‘ _g '- -' _.-. j ”i PHOTO 50 s v Q - i .- _;- _ _ ,. W ee - - . t: Illuminations 6.20 PHOTO 57 607 PHOTO 12 i _- 2."? .' I I ' _ “ E2RFO47A " -' -' I 95 f , I :'
- 111. 30924-2 FRONT FOG & REAR FOG LAMPS (2) FRONT FOG & REAR FOG LAMPS [IT—OT AT ALL TIMES| WM PASSENGER COMPARTMENT JUNCTION BLOCK PHOTO 37 From Front Fog Lamp Relay(1) 0.85R/O 0.85R/O K 7 / 6 / ‘ / _ _ _ - - - .. ._ - _ _ _ " _ _ ‘- /MF81 PHOTO .29 See Illuminations 0 SP LHD4 0 3L LHD 0.85R/O 0.85R/O ' - - _ _ _ _ _ _ _ _ __ _ _ _ __ _ __ __ 0 5 R / O 0 561/0 4 0 3 L 0 ' 5 P ( R H D ) O ' 5 L ( R H D 6E5 5§§FR11 PHOTO 89 ' ' ' 14(LHD) 12(LHD) 1.25R/O 1.25R/O 13 RHD) 11V“""""“”""1‘2“/nn11moms” ‘ 1.25R/O 1.25R/O PHOTO 33 17(LHD) "156.903 mac-1 ‘ 16(RHD) 12 RHD); 0.53 O.SB(LHD) :7 0.SB(RHD) JOINT CONNECTOR PHOTO 42 ' ' " ‘ . G32 PHOTO91 ‘ T ' , . . . __ . _.T . .. EZHFWB 96
- 112. SD924-3 FRONT FOG & REAR FOG LAMPS (3) FRONT FOG 81 REAR FOG LAMPS ' E04 KET_110WP_02F_B_FOG KET_110WP_02F_B_FOG MOB-2 tl—F” 1 8|? 6 5|4 3 211 16l15|14113|12|11|101* AMP__040M2_16F_B 9 'k 17 M30—1 7 * ~ k - k * 3 1 2 1 1 1 1 0 KET_0509_18F_W M33-B M33-C I — l l — l l — I l — l L J 1 1 1 0 9 8 7 6 3 * 1 M50 KET_0901|1_04F_W 242322219: 19181171615 * 1312 * 514 3 F1 ['1 1'1 I"! Fl ["1 I"! ("I ['1 H l_| ‘ ( AMP”O4OIII_24F_GR KET_090|1|"06F_BR 304- 1135211 .. ....KET_0901|L-_04F_-_W BLANK BLANK 97 E2RFO47C
- 113. 30924—4 FRONT FOG & REAR FOG LAMPS MEMo ' MEMO 93 -
- 114. E2RF046A ions t IOI'IS Ina mat M44 5g .. 3W/B See Ilium v,», ~a; See Ilium ‘I’KL ~52» Whig... “v3.9.3.4... . 79. , 3 1 ? ; n } . 9 5 1 . n93 1w . 5 . “ . K L “ , m n x . , . . . « . . € . . z... 5? TURN & HAZARD LAMPS x . , ~ 3 2 . . . . . b m y n w a x r . » v . .N is», mm. 4:34 2.34... n 7. m.» 2.... If’é’k 1-. a) N», «31535? 3,. ~ .. via: «an >3 ' "am 2:554.» my - (:3. ., M... ”é - . ._, '19.. 1'5» .231»: 2..» mm... "am .3 ;.: PHOTO 91 mat a" . «a. PHOTO 89 .182; 9 f ilP-A PHOTO 29 2 v91.$v..%,1m. . 1 1 . . . r. w a n d s “ . . . . 2.4mm). : 3 7§5Fn11 G 14§§MF71 To Flasher Unit(2) 0.858r 0.858r 0.853r |HOT iN ON OR START| m. w ~ I HOT AT ALL TIMES! PHOTO 63 1 E25 PHOTO 28 From Flasher Unit(2) 54.- To Hazard Relay(2) ?? 3 W 3 31,. 993. § 8 3%. p ’8 w é: i n in: K8 . . 7 : 5 % . ? ”magma": 435.... a ,5 . 9 3% % . , « § : § g a w m u g x w m m m i } . S i g n . . . . 3 3 9 2 » . a 3 % . ? » 2 . 2 5 . 5 . 2 . 3 . a s . . . =3}; mi». x;2a..s=§zfi<x. n 2 GO? PHOTO 12 k e n ; «16%.». 5 G17 PHOTO 40 «minke cu 33.1.7.5. . BSBr . 4 ? . i n . . . t «> .5 0 .H n‘ «2* am. TURN & HAZARD LAMPS (1) SD925-1
- 115. ' . '. _ SD925-2 TURN 8: HAZARD LAMS S . g TURN & HAZARD LAMPS (2) _' ‘ , FromFuse 23(1) FromHazard SwitCh(1) _- gPASSENGER . f ' f ,. - 0.85Y/O 0.856” _ B - ‘ 0-75Y/0 95 9 ' To Hazard B (LHD) 8(LHD) . 3(RHD) 2RHD MSG-1 SWItch(1) 0.75Y/O PASSENGER ‘ j‘ ‘1 COMPARTMENT JUNCTION 3 7(LHD) IIIIso-I . 1(RHD) .. -. _ 0-759 0.85G V LEFT REAR . COMBINATION _. : LAMP(OUT) . '. , » - PHOT091 . . . AQCOMPARTMENT ‘ 0353 wJUNCTIONBLOCK . ’ . 1.258 _. . , .. . -- , s 656 PHOTOS, c537 PHOTO 4o . , E2RF04SB
- 116. 30925-3 TURN & HAZARD LAMPS (3) TURN & HAZARD LAMPS E03 KUM__NMWP_06F_B KUM_NMWP_O2F_B F 1 8l736 5J4 3 2l1 16|15114|13|12111l1o|* AMP__040M2_16F_B ' 7 * ' k ' k * l 1 2 1 21110 KET_0509_18F__W d=~ sfifl * l[109 8’76 5]J KET_,0901|_10F_W M91-2 77615 M 18 17 16 15 14 13 '12'7:11-1171: 1’0" ‘ AMP_0925_18F_W KET_0901|L__D4F_W {4 362 ‘1J] KET__090III_O4F_W 101 E2F{FO4BC
- 117. 30925-4 TURN & HAZARD LAMPS MEMO MEMO 102
- 118. I! Tins: ACK-UP LAMPS A ACK WARNENG SYSTEM ASK-UP LAMPS & BACK WARNlNG SYSTEM (1) ; . ' - HOT IN ON OR STARTi IHOT AT ALL TIMES] ' ; f ~ PASSENGER . ; L _ COMPARTMENT fl . “ . JUNCflON “ - - ' BLOCK .3 ' . , PHOT032 'Q517C' __J-1 we, ,_1 ,CONNECTOR . Vi T“‘*._. PHOT019 .] .1 -‘1Atal?**P”°T°53 ' See Automatic I - - . Transaxle * . Control System . _ ; BACK WARNING . _ BUZZER ' 1 " 2/M54 I ; . ; - : 050 , ; “fgf I ________________________________________________§§§MFHTNmnozg f - i i { f } 4 . - OSL 03L " " jg; 4 FR11 PHOTO 89 1 -' "' See Electro 0'51“ _ ." Chrome Mirror 4 RR11 PHOTO 91 ' -1. ;; 035Q[ L 3 :S ' RR11PHOT091 : -‘~3 0353 N5 .-.' -- ._ " _ .. _ .._.. CENTER BACK WARNING SENSOR LEFT BACK WARNING SENSOR RIGHT BACK WARNING SENSOR . . . -. .5. ' - G32 PHOTO 91 PHOTO 96 PHOTO 96 PHOTO 96 G26 PHOTO 82 . E_- ’ ., - - - -- . ---~- A , ' , S ' E2RF030A , ; - 103 -' _ . - A
- 119. SD926—2 BACK—UP LAMPS & BACK WARNING SYSTEM C09 KET_SSD_10F_B_AI BACK-UP LAMPS 8: BACK WARNING SYSTEM (2) AMP_EJWP_02F_B F09 nun-L . C = 1 ” : l . . ., ' 1‘ ":.:I; .--i;-‘{:‘ . i_ 14 *11211111: AMP__070_14F_W KUM_CDR__O5F_W — ~ — / ‘ KET_090NI-_04F_W 1. KET_090|Il_04F_W AMP_EJWP_04F_B AMPfEJWP_04F_B AMP_EJWP_04F_B 1om‘ ' E2REQ3OB
- 120. SD927- STOP LAMPS (1) STOP LAMPS u o Closed with brake 31w?1|?c‘l-IAMP pedal depressed Open with brake PHOTO 39 pedal depressed 3 _ _ _ _ , _ - _ _ _ _ _ _ _ _ QSUO See ATM Shift Lock Control System 05L 056 12f}~ OlNT iCONNECTOR "'~ PHOTO 61 *---*_—’-—fl“*---~§3—‘V';EM01_HOT063 1.25s _________________1_6_§§MF51PHOToaa 1.256 9 V FR11 PHOTO 39 HIGH—MOUNTED 125G STOP LAMP PHOTO 85 1.256 i i - 31 I LAMP(OUT) - 1 .. 105 E2RF049A
- 121. SD927-2 STOP LAMPs_.,,(2) STOP LAMPS E62 EH1_ 4 3 KET__2500L_o4|=_w F39 ' ‘ KELosouLoéfiw ___;J] KET_090III_04F_W 106 " EZRFMQB
- 122. TML, PARKING 8: LICENSE LAMPS h ._ '2 5 ‘ SD923-1 i" -' TAIL, PARKING 8: LICENSE LAMPS (1) i ' [HOT AT ALLTIMESI i;. -' - - - - - ~ - “r- : . fJUNCTION " _ gBLOCK _; PHOTO 7 ' I I T . ' 7::EM31 . 2.00 PHOTO 29 . ‘1 ‘ / I ‘ ' 0.3P(LHD . ‘ .. _ _ , O.5P(FlHD ‘ . _' 14(LHD) ' : . CONNECTOR ‘ ' '1','.‘--_1f'??'-" :7" I CONNECTOR . : _— — (firm Wm ‘ - ' ' " ' ' ” ’ ‘ ' ' " ' ' " E2RFO48A
- 123. SD928-2 TAIL, PARKING & LICENSE LAMPS (2) TAIL, PARKING & LICENSE LAMPS From From Fuse 8(1) Fuse 7(1) A B 0.58r/B 0.5G/B Dr ' " ' ' ' ' “ ‘ ' ' ' io"§<FR11-PHOTO 89 0.58r/B 0.5Y/B 0.5G/B 13 Q2311 PHOTO 91 0.58r/B 0.5Br/B 0.5G/B 0.5G/B 0.858 93 - H / PHOTO] 0-853 95 1.253 ‘92 / o 853 2.03 . 14ég‘“‘8'fiV _ _ _ _ _ _ _ _ _ _ _ _ _ _ _ _ _ _ _ _ _ _ _ _ ._.. Jj‘qnnn PHOTO 91 __ 1.253 0.53 -. 0.858 _ 631 .0 . - 6-32 PHOTO 91 _ E2RF04BB 103 . O.
- 124. SD928-3 TAIL, PARKING & LICENSE LAMPS (3) TAIL, PARKING & LICENSE LAMPS E03 M30-1 9 8 KUM_NMWP_06F_B KUM_NMWP_06F_B 7 * t - k - k 2 1 11 10 KET_0509_18F_W M33-B M33-C I] I ‘ I L! u u 1.: 14—4154: l_l ~ . ‘ _ [ 3 : 0 11 10 9 8 7 6 24239991 * 1918[1_7 r n n n n n n n fi h fi n KET_090|I|_O4F_W AMP_040!l|_20F_W KET_090IH__D4F__W [L4 3 U 2 1]] [L4 3 i 2 1J] KET_090lll_O4F__W _KET_090III_O4F_W KET_050_02F_W KET_050_02F_W 109- E2RFO48C
- 125. SD928-4 TAIL, PARKING 8: LiCENSE LAMPS MEMO MEMO 110
- 126. ' 1 30929-1 COURTESY 81 TRUNK ROOM LAMPS . COURTESY & TRUNK ROOM LAMPS (1) -. ' IHOTATALLTIMESI . “ ' ' COMPARTMENT WE . . CONNEC _ _ See P'aSsenger Y - - . . .. . ‘ . -. ' - . .. . "g;Com-partment I g ' ' " ‘ ' ' ' “ " 43989-99999-“ l/P-L 8 3 IIP-J 10 VP-B 0.5Y/B 1 _‘ _ 15§§MF11 19$:FDO1 0.5Y/B PHOTO63 0.56 0.3513 - PHOTO29 18§§Fooz To 0.5Y PHOTO'sz Below Page (2) LO _ 1 D15 . : PHOTO 76 PHOTO 78 1-1:: : 20§iD01 19L}; FD02 j. . 0.3G/B - , - - 0.5Br 0.5Br/O 0.50/13 0.3P 0.5w 0.30/3 ‘ ' PHOTO 29 ‘ . 1:/"P_L 13 llP-L 1 l/P-B 033/3 _ .. ~1' _- -. - . . - - -. _ - .- - -_ PASSENGER - - . .. - - -- . . . .- _. COMPARTMENT . . , ' 5.‘ . g . .. . .. f . ; . 'JUNCT'ON /-‘- .EVEE-g. 05m: 1 {9219?}: .p TRUNK ” “ 5 ‘ " d -% ID - ; r ’ 7 ‘ ; , PHOT094 g , - 6'25 PHOTO 79 (5'29 PHOTO 79 ' " 111 . , ' E2RF051A
- 127. f SD929-2 COURTESY & TRUNK ROOM LAMPS COURTESY & TRUNK ROOM LAMPS (2) . . . From Power - : _ Connector (1) ; ‘ ‘ fi, , . . , 3 , , ~%¢M? ‘ ‘ ‘33 6;. «46% “I , ‘ . 9 , . . "a” :k.‘ .w . .31.: , “£3,“ . ‘ . . :_ I , 4 ‘. O . .‘ r ‘ = . _‘ .‘ _- 1 .' I 1' 8Q; MF81 4 —- . _ PHOT029 ‘ g : . 1.253 O . = 0.5Y/B O 5§§MF01 _; , PHOTO 38 O . 1.2513 - ‘ x 5'25 PHOTO 79 ' '_ . - ' ‘ ' ' ' I " ' EZRF051B ' _‘ 112 .