Jcb tm320 telescopic wheel loader service repair manual sn 2681926 and up
Work Precedure Side Standard
1. Side Standard
PROCEDURE OVERVIEW
TARGET TIME = 60 MIN
Tools Required
Generic manual mill
High speed drill bit size 3/64”
High speed drill bit size 5/32”
High speed drill bit size 5/16”
High speed drill bit size 1/8”
3/64” General Purpose Hand Tap
1/8” Hex Key
Standard Vice
Needle nose pliers
Pre-Checks
1. Mill is properly zeroed out, coordinate system is good.
2. Bottom assembly (bottom plate, spacers, bottom set screws and dowels) is fit together.
3. Wear proper safety eye protection, clothing, and gloves.
Side Standard Part
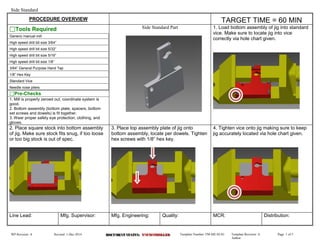
1. Load bottom assembly of jig into standard vice. Make sure to locate jig into vice correctly via hole chart given.
2. Place square stock into bottom assembly of jig. Make sure stock fits snug, if too loose or too big stock is out of spec.
3. Place top assembly plate of jig onto bottom assembly, locate per dowels. Tighten hex screws with 1/8” hex key.
4. Tighten vice onto jig making sure to keep jig accurately located via hole chart given.
Line Lead:
Mfg. Supervisor:
Mfg. Engineering:
Quality:
MCR:
Distribution:
WP Revision: A Revised: 1-Dec-2014 D DDO OOC CCU UUM MME EEN NNT TT SSSTTTAAATTTUUUSSS::: UUUNNNCCCOOONNNTTTRRROOOLLLLLLEEEDDD Template Number: FM-ME-02-01 Template Revision: A Page 1 of 5
Author:
2. Side Standard
PROCEDURE OVERVIEW
5. Use hole chart to accurately drill holes into part using manual mill, change drill bits when needed.
6. Use given dimensions and high speed end mill bit to mill outer side of part.
7. Use given dimensions and high speed end mill bit to mill final opening.
8. When finished, move mill out of obstruction and turn off. Loosen vice.
9. Move entire jig into second milling position with bottom hole facing up. Use hole chart to locate jig into vice.
10. Tighten vice onto jig making sure to keep jig accurately located via hole chart given. Use hole chart to accurately drill hole into part using manual mill.
WP Revision: A Revised: 1-Dec-2014 D DDO OOC CCU UUM MME EEN NNT TT SSSTTTAAATTTUUUSSS::: UUUNNNCCCOOONNNTTTRRROOOLLLLLLEEEDDD Template Number: FM-ME-02-01 Template Revision: A Page 2 of 5
Author:
3. Side Standard
PROCEDURE OVERVIEW
11. When finished, move mill out of obstruction and turn off. Loosen vice.
12. Move entire jig into third milling position with left side up for dowel holes. Use hole chart to locate jig into vice.
13.Tighten vice onto jig making sure to keep jig accurately located via hole chart given. Use hole chart to accurately drill holes into part using manual mill.
14.When finished, move mill out of obstruction and turn off. Loosen vice.
15. Move entire jig into forth milling position with top face up. Use hole chart to locate jig into vice.
16. Make sure the correct top spacer is assembled into jig, then drill via hole chart.
WP Revision: A Revised: 1-Dec-2014 D DDO OOC CCU UUM MME EEN NNT TT SSSTTTAAATTTUUUSSS::: UUUNNNCCCOOONNNTTTRRROOOLLLLLLEEEDDD Template Number: FM-ME-02-01 Template Revision: A Page 3 of 5
Author:
4. Side Standard
PROCEDURE OVERVIEW
17.When finished, move mill out of obstruction and turn off. Loosen vice.
18. Remove top plate from the jig using the 1/8” Hex Key. Use needle nose pliers to remove part from jig, and place into standard vice in second position.
19. Use the 3/64” Hand Tap to thread the hole at the top of the part.
20. Loosen part from vice and flip it around into forth position, then clamp the part again.
21. Use the 3/64” Hand Tap to thread the hole at the top of the part.
22 . Remove part from vice. Use needle nose pliers to move part to metal planing process.
WP Revision: A Revised: 1-Dec-2014 D DDO OOC CCU UUM MME EEN NNT TT SSSTTTAAATTTUUUSSS::: UUUNNNCCCOOONNNTTTRRROOOLLLLLLEEEDDD Template Number: FM-ME-02-01 Template Revision: A Page 4 of 5
Author:
5. Side Standard
PROCEDURE OVERVIEW
NOTE: Turn off each machine after its use is completed.
WP Revision: A Revised: 1-Dec-2014 D DDO OOC CCU UUM MME EEN NNT TT SSSTTTAAATTTUUUSSS::: UUUNNNCCCOOONNNTTTRRROOOLLLLLLEEEDDD Template Number: FM-ME-02-01 Template Revision: A Page 5 of 5
Author: