1. Operating a Hobart Slicer
The following instructions cover only the basic operation of the slicer. For cleaning instructions and
more advanced operating techniques, please see your Hobart slicer’s operating manual.
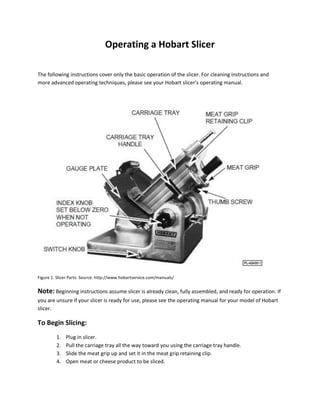
Figure 1. Slicer Parts. Source: http://www.hobartservice.com/manuals/
Note: Beginning instructions assume slicer is already clean, fully assembled, and ready for operation. If
you are unsure if your slicer is ready for use, please see the operating manual for your model of Hobart
slicer.
To Begin Slicing:
1. Plug in slicer.
2. Pull the carriage tray all the way toward you using the carriage tray handle.
3. Slide the meat grip up and set it in the meat grip retaining clip.
4. Open meat or cheese product to be sliced.
2. WARNING: Turn slicer off and set index knob to zero (0) before placing, removing, or adjusting any
product on the carriage tray.
5. Place the product onto the carriage tray, positioned as tightly as possible in the “V” of the
carriage tray.
6. Move the meat grip from the meat grip retaining clip to the top of the product.
Note: If the product is too tall, the meat grip can be positioned on the side of the product by pushing
the grips on the side of the meat grip into the product.
7. Turn the index knob to desired thickness number.
Note: Index numbers on knob do not correlate with any real measurements, but can be noted for
desired thickness in future slicing. It is basically a trial-and-error process to reach a specific desired
thickness.
8. Pull the switch knob out to turn on the slicer.
9. Gripping the carriage tray handle, push the carriage forward and back to slice the product.
Note: Product will pile up beneath the gauge plate as they are sliced. These can be removed at any
time, without fear of injury.
Warning: Before removing product from slicer, complete all three parts of number 10
When finished slicing:
10. Pull carriage tray all the way back toward you.
11. Push in the switch knob to turn it off.
12. Set index knob to zero (0).
13. Place meat grip into meat grip retaining clip.
14. Remove remaining product from slicer.
Your meat or cheese product is now sliced! Please see your Hobart slicer’s operating manual for
cleaning instructions.