

Recommended
More Related Content
What's hot
What's hot (20)
Viewers also liked
Viewers also liked (17)
Similar to Hdsd camera6030 ahd eng
Similar to Hdsd camera6030 ahd eng (20)
More from BENCO Việt Nam
Hdsd camera6030 ahd eng
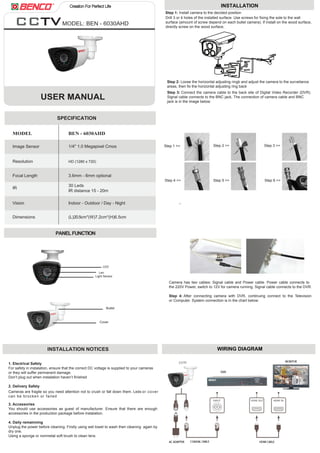
- 1. USER MANUAL MODEL: BEN - 6030AHD PANELFUNCTION WIRING DIAGRAM INSTALLATION Step 1 >> Step 4 >> Step 5 >> Step 6 >> Step 2 >> Step 3 >> 3cm 1cm Step 3: Connect the camera cable to the back site of Digital Video Recorder (DVR). Signal cable connects to the BNC jack. The connection of camera cable and BNC jack is in the image below: MODEL BEN - 6030AHD SPECIFICATION Resolution HD (1280 x 720) Focal Length IR Vision Dimensions Indoor - Outdoor / Day - Night 30 Leds IR distance 15 - 20m Image Sensor 3.6mm - 6mm optional 1/4'' 1.0 Megapixel Cmos (L)20.5cm*(W)7.2cm*(H)6.5cm INSTALLATION NOTICES 1. Electrical Safety For safety in instalation, ensure that the correct DC voltage is supplied to your cameras or they will suffer permanent damage. Don’t plug out when instalation haven’t finished 2. Delivery Safety 3. Accessories You should use accessories as guest of manufacturer. Ensure that there are enough accessories in the production package before instalation. 4. Daily remainning Unplug the power before cleaning. Firstly using wet towel to wash then cleaning again by dry one. Using a sponge or nonmetal soft brush to clean lens. Step 1: Install camera to the decided position Drill 3 or 4 holes of the installed surface. Use screws for fixing the sole to the wall surface (amount of screw depend on each bullet camera). If install on the wood surface, directly screw on the wood surface. Step 2: Loose the horizontal adjusting ringb and adjust the camera to the surveilance areas, then fix the horizontal adjusting ring back Camera has two cables: Signal cable and Power cable. Power cable connects to the 220V Power, switch to 12V for camera running. Signal cable connects to the DVR. Step 4: After connecting camera with DVR, continuing connect to the Television or Computer. System connection is in the chart below: LED Cover Bullet Len Light Sensor Cameras are fragile so you need attention not to crush or fall down them. Leds or cover can be brocken or failed