SlideShare a Scribd company logo
1 of 171
Download to read offline
YOUR 206 AT A GLANCE 1
Each model may only be fitted with some of the equipment shown, according to its specification and the
technical requirements in the country of first registration of the vehicle.
206 SW: version available according to country.
Pages
Seats 74 - 85
Instruments and controls 29 - 31
Control panel 37 - 73, 97 - 98
Mirrors 100
Pages
Checks 117 - 125
Access 87 - 92
Changing a wheel 126 - 130, 160
Changing a bulb 131 - 135
26-05-2003
Downloaded from www.Manualslib.com manuals search engine
2 YOUR 206 AT A GLANCE
26-05-2003
Downloaded from www.Manualslib.com manuals search engine
26-05-2003
3YOUR 206 AT A GLANCE
1 Side window demisting vents
2 Adjustable side vent
3 Passenger air bag
4 Windscreen demisting vents
5 Multifunction display
6 Central locking switch
7 Hazard warning lights switch
8 Instrument dials lighting
rheostat
9 Lights and direction
indicators stalk
10 Steering wheel height
adjustment control
11 Steering lock
12 Windscreen wiper stalk
13 Driver's air bag
Horn
14 Audio equipment remote
control
15 Headlamp height adjustment
16 Passenger air bag disarming
switch*
17 Rear window locking switch
18 Dynamic stability control
(ESP/ASR) button
19 Storage compartment
20 Fuse box
21 Gear lever
22 Lighter
23 Alarm button
24 Front electric window
switches
25 Electric mirrors switch
26 Handbrake
27 Front ashtray
28 Controls for heating,
ventilation, air conditioning
and heated rear screen and
mirrors
29 Audio equipment
30 Adjustable centre vents
31 Glove box
32 Bonnet opening control
* According to destination.
Downloaded from www.Manualslib.com manuals search engine
87
4 YOUR 206 AT A GLANCE
26-05-2003
KEYS
The keys enable you to switch on
the ignition, independently operate
the locks on the front doors and
the tailgate (saloon) as well as
operating the passenger air bag
disarming switch and the fuel
filler flap.
Central locking
From the driver's door, you can
lock and unlock the doors and
the boot. If one of the doors, the
boot (206 SW) or the rear screen
(206 SW) is open, the central
locking will not work.
Remote control
Press button A to remotely lock
the vehicle.
This is confirmed by fixed lighting
of the direction indicators for
approximately two seconds.
Press button B to remotely
unlock the vehicle.
This is confirmed by rapid flashing
of the direction indicators for
approximately two seconds.
206 SW: press and hold button B
to unlock the vehicle and open
the rear screen.
Key in ignition
If you leave the key in the igni-
tion, a buzzer reminds you of this
when opening the driver's door.
Locating the vehicle
To locate your vehicle, when you
have left it locked in a car park:
 press button A, the courtesy
lights will switch on and the
indicator lights flash for a few
seconds.
STARTING
The 4 positions of the key in
the ignition:
STOP position:
The ignition is off.
1st notch, Accessories posi-
tion: the ignition is off but the
accessories can be used.
2nd notch, Running position:
the ignition is on.
Starting position:
Operates the starter.
Steering lock
Before starting, unlock the steering
if necessary, by gently turning
the steering wheel at the same
time as you turn the key.
It is advisable to press the clutch
pedal while operating the starter,
to make starting easier.
Downloaded from www.Manualslib.com manuals search engine
Precautions regarding the
passenger air bag
For a vehicle fitted with a disarm-
ing switch:
– disarm the air
bag if you
install a rear-
facing child
seat,
– arm the air
bag for an
adult passen-
ger.
For a vehicle not fitted with a
disarming switch:
–do not install
a rear-facing
child seat on
the front pas-
senger seat.
In no circumstances should you
place your feet or any other
object on the fascia.
114
5YOUR 206 AT A GLANCE
26-05-2003
Never race a cold engine.
Never run the engine in a
confined space.
Do not make any modifications to
the steering lock.
Starting a petrol engine
Do not press the accelerator.
Operate the starter, without
releasing the key, until the
engine turns.
Starting a diesel
engine
Do not press the acce-
lerator.
Turn the key to the ''Running''
position.
If the engine is warm enough,
the pre-heat light does not come
on and you can start immediately.
If the pre-heat light comes on, wait
for it to go out before operating the
starter.
If the engine stalls, it is necessary
to return the key to the ''STOP''
position before restarting.
FRONT AIR BAGS
Operating check
* According to destination.
Disarming the passenger air
bag*
Insert the ignition key into switch
1 and turn it to:
– the ON position; the passenger
air bag is armed.
– the OFF position; the passen-
ger air bag is disarmed.
With the ignition on (2nd notch of
the ignition), illumination of this
warning light, accompanied by
an audible signal and the mes-
sage Passenger air bag deac-
tivated on the multifunction
display, indicates that the pas-
senger air bag is disarmed
(switch in the OFF position).
The warning light remains on
throughout the disarming process.
Downloaded from www.Manualslib.com manuals search engine
26-05-2003
Windscreen wipers
Front
2 Fast wipe
1 Normal wipe
I Intermittent wipe
or
AUTO Automatic wipe
0 Off
Single wipe
Wash-wipe: pull the stalk
towards you.
Rear
Off Intermittent Wash-
wipe wipe
Automatic wipe
In the AUTO position, the
windscreen wiper oper-
ates automatically and
adjusts its speed to the
intensity of the rainfall.
Rear fog lamp (ring B)
Rear fog lamp
(rotation of the ring
forwards)
Front fog lamps/Rear fog
lamp (ring C)
Front fog lamps
(1st rotation of the ring
forwards).
Front fog lamps and
rear fog lamp (2nd
rotation of the ring
forwards).
93 95
8 YOUR 206 AT A GLANCE
STEERING WHEEL
CONTROLS
Lights
Front lights (ring A)
Lights off
Side lights
Dipped/
main beam
headlamps
Automatic
switching on
of lights
Automatic switching on of lights
To activate or deactivate the
function, place the key in the
accessories position with the
lights stalk in position 0 and
press the end of the stalk for
more than four seconds.
Downloaded from www.Manualslib.com manuals search engine
26-05-2003
74
9YOUR 206 AT A GLANCE
FRONT SEATS
1- Forwards/backwards adjust-
ment.
2- Access to rear seats (3-door).
3- Seat back angle adjustment.
4- Height adjustment.
5- Head restraint height and
angle adjustment.
Never drive with the head
restraints removed.
Modifiable passenger seat
Access to the storage
compartment
– Push the seat as far back as
possible.
– Raise then pull the front of the
seat to unlock it, then tilt the
modifiable seat.
Downloaded from www.Manualslib.com manuals search engine
Load space cover
To install:
– position (1) one end of the cover roller in one of the two supports,
– compress (2) the opposite end of the roller and position it,
– release it (3) so that it engages,
– unroll (4) the cover to the boot pillars,
– insert the cover guides in the rails on the pillars.
To remove:
– remove the cover guides from the rails on the pillars,
– return the cover to its roller, compress it and remove it
from its support.
Rear seats
– Lift the front of the seat cushion 1,
– Tilt the seat cushion 1 against the front
seats,
– Position the seat belt under the belt
holder 2,
– Pull control 3 to unlock the seat back 4,
– Remove or lower the head restraint,
– Tilt the seat back 4.
When refitting, take care not to trap the
seat belts.
10778
10 YOUR 206 AT A GLANCE
26-05-2003
Downloaded from www.Manualslib.com manuals search engine
Precautions regarding the
passenger air bag
For a vehicle fitted with a disarm-
ing switch:
– disarm the air
bag if you
install a rear-
facing child
seat,
– arm the air
bag for an
adult passen-
ger.
For a vehicle not fitted with a
disarming switch:
–do not install
a rear-facing
child seat on
the front pas-
senger seat.
In no circumstances should you
place your feet or any other
object on the fascia.
114
5YOUR 206 AT A GLANCE
26-05-2003
Never race a cold engine.
Never run the engine in a
confined space.
Do not make any modifications to
the steering lock.
Starting a petrol engine
Do not press the accelerator.
Operate the starter, without
releasing the key, until the
engine turns.
Starting a diesel
engine
Do not press the acce-
lerator.
Turn the key to the ''Running''
position.
If the engine is warm enough,
the pre-heat light does not come
on and you can start immediately.
If the pre-heat light comes on, wait
for it to go out before operating the
starter.
If the engine stalls, it is necessary
to return the key to the ''STOP''
position before restarting.
FRONT AIR BAGS
Operating check
* According to destination.
Disarming the passenger air
bag*
Insert the ignition key into switch
1 and turn it to:
– the ON position; the passenger
air bag is armed.
– the OFF position; the passen-
ger air bag is disarmed.
With the ignition on (2nd notch of
the ignition), illumination of this
warning light, accompanied by
an audible signal and the mes-
sage Passenger air bag deac-
tivated on the multifunction
display, indicates that the pas-
senger air bag is disarmed
(switch in the OFF position).
The warning light remains on
throughout the disarming process.
Downloaded from www.Manualslib.com manuals search engine
26-05-2003
99 100
ELECTRIC WINDOWS
1. Driver's electric window
Manual operation: press or pull the switch lightly.
The window stops as soon as the switch is
released.
Automatic operation: press or pull the switch
firmly. One touch completely opens or closes the
window.
Automatic opening and closing only operate when
the engine is running.
2. Passenger's electric window.
3. Rear left electric window.
4. Rear right electric window.
ELECTRIC MIRRORS
Turn knob 5 to the right or to the left to select the cor-
responding mirror.
Move knob 5 in all four directions to adjust.
Electric folding mirrors
With the ignition on, turn knob 5 to position A.
7YOUR 206 AT A GLANCE
Downloaded from www.Manualslib.com manuals search engine
26-05-2003
DOORS
Front doors
Rear doors (206 SW)
89
LOCKING/UNLOCKING THE BOOT AND THE REAR SCREEN
(206 SW)
The boot and the rear screen cannot be opened simultaneously.
With the rear screen closed, to open the boot, pull the handle A and lift.
With the boot closed, to open the rear
screen, press and hold the unlocking
button on the remote control or pull
the handle B, then lift the rear screen
using the windscreen wiper arm (at C).
The lighting is switched on by
opening the boot or the rear screen.
Note: Close the rear screen using the
windscreen wiper arm C or by pressing
the centre of the window.
6 YOUR 206 AT A GLANCE
90
Downloaded from www.Manualslib.com manuals search engine
26-05-2003
13
101 92
YOUR 206 AT A GLANCE
STEERING WHEEL HEIGHT
ADJUSTMENT
When stationary, lower the han-
dle to unlock the steering wheel.
Adjust to the desired height and
lift the handle to lock the steering
wheel.
OPENING THE BONNET
From inside the vehicle: pull the
handle.
From the outside: lift the catch
and raise the bonnet. Secure the
strut to hold the bonnet open.
13
Downloaded from www.Manualslib.com manuals search engine
26-05-2003
110
YOUR 206 AT A GLANCE14
P. Park.
R. Reverse.
N. Neutral.
D. Drive: in this position, all four gears change automatically.
3. Automatic changing of the first three gears only.
2. Automatic changing of the first two gears only.
A. Sport programme.
B. Snow programme.
THE AUTOMATIC AUTOADAPTIVE GEARBOX
Starting
To start the engine, place the selector lever in position N or P. Press
the brake to leave position P and when selecting forward or reverse
gears.
Position of the selector lever
This is shown by an indicator on the instrument panel.
Downloaded from www.Manualslib.com manuals search engine
26-05-2003
68
70
YOUR 206 AT A GLANCE 11
N° Symbol Function
HEATING/AIR CONDITIONING
Setting the air
distribution.
1
Air intake control.2
Temperature
adjustment.3
Demisting the rear
screen and mirrors.4
Air flow adjustment.5
Air conditioning
control.6
Downloaded from www.Manualslib.com manuals search engine
26-05-2003
72
YOUR 206 AT A GLANCE12
N° Symbol Function
AUTOMATIC AIR CONDITIONING
Air flow adjustment.
Setting the air
distribution.
1
2
3
4
5
6
7
8
9
Air intake control.
Air conditioning
control.
Switching off.
Demisting the rear
screen and mirrors.
Temperature
adjustment.
Automatic comfort
programme.
Automatic visibility
programme.
Downloaded from www.Manualslib.com manuals search engine
26-05-2003
PEUGEOT SERVICING
Your vehicle benefits from extended service intervals.
• For petrol engines: every 20 000 miles (30 000 km) or every two years.
• For direct injection diesel engines: every 12 000 miles (20 000) km or every two years.
• For indirect injection diesel engines: every 10 000 miles (15 000 km) or every two years.
The extension of the service intervals means that the engine oil level must be checked regularly: topping up of the
oil between oil changes is normal.
This is why the PEUGEOT network is offering you an intermediate service between regular services.
The date of this visit is not shown by the service indicator. It is to be carried out at least every 10 000 miles
(15 000 km) for saloon and 206 SW petrol engines; every 6 000 miles (10 000 km) for 206 GTi 180 direct injection
diesel engines and every 5 000 miles (7 500 km) for indirect injection diesel engines.
A PEUGEOT dealer will carry out a quick check and top up the levels if necessary (oil, coolant, windscreen wash
up to 2 litres).
If the oil level is too low there is a risk of serious damage to the engine: check the engine oil level at least every
2 000 to 3 000 miles (3 000 to 5 000 km), depending on the conditions of use.
This extended servicing has been made possible by modifications to our vehicles and to the lubricants:
THUS IT IS ESSENTIAL TO USE ONLY ENGINE LUBRICANTS THAT ARE SUITED TO YOUR ENGINE AND RECOM-
MENDED BY THE MANUFACTURER (see Lubraicants pages).
PEUGEOT SERVICING
18
Downloaded from www.Manualslib.com manuals search engine
26-05-2003
SPECIAL FEATURES
Some of your vehicle's vital components have specific servicing schedules.
The brake fluid must be replaced every 40 000 miles (60 000 km) or every 2 years.
The passenger compartment filter must be checked at each visit to the PEUGEOT dealer (intermediate visits and regular
services).
The timing belt: consult your PEUGEOT dealer.
PEUGEOT SERVICING
19
Arduous conditions of use
If the vehicle is used in certain particularly arduous conditions:
– Continuous door-to-door use.
– Town use (e.g. taxi).
– Repeated short journeys, with the engine cold in low temperatures.
Or in long stays in the following conditions:
– Hot countries with temperatures often above 30 °C.
– Cold countries with temperatures often below minus 15 °C.
– Countries with a dusty atmosphere.
– Countries whose lubricants or fuels do not conform to our recommendations.
It is necessary to follow an Arduous Conditions servicing schedule, which includes:
– shorter service intervals:
• Every 10 000 miles (15 000 km) or every year for 206 GTi petrol engine vehicles.
• Every 12 000 miles (20 000 km) or every year for saloon or 206 SW petrol engine vehicles.
• Every 10 000 miles (15 000 km) or every year for Direct Injection Diesel engine vehicles.
• Every 6 000 miles (10 000 km) or every year for Indirect Injection Diesel engine vehicles.
– special operations:
• Replacement of the air filter every 15 000 km for the 206 RC.
Downloaded from www.Manualslib.com manuals search engine
26-05-2003
SERVICE INDICATOR
This is a visual reminder of when the
next service is due. This service is to
be carried out according to the manu-
facturer's servicing schedule.
Operation
As soon as the ignition is switched on
and for 5 seconds, the spanner sym-
bolising ''service operation'' is lit. The
trip recorder display shows you the
distance remaining (in round figures)
before the next service.
Example: 4,800 miles remain before
the next service is due. When the
ignition comes on and for 5 seconds
the display indicates:
5 seconds after the ignition is
switched on, the total distance
recorder resumes normal operation
and the display shows the total or trip
distances.
The distance remaining before the
next service is less than 500 miles.
Example: 400 miles remain before
the next service is due.
When switching on the ignition and
for 5 seconds, the display shows:
5 seconds after the ignition is
switched on, the total distance
recorder resumes normal operation
and the symbol remains lit.
This indicates that a service should
be carried out shortly. The display
shows the total or trip distances.
The service is overdue.
Each time the ignition is switched on
and for 5 seconds, the symbol and
the excess distance flash.
Example: the service is overdue by
300 miles. The service should be car-
ried out very shortly.
When the ignition is switched on and
for 5 seconds, the display shows:
5 seconds after the ignition is
switched on, the total distance
recorder resumes normal operation
and the symbol remains lit. The
display shows the total or trip
distances.
PEUGEOT SERVICING
20
Downloaded from www.Manualslib.com manuals search engine
26-05-2003
Resetting the service indicator
Your PEUGEOT dealer carries out
this operation after each service.
However, if you carry out the service
yourself, the reset procedure is as fol-
lows:
– Switch off the ignition.
– Press and hold button 1.
– Switch on the ignition.
The display begins a 10 second
countdown.
– Keep button 1 pressed for 10 seconds.
The display shows [= 0] and the
service symbol disappears.
PEUGEOT SERVICING
21
Downloaded from www.Manualslib.com manuals search engine
26-05-2003
TYPES OF SERVICE
Each vehicle has its own servicing cycle, based upon the engine type.
This cycle consists of alternating two types of service, A and C, intermediate visits and a few additional operations depend-
ing on your vehicle; these correspond to key stages in the life of your vehicle.
When the first service is carried out and at each subsequent service, your dealer will advise you of the type and
content of the next service due.
PEUGEOT SERVICING
22
THE MAINTENANCE CYCLE FOR YOUR SALOON and 206 SW PETROL
Service every 20,000 miles (30,000 km) or 2 years.
1st service at
6,000 miles (10,000 km)
or 6 months*.
This is necessary
in order to benefit
from the warranty
These services are to be carried with at least 10W40 synthetic based oil.
They can also be carried out with 5W30 Fuel Economy oil or with 5W40 synthetic oil.
Arduous conditions of use (see corresponding section).
* Whichever comes first.
Intermediate top-up visit included in
the Servicing Schedule.
MILES (KM) 20,000 (30,000) 40,000 (60,000) 60,000 (90,000)
80,000 (120,000) 100,000 (150,000) 120,000 (180,000) 140,000 (210,000) 160,000 (240,000)
Downloaded from www.Manualslib.com manuals search engine
26-05-2003
PEUGEOT SERVICING
23
THE MAINTENANCE CYCLE FOR YOUR 206 GTi 180**
Service every 12,000 miles (20,000 km) or 2 years.
1st service at
6,000 miles (10,000 km)
or 6 months*.
This is necessary
in order to benefit
from the warranty
These services are to be carried with 5W40 synthetic based oil only.
Arduous conditions of use (see corresponding section).
* Whichever comes first.
** During the year, according to destination.
Intermediate top-up visit included in
the Servicing Schedule.
MILES (KM) 12,000 (20,000) 24,000 (40,000) 36,000 (60,000) 48,000 (80,000) 60,000 (100,000)
72,000 (120,000) 84,000 (140,000) 96,000 (160,000) 108,000(180,000) 120,000 (200,000) 132,000 (220,000) 144,000 (240,000)
Downloaded from www.Manualslib.com manuals search engine
26-05-2003
PEUGEOT SERVICING
24
Intermediate top-up visit incorporated
in the Servicing Schedule.
THE MAINTENANCE CYCLE FOR YOUR 206 TURBO DIESEL HDI
Service every 12,000 miles (20,000 km) or 2 years.
1st Service at
6,000 miles (10,000 km)
or 6 months*.
This is necessary
in order to benefit
from the warranty.
These services are to be carried out with 10W40 synthetically based oil minimum.
They can also be carried out with 5W30 Fuel Economy oil or with 5W40 synthetic oil.
Arduous conditions of use (see corresponding section).
* Whichever comes first.
MILES (KM) 12,000 (20,000) 24,000 (40,000) 36,000 (60,000) 48,000 (80,000) 60,000 (100,000)
72,000 (120,000) 84,000 (140,000) 96,000 (160,000) 108,000 (180,000) 120,000 (200,000) 132,000 (220,000) 144,000 (240,000)
Downloaded from www.Manualslib.com manuals search engine
26-05-2003
PEUGEOT SERVICING
25
Intermediate top-up visit incorporated
in the Servicing Schedule.
THE MAINTENANCE CYCLE FOR YOUR 206 INDIRECT INJECTION DIESEL
Service every 10,000 miles (15,000 km) or 2 years.
1st Service at
6,000 miles 10,000 km
or 6 months*.
This is necessary
in order to benefit
from the warranty.
These services are to be carried out with 10W40 synthetically based oil minimum.
They can also be carried out with 5W30 Fuel Economy oil or with 5W40 synthetic oil.
Arduous conditions of use (see corresponding section).
* Whichever comes first.
MILES (KM) 10,000 (15,000) 20,000 (30,000) 30,000 (45,000) 40,000 (60,000)
50,000 (75,000) 60,000 (90,000) 70,000 (105,000) 80,000 (120,000) 90,000 (135,000) 100,000 (150,000)
110,000 (165,000) 120,000 (180,000) 130,000 (195,000) 140,000 (210,000) 150,000 (225,000) 160,000 (240,000)
Downloaded from www.Manualslib.com manuals search engine
PEUGEOT SERVICING
26
A  C SERVICE LEVELS AND THE INTERMEDIATE VISIT
Level
Operations Description of operation 1st service
A C Intermediate
DRAIN/REFILL
- Engine oil
- Bleed fuel filter (diesel)
- Oil filter
- Fuel filter* (petrol)
REPLACE - Fuel filter element (diesel)
- Air filter element
- Spark plugs (petrol)
- Engine oil (check + top-up)
- Manual gearbox oil (check + top-up)
- Battery (check + top-up) if cap is removable
LEVEL - Screen wash front/rear (check + top-up)
- Coolant (check + top-up)
- Brake fluid (check + top-up)
- Power steering fluid (check + top up according to specification)
- Operation of lights and indicators
- Condition of glass, headlamp and light lenses and mirrors
- Horn
- Windscreen washer jets
- Condition of wiper blades
- Condition and tension of the ancillary drive belts
- Handbrake
- Condition of hydraulic circuits (hoses and covers)
CHECK - Condition of rubber boots and gaiters
- Brake pads o
- Play in hubs, link rods, ball joints, flexible mountings
- Shock absorbers
- Rear drum brake lining wear
- Condition and pressure of tyres (including spare wheel)
- Emission control check as per current legislation (petrol)
- Smoke opacity (diesel)
- Passenger compartment filter (according to specification) o
- Visual check of the whole vehicle
SERVICE* - Courtesy vehicle
ROAD TEST
: All driving conditions o: Arduous conditions * According to destination.26-05-2003
Downloaded from www.Manualslib.com manuals search engine
26-05-2003
D I E S E LD I E S E LP E T R O L P E T R O L
(1) Minimum quality standard: Petrol engines: ACEA A3 and API SH/SJ; Diesel engines: ACEA B3 and API CF/CD
ACEA = Association des Constructeurs Européens Automobiles (Association of European Automobile Manufacturers) -
API = American Petroleum Institute.
If oil is used which does not conform to the ACEA A3-B3 standards, this requires the Arduous Conditions
servicng schedule to be followed, which involves shorter intervals between services.
Use 5W40 synthetic oil only for the 2.0 litre 16V 180 bhp engine.
TRADE NAMES OF RECOMMENDED ENGINE LUBRICANTS IN EUROPE(1)
27
Downloaded from www.Manualslib.com manuals search engine
26-05-2003
Recommended lubricants
The oils which appear in the previous
table are suitable for most purposes.
The diagram opposite states the
optimum range of viscosity depending
on the temperatures at which the oils
are to be used.
It is also possible to use superior
quality synthetic oils.
In the absence of semi-synthetic or
synthetic oils, oils of API SH/SJ
quality (for petrol engines), or CD/CF
quality (for diesel engines) may be
used by following the Arduous
Conditions servicing schedule which
specifies shorter intervals.
Do not hesitate to ask for advice from
a PEUGEOT dealer to maintain
driving pleasure and to minimise the
maintenance cost of your vehicle.
For countries outside Europe, please
contact a local PEUGEOT dealer.
PEUGEOT SERVICING
28
ONLY ONLY
Manual Gearbox ESSO GEAR OIL BV TOTAL TRANSMISSION BV
75W80 PR 9736.41 75W80
ONLY
Automatic ATF 4HP20-AL4
Gearbox PR 9736.22
Power steering ESSO ATF D TOTAL FLUIDE AT42
PR 9730.94
Other recommended products
Brake fluid PEUGEOT DOT4
Coolant PROCOR TM108/GLYSANTIN G33 or REVKOGEL 2000
ONLY protection to minus 35 °C
Downloaded from www.Manualslib.com manuals search engine
26-05-2003
INSTRUMENTS AND CONTROLS
29
INSTRUMENT DIALS: PETROL - DIESEL MANUAL GEARBOX (saloon and 206 SW)
1. Seat belt not fastened warning
light*
2. Passenger air bag disarming
warning light*
3. Front and side air bags warning
light
4. Front fog lamps indicator light
5. Anti-lock braking system (ABS)
warning light
6. Rear fog lamp indicator light
7. Diesel pre-heat warning light
8. Left hand direction indicator
9. Total distance recorder, service
indicator and engine oil level
indicator
10. Right hand direction indicator
11. Engine diagnostics warning light
12. Main beam headlamps indicator
light
13. Handbrake, low brake fluid level
and electronic brake force distri-
bution warning light
14. Dipped beam headlamps indica-
tor light
15. Battery charge warning light
16. Engine oil pressure and tempera-
ture warning light
17. Water in diesel filter warning light
18. Coolant temperature and low level
warning light
19. Engine oil temperature indicator
20. Total distance recorder button
21. Central (STOP) warning light
22. Speedometer
23. Coolant temperature indicator
24. Rev counter
25. Lighting-rheostat button
26. Fuel gauge
27. Low fuel level warning light
28. Dynamic stability control (ESP/ASR)
warning light
* According to destination.
Downloaded from www.Manualslib.com manuals search engine
26-05-2003
INSTRUMENTS AND CONTROLS
30
INSTRUMENT DIALS: PETROL MANUAL GEARBOX (206 GTi 180**)
1. Seat belt not fastened warning
light*
2. Passenger air bag disarming
warning light*
3. Front and side air bags warning
light
4. Front fog lamps indicator light
5. Anti-lock braking system (ABS)
warning light
6. Rear fog lamp indicator light
7. Left hand direction indicator
8. Total distance recorder, service
indicator and engine oil level
indicator
9. Right hand direction indicator
10. Engine diagnostics warning light
11. Main beam headlamps indicator
light
12. Handbrake, low brake fluid level
and electronic brake force distri-
bution warning light
13. Dipped beam headlamps indica-
tor light
14. Battery charge warning light
15. Engine oil pressure and tempera-
ture warning light
16. Coolant temperature and low level
warning light
17. Engine oil temperature indicator
18. Total distance recorder button
19. Central (STOP) warning light
20. Speedometer
21. Coolant temperature indicator
22. Rev counter
23. Lighting-rheostat button
24. Fuel gauge
25. Low fuel level warning light
26. Dynamic stability control (ESP/ASR)
warning light
* According to destination.
** During the year, according to destination.
Downloaded from www.Manualslib.com manuals search engine
26-05-2003
INSTRUMENTS AND CONTROLS
31
INSTRUMENT DIALS: PETROL AUTOMATIC GEARBOX (saloon and 206 SW)
1. Seat belt not fastened warning
light*
2. Passenger air bag disarming
warning light*
3. Front and side air bags warning
light
4. Front fog lamps indicator light
5. Anti-lock braking system (ABS)
warning light
6. Rear fog lamp indicator light
7. Left hand direction indicator
8. Total distance recorder, service
indicator and engine oil level
indicator
9. Right hand direction indicator
10. Engine diagnostics warning light
11. Main beam headlamps indicator
light
12. Handbrake, low brake fluid level
and electronic brake force distri-
bution warning light
13. Dipped beam headlamps indica-
tor light
14. Battery charge warning light
15. Engine oil pressure and tempera-
ture warning light
16. Coolant temperature and low
level warning light
17. Operating programmes
18. Gear indicator
19. Total distance recorder button
20. Central (STOP) warning light
21. Speedometer
22. Coolant temperature indicator
23. Rev counter
24. Lighting-rheostat button
25. Fuel gauge
26. Low fuel level warning light
27. Dynamic stability control
(ESP/ASR) warning light
* According to destination.
Downloaded from www.Manualslib.com manuals search engine
26-05-2003
INSTRUMENTS AND CONTROLS
32
Handbrake, low brake
fluid and Electronic
Brake Force Distribution
system fault warning
light
Linked to the central (STOP) warning
light.
This indicates one of the following:
– that the handbrake is applied or
not fully released,
– an excessive drop in brake fluid
level (if the warning light remains
on even when the handbrake is
released).
– a fault in the Electronic Brake
Force Distribution system, if lit at
the same time as the ABS warning
light.
You must stop.
Consult a PEUGEOT dealer.
INSTRUMENTS
AND CONTROLS
A permanently lit warning light or
one flashing, with the engine run-
ning, indicates an operating fault
of the unit concerned. The illumi-
nation of certain warning lights
may be accompanied by an audi-
ble signal and a message on the
multifunction display. Do not
ignore this warning: consult a
PEUGEOT dealer as soon as
possible.
If the central STOP warning light
comes on when you are driving,
stop your vehicle immediately,
where it is safe to do so.
Anti-lock braking
system (ABS) warning
light
This comes on for 3 seconds each
time the ignition is switched on.
If the warning light remains on or
comes on above 8 mph (12 km/h),
this indicates an ABS malfunction.
However, the vehicle retains conven-
tional servo-assisted braking.
Lighting of this warning light is
accompanied by an audible signal
and the message ABS fault on the
multifunction display.
Consult a PEUGEOT dealer.
Coolant temperature and
low coolant level warning
light
Linked to the central (STOP) warning
light.
You must stop.
Wait for the engine to cool before top-
ping up the level.
The cooling circuit is pressurised.
In the event of breakdown and to
prevent any risk of burns, unscrew
the cap by two turns to allow the
pressure to drop.
When the pressure has dropped,
remove the cap and top up the level.
Consult a PEUGEOT dealer.
Central (STOP)
warning light
Linked to the engine
oil pressure, coolant temperature
and low coolant level, handbrake,
low brake fluid level and electronic
brake force distribution system fault
warning lights.
You must stop if the light flashes
with the engine running.
Consult a PEUGEOT dealer.
Engine oil pressure
and temperature
warning light
Linked to the central (STOP) warning
light.
You must stop.
This warning light indicates one of
the following:
– insufficient oil pressure,
– a lack of oil in the lubrication cir-
cuit. Top up the level.
– an oil temperature which is too
high. The warning light is acom-
panied by an audible signal. To
lower the oil temperature, reduce
your speed.
Consult a PEUGEOT dealer.
Downloaded from www.Manualslib.com manuals search engine
26-05-2003
INSTRUMENTS AND CONTROLS
33
Seat belt not fastened
warning light*
When the ignition is switched on, this
indicator light comes on if the driver
has not fastened his seat belt.
Front and side air
bags warning light
The light will come on for a few seconds
when the ignition is switched on.
With the engine running, illumination
of this warning light is accompanied
by an audible signal and a message
on the multifunction display indicat-
ing a fault in the air bags.
Consult a PEUGEOT dealer.
Battery charge
warning light
This indicates one of the following:
– faulty operation of the charging
circuit,
– slack battery or starter terminals,
– a cut or slack alternator belt,
– an alternator failure.
Consult a PEUGEOT dealer.
Engine diagnostics
warning light
This comes on each time the ignition
is switched on.
If it comes on with the engine running,
this indicates incorrect operation of
the injection, ignition or emission con-
trol system. There is a risk of damage
to the catalytic converter (petrol
engine only).
Consult a PEUGEOT dealer.
Dynamic stability
control system
(ESP/ASR) warning light
This comes on for a few seconds
each time the ignition is switched on.
Consult a PEUGEOT dealer if the
ESP/ASR switch indicator light flash-
es and this warning light remains on
or comes on with the engine running,
vehicle moving.
With the engine running and the vehi-
cle moving, it flashes if the system is
activated.
It lights permanently when the system
is disarmed.
* According to destination.
Water in diesel filter
indicator*
Consult a PEUGEOT dealer as soon
as possible.
There is a risk of damage to the
injection system.
Passenger air bag
disarming warning
light*
Illumination of this warning light is
accompanied by an audible signal
and the message Passenger air
bag deactivated on the multifunction
display.
If the passenger air bag is disarmed, the
warning light comes on when the igni-
tion is switched on and it remains on.
Always consult a PEUGEOT dealer if
the warning light flashes.
Low fuel level
warning light
When this light first comes on, you have
enough fuel to drive at least 30 miles
(50 km). The tank capacity is approxi-
mately 50 litres.
Diesel engine pre-heat
warning light
Wait until the warning light goes out
before starting the engine.
If the temperature is high enough,
the warning light comes on for less
than one second. You can start the
engine without waiting.
Downloaded from www.Manualslib.com manuals search engine
26-05-2003
INSTRUMENTS AND CONTROLS
34
Engine oil temperature
indicator
With the engine running, this indicates
the oil temperature:
– needle in zone (C), the temperature
is correct,
– needle in zone (D), the temperature
is too high. To lower the oil tempera-
ture, reduce your speed.
Coolant temperature indicator
– needle in zone (A), the temperature
is correct,
– needle in zone (B), the temperature
is too high. The central STOP
warning light flashes.
You must stop.
Consult a PEUGEOT dealer.
Downloaded from www.Manualslib.com manuals search engine
26-05-2003
Instrument panel display
After switching on the ignition, three functions are shown in succession:
– service indicator (see corresponding section),
– engine oil level indicator,
– total distance recorder (total or trip distances).
Note: the total or trip distances are displayed for 30 seconds when the ignition is switched off, on opening the driver's door,
as well as on locking and unlocking the vehicle.
Engine oil level
When the ignition is switched on, the engine oil level is indicated for approximately 10 seconds, after the servicing information.
Maximum oil level
If the flashing of the six squares is confirmed by checking using the dipstick, a surplus of oil can
cause damage to the engine.
Consult a PEUGEOT dealer without delay.
Lack of oil
Flashing of the six segments and min on the display indicate a lack of oil which can cause
damage to the engine.
If the lack of oil is confirmed by checking using the dipstick, it is essential to top up the level.
Oil level gauge fault
Flashing of the six segments indicates a fault in the oil level gauge.
There is a risk the engine will be damaged.
Consult a PEUGEOT dealer.
INSTRUMENTS AND CONTROLS
35
The level indicated when checking using the dipstick is only correct if the vehicle has been on level ground, with
the engine stopped, for more than 10 minutes.
Downloaded from www.Manualslib.com manuals search engine
26-05-2003
INSTRUMENTS AND CONTROLS
36
Total distance records
Briefly pressing button 1 alternates
between the total and trip distance
displays.
To reset the trip recorder to zero,
when it is displayed press the button
for more than 3 seconds.
HAZARD WARNING
LIGHTS
Press the button, the direction indica-
tors flash.
They can operate with the ignition off.
Automatic lighting of hazard
warning lights*
When braking in an emergency,
depending on the force of decelera-
tion, the hazard warning lights come
on automatically. They switch off auto-
matically the first time you accelerate.
It is also possible to switch them off
by pressing the button.
* According to destination.
Lighting rheostat
With the lights on, press the button
to vary the intensity of the lighting of
the instruments and controls. When
the lighting reaches the minimum (or
maximum) setting, release the but-
ton then press it again to increase
(or reduce) the brightness.
As soon as the lighting is of the
required brightness, release the
button.
Downloaded from www.Manualslib.com manuals search engine
26-05-2003
YOUR 206 IN DETAIL
37
DISPLAY A
This displays the following information:
– the time,
– the date,
– the outside temperature (this
flashes if there is a risk of ice),
– the audio system displays,
– a door check (e.g.: ''left front door
open''),
– warning messages (e.g. ''remote
control battery flat'') or information
messages (e.g. ''economy mode
active''), displayed temporarily.
Adjusting the parameters
Press and hold button 1 for two seconds to access the settings; the data
flashes, indicating it is ready to be modified.
Then, each press of button 1 scrolls through the various data in the following
order:
– language of information displayed,
– hours (12 then 24 hour mode),
– minutes,
– year,
– month,
– day,
– unit of temperature (degrees Celsius or Fahrenheit).
Pressing button 2 alters the value of the parameter selected. Press and hold for
rapid advance (return to start after the last possible value).
After 7 seconds with no action, the main display returns; the modified data are
now recorded.
Note: Pressing button 2 briefly displays the outside temperature for a few
seconds.
Downloaded from www.Manualslib.com manuals search engine
26-05-2003
YOUR 206 IN DETAIL
38
Setting the parameters
Press and hold button 1 for two seconds to access the settings. The data
flashes, indicating it is ready to be modified.
Then, individual presses on button 1 allow you to scroll through the various data
in the following sequence:
– language in which the information is displayed,
– unit of distance (kms or miles),
– unit of temperature (degrees Celsius or Fahrenheit),
– time format (12 then 24 hour mode),
– hour,
– minutes,
– year,
– month,
– day.
Pressing button 2 allows you to change the data selected. Maintain the pressure
for rapid scrolling.
After 7 seconds without moving, the main display returns; the modified data are
now recorded.
DISPLAY B
This enables the following informa-
tion to be displayed:
– the time,
– the date,
– the outside temperature (this
flashes when there is a risk of
ice),
– the radio displays,
– the status of the doors. The dis-
play shows you, by means of a
graphic, whether a door is open,
– the warning messages (e.g. ''bat-
tery charge low'') or information
messages (e.g. fuel tank low''),
displayed temporarily, can be
cleared by pressing button 1 or 2,
– the trip computer.
Downloaded from www.Manualslib.com manuals search engine
26-05-2003
YOUR 206 IN DETAIL
39
DISPLAY C
This enables the following informa-
tion to be displayed:
– the time,
– the date,
– the outside temperature (this
flashes when there is a risk of
ice),
– the radio displays,
– the status of the doors. The dis-
play shows you, by means of a
graphic, whether a door is open,
– the warning messages (e.g. fuel level low''), displayed temporarily. These can
be cleared using the remote control,
– the trip computer (see corresponding section),
– the satellite navigation system (see corresponding section).
Setting the parameters
The remote control allows you to access the settings. Accessing the different
menus is described in the section ''Satellite Navigation System''.
Downloaded from www.Manualslib.com manuals search engine
26-05-2003
AUDIO RB3
YOUR 206 IN DETAIL
42
Stalk movement Function
1 - Press (behind) Increase volume
2 - Press (behind) Decrease volume
1 + 2 - Simultaneous press Sound cut-off (mute); restoring of the sound by pressing any button
3 - Press Automatic search of higher frequencies (radio) -
Selection of the next track (CD)
4 - Press Automatic search of lower frequencies (radio) -
Selection of the previous track (CD)
5 - Press the end Change of source (radio/cassette/CD changer)
6 - Rotation Selection of next station stored in memory (radio) -
(clockwise) Selection of next CD
7 - Rotation Selection of previous station stored in memory (radio) -
(anti-clockwise) Selection of previous CD
Downloaded from www.Manualslib.com manuals search engine
26-05-2003
YOUR 206 IN DETAIL
43
Button Function
A Radio on/off
B – Decrease volume
C + Increase volume
D RDS RDS function on/off
Press for more than 2 seconds: regional following mode on/off
E TA Traffic information priority on/off
F Press fully: cassette rewind
G Press fully: cassette fast forward
F+G j k Press half way: reversal of direction of play of the cassette
jj kk Press fully: ejection of the cassette
H Adjustment of bass, treble, loudness, sound distribution and automatic
volume correction
I L Increase the setting of the functions associated with button H
J M Decrease the setting of the functions associated with button H
K SRC Selection of source: radio, cassette or CD changer
Press for more than 2 seconds: CD shuffle
L
kk Manual and automatic search of higher frequency
Selection of next CD track and PTY (radio)
M MAN Manual/automatic operation of buttons L and N in radio mode
N
jj
Manual and automatic search of lower frequency
Selection of previous CD track and PTY (radio)
O BND Selection of FM1, FM2, FMast and AM wavebands
AST Press for more than 2 seconds: automatic storing of stations in memory (autostore)
1 to 6 1 2 3 4 5 6 Selection of station stored in memory - Selection of a CD changer disc
Press for more than 2 seconds: storing of a station in memory
Downloaded from www.Manualslib.com manuals search engine
26-05-2003
GENERAL FUNCTIONS
On/off
With the ignition key in the accessories or ignition position, press button A to switch the audio system on
or off.
The audio system can operate for 30 minutes without the vehicle ignition being switched on.
Anti-theft system
The audio system is coded in such a way that it can operate only on your vehicle. It would not function if fitted to another
vehicle
The anti-theft system is automatic and requires no action on your part.
ADJUSTING THE VOLUME
Press button C to increase the volume, or button B to decrease it.
Continuous pressure on buttons C and B allows a gradual adjustment of the volume.
AUDIO SETTINGS
Press button H several times in succession to access the bass (BASS), treble (TREB), loudness (LOUD),
fader (FAD), balance (BAL) and automatic volume correction settings.
Exit from audio mode is automatic after a few seconds without pressing any button, or by pressing button H
after configuration of the automatic volume correction.
Note: bass and treble settings are specific to each source. It is possible to set them differently for radio, cassette
(RB3), CD (RD3) and CD changer.
YOUR 206 IN DETAIL
46
Downloaded from www.Manualslib.com manuals search engine
26-05-2003
Adjusting the bass
When BASS is displayed, press button I or J to vary the setting.
– BASS –9 for a minimum bass setting,
– BASS 0 for a normal setting,
– BASS +9 for a maximum bass setting.
Adjusting the treble
When TREB is displayed, press button I or J to vary the setting.
– TREB –9 for a minimum treble setting,
– TREB 0 for a normal setting,
– TREB +9 for a maximum treble setting.
Adjusting the loudness
This function automatically emphasises bass and treble tones.
Press button I or J to switch the function on or off.
Adjusting the front/rear sound distribution (Fader)
When FAD is displayed, press button I or J.
Button I increases the volume in the front.
Button J increases the volume in the rear.
Adjusting the right/left sound distribution (Balance)
When BAL is displayed, press button I or J.
Button I increases the volume on the right-hand side.
Button J increases the volume on the left-hand side.
Automatic volume correction CAV
This function enables the volume to be automatically adjusted depending on the level of noise produced by the speed of the vehicle.
Press buttons I or J to switch the function on or off.
YOUR 206 IN DETAIL
47
Downloaded from www.Manualslib.com manuals search engine
26-05-2003
RADIO
Notes on radio reception
Your car radio is subject to phenomena which do not affect domestic radio sets. Both AM (MW/LW) and FM reception are
subject to various forms of interference. This is no reflection on the quality of the equipment, but is due to the nature of the
signals and the way in which they are transmitted.
On MW/LW, interference may be noticed when passing under high voltage power lines or bridges, or in tunnels.
On FM, interference may be the result of increasing distance from the transmitter, deflection of the signals by obstacles
(mountains, hills, buildings, etc.), or of being in an area which is not covered by a transmitter.
Selecting radio mode
Audio RB3: press button SRC several times in succession.
Audio RD3: press button R.
Selecting a waveband
Audio RB3: briefly press the BND/AST button to select the FM1, FM2, FMast and AM wave-
bands.
Audio RD3: briefly press button R to select the FM1, FM2, FMast and AM wavebands.
Automatic station search
Briefly press button L or N to search for the station immediately above or below. By continuing to press
the button in the direction selected, you will obtain continuous scrolling of the frequency.
The scrolling stops at the first station found as soon as the button is released.
If the TA traffic information programme is selected, only stations broadcasting this type of pro-
gramme are selected.
Searching for a station occurs first in LO sensitivity (selection of the most powerful transmitters) during scanning of the
waveband, then in DX sensitivity (selection of the weakest and most distant transmitters).
To make a direct search in DX sensitivity, press button L or N twice.
YOUR 206 IN DETAIL
48
Downloaded from www.Manualslib.com manuals search engine
26-05-2003
Manual station search
Press the MAN button.
Briefly press button L or N to increase or decrease the frequency displayed.
By continuing to press the button in the direction selected, you will obtain continuous scrolling of the frequency.
The scrolling stops as soon as the button is released.
Pressing the MAN button again returns you to automatic station search.
Manual storing of stations in the memory
Select the station required.
Press one of the buttons 1 to 6 for more than two seconds.
The sound stops then becomes audible again, confirming that the station has been stored in the memory.
Automatic storing of FM stations in the memory (autostore)
Audio RB3: press and hold the BND/AST button for more than two seconds.
Audio RD3: press and hold button R for more than two seconds.
Your radio automatically stores the 6 stations with the strongest signal in FM. These stations are stored in the FMast waveband.
If it is not possible to find 6 stations, the remaining memories are empty.
Recalling stations stored in the memory
For each waveband, briefly press buttons 1 to 6 to recall the corresponding station.
YOUR 206 IN DETAIL
49
Downloaded from www.Manualslib.com manuals search engine
26-05-2003
RDS
Using the RDS (Radio Data System) function on FM
Radio Data System allows you to continue listening to the same station, whatever frequency it is using for the region you are
going through.
Briefly press the RDS button to switch the function on or off.
The multifunction display will show:
– RDS if the function is selected.
– (RDS) if the function is selected but not available.
RDS station following
The display indicates the name of the station selected. The radio is continually searching for the station which has the best
reception and which is transmitting the same programme.
Traffic information programme
Press the TA button to switch the function on or off.
The multifunction display will show:
– TA if the function is selected,
– (TA) if the function is selected but not available.
Any traffic information flash will be given priority, whatever source you are listening to (radio, cassette or CD changer).
If you wish to interrupt a message, press the TA button; this switches the function off.
Note: the volume of traffic information announcements is independent of the volume of normal radio listening.
You can adjust it using the volume button. The setting will be stored and will be used when the next messages
are broadcast.
Regional following mode (REG)
When they are part of a network, certain stations broadcast regional programmes in the various areas they serve. With
regional following mode you can keep listening to the same programme.
Press the RDS button for more than two seconds to switch the function on or off.
YOUR 206 IN DETAIL
50
Downloaded from www.Manualslib.com manuals search engine
26-05-2003
CASSETTE: AUDIO RD3
Selecting cassette mode
When a cassette is inserted, the cassette player will start automatically.
If a cassette is already inserted, press button SRC several times to select cassette mode.
Note: before inserting the cassette, ensure that the tape is taut.
Ejecting the cassette
Fully press buttons F and G to eject the cassette from the player.
Direction of play
The player will play sides 1 and 2 of the cassette alternately, by automatically reversing the direction of play at the end of
a side.
To manually reverse the direction of play, press the 2 buttons F and G half way.
Fast forward/rewind
Fully press button F or G to fast forward or rewind the cassette. At the end of the fast forward/rewind, the set plays the
current side.
Recommendations for using cassettes
– Use good quality cassettes.
– Avoid the use of cassettes which play for longer than 90 minutes.
– Never expose the cassettes to heat or the direct rays of the sun.
– Re-tighten the tape if necessary before inserting the cassette in the player.
– Clean the playing head regularly with a damp type cleaning cassette.
YOUR 206 IN DETAIL
52
Downloaded from www.Manualslib.com manuals search engine
26-05-2003
CD CHANGER
Selecting CD changer mode
Audio RB3: press button SRC several times in succession.
Audio RD3: press button P.
Selecting a disc
Press buttons 1 to 6 of the radio to select the corresponding disc.
Selecting a track
Press button L to select the next track.
Press button N to return to the start of the current track or to select the previous track.
Accelerated play
Keep button L or N pressed for forwards or backwards accelerated play. Accelerated play stops as soon as the button is
released.
Shuffle (RDM)
When the CD changer is selected:
– audio RB3: keep button SRC pressed for two seconds;
– audio RD3: keep button P pressed for two seconds.
The tracks will be played in random sequence. Pressing the button again for two seconds returns you to normal play.
YOUR 206 IN DETAIL
54
The use of copied compact discs may cause faults.
Insert circular compact discs only.
Downloaded from www.Manualslib.com manuals search engine
26-05-2003
YOUR 206 IN DETAIL
44
AUDIO RD3
Stalk movement Function
1 - Press (behind) Increase volume
2 - Press (behind) Decrease volume
1 + 2 - Simultaneous press Sound cut-off (mute); restoring of the sound by pressing any button
3 - Press Automatic search of higher frequencies (radio) -
Selection of the next track (CD)
4 - Press Automatic search of lower frequencies (radio) -
Selection of the previous track (CD)
5 - Press the end Change of source (radio/CD/CD changer)
6 - Rotation Selection of next station stored in memory (radio) -
(clockwise) Selection of following CD
7 - Rotation Selection of previous station stored in memory (radio) -
(anti-clockwise) Selection of previous CD
Downloaded from www.Manualslib.com manuals search engine
26-05-2003
YOUR 206 IN DETAIL
45
Button Function
A Radio on/off
B – Decrease volume
C + Increase volume
D RDS RDS function on/off
Press for more than 2 seconds: regional following mode on/off
E TA Traffic information priority on/off
Press for more than 2 seconds: PTY function on/off
H Adjustment of bass, treble, loudness, sound distribution and automatic
volume correction
I L Increase the setting of the functions associated with button H
J M Decrease the setting of the functions associated with button H
L
kk
Manual and automatic search of higher frequency
Selection of next CD track and PTY (radio)
M MAN Manual/automatic operation of buttons L and N
N
jj Manual and automatic search of lower frequency.
Selection of previous CD track and PTY (radio)
P CH.CD Selection of CD changer
Press for more than 2 seconds: shuffle
Q CD Selection of CD
Press for more than 2 seconds: shuffle
R Radio Selection of radio. Selection of FM1, FM2, RMAST, AM wavebands
Press for more than 2 seconds: automatic storing of stations in memory (autostore)
S L Ejection of CD
1 to 6 1 2 3 4 5 6 Selection of station stored in memory - Selection of a CD changer disc
Press for more than 2 seconds: storing of a station in memory
Downloaded from www.Manualslib.com manuals search engine
26-05-2003
RADIO
Notes on radio reception
Your car radio is subject to phenomena which do not affect domestic radio sets. Both AM (MW/LW) and FM reception are
subject to various forms of interference. This is no reflection on the quality of the equipment, but is due to the nature of the
signals and the way in which they are transmitted.
On MW/LW, interference may be noticed when passing under high voltage power lines or bridges, or in tunnels.
On FM, interference may be the result of increasing distance from the transmitter, deflection of the signals by obstacles
(mountains, hills, buildings, etc.), or of being in an area which is not covered by a transmitter.
Selecting radio mode
Audio RB3: press button SRC several times in succession.
Audio RD3: press button R.
Selecting a waveband
Audio RB3: briefly press the BND/AST button to select the FM1, FM2, FMast and AM wave-
bands.
Audio RD3: briefly press button R to select the FM1, FM2, FMast and AM wavebands.
Automatic station search
Briefly press button L or N to search for the station immediately above or below. By continuing to press
the button in the direction selected, you will obtain continuous scrolling of the frequency.
The scrolling stops at the first station found as soon as the button is released.
If the TA traffic information programme is selected, only stations broadcasting this type of pro-
gramme are selected.
Searching for a station occurs first in LO sensitivity (selection of the most powerful transmitters) during scanning of the
waveband, then in DX sensitivity (selection of the weakest and most distant transmitters).
To make a direct search in DX sensitivity, press button L or N twice.
YOUR 206 IN DETAIL
48
Downloaded from www.Manualslib.com manuals search engine
26-05-2003
Manual station search
Press the MAN button.
Briefly press button L or N to increase or decrease the frequency displayed.
By continuing to press the button in the direction selected, you will obtain continuous scrolling of the frequency.
The scrolling stops as soon as the button is released.
Pressing the MAN button again returns you to automatic station search.
Manual storing of stations in the memory
Select the station required.
Press one of the buttons 1 to 6 for more than two seconds.
The sound stops then becomes audible again, confirming that the station has been stored in the memory.
Automatic storing of FM stations in the memory (autostore)
Audio RB3: press and hold the BND/AST button for more than two seconds.
Audio RD3: press and hold button R for more than two seconds.
Your radio automatically stores the 6 stations with the strongest signal in FM. These stations are stored in the FMast waveband.
If it is not possible to find 6 stations, the remaining memories are empty.
Recalling stations stored in the memory
For each waveband, briefly press buttons 1 to 6 to recall the corresponding station.
YOUR 206 IN DETAIL
49
Downloaded from www.Manualslib.com manuals search engine
26-05-2003
RDS
Using the RDS (Radio Data System) function on FM
Radio Data System allows you to continue listening to the same station, whatever frequency it is using for the region you are
going through.
Briefly press the RDS button to switch the function on or off.
The multifunction display will show:
– RDS if the function is selected.
– (RDS) if the function is selected but not available.
RDS station following
The display indicates the name of the station selected. The radio is continually searching for the station which has the best
reception and which is transmitting the same programme.
Traffic information programme
Press the TA button to switch the function on or off.
The multifunction display will show:
– TA if the function is selected,
– (TA) if the function is selected but not available.
Any traffic information flash will be given priority, whatever source you are listening to (radio, cassette or CD changer).
If you wish to interrupt a message, press the TA button; this switches the function off.
Note: the volume of traffic information announcements is independent of the volume of normal radio listening.
You can adjust it using the volume button. The setting will be stored and will be used when the next messages
are broadcast.
Regional following mode (REG)
When they are part of a network, certain stations broadcast regional programmes in the various areas they serve. With
regional following mode you can keep listening to the same programme.
Press the RDS button for more than two seconds to switch the function on or off.
YOUR 206 IN DETAIL
50
Downloaded from www.Manualslib.com manuals search engine
26-05-2003
PTY function: Audio RD3
This allows you to listen to stations broadcasting a specific type of programme (news, culture, sport, rock etc.).
With FM selected, press the TA button for more than two seconds to switch this function on or off.
To search for a PTY programme:
– select the PTY function,
– briefly press button L or N to scroll down the list of the various types of programmes offered,
– when the programme of your choice is displayed, keep button L or N pressed for more than
two seconds to carry out an automatic search (after an automatic search the PTY function is
switched off).
In PTY mode the different types of programmes can be stored in the memory. To do this, press the preselection buttons
1 to 6 for more than two seconds. Briefly press the corresponding button to recall the type of programme stored in
the memory.
EON system: Audio RD3
This connects stations which are part of the same network. It enables the broadcast of traffic information, by a station that
is part of the same network as the station to which you are listening.
This service is available when you have selected the TA traffic information programme or the PTY function.
YOUR 206 IN DETAIL
51
Downloaded from www.Manualslib.com manuals search engine
26-05-2003
COMPACT DISC: AUDIO RD3
Selecting CD mode
After insertion of a disc, printed face upwards, the player starts automatically.
If a disc is already inserted, press button Q.
Ejection of a disc
Press button S to eject the disc from the player.
Selecting a track
Press button L to select the next track.
Press button N to return to the start of the current track or to select the previous track.
Accelerated play
Keep button L or N pressed for forwards or backwards accelerated play.
Accelerated play stops as soon as the button is released.
Shuffle (RDM)
When the CD player is selected, keep button Q pressed for two seconds. The tracks will be played in random sequence.
Pressing the button again for two seconds returns you to normal play.
Shuffle mode is de-activated each time the audio system is switched off.
YOUR 206 IN DETAIL
53
The use of copied compact discs may cause faults.
Insert circular compact discs only.
Downloaded from www.Manualslib.com manuals search engine
26-05-2003
YOUR 206 IN DETAIL
55
6 CD CHANGER*
This is located in the boot on the left-hand side. It holds up to 6 discs.
To insert a disc into the changer:
– open sliding panel A,
– press button B to eject the cartridge C,
– open one of the six compartments of the cartridge by pulling tab D,
– insert the disc into the cartridge, with the printed face upwards, and
close the compartment,
– insert the cartridge into the changer, observing the direction of the arrow,
– close the sliding panel A.
5 CD CHANGER*
This is located in the glove box. It
holds up to 5 discs.
To load the changer, insert the discs
with the printed side upwards.
To remove a disc, press and hold
one of the buttons 1 to 5.
* According to destination.
The use of copied compact discs may cause faults.
Insert circular compact discs only.
Downloaded from www.Manualslib.com manuals search engine
26-05-2003
YOUR 206 IN DETAIL
56
Direction arrows:
These enable you to move around the screen and
thus select a function.
On the welcome screen only, the up and down
arrows enable the brightness of the screen to be
adjusted.
The right and left arrows enable the complete
name of the road to be displayed temporarily,
during guidance, if the name exceeds the capacity
of the screen.
menu : this button allows access to the main menu. It can
be used at any time.
esc : escape button
Short press: cancels the current operation and
returns to the previous screen.
Press for more than 2 seconds: returns to the wel-
come screen.
This button can be used in any menu. It is inactive
during guidance.
mod : mode button
Short press: changes between date, navigation,
radio and permanent locating.
val : Validation button
Confirms the function selected.
Reference of the 2 batteries: 1.5 volts type LR03.
THE SATELLITE
NAVIGATION SYSTEM
Introduction
The satellite navigation system
guides you to the destination of your
choice by means of vocal and visual
instructions.
The heart of the system lies in the
use of a map database and a GPS
system. The latter enables your
position to be located by means of
several satellites.
The satellite navigation system con-
sists of the following components:
– the remote control,
– the display,
– the control unit,
– the last voice message recall
control,
– the CD ROM,
– the multifunction aerial.
The remote control
Pointing this at the screen enables the information contained in the various
menus to be selected.
A special compartment in the glove box permits storage of the remote control.
Some functions or services
described may vary depending on
the CD-ROM version or the country
where the vehicle is sold.
Downloaded from www.Manualslib.com manuals search engine
26-05-2003
The display
When the menus are used, the functions which appear at
the bottom of the screen are presented in various ways:
1. Function selected.
2. Function inaccessible in this situation.
3. Function accessible.
Note: the List option is accessible for a maximum of 80
possible addresses.
YOUR 206 IN DETAIL
57
During guidance the screen displays different information
depending on the manoeuvres to be carried out:
1. Distance to next manoeuvre.
2. Next manoeuvre to be carried out.
3. Next road to take.
4. Time.
5. Exterior temperature.
6. Current road.
7. Distance to final destination.
8. Manoeuvre to be carried out.
Downloaded from www.Manualslib.com manuals search engine
26-05-2003
The control unit
This is located in the glove box.
1. CD-ROM eject button.
2. CD-ROM compartment.
3. ON indicator light indicates that the control unit is sup-
plied with power.
4. CD indicator light shows that there is a CD-ROM in the
unit.
5. Remote control storage compartment.
The last voice message recall control
Pressing the button on the end
of the lights stalk allows the
last voice message to be
repeated, or, if appropriate, a
voice message to be heard
and a more detailed display of the approaching landscape to be
displayed.
The CD-ROM
This contains all the map-
ping data.
It must be inserted with the
printed face upwards.
Use only CD-ROMs approved by PEUGEOT.
The satellite navigation system is active when the globe is
lit with a full outline.
YOUR 206 IN DETAIL
58
The use of copied compact discs may cause
faults.
Downloaded from www.Manualslib.com manuals search engine
26-05-2003
YOUR 206 IN DETAIL
59
Main menu
Switch on the ignition.
Press the Menu button to access the main menu.
Select a function using the direction arrows, then confirm
(VAL button).
Following selection of the Navigation/guidance menu, a
screen warns you about the use of the navigation system.
Follow the regulations in force and do not use the remote
control while driving.
Press the VAL button to access the next screen.
The Navigation/guidance menu offers the following
options:
– entering of the address of a new destination;
– selection of a service (hotel, station, airport...) available
in a town;
– selection of an address stored in one of the two directories;
– access to the Navigation options menu.
– Radio functions are suspended when the system is in
guidance mode.
Navigation/Guidance
Downloaded from www.Manualslib.com manuals search engine
26-05-2003
YOUR 206 IN DETAIL
60
Enter the name of the street. Select the Validate function
then press the VAL button.
Note: the guidance can be activated from the time the town
is entered without the name of a street or a number. To do
this, select the City centre function.
Enter the number on the street. Select the Validate func-
tion then press the VAL button.
Note: the guidance can be activated as soon as the town
and street are entered without a number. To do this, select
the Validate function.
The last town entered is displayed.
To enter the name of another town, select each letter using
the direction arrows then confirm (VAL button) for each
letter.
If an error is made, the Correct function enables the last
letter entered to be cleared.
The List function indicates, as the name is entered, the
number of towns beginning with the same letters. If the list
contains less than 5 names, these are displayed automati-
cally. Select a town then confirm (VAL button).
The Change function enables the town entered to be
completely cleared.
When the complete name of the town is displayed, select
the Validate function then press the VAL button.
Note: following confirmation of a letter, only those letters
which could make up an existing name appear.
Entering a new destination
Downloaded from www.Manualslib.com manuals search engine
26-05-2003
YOUR 206 IN DETAIL
61
The complete destination is displayed. Select the Validate
function then press the VAL button.
Note: you can also change the destination or store it in one
of the two directories (see the section on storing an address
in a directory).
Select a criterion from the list offered then confirm (VAL
button). When the criterion of your choice is selected, select
the Validate function then press the VAL button.
Guidance begins, follow the instructions.
The last guidance criterion used is displayed.
Guidance begins automatically, retaining this criterion if
there is no action within 5 seconds or following confirmation
of the NO function.
Follow the instructions.
If you wish to change the guidance criterion, select the
YES function then press the VAL button.
Downloaded from www.Manualslib.com manuals search engine
26-05-2003
YOUR 206 IN DETAIL
62
Selecting a service
The last address entered is displayed.
There are 3 options for defining the location in which you
wish to obtain a service:
– resume the last address entered by means of the
Validate function.
– enter the name of a new town then enter the street (or
the City centre function) by means of the Change
function.
– automatically enter your current location by using the
Current location function.
The address of the required service is displayed.
An indication on the right-hand side of the screen (e.g. 1/50)
indicates whether there are any other establishments
(50 maximum) offering the same service within a radius of
approximately 30 miles (50 km).
Use the Next or Previous functions to consult the list
offered.
When the establishment of your choice is displayed, select
the Validate function then press the VAL button. Select
a guidance criterion. Guidance begins, follow the instruc-
tions.
After confirming the address, select a service by scrolling
through the list using the direction arrows then press the
VAL button.
A cursor on the left-hand side of the screen indicates your
position in the list.
Downloaded from www.Manualslib.com manuals search engine
26-05-2003
YOUR 206 IN DETAIL
Storing an address in a directory
When a new address is entered, you can store it by selecting
the Store function.
Selecting a stored destination
Enter the description of the address. If the description
already exists for a different address, you can replace the
old address with a new one.
Select the Personal or Professional directory, then press the
VAL button. The address is then stored in the directory of
your choice.
Using the direction arrows, select the directory in which the
address you are looking for is stored then press the VAL
button.
The stored addresses are displayed.
A cursor on the left-hand side of the screen indicates your
position in the list. Select a description, by scrolling through
the list using the direction arrows, then press the VAL
button. The complete address is displayed. Select the
Validate function then press the VAL button. Select a
guidance criterion. Guidance begins, follow the instructions.
63
Downloaded from www.Manualslib.com manuals search engine
26-05-2003
YOUR 206 IN DETAIL
64
Display configuration
From the general menu, the Configure display menu
gives access to the following parameters:
– Adjustment of the display brightness;
– Adjustment of the date and time;
– Selection of the language of the display and voice infor-
mation (English, German, Spanish, French, Italian,
Dutch);
– Adjustment of formats and units. This enables you to
choose between Km/h or mph and degrees Celsius or
Fahrenheit and to modify the format for the hours (12 or
24 hour mode).
Navigation options
From the navigation/guidance menu, the Navigation
options menu offers the following options:
– Management of the directories. It enables an address
stored under a description to be renamed or deleted. To
do this, select the directory and the description to be
changed;
– Voice synthesis volume adjustment;
– Deletion of all data stored in the two directories;
– Stopping or resuming of guidance. Two messages may
be displayed depending on the previous status:
Resume guidance or Stop guidance.
Downloaded from www.Manualslib.com manuals search engine
26-05-2003
YOUR 206 IN DETAIL
65
Guidance tools
Access to the Guidance tools menu is by pressing the
VAL button during guidance.
It enables:
– the current guidance criterion to be changed,
– the programmed destination to be displayed or changed,
– the voice synthesis volume to be adjusted,
– the current guidance to be stopped.
Downloaded from www.Manualslib.com manuals search engine
26-05-2003
YOUR 206 IN DETAIL
66
Downloaded from www.Manualslib.com manuals search engine
26-05-2003
VENTILATION
1. Windscreen de-icing or demisting vents.
2. Front door windows de-icing or demisting vents.
3. Side vents.
4. Centre vents.
5. Air outlet to front footwells.
6. Air outlet to rear footwells.
Advice on operation
– Place the air flow control at a level sufficient to ensure correct renewal of air in the passenger compartment. The ''OFF''
position cuts off all the air circulation in the passenger compartment.
Note: only use the ''OFF'' position occasionally (risk of condensation).
– Select the air distribution most suited to your requirements and the climatic conditions.
– Gradually adjust the temperature setting for your comfort.
– Position the outside air control to the left; the Outside Air position.
– For perfectly even air distribution, take care not to obstruct the exterior air intake grille on the bonnet, the vents and the
air ducts under the front seats. Check that the passenger compartment filter is in good condition.
YOUR 206 IN DETAIL
67
Downloaded from www.Manualslib.com manuals search engine
26-05-2003
YOUR 206 IN DETAIL
68
1. Temperature adjustment
To be adjusted to your requirements.
From blue (exterior temperature) to
red (hot).
2. Air distribution adjustment
Windscreen and side win-
dows (de-icing/demisting).
To quickly de-ice or demist the wind-
screen and side windows:
– position the air intake control to
the left; the Outside Air position,
– turn the temperature and air flow
controls to maximum,
– close the centre and side vents.
HEATING/VENTILATION
Downloaded from www.Manualslib.com manuals search engine
26-05-2003
4. Air intake control
Intake of exterior air.
This is the normal operating position.
Recirculation of interior air.
This position prevents exterior
odours and smoke entering the pas-
senger compartment and speeds up
the rate at which the passenger
compartment can be heated.
As soon as possible, position the
control in the exterior air intake
position to prevent misting of the
windows.
YOUR 206 IN DETAIL
69
Windscreen, side windows
and footwells.
Footwells.
These settings are recommended
for cold climates.
Centre and side vents.
This setting is recommended for hot
climates.
3. Air flow adjustment
Turn the control from posi-
tion 1 to position 4 to obtain
an air flow sufficient to
ensure your comfort.
5. Demisting the rear screen and
the mirrors
With the engine running,
press once to demist the
rear screen and the mirrors.
It switches off automatically after
approximately twelve minutes.
Press again to switch it back on for
twelve minutes.
It is possible to stop demisting by
pressing the button again before the
end of the twelve minutes.
Downloaded from www.Manualslib.com manuals search engine
26-05-2003
YOUR 206 IN DETAIL
70
AIR CONDITIONING
1. Air conditioning
The air conditioning is designed to
operate in all seasons. In summer, it
enables the temperature to be low-
ered and in winter, above 0 °C, it
increases the effectiveness of the
demisting.
Press the switch to activate
the air conditioning. The indi-
cator light comes on.
The air conditioning does not oper-
ate while the air flow adjustment
control is in the OFF position.
Note:
It is quite normal that the condensa-
tion created by the air conditioning
results in a flow of water under the
vehicle when it is stationary.
2. Temperature adjustment
To be adjusted to your requirements.
From blue (cold when the air condi-
tioning is on) to red (hot).
Downloaded from www.Manualslib.com manuals search engine
26-05-2003
YOUR 206 IN DETAIL
71
3. Air distribution adjustment
Windscreen and side win-
dows (de-icing/demisting).
To quickly de-ice or demist the wind-
screen and side windows:
– turn the temperature and air flow
controls to maximum,
– close the centre vents,
– position the air intake control to
the left; the Outside Air position,
– start the air conditioning.
Windscreen, side windows
and footwells.
Footwells.
These settings are recommended
for cold climates.
Centre and side vents.
This setting is recommended for hot
climates.
5. Air intake control
Intake of exterior air.
This is the normal operating position.
Recirculation of interior air.
This position prevents exterior
odours and smoke entering the pas-
senger compartment.
Used simultaneously with the air con-
ditioning, recirculation enables both
heating and cooling performance to
be improved.
Used without the air conditioning,
recirculation may result in misting of
the windows.
As soon as possible, position the
control in the exterior air intake
position.
Important precaution
Operate the air conditioning system
for 5 to 10 minutes, once or twice a
month, to keep it in perfect working
order.
If the system does not produce
cold air, do not use it and contact a
PEUGEOT dealer.
4. Air flow adjustment
Turn the control from posi-
tion 1 to position 4 to obtain
an air flow sufficient to
ensure your comfort.
6. Demisting the rear screen and
the mirrors
With the engine running,
press once to demist
the rear screen and the
mirrors.
It switches off automatically after
approximately twelve minutes.
Press again to switch it back on for
twelve minutes.
It is possible to stop demisting by
pressing the button again before the
end of the twelve minutes.
Downloaded from www.Manualslib.com manuals search engine
26-05-2003
YOUR 206 IN DETAIL
72
Automatic operation
1. Temperature adjustment
The chosen temperature is
displayed. Press the up and
down arrows to change it.
A setting around 21 °C
enables a comfortable tem-
perature to be obtained.
2. Automatic comfort programme
Press the AUTO button. The sys-
tem automatically adjusts the
atmosphere inside the vehicle in
accordance with the temperature
that you have chosen. To do this, it controls the
temperature, the flow, the distribution and the
intake of air as well as the air conditioning.
Note: for your comfort, the settings are retained
between two start-ups of your vehicle if the tem-
perature in the passenger compartment has not
changed significantly; otherwise, operation
resumes in automatic mode.
3. Automatic visibility programme
In some cases, the auto-
matic comfort programme
may not be sufficient for
de-icing or demisting of the
windows (humidity, several passen-
gers, ice etc.). In this case, select the
automatic visibility programme to
clear the windows quickly.
To exit this programme and return to
the automatic comfort programme,
press the AUTO button.
AUTOMATIC AIR CONDITIONING
Downloaded from www.Manualslib.com manuals search engine
26-05-2003
YOUR 206 IN DETAIL
73
5. Air distribution
Pressing this button sever-
al times in succession
enables the air flow to be
directed in turn towards:
– the windscreen (de-icing or
demisting),
– the windscreen and the footwells,
– the footwells,
– the centre and side vents and the
footwells,
– the centre and side vents.
7. Air intake
Press this button for recircu-
lation of the interior air.
Recirculation, shown on the
display, enables the passen-
ger compartment to be insulated from
exterior odours and smoke.
Avoid prolonged recirculation of interi-
or air. To do this, press the button
again to resume automatic manage-
ment of the intake of air.
Note: To prevent condensation on the
inside of the vehicle in cold or wet
weather, you are advised to avoid
using this mode.
4. Air conditioning
Press this button to switch
off the air conditioning. The
symbol ECO is displayed.
Automatic operation of the
air conditioning is resumed when the
button is pressed again. The symbol
A/C is displayed.
8. Switching the system off
The OFF button enables
the entire system to be
switched off.
Temperature-related com-
fort is no longer guaranteed.
Pressing the OFF, AUTO, or visi-
bility button again reactivates the
system with the values set before it
was switched off.
9. Demisting the rear screen
Press this button to demist
the rear screen and the
mirrors. Demisting switches
off automatically. It is pos-
sible to stop operation of the
demisting before it is switched off
automatically by pressing the button
again.
Important precaution
Operate the air conditioning for 5 to
10 minutes, once or twice a month,
to keep it in good working order.
If the system does not produce cold
air, do not use it and contact your
PEUGEOT dealer.
Manual operation
If you wish, you can make a different
choice from that offered by the sys-
tem by changing a setting. The other
functions will still be controlled auto-
matically. Pressing the AUTO button
returns the system to completely
automatic operation.
6. Air flow
The flow of air can be
increased or reduced
by pressing buttons
+ or – respectively.
Notes
It is quite normal that the condensa-
tion created by the air conditioning
results in a flow of water under the
vehicle when it is stationary.
To prevent condensation on the
inside of the vehicle in cold or wet
weather, you are advised to avoid
using the ECO mode.
Downloaded from www.Manualslib.com manuals search engine
YOUR 206 IN DETAIL
74
26-05-2003
Downloaded from www.Manualslib.com manuals search engine
26-05-2003
YOUR 206 IN DETAIL
75
5. Head restraint height and angle
adjustment (saloon and 206 SW)
To raise the restraint, push it
upwards.
The adjustment is correct
when the upper edge of the
head restraint is level with
the top of the head.
The head restraint has a frame
with notches, which prevent the
head restraint dropping down
(this is a safety device in the
event of an impact).
To lower the head restraint, it is
necessary to push simultane-
ously:
– the button located at the base
of the head restraint frame,
– the head restraint downwards.
To remove the head restraint,
press the lug.
Never drive with the
head restraints removed;
they should be in place
and correctly adjusted.
Rear head restraints
These have one position for when
they are being used (high) and a
storage position (low). They can
be removed.
To lower the head restraints,
press the lug.
To remove them, pull upwards as
far as the stop then press the
release control.
FRONT SEATS
1. Forwards-backwards
adjustment
Lift the control and slide the seat
forwards or backwards.
2. Access to rear seats
(3 door)
Pull one of the two handles to fold
the seat back and move the seat
forwards. On repositioning, the
seat returns to its initial position
It is impossible to access the rear
seats if the front seat is in the
reclining position.
3. Seat back angle adjustment
Push one of the two handles
towards the rear.
4. Seat height adjustment
Pull the handle upwards.
Remove your weight from the
seat to raise, or press on the seat
to lower.
Downloaded from www.Manualslib.com manuals search engine
26-05-2003
YOUR 206 IN DETAIL
76
Storage compartment
– Lift the cover to gain access to the
storage compartment.
– Ensure that the cover is locked
correctly before folding back the
seat cushion.
Folding seat back
(all models)
– Remove the head restraint for
complete folding of the seat.
– Push either of the two handles 2
towards the rear to fold the seat
back.
Note: with the modifiable seat, this
can be tilted or removed in order to
fold down the seat back horizontally.
Modifiable front passenger
seat (saloon)
Access to the storage
compartment
– Push the seat as far back as pos-
sible.
– Lift then pull the front of the seat
to unlock it.
– Tilt the seat cushion forwards.
Downloaded from www.Manualslib.com manuals search engine
26-05-2003
YOUR 206 IN DETAIL
77
Removing the modifiable
front passenger seat
– Push the seat as far back as pos-
sible.
– Lift then pull the front of the seat
to unlock it.
– Tilt the seat forwards.
– Pulling upwards, tilt the seat from left
to right to make it easier to remove.
Refitting the modifiable front
passenger seat
– Push the seat as far back as pos-
sible.
– Engage the seat fastener in the
clips.
– Fold back the seat.
Downloaded from www.Manualslib.com manuals search engine
26-05-2003
YOUR 206 IN DETAIL
75
5. Head restraint height and angle
adjustment (saloon and 206 SW)
To raise the restraint, push it
upwards.
The adjustment is correct
when the upper edge of the
head restraint is level with
the top of the head.
The head restraint has a frame
with notches, which prevent the
head restraint dropping down
(this is a safety device in the
event of an impact).
To lower the head restraint, it is
necessary to push simultane-
ously:
– the button located at the base
of the head restraint frame,
– the head restraint downwards.
To remove the head restraint,
press the lug.
Never drive with the
head restraints removed;
they should be in place
and correctly adjusted.
Rear head restraints
These have one position for when
they are being used (high) and a
storage position (low). They can
be removed.
To lower the head restraints,
press the lug.
To remove them, pull upwards as
far as the stop then press the
release control.
FRONT SEATS
1. Forwards-backwards
adjustment
Lift the control and slide the seat
forwards or backwards.
2. Access to rear seats
(3 door)
Pull one of the two handles to fold
the seat back and move the seat
forwards. On repositioning, the
seat returns to its initial position
It is impossible to access the rear
seats if the front seat is in the
reclining position.
3. Seat back angle adjustment
Push one of the two handles
towards the rear.
4. Seat height adjustment
Pull the handle upwards.
Remove your weight from the
seat to raise, or press on the seat
to lower.
Downloaded from www.Manualslib.com manuals search engine
26-05-2003
YOUR 206 IN DETAIL
78
REAR SEATS
To fold the rear seats:
– lift the front of the seat cushion 1,
– tilt the seat cushion 1 against the front seats,
– position the seat belt under the belt holder 2,
– pull control 3 to unlock the seat back 4,
– remove or lower the head restraint,
– tilt the seat back 4.
Always start with the seat, never the seat back (risk of damage).
When repositioning:
– fold up the seat back,
– fold back the seat cushion,
– reposition the lap belt and the buckles before locking the front of the seat cushion.
Take care not to trap the seat belts.
Downloaded from www.Manualslib.com manuals search engine
26-05-2003
YOUR 206 IN DETAIL
79
Removing the rear seat
– Tilt the seat cushion against the
front seats.
– Squeeze the seat fasteners to
release them from their attach-
ments.
– Remove the seat cushion.
TRANSPORTING LONG
OBJECTS
To allow the transportation of long
objects:
Front seat:
– remove the modifiable seat (see
corresponding paragraph) and
fold down the seat back.
Rear seat:
– remove the seat cushion,
– tilt the seat back.
Downloaded from www.Manualslib.com manuals search engine
26-05-2003
YOUR 206 IN DETAIL
80
Rules for transporting children
on the front passenger seat**
Children under the age of 10 must
not travel in the forwards facing
position, unless the rear seats are
already occupied by other children
or the rear seats cannot be used
(absent or folded). In this case,
adjust the front passenger seat to
the most rearward position and arm
the passenger air bag.
The rearwards facing position is per-
mitted from birth to 13 kg or 18 kg. In
this position, it is essential to disarm
the passenger air bag.
GENERAL POINTS RELATING TO CHILD SEATS
Although one of PEUGEOT's main criteria when designing your vehicle, the safe-
ty of your children also depends on you.
For maximum safety, please follow these precautions:
– Since 1992, all children under the age of 10 must travel in approved child
seats* suited to their weight, on seats fitted with a seat belt.
In order to recognise a child seat which conforms to current legislation, check
that it bears an orange label indicating the weight range for its use and
its approval number.
– A child weighing less than 9 kg must travel in the rearwards facing posi-
tion both in the front and in the rear. PEUGEOT recommends that chil-
dren should travel in the rearwards facing position up to the age of two.
– Statistically, the safest seats in your vehicle for the transportation of chil-
dren are the rear seats.
– If a child is travelling on a booster seat, check that the lap section of the seat
belt passes over the child's thighs correctly. The chest section of the seat belt
must be positioned on the child's shoulder without touching the neck.
PEUGEOT recommends that you use a booster seat with a back, fitted
with a seat belt guide.
– Remember to fasten the seat belt or the child seat harness keeping the slack
in relation to the child's body to a minimum, even for short journeys.
* According to current legislation in the country.
** Consult the relevant administration in your country for information regarding
the rules for transporting children on the front passenger seat.
Downloaded from www.Manualslib.com manuals search engine
26-05-2003
YOUR 206 IN DETAIL
81
ISOFIX MOUNTINGS
The front passenger seat, the two
rear side seats (saloon and 206 SW)
and the one third section of the rear
seat (206 RC) are fitted with ISOFIX
mountings. These are two rings
located between the seat back and
the seat cushion.
The ISOFIX child seats are fitted
with two locks which are secured
easily on these rings. All this guar-
antees reliable, safe and fast fitting.
The ISOFIX child seat approved for
PEUGEOT vehicles and sold by
PEUGEOT dealers is the Isofix
KIDDY* child seat. It can be fitted in
the rear facing position from birth
to 13 kg and in the forwards facing
position from 9 to 18 kg.
In the front, in the rear facing posi-
tion, the front passenger seat must
be moved as far forward as possible
so that the body of the child seat is
in contact with or as close as possi-
ble to the fascia.
In the rear, in the forwards facing
position, in the saloon and 206 SW,
it is imperative that the front passen-
ger seat is in the mid-way position
on the runner, seat back upright. In
the 206 RC, the body of the child
seat must be in the most upright
position. Refer to the child seat's
installation guide for this setting.
In the rear, in the rear facing posi-
tion, the body of the child seat must
be in contact with the back of the
corresponding front seat.
This seat can also be used on seats
not fitted with ISOFIX mountings. In
this case it is compulsory to attach it
to the vehicle's seat by means of the
three-point seat belt for both the
rear facing and forwards facing
positions.
Refer to the Summary table for
fitting child seats.
When the ISOFIX KIDDY seat is
fitted in the rear facing position
on the front passenger seat, it is
essential to disarm the passenger
air bag.
Otherwise, the child would risk
being killed or seriously injured if
the air bag were to inflate.
Follow the instructions for fitting
the child seat in the seat manu-
facturer's instruction booklet.
* You can only fit ISOFIX child seats
approved by PEUGEOT and sold
by PEUGEOT dealers on your
vehicle's ISOFIX mountings.
Downloaded from www.Manualslib.com manuals search engine
26-05-2003
YOUR 206 IN DETAIL
82
CHILD SEATS RECOMMENDED BY PEUGEOT
In addition to the ISOFIX child seats, PEUGEOT offers a complete range of child seats which are secured using the seat belt:
Group 0+: from birth to 13 kg
L1 - Britax Babysure: installed in the rear-facing position in the front or in the rear using a three-point seat belt.
In the front, it is compulsory to disarm the passenger air bag and the passenger seat must be adjusted to the 'mid-way'
position on the runner.
Group 1: from 9 to 18 kg
L2 - Römer Prince: installed in the rear using a two or three-point seat belt.
For the safety of your child, the seat and the restraining cushion must never be separated.
Group 2: from 15 to 25 kg
L3 - Römer Vario'': installed in the rear with a two or three-point seat belt.
Downloaded from www.Manualslib.com manuals search engine
26-05-2003
YOUR 206 IN DETAIL
83
Never leave one or more
children alone and unsu-
pervised in a vehicle.
Never leave a child or an
animal in a vehicle which is
exposed to the sun and has the
windows closed.
To protect your young children from
the sun, fit blinds on the rear windows.
Never leave the keys within reach
of children inside the vehicle.
Disarm the passenger air bag
when installing a rearwards
facing child seat on the front
passenger seat. Otherwise, the
child would risk being killed or
seriously injured were the air
bag to inflate.
Observe strictly the recommenda-
tions for assembling and securing
the child seat as shown in the
child seat instructions.
To prevent the doors from opening
accidentally, use the child lock*.
Also, do not open the rear win-
dows more than a third*.
* According to model.
Groups 2 and 3: from 15 to 36 kg
L4 - ''Recaro Start'': installed in the rear with a three-point seat belt.
The height and width of the seat back and length of the seat cushion must
be adjusted according to the age and build of your child.
L5 - Klippan Optima: installed in the rear with a three-point seat belt.
From the age of 6 years (approximately 22 kg), the booster is used on its
own.
Refer to the Summary table for the installation of child seats.
Downloaded from www.Manualslib.com manuals search engine
YOUR 206 IN DETAIL
84
SUMMARY TABLE FOR FITTING CHILD SEATS (Saloon and 206 SW)
In accordance with the European regulation (Directive 2000/3), the table below indicates the options for the installation of
child restraints, depending on the weight group and the seat in the vehicle:
U : universal category
U F : universal category, forward-facing.
X : no child restraint.
According to destination:
L1 : BRITAX Babysure E11 0344117 Universal (birth to 13 kg).
L2 : ROMER Prince E1 03301058 Universal (9 to 18 kg).
L3 : ROMER Vario E1 03301120 Universal (15 to 25 kg).
L4 : RECARO Start E1 03301108 Universal (15 to 36 kg).
L5 : KLIPPAN Optima E17 030007 Universal (15 to 36 kg).
L6 : KIDDY Isofix Rearwards facing(c)
E1 03301123 and Universal (birth to 13 kg).
L7 : KIDDY Isofix Forwards facing(c)
E2 030011 Universal (9 to 18 kg).
(a) Group 0: from birth to 10 kg.
(b) The rules for transporting children in the front passenger seat are specific to each country. Consult the current legisla-
tion in your country.
(c) See section Seats - Isofix mountings for use of the KIDDY child seat on the vehicle's Isofix mountings, or failing this
with the seat belt.
Statutory weight group
Seat
Group 0(a) at 0+ Group 1 Group 2 Group 3
 13 kg 9 - 18 kg 15 - 25 kg 22 - 36 kg
Front passenger(b) U U U U
Fixed seat, Height adjustable seat L1, L6 L2, L7 L3, L4, L5 L4, L5
Rear passenger U U U U
Side seat L1, L6 L2, L7 L3, L4, L5 L4, L5
Rear passenger X U F U F U F
Centre seat L2 L3, L4, L5 L4, L5
Three-point seat belt
Rear passenger X U F U F U F
Centre seat L2 L3
Two-point seat belt
26-05-2003
Downloaded from www.Manualslib.com manuals search engine
-Manual 206-
-Manual 206-
-Manual 206-
-Manual 206-
-Manual 206-
-Manual 206-
-Manual 206-
-Manual 206-
-Manual 206-
-Manual 206-
-Manual 206-
-Manual 206-
-Manual 206-
-Manual 206-
-Manual 206-
-Manual 206-
-Manual 206-
-Manual 206-
-Manual 206-
-Manual 206-
-Manual 206-
-Manual 206-
-Manual 206-
-Manual 206-
-Manual 206-
-Manual 206-
-Manual 206-
-Manual 206-
-Manual 206-
-Manual 206-
-Manual 206-
-Manual 206-
-Manual 206-
-Manual 206-
-Manual 206-
-Manual 206-
-Manual 206-
-Manual 206-
-Manual 206-
-Manual 206-
-Manual 206-
-Manual 206-
-Manual 206-
-Manual 206-
-Manual 206-
-Manual 206-
-Manual 206-
-Manual 206-
-Manual 206-
-Manual 206-
-Manual 206-
-Manual 206-
-Manual 206-
-Manual 206-
-Manual 206-
-Manual 206-
-Manual 206-
-Manual 206-
-Manual 206-
-Manual 206-
-Manual 206-
-Manual 206-
-Manual 206-
-Manual 206-
-Manual 206-
-Manual 206-
-Manual 206-
-Manual 206-
-Manual 206-
-Manual 206-
-Manual 206-
-Manual 206-
-Manual 206-
-Manual 206-
-Manual 206-
-Manual 206-
-Manual 206-
-Manual 206-
-Manual 206-
-Manual 206-
-Manual 206-
-Manual 206-
-Manual 206-
-Manual 206-
-Manual 206-

More Related Content

What's hot

sealing system for rotating shafts ( mechanical seals and packing )
sealing system for rotating shafts ( mechanical seals and packing )sealing system for rotating shafts ( mechanical seals and packing )
sealing system for rotating shafts ( mechanical seals and packing )elkeik
 
Hyundai D4DD engine manual
Hyundai D4DD engine manualHyundai D4DD engine manual
Hyundai D4DD engine manualViktor
 
Manual elementos-dispositivos-electronicos-seguridad-volkswagen-cinturones-ai...
Manual elementos-dispositivos-electronicos-seguridad-volkswagen-cinturones-ai...Manual elementos-dispositivos-electronicos-seguridad-volkswagen-cinturones-ai...
Manual elementos-dispositivos-electronicos-seguridad-volkswagen-cinturones-ai...Carlos Ramiro Bermeo Guallpa
 
Sistem eps
Sistem epsSistem eps
Sistem epsotonik
 
Cummins isb6.7 cm2150 (2007-09)
Cummins   isb6.7 cm2150 (2007-09)Cummins   isb6.7 cm2150 (2007-09)
Cummins isb6.7 cm2150 (2007-09)DiegoLira32
 
Manual de serviço xlr125 00 x6b-kfc-601 cabecote
Manual de serviço xlr125   00 x6b-kfc-601 cabecoteManual de serviço xlr125   00 x6b-kfc-601 cabecote
Manual de serviço xlr125 00 x6b-kfc-601 cabecoteThiago Huari
 
Screw Air Compressors
Screw Air CompressorsScrew Air Compressors
Screw Air Compressorsksatm
 
VVDI2 Commander Transponder Key programmer user manual-vobdii.com
VVDI2 Commander Transponder Key programmer user manual-vobdii.comVVDI2 Commander Transponder Key programmer user manual-vobdii.com
VVDI2 Commander Transponder Key programmer user manual-vobdii.comSerena Kong
 
Dlscrib.com npr manual-y-diagrama-motor-isuzu-7294hk1trainingpdf
Dlscrib.com npr manual-y-diagrama-motor-isuzu-7294hk1trainingpdfDlscrib.com npr manual-y-diagrama-motor-isuzu-7294hk1trainingpdf
Dlscrib.com npr manual-y-diagrama-motor-isuzu-7294hk1trainingpdfLuis Capella Padilla
 
trafic-combi-y-furgon
trafic-combi-y-furgontrafic-combi-y-furgon
trafic-combi-y-furgonJoao Amora
 
090 climatizacion-ibiza-2002pdf4766-111005112700-phpapp01 (1)
090 climatizacion-ibiza-2002pdf4766-111005112700-phpapp01 (1)090 climatizacion-ibiza-2002pdf4766-111005112700-phpapp01 (1)
090 climatizacion-ibiza-2002pdf4766-111005112700-phpapp01 (1)David Medina
 
Manual de serviço cbx750 f (1990) carcaca
Manual de serviço cbx750 f (1990) carcacaManual de serviço cbx750 f (1990) carcaca
Manual de serviço cbx750 f (1990) carcacaThiago Huari
 
Manual ford fiesta 2006
Manual ford fiesta 2006Manual ford fiesta 2006
Manual ford fiesta 2006riccir
 
Manaul de serviço cbr900 rr fireblade (2000~2001) defeitos
Manaul de serviço cbr900 rr fireblade (2000~2001) defeitosManaul de serviço cbr900 rr fireblade (2000~2001) defeitos
Manaul de serviço cbr900 rr fireblade (2000~2001) defeitosThiago Huari
 

What's hot (20)

sealing system for rotating shafts ( mechanical seals and packing )
sealing system for rotating shafts ( mechanical seals and packing )sealing system for rotating shafts ( mechanical seals and packing )
sealing system for rotating shafts ( mechanical seals and packing )
 
Hyundai D4DD engine manual
Hyundai D4DD engine manualHyundai D4DD engine manual
Hyundai D4DD engine manual
 
Iveco
IvecoIveco
Iveco
 
Ssp404es
Ssp404esSsp404es
Ssp404es
 
Sistema electronico
Sistema electronicoSistema electronico
Sistema electronico
 
Manual elementos-dispositivos-electronicos-seguridad-volkswagen-cinturones-ai...
Manual elementos-dispositivos-electronicos-seguridad-volkswagen-cinturones-ai...Manual elementos-dispositivos-electronicos-seguridad-volkswagen-cinturones-ai...
Manual elementos-dispositivos-electronicos-seguridad-volkswagen-cinturones-ai...
 
Sistem eps
Sistem epsSistem eps
Sistem eps
 
Cummins isb6.7 cm2150 (2007-09)
Cummins   isb6.7 cm2150 (2007-09)Cummins   isb6.7 cm2150 (2007-09)
Cummins isb6.7 cm2150 (2007-09)
 
Manual de serviço xlr125 00 x6b-kfc-601 cabecote
Manual de serviço xlr125   00 x6b-kfc-601 cabecoteManual de serviço xlr125   00 x6b-kfc-601 cabecote
Manual de serviço xlr125 00 x6b-kfc-601 cabecote
 
1
11
1
 
Screw Air Compressors
Screw Air CompressorsScrew Air Compressors
Screw Air Compressors
 
VVDI2 Commander Transponder Key programmer user manual-vobdii.com
VVDI2 Commander Transponder Key programmer user manual-vobdii.comVVDI2 Commander Transponder Key programmer user manual-vobdii.com
VVDI2 Commander Transponder Key programmer user manual-vobdii.com
 
Dlscrib.com npr manual-y-diagrama-motor-isuzu-7294hk1trainingpdf
Dlscrib.com npr manual-y-diagrama-motor-isuzu-7294hk1trainingpdfDlscrib.com npr manual-y-diagrama-motor-isuzu-7294hk1trainingpdf
Dlscrib.com npr manual-y-diagrama-motor-isuzu-7294hk1trainingpdf
 
trafic-combi-y-furgon
trafic-combi-y-furgontrafic-combi-y-furgon
trafic-combi-y-furgon
 
090 climatizacion-ibiza-2002pdf4766-111005112700-phpapp01 (1)
090 climatizacion-ibiza-2002pdf4766-111005112700-phpapp01 (1)090 climatizacion-ibiza-2002pdf4766-111005112700-phpapp01 (1)
090 climatizacion-ibiza-2002pdf4766-111005112700-phpapp01 (1)
 
Capitulo 17
Capitulo  17Capitulo  17
Capitulo 17
 
Manual de serviço cbx750 f (1990) carcaca
Manual de serviço cbx750 f (1990) carcacaManual de serviço cbx750 f (1990) carcaca
Manual de serviço cbx750 f (1990) carcaca
 
Manual ford fiesta 2006
Manual ford fiesta 2006Manual ford fiesta 2006
Manual ford fiesta 2006
 
Tabela compressao-cilindro-basica
Tabela compressao-cilindro-basicaTabela compressao-cilindro-basica
Tabela compressao-cilindro-basica
 
Manaul de serviço cbr900 rr fireblade (2000~2001) defeitos
Manaul de serviço cbr900 rr fireblade (2000~2001) defeitosManaul de serviço cbr900 rr fireblade (2000~2001) defeitos
Manaul de serviço cbr900 rr fireblade (2000~2001) defeitos
 

Similar to -Manual 206-

2011 GMC Terrain Toledo Get to Know
2011 GMC Terrain Toledo Get to Know2011 GMC Terrain Toledo Get to Know
2011 GMC Terrain Toledo Get to KnowBallas Buick GMC
 
2011 GMC Terrain Toledo Get to know
2011 GMC Terrain Toledo Get to know2011 GMC Terrain Toledo Get to know
2011 GMC Terrain Toledo Get to knowBallas Buick GMC
 
2011 GMC Acadia Toledo Get to know
2011 GMC Acadia Toledo Get to know2011 GMC Acadia Toledo Get to know
2011 GMC Acadia Toledo Get to knowBallas Buick GMC
 
2011 Hyundai Sonata Quick Reference Guide - Glenbrook Hyundai - Happy Car Sto...
2011 Hyundai Sonata Quick Reference Guide - Glenbrook Hyundai - Happy Car Sto...2011 Hyundai Sonata Quick Reference Guide - Glenbrook Hyundai - Happy Car Sto...
2011 Hyundai Sonata Quick Reference Guide - Glenbrook Hyundai - Happy Car Sto...Glenbrook Hyundai - Happy Car Store
 
2011 Buick Enclave Toledo Get to know
2011 Buick Enclave Toledo Get to know2011 Buick Enclave Toledo Get to know
2011 Buick Enclave Toledo Get to knowBallas Buick GMC
 
KWANG YANG MOTOR CO.,LTD UXV 450i 2015 Owner Manual
KWANG YANG MOTOR CO.,LTD UXV 450i 2015 Owner ManualKWANG YANG MOTOR CO.,LTD UXV 450i 2015 Owner Manual
KWANG YANG MOTOR CO.,LTD UXV 450i 2015 Owner ManualRimsky Cheng
 
2005_toyota_yaris owners manual yaris.pdf
2005_toyota_yaris owners manual yaris.pdf2005_toyota_yaris owners manual yaris.pdf
2005_toyota_yaris owners manual yaris.pdfBassoumSahi
 
Getting To Know Your 2012 Buick LaCrosse
Getting To Know Your 2012 Buick LaCrosseGetting To Know Your 2012 Buick LaCrosse
Getting To Know Your 2012 Buick LaCrosseZimbrick Buick/GMC West
 
Manual de usuario automovil corolla 2009
Manual de usuario automovil corolla 2009Manual de usuario automovil corolla 2009
Manual de usuario automovil corolla 2009FlorGlez2
 
Medical response vehicle in service
Medical response vehicle in serviceMedical response vehicle in service
Medical response vehicle in servicejherrman1804
 
Manual reparacion Jeep Compass - Patriot Limited 2007-2009_Sunroof
Manual reparacion Jeep Compass - Patriot Limited 2007-2009_SunroofManual reparacion Jeep Compass - Patriot Limited 2007-2009_Sunroof
Manual reparacion Jeep Compass - Patriot Limited 2007-2009_SunroofGustavo Castro
 
Peugeot 106 owners manual
Peugeot 106 owners manualPeugeot 106 owners manual
Peugeot 106 owners manuallionpjr
 
2000 oldsmobile bravada service repair manual
2000 oldsmobile bravada service repair manual2000 oldsmobile bravada service repair manual
2000 oldsmobile bravada service repair manualfjskkedmmem
 

Similar to -Manual 206- (20)

2011 GMC Terrain Toledo Get to Know
2011 GMC Terrain Toledo Get to Know2011 GMC Terrain Toledo Get to Know
2011 GMC Terrain Toledo Get to Know
 
2011 GMC Terrain Toledo Get to know
2011 GMC Terrain Toledo Get to know2011 GMC Terrain Toledo Get to know
2011 GMC Terrain Toledo Get to know
 
2011 GMC Acadia Toledo Get to know
2011 GMC Acadia Toledo Get to know2011 GMC Acadia Toledo Get to know
2011 GMC Acadia Toledo Get to know
 
2012 mazda2 qt
2012 mazda2 qt2012 mazda2 qt
2012 mazda2 qt
 
1997-toyota-rav4-41.pdf
1997-toyota-rav4-41.pdf1997-toyota-rav4-41.pdf
1997-toyota-rav4-41.pdf
 
2011 Hyundai Sonata Quick Reference Guide - Glenbrook Hyundai - Happy Car Sto...
2011 Hyundai Sonata Quick Reference Guide - Glenbrook Hyundai - Happy Car Sto...2011 Hyundai Sonata Quick Reference Guide - Glenbrook Hyundai - Happy Car Sto...
2011 Hyundai Sonata Quick Reference Guide - Glenbrook Hyundai - Happy Car Sto...
 
2011 Buick Enclave Toledo Get to know
2011 Buick Enclave Toledo Get to know2011 Buick Enclave Toledo Get to know
2011 Buick Enclave Toledo Get to know
 
KWANG YANG MOTOR CO.,LTD UXV 450i 2015 Owner Manual
KWANG YANG MOTOR CO.,LTD UXV 450i 2015 Owner ManualKWANG YANG MOTOR CO.,LTD UXV 450i 2015 Owner Manual
KWANG YANG MOTOR CO.,LTD UXV 450i 2015 Owner Manual
 
2005_toyota_yaris owners manual yaris.pdf
2005_toyota_yaris owners manual yaris.pdf2005_toyota_yaris owners manual yaris.pdf
2005_toyota_yaris owners manual yaris.pdf
 
1998-toyota-4runner-61.pdf
1998-toyota-4runner-61.pdf1998-toyota-4runner-61.pdf
1998-toyota-4runner-61.pdf
 
Getting To Know Your 2012 Buick LaCrosse
Getting To Know Your 2012 Buick LaCrosseGetting To Know Your 2012 Buick LaCrosse
Getting To Know Your 2012 Buick LaCrosse
 
Manual de usuario automovil corolla 2009
Manual de usuario automovil corolla 2009Manual de usuario automovil corolla 2009
Manual de usuario automovil corolla 2009
 
Renault
RenaultRenault
Renault
 
Medical response vehicle in service
Medical response vehicle in serviceMedical response vehicle in service
Medical response vehicle in service
 
Module 9 2009
Module 9 2009Module 9 2009
Module 9 2009
 
98 ranger
98 ranger98 ranger
98 ranger
 
Cx 7
Cx 7Cx 7
Cx 7
 
Manual reparacion Jeep Compass - Patriot Limited 2007-2009_Sunroof
Manual reparacion Jeep Compass - Patriot Limited 2007-2009_SunroofManual reparacion Jeep Compass - Patriot Limited 2007-2009_Sunroof
Manual reparacion Jeep Compass - Patriot Limited 2007-2009_Sunroof
 
Peugeot 106 owners manual
Peugeot 106 owners manualPeugeot 106 owners manual
Peugeot 106 owners manual
 
2000 oldsmobile bravada service repair manual
2000 oldsmobile bravada service repair manual2000 oldsmobile bravada service repair manual
2000 oldsmobile bravada service repair manual
 

Recently uploaded

Rekha Agarkar Escorts Service Kollam ❣️ 7014168258 ❣️ High Cost Unlimited Har...
Rekha Agarkar Escorts Service Kollam ❣️ 7014168258 ❣️ High Cost Unlimited Har...Rekha Agarkar Escorts Service Kollam ❣️ 7014168258 ❣️ High Cost Unlimited Har...
Rekha Agarkar Escorts Service Kollam ❣️ 7014168258 ❣️ High Cost Unlimited Har...nirzagarg
 
Call Girls In Kotla Mubarakpur Delhi ❤️8448577510 ⊹Best Escorts Service In 24...
Call Girls In Kotla Mubarakpur Delhi ❤️8448577510 ⊹Best Escorts Service In 24...Call Girls In Kotla Mubarakpur Delhi ❤️8448577510 ⊹Best Escorts Service In 24...
Call Girls In Kotla Mubarakpur Delhi ❤️8448577510 ⊹Best Escorts Service In 24...lizamodels9
 
Marathi Call Girls Santacruz WhatsApp +91-9930687706, Best Service
Marathi Call Girls Santacruz WhatsApp +91-9930687706, Best ServiceMarathi Call Girls Santacruz WhatsApp +91-9930687706, Best Service
Marathi Call Girls Santacruz WhatsApp +91-9930687706, Best Servicemeghakumariji156
 
ELECTRICITÉ TMT 55.pdf electrick diagram manitout
ELECTRICITÉ TMT 55.pdf electrick diagram manitoutELECTRICITÉ TMT 55.pdf electrick diagram manitout
ELECTRICITÉ TMT 55.pdf electrick diagram manitoutssjews46
 
➥🔝 7737669865 🔝▻ Asansol Call-girls in Women Seeking Men 🔝Asansol🔝 Escorts...
➥🔝 7737669865 🔝▻ Asansol Call-girls in Women Seeking Men  🔝Asansol🔝   Escorts...➥🔝 7737669865 🔝▻ Asansol Call-girls in Women Seeking Men  🔝Asansol🔝   Escorts...
➥🔝 7737669865 🔝▻ Asansol Call-girls in Women Seeking Men 🔝Asansol🔝 Escorts...amitlee9823
 
如何办理麦考瑞大学毕业证(MQU毕业证书)成绩单原版一比一
如何办理麦考瑞大学毕业证(MQU毕业证书)成绩单原版一比一如何办理麦考瑞大学毕业证(MQU毕业证书)成绩单原版一比一
如何办理麦考瑞大学毕业证(MQU毕业证书)成绩单原版一比一ozave
 
➥🔝 7737669865 🔝▻ narsinghpur Call-girls in Women Seeking Men 🔝narsinghpur🔝 ...
➥🔝 7737669865 🔝▻ narsinghpur Call-girls in Women Seeking Men  🔝narsinghpur🔝  ...➥🔝 7737669865 🔝▻ narsinghpur Call-girls in Women Seeking Men  🔝narsinghpur🔝  ...
➥🔝 7737669865 🔝▻ narsinghpur Call-girls in Women Seeking Men 🔝narsinghpur🔝 ...nirzagarg
 
➥🔝 7737669865 🔝▻ pathankot Call-girls in Women Seeking Men 🔝pathankot🔝 Esc...
➥🔝 7737669865 🔝▻ pathankot Call-girls in Women Seeking Men  🔝pathankot🔝   Esc...➥🔝 7737669865 🔝▻ pathankot Call-girls in Women Seeking Men  🔝pathankot🔝   Esc...
➥🔝 7737669865 🔝▻ pathankot Call-girls in Women Seeking Men 🔝pathankot🔝 Esc...nirzagarg
 
Call Girls in Malviya Nagar Delhi 💯 Call Us 🔝9205541914 🔝( Delhi) Escorts Ser...
Call Girls in Malviya Nagar Delhi 💯 Call Us 🔝9205541914 🔝( Delhi) Escorts Ser...Call Girls in Malviya Nagar Delhi 💯 Call Us 🔝9205541914 🔝( Delhi) Escorts Ser...
Call Girls in Malviya Nagar Delhi 💯 Call Us 🔝9205541914 🔝( Delhi) Escorts Ser...Delhi Call girls
 
Vip Mumbai Call Girls Panvel Call On 9920725232 With Body to body massage wit...
Vip Mumbai Call Girls Panvel Call On 9920725232 With Body to body massage wit...Vip Mumbai Call Girls Panvel Call On 9920725232 With Body to body massage wit...
Vip Mumbai Call Girls Panvel Call On 9920725232 With Body to body massage wit...amitlee9823
 
BOOK FARIDABAD CALL GIRL(VIP Sunny Leone) @8168257667 BOOK 24/7
BOOK FARIDABAD CALL GIRL(VIP Sunny Leone) @8168257667 BOOK  24/7BOOK FARIDABAD CALL GIRL(VIP Sunny Leone) @8168257667 BOOK  24/7
BOOK FARIDABAD CALL GIRL(VIP Sunny Leone) @8168257667 BOOK 24/7Hyderabad Escorts Agency
 
Top Rated Call Girls Navi Mumbai : 9920725232 We offer Beautiful and sexy Cal...
Top Rated Call Girls Navi Mumbai : 9920725232 We offer Beautiful and sexy Cal...Top Rated Call Girls Navi Mumbai : 9920725232 We offer Beautiful and sexy Cal...
Top Rated Call Girls Navi Mumbai : 9920725232 We offer Beautiful and sexy Cal...amitlee9823
 
+971565801893>>SAFE AND ORIGINAL ABORTION PILLS FOR SALE IN ABUDHABI,DUBAI MA...
+971565801893>>SAFE AND ORIGINAL ABORTION PILLS FOR SALE IN ABUDHABI,DUBAI MA...+971565801893>>SAFE AND ORIGINAL ABORTION PILLS FOR SALE IN ABUDHABI,DUBAI MA...
+971565801893>>SAFE AND ORIGINAL ABORTION PILLS FOR SALE IN ABUDHABI,DUBAI MA...Health
 
➥🔝 7737669865 🔝▻ Bhiwandi Call-girls in Women Seeking Men 🔝Bhiwandi🔝 Escor...
➥🔝 7737669865 🔝▻ Bhiwandi Call-girls in Women Seeking Men  🔝Bhiwandi🔝   Escor...➥🔝 7737669865 🔝▻ Bhiwandi Call-girls in Women Seeking Men  🔝Bhiwandi🔝   Escor...
➥🔝 7737669865 🔝▻ Bhiwandi Call-girls in Women Seeking Men 🔝Bhiwandi🔝 Escor...amitlee9823
 
Call Girls in Malviya Nagar Delhi 💯 Call Us 🔝9205541914 🔝( Delhi) Escorts Ser...
Call Girls in Malviya Nagar Delhi 💯 Call Us 🔝9205541914 🔝( Delhi) Escorts Ser...Call Girls in Malviya Nagar Delhi 💯 Call Us 🔝9205541914 🔝( Delhi) Escorts Ser...
Call Girls in Malviya Nagar Delhi 💯 Call Us 🔝9205541914 🔝( Delhi) Escorts Ser...Delhi Call girls
 
Connaught Place, Delhi Call girls :8448380779 Model Escorts | 100% verified
Connaught Place, Delhi Call girls :8448380779 Model Escorts | 100% verifiedConnaught Place, Delhi Call girls :8448380779 Model Escorts | 100% verified
Connaught Place, Delhi Call girls :8448380779 Model Escorts | 100% verifiedDelhi Call girls
 
Lecture-20 Kleene’s Theorem-1.pptx best for understanding the automata
Lecture-20 Kleene’s Theorem-1.pptx best for understanding the automataLecture-20 Kleene’s Theorem-1.pptx best for understanding the automata
Lecture-20 Kleene’s Theorem-1.pptx best for understanding the automataHUSNAINAHMAD39
 

Recently uploaded (20)

Rekha Agarkar Escorts Service Kollam ❣️ 7014168258 ❣️ High Cost Unlimited Har...
Rekha Agarkar Escorts Service Kollam ❣️ 7014168258 ❣️ High Cost Unlimited Har...Rekha Agarkar Escorts Service Kollam ❣️ 7014168258 ❣️ High Cost Unlimited Har...
Rekha Agarkar Escorts Service Kollam ❣️ 7014168258 ❣️ High Cost Unlimited Har...
 
Call Girls In Kotla Mubarakpur Delhi ❤️8448577510 ⊹Best Escorts Service In 24...
Call Girls In Kotla Mubarakpur Delhi ❤️8448577510 ⊹Best Escorts Service In 24...Call Girls In Kotla Mubarakpur Delhi ❤️8448577510 ⊹Best Escorts Service In 24...
Call Girls In Kotla Mubarakpur Delhi ❤️8448577510 ⊹Best Escorts Service In 24...
 
Marathi Call Girls Santacruz WhatsApp +91-9930687706, Best Service
Marathi Call Girls Santacruz WhatsApp +91-9930687706, Best ServiceMarathi Call Girls Santacruz WhatsApp +91-9930687706, Best Service
Marathi Call Girls Santacruz WhatsApp +91-9930687706, Best Service
 
(ISHITA) Call Girls Service Jammu Call Now 8617697112 Jammu Escorts 24x7
(ISHITA) Call Girls Service Jammu Call Now 8617697112 Jammu Escorts 24x7(ISHITA) Call Girls Service Jammu Call Now 8617697112 Jammu Escorts 24x7
(ISHITA) Call Girls Service Jammu Call Now 8617697112 Jammu Escorts 24x7
 
ELECTRICITÉ TMT 55.pdf electrick diagram manitout
ELECTRICITÉ TMT 55.pdf electrick diagram manitoutELECTRICITÉ TMT 55.pdf electrick diagram manitout
ELECTRICITÉ TMT 55.pdf electrick diagram manitout
 
(INDIRA) Call Girl Nashik Call Now 8617697112 Nashik Escorts 24x7
(INDIRA) Call Girl Nashik Call Now 8617697112 Nashik Escorts 24x7(INDIRA) Call Girl Nashik Call Now 8617697112 Nashik Escorts 24x7
(INDIRA) Call Girl Nashik Call Now 8617697112 Nashik Escorts 24x7
 
➥🔝 7737669865 🔝▻ Asansol Call-girls in Women Seeking Men 🔝Asansol🔝 Escorts...
➥🔝 7737669865 🔝▻ Asansol Call-girls in Women Seeking Men  🔝Asansol🔝   Escorts...➥🔝 7737669865 🔝▻ Asansol Call-girls in Women Seeking Men  🔝Asansol🔝   Escorts...
➥🔝 7737669865 🔝▻ Asansol Call-girls in Women Seeking Men 🔝Asansol🔝 Escorts...
 
如何办理麦考瑞大学毕业证(MQU毕业证书)成绩单原版一比一
如何办理麦考瑞大学毕业证(MQU毕业证书)成绩单原版一比一如何办理麦考瑞大学毕业证(MQU毕业证书)成绩单原版一比一
如何办理麦考瑞大学毕业证(MQU毕业证书)成绩单原版一比一
 
➥🔝 7737669865 🔝▻ narsinghpur Call-girls in Women Seeking Men 🔝narsinghpur🔝 ...
➥🔝 7737669865 🔝▻ narsinghpur Call-girls in Women Seeking Men  🔝narsinghpur🔝  ...➥🔝 7737669865 🔝▻ narsinghpur Call-girls in Women Seeking Men  🔝narsinghpur🔝  ...
➥🔝 7737669865 🔝▻ narsinghpur Call-girls in Women Seeking Men 🔝narsinghpur🔝 ...
 
➥🔝 7737669865 🔝▻ pathankot Call-girls in Women Seeking Men 🔝pathankot🔝 Esc...
➥🔝 7737669865 🔝▻ pathankot Call-girls in Women Seeking Men  🔝pathankot🔝   Esc...➥🔝 7737669865 🔝▻ pathankot Call-girls in Women Seeking Men  🔝pathankot🔝   Esc...
➥🔝 7737669865 🔝▻ pathankot Call-girls in Women Seeking Men 🔝pathankot🔝 Esc...
 
Call Girls in Malviya Nagar Delhi 💯 Call Us 🔝9205541914 🔝( Delhi) Escorts Ser...
Call Girls in Malviya Nagar Delhi 💯 Call Us 🔝9205541914 🔝( Delhi) Escorts Ser...Call Girls in Malviya Nagar Delhi 💯 Call Us 🔝9205541914 🔝( Delhi) Escorts Ser...
Call Girls in Malviya Nagar Delhi 💯 Call Us 🔝9205541914 🔝( Delhi) Escorts Ser...
 
Vip Mumbai Call Girls Panvel Call On 9920725232 With Body to body massage wit...
Vip Mumbai Call Girls Panvel Call On 9920725232 With Body to body massage wit...Vip Mumbai Call Girls Panvel Call On 9920725232 With Body to body massage wit...
Vip Mumbai Call Girls Panvel Call On 9920725232 With Body to body massage wit...
 
BOOK FARIDABAD CALL GIRL(VIP Sunny Leone) @8168257667 BOOK 24/7
BOOK FARIDABAD CALL GIRL(VIP Sunny Leone) @8168257667 BOOK  24/7BOOK FARIDABAD CALL GIRL(VIP Sunny Leone) @8168257667 BOOK  24/7
BOOK FARIDABAD CALL GIRL(VIP Sunny Leone) @8168257667 BOOK 24/7
 
Top Rated Call Girls Navi Mumbai : 9920725232 We offer Beautiful and sexy Cal...
Top Rated Call Girls Navi Mumbai : 9920725232 We offer Beautiful and sexy Cal...Top Rated Call Girls Navi Mumbai : 9920725232 We offer Beautiful and sexy Cal...
Top Rated Call Girls Navi Mumbai : 9920725232 We offer Beautiful and sexy Cal...
 
+971565801893>>SAFE AND ORIGINAL ABORTION PILLS FOR SALE IN ABUDHABI,DUBAI MA...
+971565801893>>SAFE AND ORIGINAL ABORTION PILLS FOR SALE IN ABUDHABI,DUBAI MA...+971565801893>>SAFE AND ORIGINAL ABORTION PILLS FOR SALE IN ABUDHABI,DUBAI MA...
+971565801893>>SAFE AND ORIGINAL ABORTION PILLS FOR SALE IN ABUDHABI,DUBAI MA...
 
Call Girls in Patel Nagar, Delhi 💯 Call Us 🔝9953056974 🔝 Escort Service
Call Girls in Patel Nagar, Delhi 💯 Call Us 🔝9953056974 🔝 Escort ServiceCall Girls in Patel Nagar, Delhi 💯 Call Us 🔝9953056974 🔝 Escort Service
Call Girls in Patel Nagar, Delhi 💯 Call Us 🔝9953056974 🔝 Escort Service
 
➥🔝 7737669865 🔝▻ Bhiwandi Call-girls in Women Seeking Men 🔝Bhiwandi🔝 Escor...
➥🔝 7737669865 🔝▻ Bhiwandi Call-girls in Women Seeking Men  🔝Bhiwandi🔝   Escor...➥🔝 7737669865 🔝▻ Bhiwandi Call-girls in Women Seeking Men  🔝Bhiwandi🔝   Escor...
➥🔝 7737669865 🔝▻ Bhiwandi Call-girls in Women Seeking Men 🔝Bhiwandi🔝 Escor...
 
Call Girls in Malviya Nagar Delhi 💯 Call Us 🔝9205541914 🔝( Delhi) Escorts Ser...
Call Girls in Malviya Nagar Delhi 💯 Call Us 🔝9205541914 🔝( Delhi) Escorts Ser...Call Girls in Malviya Nagar Delhi 💯 Call Us 🔝9205541914 🔝( Delhi) Escorts Ser...
Call Girls in Malviya Nagar Delhi 💯 Call Us 🔝9205541914 🔝( Delhi) Escorts Ser...
 
Connaught Place, Delhi Call girls :8448380779 Model Escorts | 100% verified
Connaught Place, Delhi Call girls :8448380779 Model Escorts | 100% verifiedConnaught Place, Delhi Call girls :8448380779 Model Escorts | 100% verified
Connaught Place, Delhi Call girls :8448380779 Model Escorts | 100% verified
 
Lecture-20 Kleene’s Theorem-1.pptx best for understanding the automata
Lecture-20 Kleene’s Theorem-1.pptx best for understanding the automataLecture-20 Kleene’s Theorem-1.pptx best for understanding the automata
Lecture-20 Kleene’s Theorem-1.pptx best for understanding the automata
 

-Manual 206-

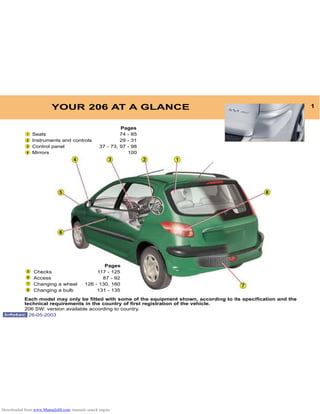
  • 1. YOUR 206 AT A GLANCE 1 Each model may only be fitted with some of the equipment shown, according to its specification and the technical requirements in the country of first registration of the vehicle. 206 SW: version available according to country. Pages Seats 74 - 85 Instruments and controls 29 - 31 Control panel 37 - 73, 97 - 98 Mirrors 100 Pages Checks 117 - 125 Access 87 - 92 Changing a wheel 126 - 130, 160 Changing a bulb 131 - 135 26-05-2003 Downloaded from www.Manualslib.com manuals search engine
  • 2. 2 YOUR 206 AT A GLANCE 26-05-2003 Downloaded from www.Manualslib.com manuals search engine
  • 3. 26-05-2003 3YOUR 206 AT A GLANCE 1 Side window demisting vents 2 Adjustable side vent 3 Passenger air bag 4 Windscreen demisting vents 5 Multifunction display 6 Central locking switch 7 Hazard warning lights switch 8 Instrument dials lighting rheostat 9 Lights and direction indicators stalk 10 Steering wheel height adjustment control 11 Steering lock 12 Windscreen wiper stalk 13 Driver's air bag Horn 14 Audio equipment remote control 15 Headlamp height adjustment 16 Passenger air bag disarming switch* 17 Rear window locking switch 18 Dynamic stability control (ESP/ASR) button 19 Storage compartment 20 Fuse box 21 Gear lever 22 Lighter 23 Alarm button 24 Front electric window switches 25 Electric mirrors switch 26 Handbrake 27 Front ashtray 28 Controls for heating, ventilation, air conditioning and heated rear screen and mirrors 29 Audio equipment 30 Adjustable centre vents 31 Glove box 32 Bonnet opening control * According to destination. Downloaded from www.Manualslib.com manuals search engine
  • 4. 87 4 YOUR 206 AT A GLANCE 26-05-2003 KEYS The keys enable you to switch on the ignition, independently operate the locks on the front doors and the tailgate (saloon) as well as operating the passenger air bag disarming switch and the fuel filler flap. Central locking From the driver's door, you can lock and unlock the doors and the boot. If one of the doors, the boot (206 SW) or the rear screen (206 SW) is open, the central locking will not work. Remote control Press button A to remotely lock the vehicle. This is confirmed by fixed lighting of the direction indicators for approximately two seconds. Press button B to remotely unlock the vehicle. This is confirmed by rapid flashing of the direction indicators for approximately two seconds. 206 SW: press and hold button B to unlock the vehicle and open the rear screen. Key in ignition If you leave the key in the igni- tion, a buzzer reminds you of this when opening the driver's door. Locating the vehicle To locate your vehicle, when you have left it locked in a car park: press button A, the courtesy lights will switch on and the indicator lights flash for a few seconds. STARTING The 4 positions of the key in the ignition: STOP position: The ignition is off. 1st notch, Accessories posi- tion: the ignition is off but the accessories can be used. 2nd notch, Running position: the ignition is on. Starting position: Operates the starter. Steering lock Before starting, unlock the steering if necessary, by gently turning the steering wheel at the same time as you turn the key. It is advisable to press the clutch pedal while operating the starter, to make starting easier. Downloaded from www.Manualslib.com manuals search engine
  • 5. 87 4 YOUR 206 AT A GLANCE 26-05-2003 KEYS The keys enable you to switch on the ignition, independently operate the locks on the front doors and the tailgate (saloon) as well as operating the passenger air bag disarming switch and the fuel filler flap. Central locking From the driver's door, you can lock and unlock the doors and the boot. If one of the doors, the boot (206 SW) or the rear screen (206 SW) is open, the central locking will not work. Remote control Press button A to remotely lock the vehicle. This is confirmed by fixed lighting of the direction indicators for approximately two seconds. Press button B to remotely unlock the vehicle. This is confirmed by rapid flashing of the direction indicators for approximately two seconds. 206 SW: press and hold button B to unlock the vehicle and open the rear screen. Key in ignition If you leave the key in the igni- tion, a buzzer reminds you of this when opening the driver's door. Locating the vehicle To locate your vehicle, when you have left it locked in a car park: press button A, the courtesy lights will switch on and the indicator lights flash for a few seconds. STARTING The 4 positions of the key in the ignition: STOP position: The ignition is off. 1st notch, Accessories posi- tion: the ignition is off but the accessories can be used. 2nd notch, Running position: the ignition is on. Starting position: Operates the starter. Steering lock Before starting, unlock the steering if necessary, by gently turning the steering wheel at the same time as you turn the key. It is advisable to press the clutch pedal while operating the starter, to make starting easier. Downloaded from www.Manualslib.com manuals search engine
  • 6. Precautions regarding the passenger air bag For a vehicle fitted with a disarm- ing switch: – disarm the air bag if you install a rear- facing child seat, – arm the air bag for an adult passen- ger. For a vehicle not fitted with a disarming switch: –do not install a rear-facing child seat on the front pas- senger seat. In no circumstances should you place your feet or any other object on the fascia. 114 5YOUR 206 AT A GLANCE 26-05-2003 Never race a cold engine. Never run the engine in a confined space. Do not make any modifications to the steering lock. Starting a petrol engine Do not press the accelerator. Operate the starter, without releasing the key, until the engine turns. Starting a diesel engine Do not press the acce- lerator. Turn the key to the ''Running'' position. If the engine is warm enough, the pre-heat light does not come on and you can start immediately. If the pre-heat light comes on, wait for it to go out before operating the starter. If the engine stalls, it is necessary to return the key to the ''STOP'' position before restarting. FRONT AIR BAGS Operating check * According to destination. Disarming the passenger air bag* Insert the ignition key into switch 1 and turn it to: – the ON position; the passenger air bag is armed. – the OFF position; the passen- ger air bag is disarmed. With the ignition on (2nd notch of the ignition), illumination of this warning light, accompanied by an audible signal and the mes- sage Passenger air bag deac- tivated on the multifunction display, indicates that the pas- senger air bag is disarmed (switch in the OFF position). The warning light remains on throughout the disarming process. Downloaded from www.Manualslib.com manuals search engine
  • 7. 26-05-2003 Windscreen wipers Front 2 Fast wipe 1 Normal wipe I Intermittent wipe or AUTO Automatic wipe 0 Off Single wipe Wash-wipe: pull the stalk towards you. Rear Off Intermittent Wash- wipe wipe Automatic wipe In the AUTO position, the windscreen wiper oper- ates automatically and adjusts its speed to the intensity of the rainfall. Rear fog lamp (ring B) Rear fog lamp (rotation of the ring forwards) Front fog lamps/Rear fog lamp (ring C) Front fog lamps (1st rotation of the ring forwards). Front fog lamps and rear fog lamp (2nd rotation of the ring forwards). 93 95 8 YOUR 206 AT A GLANCE STEERING WHEEL CONTROLS Lights Front lights (ring A) Lights off Side lights Dipped/ main beam headlamps Automatic switching on of lights Automatic switching on of lights To activate or deactivate the function, place the key in the accessories position with the lights stalk in position 0 and press the end of the stalk for more than four seconds. Downloaded from www.Manualslib.com manuals search engine
  • 8. 26-05-2003 74 9YOUR 206 AT A GLANCE FRONT SEATS 1- Forwards/backwards adjust- ment. 2- Access to rear seats (3-door). 3- Seat back angle adjustment. 4- Height adjustment. 5- Head restraint height and angle adjustment. Never drive with the head restraints removed. Modifiable passenger seat Access to the storage compartment – Push the seat as far back as possible. – Raise then pull the front of the seat to unlock it, then tilt the modifiable seat. Downloaded from www.Manualslib.com manuals search engine
  • 9. Load space cover To install: – position (1) one end of the cover roller in one of the two supports, – compress (2) the opposite end of the roller and position it, – release it (3) so that it engages, – unroll (4) the cover to the boot pillars, – insert the cover guides in the rails on the pillars. To remove: – remove the cover guides from the rails on the pillars, – return the cover to its roller, compress it and remove it from its support. Rear seats – Lift the front of the seat cushion 1, – Tilt the seat cushion 1 against the front seats, – Position the seat belt under the belt holder 2, – Pull control 3 to unlock the seat back 4, – Remove or lower the head restraint, – Tilt the seat back 4. When refitting, take care not to trap the seat belts. 10778 10 YOUR 206 AT A GLANCE 26-05-2003 Downloaded from www.Manualslib.com manuals search engine
  • 10. Precautions regarding the passenger air bag For a vehicle fitted with a disarm- ing switch: – disarm the air bag if you install a rear- facing child seat, – arm the air bag for an adult passen- ger. For a vehicle not fitted with a disarming switch: –do not install a rear-facing child seat on the front pas- senger seat. In no circumstances should you place your feet or any other object on the fascia. 114 5YOUR 206 AT A GLANCE 26-05-2003 Never race a cold engine. Never run the engine in a confined space. Do not make any modifications to the steering lock. Starting a petrol engine Do not press the accelerator. Operate the starter, without releasing the key, until the engine turns. Starting a diesel engine Do not press the acce- lerator. Turn the key to the ''Running'' position. If the engine is warm enough, the pre-heat light does not come on and you can start immediately. If the pre-heat light comes on, wait for it to go out before operating the starter. If the engine stalls, it is necessary to return the key to the ''STOP'' position before restarting. FRONT AIR BAGS Operating check * According to destination. Disarming the passenger air bag* Insert the ignition key into switch 1 and turn it to: – the ON position; the passenger air bag is armed. – the OFF position; the passen- ger air bag is disarmed. With the ignition on (2nd notch of the ignition), illumination of this warning light, accompanied by an audible signal and the mes- sage Passenger air bag deac- tivated on the multifunction display, indicates that the pas- senger air bag is disarmed (switch in the OFF position). The warning light remains on throughout the disarming process. Downloaded from www.Manualslib.com manuals search engine
  • 11. 26-05-2003 99 100 ELECTRIC WINDOWS 1. Driver's electric window Manual operation: press or pull the switch lightly. The window stops as soon as the switch is released. Automatic operation: press or pull the switch firmly. One touch completely opens or closes the window. Automatic opening and closing only operate when the engine is running. 2. Passenger's electric window. 3. Rear left electric window. 4. Rear right electric window. ELECTRIC MIRRORS Turn knob 5 to the right or to the left to select the cor- responding mirror. Move knob 5 in all four directions to adjust. Electric folding mirrors With the ignition on, turn knob 5 to position A. 7YOUR 206 AT A GLANCE Downloaded from www.Manualslib.com manuals search engine
  • 12. 26-05-2003 DOORS Front doors Rear doors (206 SW) 89 LOCKING/UNLOCKING THE BOOT AND THE REAR SCREEN (206 SW) The boot and the rear screen cannot be opened simultaneously. With the rear screen closed, to open the boot, pull the handle A and lift. With the boot closed, to open the rear screen, press and hold the unlocking button on the remote control or pull the handle B, then lift the rear screen using the windscreen wiper arm (at C). The lighting is switched on by opening the boot or the rear screen. Note: Close the rear screen using the windscreen wiper arm C or by pressing the centre of the window. 6 YOUR 206 AT A GLANCE 90 Downloaded from www.Manualslib.com manuals search engine
  • 13. 26-05-2003 13 101 92 YOUR 206 AT A GLANCE STEERING WHEEL HEIGHT ADJUSTMENT When stationary, lower the han- dle to unlock the steering wheel. Adjust to the desired height and lift the handle to lock the steering wheel. OPENING THE BONNET From inside the vehicle: pull the handle. From the outside: lift the catch and raise the bonnet. Secure the strut to hold the bonnet open. 13 Downloaded from www.Manualslib.com manuals search engine
  • 14. 26-05-2003 110 YOUR 206 AT A GLANCE14 P. Park. R. Reverse. N. Neutral. D. Drive: in this position, all four gears change automatically. 3. Automatic changing of the first three gears only. 2. Automatic changing of the first two gears only. A. Sport programme. B. Snow programme. THE AUTOMATIC AUTOADAPTIVE GEARBOX Starting To start the engine, place the selector lever in position N or P. Press the brake to leave position P and when selecting forward or reverse gears. Position of the selector lever This is shown by an indicator on the instrument panel. Downloaded from www.Manualslib.com manuals search engine
  • 15. 26-05-2003 68 70 YOUR 206 AT A GLANCE 11 N° Symbol Function HEATING/AIR CONDITIONING Setting the air distribution. 1 Air intake control.2 Temperature adjustment.3 Demisting the rear screen and mirrors.4 Air flow adjustment.5 Air conditioning control.6 Downloaded from www.Manualslib.com manuals search engine
  • 16. 26-05-2003 72 YOUR 206 AT A GLANCE12 N° Symbol Function AUTOMATIC AIR CONDITIONING Air flow adjustment. Setting the air distribution. 1 2 3 4 5 6 7 8 9 Air intake control. Air conditioning control. Switching off. Demisting the rear screen and mirrors. Temperature adjustment. Automatic comfort programme. Automatic visibility programme. Downloaded from www.Manualslib.com manuals search engine
  • 17. 26-05-2003 PEUGEOT SERVICING Your vehicle benefits from extended service intervals. • For petrol engines: every 20 000 miles (30 000 km) or every two years. • For direct injection diesel engines: every 12 000 miles (20 000) km or every two years. • For indirect injection diesel engines: every 10 000 miles (15 000 km) or every two years. The extension of the service intervals means that the engine oil level must be checked regularly: topping up of the oil between oil changes is normal. This is why the PEUGEOT network is offering you an intermediate service between regular services. The date of this visit is not shown by the service indicator. It is to be carried out at least every 10 000 miles (15 000 km) for saloon and 206 SW petrol engines; every 6 000 miles (10 000 km) for 206 GTi 180 direct injection diesel engines and every 5 000 miles (7 500 km) for indirect injection diesel engines. A PEUGEOT dealer will carry out a quick check and top up the levels if necessary (oil, coolant, windscreen wash up to 2 litres). If the oil level is too low there is a risk of serious damage to the engine: check the engine oil level at least every 2 000 to 3 000 miles (3 000 to 5 000 km), depending on the conditions of use. This extended servicing has been made possible by modifications to our vehicles and to the lubricants: THUS IT IS ESSENTIAL TO USE ONLY ENGINE LUBRICANTS THAT ARE SUITED TO YOUR ENGINE AND RECOM- MENDED BY THE MANUFACTURER (see Lubraicants pages). PEUGEOT SERVICING 18 Downloaded from www.Manualslib.com manuals search engine
  • 18. 26-05-2003 SPECIAL FEATURES Some of your vehicle's vital components have specific servicing schedules. The brake fluid must be replaced every 40 000 miles (60 000 km) or every 2 years. The passenger compartment filter must be checked at each visit to the PEUGEOT dealer (intermediate visits and regular services). The timing belt: consult your PEUGEOT dealer. PEUGEOT SERVICING 19 Arduous conditions of use If the vehicle is used in certain particularly arduous conditions: – Continuous door-to-door use. – Town use (e.g. taxi). – Repeated short journeys, with the engine cold in low temperatures. Or in long stays in the following conditions: – Hot countries with temperatures often above 30 °C. – Cold countries with temperatures often below minus 15 °C. – Countries with a dusty atmosphere. – Countries whose lubricants or fuels do not conform to our recommendations. It is necessary to follow an Arduous Conditions servicing schedule, which includes: – shorter service intervals: • Every 10 000 miles (15 000 km) or every year for 206 GTi petrol engine vehicles. • Every 12 000 miles (20 000 km) or every year for saloon or 206 SW petrol engine vehicles. • Every 10 000 miles (15 000 km) or every year for Direct Injection Diesel engine vehicles. • Every 6 000 miles (10 000 km) or every year for Indirect Injection Diesel engine vehicles. – special operations: • Replacement of the air filter every 15 000 km for the 206 RC. Downloaded from www.Manualslib.com manuals search engine
  • 19. 26-05-2003 SERVICE INDICATOR This is a visual reminder of when the next service is due. This service is to be carried out according to the manu- facturer's servicing schedule. Operation As soon as the ignition is switched on and for 5 seconds, the spanner sym- bolising ''service operation'' is lit. The trip recorder display shows you the distance remaining (in round figures) before the next service. Example: 4,800 miles remain before the next service is due. When the ignition comes on and for 5 seconds the display indicates: 5 seconds after the ignition is switched on, the total distance recorder resumes normal operation and the display shows the total or trip distances. The distance remaining before the next service is less than 500 miles. Example: 400 miles remain before the next service is due. When switching on the ignition and for 5 seconds, the display shows: 5 seconds after the ignition is switched on, the total distance recorder resumes normal operation and the symbol remains lit. This indicates that a service should be carried out shortly. The display shows the total or trip distances. The service is overdue. Each time the ignition is switched on and for 5 seconds, the symbol and the excess distance flash. Example: the service is overdue by 300 miles. The service should be car- ried out very shortly. When the ignition is switched on and for 5 seconds, the display shows: 5 seconds after the ignition is switched on, the total distance recorder resumes normal operation and the symbol remains lit. The display shows the total or trip distances. PEUGEOT SERVICING 20 Downloaded from www.Manualslib.com manuals search engine
  • 20. 26-05-2003 Resetting the service indicator Your PEUGEOT dealer carries out this operation after each service. However, if you carry out the service yourself, the reset procedure is as fol- lows: – Switch off the ignition. – Press and hold button 1. – Switch on the ignition. The display begins a 10 second countdown. – Keep button 1 pressed for 10 seconds. The display shows [= 0] and the service symbol disappears. PEUGEOT SERVICING 21 Downloaded from www.Manualslib.com manuals search engine
  • 21. 26-05-2003 TYPES OF SERVICE Each vehicle has its own servicing cycle, based upon the engine type. This cycle consists of alternating two types of service, A and C, intermediate visits and a few additional operations depend- ing on your vehicle; these correspond to key stages in the life of your vehicle. When the first service is carried out and at each subsequent service, your dealer will advise you of the type and content of the next service due. PEUGEOT SERVICING 22 THE MAINTENANCE CYCLE FOR YOUR SALOON and 206 SW PETROL Service every 20,000 miles (30,000 km) or 2 years. 1st service at 6,000 miles (10,000 km) or 6 months*. This is necessary in order to benefit from the warranty These services are to be carried with at least 10W40 synthetic based oil. They can also be carried out with 5W30 Fuel Economy oil or with 5W40 synthetic oil. Arduous conditions of use (see corresponding section). * Whichever comes first. Intermediate top-up visit included in the Servicing Schedule. MILES (KM) 20,000 (30,000) 40,000 (60,000) 60,000 (90,000) 80,000 (120,000) 100,000 (150,000) 120,000 (180,000) 140,000 (210,000) 160,000 (240,000) Downloaded from www.Manualslib.com manuals search engine
  • 22. 26-05-2003 TYPES OF SERVICE Each vehicle has its own servicing cycle, based upon the engine type. This cycle consists of alternating two types of service, A and C, intermediate visits and a few additional operations depend- ing on your vehicle; these correspond to key stages in the life of your vehicle. When the first service is carried out and at each subsequent service, your dealer will advise you of the type and content of the next service due. PEUGEOT SERVICING 22 THE MAINTENANCE CYCLE FOR YOUR SALOON and 206 SW PETROL Service every 20,000 miles (30,000 km) or 2 years. 1st service at 6,000 miles (10,000 km) or 6 months*. This is necessary in order to benefit from the warranty These services are to be carried with at least 10W40 synthetic based oil. They can also be carried out with 5W30 Fuel Economy oil or with 5W40 synthetic oil. Arduous conditions of use (see corresponding section). * Whichever comes first. Intermediate top-up visit included in the Servicing Schedule. MILES (KM) 20,000 (30,000) 40,000 (60,000) 60,000 (90,000) 80,000 (120,000) 100,000 (150,000) 120,000 (180,000) 140,000 (210,000) 160,000 (240,000) Downloaded from www.Manualslib.com manuals search engine
  • 23. 26-05-2003 PEUGEOT SERVICING 23 THE MAINTENANCE CYCLE FOR YOUR 206 GTi 180** Service every 12,000 miles (20,000 km) or 2 years. 1st service at 6,000 miles (10,000 km) or 6 months*. This is necessary in order to benefit from the warranty These services are to be carried with 5W40 synthetic based oil only. Arduous conditions of use (see corresponding section). * Whichever comes first. ** During the year, according to destination. Intermediate top-up visit included in the Servicing Schedule. MILES (KM) 12,000 (20,000) 24,000 (40,000) 36,000 (60,000) 48,000 (80,000) 60,000 (100,000) 72,000 (120,000) 84,000 (140,000) 96,000 (160,000) 108,000(180,000) 120,000 (200,000) 132,000 (220,000) 144,000 (240,000) Downloaded from www.Manualslib.com manuals search engine
  • 24. 26-05-2003 PEUGEOT SERVICING 24 Intermediate top-up visit incorporated in the Servicing Schedule. THE MAINTENANCE CYCLE FOR YOUR 206 TURBO DIESEL HDI Service every 12,000 miles (20,000 km) or 2 years. 1st Service at 6,000 miles (10,000 km) or 6 months*. This is necessary in order to benefit from the warranty. These services are to be carried out with 10W40 synthetically based oil minimum. They can also be carried out with 5W30 Fuel Economy oil or with 5W40 synthetic oil. Arduous conditions of use (see corresponding section). * Whichever comes first. MILES (KM) 12,000 (20,000) 24,000 (40,000) 36,000 (60,000) 48,000 (80,000) 60,000 (100,000) 72,000 (120,000) 84,000 (140,000) 96,000 (160,000) 108,000 (180,000) 120,000 (200,000) 132,000 (220,000) 144,000 (240,000) Downloaded from www.Manualslib.com manuals search engine
  • 25. 26-05-2003 PEUGEOT SERVICING 25 Intermediate top-up visit incorporated in the Servicing Schedule. THE MAINTENANCE CYCLE FOR YOUR 206 INDIRECT INJECTION DIESEL Service every 10,000 miles (15,000 km) or 2 years. 1st Service at 6,000 miles 10,000 km or 6 months*. This is necessary in order to benefit from the warranty. These services are to be carried out with 10W40 synthetically based oil minimum. They can also be carried out with 5W30 Fuel Economy oil or with 5W40 synthetic oil. Arduous conditions of use (see corresponding section). * Whichever comes first. MILES (KM) 10,000 (15,000) 20,000 (30,000) 30,000 (45,000) 40,000 (60,000) 50,000 (75,000) 60,000 (90,000) 70,000 (105,000) 80,000 (120,000) 90,000 (135,000) 100,000 (150,000) 110,000 (165,000) 120,000 (180,000) 130,000 (195,000) 140,000 (210,000) 150,000 (225,000) 160,000 (240,000) Downloaded from www.Manualslib.com manuals search engine
  • 26. PEUGEOT SERVICING 26 A C SERVICE LEVELS AND THE INTERMEDIATE VISIT Level Operations Description of operation 1st service A C Intermediate DRAIN/REFILL - Engine oil - Bleed fuel filter (diesel) - Oil filter - Fuel filter* (petrol) REPLACE - Fuel filter element (diesel) - Air filter element - Spark plugs (petrol) - Engine oil (check + top-up) - Manual gearbox oil (check + top-up) - Battery (check + top-up) if cap is removable LEVEL - Screen wash front/rear (check + top-up) - Coolant (check + top-up) - Brake fluid (check + top-up) - Power steering fluid (check + top up according to specification) - Operation of lights and indicators - Condition of glass, headlamp and light lenses and mirrors - Horn - Windscreen washer jets - Condition of wiper blades - Condition and tension of the ancillary drive belts - Handbrake - Condition of hydraulic circuits (hoses and covers) CHECK - Condition of rubber boots and gaiters - Brake pads o - Play in hubs, link rods, ball joints, flexible mountings - Shock absorbers - Rear drum brake lining wear - Condition and pressure of tyres (including spare wheel) - Emission control check as per current legislation (petrol) - Smoke opacity (diesel) - Passenger compartment filter (according to specification) o - Visual check of the whole vehicle SERVICE* - Courtesy vehicle ROAD TEST : All driving conditions o: Arduous conditions * According to destination.26-05-2003 Downloaded from www.Manualslib.com manuals search engine
  • 27. 26-05-2003 D I E S E LD I E S E LP E T R O L P E T R O L (1) Minimum quality standard: Petrol engines: ACEA A3 and API SH/SJ; Diesel engines: ACEA B3 and API CF/CD ACEA = Association des Constructeurs Européens Automobiles (Association of European Automobile Manufacturers) - API = American Petroleum Institute. If oil is used which does not conform to the ACEA A3-B3 standards, this requires the Arduous Conditions servicng schedule to be followed, which involves shorter intervals between services. Use 5W40 synthetic oil only for the 2.0 litre 16V 180 bhp engine. TRADE NAMES OF RECOMMENDED ENGINE LUBRICANTS IN EUROPE(1) 27 Downloaded from www.Manualslib.com manuals search engine
  • 28. 26-05-2003 Recommended lubricants The oils which appear in the previous table are suitable for most purposes. The diagram opposite states the optimum range of viscosity depending on the temperatures at which the oils are to be used. It is also possible to use superior quality synthetic oils. In the absence of semi-synthetic or synthetic oils, oils of API SH/SJ quality (for petrol engines), or CD/CF quality (for diesel engines) may be used by following the Arduous Conditions servicing schedule which specifies shorter intervals. Do not hesitate to ask for advice from a PEUGEOT dealer to maintain driving pleasure and to minimise the maintenance cost of your vehicle. For countries outside Europe, please contact a local PEUGEOT dealer. PEUGEOT SERVICING 28 ONLY ONLY Manual Gearbox ESSO GEAR OIL BV TOTAL TRANSMISSION BV 75W80 PR 9736.41 75W80 ONLY Automatic ATF 4HP20-AL4 Gearbox PR 9736.22 Power steering ESSO ATF D TOTAL FLUIDE AT42 PR 9730.94 Other recommended products Brake fluid PEUGEOT DOT4 Coolant PROCOR TM108/GLYSANTIN G33 or REVKOGEL 2000 ONLY protection to minus 35 °C Downloaded from www.Manualslib.com manuals search engine
  • 29. 26-05-2003 INSTRUMENTS AND CONTROLS 29 INSTRUMENT DIALS: PETROL - DIESEL MANUAL GEARBOX (saloon and 206 SW) 1. Seat belt not fastened warning light* 2. Passenger air bag disarming warning light* 3. Front and side air bags warning light 4. Front fog lamps indicator light 5. Anti-lock braking system (ABS) warning light 6. Rear fog lamp indicator light 7. Diesel pre-heat warning light 8. Left hand direction indicator 9. Total distance recorder, service indicator and engine oil level indicator 10. Right hand direction indicator 11. Engine diagnostics warning light 12. Main beam headlamps indicator light 13. Handbrake, low brake fluid level and electronic brake force distri- bution warning light 14. Dipped beam headlamps indica- tor light 15. Battery charge warning light 16. Engine oil pressure and tempera- ture warning light 17. Water in diesel filter warning light 18. Coolant temperature and low level warning light 19. Engine oil temperature indicator 20. Total distance recorder button 21. Central (STOP) warning light 22. Speedometer 23. Coolant temperature indicator 24. Rev counter 25. Lighting-rheostat button 26. Fuel gauge 27. Low fuel level warning light 28. Dynamic stability control (ESP/ASR) warning light * According to destination. Downloaded from www.Manualslib.com manuals search engine
  • 30. 26-05-2003 INSTRUMENTS AND CONTROLS 30 INSTRUMENT DIALS: PETROL MANUAL GEARBOX (206 GTi 180**) 1. Seat belt not fastened warning light* 2. Passenger air bag disarming warning light* 3. Front and side air bags warning light 4. Front fog lamps indicator light 5. Anti-lock braking system (ABS) warning light 6. Rear fog lamp indicator light 7. Left hand direction indicator 8. Total distance recorder, service indicator and engine oil level indicator 9. Right hand direction indicator 10. Engine diagnostics warning light 11. Main beam headlamps indicator light 12. Handbrake, low brake fluid level and electronic brake force distri- bution warning light 13. Dipped beam headlamps indica- tor light 14. Battery charge warning light 15. Engine oil pressure and tempera- ture warning light 16. Coolant temperature and low level warning light 17. Engine oil temperature indicator 18. Total distance recorder button 19. Central (STOP) warning light 20. Speedometer 21. Coolant temperature indicator 22. Rev counter 23. Lighting-rheostat button 24. Fuel gauge 25. Low fuel level warning light 26. Dynamic stability control (ESP/ASR) warning light * According to destination. ** During the year, according to destination. Downloaded from www.Manualslib.com manuals search engine
  • 31. 26-05-2003 INSTRUMENTS AND CONTROLS 31 INSTRUMENT DIALS: PETROL AUTOMATIC GEARBOX (saloon and 206 SW) 1. Seat belt not fastened warning light* 2. Passenger air bag disarming warning light* 3. Front and side air bags warning light 4. Front fog lamps indicator light 5. Anti-lock braking system (ABS) warning light 6. Rear fog lamp indicator light 7. Left hand direction indicator 8. Total distance recorder, service indicator and engine oil level indicator 9. Right hand direction indicator 10. Engine diagnostics warning light 11. Main beam headlamps indicator light 12. Handbrake, low brake fluid level and electronic brake force distri- bution warning light 13. Dipped beam headlamps indica- tor light 14. Battery charge warning light 15. Engine oil pressure and tempera- ture warning light 16. Coolant temperature and low level warning light 17. Operating programmes 18. Gear indicator 19. Total distance recorder button 20. Central (STOP) warning light 21. Speedometer 22. Coolant temperature indicator 23. Rev counter 24. Lighting-rheostat button 25. Fuel gauge 26. Low fuel level warning light 27. Dynamic stability control (ESP/ASR) warning light * According to destination. Downloaded from www.Manualslib.com manuals search engine
  • 32. 26-05-2003 INSTRUMENTS AND CONTROLS 32 Handbrake, low brake fluid and Electronic Brake Force Distribution system fault warning light Linked to the central (STOP) warning light. This indicates one of the following: – that the handbrake is applied or not fully released, – an excessive drop in brake fluid level (if the warning light remains on even when the handbrake is released). – a fault in the Electronic Brake Force Distribution system, if lit at the same time as the ABS warning light. You must stop. Consult a PEUGEOT dealer. INSTRUMENTS AND CONTROLS A permanently lit warning light or one flashing, with the engine run- ning, indicates an operating fault of the unit concerned. The illumi- nation of certain warning lights may be accompanied by an audi- ble signal and a message on the multifunction display. Do not ignore this warning: consult a PEUGEOT dealer as soon as possible. If the central STOP warning light comes on when you are driving, stop your vehicle immediately, where it is safe to do so. Anti-lock braking system (ABS) warning light This comes on for 3 seconds each time the ignition is switched on. If the warning light remains on or comes on above 8 mph (12 km/h), this indicates an ABS malfunction. However, the vehicle retains conven- tional servo-assisted braking. Lighting of this warning light is accompanied by an audible signal and the message ABS fault on the multifunction display. Consult a PEUGEOT dealer. Coolant temperature and low coolant level warning light Linked to the central (STOP) warning light. You must stop. Wait for the engine to cool before top- ping up the level. The cooling circuit is pressurised. In the event of breakdown and to prevent any risk of burns, unscrew the cap by two turns to allow the pressure to drop. When the pressure has dropped, remove the cap and top up the level. Consult a PEUGEOT dealer. Central (STOP) warning light Linked to the engine oil pressure, coolant temperature and low coolant level, handbrake, low brake fluid level and electronic brake force distribution system fault warning lights. You must stop if the light flashes with the engine running. Consult a PEUGEOT dealer. Engine oil pressure and temperature warning light Linked to the central (STOP) warning light. You must stop. This warning light indicates one of the following: – insufficient oil pressure, – a lack of oil in the lubrication cir- cuit. Top up the level. – an oil temperature which is too high. The warning light is acom- panied by an audible signal. To lower the oil temperature, reduce your speed. Consult a PEUGEOT dealer. Downloaded from www.Manualslib.com manuals search engine
  • 33. 26-05-2003 INSTRUMENTS AND CONTROLS 33 Seat belt not fastened warning light* When the ignition is switched on, this indicator light comes on if the driver has not fastened his seat belt. Front and side air bags warning light The light will come on for a few seconds when the ignition is switched on. With the engine running, illumination of this warning light is accompanied by an audible signal and a message on the multifunction display indicat- ing a fault in the air bags. Consult a PEUGEOT dealer. Battery charge warning light This indicates one of the following: – faulty operation of the charging circuit, – slack battery or starter terminals, – a cut or slack alternator belt, – an alternator failure. Consult a PEUGEOT dealer. Engine diagnostics warning light This comes on each time the ignition is switched on. If it comes on with the engine running, this indicates incorrect operation of the injection, ignition or emission con- trol system. There is a risk of damage to the catalytic converter (petrol engine only). Consult a PEUGEOT dealer. Dynamic stability control system (ESP/ASR) warning light This comes on for a few seconds each time the ignition is switched on. Consult a PEUGEOT dealer if the ESP/ASR switch indicator light flash- es and this warning light remains on or comes on with the engine running, vehicle moving. With the engine running and the vehi- cle moving, it flashes if the system is activated. It lights permanently when the system is disarmed. * According to destination. Water in diesel filter indicator* Consult a PEUGEOT dealer as soon as possible. There is a risk of damage to the injection system. Passenger air bag disarming warning light* Illumination of this warning light is accompanied by an audible signal and the message Passenger air bag deactivated on the multifunction display. If the passenger air bag is disarmed, the warning light comes on when the igni- tion is switched on and it remains on. Always consult a PEUGEOT dealer if the warning light flashes. Low fuel level warning light When this light first comes on, you have enough fuel to drive at least 30 miles (50 km). The tank capacity is approxi- mately 50 litres. Diesel engine pre-heat warning light Wait until the warning light goes out before starting the engine. If the temperature is high enough, the warning light comes on for less than one second. You can start the engine without waiting. Downloaded from www.Manualslib.com manuals search engine
  • 34. 26-05-2003 INSTRUMENTS AND CONTROLS 34 Engine oil temperature indicator With the engine running, this indicates the oil temperature: – needle in zone (C), the temperature is correct, – needle in zone (D), the temperature is too high. To lower the oil tempera- ture, reduce your speed. Coolant temperature indicator – needle in zone (A), the temperature is correct, – needle in zone (B), the temperature is too high. The central STOP warning light flashes. You must stop. Consult a PEUGEOT dealer. Downloaded from www.Manualslib.com manuals search engine
  • 35. 26-05-2003 Instrument panel display After switching on the ignition, three functions are shown in succession: – service indicator (see corresponding section), – engine oil level indicator, – total distance recorder (total or trip distances). Note: the total or trip distances are displayed for 30 seconds when the ignition is switched off, on opening the driver's door, as well as on locking and unlocking the vehicle. Engine oil level When the ignition is switched on, the engine oil level is indicated for approximately 10 seconds, after the servicing information. Maximum oil level If the flashing of the six squares is confirmed by checking using the dipstick, a surplus of oil can cause damage to the engine. Consult a PEUGEOT dealer without delay. Lack of oil Flashing of the six segments and min on the display indicate a lack of oil which can cause damage to the engine. If the lack of oil is confirmed by checking using the dipstick, it is essential to top up the level. Oil level gauge fault Flashing of the six segments indicates a fault in the oil level gauge. There is a risk the engine will be damaged. Consult a PEUGEOT dealer. INSTRUMENTS AND CONTROLS 35 The level indicated when checking using the dipstick is only correct if the vehicle has been on level ground, with the engine stopped, for more than 10 minutes. Downloaded from www.Manualslib.com manuals search engine
  • 36. 26-05-2003 INSTRUMENTS AND CONTROLS 36 Total distance records Briefly pressing button 1 alternates between the total and trip distance displays. To reset the trip recorder to zero, when it is displayed press the button for more than 3 seconds. HAZARD WARNING LIGHTS Press the button, the direction indica- tors flash. They can operate with the ignition off. Automatic lighting of hazard warning lights* When braking in an emergency, depending on the force of decelera- tion, the hazard warning lights come on automatically. They switch off auto- matically the first time you accelerate. It is also possible to switch them off by pressing the button. * According to destination. Lighting rheostat With the lights on, press the button to vary the intensity of the lighting of the instruments and controls. When the lighting reaches the minimum (or maximum) setting, release the but- ton then press it again to increase (or reduce) the brightness. As soon as the lighting is of the required brightness, release the button. Downloaded from www.Manualslib.com manuals search engine
  • 37. 26-05-2003 YOUR 206 IN DETAIL 37 DISPLAY A This displays the following information: – the time, – the date, – the outside temperature (this flashes if there is a risk of ice), – the audio system displays, – a door check (e.g.: ''left front door open''), – warning messages (e.g. ''remote control battery flat'') or information messages (e.g. ''economy mode active''), displayed temporarily. Adjusting the parameters Press and hold button 1 for two seconds to access the settings; the data flashes, indicating it is ready to be modified. Then, each press of button 1 scrolls through the various data in the following order: – language of information displayed, – hours (12 then 24 hour mode), – minutes, – year, – month, – day, – unit of temperature (degrees Celsius or Fahrenheit). Pressing button 2 alters the value of the parameter selected. Press and hold for rapid advance (return to start after the last possible value). After 7 seconds with no action, the main display returns; the modified data are now recorded. Note: Pressing button 2 briefly displays the outside temperature for a few seconds. Downloaded from www.Manualslib.com manuals search engine
  • 38. 26-05-2003 YOUR 206 IN DETAIL 38 Setting the parameters Press and hold button 1 for two seconds to access the settings. The data flashes, indicating it is ready to be modified. Then, individual presses on button 1 allow you to scroll through the various data in the following sequence: – language in which the information is displayed, – unit of distance (kms or miles), – unit of temperature (degrees Celsius or Fahrenheit), – time format (12 then 24 hour mode), – hour, – minutes, – year, – month, – day. Pressing button 2 allows you to change the data selected. Maintain the pressure for rapid scrolling. After 7 seconds without moving, the main display returns; the modified data are now recorded. DISPLAY B This enables the following informa- tion to be displayed: – the time, – the date, – the outside temperature (this flashes when there is a risk of ice), – the radio displays, – the status of the doors. The dis- play shows you, by means of a graphic, whether a door is open, – the warning messages (e.g. ''bat- tery charge low'') or information messages (e.g. fuel tank low''), displayed temporarily, can be cleared by pressing button 1 or 2, – the trip computer. Downloaded from www.Manualslib.com manuals search engine
  • 39. 26-05-2003 YOUR 206 IN DETAIL 39 DISPLAY C This enables the following informa- tion to be displayed: – the time, – the date, – the outside temperature (this flashes when there is a risk of ice), – the radio displays, – the status of the doors. The dis- play shows you, by means of a graphic, whether a door is open, – the warning messages (e.g. fuel level low''), displayed temporarily. These can be cleared using the remote control, – the trip computer (see corresponding section), – the satellite navigation system (see corresponding section). Setting the parameters The remote control allows you to access the settings. Accessing the different menus is described in the section ''Satellite Navigation System''. Downloaded from www.Manualslib.com manuals search engine
  • 40. 26-05-2003 AUDIO RB3 YOUR 206 IN DETAIL 42 Stalk movement Function 1 - Press (behind) Increase volume 2 - Press (behind) Decrease volume 1 + 2 - Simultaneous press Sound cut-off (mute); restoring of the sound by pressing any button 3 - Press Automatic search of higher frequencies (radio) - Selection of the next track (CD) 4 - Press Automatic search of lower frequencies (radio) - Selection of the previous track (CD) 5 - Press the end Change of source (radio/cassette/CD changer) 6 - Rotation Selection of next station stored in memory (radio) - (clockwise) Selection of next CD 7 - Rotation Selection of previous station stored in memory (radio) - (anti-clockwise) Selection of previous CD Downloaded from www.Manualslib.com manuals search engine
  • 41. 26-05-2003 YOUR 206 IN DETAIL 43 Button Function A Radio on/off B – Decrease volume C + Increase volume D RDS RDS function on/off Press for more than 2 seconds: regional following mode on/off E TA Traffic information priority on/off F Press fully: cassette rewind G Press fully: cassette fast forward F+G j k Press half way: reversal of direction of play of the cassette jj kk Press fully: ejection of the cassette H Adjustment of bass, treble, loudness, sound distribution and automatic volume correction I L Increase the setting of the functions associated with button H J M Decrease the setting of the functions associated with button H K SRC Selection of source: radio, cassette or CD changer Press for more than 2 seconds: CD shuffle L kk Manual and automatic search of higher frequency Selection of next CD track and PTY (radio) M MAN Manual/automatic operation of buttons L and N in radio mode N jj Manual and automatic search of lower frequency Selection of previous CD track and PTY (radio) O BND Selection of FM1, FM2, FMast and AM wavebands AST Press for more than 2 seconds: automatic storing of stations in memory (autostore) 1 to 6 1 2 3 4 5 6 Selection of station stored in memory - Selection of a CD changer disc Press for more than 2 seconds: storing of a station in memory Downloaded from www.Manualslib.com manuals search engine
  • 42. 26-05-2003 GENERAL FUNCTIONS On/off With the ignition key in the accessories or ignition position, press button A to switch the audio system on or off. The audio system can operate for 30 minutes without the vehicle ignition being switched on. Anti-theft system The audio system is coded in such a way that it can operate only on your vehicle. It would not function if fitted to another vehicle The anti-theft system is automatic and requires no action on your part. ADJUSTING THE VOLUME Press button C to increase the volume, or button B to decrease it. Continuous pressure on buttons C and B allows a gradual adjustment of the volume. AUDIO SETTINGS Press button H several times in succession to access the bass (BASS), treble (TREB), loudness (LOUD), fader (FAD), balance (BAL) and automatic volume correction settings. Exit from audio mode is automatic after a few seconds without pressing any button, or by pressing button H after configuration of the automatic volume correction. Note: bass and treble settings are specific to each source. It is possible to set them differently for radio, cassette (RB3), CD (RD3) and CD changer. YOUR 206 IN DETAIL 46 Downloaded from www.Manualslib.com manuals search engine
  • 43. 26-05-2003 Adjusting the bass When BASS is displayed, press button I or J to vary the setting. – BASS –9 for a minimum bass setting, – BASS 0 for a normal setting, – BASS +9 for a maximum bass setting. Adjusting the treble When TREB is displayed, press button I or J to vary the setting. – TREB –9 for a minimum treble setting, – TREB 0 for a normal setting, – TREB +9 for a maximum treble setting. Adjusting the loudness This function automatically emphasises bass and treble tones. Press button I or J to switch the function on or off. Adjusting the front/rear sound distribution (Fader) When FAD is displayed, press button I or J. Button I increases the volume in the front. Button J increases the volume in the rear. Adjusting the right/left sound distribution (Balance) When BAL is displayed, press button I or J. Button I increases the volume on the right-hand side. Button J increases the volume on the left-hand side. Automatic volume correction CAV This function enables the volume to be automatically adjusted depending on the level of noise produced by the speed of the vehicle. Press buttons I or J to switch the function on or off. YOUR 206 IN DETAIL 47 Downloaded from www.Manualslib.com manuals search engine
  • 44. 26-05-2003 RADIO Notes on radio reception Your car radio is subject to phenomena which do not affect domestic radio sets. Both AM (MW/LW) and FM reception are subject to various forms of interference. This is no reflection on the quality of the equipment, but is due to the nature of the signals and the way in which they are transmitted. On MW/LW, interference may be noticed when passing under high voltage power lines or bridges, or in tunnels. On FM, interference may be the result of increasing distance from the transmitter, deflection of the signals by obstacles (mountains, hills, buildings, etc.), or of being in an area which is not covered by a transmitter. Selecting radio mode Audio RB3: press button SRC several times in succession. Audio RD3: press button R. Selecting a waveband Audio RB3: briefly press the BND/AST button to select the FM1, FM2, FMast and AM wave- bands. Audio RD3: briefly press button R to select the FM1, FM2, FMast and AM wavebands. Automatic station search Briefly press button L or N to search for the station immediately above or below. By continuing to press the button in the direction selected, you will obtain continuous scrolling of the frequency. The scrolling stops at the first station found as soon as the button is released. If the TA traffic information programme is selected, only stations broadcasting this type of pro- gramme are selected. Searching for a station occurs first in LO sensitivity (selection of the most powerful transmitters) during scanning of the waveband, then in DX sensitivity (selection of the weakest and most distant transmitters). To make a direct search in DX sensitivity, press button L or N twice. YOUR 206 IN DETAIL 48 Downloaded from www.Manualslib.com manuals search engine
  • 45. 26-05-2003 Manual station search Press the MAN button. Briefly press button L or N to increase or decrease the frequency displayed. By continuing to press the button in the direction selected, you will obtain continuous scrolling of the frequency. The scrolling stops as soon as the button is released. Pressing the MAN button again returns you to automatic station search. Manual storing of stations in the memory Select the station required. Press one of the buttons 1 to 6 for more than two seconds. The sound stops then becomes audible again, confirming that the station has been stored in the memory. Automatic storing of FM stations in the memory (autostore) Audio RB3: press and hold the BND/AST button for more than two seconds. Audio RD3: press and hold button R for more than two seconds. Your radio automatically stores the 6 stations with the strongest signal in FM. These stations are stored in the FMast waveband. If it is not possible to find 6 stations, the remaining memories are empty. Recalling stations stored in the memory For each waveband, briefly press buttons 1 to 6 to recall the corresponding station. YOUR 206 IN DETAIL 49 Downloaded from www.Manualslib.com manuals search engine
  • 46. 26-05-2003 RDS Using the RDS (Radio Data System) function on FM Radio Data System allows you to continue listening to the same station, whatever frequency it is using for the region you are going through. Briefly press the RDS button to switch the function on or off. The multifunction display will show: – RDS if the function is selected. – (RDS) if the function is selected but not available. RDS station following The display indicates the name of the station selected. The radio is continually searching for the station which has the best reception and which is transmitting the same programme. Traffic information programme Press the TA button to switch the function on or off. The multifunction display will show: – TA if the function is selected, – (TA) if the function is selected but not available. Any traffic information flash will be given priority, whatever source you are listening to (radio, cassette or CD changer). If you wish to interrupt a message, press the TA button; this switches the function off. Note: the volume of traffic information announcements is independent of the volume of normal radio listening. You can adjust it using the volume button. The setting will be stored and will be used when the next messages are broadcast. Regional following mode (REG) When they are part of a network, certain stations broadcast regional programmes in the various areas they serve. With regional following mode you can keep listening to the same programme. Press the RDS button for more than two seconds to switch the function on or off. YOUR 206 IN DETAIL 50 Downloaded from www.Manualslib.com manuals search engine
  • 47. 26-05-2003 CASSETTE: AUDIO RD3 Selecting cassette mode When a cassette is inserted, the cassette player will start automatically. If a cassette is already inserted, press button SRC several times to select cassette mode. Note: before inserting the cassette, ensure that the tape is taut. Ejecting the cassette Fully press buttons F and G to eject the cassette from the player. Direction of play The player will play sides 1 and 2 of the cassette alternately, by automatically reversing the direction of play at the end of a side. To manually reverse the direction of play, press the 2 buttons F and G half way. Fast forward/rewind Fully press button F or G to fast forward or rewind the cassette. At the end of the fast forward/rewind, the set plays the current side. Recommendations for using cassettes – Use good quality cassettes. – Avoid the use of cassettes which play for longer than 90 minutes. – Never expose the cassettes to heat or the direct rays of the sun. – Re-tighten the tape if necessary before inserting the cassette in the player. – Clean the playing head regularly with a damp type cleaning cassette. YOUR 206 IN DETAIL 52 Downloaded from www.Manualslib.com manuals search engine
  • 48. 26-05-2003 CD CHANGER Selecting CD changer mode Audio RB3: press button SRC several times in succession. Audio RD3: press button P. Selecting a disc Press buttons 1 to 6 of the radio to select the corresponding disc. Selecting a track Press button L to select the next track. Press button N to return to the start of the current track or to select the previous track. Accelerated play Keep button L or N pressed for forwards or backwards accelerated play. Accelerated play stops as soon as the button is released. Shuffle (RDM) When the CD changer is selected: – audio RB3: keep button SRC pressed for two seconds; – audio RD3: keep button P pressed for two seconds. The tracks will be played in random sequence. Pressing the button again for two seconds returns you to normal play. YOUR 206 IN DETAIL 54 The use of copied compact discs may cause faults. Insert circular compact discs only. Downloaded from www.Manualslib.com manuals search engine
  • 49. 26-05-2003 YOUR 206 IN DETAIL 44 AUDIO RD3 Stalk movement Function 1 - Press (behind) Increase volume 2 - Press (behind) Decrease volume 1 + 2 - Simultaneous press Sound cut-off (mute); restoring of the sound by pressing any button 3 - Press Automatic search of higher frequencies (radio) - Selection of the next track (CD) 4 - Press Automatic search of lower frequencies (radio) - Selection of the previous track (CD) 5 - Press the end Change of source (radio/CD/CD changer) 6 - Rotation Selection of next station stored in memory (radio) - (clockwise) Selection of following CD 7 - Rotation Selection of previous station stored in memory (radio) - (anti-clockwise) Selection of previous CD Downloaded from www.Manualslib.com manuals search engine
  • 50. 26-05-2003 YOUR 206 IN DETAIL 45 Button Function A Radio on/off B – Decrease volume C + Increase volume D RDS RDS function on/off Press for more than 2 seconds: regional following mode on/off E TA Traffic information priority on/off Press for more than 2 seconds: PTY function on/off H Adjustment of bass, treble, loudness, sound distribution and automatic volume correction I L Increase the setting of the functions associated with button H J M Decrease the setting of the functions associated with button H L kk Manual and automatic search of higher frequency Selection of next CD track and PTY (radio) M MAN Manual/automatic operation of buttons L and N N jj Manual and automatic search of lower frequency. Selection of previous CD track and PTY (radio) P CH.CD Selection of CD changer Press for more than 2 seconds: shuffle Q CD Selection of CD Press for more than 2 seconds: shuffle R Radio Selection of radio. Selection of FM1, FM2, RMAST, AM wavebands Press for more than 2 seconds: automatic storing of stations in memory (autostore) S L Ejection of CD 1 to 6 1 2 3 4 5 6 Selection of station stored in memory - Selection of a CD changer disc Press for more than 2 seconds: storing of a station in memory Downloaded from www.Manualslib.com manuals search engine
  • 51. 26-05-2003 RADIO Notes on radio reception Your car radio is subject to phenomena which do not affect domestic radio sets. Both AM (MW/LW) and FM reception are subject to various forms of interference. This is no reflection on the quality of the equipment, but is due to the nature of the signals and the way in which they are transmitted. On MW/LW, interference may be noticed when passing under high voltage power lines or bridges, or in tunnels. On FM, interference may be the result of increasing distance from the transmitter, deflection of the signals by obstacles (mountains, hills, buildings, etc.), or of being in an area which is not covered by a transmitter. Selecting radio mode Audio RB3: press button SRC several times in succession. Audio RD3: press button R. Selecting a waveband Audio RB3: briefly press the BND/AST button to select the FM1, FM2, FMast and AM wave- bands. Audio RD3: briefly press button R to select the FM1, FM2, FMast and AM wavebands. Automatic station search Briefly press button L or N to search for the station immediately above or below. By continuing to press the button in the direction selected, you will obtain continuous scrolling of the frequency. The scrolling stops at the first station found as soon as the button is released. If the TA traffic information programme is selected, only stations broadcasting this type of pro- gramme are selected. Searching for a station occurs first in LO sensitivity (selection of the most powerful transmitters) during scanning of the waveband, then in DX sensitivity (selection of the weakest and most distant transmitters). To make a direct search in DX sensitivity, press button L or N twice. YOUR 206 IN DETAIL 48 Downloaded from www.Manualslib.com manuals search engine
  • 52. 26-05-2003 Manual station search Press the MAN button. Briefly press button L or N to increase or decrease the frequency displayed. By continuing to press the button in the direction selected, you will obtain continuous scrolling of the frequency. The scrolling stops as soon as the button is released. Pressing the MAN button again returns you to automatic station search. Manual storing of stations in the memory Select the station required. Press one of the buttons 1 to 6 for more than two seconds. The sound stops then becomes audible again, confirming that the station has been stored in the memory. Automatic storing of FM stations in the memory (autostore) Audio RB3: press and hold the BND/AST button for more than two seconds. Audio RD3: press and hold button R for more than two seconds. Your radio automatically stores the 6 stations with the strongest signal in FM. These stations are stored in the FMast waveband. If it is not possible to find 6 stations, the remaining memories are empty. Recalling stations stored in the memory For each waveband, briefly press buttons 1 to 6 to recall the corresponding station. YOUR 206 IN DETAIL 49 Downloaded from www.Manualslib.com manuals search engine
  • 53. 26-05-2003 RDS Using the RDS (Radio Data System) function on FM Radio Data System allows you to continue listening to the same station, whatever frequency it is using for the region you are going through. Briefly press the RDS button to switch the function on or off. The multifunction display will show: – RDS if the function is selected. – (RDS) if the function is selected but not available. RDS station following The display indicates the name of the station selected. The radio is continually searching for the station which has the best reception and which is transmitting the same programme. Traffic information programme Press the TA button to switch the function on or off. The multifunction display will show: – TA if the function is selected, – (TA) if the function is selected but not available. Any traffic information flash will be given priority, whatever source you are listening to (radio, cassette or CD changer). If you wish to interrupt a message, press the TA button; this switches the function off. Note: the volume of traffic information announcements is independent of the volume of normal radio listening. You can adjust it using the volume button. The setting will be stored and will be used when the next messages are broadcast. Regional following mode (REG) When they are part of a network, certain stations broadcast regional programmes in the various areas they serve. With regional following mode you can keep listening to the same programme. Press the RDS button for more than two seconds to switch the function on or off. YOUR 206 IN DETAIL 50 Downloaded from www.Manualslib.com manuals search engine
  • 54. 26-05-2003 PTY function: Audio RD3 This allows you to listen to stations broadcasting a specific type of programme (news, culture, sport, rock etc.). With FM selected, press the TA button for more than two seconds to switch this function on or off. To search for a PTY programme: – select the PTY function, – briefly press button L or N to scroll down the list of the various types of programmes offered, – when the programme of your choice is displayed, keep button L or N pressed for more than two seconds to carry out an automatic search (after an automatic search the PTY function is switched off). In PTY mode the different types of programmes can be stored in the memory. To do this, press the preselection buttons 1 to 6 for more than two seconds. Briefly press the corresponding button to recall the type of programme stored in the memory. EON system: Audio RD3 This connects stations which are part of the same network. It enables the broadcast of traffic information, by a station that is part of the same network as the station to which you are listening. This service is available when you have selected the TA traffic information programme or the PTY function. YOUR 206 IN DETAIL 51 Downloaded from www.Manualslib.com manuals search engine
  • 55. 26-05-2003 COMPACT DISC: AUDIO RD3 Selecting CD mode After insertion of a disc, printed face upwards, the player starts automatically. If a disc is already inserted, press button Q. Ejection of a disc Press button S to eject the disc from the player. Selecting a track Press button L to select the next track. Press button N to return to the start of the current track or to select the previous track. Accelerated play Keep button L or N pressed for forwards or backwards accelerated play. Accelerated play stops as soon as the button is released. Shuffle (RDM) When the CD player is selected, keep button Q pressed for two seconds. The tracks will be played in random sequence. Pressing the button again for two seconds returns you to normal play. Shuffle mode is de-activated each time the audio system is switched off. YOUR 206 IN DETAIL 53 The use of copied compact discs may cause faults. Insert circular compact discs only. Downloaded from www.Manualslib.com manuals search engine
  • 56. 26-05-2003 YOUR 206 IN DETAIL 55 6 CD CHANGER* This is located in the boot on the left-hand side. It holds up to 6 discs. To insert a disc into the changer: – open sliding panel A, – press button B to eject the cartridge C, – open one of the six compartments of the cartridge by pulling tab D, – insert the disc into the cartridge, with the printed face upwards, and close the compartment, – insert the cartridge into the changer, observing the direction of the arrow, – close the sliding panel A. 5 CD CHANGER* This is located in the glove box. It holds up to 5 discs. To load the changer, insert the discs with the printed side upwards. To remove a disc, press and hold one of the buttons 1 to 5. * According to destination. The use of copied compact discs may cause faults. Insert circular compact discs only. Downloaded from www.Manualslib.com manuals search engine
  • 57. 26-05-2003 YOUR 206 IN DETAIL 56 Direction arrows: These enable you to move around the screen and thus select a function. On the welcome screen only, the up and down arrows enable the brightness of the screen to be adjusted. The right and left arrows enable the complete name of the road to be displayed temporarily, during guidance, if the name exceeds the capacity of the screen. menu : this button allows access to the main menu. It can be used at any time. esc : escape button Short press: cancels the current operation and returns to the previous screen. Press for more than 2 seconds: returns to the wel- come screen. This button can be used in any menu. It is inactive during guidance. mod : mode button Short press: changes between date, navigation, radio and permanent locating. val : Validation button Confirms the function selected. Reference of the 2 batteries: 1.5 volts type LR03. THE SATELLITE NAVIGATION SYSTEM Introduction The satellite navigation system guides you to the destination of your choice by means of vocal and visual instructions. The heart of the system lies in the use of a map database and a GPS system. The latter enables your position to be located by means of several satellites. The satellite navigation system con- sists of the following components: – the remote control, – the display, – the control unit, – the last voice message recall control, – the CD ROM, – the multifunction aerial. The remote control Pointing this at the screen enables the information contained in the various menus to be selected. A special compartment in the glove box permits storage of the remote control. Some functions or services described may vary depending on the CD-ROM version or the country where the vehicle is sold. Downloaded from www.Manualslib.com manuals search engine
  • 58. 26-05-2003 The display When the menus are used, the functions which appear at the bottom of the screen are presented in various ways: 1. Function selected. 2. Function inaccessible in this situation. 3. Function accessible. Note: the List option is accessible for a maximum of 80 possible addresses. YOUR 206 IN DETAIL 57 During guidance the screen displays different information depending on the manoeuvres to be carried out: 1. Distance to next manoeuvre. 2. Next manoeuvre to be carried out. 3. Next road to take. 4. Time. 5. Exterior temperature. 6. Current road. 7. Distance to final destination. 8. Manoeuvre to be carried out. Downloaded from www.Manualslib.com manuals search engine
  • 59. 26-05-2003 The control unit This is located in the glove box. 1. CD-ROM eject button. 2. CD-ROM compartment. 3. ON indicator light indicates that the control unit is sup- plied with power. 4. CD indicator light shows that there is a CD-ROM in the unit. 5. Remote control storage compartment. The last voice message recall control Pressing the button on the end of the lights stalk allows the last voice message to be repeated, or, if appropriate, a voice message to be heard and a more detailed display of the approaching landscape to be displayed. The CD-ROM This contains all the map- ping data. It must be inserted with the printed face upwards. Use only CD-ROMs approved by PEUGEOT. The satellite navigation system is active when the globe is lit with a full outline. YOUR 206 IN DETAIL 58 The use of copied compact discs may cause faults. Downloaded from www.Manualslib.com manuals search engine
  • 60. 26-05-2003 YOUR 206 IN DETAIL 59 Main menu Switch on the ignition. Press the Menu button to access the main menu. Select a function using the direction arrows, then confirm (VAL button). Following selection of the Navigation/guidance menu, a screen warns you about the use of the navigation system. Follow the regulations in force and do not use the remote control while driving. Press the VAL button to access the next screen. The Navigation/guidance menu offers the following options: – entering of the address of a new destination; – selection of a service (hotel, station, airport...) available in a town; – selection of an address stored in one of the two directories; – access to the Navigation options menu. – Radio functions are suspended when the system is in guidance mode. Navigation/Guidance Downloaded from www.Manualslib.com manuals search engine
  • 61. 26-05-2003 YOUR 206 IN DETAIL 60 Enter the name of the street. Select the Validate function then press the VAL button. Note: the guidance can be activated from the time the town is entered without the name of a street or a number. To do this, select the City centre function. Enter the number on the street. Select the Validate func- tion then press the VAL button. Note: the guidance can be activated as soon as the town and street are entered without a number. To do this, select the Validate function. The last town entered is displayed. To enter the name of another town, select each letter using the direction arrows then confirm (VAL button) for each letter. If an error is made, the Correct function enables the last letter entered to be cleared. The List function indicates, as the name is entered, the number of towns beginning with the same letters. If the list contains less than 5 names, these are displayed automati- cally. Select a town then confirm (VAL button). The Change function enables the town entered to be completely cleared. When the complete name of the town is displayed, select the Validate function then press the VAL button. Note: following confirmation of a letter, only those letters which could make up an existing name appear. Entering a new destination Downloaded from www.Manualslib.com manuals search engine
  • 62. 26-05-2003 YOUR 206 IN DETAIL 61 The complete destination is displayed. Select the Validate function then press the VAL button. Note: you can also change the destination or store it in one of the two directories (see the section on storing an address in a directory). Select a criterion from the list offered then confirm (VAL button). When the criterion of your choice is selected, select the Validate function then press the VAL button. Guidance begins, follow the instructions. The last guidance criterion used is displayed. Guidance begins automatically, retaining this criterion if there is no action within 5 seconds or following confirmation of the NO function. Follow the instructions. If you wish to change the guidance criterion, select the YES function then press the VAL button. Downloaded from www.Manualslib.com manuals search engine
  • 63. 26-05-2003 YOUR 206 IN DETAIL 62 Selecting a service The last address entered is displayed. There are 3 options for defining the location in which you wish to obtain a service: – resume the last address entered by means of the Validate function. – enter the name of a new town then enter the street (or the City centre function) by means of the Change function. – automatically enter your current location by using the Current location function. The address of the required service is displayed. An indication on the right-hand side of the screen (e.g. 1/50) indicates whether there are any other establishments (50 maximum) offering the same service within a radius of approximately 30 miles (50 km). Use the Next or Previous functions to consult the list offered. When the establishment of your choice is displayed, select the Validate function then press the VAL button. Select a guidance criterion. Guidance begins, follow the instruc- tions. After confirming the address, select a service by scrolling through the list using the direction arrows then press the VAL button. A cursor on the left-hand side of the screen indicates your position in the list. Downloaded from www.Manualslib.com manuals search engine
  • 64. 26-05-2003 YOUR 206 IN DETAIL Storing an address in a directory When a new address is entered, you can store it by selecting the Store function. Selecting a stored destination Enter the description of the address. If the description already exists for a different address, you can replace the old address with a new one. Select the Personal or Professional directory, then press the VAL button. The address is then stored in the directory of your choice. Using the direction arrows, select the directory in which the address you are looking for is stored then press the VAL button. The stored addresses are displayed. A cursor on the left-hand side of the screen indicates your position in the list. Select a description, by scrolling through the list using the direction arrows, then press the VAL button. The complete address is displayed. Select the Validate function then press the VAL button. Select a guidance criterion. Guidance begins, follow the instructions. 63 Downloaded from www.Manualslib.com manuals search engine
  • 65. 26-05-2003 YOUR 206 IN DETAIL 64 Display configuration From the general menu, the Configure display menu gives access to the following parameters: – Adjustment of the display brightness; – Adjustment of the date and time; – Selection of the language of the display and voice infor- mation (English, German, Spanish, French, Italian, Dutch); – Adjustment of formats and units. This enables you to choose between Km/h or mph and degrees Celsius or Fahrenheit and to modify the format for the hours (12 or 24 hour mode). Navigation options From the navigation/guidance menu, the Navigation options menu offers the following options: – Management of the directories. It enables an address stored under a description to be renamed or deleted. To do this, select the directory and the description to be changed; – Voice synthesis volume adjustment; – Deletion of all data stored in the two directories; – Stopping or resuming of guidance. Two messages may be displayed depending on the previous status: Resume guidance or Stop guidance. Downloaded from www.Manualslib.com manuals search engine
  • 66. 26-05-2003 YOUR 206 IN DETAIL 65 Guidance tools Access to the Guidance tools menu is by pressing the VAL button during guidance. It enables: – the current guidance criterion to be changed, – the programmed destination to be displayed or changed, – the voice synthesis volume to be adjusted, – the current guidance to be stopped. Downloaded from www.Manualslib.com manuals search engine
  • 67. 26-05-2003 YOUR 206 IN DETAIL 66 Downloaded from www.Manualslib.com manuals search engine
  • 68. 26-05-2003 VENTILATION 1. Windscreen de-icing or demisting vents. 2. Front door windows de-icing or demisting vents. 3. Side vents. 4. Centre vents. 5. Air outlet to front footwells. 6. Air outlet to rear footwells. Advice on operation – Place the air flow control at a level sufficient to ensure correct renewal of air in the passenger compartment. The ''OFF'' position cuts off all the air circulation in the passenger compartment. Note: only use the ''OFF'' position occasionally (risk of condensation). – Select the air distribution most suited to your requirements and the climatic conditions. – Gradually adjust the temperature setting for your comfort. – Position the outside air control to the left; the Outside Air position. – For perfectly even air distribution, take care not to obstruct the exterior air intake grille on the bonnet, the vents and the air ducts under the front seats. Check that the passenger compartment filter is in good condition. YOUR 206 IN DETAIL 67 Downloaded from www.Manualslib.com manuals search engine
  • 69. 26-05-2003 YOUR 206 IN DETAIL 68 1. Temperature adjustment To be adjusted to your requirements. From blue (exterior temperature) to red (hot). 2. Air distribution adjustment Windscreen and side win- dows (de-icing/demisting). To quickly de-ice or demist the wind- screen and side windows: – position the air intake control to the left; the Outside Air position, – turn the temperature and air flow controls to maximum, – close the centre and side vents. HEATING/VENTILATION Downloaded from www.Manualslib.com manuals search engine
  • 70. 26-05-2003 4. Air intake control Intake of exterior air. This is the normal operating position. Recirculation of interior air. This position prevents exterior odours and smoke entering the pas- senger compartment and speeds up the rate at which the passenger compartment can be heated. As soon as possible, position the control in the exterior air intake position to prevent misting of the windows. YOUR 206 IN DETAIL 69 Windscreen, side windows and footwells. Footwells. These settings are recommended for cold climates. Centre and side vents. This setting is recommended for hot climates. 3. Air flow adjustment Turn the control from posi- tion 1 to position 4 to obtain an air flow sufficient to ensure your comfort. 5. Demisting the rear screen and the mirrors With the engine running, press once to demist the rear screen and the mirrors. It switches off automatically after approximately twelve minutes. Press again to switch it back on for twelve minutes. It is possible to stop demisting by pressing the button again before the end of the twelve minutes. Downloaded from www.Manualslib.com manuals search engine
  • 71. 26-05-2003 YOUR 206 IN DETAIL 70 AIR CONDITIONING 1. Air conditioning The air conditioning is designed to operate in all seasons. In summer, it enables the temperature to be low- ered and in winter, above 0 °C, it increases the effectiveness of the demisting. Press the switch to activate the air conditioning. The indi- cator light comes on. The air conditioning does not oper- ate while the air flow adjustment control is in the OFF position. Note: It is quite normal that the condensa- tion created by the air conditioning results in a flow of water under the vehicle when it is stationary. 2. Temperature adjustment To be adjusted to your requirements. From blue (cold when the air condi- tioning is on) to red (hot). Downloaded from www.Manualslib.com manuals search engine
  • 72. 26-05-2003 YOUR 206 IN DETAIL 71 3. Air distribution adjustment Windscreen and side win- dows (de-icing/demisting). To quickly de-ice or demist the wind- screen and side windows: – turn the temperature and air flow controls to maximum, – close the centre vents, – position the air intake control to the left; the Outside Air position, – start the air conditioning. Windscreen, side windows and footwells. Footwells. These settings are recommended for cold climates. Centre and side vents. This setting is recommended for hot climates. 5. Air intake control Intake of exterior air. This is the normal operating position. Recirculation of interior air. This position prevents exterior odours and smoke entering the pas- senger compartment. Used simultaneously with the air con- ditioning, recirculation enables both heating and cooling performance to be improved. Used without the air conditioning, recirculation may result in misting of the windows. As soon as possible, position the control in the exterior air intake position. Important precaution Operate the air conditioning system for 5 to 10 minutes, once or twice a month, to keep it in perfect working order. If the system does not produce cold air, do not use it and contact a PEUGEOT dealer. 4. Air flow adjustment Turn the control from posi- tion 1 to position 4 to obtain an air flow sufficient to ensure your comfort. 6. Demisting the rear screen and the mirrors With the engine running, press once to demist the rear screen and the mirrors. It switches off automatically after approximately twelve minutes. Press again to switch it back on for twelve minutes. It is possible to stop demisting by pressing the button again before the end of the twelve minutes. Downloaded from www.Manualslib.com manuals search engine
  • 73. 26-05-2003 YOUR 206 IN DETAIL 72 Automatic operation 1. Temperature adjustment The chosen temperature is displayed. Press the up and down arrows to change it. A setting around 21 °C enables a comfortable tem- perature to be obtained. 2. Automatic comfort programme Press the AUTO button. The sys- tem automatically adjusts the atmosphere inside the vehicle in accordance with the temperature that you have chosen. To do this, it controls the temperature, the flow, the distribution and the intake of air as well as the air conditioning. Note: for your comfort, the settings are retained between two start-ups of your vehicle if the tem- perature in the passenger compartment has not changed significantly; otherwise, operation resumes in automatic mode. 3. Automatic visibility programme In some cases, the auto- matic comfort programme may not be sufficient for de-icing or demisting of the windows (humidity, several passen- gers, ice etc.). In this case, select the automatic visibility programme to clear the windows quickly. To exit this programme and return to the automatic comfort programme, press the AUTO button. AUTOMATIC AIR CONDITIONING Downloaded from www.Manualslib.com manuals search engine
  • 74. 26-05-2003 YOUR 206 IN DETAIL 73 5. Air distribution Pressing this button sever- al times in succession enables the air flow to be directed in turn towards: – the windscreen (de-icing or demisting), – the windscreen and the footwells, – the footwells, – the centre and side vents and the footwells, – the centre and side vents. 7. Air intake Press this button for recircu- lation of the interior air. Recirculation, shown on the display, enables the passen- ger compartment to be insulated from exterior odours and smoke. Avoid prolonged recirculation of interi- or air. To do this, press the button again to resume automatic manage- ment of the intake of air. Note: To prevent condensation on the inside of the vehicle in cold or wet weather, you are advised to avoid using this mode. 4. Air conditioning Press this button to switch off the air conditioning. The symbol ECO is displayed. Automatic operation of the air conditioning is resumed when the button is pressed again. The symbol A/C is displayed. 8. Switching the system off The OFF button enables the entire system to be switched off. Temperature-related com- fort is no longer guaranteed. Pressing the OFF, AUTO, or visi- bility button again reactivates the system with the values set before it was switched off. 9. Demisting the rear screen Press this button to demist the rear screen and the mirrors. Demisting switches off automatically. It is pos- sible to stop operation of the demisting before it is switched off automatically by pressing the button again. Important precaution Operate the air conditioning for 5 to 10 minutes, once or twice a month, to keep it in good working order. If the system does not produce cold air, do not use it and contact your PEUGEOT dealer. Manual operation If you wish, you can make a different choice from that offered by the sys- tem by changing a setting. The other functions will still be controlled auto- matically. Pressing the AUTO button returns the system to completely automatic operation. 6. Air flow The flow of air can be increased or reduced by pressing buttons + or – respectively. Notes It is quite normal that the condensa- tion created by the air conditioning results in a flow of water under the vehicle when it is stationary. To prevent condensation on the inside of the vehicle in cold or wet weather, you are advised to avoid using the ECO mode. Downloaded from www.Manualslib.com manuals search engine
  • 75. YOUR 206 IN DETAIL 74 26-05-2003 Downloaded from www.Manualslib.com manuals search engine
  • 76. 26-05-2003 YOUR 206 IN DETAIL 75 5. Head restraint height and angle adjustment (saloon and 206 SW) To raise the restraint, push it upwards. The adjustment is correct when the upper edge of the head restraint is level with the top of the head. The head restraint has a frame with notches, which prevent the head restraint dropping down (this is a safety device in the event of an impact). To lower the head restraint, it is necessary to push simultane- ously: – the button located at the base of the head restraint frame, – the head restraint downwards. To remove the head restraint, press the lug. Never drive with the head restraints removed; they should be in place and correctly adjusted. Rear head restraints These have one position for when they are being used (high) and a storage position (low). They can be removed. To lower the head restraints, press the lug. To remove them, pull upwards as far as the stop then press the release control. FRONT SEATS 1. Forwards-backwards adjustment Lift the control and slide the seat forwards or backwards. 2. Access to rear seats (3 door) Pull one of the two handles to fold the seat back and move the seat forwards. On repositioning, the seat returns to its initial position It is impossible to access the rear seats if the front seat is in the reclining position. 3. Seat back angle adjustment Push one of the two handles towards the rear. 4. Seat height adjustment Pull the handle upwards. Remove your weight from the seat to raise, or press on the seat to lower. Downloaded from www.Manualslib.com manuals search engine
  • 77. 26-05-2003 YOUR 206 IN DETAIL 76 Storage compartment – Lift the cover to gain access to the storage compartment. – Ensure that the cover is locked correctly before folding back the seat cushion. Folding seat back (all models) – Remove the head restraint for complete folding of the seat. – Push either of the two handles 2 towards the rear to fold the seat back. Note: with the modifiable seat, this can be tilted or removed in order to fold down the seat back horizontally. Modifiable front passenger seat (saloon) Access to the storage compartment – Push the seat as far back as pos- sible. – Lift then pull the front of the seat to unlock it. – Tilt the seat cushion forwards. Downloaded from www.Manualslib.com manuals search engine
  • 78. 26-05-2003 YOUR 206 IN DETAIL 77 Removing the modifiable front passenger seat – Push the seat as far back as pos- sible. – Lift then pull the front of the seat to unlock it. – Tilt the seat forwards. – Pulling upwards, tilt the seat from left to right to make it easier to remove. Refitting the modifiable front passenger seat – Push the seat as far back as pos- sible. – Engage the seat fastener in the clips. – Fold back the seat. Downloaded from www.Manualslib.com manuals search engine
  • 79. 26-05-2003 YOUR 206 IN DETAIL 75 5. Head restraint height and angle adjustment (saloon and 206 SW) To raise the restraint, push it upwards. The adjustment is correct when the upper edge of the head restraint is level with the top of the head. The head restraint has a frame with notches, which prevent the head restraint dropping down (this is a safety device in the event of an impact). To lower the head restraint, it is necessary to push simultane- ously: – the button located at the base of the head restraint frame, – the head restraint downwards. To remove the head restraint, press the lug. Never drive with the head restraints removed; they should be in place and correctly adjusted. Rear head restraints These have one position for when they are being used (high) and a storage position (low). They can be removed. To lower the head restraints, press the lug. To remove them, pull upwards as far as the stop then press the release control. FRONT SEATS 1. Forwards-backwards adjustment Lift the control and slide the seat forwards or backwards. 2. Access to rear seats (3 door) Pull one of the two handles to fold the seat back and move the seat forwards. On repositioning, the seat returns to its initial position It is impossible to access the rear seats if the front seat is in the reclining position. 3. Seat back angle adjustment Push one of the two handles towards the rear. 4. Seat height adjustment Pull the handle upwards. Remove your weight from the seat to raise, or press on the seat to lower. Downloaded from www.Manualslib.com manuals search engine
  • 80. 26-05-2003 YOUR 206 IN DETAIL 78 REAR SEATS To fold the rear seats: – lift the front of the seat cushion 1, – tilt the seat cushion 1 against the front seats, – position the seat belt under the belt holder 2, – pull control 3 to unlock the seat back 4, – remove or lower the head restraint, – tilt the seat back 4. Always start with the seat, never the seat back (risk of damage). When repositioning: – fold up the seat back, – fold back the seat cushion, – reposition the lap belt and the buckles before locking the front of the seat cushion. Take care not to trap the seat belts. Downloaded from www.Manualslib.com manuals search engine
  • 81. 26-05-2003 YOUR 206 IN DETAIL 79 Removing the rear seat – Tilt the seat cushion against the front seats. – Squeeze the seat fasteners to release them from their attach- ments. – Remove the seat cushion. TRANSPORTING LONG OBJECTS To allow the transportation of long objects: Front seat: – remove the modifiable seat (see corresponding paragraph) and fold down the seat back. Rear seat: – remove the seat cushion, – tilt the seat back. Downloaded from www.Manualslib.com manuals search engine
  • 82. 26-05-2003 YOUR 206 IN DETAIL 80 Rules for transporting children on the front passenger seat** Children under the age of 10 must not travel in the forwards facing position, unless the rear seats are already occupied by other children or the rear seats cannot be used (absent or folded). In this case, adjust the front passenger seat to the most rearward position and arm the passenger air bag. The rearwards facing position is per- mitted from birth to 13 kg or 18 kg. In this position, it is essential to disarm the passenger air bag. GENERAL POINTS RELATING TO CHILD SEATS Although one of PEUGEOT's main criteria when designing your vehicle, the safe- ty of your children also depends on you. For maximum safety, please follow these precautions: – Since 1992, all children under the age of 10 must travel in approved child seats* suited to their weight, on seats fitted with a seat belt. In order to recognise a child seat which conforms to current legislation, check that it bears an orange label indicating the weight range for its use and its approval number. – A child weighing less than 9 kg must travel in the rearwards facing posi- tion both in the front and in the rear. PEUGEOT recommends that chil- dren should travel in the rearwards facing position up to the age of two. – Statistically, the safest seats in your vehicle for the transportation of chil- dren are the rear seats. – If a child is travelling on a booster seat, check that the lap section of the seat belt passes over the child's thighs correctly. The chest section of the seat belt must be positioned on the child's shoulder without touching the neck. PEUGEOT recommends that you use a booster seat with a back, fitted with a seat belt guide. – Remember to fasten the seat belt or the child seat harness keeping the slack in relation to the child's body to a minimum, even for short journeys. * According to current legislation in the country. ** Consult the relevant administration in your country for information regarding the rules for transporting children on the front passenger seat. Downloaded from www.Manualslib.com manuals search engine
  • 83. 26-05-2003 YOUR 206 IN DETAIL 81 ISOFIX MOUNTINGS The front passenger seat, the two rear side seats (saloon and 206 SW) and the one third section of the rear seat (206 RC) are fitted with ISOFIX mountings. These are two rings located between the seat back and the seat cushion. The ISOFIX child seats are fitted with two locks which are secured easily on these rings. All this guar- antees reliable, safe and fast fitting. The ISOFIX child seat approved for PEUGEOT vehicles and sold by PEUGEOT dealers is the Isofix KIDDY* child seat. It can be fitted in the rear facing position from birth to 13 kg and in the forwards facing position from 9 to 18 kg. In the front, in the rear facing posi- tion, the front passenger seat must be moved as far forward as possible so that the body of the child seat is in contact with or as close as possi- ble to the fascia. In the rear, in the forwards facing position, in the saloon and 206 SW, it is imperative that the front passen- ger seat is in the mid-way position on the runner, seat back upright. In the 206 RC, the body of the child seat must be in the most upright position. Refer to the child seat's installation guide for this setting. In the rear, in the rear facing posi- tion, the body of the child seat must be in contact with the back of the corresponding front seat. This seat can also be used on seats not fitted with ISOFIX mountings. In this case it is compulsory to attach it to the vehicle's seat by means of the three-point seat belt for both the rear facing and forwards facing positions. Refer to the Summary table for fitting child seats. When the ISOFIX KIDDY seat is fitted in the rear facing position on the front passenger seat, it is essential to disarm the passenger air bag. Otherwise, the child would risk being killed or seriously injured if the air bag were to inflate. Follow the instructions for fitting the child seat in the seat manu- facturer's instruction booklet. * You can only fit ISOFIX child seats approved by PEUGEOT and sold by PEUGEOT dealers on your vehicle's ISOFIX mountings. Downloaded from www.Manualslib.com manuals search engine
  • 84. 26-05-2003 YOUR 206 IN DETAIL 82 CHILD SEATS RECOMMENDED BY PEUGEOT In addition to the ISOFIX child seats, PEUGEOT offers a complete range of child seats which are secured using the seat belt: Group 0+: from birth to 13 kg L1 - Britax Babysure: installed in the rear-facing position in the front or in the rear using a three-point seat belt. In the front, it is compulsory to disarm the passenger air bag and the passenger seat must be adjusted to the 'mid-way' position on the runner. Group 1: from 9 to 18 kg L2 - Römer Prince: installed in the rear using a two or three-point seat belt. For the safety of your child, the seat and the restraining cushion must never be separated. Group 2: from 15 to 25 kg L3 - Römer Vario'': installed in the rear with a two or three-point seat belt. Downloaded from www.Manualslib.com manuals search engine
  • 85. 26-05-2003 YOUR 206 IN DETAIL 83 Never leave one or more children alone and unsu- pervised in a vehicle. Never leave a child or an animal in a vehicle which is exposed to the sun and has the windows closed. To protect your young children from the sun, fit blinds on the rear windows. Never leave the keys within reach of children inside the vehicle. Disarm the passenger air bag when installing a rearwards facing child seat on the front passenger seat. Otherwise, the child would risk being killed or seriously injured were the air bag to inflate. Observe strictly the recommenda- tions for assembling and securing the child seat as shown in the child seat instructions. To prevent the doors from opening accidentally, use the child lock*. Also, do not open the rear win- dows more than a third*. * According to model. Groups 2 and 3: from 15 to 36 kg L4 - ''Recaro Start'': installed in the rear with a three-point seat belt. The height and width of the seat back and length of the seat cushion must be adjusted according to the age and build of your child. L5 - Klippan Optima: installed in the rear with a three-point seat belt. From the age of 6 years (approximately 22 kg), the booster is used on its own. Refer to the Summary table for the installation of child seats. Downloaded from www.Manualslib.com manuals search engine
  • 86. YOUR 206 IN DETAIL 84 SUMMARY TABLE FOR FITTING CHILD SEATS (Saloon and 206 SW) In accordance with the European regulation (Directive 2000/3), the table below indicates the options for the installation of child restraints, depending on the weight group and the seat in the vehicle: U : universal category U F : universal category, forward-facing. X : no child restraint. According to destination: L1 : BRITAX Babysure E11 0344117 Universal (birth to 13 kg). L2 : ROMER Prince E1 03301058 Universal (9 to 18 kg). L3 : ROMER Vario E1 03301120 Universal (15 to 25 kg). L4 : RECARO Start E1 03301108 Universal (15 to 36 kg). L5 : KLIPPAN Optima E17 030007 Universal (15 to 36 kg). L6 : KIDDY Isofix Rearwards facing(c) E1 03301123 and Universal (birth to 13 kg). L7 : KIDDY Isofix Forwards facing(c) E2 030011 Universal (9 to 18 kg). (a) Group 0: from birth to 10 kg. (b) The rules for transporting children in the front passenger seat are specific to each country. Consult the current legisla- tion in your country. (c) See section Seats - Isofix mountings for use of the KIDDY child seat on the vehicle's Isofix mountings, or failing this with the seat belt. Statutory weight group Seat Group 0(a) at 0+ Group 1 Group 2 Group 3 13 kg 9 - 18 kg 15 - 25 kg 22 - 36 kg Front passenger(b) U U U U Fixed seat, Height adjustable seat L1, L6 L2, L7 L3, L4, L5 L4, L5 Rear passenger U U U U Side seat L1, L6 L2, L7 L3, L4, L5 L4, L5 Rear passenger X U F U F U F Centre seat L2 L3, L4, L5 L4, L5 Three-point seat belt Rear passenger X U F U F U F Centre seat L2 L3 Two-point seat belt 26-05-2003 Downloaded from www.Manualslib.com manuals search engine