Gate keeper 20 series
•Download as PPTX, PDF•
1 like•483 views

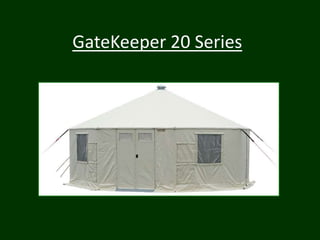
Instructions on operating the GateKeeper 20 System

Recommended
More Related Content
What's hot
Similar to Gate keeper 20 series
Similar to Gate keeper 20 series (20)
Gate keeper 20 series
- 2. a. Site Evaluation / Preparation • FOD search (Foreign Objects or Debris) • Possible obstructions/hazards- i.e. trees, power lines, underground plumbing, etc. • Terrain type- i.e. grass, sand, gravel, concrete, asphalt, etc. • Anchoring needs vary depending on terrain • Shelter configuration • Repeat weather
- 3. b. Equipment Positioning – Layout cases/bags in kit form • Stage close to set up location • Do not stage within designated set up location • Case=kit form • No cases? Bags=kit form – Organize equipment accordingly
- 4. c. Frame 1. Layout Mainframe Assy 2. Stand up the mainframe and remove the bottom strap 3. Using 4 people (each grabbing two roof trusses), expand the mainframe *Shown here with GK1935 Frame*
- 5. c. Frame Continued… 4. Extend roof truss assemblies 5. Connect Eave Bars (Velcro OUT) • Caution! Pinch Point • Keep Eave Bars parallel to the ground for easier installation 11. Lower leg assemblies • Squeeze two bars together about 1 foot up the Eave Bar and pull pin out, lower the leg slowly
- 6. d. Roof Fabric 1. Locate the center hole of the Insulation Roof and place over the Key Flange 2. Partially unfold the fabric onto the frame assembly, leaving room to gain access to the top to later attach the vent cap
- 7. d. Roof Fabric Continued… 3. Locate the Vinyl Roof Panel cone and place over the Key Flange 4. Partially unfold the fabric onto the frame assembly, leaving room to gain access to the top to later attach the vent cap 5. Remove the protective pieces of fabric and place them into the corresponding storage bag
- 8. d. Roof Fabric Continued… 7. Install Vent Cap(s) • Locate Vent Cap hole • Pull pin and connect to Vent Cap hole • Clear out all fabric between Key Flange and Cones • Assure that the Vent Cap is securely attached
- 9. e. Raising the Shelter Frame 1. Using 4 people, lift the entire shelter (or using 2 people, lift the shelter one side at a time) • Caution! Always make first lift facing INTO the wind • Lift until legs are fully extended • Caution! Pinch Point • Rest frame on extended legs and install pins into top most outside hole on the frame *Shown with GK1935 Shelter
- 10. f. Insulation Roof Panel 1. Locate the center seam on the Insulation Roof Panel 2. Locate the center mark on the Eave Bars (metal screw) 3. Ensure center seam of Insulation Panel matches with the center of the Eave Bar • Vertically center the two strips of Velcro
- 11. f. Insulation Roof Panel Continued… 4. Start at the center and work out towards the legs 5. Do not attach Vinyl Roof Panel at this time
- 12. g. Flooring Installation 1. Place Floor Fabric in the center of the shelter and unfold completely 3. Place Legs onto Floor Fabric • Lift each Leg and place on the 2’’ welded strip located on the floor • Pull both the Floor Fabric and Leg until the Leg is vertically square and the floor is tight
- 13. g. Flooring Installation Continued… 4. Install all Base Bars • Caution! Pinch Point • Keep Base Bars parallel to the ground for easier installation **Note: If it is determined that a vestibule is to be installed and one shelter is already standing, now is the recommended time to start the installation.
- 14. h. Door Installation 2. Peel back the Insulation Roof Panel at the Door location only 4. Leaving the Door folded, install over the Eave Bar • Align the center hinge of the Door along with the center of the Eave Bar (metal screw) 5. Unfold Door while guiding the Door frame over the Eave Bar
- 15. h. Door Installation Continued… 6. From the inside, use the center mark on the Eave Bar to ensure the Door is centered 7. Lift the Door and guide it over the Base Bar 8. Ensure that the Door is securely in place and centered 9. Reattach the Insulation Roof Panel over the Door
- 16. h. Door Installation Continued… 10. Insert Door Ramp directly after installing the Door • Open doors fully • Insert Door Ramp slots into door gussets
- 17. i. Insulation Wall Panels 1. Review label on inside of Insulation Wall (“Left of Door” and “Right of Door”) 2. Align Velcro along the Door hinge 3. Attach completely along the Door before continuing onto the rest of the shelter
- 18. i. Insulation Wall Panels Continued… 4. Unroll and place loosely on the Insulation Roof Panel Velcro 5. Go around the shelter for a second time and attach the Wall Panel to the Roof, stretching as tightly as possible 6. Repeat with remaining Insulation Wall Panels
- 19. i. Insulation Wall Panels Continued… 7. Connect Insulation Wall Panels • Use the left hand on the inside and the right hand on the outside to stretch and attach the two panels **Note: It may be necessary to stretch the Insulation Wall Panels a second time to achieve a complete connection. Expansion Strips can be used if the Fabric does not connect.
- 20. j. Vinyl Wall Panels 1. Review label on the Vinyl Wall Panel. If folded correctly, the label will be on the outside of the Wall Panel (“Left of Door” and “Right of Door”) 2. Align Velcro along the Door hinge 3. Attach completely down the side of the Door before continuing along the Insulation Wall Panel
- 21. j. Vinyl Wall Panels Continued… 4. Unroll and place loosely on the Insulation Roof Panel Velcro 5. Go around the shelter for a second time and attach the Wall Panel to the Roof, stretching as tightly as possible 6. Repeat with remaining Vinyl Wall Panels
- 22. j. Vinyl Wall Panels Continued… 7. Connect the Vinyl Wall Panels • Use the left hand on the inside and the right hand on the outside to stretch and attach the two panels together • It is very important to ensure no blue Velcro is showing, and if there is, go back a third time and stretch again until no blue Velcro is showing. **Note: It may be necessary to stretch the Insulation Wall Panels a second time to achieve a complete connection. Expansion Strips can be used if the Fabric does not connect.
- 23. k. Attach Vinyl Roof Panel 1. Align the middle welded seam on the Vinyl Roof Panel with the Roof Bar 2. In a star pattern, stretch one corner then move to the opposing corner and stretch it to the Vinyl Wall Panel Velcro. Do this on all corners before attaching the Vinyl between the corners. • Tip: Use thumbs as leverage and rotate wrists backward to stretch over the corner 3. DO NOT pull too much!
- 24. k. Attach Vinyl Roof Panel Continued… 4. Attach remaining Roof Panel to Wall Panels by starting in the center of each section and working out toward the corners • Tip: Use thumbs as leverage and rotate wrists backward to stretch over the corner
- 25. l. Wall to Floor Connection 1. Connect Wall Straps • Disconnect buckle from Wall Panel • Feed the strap under the Base Bar • Reconnect the buckle to the Wall Panel • Slightly tighten by pulling the adjustment strap • DO NOT over tighten! • Do this throughout the entire shelter
- 26. l. Wall to Floor Connection Continued… 2. Door Strap • Feed strap from Vinyl Wall Panel under the Base Bar • Feed the strap through the double D’rings and pull through to create tension
- 27. l. Wall to Floor Connection Continued… 3. Create the Berm • From the outside, lift the skirt to expose the floor beneath • Detach the black Velcro strap from the Floor Panel • Fold the left side (with the D-Ring) toward the black Velcro Strap • Ensure the Floor fabric is folded inward toward the interior of the tent • Weave the black Velcro strap through the D-Rings and tighten • DO NOT over tighten • Reattach black Velcro strap to Floor
- 28. l. Wall to Floor Connection Continued… 4. Create the Berm by the Door • Fold the Floor next to the Door Ramp upward • Tuck the floor upward under the Door Ramp • Reconnect the Wall Panel along the Door hinge • Connect the Wall Panel Velcro to the Floor Velcro • Ensure the Wall skirt is covering the newly created Berm
- 29. l. Wall to Floor Connection Continued… 5. Velcro Connection • Lift outside skirt to expose Velcro flap • Pull Vinyl Floor snugly and attach the Velcro to the Wall Panel • Pull Vinyl Wall skirt over the connection • Continue around entire shelter
- 30. m. Accessory Set Up 1. Interior • Wiring Harness • Lights • Plenum • Desk Sets • Thermostats • CO / Smoke Alarm 2. Exterior • Stake Kit • Generator / Electrical Distribution • Climate Control
- 31. n. Complete Shelter Overview 1. Interior • Floor Buckles • Floor Velcro • Door to Wall Connection • Lighting 2. Exterior • Roof Connection • Skirting placement • Anchoring • Electrical cables • Vestibules
- 32. o. Accessory Strike 1. Interior • Wiring Harness • Lights • Plenum • Desk Sets • Thermostats • CO / Smoke Alarm 2. Exterior • Stake Kit • Generator / Electrical Distribution • Climate Control
- 33. p. Accessory Inventory 1. Importance of Inventory • Match label with equipment • Assure correct quantity
- 34. q. Accessory Repackaging 1. The Importance of Cleaning • Clean with a mild cleansing solution • Dry completely • Fold or package as directed • Set aside for further packaging
- 35. Shelter Strike, Folding, and Repacking
- 36. a. Vinyl Walls 1. Disconnect buckles from floor to wall connection 2. Close all window and duct openings 3. Peel back Roof Fabric and remove walls in individual pieces 4. Lay walls flat on clean surface (preferably shelter floor) with the outer side of the fabric facing upwards
- 37. a. Vinyl Walls Continued… 5. Clean the Wall Panels with a mild solution and let dry completely 6. Fold the BOTTOM edge 1/3 of the way toward the top edge 7. Fold again from the BOTTOM the rest of the way to the top
- 38. a. Vinyl Walls Continued… 8. Roll TOWARDS the end with the Wall Panel label • If rolled correctly, the Vinyl Wall label will be on the top of the roll 9. Roll tightly as to fit the Wall Panel back in the bag 10. Put immediately into the corresponding bag
- 39. b. Insulation Walls 1. Remove walls in individual pieces 2. Lay the Insulation Walls on a clean surface (preferrably the shelter floor) with the inside (WHITE) of the fabric facing up 3. Clean the Insulation Walls with a mild solution and let dry completely • DO NOT spray cleaner directly onto the Insulation fabric as it could lead to mold/mildew
- 40. b. Insulation Walls Continued… 4. Fold the BOTTOM edge 1/3 of the way toward the top edge 5. Fold again from the BOTTOM the rest of the way to the top
- 41. b. Insulation Walls Continued… 6. Roll TOWARDS the end with the Wall Panel label • If rolled correctly, the Insulation Wall label will be on the top of the roll 7. Roll tightly as to fit the Wall Panel back in the bag 8. Put immediately into the corresponding bag
- 42. c. Doors 1. Reattach the door strap and close the window material 2. Lock the upper barrel bolt 3. Lift and remove the door completely and fold in half 4. Clean the Door and dry completely as needed 5. Put immediately in the corresponding bag
- 43. d. Base Bars 1. Remove all Base Bars 2. Put immediately in corresponding bag or case
- 44. e. Flooring 1. Unfasten the berm straps at each corner of the floor so it lays flat 2. Lift each leg of the shelter to remove the floor from underneath 3. Clean the floor panel with a mild solution and let dry completely
- 45. e. Flooring Continued… Note: The following folding steps are shown with the GK1935, but the instruction remains the same 4. Fold each end of the floor toward the middle to make the floor a rectangle 5. Take one side and fold to the middle weld-line 3 times 6. Repeat on the other side
- 46. e. Flooring Continued… 7. Fold the two halves together 8. Take each end and fold to meet in the middle 9. Fold one end on top of the other 10. Place immediately in the corresponding bag or case
- 47. f. Lowering the Shelter 1. Lift up and lock into place the 2 opposing sets of legs on the narrow ends of the shelter Note: The following steps are shown with the GK1935, but the instruction remains the same 2. (Using 2 people) On one side, remove the pins on the legs, lift up the 2 legs and lower down slowly • Make sure not to lock into place! 3. Unlock and Lift up remaining 2 legs on other side. Lower shelter down slowly • Make sure not to lock into place!
- 48. f. Lowering the Shelter Continued… 4. Peel back the Insulation and Vinyl material to gain access to the Vent Cap 5. Pull the pin on the Vent Cap and lift to remove 6. Put immediately in the corresponding bag or case
- 49. f. Lowering the Shelter Continued… 7. Assure that the protective pieces of fabric for the cones are installed prior to folding 8. Clean the Roof Panel with a mild solution and let dry completely
- 50. f. Fold and Repackage Roof Panels Continued… 1. Fold one side approximately 6 inches over the Roof Cone of the Mainframe 2. Fold the opposite side up to meet with the first fold 3. Fold each side in half TWO more times 4. Fold the one side (that was NOT folded over the roof cone) on top of the opposing side to rest on the roof cone
- 51. f. Fold and Repackage Roof Panels Continued… 5. Fold each of the long ends at about a 12 inch length and begin to fold toward the center roof cone 6. Fold one end on top the roof cone and fold the other end to lay on the top of the entire roll 7. If rolled correctly, the vent cap will be on the bottom of the roll 8. Return Vinyl Roof Panel to appropriate bag or case
- 52. f. Fold and Repackage Roof Panels Continued… 9. Clean the Insulation Roof Panel with a mild solution and let dry completely 10. Fold one side approximately 6 inches over the Roof Cone of the Mainframe 11. Fold the opposite side up to meet with the first fold 12. Fold each side in half TWO more times 13. Fold the one side (that was NOT folded over the roof cone) on top of the opposing side to rest on the roof cone
- 53. f. Fold and Repackage Roof Panels Continued… 14. Fold each of the long ends at about a 12 inch length and begin to fold toward the center roof cone 15. Fold one end on top the roof cone and fold the other end to lay on the top of the entire roll 16. If rolled correctly, the vent cap will be on the bottom of the roll 17. Place the Insulation Roof in the corresponding bag or case
- 54. f. Repackaging the Frame 1. Lock remaining legs into storage position 6. Remove all Eave Bars
- 55. f. Repackaging the Frame Continued… 7. Depress the button and slide the Roof Truss assembly into storage position on all legs 8. Bundle the frame and fasten the frame strap 9. Put all pieces immediately into the corresponding bag or case
- 56. Shelter Inventory a. Bags – Use bag labels to inventory shelter components b. Cases – Use case labels to inventory shelter components