2. Legend has it that when Michelangelo
was asked how he was able to create
such a magnificent statue of David out
or a scrap piece of marble he
replied, “all I did was remove everything
that was not David”. It is my sentiment
that whacking these beautiful trees year
after year is not creating Davids but is
rather as symbols of ignorance that
depress me each February. Like
sculpting, pruning is an art and must be
studied and practiced. It’s my belief that
crape myrtles are trees and should not
be topped or otherwise molested.
3. I am not going to get scientific on you by talking about
terminal or latent buds or auxins or any of that, but I hope to
plant a seed that could change your mind about aggressively
pruning crape myrtles. I can’t possibly teach you how to
prune in this short presentation, just like you could probably
not show me how you do what you do, but hopefully I can
give you a new perspective. If it saves one tree from the
buzzsaw then my time has been well spent.
4. If you are considering hard pruning your crape
myrtles, please pause for a moment and ask
yourself “Why?”
If your answers are anything like:
• Because everyone else does
• I see the professional landscape crews doing
it all the time at properties I like
• I’ve always done it
then I invite you put down the loppers or
chainsaws and pull up a seat for a moment.
All I ask is for you to forget for a minute what
someone on google, your neighbor, or your
landscape guy tells you and let me show you
what goes through my head before I pick up
any one of the many cutting instruments in my
arsenal.
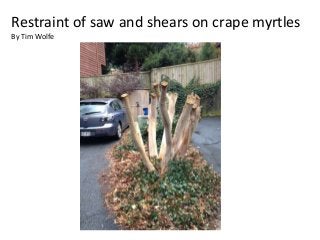
5. Here is one in my garden in
Decatur. This happens to be a
pretty mature Natchez variety
that is growing close to my
dwelling and could use a little
pruning. One of the first things I
observe it that the previous
owner selected a good location
for the tree, plenty of open
space for it to stretch out and it
provides some extra shade on
hot summer afternoons. Wow!
With the size of these trunks we
are definitely going to need a
chainsaw. Right? Not so
fast. We will need a chainsaw
but not for what you think.
6. So let’s get started. The color and
texture of the trunks of crape
myrtles are stunning and this one is
no exception. They are like giant
cinnamon sticks outside my
windows. That being the case, I am
going to want to preserve as many
trunks as possible. The chainsaw
will only be used in this case to
complete some unfinished business
from a few months ago when I reroofed my house and had to prune a
few major trunks in a hurry one
morning so the roofers could do
their work. I pruned them leaving
excess trunk and limbs so I could
come back and correct the removal
cuts at a later date when I had more
time. These photos illustrate how I
repaired those quick cuts.
7. Now that we got those out of the way
lets appraise what we need to do
next. Lets see here, these two limbs
are crossing and rubbing on each
other so we should remove one or
the other to open things up and give
it better form. Right? Well, that’s
what a book or some article online
might tell you, but I’m the Sheriff of
my garden (and a few others) and this
beautiful tree is in my jurisdiction, so
let’s think about it for a minute. If I
had a time machine I would go back
and remove the limbs so they would
not intersect as they grew, but since I
don’t and these limbs are pretty
mature and quite gorgeous, why
would I do that? They are not doing
any immediate damage to each other
so there is no reason to remove
either one. Plus it makes for a nice
conversation piece.
8. Moving right along: I see a
few smaller limbs that turn
inward and crowd the scene.
Thinning will help the tree
have better form and allow a
little more indirect light enter
the side garden below. I
approve this kind of
discriminatory pruning as it
has purpose, unlike topping.
9. So lets do that now. When I
prune, I like to start along the
lower outside first since this
makes it easier to prune
overall. If you start higher up
and in the center there may be
branches that will need to be
removed that will be in the way
lower down. Continue up the
tree and remove any branches
that point inward. If there are
two branches that do the same
job (ie. growing parallel to each
other from the same or a
different limbs), pick a
favorite, and remove the other
one but use good judgment like
I did earlier with the larger
branches.
10. Continue up until you have decluttered the canopy at a height
you are comfortable working. In
my case here I used hand
pruners, a pole saw and pole
loppers. I’m not really into
climbing trees, but I did have to
climb into this one to rescue my
loppers from a limb that
pinched them and wouldn't let
go. This job took me about an
hour and yielded a small
amount of debris that I will use
in my firepit tonight and
perhaps roast a hotdog.
11. Did I do a perfect textbook
job? No. And do I care? No. I
don’t have to impress anybody
(and you don’t either) but I
didn’t butcher my tree, so I can
sleep good tonight. With my
tree in this demonstration I
could have left it alone and it
would have been considered
fine in my book. However, the
thought sawing the limbs 3-10’
from the ground makes me not
want to get out of bed for a
week. So if I can help just one
person think twice before
breaking out the chainsaw or
hiring someone else to be the
trigger man for them, then like
I said earlier I feel like this was
worth it.
12. I’ll post some photos later this summer when it’s in bloom. In the meantime, if you are
confused and not sure what to do then the best thing to do is nothing , because once you
have removed too much of David, he is no longer David.
Feel free to contact me with questions at
(404) 569-4455 or timwolfe@timwolfedesign.com
And find me at www.timwolfedesign.com