
Recommended
More Related Content
What's hot
What's hot (20)
Viewers also liked
Similar to Process to file Income Tax Return (ITR2) on www.itreturnsonline.com
Similar to Process to file Income Tax Return (ITR2) on www.itreturnsonline.com (20)
Recently uploaded
Recently uploaded (20)
Process to file Income Tax Return (ITR2) on www.itreturnsonline.com
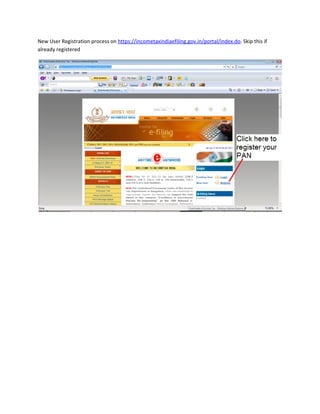
- 1. New User Registration process on https://incometaxindiaefiling.gov.in/portal/index.do. Skip this if already registered
- 2. Insert your PAN Number
- 3. Fill your personal details. Name should be same as appearing on your PAN card else the registration won’t be successful. Ensure you give your regularly used email-id.
- 4. Click on ‘Register’, a message would be displayed that you have successfully registered. If you have problem in getting registered call Toll free number : 1800-425-2229, Direct: 080-22546500
- 5. Know your Jurisdiction these details would be required while filling the ITR form. Log on https://incometaxindiaefiling.gov.in/portal/index.do click on services
- 6. Log on to www.itreturnsonline.com For New User Click Register
- 7. Fill your personal details. Ensure you give your personal regular used email-id
- 8. Users can login with your Email ID and password
- 9. Enter name and email ID of the Assessee and click on ‘Save’
- 10. Double click on your name
- 11. Select the Assessment Year 2011-2012
- 12. Select the Assessment Year and click on ‘Save’. Then select and double click on the Assessment Year
- 13. Select ITR – ITR1 is for salaried person without housing property/capital gains & ITR2 is for salaried person with Housing property/capital gains AO circle/AO Type / Range Code /AO Number Ward as shown earlier on ‘Know your Jurisdiction’. Click ‘Save’ to go to the next step. Due date and Applicable date is 31/07/2011. Select ‘Yes’ go to the next screen to enter your Form 16 details.
- 14. Enter the salary details as stated on your Form 16.Like gross salary, allowances, Profession tax etc If you want to add more than one employer click on ‘Back’ button. Save the details and select ‘Yes’ if you have to enter House property details or go to schedule VI A deductions by selecting ‘No’.
- 15. Click on ‘New’, then select ‘Form 16’ from the Select dropdown options and then click on ‘Save’ button, a blank Form-16 entry page will appear to enter one more employers data.
- 16. Select ‘Self Occupied Property’ if you reside in your owned house or ‘Let Out Property’ if you have rented out your self-owned house. Example of Self Occupied Property shown below:
- 17. Enter Let out property details here (if any) Click ‘Save’ once you have entered both Self Occupied and Let Out Property details. Then select ‘Yes’ to enter the schedule VIA deductions
- 18. Deductions from your taxable income, like insurance/donations/medical insurance/mediclaim.
- 19. Click here to select 80C investments like LIC, Insurance other than LIC, MF, ULIP, NSC, PPF etc.
- 20. Select any other investment type Enter the details for the selected other deduction and click ‘Save’. Click ‘New’ to add another entry. Click ‘Close’ on above screen to come back to the VI A deductions screen.
- 21. Enter the other deduction details. Now select 80D Deductions (if any)
- 22. Following Screen appears after selecting the 80D deductions. Enter the details (if any)
- 23. Click here to enter the 80G deductions- For specified donation 100% deduction for other 50% of the paid amount for whom 80G benefit is available
- 24. Add the Donation details here after selecting the appropriate donation category
- 25. Enter the details of the Donee and then select correct group. The ‘Group’ to be selected A/B/C would be mentioned on your 80G certificate issued by the Donee. Save the details and select ‘Close’ to move to the next step or select any other VIA deduction category(s)
- 26. Enter the TDS deducted by your employer as mentioned in form 16. If more than one employer use ‘New’ to enter TDS details for each employer
- 27. Enter other TDS details i.e. TDS other than salary like TDS on bank interest so on… Click ‘New’ to add more TDS details. Click ‘Save’ and select ‘No’ to view report.
- 28. In case you need to recheck the data or add any more other sources income/deduction you can navigate through each of the left vertical menu options and add/update details wherever required. A. Select ‘Salary’ menu to modify the salary details B. Select STCG menu to add/edit Short Term Capital Gain details
- 29. C. Select LTCG to add/edit Long Term Capital Gain details D. Select ‘Other Sources’ to enter income from other sources like Bank Interest/NSC/Pension/Gifts etc. E. Select ‘Cur. Yr Setoff’ to if you need to enter details of any losses from previous year(s) to be brought forward in this return. Refer previous return of losses to be brought forward (if any) F. Select ‘Agri Income’ if you have any agricultural income G. Select ‘Relief’ in case you need to enter any exemptions or relief under specified sections H. Select ‘Advance Tax Paid’ menu to enter payment details if you have paid any Advance tax other than the TDS deducted in your Form 16 I. In case tax is shown payable, you need to pay this Self Assessment Tax to government and select the ‘Self Asst. Tax’ menu to enter the paid challan payment details J. The ‘C/F Losses’ will display the losses you need to carry forward in your next assessment year’s income tax return. This information (if present) will be required for next years return. K. Select ‘Exempt Income’ if you want to add any Exempt Income details (if any) L. Select ‘Clubbing Income’ menu if you need to include of any of your family/friend/minor’s income in your tax return.
- 30. If you have to enter Income from other Sources select the ‘Other Sources’ menu on the left. If you have to enter Interest received from the banks, then you first need to enter the banks in the ‘General->Banks’ menu
- 31. If you know the Bank BSR Code, you enter that, Bank Name and Bank Branch and save the details. Select ‘New’ to add one more Bank. If you do not know the BSR Code, then select the ‘Bank Codes’ option
- 32. Select the State, Bank and City and search for the appropriate branch and then select ‘Add to Bank Master’ to add this bank. You can add more than one banks by searching the next bank and adding it to the Bank Master. Now close this above screen and you will find your banks in the Bank Master screen.
- 33. Now click the ‘Other Sources’ option from the left vertical menu and then select the ‘Interest from Banks’ option as shown below:
- 34. Now Enter the Interest Amount and Particulars and select the Bank BSR code from the bank list we created above. You can enter more than one row by selecting ‘New’. After you select ‘Close’, the total of all Bank Interests will be displayed in the ‘Other Sources’ Income.
- 35. Now select ‘Verification’ from Masters Menu (This is mandatory)
- 36. Enter ‘Bank Details’ from Masters Manu to select refund by cheque or ECS option (direct deposit to your bank). In case of ECS you need to enter the MICR code of the bank and select the Account type.
- 37. After clicking on view report you are directed to the PG, make the payment through net banking or VISA Credit/Debit Card. You can now view and print ITR Form (Click on ITR Report) / For Income Computation click Computation Report. To generate Electronic IT Return (Xml File) click e Return
- 39. Select ‘e RETURN’ from the menu and click on ‘Confirm’ to re-confirm the details before e-filing
- 40. Select ‘Download’ button to save the xml on the desktop to upload it further on gov site. Select the ‘Click here to upload Generated XML file’ button and you are redirected to the Income Tax Government Website to upload the xml.
- 41. Login on this https://incometaxindiaefiling.gov.in/portal/index.do Click on the ‘Self Assessment Year’ from the Submit Return option (For current return for the year ended 31st March 2011 select AY 11-12)
- 43. Select the ITR form type i.e. ITR1 or ITR2and then click on ‘Next’
- 44. Browse from desktop and select the XML file you have saved. Click ‘Upload’. You will receive a message that the income tax return has been successfully uploaded.
- 45. On successful upload acknowledgement details PDF would be received via email.
- 46. Download the zip file and select the Save option.
- 47. Save the Acknowledgement zip file for future reference
- 48. Open the zip file The ITRV/ITR ACK PDF document is password protected to ensure it is accessed by the appropriate user. The password is a combination of the PAN (in lower case) and the date of birth in the format ddmmyyyy. E.g. if the PAN is AAAAA0000A and the date of birth is 10-Jan-2008, then the password will be aaaa0000a10012008 Please note that you will need Adobe Acrobat reader 8.0 or forward to open the password protected PDF file. If you do not have Adobe Acrobat Reader, please visit the following link to download it: www.adobe.com/products/acrobat/readstep2.html In case you are unable to open the document, please contact Efiling Income Tax Administrator at ask@incometaxindia.gov.in
- 49. The following acknowledgement will be received. Click on "Print" to generate printout of acknowledgement/ITR-V Form.
- 50. Print 2 copies of this acknowledgement (one for your record) Sign it here (in blue ink only) and send one signed copy to Bangalore CPC at the address given below by ordinary post or Speed post only (registered Post or Courier will not be accepted). “Income Tax Department – CPC, Post Bag No - 1, Electronic City Post Office, Bengaluru - 560100, Karnataka” Normally within 2 to 3 weeks you would receive a confirmation email along with the acknowledgement file from Bengaluru CPC which states that they have received the ITR-V. OR you can also log on to the income tax government website https://incometaxindiaefiling.gov.in/portal/index.do. and select ‘Services>ITR-V Receipt Status’ option. In case you do not receive it then kindly contact Toll free no: 1800-425-2229, Direct: 080-22546500