SlideShare a Scribd company logo
1 of 26
Download to read offline
Every BMW I have owned has always shifted pretty well - providing that the shift bushings are not
worn out. Very often on older BMWs, the shifting ability deteriorates as the years go by. While
many people blame their transmissions and prepare for a full rebuild, their worries may be needless.
In many cases, the shift bushings have simply worn out and need to be replaced. Worn bushings can
result in sloppy shifting, misplaced shifts, and grinding when engaging gears. Most people are
amazed at the improvement that occurs when they replace their bushings. A mere $45 spent on new
bushings is a heck of a lot cheaper than a $1500 transmission rebuild.

  The first step is to jack up the car and gain access to the under carriage (Figure 1).


 The main shift linkage components are located above the driveshaft. The photos for this technical
article were taken with the driveshaft removed, as I was performing a clutch replacement at the
same time. Keep in mind that during the normal process of replacing these bushings, your access
and viewpoint will be restricted by the driveshaft (Figure 2).
You can accomplish all the tasks without removing the driveshaft - it just makes things a bit more
difficult.

   Before working underneath the car, you should move to the cockpit and remove the gearshift
knob. See our Pelican Technical article on Gearshift Knob Replacement for more details. With the
gear shift knob removed, remove the foam padding beneath the shift boot. Then pull up the rubber
shift boot so that it is only connected to the shifter lever.

  Now, move underneath the car. The shifter assembly is shown in Figure 5.


 Again, this photo was taken without the driveshaft installed, so you will have to peek and work
around the driveshaft while you're working on the shifter mechanism. Begin by removing the lower
shift selector rod. This rod is held onto the shifter handle and transmission coupler by two small
circlips. Using a small screwdriver, remove both circlips (Figure 6 and Figure 7)
and the rod should simply slide off (Figure 8).


Catch the yellow plastic washers as they fall out of the assembly when you remove it.

  Now, pry out the shifter arm bushing which is attached to the chassis, and supports the shifter
arm (Figure 9).
A small flathead screwdriver will work well in this case. Figure 10 shows the inside of the bushing as
it is being removed.


  This will leave the shifter arm attached only to transmission hinge point. This part is very tricky if
you have never done it before, or don't know what to expect. Never fear - the photos here will
make it very easy. There is a clip that is attached to the transmission that secures the shifter arm.
You need to remove this clip from the transmission in order to remove the arm. The trouble is, you
cannot see the clip and cannot see what you're doing, or how to release the clip. However, if you
have enough photos and know how it's mounted, then removing it should be a snap.

  The side of the clip is shown in Figure 11.


Another view is shown in Figure 12.
Removal of the clip is shown in Figure 13. These are all photos taken from underneath the car. This
is what you will see, but will not be very useful to you while you are removing this clip. To be 100%
on how to remove it, we'll have to take a look at some of the photos detailed later in this article.
Figure 46 shows the top of the transmission where the clip sits.


 Figure 47 shows the clip and its integrated pin, and how it is lifted up for removal.
Figure 48 shows the clip mounted and attached to the transmission flange.


You can't see this from under the car, and it will drive you crazy trying to get this off if you don't
know how it's attached (trust me, I know). Figure 49 shows the opposite side of the clip.


Finally, Figure 14 shows the best way to remove the clip - by getting under the backside with a small
screwdriver. It's not easy underneath the car, but it is possible.
With the right knowledge and a small screwdriver, this clip can come out within about 30 seconds.
Without knowing exactly what to do, it could take hours. With the clip removed, you can then tug
on the shifter arm, and the entire assembly should drop from the car (Figure 15).


    Renewing your shifter bushings is as simple as replacing all of the parts that have a tendency to
wear out. Figure 16 shows all of the pieces and bushings that I feel should be replaced to return
your shifter back to a pristine, precise feel. Of course, some of your existing components may be
reusable, so inspect them carefully. But if you want everything to be 100% crisp, then replace them
all. Here's what's detailed in Figure 16:
1- Shift coupler with internal bushing
2- Pin retaining clip (often destroyed or weakened when removed)
3- Ball cup sponge - typically completely disintegrated
4- Shifter arm bushing (attaches to chassis)
5- Shifter arm bushing (attaches to transmission)
6- Lower shift boot (often cracked)
7- Shifter arm pin (often damaged when removed)
8- Shift selector rod circlips
9- Yellow plastic washers/bushings for shift selector rod
10- Shift handle ball cup bushing (almost always heavily worn)

   Let's begin the renewal process by replacing each bushing, starting with the shifter arm bushing
(sometimes called a carrier bushing) that attaches to the transmission. The old bushing is shown in
Figure 17.
Remove the old bushing by cutting it off with a razor blade or knife (Figure 18).


The inside of the bushing may have some metal parts reinforcing it, so be aware of this while you
are cutting. The new bushing is simply inserted into the arm, as is shown in Figure 19.


You probably won't be able to push the bushing in all of the way yourself, so you may have to use a
press or a vice to help get the bushing seated completely in the arm (Figure 20).
You can use the standard stock bushings, or upgrade to aftermarket Delrin carrier bushings. UUC
Motorwerks makes a fine set of aftermarket bushings that I recommend. They are direct
replacements for the factory rubber bushing, and are a more precise fit than the originals. Figure 21
shows this Delrin bushings,


and Figure 22 shows how they fit on each side, in place of the factory bushing.
Now let's talk about the shifter arm bushing (Figure 23).


 Unfortunately, if this bushing is worn, then you have to replace the entire arm. The good news is
that if you are installing a short shift kit, then you are going to be replacing the arm anyways. For
more information on Installing a Short Shift Kit (SSK), see the Pelican Technical Article: Installing a 3-
Series Short Shift Kit.
The main bushing that becomes worn out is the ball-cup bushing that the shift handle sits in.
Pulling back on the shift boot shows this bushing (Figure 24).


There is a small, special tool that is used to remove this bushing from the shifter arm, however, I
found that you don't really need it. You can use two screwdrivers to rotate the bushing counter-
clockwise, and it should snap out of its housing. If the bushing offers resistance, you can chip at it
with a screwdriver or pick, as you will be replacing it anyways. Figure 25 shows the bushing being
removed after rotating it out of the housing.


To get the bushing off of the shifter arm, simply pull on it with your fingers (Figure 26 and Figure 27).
Figure 28 shows the old, worn out bushing looking pretty ugly.
Clean off the shifter arm thoroughly before installing the new ball-cup bushing (Figure 29).


Now is also a good time to install your new boot (Figure 30).
Clean the inside of the shifter arm where the ball-cup bushing fits (Figure 31).


Apply some white lithium grease to the ball of the shifter arm prior to installation (Figure 32).
Push the new ball cup bushing onto the shift lever and insert into the shifter arm (Figure 33).


Push the bushing in and rotate it clockwise with a screwdriver (Figure 34)
until it the tab on the bushing clicks in place with the slot in the shifter arm (Figure 35).


   Now, we'll turn our attention to the shift selector coupler. The coupler is attached to the
transmission with a small press pin. Remove the covering clip and tap out this pin to remove the
coupler from the transmission. With the coupler removed, take a close look at your shift selector
seal. If it's looking like it might be worn, this would be an ideal time to replace it. The shift selector
seal is indicated by the yellow arrow in Figure 36.
Removal is accomplished by taking a pick or screwdriver and picking it out of its bore (Figure 37).


The new shift shaft selector seal is pushed onto the shaft and pressed into its bore (Figure 38). It's
easy to tap it in with a deep socket placed over the shaft (Figure 39).

Tap the seal in until it is flush with the transmission housing.
Now we'll move onto the shift coupler bushings. Using a wire brush, ensure that the ball on the
transmission selector shaft is clean and clear of debris (Figure 40).


A new shift coupler is shown in Figure 41 - it may be necessary to replace the coupler if the internal
plastic bushing (shown by the arrow) is severely worn.
There is a small sponge piece that fits inside of the coupler (Figure 42) to ensure that it remains
firmly mounted and secured with the transmission selector shaft.


This small sponge eliminates any backlash or slop in the transmission selector and is important to
maintaining a crisp shifting feel. The sponge piece is shown installed in the coupler in Figure 43.
With the new sponge installed, mount the coupler on the transmission and tap in the pin that
secures it to the selector shaft (shown by the red arrow in Figure 44).


Make sure that you place the small retaining clip on the selector shaft prior to tapping in the pin -
otherwise you will not be able to get the clip on (shown with blue arrow in Figure 45). When the pin
is tapped in, move the retaining clip to cover it.
With all of the bushings and couplers installed, it's now time to install the shifter arm back into
the car. Installation of the retaining clip is the opposite of removal. Figure 46 shows the top of the
transmission where the clip sits.


Figure 47 shows the clip and its integrated pin, and how it is lifted up for removal.
Figure 48 shows the clip mounted and attached to the transmission flange.


 You can't see this from under the car, and it will drive you crazy trying to get this off if you don't
know how it's attached (trust me, I know). Figure 49 shows the opposite side of the clip.


   Now, install the new shifter arm bushing (Figure 50) onto the shifter arm and chassis of the car.
Place the bushing on the end of the shifter arm, and then snap it into place in its bracket on the
bottom of the chassis (Figure 51).

It may require some significant force pushing upwards to get this bushing to snap properly into
place.


  With the arm securely in place, now install the shift selector rod back into place.
Figure 52 shows how the yellow washers, circlips, and the selector rod are installed with respect to
each other.


 Figure 53 and Figure 54 show the selector rod mounted on the transmission. Mount the rod to the
shift lever in a similar manner.
If you have any doubts about how the whole assembly goes back together, refer to Figure 55


, which shows the gear shift mechanism fully assembled and attached to the transmission, but
removed from the car. When the assembly is put back into the car, fit the gearshift boot properly in
the cockpit, and reinstall the gearshift knob.

  Well, there you have it - a lot of work, but if you walk through it step-by-step and follow the
photos I have published here for you, you should have no problems. If you would like to see more
technical articles like this one, please continue to support Pelican Parts with all your parts needs. If
you like what you see here, then please visit our online BMW catalog and help support the collection
and creating of new and informative technical articles like this one. Your continued support directly
affects the expansion and existence of this site and technical articles like this one. As always, if you
have any questions or comments about this helpful article, please drop us a line.

More Related Content

Similar to Gearshift fix e30

Daewoo doosan dx480 lc excavator service repair manual
Daewoo doosan dx480 lc excavator service repair manualDaewoo doosan dx480 lc excavator service repair manual
Daewoo doosan dx480 lc excavator service repair manualfjjskdmnenemm
 
Daewoo doosan dx520 lc excavator service repair manual
Daewoo doosan dx520 lc excavator service repair manualDaewoo doosan dx520 lc excavator service repair manual
Daewoo doosan dx520 lc excavator service repair manualfjjskdmnenemm
 
Daewoo doosan dx480 lc excavator service repair manual
Daewoo doosan dx480 lc excavator service repair manualDaewoo doosan dx480 lc excavator service repair manual
Daewoo doosan dx480 lc excavator service repair manualdfujsjefjkskemm
 
Daewoo doosan dx520 lc excavator service repair manual
Daewoo doosan dx520 lc excavator service repair manualDaewoo doosan dx520 lc excavator service repair manual
Daewoo doosan dx520 lc excavator service repair manualfujsjefjskkem
 
Daewoo doosan dx480 lc excavator service repair manual
Daewoo doosan dx480 lc excavator service repair manualDaewoo doosan dx480 lc excavator service repair manual
Daewoo doosan dx480 lc excavator service repair manualufjjdjkkskemmd
 
Daewoo doosan dx520 lc excavator service repair manual
Daewoo doosan dx520 lc excavator service repair manualDaewoo doosan dx520 lc excavator service repair manual
Daewoo doosan dx520 lc excavator service repair manualdfujsjefjkskemm
 
Daewoo doosan dx480 lc excavator service repair manual
Daewoo doosan dx480 lc excavator service repair manualDaewoo doosan dx480 lc excavator service repair manual
Daewoo doosan dx480 lc excavator service repair manualfujsjefjskkem
 
Guia reparo injetores denso
Guia reparo injetores densoGuia reparo injetores denso
Guia reparo injetores densoJunior Iung
 
Hyster j006 (h6.0 ft europe) forklift service repair manual
Hyster j006 (h6.0 ft europe) forklift service repair manualHyster j006 (h6.0 ft europe) forklift service repair manual
Hyster j006 (h6.0 ft europe) forklift service repair manualfusjejfskekemm
 
Hyster j006 (h7.0 ft europe) forklift service repair manual
Hyster j006 (h7.0 ft europe) forklift service repair manualHyster j006 (h7.0 ft europe) forklift service repair manual
Hyster j006 (h7.0 ft europe) forklift service repair manualfjjskekdmmem
 
Hyster j006 (h6.0 ft europe) forklift service repair manual
Hyster j006 (h6.0 ft europe) forklift service repair manualHyster j006 (h6.0 ft europe) forklift service repair manual
Hyster j006 (h6.0 ft europe) forklift service repair manualfusjfjskekmem
 
Hyster j006 (h7.0 ft europe) forklift service repair manual
Hyster j006 (h7.0 ft europe) forklift service repair manualHyster j006 (h7.0 ft europe) forklift service repair manual
Hyster j006 (h7.0 ft europe) forklift service repair manualjfksekmmdme
 
Hyster h006 (h155 ft) forklift service repair manual
Hyster h006 (h155 ft) forklift service repair manualHyster h006 (h155 ft) forklift service repair manual
Hyster h006 (h155 ft) forklift service repair manualfujdfjjskkkemw
 
Hyster h006 (h135 ft) forklift service repair manual
Hyster h006 (h135 ft) forklift service repair manualHyster h006 (h135 ft) forklift service repair manual
Hyster h006 (h135 ft) forklift service repair manualfusjefjsekksemm
 
Hyster h006 (h135 ft) forklift service repair manual
Hyster h006 (h135 ft) forklift service repair manualHyster h006 (h135 ft) forklift service repair manual
Hyster h006 (h135 ft) forklift service repair manualfjsjekkdmmemm
 
Hyster h006 (h135 ft) forklift service repair manual
Hyster h006 (h135 ft) forklift service repair manualHyster h006 (h135 ft) forklift service repair manual
Hyster h006 (h135 ft) forklift service repair manualfujfjjjskekemm
 
Hyster h006 (h155 ft) forklift service repair manual
Hyster h006 (h155 ft) forklift service repair manualHyster h006 (h155 ft) forklift service repair manual
Hyster h006 (h155 ft) forklift service repair manualfujsjfjkskekmm
 
Caterpillar cat 320 d excavator (prefix kgf) service repair manual (kgf00001 ...
Caterpillar cat 320 d excavator (prefix kgf) service repair manual (kgf00001 ...Caterpillar cat 320 d excavator (prefix kgf) service repair manual (kgf00001 ...
Caterpillar cat 320 d excavator (prefix kgf) service repair manual (kgf00001 ...fjskekfseik
 
Caterpillar cat 320 d l excavator (prefix kgf) service repair manual (kgf0000...
Caterpillar cat 320 d l excavator (prefix kgf) service repair manual (kgf0000...Caterpillar cat 320 d l excavator (prefix kgf) service repair manual (kgf0000...
Caterpillar cat 320 d l excavator (prefix kgf) service repair manual (kgf0000...fkjsekksmem
 

Similar to Gearshift fix e30 (20)

Daewoo doosan dx480 lc excavator service repair manual
Daewoo doosan dx480 lc excavator service repair manualDaewoo doosan dx480 lc excavator service repair manual
Daewoo doosan dx480 lc excavator service repair manual
 
Daewoo doosan dx520 lc excavator service repair manual
Daewoo doosan dx520 lc excavator service repair manualDaewoo doosan dx520 lc excavator service repair manual
Daewoo doosan dx520 lc excavator service repair manual
 
Daewoo doosan dx480 lc excavator service repair manual
Daewoo doosan dx480 lc excavator service repair manualDaewoo doosan dx480 lc excavator service repair manual
Daewoo doosan dx480 lc excavator service repair manual
 
Guia reparo injetores denso
Guia reparo injetores densoGuia reparo injetores denso
Guia reparo injetores denso
 
Hyster j006 (h6.0 ft europe) forklift service repair manual
Hyster j006 (h6.0 ft europe) forklift service repair manualHyster j006 (h6.0 ft europe) forklift service repair manual
Hyster j006 (h6.0 ft europe) forklift service repair manual
 
Hyster j006 (h7.0 ft europe) forklift service repair manual
Hyster j006 (h7.0 ft europe) forklift service repair manualHyster j006 (h7.0 ft europe) forklift service repair manual
Hyster j006 (h7.0 ft europe) forklift service repair manual
 
Hyster j006 (h6.0 ft europe) forklift service repair manual
Hyster j006 (h6.0 ft europe) forklift service repair manualHyster j006 (h6.0 ft europe) forklift service repair manual
Hyster j006 (h6.0 ft europe) forklift service repair manual
 
Hyster j006 (h7.0 ft europe) forklift service repair manual
Hyster j006 (h7.0 ft europe) forklift service repair manualHyster j006 (h7.0 ft europe) forklift service repair manual
Hyster j006 (h7.0 ft europe) forklift service repair manual
 
Hyster h006 (h155 ft) forklift service repair manual
Hyster h006 (h155 ft) forklift service repair manualHyster h006 (h155 ft) forklift service repair manual
Hyster h006 (h155 ft) forklift service repair manual
 
Hyster h006 (h135 ft) forklift service repair manual
Hyster h006 (h135 ft) forklift service repair manualHyster h006 (h135 ft) forklift service repair manual
Hyster h006 (h135 ft) forklift service repair manual
 
Hyster h006 (h135 ft) forklift service repair manual
Hyster h006 (h135 ft) forklift service repair manualHyster h006 (h135 ft) forklift service repair manual
Hyster h006 (h135 ft) forklift service repair manual
 
Hyster h006 (h135 ft) forklift service repair manual
Hyster h006 (h135 ft) forklift service repair manualHyster h006 (h135 ft) forklift service repair manual
Hyster h006 (h135 ft) forklift service repair manual
 
Hyster h006 (h155 ft) forklift service repair manual
Hyster h006 (h155 ft) forklift service repair manualHyster h006 (h155 ft) forklift service repair manual
Hyster h006 (h155 ft) forklift service repair manual
 
EVANNEX EcoHitch for Tesla Model S Install Guide
EVANNEX EcoHitch for Tesla Model S Install GuideEVANNEX EcoHitch for Tesla Model S Install Guide
EVANNEX EcoHitch for Tesla Model S Install Guide
 
Caterpillar cat 320 d excavator (prefix kgf) service repair manual (kgf00001 ...
Caterpillar cat 320 d excavator (prefix kgf) service repair manual (kgf00001 ...Caterpillar cat 320 d excavator (prefix kgf) service repair manual (kgf00001 ...
Caterpillar cat 320 d excavator (prefix kgf) service repair manual (kgf00001 ...
 
Caterpillar cat 320 d l excavator (prefix kgf) service repair manual (kgf0000...
Caterpillar cat 320 d l excavator (prefix kgf) service repair manual (kgf0000...Caterpillar cat 320 d l excavator (prefix kgf) service repair manual (kgf0000...
Caterpillar cat 320 d l excavator (prefix kgf) service repair manual (kgf0000...
 

More from Fajar Isnanto

Micro controller based projects
Micro controller based projectsMicro controller based projects
Micro controller based projectsFajar Isnanto
 
Toyota motor manual 2 lt
Toyota motor manual 2 ltToyota motor manual 2 lt
Toyota motor manual 2 ltFajar Isnanto
 
L 2l 2l-t_repair_manual
L 2l 2l-t_repair_manualL 2l 2l-t_repair_manual
L 2l 2l-t_repair_manualFajar Isnanto
 
2010.06 defender my07 workshop manual complete
2010.06 defender my07 workshop manual complete2010.06 defender my07 workshop manual complete
2010.06 defender my07 workshop manual completeFajar Isnanto
 
Bmw e39 door lock actuator replacement
Bmw e39 door lock actuator replacementBmw e39 door lock actuator replacement
Bmw e39 door lock actuator replacementFajar Isnanto
 
Land rover monthly 2013 04
Land rover monthly 2013 04Land rover monthly 2013 04
Land rover monthly 2013 04Fajar Isnanto
 
Land rover defender_110_en_gb
Land rover defender_110_en_gbLand rover defender_110_en_gb
Land rover defender_110_en_gbFajar Isnanto
 
Series iii optional_parts_catalogue_1
Series iii optional_parts_catalogue_1Series iii optional_parts_catalogue_1
Series iii optional_parts_catalogue_1Fajar Isnanto
 
Lr series iii part 1
Lr series iii  part 1Lr series iii  part 1
Lr series iii part 1Fajar Isnanto
 
Land rover defender_110_en_gb
Land rover defender_110_en_gbLand rover defender_110_en_gb
Land rover defender_110_en_gbFajar Isnanto
 
Def 90 110_wsm_book1
Def 90 110_wsm_book1Def 90 110_wsm_book1
Def 90 110_wsm_book1Fajar Isnanto
 
Venus ecu user manual ver2.2.4.0
Venus ecu user manual ver2.2.4.0Venus ecu user manual ver2.2.4.0
Venus ecu user manual ver2.2.4.0Fajar Isnanto
 
2011 auto meter hp catalog w links
2011 auto meter hp catalog w  links2011 auto meter hp catalog w  links
2011 auto meter hp catalog w linksFajar Isnanto
 
Apt presso good to learn
Apt presso   good to learnApt presso   good to learn
Apt presso good to learnFajar Isnanto
 
Know your-differential-ec-12.97
Know your-differential-ec-12.97Know your-differential-ec-12.97
Know your-differential-ec-12.97Fajar Isnanto
 
BMW E30 Wiring DIagram
BMW E30 Wiring DIagramBMW E30 Wiring DIagram
BMW E30 Wiring DIagramFajar Isnanto
 

More from Fajar Isnanto (20)

Micro controller based projects
Micro controller based projectsMicro controller based projects
Micro controller based projects
 
Toyota motor manual 2 lt
Toyota motor manual 2 ltToyota motor manual 2 lt
Toyota motor manual 2 lt
 
L 2l 2l-t_repair_manual
L 2l 2l-t_repair_manualL 2l 2l-t_repair_manual
L 2l 2l-t_repair_manual
 
2010.06 defender my07 workshop manual complete
2010.06 defender my07 workshop manual complete2010.06 defender my07 workshop manual complete
2010.06 defender my07 workshop manual complete
 
2lt 3l supplement
2lt 3l supplement2lt 3l supplement
2lt 3l supplement
 
Bmw e39 door lock actuator replacement
Bmw e39 door lock actuator replacementBmw e39 door lock actuator replacement
Bmw e39 door lock actuator replacement
 
1uzto3uz history
1uzto3uz history1uzto3uz history
1uzto3uz history
 
Land rover monthly 2013 04
Land rover monthly 2013 04Land rover monthly 2013 04
Land rover monthly 2013 04
 
Land rover defender_110_en_gb
Land rover defender_110_en_gbLand rover defender_110_en_gb
Land rover defender_110_en_gb
 
Series iii optional_parts_catalogue_1
Series iii optional_parts_catalogue_1Series iii optional_parts_catalogue_1
Series iii optional_parts_catalogue_1
 
Lr series iii part 1
Lr series iii  part 1Lr series iii  part 1
Lr series iii part 1
 
Land rover defender_110_en_gb
Land rover defender_110_en_gbLand rover defender_110_en_gb
Land rover defender_110_en_gb
 
Def 90 110_wsm_book1
Def 90 110_wsm_book1Def 90 110_wsm_book1
Def 90 110_wsm_book1
 
Venus ecu user manual ver2.2.4.0
Venus ecu user manual ver2.2.4.0Venus ecu user manual ver2.2.4.0
Venus ecu user manual ver2.2.4.0
 
2011 auto meter hp catalog w links
2011 auto meter hp catalog w  links2011 auto meter hp catalog w  links
2011 auto meter hp catalog w links
 
Cda 117e apvers
Cda 117e apversCda 117e apvers
Cda 117e apvers
 
Apt presso good to learn
Apt presso   good to learnApt presso   good to learn
Apt presso good to learn
 
D600 en
D600 enD600 en
D600 en
 
Know your-differential-ec-12.97
Know your-differential-ec-12.97Know your-differential-ec-12.97
Know your-differential-ec-12.97
 
BMW E30 Wiring DIagram
BMW E30 Wiring DIagramBMW E30 Wiring DIagram
BMW E30 Wiring DIagram
 

Recently uploaded

一比一原版(PU学位证书)普渡大学毕业证学历认证加急办理
一比一原版(PU学位证书)普渡大学毕业证学历认证加急办理一比一原版(PU学位证书)普渡大学毕业证学历认证加急办理
一比一原版(PU学位证书)普渡大学毕业证学历认证加急办理ezgenuh
 
Call Girls Kadugodi Just Call 👗 7737669865 👗 Top Class Call Girl Service Bang...
Call Girls Kadugodi Just Call 👗 7737669865 👗 Top Class Call Girl Service Bang...Call Girls Kadugodi Just Call 👗 7737669865 👗 Top Class Call Girl Service Bang...
Call Girls Kadugodi Just Call 👗 7737669865 👗 Top Class Call Girl Service Bang...amitlee9823
 
Vip Mumbai Call Girls Mumbai Call On 9920725232 With Body to body massage wit...
Vip Mumbai Call Girls Mumbai Call On 9920725232 With Body to body massage wit...Vip Mumbai Call Girls Mumbai Call On 9920725232 With Body to body massage wit...
Vip Mumbai Call Girls Mumbai Call On 9920725232 With Body to body massage wit...amitlee9823
 
John Deere 335 375 385 435 Service Repair Manual
John Deere 335 375 385 435 Service Repair ManualJohn Deere 335 375 385 435 Service Repair Manual
John Deere 335 375 385 435 Service Repair ManualExcavator
 
一比一原版(UdeM学位证书)蒙特利尔大学毕业证学历认证怎样办
一比一原版(UdeM学位证书)蒙特利尔大学毕业证学历认证怎样办一比一原版(UdeM学位证书)蒙特利尔大学毕业证学历认证怎样办
一比一原版(UdeM学位证书)蒙特利尔大学毕业证学历认证怎样办ezgenuh
 
Tata_Nexon_brochure tata nexon brochure tata
Tata_Nexon_brochure tata nexon brochure tataTata_Nexon_brochure tata nexon brochure tata
Tata_Nexon_brochure tata nexon brochure tataaritradey27234
 
Call Girls Kanakapura Road Just Call 👗 7737669865 👗 Top Class Call Girl Servi...
Call Girls Kanakapura Road Just Call 👗 7737669865 👗 Top Class Call Girl Servi...Call Girls Kanakapura Road Just Call 👗 7737669865 👗 Top Class Call Girl Servi...
Call Girls Kanakapura Road Just Call 👗 7737669865 👗 Top Class Call Girl Servi...amitlee9823
 
Call Girls Bangalore Just Call 👗 7737669865 👗 Top Class Call Girl Service Ban...
Call Girls Bangalore Just Call 👗 7737669865 👗 Top Class Call Girl Service Ban...Call Girls Bangalore Just Call 👗 7737669865 👗 Top Class Call Girl Service Ban...
Call Girls Bangalore Just Call 👗 7737669865 👗 Top Class Call Girl Service Ban...amitlee9823
 
John Deere 7430 7530 Tractors Diagnostic Service Manual W.pdf
John Deere 7430 7530 Tractors Diagnostic Service Manual W.pdfJohn Deere 7430 7530 Tractors Diagnostic Service Manual W.pdf
John Deere 7430 7530 Tractors Diagnostic Service Manual W.pdfExcavator
 
Top Rated Call Girls Mumbai Central : 9920725232 We offer Beautiful and sexy ...
Top Rated Call Girls Mumbai Central : 9920725232 We offer Beautiful and sexy ...Top Rated Call Girls Mumbai Central : 9920725232 We offer Beautiful and sexy ...
Top Rated Call Girls Mumbai Central : 9920725232 We offer Beautiful and sexy ...amitlee9823
 
Rekha Agarkar Escorts Service Kollam ❣️ 7014168258 ❣️ High Cost Unlimited Har...
Rekha Agarkar Escorts Service Kollam ❣️ 7014168258 ❣️ High Cost Unlimited Har...Rekha Agarkar Escorts Service Kollam ❣️ 7014168258 ❣️ High Cost Unlimited Har...
Rekha Agarkar Escorts Service Kollam ❣️ 7014168258 ❣️ High Cost Unlimited Har...nirzagarg
 
如何办理麦考瑞大学毕业证(MQU毕业证书)成绩单原版一比一
如何办理麦考瑞大学毕业证(MQU毕业证书)成绩单原版一比一如何办理麦考瑞大学毕业证(MQU毕业证书)成绩单原版一比一
如何办理麦考瑞大学毕业证(MQU毕业证书)成绩单原版一比一ozave
 
John Deere Tractors 6130M 6140M Diagnostic Manual
John Deere Tractors  6130M 6140M Diagnostic ManualJohn Deere Tractors  6130M 6140M Diagnostic Manual
John Deere Tractors 6130M 6140M Diagnostic ManualExcavator
 
What Could Cause Your Subaru's Touch Screen To Stop Working
What Could Cause Your Subaru's Touch Screen To Stop WorkingWhat Could Cause Your Subaru's Touch Screen To Stop Working
What Could Cause Your Subaru's Touch Screen To Stop WorkingBruce Cox Imports
 
design a four cylinder internal combustion engine
design a four cylinder internal combustion enginedesign a four cylinder internal combustion engine
design a four cylinder internal combustion enginepiyushsingh943161
 
9990611130 Find & Book Russian Call Girls In Vijay Nagar
9990611130 Find & Book Russian Call Girls In Vijay Nagar9990611130 Find & Book Russian Call Girls In Vijay Nagar
9990611130 Find & Book Russian Call Girls In Vijay NagarGenuineGirls
 
Delhi Call Girls Mayur Vihar 9711199171 ☎✔👌✔ Whatsapp Hard And Sexy Vip Call
Delhi Call Girls Mayur Vihar 9711199171 ☎✔👌✔ Whatsapp Hard And Sexy Vip CallDelhi Call Girls Mayur Vihar 9711199171 ☎✔👌✔ Whatsapp Hard And Sexy Vip Call
Delhi Call Girls Mayur Vihar 9711199171 ☎✔👌✔ Whatsapp Hard And Sexy Vip Callshivangimorya083
 

Recently uploaded (20)

一比一原版(PU学位证书)普渡大学毕业证学历认证加急办理
一比一原版(PU学位证书)普渡大学毕业证学历认证加急办理一比一原版(PU学位证书)普渡大学毕业证学历认证加急办理
一比一原版(PU学位证书)普渡大学毕业证学历认证加急办理
 
Call Girls Kadugodi Just Call 👗 7737669865 👗 Top Class Call Girl Service Bang...
Call Girls Kadugodi Just Call 👗 7737669865 👗 Top Class Call Girl Service Bang...Call Girls Kadugodi Just Call 👗 7737669865 👗 Top Class Call Girl Service Bang...
Call Girls Kadugodi Just Call 👗 7737669865 👗 Top Class Call Girl Service Bang...
 
Vip Mumbai Call Girls Mumbai Call On 9920725232 With Body to body massage wit...
Vip Mumbai Call Girls Mumbai Call On 9920725232 With Body to body massage wit...Vip Mumbai Call Girls Mumbai Call On 9920725232 With Body to body massage wit...
Vip Mumbai Call Girls Mumbai Call On 9920725232 With Body to body massage wit...
 
John Deere 335 375 385 435 Service Repair Manual
John Deere 335 375 385 435 Service Repair ManualJohn Deere 335 375 385 435 Service Repair Manual
John Deere 335 375 385 435 Service Repair Manual
 
Call Now ≽ 9953056974 ≼🔝 Call Girls In Shankar vihar ≼🔝 Delhi door step delev...
Call Now ≽ 9953056974 ≼🔝 Call Girls In Shankar vihar ≼🔝 Delhi door step delev...Call Now ≽ 9953056974 ≼🔝 Call Girls In Shankar vihar ≼🔝 Delhi door step delev...
Call Now ≽ 9953056974 ≼🔝 Call Girls In Shankar vihar ≼🔝 Delhi door step delev...
 
一比一原版(UdeM学位证书)蒙特利尔大学毕业证学历认证怎样办
一比一原版(UdeM学位证书)蒙特利尔大学毕业证学历认证怎样办一比一原版(UdeM学位证书)蒙特利尔大学毕业证学历认证怎样办
一比一原版(UdeM学位证书)蒙特利尔大学毕业证学历认证怎样办
 
Tata_Nexon_brochure tata nexon brochure tata
Tata_Nexon_brochure tata nexon brochure tataTata_Nexon_brochure tata nexon brochure tata
Tata_Nexon_brochure tata nexon brochure tata
 
Call Girls Kanakapura Road Just Call 👗 7737669865 👗 Top Class Call Girl Servi...
Call Girls Kanakapura Road Just Call 👗 7737669865 👗 Top Class Call Girl Servi...Call Girls Kanakapura Road Just Call 👗 7737669865 👗 Top Class Call Girl Servi...
Call Girls Kanakapura Road Just Call 👗 7737669865 👗 Top Class Call Girl Servi...
 
Stay Cool and Compliant: Know Your Window Tint Laws Before You Tint
Stay Cool and Compliant: Know Your Window Tint Laws Before You TintStay Cool and Compliant: Know Your Window Tint Laws Before You Tint
Stay Cool and Compliant: Know Your Window Tint Laws Before You Tint
 
Call Girls Bangalore Just Call 👗 7737669865 👗 Top Class Call Girl Service Ban...
Call Girls Bangalore Just Call 👗 7737669865 👗 Top Class Call Girl Service Ban...Call Girls Bangalore Just Call 👗 7737669865 👗 Top Class Call Girl Service Ban...
Call Girls Bangalore Just Call 👗 7737669865 👗 Top Class Call Girl Service Ban...
 
John Deere 7430 7530 Tractors Diagnostic Service Manual W.pdf
John Deere 7430 7530 Tractors Diagnostic Service Manual W.pdfJohn Deere 7430 7530 Tractors Diagnostic Service Manual W.pdf
John Deere 7430 7530 Tractors Diagnostic Service Manual W.pdf
 
Top Rated Call Girls Mumbai Central : 9920725232 We offer Beautiful and sexy ...
Top Rated Call Girls Mumbai Central : 9920725232 We offer Beautiful and sexy ...Top Rated Call Girls Mumbai Central : 9920725232 We offer Beautiful and sexy ...
Top Rated Call Girls Mumbai Central : 9920725232 We offer Beautiful and sexy ...
 
Rekha Agarkar Escorts Service Kollam ❣️ 7014168258 ❣️ High Cost Unlimited Har...
Rekha Agarkar Escorts Service Kollam ❣️ 7014168258 ❣️ High Cost Unlimited Har...Rekha Agarkar Escorts Service Kollam ❣️ 7014168258 ❣️ High Cost Unlimited Har...
Rekha Agarkar Escorts Service Kollam ❣️ 7014168258 ❣️ High Cost Unlimited Har...
 
如何办理麦考瑞大学毕业证(MQU毕业证书)成绩单原版一比一
如何办理麦考瑞大学毕业证(MQU毕业证书)成绩单原版一比一如何办理麦考瑞大学毕业证(MQU毕业证书)成绩单原版一比一
如何办理麦考瑞大学毕业证(MQU毕业证书)成绩单原版一比一
 
John Deere Tractors 6130M 6140M Diagnostic Manual
John Deere Tractors  6130M 6140M Diagnostic ManualJohn Deere Tractors  6130M 6140M Diagnostic Manual
John Deere Tractors 6130M 6140M Diagnostic Manual
 
What Could Cause Your Subaru's Touch Screen To Stop Working
What Could Cause Your Subaru's Touch Screen To Stop WorkingWhat Could Cause Your Subaru's Touch Screen To Stop Working
What Could Cause Your Subaru's Touch Screen To Stop Working
 
Call Girls in Shri Niwas Puri Delhi 💯Call Us 🔝9953056974🔝
Call Girls in  Shri Niwas Puri  Delhi 💯Call Us 🔝9953056974🔝Call Girls in  Shri Niwas Puri  Delhi 💯Call Us 🔝9953056974🔝
Call Girls in Shri Niwas Puri Delhi 💯Call Us 🔝9953056974🔝
 
design a four cylinder internal combustion engine
design a four cylinder internal combustion enginedesign a four cylinder internal combustion engine
design a four cylinder internal combustion engine
 
9990611130 Find & Book Russian Call Girls In Vijay Nagar
9990611130 Find & Book Russian Call Girls In Vijay Nagar9990611130 Find & Book Russian Call Girls In Vijay Nagar
9990611130 Find & Book Russian Call Girls In Vijay Nagar
 
Delhi Call Girls Mayur Vihar 9711199171 ☎✔👌✔ Whatsapp Hard And Sexy Vip Call
Delhi Call Girls Mayur Vihar 9711199171 ☎✔👌✔ Whatsapp Hard And Sexy Vip CallDelhi Call Girls Mayur Vihar 9711199171 ☎✔👌✔ Whatsapp Hard And Sexy Vip Call
Delhi Call Girls Mayur Vihar 9711199171 ☎✔👌✔ Whatsapp Hard And Sexy Vip Call
 

Gearshift fix e30

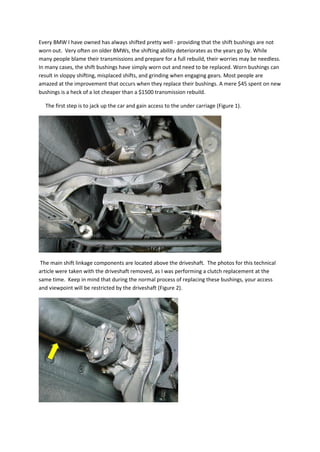
  • 1. Every BMW I have owned has always shifted pretty well - providing that the shift bushings are not worn out. Very often on older BMWs, the shifting ability deteriorates as the years go by. While many people blame their transmissions and prepare for a full rebuild, their worries may be needless. In many cases, the shift bushings have simply worn out and need to be replaced. Worn bushings can result in sloppy shifting, misplaced shifts, and grinding when engaging gears. Most people are amazed at the improvement that occurs when they replace their bushings. A mere $45 spent on new bushings is a heck of a lot cheaper than a $1500 transmission rebuild. The first step is to jack up the car and gain access to the under carriage (Figure 1). The main shift linkage components are located above the driveshaft. The photos for this technical article were taken with the driveshaft removed, as I was performing a clutch replacement at the same time. Keep in mind that during the normal process of replacing these bushings, your access and viewpoint will be restricted by the driveshaft (Figure 2).
  • 2. You can accomplish all the tasks without removing the driveshaft - it just makes things a bit more difficult. Before working underneath the car, you should move to the cockpit and remove the gearshift knob. See our Pelican Technical article on Gearshift Knob Replacement for more details. With the gear shift knob removed, remove the foam padding beneath the shift boot. Then pull up the rubber shift boot so that it is only connected to the shifter lever. Now, move underneath the car. The shifter assembly is shown in Figure 5. Again, this photo was taken without the driveshaft installed, so you will have to peek and work around the driveshaft while you're working on the shifter mechanism. Begin by removing the lower shift selector rod. This rod is held onto the shifter handle and transmission coupler by two small circlips. Using a small screwdriver, remove both circlips (Figure 6 and Figure 7)
  • 3. and the rod should simply slide off (Figure 8). Catch the yellow plastic washers as they fall out of the assembly when you remove it. Now, pry out the shifter arm bushing which is attached to the chassis, and supports the shifter arm (Figure 9).
  • 4. A small flathead screwdriver will work well in this case. Figure 10 shows the inside of the bushing as it is being removed. This will leave the shifter arm attached only to transmission hinge point. This part is very tricky if you have never done it before, or don't know what to expect. Never fear - the photos here will make it very easy. There is a clip that is attached to the transmission that secures the shifter arm. You need to remove this clip from the transmission in order to remove the arm. The trouble is, you cannot see the clip and cannot see what you're doing, or how to release the clip. However, if you have enough photos and know how it's mounted, then removing it should be a snap. The side of the clip is shown in Figure 11. Another view is shown in Figure 12.
  • 5. Removal of the clip is shown in Figure 13. These are all photos taken from underneath the car. This is what you will see, but will not be very useful to you while you are removing this clip. To be 100% on how to remove it, we'll have to take a look at some of the photos detailed later in this article. Figure 46 shows the top of the transmission where the clip sits. Figure 47 shows the clip and its integrated pin, and how it is lifted up for removal.
  • 6. Figure 48 shows the clip mounted and attached to the transmission flange. You can't see this from under the car, and it will drive you crazy trying to get this off if you don't know how it's attached (trust me, I know). Figure 49 shows the opposite side of the clip. Finally, Figure 14 shows the best way to remove the clip - by getting under the backside with a small screwdriver. It's not easy underneath the car, but it is possible.
  • 7. With the right knowledge and a small screwdriver, this clip can come out within about 30 seconds. Without knowing exactly what to do, it could take hours. With the clip removed, you can then tug on the shifter arm, and the entire assembly should drop from the car (Figure 15). Renewing your shifter bushings is as simple as replacing all of the parts that have a tendency to wear out. Figure 16 shows all of the pieces and bushings that I feel should be replaced to return your shifter back to a pristine, precise feel. Of course, some of your existing components may be reusable, so inspect them carefully. But if you want everything to be 100% crisp, then replace them all. Here's what's detailed in Figure 16:
  • 8. 1- Shift coupler with internal bushing 2- Pin retaining clip (often destroyed or weakened when removed) 3- Ball cup sponge - typically completely disintegrated 4- Shifter arm bushing (attaches to chassis) 5- Shifter arm bushing (attaches to transmission) 6- Lower shift boot (often cracked) 7- Shifter arm pin (often damaged when removed) 8- Shift selector rod circlips 9- Yellow plastic washers/bushings for shift selector rod 10- Shift handle ball cup bushing (almost always heavily worn) Let's begin the renewal process by replacing each bushing, starting with the shifter arm bushing (sometimes called a carrier bushing) that attaches to the transmission. The old bushing is shown in Figure 17.
  • 9. Remove the old bushing by cutting it off with a razor blade or knife (Figure 18). The inside of the bushing may have some metal parts reinforcing it, so be aware of this while you are cutting. The new bushing is simply inserted into the arm, as is shown in Figure 19. You probably won't be able to push the bushing in all of the way yourself, so you may have to use a press or a vice to help get the bushing seated completely in the arm (Figure 20).
  • 10. You can use the standard stock bushings, or upgrade to aftermarket Delrin carrier bushings. UUC Motorwerks makes a fine set of aftermarket bushings that I recommend. They are direct replacements for the factory rubber bushing, and are a more precise fit than the originals. Figure 21 shows this Delrin bushings, and Figure 22 shows how they fit on each side, in place of the factory bushing.
  • 11. Now let's talk about the shifter arm bushing (Figure 23). Unfortunately, if this bushing is worn, then you have to replace the entire arm. The good news is that if you are installing a short shift kit, then you are going to be replacing the arm anyways. For more information on Installing a Short Shift Kit (SSK), see the Pelican Technical Article: Installing a 3- Series Short Shift Kit.
  • 12. The main bushing that becomes worn out is the ball-cup bushing that the shift handle sits in. Pulling back on the shift boot shows this bushing (Figure 24). There is a small, special tool that is used to remove this bushing from the shifter arm, however, I found that you don't really need it. You can use two screwdrivers to rotate the bushing counter- clockwise, and it should snap out of its housing. If the bushing offers resistance, you can chip at it with a screwdriver or pick, as you will be replacing it anyways. Figure 25 shows the bushing being removed after rotating it out of the housing. To get the bushing off of the shifter arm, simply pull on it with your fingers (Figure 26 and Figure 27).
  • 13. Figure 28 shows the old, worn out bushing looking pretty ugly.
  • 14. Clean off the shifter arm thoroughly before installing the new ball-cup bushing (Figure 29). Now is also a good time to install your new boot (Figure 30).
  • 15. Clean the inside of the shifter arm where the ball-cup bushing fits (Figure 31). Apply some white lithium grease to the ball of the shifter arm prior to installation (Figure 32).
  • 16. Push the new ball cup bushing onto the shift lever and insert into the shifter arm (Figure 33). Push the bushing in and rotate it clockwise with a screwdriver (Figure 34)
  • 17. until it the tab on the bushing clicks in place with the slot in the shifter arm (Figure 35). Now, we'll turn our attention to the shift selector coupler. The coupler is attached to the transmission with a small press pin. Remove the covering clip and tap out this pin to remove the coupler from the transmission. With the coupler removed, take a close look at your shift selector seal. If it's looking like it might be worn, this would be an ideal time to replace it. The shift selector seal is indicated by the yellow arrow in Figure 36.
  • 18. Removal is accomplished by taking a pick or screwdriver and picking it out of its bore (Figure 37). The new shift shaft selector seal is pushed onto the shaft and pressed into its bore (Figure 38). It's easy to tap it in with a deep socket placed over the shaft (Figure 39). Tap the seal in until it is flush with the transmission housing.
  • 19. Now we'll move onto the shift coupler bushings. Using a wire brush, ensure that the ball on the transmission selector shaft is clean and clear of debris (Figure 40). A new shift coupler is shown in Figure 41 - it may be necessary to replace the coupler if the internal plastic bushing (shown by the arrow) is severely worn.
  • 20. There is a small sponge piece that fits inside of the coupler (Figure 42) to ensure that it remains firmly mounted and secured with the transmission selector shaft. This small sponge eliminates any backlash or slop in the transmission selector and is important to maintaining a crisp shifting feel. The sponge piece is shown installed in the coupler in Figure 43.
  • 21. With the new sponge installed, mount the coupler on the transmission and tap in the pin that secures it to the selector shaft (shown by the red arrow in Figure 44). Make sure that you place the small retaining clip on the selector shaft prior to tapping in the pin - otherwise you will not be able to get the clip on (shown with blue arrow in Figure 45). When the pin is tapped in, move the retaining clip to cover it.
  • 22. With all of the bushings and couplers installed, it's now time to install the shifter arm back into the car. Installation of the retaining clip is the opposite of removal. Figure 46 shows the top of the transmission where the clip sits. Figure 47 shows the clip and its integrated pin, and how it is lifted up for removal.
  • 23. Figure 48 shows the clip mounted and attached to the transmission flange. You can't see this from under the car, and it will drive you crazy trying to get this off if you don't know how it's attached (trust me, I know). Figure 49 shows the opposite side of the clip. Now, install the new shifter arm bushing (Figure 50) onto the shifter arm and chassis of the car.
  • 24. Place the bushing on the end of the shifter arm, and then snap it into place in its bracket on the bottom of the chassis (Figure 51). It may require some significant force pushing upwards to get this bushing to snap properly into place. With the arm securely in place, now install the shift selector rod back into place.
  • 25. Figure 52 shows how the yellow washers, circlips, and the selector rod are installed with respect to each other. Figure 53 and Figure 54 show the selector rod mounted on the transmission. Mount the rod to the shift lever in a similar manner.
  • 26. If you have any doubts about how the whole assembly goes back together, refer to Figure 55 , which shows the gear shift mechanism fully assembled and attached to the transmission, but removed from the car. When the assembly is put back into the car, fit the gearshift boot properly in the cockpit, and reinstall the gearshift knob. Well, there you have it - a lot of work, but if you walk through it step-by-step and follow the photos I have published here for you, you should have no problems. If you would like to see more technical articles like this one, please continue to support Pelican Parts with all your parts needs. If you like what you see here, then please visit our online BMW catalog and help support the collection and creating of new and informative technical articles like this one. Your continued support directly affects the expansion and existence of this site and technical articles like this one. As always, if you have any questions or comments about this helpful article, please drop us a line.