Filocity training series uploading your first documents
•Download as DOCX, PDF•
0 likes•171 views

Online document and project management. Full backoffice automation in one program. Share calendars, tasks, files, documents and projects, Full editing, permission based sharing, online backup and catastrophe protection all in one workspace. Free trial at http://www.filocity.com

Recommended
More Related Content
Viewers also liked
Recently uploaded
Recently uploaded (20)
Filocity training series uploading your first documents
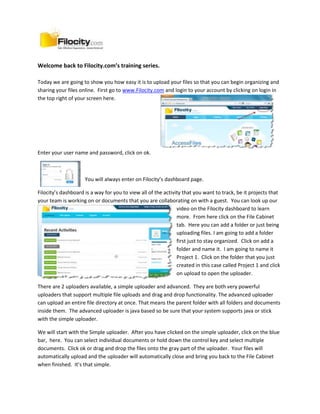
- 1. Welcome back to Filocity.com’s training series. Today we are going to show you how easy it is to upload your files so that you can begin organizing and sharing your files online. First go to www.Filocity.com and login to your account by clicking on login in the top right of your screen here. Enter your user name and password, click on ok. You will always enter on Filocity’s dashboard page. Filocity’s dashboard is a way for you to view all of the activity that you want to track, be it projects that your team is working on or documents that you are collaborating on with a guest. You can look up our video on the Filocity dashboard to learn more. From here click on the File Cabinet tab. Here you can add a folder or just being uploading files. I am going to add a folder first just to stay organized. Click on add a folder and name it. I am going to name it Project 1. Click on the folder that you just created in this case called Project 1 and click on upload to open the uploader. There are 2 uploaders available, a simple uploader and advanced. They are both very powerful uploaders that support multiple file uploads and drag and drop functionality. The advanced uploader can upload an entire file directory at once. That means the parent folder with all folders and documents inside them. The advanced uploader is java based so be sure that your system supports java or stick with the simple uploader. We will start with the Simple uploader. After you have clicked on the simple uploader, click on the blue bar, here. You can select individual documents or hold down the control key and select multiple documents. Click ok or drag and drop the files onto the gray part of the uploader. Your files will automatically upload and the uploader will automatically close and bring you back to the File Cabinet when finished. It’s that simple.
- 2. Lets talk now about the advanced uploader. In the advanced uploader you have a few more options. You can select an entire folder directory and have it upload at one time. You can also also click on the icon next to the browse button here and see thumbnail images of the files that you want to upload. You can check or uncheck the files that you want to keep and then click the upload button. Your files will upload very quickly and even if interrupted can pick up where it left off. When complete, the uploader will close and bring you back to the file cabinet page where you can start sharing, editing and managing your documents and projects. Thanks for reading –About the Filocity file uploader. You can watch the associated training video at http://youtu.be/KARvQ2WU3L0 Filocity.com Safe, Effortless Organization with Instant Retrieval. FREE TRIAL at http://www.Filocity.com