
Recommended
More Related Content
Similar to Picasa guide
Similar to Picasa guide (20)
Recently uploaded
Recently uploaded (20)
Picasa guide
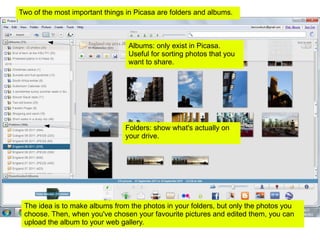
- 1. Albums: only exist in Picasa. Useful for sorting photos that you want to share. Folders: show what's actually on your drive. The idea is to make albums from the photos in your folders, but only the photos you choose. Then, when you've chosen your favourite pictures and edited them, you can upload the album to your web gallery. Two of the most important things in Picasa are folders and albums.
- 2. Here's a folder of photos from England in September – 83 photos, in fact. I don't want to upload them all, but I'm going to put some of them into a new album, of pictures from around my hall.
- 3. So I select a photo I want to include in the album... ...and click on 'new album' down here.
- 4. Here you can give your album a name, place, date and description. Don't worry – you can always change these later.
- 5. Here's my new album, with one photo in it.
- 6. Double click here to change any of the album info.
- 7. To add a photo to your album, find it in your folderand click here... ...and here.
- 8. And it appears in the album.
- 9. Or you can drag the photo over to the album name.
- 10. And the same thing happens.
- 11. You can also select a bunch of photos and use either method to add them to the album.
- 12. So now I have 13 photos in my album
- 13. If you decide you want to get rid of a photo from the album, right click and select 'remove from album'.
- 14. Now there are only 12 photos in the album, but the file I removed will still be in the original folder if I change my mind.
- 15. When you're happy with the album and ready to upload, click on 'share' and 'enable sync'. This will add the album to your web gallery and keep it synchronised (i.e. everything you change here will also be changed online, so you can add/delete photos, and they will automatically appear in/disappear from the web gallery). Now edit your chosen photos (crop, straighten, change brightness etc) and add captions, if needed.
- 16. The default settings. I upload full-size images, so I have an extra back-up, but you could quickly run out of space online (I pay for extra Google storage). 1600 pixels is a good size for the web and small prints. See what works for you. If you have an album you don't want everyone to see, you can choose 'anyone with link' rather than 'public on the web'.
- 17. Click 'sync' and it will start synchronising.
- 18. This will spin when the album is syncing. Sometimes it gets stuck - just restart Picasa, and all should be well.
- 19. This symbol means that the photo has been uploaded.
- 20. Then if you go to your web gallery, the album should be there.
- 21. Open it up to change settings like 'album cover'.
- 22. Choose a photo that looks good in a square for the cover (If you like).
- 23. If you add new photos to the album...
- 24. They should appear here quite soon. And the same goes for deleted photos (well, the opposite effect, obviously).
- 25. Copy the URL to share your album.
- 26. You can also add or change captions here, although I haven't done it for this album.
- 27. Any edits (cropping, brightness etc.) you make to photos in the album will also be synced to the online version of the photo. It's probably best to do most of these before syncing, but it really doesn't matter.
- 28. Or you can try installing this app, which should make things easier: http://apps.facebook.com/picasauploader which puts a Facebook button into Picasa. I haven't really tried this, but it seems simple enough. If you want to get your album onto Facebook, you can select all the photos in the album (ctrl+a) and choose 'file / export picture to folder.' this will create copies of the photos (any size you like) in a new folder. You can then upload these copies to Facebook the old-fashioned way.
- 29. That's about it, I think. It may seem a bit of a hassle to start with, but it's really quick, easy and flexible. Honest. The best way to look at is as an easy way to select your best pictures, without having to go through and delete anything, or move anything around between folders. This was you can add or remove photos whenever you like, and the programme takes care of the rest. Looking forward to seeing your pictures.