Beginners Guide to TikTok for Search - Rachel Pearson - We are Tilt __ Bright...
Instruksia po sborke
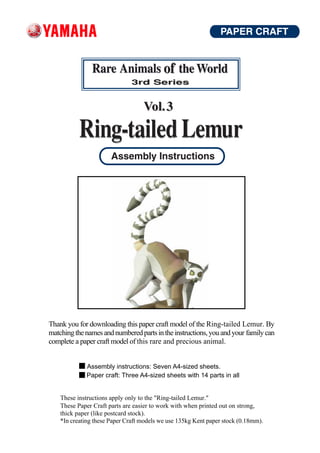
1. Thank you for downloading this paper craft model of the Ring-tailed Lemur. By
matching the names and numbered parts in the instructions, you and your family can
complete a paper craft model of this rare and precious animal.
Assembly instructions: Seven A4-sized sheets.
Paper craft: Three A4-sized sheets with 14 parts in all
These instructions apply only to the "Ring-tailed Lemur."
These Paper Craft parts are easier to work with when printed out on strong,
thick paper (like postcard stock).
*In creating these Paper Craft models we use 135kg Kent paper stock (0.18mm).
2. 1 To begin Basic working method and markings
Tools and materials needed
-Ruler - scissors - blade cutter or "Exacto-knife" - awl or Solid lines
other pointed tool (for making a folding crease) - felt pen Fold along these lines. The printed
- pin set - glue - hand towel ( for cleaning your fingers) - surface should be on the outside of
dictionary or other heavy book ( to press the papers flat). the folded shape.
Items of Caution
*Take care when using sharp or pointed objects or when Broken lines
using bladed cutting tools. Place a heavy sheet of paper Fold along these lines. The printed
under the paper you want to cut. surface should be on the inside of
*Use glue and other adhesives only in well-ventilated the folded shape.
areas.
*When printing, use a slightly reduced font size. There
may be differences in dimensions, depending on the type
of printer used. Dotted line
Cut along these lines.
2 How to assemble
*Follow the working method and markings carefully.
*Cut carefully along the outter line with cutting blade,
Exacto-knife or scissors.
Do not fold or cut the parts
marked .
One - point Advice
*Cut carefully with cutting blade, Exacto-knife or
scissors.
*For folding parts, first use an awl or other pointed
Cut out parts marked with an as-
tool to make a light crease along the dotted or solid
terisk(*).
line. This will make the folds straight. Avoid making
strong creases, as this will cause the paper to tear.
*As an adhesive, white wood glue is recommended.
Avoid over application as this may cause the paper
to wrinkle.
Red dots are the reference positions
*Before beginning assembly, test adhesive amounts
for gluing surfaces.
on extra paper.
*Occasionally, white spots will be apparent on folds
and cuts. Use a marker or pencil to fill in these spots.
It is recommended that this be done after each stage
of assembly because coloring becomes more diffi-
cult once parts are assembled.
-2-
3. 3
Please refer to the "Basic working method
Assembly
Indication of Working Methods
and markings" symbol chart on Page 2 to
assemble each part. Fold or Curve Glue
Instructions for Ring-tailed Lemur
1.Assembly of Head Fold each relevant part according to the assembly symbols.
Reference photo
1
2.Assembly of Mouth Reference photo
2
3.Assembly of Ears Reference photo
*Assemble each part in pairs.
Right (3)
4(3) Left (4)
4.Assembly of Belly
Reference photo
5
-3-
4. 3 Assembly
Please refer to the "Basic working method Indication of Working Methods
and markings" symbol chart on Page 2 to
assemble each part. Fold or Curve Glue
Instructions for Ring-tailed Lemur
5.Assembly of Shoulders Fold each relevant part according to the assembly symbols.
Reference photo
6
6.Assembly of Body
Reference photo
7
7.Assembly of Leg
Reference photo
8
-4-
5. 3 Assembly
Please refer to the "Basic working method Indication of Working Methods
and markings" symbol chart on Page 2 to
assemble each part. Fold or Curve Glue
Instructions for Ring-tailed Lemur
8.Assembly of Tail1 Fold each relevant part according to the assembly symbols.
Reference photo
9
9.Assembly of Tail2
Reference photo
10
-5-
6. Please refer to the "Basic working method
3 Assembly
Indication of Working Methods
and markings" symbol chart on Page 2 to
assemble each part. Fold or Curve Glue
Instructions for Ring-tailed Lemur
Please use the dots on each component as reference when gluing surfaces.
5. Finish Assemble according to steps through .
Procedure
Glue the muzzle to the head. Glue the legs to the part completed in .
Glue the ears to the part completed in . Glue the parts completed in and .
Glue the shoulder to the body. Glue the tail 1 to the tail 2.
Glue the underside to the part completed in . Glue the parts completed in and .
Ears
Body Head
Tail2
Mouth
Reference photo
Shoulders
Belly
Tail1
Leg
Assembly of the Pedestal
*Display the completed paper sculpture on the pedestal.
Assemble 11 - 13 and glue them on the pedestal where indicated. 13
12
11
Pedestal
-6-
7. 4 Completion
Here are pictures of the completed models.
Please refer to them when assembling and painting.
Colored
Ring-tailed Lemur
Photo of realistically colored paper sculpture.
Uncolored
Ring-tailed Lemur
Uncolored sculpture with textured paper.
Ring-tailed Lemur, Rare Animal
Ring-tailed Lemurs are the national animal of Madagascar and have
grayish brown backs and whitish gray stomachs. There are black mark-
ings around the eyes and the nose. The most distinctive of their fea-
tures, however, is a long bushy tail ringed in black and white, which is
the origin of their name. These primates have glands in the wrists
which disperse distinctively scented secretions, and adult males rub
their tails with their scent and then wave their tails over their heads in
order to intimidate opponents during confrontations. Although the they
leap between trees when traveling just like other lemurs, the ring-tails
often walk on the ground with their tails put up high. They feed on
fruit, leaves,flowers, and plants and occasionally eat insects and
chameleons.Ring-tailed Lemurs are found in forests and woods near
rivers in the southern part of Madagascar Island. The number of Ring-
tailed Lemurs has decreased mainly because of habitat loss due to tree
cutting, overgrazing by livestock, etc.
-7-