Steps on building sliding shelf for your laptop
•
0 likes•144 views

Having a smaller sliding shelf for your laptop ensures a better, convenient work space. Not only does it save valuable space in a smaller work space, but also provides an ideal positioning for work. Although, most desks come with handy sliding shelves, in some cases you might need to build a custom shelf for your convenience.

Recommended
More Related Content
Recently uploaded
Recently uploaded (15)
Featured
Featured (20)
Steps on building sliding shelf for your laptop
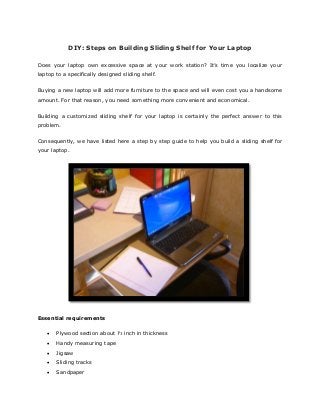
- 1. DIY: Steps on Building Sliding Shelf for Your Laptop Does your laptop own excessive space at your work station? It’s time you localize your laptop to a specifically designed sliding shelf. Buying a new laptop will add more furniture to the space and will even cost you a handsome amount. For that reason, you need something more convenient and economical. Building a customized sliding shelf for your laptop is certainly the perfect answer to this problem. Consequently, we have listed here a step by step guide to help you build a sliding shelf for your laptop. Essential requirements Plywood section about ½ inch in thickness Handy measuring tape Jigsaw Sliding tracks Sandpaper
- 2. Paint ¼ inch screw and screwdriver Step 1 Using a measuring tape determine the laptop dimensions and space available under the desk. Although, most laptops are relatively similar in dimensions, the sliding shelf should be around an inch bigger than the measurements. Step 2 Place the plywood section on a flat surface and use a pencil to mark the outline of sliding shelf. For clear-cut outlining, use a measuring ruler and chop the shelf design using a jigsaw. Step 3 Once the shelf is ready, get rid of the annoying splinter with sandpaper. For uneven surfaces and cracks, paint the plywood and let it dry for sufficient hours. Step 4 Now separate the two sliding tracks as base piece and sliding part. The base track is the section that gets installed to the desk, whereas the sliding part will be attached to the shelf. Step 5 Now on each side of the sliding shelf, line up the base track and attach it using ¼ screws and a compact screwdriver. Once the base track is fixed, hold it with the selected area underneath the desk and outline the area with a pencil. Step 6 Sketch the track direction with marks and install them with similar ¼ inch screw. After installation, ensure that the track is firmly mounted and is safe enough to sustain the weight of your laptop.
- 3. Step 7 Lastly, bring the sliding track next to base track and insert it towards the base track at an angle. As soon as the one section gets attached to the base track, turn the sliding shelf straight and push the other end jointly. Once the sliding shelf is at its desired place, simply push and pull the shelf to verify its functioning. Resource: Hays-NYC