GearLaunch Overview.
•Download as PPTX, PDF•
4 likes•618 views

GearLaunch Bangladesh Meetup. Event video : https://youtu.be/hwf_Zl0RfuY

Recommended
Recommended
More Related Content
Recently uploaded
Recently uploaded (20)
Featured
Featured (20)
Editor's Notes
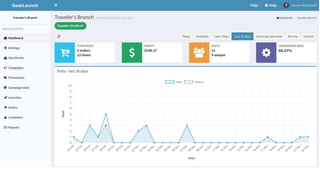
- This is the dashboard sellers will see when they first log in to their account. It has summary statistics on store performance for any time period they want to view, and a graph for traffic and order history over the past month. Notables: Good to talk about the mobile responsiveness of the platform here. You can do everything on mobile that you can do on desktop, both as a buyer and as a seller. Google infrastructure: We host domains on the Google Infrastructure, which is the most reliable system available. Your store will never crash due to traffic loads, as it is practically infinitely scalable. Continued on next slide
- Bottom of dashboard page.
- Store Settings – This is where you manage your team members and high level settings for you brand and business. Add your logo and favicon (logo icon in the browser tab), add team members with varying levels of permissions, set store time zone and name. Continued on next slide.
- Opt in or out of abandoned cart emails that we send automatically to customers who bounce from the buy page to remind them to purchase (promotions are not included in these yet, but its in the roadmap) Customer support!!! We manage branded customer support – FOR FREE – so when your customer calls or emails, we recognize that it is from your brand and we answer accordingly. Custoemrs never see the GearLaunch name/logo in the buying process. Facebook pixels and Google tag manager ID for google analytics (sellers can override the store pixel for an individual campaign if they want to)
- Storefronts – Sellers always ask, “Can I add more than one domain to my GL account?” and the answer is yes, but you can can now add multiple storefronts under one domain to keep your business all in one place. Here we have a store with the main homepage as demo.travelersbrunch.com, with a separate storefront created for dog campaigns. Next slide we are in the storefront settings.
- In the storefront settings, you can add the images and customizations that will make up the storefront. Check the “Hide storeront page” box to un-index it from search engines (spys). Set the URL path for the storefont, and add a nice banner image. Continued on next slide.
- At the bottom, add description (you can also add html, images, etc.) Add campaigns to the storefront by tag. You will tag campaigns with keywords when launching, and adding that same tag here will pull the campaigns onto the storefront. Storefront template is fixed, and you customize within the template, but we are planning to add more themese/template in 2017 (also a shopify plug in).
- Campaign dahsboard - View campaign performance and info, create new campaigns from the beginning, or clone a campaign to make minor adjustments before launching. Next slide we will be cloning a campaign.
- Campaign creation: Settings – Here you can add the campaign name, custom URL path, TAGS, and additional campaign settings. - Tags are important, and sellers should get in the habit of using them regularly. When a customer makes a purchase, their customer profile will take on the tags from that campaign. This is great for segmenting customer list later on for email marketing and custom audience creation. Additionally, tags are used to add campaigns to a storefront by category. Order fulfillment – You can choose normal campaign fulfillment (launch end fulfillment) where you take preorders for a week or so (like teespring), or Immediate Fulfillment, where products are printed on demand at a fixed base cost. Benefit of Launch End = possibility of better margins per unit as you scale. Benefit of Immediate = faster shipping (since it’s printed right away), but downside = fixed base cost. Hide number of purchases from product page, add a fudge factor (fake items sold to create urgency and social proof). Hide campaign from search engines, hide/display social sharing buttons UPSELLS – give dollar discount to customers after making first purchase. A popup says “Thanks for you order! Buy another and save $x” Upsells are only in the same campaign now, but we offer recommended campaigns on the confirmation page. Continued on next slide
- At the bottom you can edit campaign description and override the store pixel.
- Campaign creation: Design – Upload artwork, add products, set prices, choose colors and estimate profit. You can do two sided designs, but no branded tags or sleeve prints.
- Mugs are being beta tested right now!! This is the product selector. Add products all in one step.
- Profit estimator that gives you profit per unit, given the prices you set. Hanes tagless is only $11.95 at 1 unit sold (with printing), pricing is competitive overall.
- Campaign creator: Launches – Set campaign duration, opt in/out of auto-relaunch (where campaigns are relaunched right when they end), and choose to display countdown timer or not.
- Campaign creation: Advertise – Here is where you can use our URL builder to create Ad URLs for testing different ad sets. Just choose the product/color combination you want to view in the ad image, and the URL above will update automatically so you can paste it in the ad. GA variables are for Google Analytics users.
- Note the difference in the URLs between the last slide and this one.
- Promotions – Create dollar, percent, or free shipping promotions to offer to customers. They will click the URL and see an announcement on the product page.
- Campaign stats – Choose what statistics you want to view, filter campaigns by name, URL path, tags, sort by any metric, view any time period. The break down of how each ad drives traffic/purchases will be below (e.g., var test1 below the red doggy paw copy campaign).
- Launches – This is similar to the campaign stats page, but shows the metrics for each individual aunch of a campaign. You can auto-relaunch many times, and this show the most recent luanches and their performance.
- Orders – This is where you see the orders coming in in real time. Click the order number to view the information and status. Here you can see all customer info, the tags they took on in this purchase, email address, location, but the real value from this transparency is in the customers page…. Next slide
- Customers – Here you can see all of your customers and the tags they took on in their purchases. For FB custom audience, segment by tag (e.g., Dogs) and download the list to work with in FB or email marketing. Huge value in this list. You do not need to sell x units to get acces either. You own your customers and this is great for you customer lifetime value.
- Payouts – See payouts broken down by the fulfillment type of the campaign. Get paid out through payoneer, paypal, wire transfer (for larger payouts). Payouts are processed within 24 hours during business days.
- Example storefront (Mugs are in beta)
- Product page with SHOPPING CART!!
- Add to cart, and continue shopping. Great for average order value!
- Continue back to storefont, shop around…
- Add another product to the cart
- Check out with more than one campaign in one order! Items may arrive separately depending on their fulfillment, but we have clear messaging on this.
- Example confirmation page (different store - didn’t feel like paying for example shirts ;-)
- Upsell example pop up on receipt page.