4. Add Media Options
• Upload from computer
• Record using a webcam
• Upload from YouTube
• Record your screen
Editor's Notes
We are going to go over the Kaltura interface and show you how to upload a file.
We have enrolled you in the Kaltura course as a STUDENT, so we will be going over how to do all of this as a STUDENT.
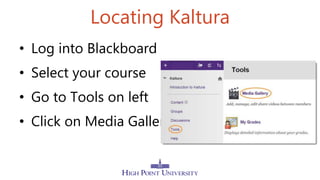
Click on this course in your course menu
To locate Kaltura click on tools in the control panel
Select media gallery
This will bring you to the course media gallery
The course media gallery contains all media in the course from all users
You can sort the media gallery
To add your own media, click add media
The Media Gallery is where you will see a list of all of your uploaded content. This is where you will see all uploaded videos, even ones that have not been published yet. It is currently empty right now, and that tis why it says no media found. Once you have added media to your media gallery it is fairly seamless to add the media to content sections of your course.
This is how you add media to your media gallery. We will go over these options in more detail in a minute
The actions are where you can edit your Media Gallery and see analytics for your videos. You can see things like: the average amount of time a video is watched, how many times a video is watched, and who watched the video.
To upload content click on Add Media
This brings you to the full media gallery
This is where you can add videos from your computer or record your screen
This is where you can add a YouTube video
Record your screen
Or record yourself using a webcam
Today we are going to focus on the media upload option.
We will cover the other upload options at a later date. Remember to check the portal regularly to stay up to date on our trainings.