This document provides instructions for setting up and using the Baby Brezza Formula Pro machine. It includes a chart listing different formula brands and types and the corresponding setting number to select on the measuring wheel. It then provides step-by-step instructions for cleaning parts, filling the water tank, adding formula powder to the container, selecting the bottle size and starting the machine to dispense the prepared bottle. Additional sections provide cleaning instructions and troubleshooting tips.
This document provides the limited one-year warranty terms for a coffee maker. It covers defects in materials or workmanship for one year from the date of original purchase for the original consumer. It will either repair or replace the product if defective. Damage from misuse, accidents, commercial use, or improper service is not covered. The warranty is only valid in the US and Canada. It also provides instructions on how to obtain warranty service by contacting the company for return instructions.
El documento describe los atributos de un producto y las etapas de su ciclo de vida. Explica que los atributos como calidad, diseño, empaque y marca permiten identificar un producto. Luego detalla las cuatro etapas del ciclo de vida de un producto: introducción, crecimiento, madurez y declinación.
This document provides instructions for using the Baby Brezza Formula Pro baby formula maker. It includes assembly instructions, how to select the appropriate measuring insert based on formula type, instructions for cleaning different parts, safety information, and tips for use. The summary is:
1) The document provides setup and use instructions for the Baby Brezza Formula Pro baby formula maker, including how to assemble parts, select the correct measuring insert, fill and use the machine to prepare formula bottles.
2) It describes how to clean different parts of the machine on a regular basis, with safety warnings to unplug the machine before cleaning.
3) Additional use tips are provided, such as adjusting the drip tray and checking
This document provides instructions for using a Keurig Rivo cappuccino and latte system. It explains how to prepare the water reservoir and brewing system by running initial cleansing cycles. Instructions are provided for making espresso, frothing milk to make cappuccinos and lattes, and crafting iced lattes. Helpful hints are also included, such as using bottled or filtered water and how the automatic shut-off feature works. Safety warnings and cleaning instructions are also listed.
https://www.coffeeza.com/coffee-pods-and-capsule-machines/
Purchase Authentic Nespresso compatible Italian coffee pods, Capsule machines and Accessories online in India only from Coffeeza
The document provides information about the Talboys high throughput homogenizer. It is designed to homogenize samples in a microplate or vial format to allow for high throughput processing. Samples are placed in wells or vials with grinding balls and buffer, then processed rapidly in the homogenizer. The homogenizer can effectively process various sample types such as tissues, seeds, and cultures. Installation and operating instructions are provided, along with safety guidelines and tips for use. Maintenance is not required beyond cleaning, and the homogenizer is built for long-term dependable use.
Aroma Rice Cooker Instructions_pdfrao.comMr. Henry
Aroma rice cookers are popular kitchen appliances for cooking rice and other grains. Here are general instructions on how to use an Aroma rice cooker:
**Ingredients and Equipment:**
- Aroma rice cooker
- Rice (jasmine, basmati, long-grain, etc.)
- Water
- Measuring cup
- Optional: Salt, butter, or oil for flavor (adjust to taste)
**Instructions:**
1. **Measure the Rice:** Use the provided measuring cup or a standard measuring cup to measure the desired amount of rice. Typically, 1 cup of uncooked rice will yield about 3 cups of cooked rice. Adjust the quantity according to your needs.
2. **Rinse the Rice (Optional):** Rinsing rice can remove excess starch and improve the texture. Place the measured rice in a fine-mesh strainer or sieve and rinse it under cold water until the water runs clear. Drain well.
3. **Add Water:** Refer to the rice cooker's instructions for the correct rice-to-water ratio. As a general guideline, for white rice, use a 1:1.5 or 1:2 ratio (1 cup of rice to 1.5 or 2 cups of water). For brown rice, you may need slightly more water, such as a 1:2 or 1:2.5 ratio. Adjust based on your preference and the type of rice you're cooking.
4. **Season (Optional):** Add a pinch of salt, a small amount of butter, or a teaspoon of oil to the rice and water mixture for extra flavor. You can also add herbs or spices as desired.
5. **Start the Cooking Process:** Place the rinsed rice and water mixture into the inner pot of the Aroma rice cooker. Make sure the inner pot is properly positioned in the cooker.
6. **Select the Cooking Setting:** Aroma rice cookers typically have settings for white rice, brown rice, and sometimes additional options like steam, sauté, or delay timer. Choose the appropriate setting for your rice type. Most models have indicator lights to show the selected setting.
7. **Start Cooking:** Close the lid of the rice cooker, plug it in, and press the "Cook" button. The rice cooker will start cooking, and it will automatically switch to "Keep Warm" mode when the rice is done. This keeps the rice warm until you're ready to serve.
8. **Let It Rest:** After the rice cooker switches to "Keep Warm," let the rice rest for about 10-15 minutes. This allows any remaining moisture to distribute evenly and results in fluffier rice.
9. **Serve:** Open the lid, fluff the rice with a fork, and serve it hot as a side dish or base for your favorite dishes.
Remember to consult your specific Aroma rice cooker's manual for detailed instructions and settings, as features and functions may vary between different models.
This document provides contact and product information for Phray Technology Co., Ltd, a manufacturer of medical devices including insulin pumps, near-infrared therapy devices, and ECG machines. It includes the company address and contact details of an individual, as well as an overview of key products and services like original equipment manufacturing and a description of Phray's insulin pump model PH300. International cooperation opportunities and terms and conditions for product use are also mentioned.
The document is a user's guide for a Bissell Steam Mop that provides instructions on assembly, use, maintenance and safety warnings. It includes:
1) Directions for assembling the steam mop which involves attaching the swivel head, handle and water tank.
2) An overview of the steam mop's features such as the removable water tank, water filter, steam trigger and microfiber pads.
3) Steps for operating the steam mop which are to fill the water tank, plug it in, and slowly move the steam mop across floors while pressing the trigger to emit steam as needed.
8. This 3 sentence summary provides the high level and essential information from the multi-page document on the Tefal 8 in 1 Cooker:
The document provides safety instructions and descriptions for the Tefal 8 in 1 Cooker, a multi-function electric rice cooker and slow cooker. It outlines important safeguards for using the appliance and connecting it to a power supply, and describes its key components such as the non-stick bowl, lid, and control panel. The document also provides instructions for cleaning the appliance before its first use.
Instructions about Presto FryDaddy Deep FryerAmy Pie
This document provides instructions for using a FryDaddy electric deep fryer. It begins with safety instructions, then provides directions for setup, use, cleaning and storage. Recipes and cooking times are included for common deep fried foods. Maintenance is recommended only through the manufacturer to ensure safety and performance.
Better Tasting Wine Instantly! By Waerator.SWAGTRON USA
The document is the user manual for the Waerator Instant Wine Aerator. It contains 8 sections that provide information about the product parts, specifications, how to use the aerator, cleaning instructions, storage, disposal, and warranty details. The manual instructs users to read all safety warnings and instructions carefully before using the aerator to properly operate and maintain the device.
This document provides instructions for assembling and using a Ninja® Professional Blender. It includes safety warnings and instructions for assembling the single serve cup and 72-oz pitcher attachments. The summary is:
1) The document provides assembly instructions for the Ninja® Professional Blender's single serve cup and 72-oz pitcher attachments, including how to attach the blades and lids.
2) It emphasizes safety warnings such as not overfilling containers, using caution with sharp blades, and avoiding hot foods or liquids over 180°F.
3) Instructions are given for operating the blender with short pulses using the single serve cup attachment and engaging the various speed settings when using the larger pitcher attachment.
Melitta solo milk_coffee_machine_manual-from_espress_groupDamiano Gestri
This document provides operating instructions for a single-serve coffee maker. It includes safety instructions warning of risks of electric shock, burns, and scalding. It also provides instructions on starting up the appliance, including filling the water reservoir and bean container. It describes how to adjust the dispensed coffee quantity and strength. Steps are provided for dispensing coffee or espresso and preparing milk froth or heating milk using the steam pipe. The document also notes the display interface and indicates when maintenance like cleaning or descaling is needed.
Ръководство за екплоатация на прахосмукачка робот Xiaomi Roborcok 2nd generation. За повече информация
https://domotics.bg/prahosmukachka-robot-xiaomi-roborock-s50
With changing lifestyle of people, pollution, popularity of junk food, and stress normal brushing of teeth is no more solution for maintaining healthy teeth and gums. We can find many people although brushing their teeth twice in a day but still suffering from oral problems. If we go through the basic reason behind this fact we can find that while brushing many hard to reach corners are left where harmful debris left behind that badly affect our teeth and gum. In addition, at times it also happens due to hurry we devote less time in brushing and due that many gum problems arise.
The document is a manual for a WestBend 4-Slice Egg & Muffin Toaster. It contains important safety instructions for using the appliance, as well as sections explaining how to operate the different functions of the toaster for toasting, poaching eggs, cooking eggs, and making breakfast sandwiches. The manual also provides instructions for cleaning and maintaining the toaster, as well as a product warranty and list of replacement parts.
The Gurin steam inhaler provides a natural, safe and effective therapy to relieve symptoms due to: allergies, bronchitis, colds, flu, laryngitis, rhinitis, sinustis and more. Soothing steady vapor. Variable steam adjustment. Ideal for aromatherapy. Features include soft flexible mask, extension tube, drain tank, convenient indicator light, Aromatherapy tank, variable steam control, measuring cup, internal water chamber, and generous 5" power cord. Latex free. One-year limited warranty.
To clean a blender:
1. Add warm water and dish soap to the blender halfway and blend for 30 seconds to remove particles.
2. Rinse the blender jug, blade, and lid by hand and allow them to air dry to prevent damage.
3. Store all blender parts assembled in a dry place to prevent loss of parts and dulling of blades.
This document provides instructions for operating and installing a Bosch washing machine. It covers general safety information, preparing laundry, using detergents, operating the control panel and programs, cleaning and maintenance, troubleshooting, and installation instructions. Safety warnings advise keeping children and pets away from the machine and following instructions to avoid electric shock, injury, or poisoning from detergents. Environmental tips encourage using full loads and lower temperature programs to conserve energy and resources.
Cleaning your breast pump parts has always been a very important process and is a hot topic of conversation among moms. What’s the best way to clean pump parts? Should you clean right after using your pump? Though many moms go about cleaning their breast pump parts differently, there is actually a specific process that works best.
The document is the operation manual for the Green Star Elite Juice Extractor. It describes the various parts of the juicer, how to assemble and use it to juice fruits and vegetables or make other foods like baby food or nut butters. It provides important safety instructions, cleaning instructions, and troubleshooting tips. The manual emphasizes only using authorized parts and following safety precautions to ensure safe use of the juicer.
The user manual provides instructions for operating a washing machine. It describes safety information, the product features, how to use the control panel, and guidance for daily use. Key details include how to load laundry, add detergent, select a wash program, and start the machine. The manual aims to ensure users understand how to properly and safely operate the appliance.
The document provides instructions for installing and using an Electrolux dishwasher. It recommends reading the manual before use and checking for any scratches or missing accessories when unpacking. Installation can be built-in or freestanding. It describes filling the salt and rinse aid, loading dishes correctly, selecting programs, and basic care and maintenance.
The document provides instructions for operating various appliances and equipment used in caregiving, including blenders, coffee makers, can openers, food processors, microwave ovens, bottle sterilizers, flat irons, and washing machines. It explains how to safely use each appliance, listing the steps for setup, operation, and cleanup. It then provides a brief quiz to test comprehension of the proper uses and safety procedures for the discussed appliances.
The document provides instructions for operating various appliances and equipment used in caregiving, including blenders, coffee makers, can openers, food processors, microwaves, bottle sterilizers, flat irons, and washing machines. It explains how to safely use each appliance, listing the steps for setup, operation, and cleanup. It then provides a short quiz to test comprehension of the proper use and safety procedures for each item.
The document provides instructions for operating various appliances and equipment used in caregiving, including blenders, coffee makers, can openers, food processors, microwave ovens, bottle sterilizers, flat irons, and washing machines. It explains how to safely use each appliance, listing the steps for setup, operation, and cleanup. It then provides a short quiz to test comprehension of the proper uses and safety procedures for the appliances.
Maintenance and calibration of laser Doppler probes and pressure cuffsPerimed
The aim of this document is to summarize the basic
maintenance requirements for laser Doppler probes and
pressure cuffs used for pressure measurements.
Similar to Baby brezza formula pro user guide - babybrezzaformulapro.com (20)
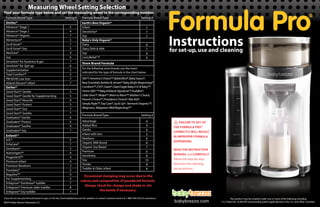
Heritage Conservation.Strategies and Options for Preserving India HeritageJIT KUMAR GUPTA
Presentation looks at the role , relevance and importance of built and natural heritage, issues faced by heritage in the Indian context and options which can be leveraged to preserve and conserve the heritage.It also lists the challenges faced by the heritage due to rapid urbanisation, land speculation and commercialisation in the urban areas. In addition, ppt lays down the roadmap for the preservation, conservation and making value addition to the available heritage by making it integral part of the planning , designing and management of the human settlements.
2. Power
Cord
Control
Panel
Axle
Powder
Container
Lid
Powder
Container
Water
Tank
Lid
Funnel
Funnel
Cover
Funnel
Compartment
Base
Water
Tank
Bottle Grate Drip Tray
Stirring
Wheel
Locking
Cover
Upper
Measuring
Wheel
Lower
Measuring
Wheel
Formula Pro® Controls & Indicator Lights
No Water
warning LED
Funnel Out
Warning LED
Water temperature
indicator LEDs
Water ounce indicator LEDs
Water ounce selector button Start Button
Stop Button
Powder Container
Parts
Silicone Scraper
1
Important Safeguards
Save these instructions
Warning:
For infants less than 6 months old,always use bottled water suitable for infant formula preparation.Tap
water and/or unsterilized baby bottles can potentially lead to adverse effects for the health of your baby.
Only prepare one bottle at a time,feed immediately and follow all instructions carefully. Do not keep
leftover formula mix. Always hold baby while feeding. Leaving baby unattended may cause choking.
TECHNICAL DATA
Supply voltage: 120V ~ 60Hz Current: 2.5A Motor Power: 20W
Model: FRP0045 Heater Power: 250W
When using electrical appliances, basic safety precautions should always be followed, including the following:
wash before first use
wash all before first use
wash before
first use
wash before
first use
wash before
first use
wash before
first use
2
1. Read all instructions before using.
2. Do not touch hot surfaces.
3. To protect against electric shock and injury to persons do not immerse cord, plug, water tank or appliance in water or other liquid.
4. Close supervision is necessary when any appliance is used by or near children.
5. Unplug from outlet when not in use and before cleaning. Allow to cool before inserting or removing parts, and before cleaning the appliance.
6. Do not operate this appliance with a damaged cord or plug. If the appliance malfunctions or has been damaged in any manner, return
appliance to the nearest authorized service facility for examination, repair or adjustment.
7. The use of accessory attachments not recommended by the appliance manufacturer may cause fire, electric shock or injury.
8. Use on level surface and be sure there is no debris under the unit and the rubber pads are touching the surface.
9. Household use only. Do not use outdoors.
10. Do not let cord hang over edge of table or counter, or touch hot surfaces.
11. Do not place on or near hot gas or electric burner, or in a heated oven.
12. Do not use appliance for other than intended use.
13. Do not attempt to use the machine without water in the water tank.
14. This appliance has a polarized plug (one blade wider than the other). To reduce risk of electric shock, this plug is intended to fit into a
polarized outlet only one way. If the plug does not fit fully into the outlet, reverse the plug. If it still does not fit, contact a qualified
electrician. Do not attempt to modify the plug in any way.
15. Make sure machine is turned off before unplugging.
16. A short power-supply cord is provided to reduce risks of becoming entangled in or tripping over a longer cord. Longer detachable
power-supply cords or extension cords are available and may be used if care is exercised in their use. If using the machine with an
extension cord, make sure the cord is the proper electrical rating for the machine. The extension cord should be arranged so that it does
not drape over countertop or tabletop where it can be pulled on by children or tripped over unintentionally.
17. Before serving make sure formula mixture is at safe temperature for baby.
18. Avoid contact with moving parts. Never remove powder container, powder container lid, funnel or water tank while machine is in operation.
19. Do not disassemble.
Formula Pro
Components
®
3. Example :
Assembled
Measuring Wheel
set to #5
Example :
Assembled
Measuring Wheel
set to #5
Powder Container set up Clean internal parts - before first use - without powderWash: Funnel,Funnel Cover,Inside of Water Tank,and all Powder Container parts (see page 2).
3 4
After washing,make sure all Powder Container parts are COMPLETELY DRY before assembly.
Locking Cover should look
like this when inserted properly.
Place 10 ounce or larger container
to catch water.
Turn Powder Container Lid
Clockwise to lock into place.
Your Formula Pro® is now ready to use with powder.
Fill water tank to MAX line with
distilled water.
Select Measuring Wheel
setting 1 - 10 by using the chart
on the back cover of this booklet.
Place Powder Container Lid
on Powder Container as shown.
Make sure tab is in the back
Press upper & lower halves of Measuring Wheel together so your powder’s setting number shows through
window on the Upper Measuring Wheel. You have now assembled your Measuring Wheel.
Always use a clean and sterilized bottle,nipple or other feeding equipment.
Wash and dry hands before handling sterilized bottles.
Make each bottle as needed,and do not store mixed formula for later use.
Don’t add powder yet.
Follow the steps on the next
page to run an internal
cleaning cycle BEFORE using
the Formula Pro® with
powder.
Plug in machine and turn
power switch to on position.
Choose 10 oz.size by
pressing ounce button
4 times.
Press start to begin rinsing.
The Formula Pro® will stop after
dispensing 10oz of water.
Dispose of the water captured in
the container.
1.Place the front edge of Locking
Cover under the tab in the
Powder Container.
1
1 2
64 5
3
3 54
2 2a
Set up the Measuring Wheel to work with your powder type.
After setting up the powder container,run a cleaning cycle to rinse internal parts.
Set up the Powder Container and parts.
Place Powder Container on Base
with“MIN”&“MAX”lines facing front.
Place assembled Measuring Wheel
In Powder Container.
1
2
2.Press down on back edge
to lock in place.
Place Stirring Wheel In Powder
Container,align with axle and
push down so it touches the
Locking Cover.
5a 6
Numbers on
Lower Measuring Wheel
Numbers on
Lower Measuring Wheel Don’t add
powder
Don’t add
powder
Follow the steps on pages 5 and 6 to prepare bottle with the Formula Pro®
4. Adjust the drip tray so the bottle is as close to the Funnel outlet as possible.
This will make sure no formula spills outside of the bottle.
Lift up and pull out to remove.
Push in and down to install.
Tall BottleShort Bottle
Bottle Preparation Continued
Afterbabystopsfeedingfrombottle,discardanyleftoverformulamixture.
Never removeWaterTank,Funnel or Powder Container while machine is in operation.
Alwaysholdthebottlewhenfeedingbaby. Neverpropthebottleupandleaveyourbabytofeedunsupervised.
Bottle Preparation continued on next page
PourpowderlooselyandevenlyintoPowderContainer. NeverfillpasttheMAXline.
NeverpackpowderinthePowderContaineroroverfill.
Powdercanbespreadevenlywiththe3armsonthePowderContainerLidbeforeclosing.
5 6
Check for clumps and shake
or stir the bottle if necessary.
Test temperature...
1 2Fill water to MAX line
Fill powder container with powder
and close Lid
3
The heater in the Water Tank will warm the water and keep it warm as
long as the machine is powered on.
If you refill the Water Tank with cool or room temperature water and
need to use the machine right away,the machine can be used while
water is heating (flashing yellow light).
If you run the machine with cool or room temperature water,before
the water is warm and ready, always make sure formula is mixed
properly and check for clumps.
About water temperature
FlashingYellowmeans
waterisheating.
SolidGreenmeans
wateriswarm
andready.
Temperature Indicator Lights
FlashingYellow&Green
meanswaterpouredinto
tankistoohotortoocold.
Never fillWaterTank with hot water. If you boil water before using it
in the machine,let the water cool to body or room temperature before
pouring it into theWaterTank.
For quickest warming time,always fill the water tank with room
temperature or cool water. Flashing green & yellow lights mean the
water poured into in the Water Tank is too hot or too cold.
The machine will not work while the green & yellow lights flash.
If you don’t want to wait long for the water to heat,do not fill with
water stored in the refrigerator.
Select correct height for Drip
Tray based on bottle height.
Machine will dispense formula
into bottle and stop when done.
Select bottle size by pressing the ounce button.
With each push,the amount will increase 2 ounces.
When desired ounce size is selected,press start
to dispense formula.
4 5
6 7 8
Check level of mixed formula.
Bottle Preparation
due to
added powder volume and/or
variance in bottle markings.
Level will appear higher
Follow the steps on these pages to prepare bottles with the Formula Pro®
... andfeedbaby.
5. User TipsDaily Cleaning
Monthly Cleaning
The Funnel,Funnel Cover and underside of Powder Container MUST BE CLEANED once per day
(if machine is used daily). Follow these steps to clean the Formula Pro® parts every day.
Remove Funnel & Funnel Cover
by pulling out and down.
Wipe the hole the on underside of
Powder Container.
The Powder Container parts,Water tank and Base should be cleaned once a month.
With the Funnel removed and Powder Container attached to machine,
wipe any dry formula powder from the hole on the underside of the
Powder Container & Funnel Compartment in a circular motion with a
DRY paper towel or DRY soft cloth.
Always make sure the Funnel and Funnel Cover are completely DRY
before placing in machine.
Remove Funnel Cover from Funnel
by lifting up on Funnel Cover.
Wash and rinse Funnel & Funnel Cover
thoroughly.
Unplug the appliance before cleaning. Do not use abrasive pads to clean the machine.
Funnel and Funnel Cover are top rack
dishwasher safe and are also safe for
steam sterilization.
Never use a wet or damp cloth to clean the Funnel Compartment
or underside of Powder Container.
The Formula Pro can be used at any time during the water heating cycle, but not all powders mix well with cool
or room temperature water. Always check for clumps & shake or stir the closed bottle gently to mix the powder
completely with the water.
ALWAYS FOLLOW INSTRUCTIONS AND NOTE EXPIRY DATE ON POWDER MANUFACTURER LABEL7 8
1
4
2 3
1
2 3
RefillWaterTank regularly with room temperature water and keep
machine powered on.This way,the water will always be warm and
ready to serve.
Do not remove theWaterTank from the base to refill. Simply lift the
WaterTank Lid at the front and pour water in.Make sure to keep
water above“MIN”line.
To easily separate the Upper MeasuringWheel from the
Lower MeasuringWheel,press the raised center area while
holding the outside edge as shown in photo at right.
If the powder forms a cone shape
mound when refilling the Powder
Container, use the 3 arms on the
bottom of the Powder Container
Lid to gently level the powder
before closing. Always keep
the powder level below the MAX line
and never pack powder in the
Powder Container.
The machine Base should be wiped
with a damp,soft cloth or sponge
and dried immediately. Never
submerge the base or plug in water
or other liquids. Dry machine Base
after cleaning.
TheWaterTank
should be cleaned
onceamonth
with mild detergent
and soft cloth or
sponge. Rinse inside
ofWaterTank
thoroughly before
refilling with clean,
purified water. Wipe
the outside of the
WaterTank with a
damp clean cloth.
NeverimmerseWaterTankorget
theelectronicsin thebaseofthe
WaterTankwet. If the electronics in
the base of theWaterTank get wet,allow
to air dry thoroughly before placing back
on base. NeverplaceWaterTankin
dishwasher.
The Powder Container and Powder
Container Parts should be cleaned
onceamonth by emptying any
remaining powder (powder can be
saved for refill) and cleaned with mild
detergent and soft cloth or sponge.
NeverplacePowderContainerin
dishwasher.
Always make sure powder level is above the top of the StirringWheel.
You will know it’s time to refill the Powder Container when any of the
four horizontal arms of the StirringWheel are visible through the
powder.
Do not use the machine when the powder level is below the MIN
line marked on the Powder Container.
Refill when arms of stirring
wheel are visible
Make sure
powder is
not above
the MAX line
before closing
lid.
Make sure
powder is
not above
the MAX line
before closing
lid.
6. Limited 1-Year Warranty
The limited warranty is valid only on products bought through authorized resellers and used in the United States and Canada.
Buying through an unauthorized reseller or using this product outside of the United States and Canada automatically voids
this warranty.
This warranty is available to consumers only. You are a consumer if you own a Baby Brezza Formula pro that was purchased at
retail for personal,family or household use.Except as otherwise required under applicable state law,this warranty is not
available to retailers or other commercial purchasers or owners.We warrant that your Baby Brezza Formula Pro will be free of
defects in material or workmanship under normal home use for one year from the date of original purchase.Customer will be
required to present original proof of purchase in order to obtain the warranty benefits. In the event that you do not have
proof of purchase date,the purchase date for purposes of this warranty will be the date of manufacture.If your Baby Brezza
Formula Pro should prove to be defective within the warranty period,we will repair it or,if we consider it necessary,replace it.
To obtain warranty services,please call Customer Service at 1-888-396-6552 or write to:
Baby Brezza,250 Passaic Street,Newark,NJ 07104 Attn:Customer Service.
Troubleshooting
Customer Service and Warranty
Condition Possible Cause Remedy
Machine will not start.
Temperature of
dispensed formula
is too cold.
Water has not yet been heated to
correct temperature.
Powder level in powder container is
too low.
Powder is stuck in powder measuring
wheel.
Measuring wheel is set to incorrect
number for powder type.
Wait for heater to warm water
in tank. Green LED in“temp”
section of control panel will
illuminate when water reaches
correct temperature.
Make sure silicone scraper is
installed correctly.
Make sure the measuring wheel is
set to the correct number for your
powder type. See Back Cover.
Locking cover is not locked under
tab in powder container.
Check locking cover and make sure
the edge is locked under the tab in
the powder container.
See page 3,Step 5 for details.
Refill Powder Container with
more powder.
If you can not remedy problems with the machine by using the troubleshooting chart above,
do not return the your Formula Pro® to the store, please contact Customer Service at 1-888-396-6552.
Any other servicing should be performed by an authorized service representative.
Unit is unplugged.
Unit is not turned on.
Funnel is removed or not fully
inserted.
Water Tank is removed or not
fully seated.
Water level is below“MIN”line.
Powder container is removed or not
fully seated.
Powder container lid is not
completely closed.
Powder container lid is on backwards.
Turn Powder container lid
clockwise to close completely.
Make sure tab on outer edge of
Powder Container Lid is facing the
back of the machine and engaged
with safety switch.
See page 4,step 1 & 2 for details.
Water in Water Tank is too cold.
( Green & Yellow Temp LEDs Flashing)
Water in Water Tank is too hot.
( Green & Yellow Temp LEDs Flashing)
Allow water to warm up or pour
warmer water in Water Tank to
raise temperature faster.
Allow water to cool down or pour
cool water in Water Tank to
lower temperature faster.
Insert funnel or push front of
funnel until flush with machine.
Place water tank on base or
push down all the way.
Water Tank not fully seated. Push Water Tank down all the way
on Base.
Water Tank not fully seated. Push Water Tank down all the way
on Base.
Add more water to water tank.
Place powder container on
base or push down all the way.
Make sure the plug is securely
inserted into the power outlet.
Turn switch on lower back of
unit from off to on.
Troubleshooting
Condition Possible Cause Remedy
Not enough powder
dispensed.
Too much powder
dispensed.
Not dispensing water
Clean heater plate and use
purified/distilled water.
Scaling on water tank
heater plate.
Mineral rich water used
persistently.
Powder build-up
on funnel cover
and underside of
powder container.
Water Tank is full,
red no water light
is on.
Clean funnel cover and powder
container bottom frequently,
every 5-6 bottles,or at least
once a day.
Frequent use without cleaning
underside of powder container.
See page 7,step 4 for details.
9 10
If you are experiencing problems with your Baby Brezza Formula Pro,
please call our Customer Service department at 1-888-396-6552 before returning
the product so that we can offer you our best service customized to your particular situation.
Funnel Cover is not straight
on funnel or not pushed down
completely.
Align tab on front of Funnel Cover
with notch in Funnel and push
down Funnel Cover completely.
Funnel will not fit
all the way in Funnel
Compartment.
Measuring wheel is set to incorrect
number for powder type.
Make sure the measuring wheel is
set to the correct number for your
powder type. See Back Cover.