Rsa animation how to guide
•
0 likes•916 views

The document provides instructions for creating an RSA Animations-style video using common classroom equipment. It outlines the roles and materials needed, including laptops, cameras, paper, and software. It then lists a 7-step process: 1) Split into groups and assign roles, 2) Create a script, 3) Develop illustrations to match, 4) Set up camera to capture drawings, 5) Record the sketch, 6) Edit footage in Movie Maker, adjusting speed and removing sound, 7) Record narration and save the video.

Recommended
More Related Content
Similar to Rsa animation how to guide
Similar to Rsa animation how to guide (20)
More from Steve Brophy
Rsa animation how to guide
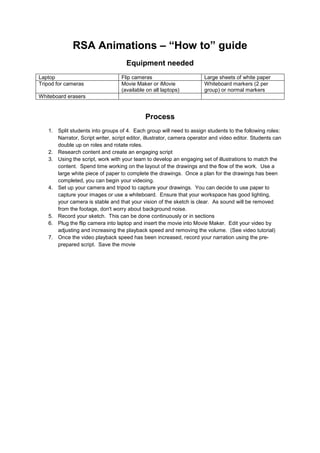
- 1. RSA Animations – “How to” guide Equipment needed Laptop Flip cameras Large sheets of white paper Tripod for cameras Movie Maker or iMovie (available on all laptops) Whiteboard markers (2 per group) or normal markers Whiteboard erasers Process 1. Split students into groups of 4. Each group will need to assign students to the following roles: Narrator, Script writer, script editor, illustrator, camera operator and video editor. Students can double up on roles and rotate roles. 2. Research content and create an engaging script 3. Using the script, work with your team to develop an engaging set of illustrations to match the content. Spend time working on the layout of the drawings and the flow of the work. Use a large white piece of paper to complete the drawings. Once a plan for the drawings has been completed, you can begin your videoing. 4. Set up your camera and tripod to capture your drawings. You can decide to use paper to capture your images or use a whiteboard. Ensure that your workspace has good lighting, your camera is stable and that your vision of the sketch is clear. As sound will be removed from the footage, don't worry about background noise. 5. Record your sketch. This can be done continuously or in sections 6. Plug the flip camera into laptop and insert the movie into Movie Maker. Edit your video by adjusting and increasing the playback speed and removing the volume. (See video tutorial) 7. Once the video playback speed has been increased, record your narration using the pre- prepared script. Save the movie