
Recommended
More Related Content
Similar to Jdeveloper12c
Similar to Jdeveloper12c (20)
Jdeveloper12c
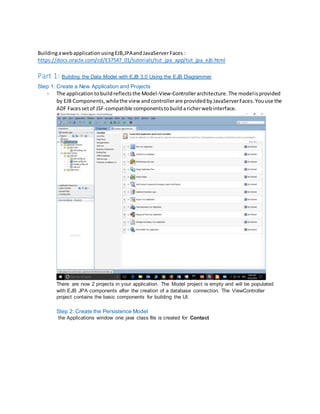
- 1. BuildingawebapplicationusingEJB,JPAandJavaServerFaces : https://docs.oracle.com/cd/E37547_01/tutorials/tut_jpa_app/tut_jpa_ejb.html Part 1: Building the Data Model with EJB 3.0 Using the EJB Diagrammer Step 1: Create a New Application and Projects - The applicationtobuildreflectsthe Model-View-Controllerarchitecture.The modelisprovided by EJB Components,whilethe view andcontrollerare providedbyJavaServerFaces.Youuse the ADF Facessetof JSF-compatible componentstobuildaricherwebinterface. There are now 2 projects in your application. The Model project is empty and will be populated with EJB JPA components after the creation of a database connection. The ViewController project contains the basic components for building the UI. Step 2: Create the Persistence Model the Applications window one java class file is created for Contact
- 2. Step 3: Create an EJB Diagram An EJB diagram is a way to create and visualize entities, java bean and relationships between these components.
- 3. Step 4: Create a Facade Bean to Expose for the Client Application Facade bean trình bày các đối tượng client với giao diện thống nhất cho các EJB cơ bản (Enterprise JavaBeans). Máy khách chỉ tương tác với façade bean, nằm trên máy chủ và gọi các phương thức EJB thích hợp. Kết quả là, các phụ thuộc và giao tiếp giữa client và EJB được giảm In the Components window, select the EJB Components library and open the EJB Nodes. . The session bean is made up of three files: ContactFacadeBean - contains the session bean code. ContactFacade - describes the capabilities of the bean for remote clients and ContactFacadeLocal describes the capabilities for the local client.’ Step 5: Create ADF Data Controls from EJB Session Beans You now expose the EJB as a data control for the Oracle ADF framework. This simplifies the way that you bind user interfaces to the EJB To create ADF data controls from EJB Session Beans, perform the follwing steps: A number of things happen in your project when you create a data control based on an EJB session bean. Jdeveloper creates the data control definition file ( DataControls.dcx), opens the file in the overview editor Expand the Data Controls accordion to review the components that have been created and are now available for the UI.
- 4. Expand the ContactFacadeBean node. Selecting the contactFindAll node provides details in the right hand side about the data control. Step 6: Add UI Hints and Validation Rules The ADF Model provides a declarative way of adding validation and consistent UI control to your application In the next few steps, you will set the label of several attributes and a validation rule to the Contact data control Part 2: Building the View Project Step 1: Create the Global Layout for the JavaServer Faces Page In the next few steps, you create a JavaServer Faces Page using ADF Faces components for the Contact Detail page. Right-click the ViewController project and select New > From Gallery from context. In the next few steps, you add data-bound ADF Faces components to the page. These components display a department along with the employees belonging to the department.
- 6. Part 3: Simply example JDEV tool Example jdev: https://o7planning.org/vi/11485/cac-buoc-de-tao-mot-ung-dung-adf-fusion-web-su-dung-adf-business- components 1- Mục tiêucủa hướngdẫn 2- Cơ sở dữ liệu 3- Tạo ứng dụng ADF(ADFFusionWebApplication) 4- Tạo kết nối tới cơ sở dữ liệu 5- Tạo ApplicationModule 6- Tạo các EntityObjecttrênModel Project 7- Tạo các ViewObjectmặcđịnh 1- Mục tiêu của hướng dẫn Trong bài viếtnày tôi hướngdẫn bạntạo một ứng dụngADF Fusion Websửdụng ADF Bussiness Components. Một ứngdụng ADF thôngthườnggồm 2 project,cũng có thể coi là gồm2 module ( Model & ViewController),giốnghìnhminhhọadưới đây:
- 7. Mục tiêucủa bài viếtbaogồm: 1. Tạo một ứng dụngADF có kiểuADFFusionWebApplication. 2. Tạo Model Project và ViewControllerProject. 3. Tạo kếtnối (connection)vàocơ sở dữ liệuOracle. 4. Tạo ApplicationModule trênModel Project. 5. Tạo các Entity Object trênModel Project.
- 8. 6. Tạo các ViewObjectmặc địnhtrên Model Project và đăng kýchúng với với Application Module. 2- Cơ sở dữ liệu Trong bài viếtnày tôi sử dụngHR Schema, nólà một schemamẫucủa Oracle,và có sẵn khi bạn cài đặt Oracle, nếukhôngcó bạn có thể tạo Schemanày theohướngdẫn dưới đây: TODO Link! 3- Tạo ứng dụng ADF (ADF Fusion Web Application) Trên JDeveloperchọn: File/New/FromGallery... Chọn"ADF FusionWebApplication":
- 10. TiếptheoJDevelopersẽ tạora Model Project,mặc địnhtên của nó là"Model",bạncó thể đặt một tênkhác nếumuốn.Các công nghệ được sử dụngcho projectnày baogồm: Java XML ADF BussinessComponents.
- 11. TiếptheoJDevelopersẽ tạora ViewControllerProject,mặcđịnhnó được đặt tênlà "ViewController",bạncóthể đặt mộttên khácnếu muốn.Các công nghệ sử dụngtrong project này baogồm: ADF Faces ADF Page Flow Java JavaServer Faces(JSF) JSP and Servlets Trinidad XML,..
- 13. Ứng dụngcủa bạn đã được tạo ra, nó giốngvới hình minhhọadưới đây: 4- Tạo kết nối tới cơ sở dữ liệu Tiếptheobạn cần tạo một kếtnối vào cơ sở dữ liệuOracle,ở đây tôi sẽ kếtnối vào HR Schema. Trên JDeveloperchọn: File/New/FromGallery...
- 14. Nhậpcác thôngsố để kếtnối vào HR Schema.Sau đó nhấn "TestConnection" để kiểmtra kết nối.Nếumọi việctốtđẹp bạn sẽ nhận đượcmột thôngbáo thành công (Success!).
- 15. Một Connection(kếtnối) đãđược tạo ra, bạn có thể nhìn thấy trêncửa sổ "Application Resources":
- 16. 5- Tạo Application Module "ApplicationModule" làmộtthànhphần quantrọng của ứng dụngADF. Nó giốngnhưmột cầu nối giữa ViewControllerProjectvàModel Project. ApplicationModule được đặt tại Model Project. ViewControllerchỉcó thể truycập vàocác đối tượnghoặc các phươngthức của Model nếu chúng được đăng kývới ApplicationModule.(Xemhìnhminhhọaở trên). Để tạo mộtApplicationModule,trênJDeveloperchọn: File/New/FromGallery... o >> BusinessTier/ADF BusinessComponents/ApplicationModule
- 17. Chọnkết nối (connection)làHR, mà bạnđã tạo ở bướctrên.
- 20. TiếptheoJDevelopergợi ýbạn tạo ra một lớpcho "ApplicationModule".Checkchọn "Generate ApplicationModule class" vànhấn"Next" để tiếptục:
- 21. "ApplicationModule" củabạn đã được tạo ra:
- 22. Sau khi tạo ApplicationModule,các đối tượngđăng kývới nó sẽ được nhìn thấy trênvùng "Data Controls",vàcó thể được sửdụng bởi các Projectkhác (Chẳnghạn nhưViewController). Hiệntại ApplicationModule ủa bạn chưa có đối tượnghoặc các phươngthức nào.
- 23. 6- Tạo các Entity Object trên Model Project Tiếptheo,bạncần tạo ra các Entity Object.Mỗi Entity Object đại diệncho mộtbảng trong cơ sở dữ liệu,vàchúngcũng có quan hệ với nhauthông quacác Association(Liênhợp). Trên JDeveloperchọn: File/New/FromGallery... o >> BusinessTier/ADF BusinessComponents/BusinessComponentsfrom Tables...
- 24. Chọnkết nối (connection)làHR, mà bạnđã tạo ở bướctrên.
- 25. Đặt tên cho package sử dụngđể chứa các Entity là: org.o7planning.adf.model.entities Chọncác bảng bạnmuốn tạo ra các Entity Objecttương ứngcho nó.
- 26. TiếptheoJDevelopergợi ýbạn tạo ra các Entity-basedViewObject(Các ViewObjectmặc đinh),Bạncó thể khôngcần tới chúng,vì vậycó thể bỏ qua,bạn có thể tạo sau, nếucần thiết cho ứng dụngcủa bạn.
- 27. TiếptheoJDevelopergợi ýbạn tạo tiếpcác "Querybased ViewObject" (Các ViewObjectdựa trêncâu lệnhtruyvấn).Bạn cũngcó thể khôngcần tới chúng. TiếptheoJDevelopergợi ýbạn đăng kýcác đối tượngtạo ở bướctrước với ApplicationModule. Bạn có thể bỏqua bước này.
- 29. Các Entity Object đã được tạo ra trênModel Project.Mỗi bảng trêncơ sở dữ liệusẽ tươngứng với mộtEntity Objectđược tạo ra. Các ForeignKeytrên cơ sở dữ liệusẽ tươngứngvới một Association(Liênhợp).Xemhìnhminhhọadưới đây:
- 30. Chú ý:NếuJDevelopertựđộng tạo ra thêmmộtApplicationModule khác bạn có thể xóa nóđi. Một ứngdụng ADF cho phépmộthoặc nhiềuApplicationModule. 7- Tạo các View Object mặc định 1. Entity Object làmột thànhphần của ứng dụngADF BC, nó tươngứng với một bảngtrên cơ sở dữliệu. 2. ViewObjectlà một thànhphần của ứng dụngADF BC, nó tươngứng với mộtVIEW của cơ sở dữliệu(Hoặcmột câu lệnhtruyvấn bất kỳ). 3. ViewObjectmặc địnhlà mộtViewObject được tạo ra từ một Entity Object. Việctạo các ViewObject mặc địnhlà khôngbắt buộc,nó phụthuộc vào ứng dụngcủa bạn. Các ViewObjectđược tạo ra bạn có thể đăng ký nó với ApplicationModule.CácViewObject được đăng ký với ApplicationModule có thể được sử dụngbởi các projectkhác.
- 31. Tạo View Object mặc định Nhấnphải chuột vào mộtEntity Object chọn "NewDefaultViewObject": Nhậpvào: Package:org.o7planning.adf.model.views
- 32. Name:V00Departments ViewObjectmặc định(V00Departments) đãđượctạo ra. Tiếptheobạn cần tạo ra lớpJava cho ViewObjectvừa tạo ra.
- 33. Tươngtự bạn tạo tiếpViewObjectmặc địnhcho Employees.
- 34. Đăng ký View Object với Application Module: Mở ApplicationModule: Lựa chọn các ViewObjectvà chuyểnnó sang"Data Model".
- 35. Lúc này 2 ViewObject( V00Departments & V00Employees) đã đượcđăng kýlên Application Module,vàcác Projectkhác có thể truy cập sử dụngchúng thôngqua "Data Controls":
- 36. Xemthêmcác chuyên mục: https://o7planning.org/vi/11495/tao-trang-tim-kiem-trong-adf-bc-su-dung-parameter- form-va-hien-thi-tren-adf-table 1- Mục tiêucủa ví dụ này 2- Tạo ứng dụng 3- Tạo ViewObjectcótham số 4- Tạo View 5- Thiếtkế giao diệnchoView 6- Chạy ứng dụng 1- Mục tiêu của ví dụ này Trong bài viếtnày tôi hướngdẫn bạntạo một ứng dụngADF Fusion WebApplication.Hiểnthị dữ liệutrêntrangwebdưới dạngbảng và có Form tham số lọc dữliệu.
- 37. Dưới đây là hình ảnhứng dụng. Nhữngviệclàmhấp dẫn Front-endDeveloper(JavaScript,NodeJS) |$2,200 DFO Global Performance CommerceHoChi Minh,HaNoiUpto $2,200 JavaScriptNodeJSFront-End
- 38. Lập Trình Website PHP SPACEPropertyHoChi MinhUpto 15,000,000 VNĐ PHPWeb WebDeveloper(PHP,HTML5,AngularJS) SeldatHoChi MinhUpto $1,500 PHPHTML5AngularJS 2- Tạo ứng dụng Các bước để tạo một"ADF FusionWebApplication" vàkết nối vàomột cơ sở dữ liệubạncó thể xemtại: Các bước để tạo mộtứng dụngADF FusionWebsử dụngADF BusinessComponents Đây là hình ảnhứng dụng với các thiếtlậpcơ bản:
- 39. 3- Tạo View Object có tham số Trên JDeveloperchọn: File/New/FromGallery... o >> BusinessTier/ADF BusinessComponents/ViewObject
- 41. Nhậpvào câu truy vấn: ? 1 2 3 4 5 6 7 8 9 Select e.Employee_Id ,e.First_Name ,e.Last_Name ,e.Email ,e.Phone_Number ,e.Hire_Date ,e.Job_Id ,j.Job_Title ,e.Salary ,e.Commission_Pct
- 42. 10 11 12 13 14 15 16 17 18 19 20 21 ,e.Manager_Id ,e.Department_Id ,d.Department_Name From Employees e ,Departments d ,Jobs j Where e.Department_Id = d.Department_Id And e.Job_Id = j.Job_Id And (e.Salary >= :Sal_Min Or :Sal_Min Is Null) And (e.Salary <= :Sal_Max Or :Sal_Max Is Null)
- 43. Tạo 2 tham sốSal_Min và Sal_Max có kiểuNumber.
- 46. Với một"ViewObject" tùybiến,bạncần chỉ địnhrõ "KeyAttribute" (Thuộctính khóa chính), trong ví dụ nàynó là cột EmployeeId.
- 49. ViewObject(V02Employees) đã được tạo ra:
- 50. Bạn cần phải đăng ký V02Employeesvới ApplicationModule,Saukhi đăng ký nó có thể được sử dụngbởi các Projectkhác trongứng dụng. Mở AppModule:
- 51. V02Employeesđã được nhìn thấy trên"Data Controls":
- 52. 4- Tạo View Trên ViewControllermở fileadfc-config.xml:
- 53. Tìm kiếmvới từkhóa"view" vàkéothả "View(ADFTask Flow.Components)" vàocửasổ "Diagram" của adfc-config.xml. Một đối tượngvừa được tạo ra, đổi têncủa nó thànhempList2. Nhấnképchuột vào "empList2" để tạo ra một file nguồn. Chú ý:Bạn nên đặt file nguồn(jsp,jsf,..) trongthưmụcWEB-INFhoặc thư mục con của WEB- INF,nó giúp ẩn các file nàyvới người dùng.
- 55. 5- Thiết kế giao diện cho View Tìm kiếmvới từkhóa"Stretch" và kéothả thành phần"Panel Stretch Layou (ADF Faces.Layout)" vào "empList2.jsf".
- 56. PanelStretchLayoutcó 5 Facet (Cóthể hiểulà5 vùng). Xóa3 vùng "start","end","bottom": Tìm kiếmvới từkhóa"panelbox" vàkéothả đối tượng "Panel Box(ADF Faces.Layout)" vào vùng"Top" và "Center" của empList2.jsf:
- 58. Kéothả đối tượng V02Employees1từ "Data Controls" vàovùng "Employees" củaempList2.jsp để tạo mộtADF Table: Xóa bỏmột số cột mà bạn khôngmuốnnó hiểnthị trênADF Table.
- 61. Bước tiếptheo,kéothảthànhphần "ExecuteWithParams" củaV02Employees1vàovùng "Search" của empList2.jsf để tạo ra "ADF Parameter Form...":
- 63. "ADF ParameterForm" đã được tạo ra, bạncó thể kéođể tăngchiềucao của vùng"Search".
- 64. 6- Chạy ứng dụng Lựa chọn "empList2" trênadfc-config.xml vànhấnbiểutượngRun (Hoặc F11).
- 66. ALTER USER 'root'@'localhost' IDENTIFIED WITH mysql_native_password BY 'admin1234';
- 68. Part 4: Oracle SOA Suite 12.2.1.3.0 1. Start the appropriate server OSA start icons.OSA is NOT a WebLogicdomain SOA Domain:start iconsfor an expandedSOA domainwithone Adminserver,one SOA/B2Bserver,one Service Busserver,one ESSserver,one MFT serverandone BAM managed server + The start/stopfor a compact domainwithone AdminserverwithSOA/Service/Bus/BAM/Insightisto be usedfor Insight 2. Oracle Stream Analytics Use thisforany trial,training,ordemoof StreamAnalystics The icon to Start StreamAnalysticscriptwill setthe terminaltothe OSA serverdirectoryandrunthe startwlevs.shscriptwhichstartsthe OSA server To use the StreamAnalysticUI,youwill needtowaita few momentsmore afteryousee the server startedmessage.Whenyousee amessage similarto: Apr 05, 2016 12:47:37 PM com.sun.jersey.server.impl.application.WebApplicationImpl _initiate INFO: Initiating Jersey application, version 'Jersey:1.18 11/22/2013 01:21 AM
- 69. Then the SX UI is ready. You can use the URL: http://localhost:9002/sx/login.html login in with username: wlevs password: welcome1 3. SOA suite Use thisforany trial,training,demoof SOA suite,Service Bus,MFT,BAMor Insight + Start compact_domainAdminserver(insight):startsupthe compact_domain adminserver.Double- clickingonthisshortcutwill openaterminal window showingthe serveroutput.Donotclose this windoworthe serverwill be killed. The serverisconfiguredasa “compact domain”andusesport 7001 for the server + Start soa_domainAdminserver:startsupthe soa_domainadminserver.Double-clickingonthis shortcutwill openaterminal windowshowingthe serveroutput.The serverisconfiguredasa “expandeddomain”andusesport 7001 fro the admin server + start soa_domainSOA server:startsupthe soa_domainSOA managedserver.The serverisconfigured as a “expandeddomain”anduserport 8001 for the SOA server + start soa_domain MFTserver: starts up the soa_domain MFT managed server.The serveris configuredas a “expanded domain” andusesport 7901. Oracle Managed File Transfer (MFT) is a high performance, standards-based, end-to-end managed file gateway. It features design, deployment, and monitoring of file transfers using a lightweight web-based design-time console that includes transfer prioritization, file encryption, scheduling, and embedded FTP and sFTP servers. + start soa_domain BAMserver: starts up the SOA domain BAM+Insight server.The serveris configuredas a “expandeddomain” anduser port 7005. Oracle Business Activity Monitoring (Oracle
- 70. BAM) gives business users the ability to create their own dashboards and monitor their business services and processes in the enterprise. Oracle BAM 12c supports both "active" real-time,changing dashboards thatupdate withouthaving to refresh the browser and also "tactical"dashboards thatallow a user to change parameters to see a new perspective of the data without having to develop a database query. + Start soa_domain OSBserver: usesport 8003. Oracle Service Buscombinesintelligentmessage brokeringwithservice monitoringandadministrationtoprovide aunifiedsoftware productfor implementinganddeployingService-OrientedArchitecture (SOA)onyourenterprise. Oracle ESBlàmột ESB di chuyểndữliệugiữanhiềuthiếtbị đầucuối,cả bêntrong và bênngoài của doanh nghiệpNósử dụngcác tiêuchuẩnmở để kếtnối và chuyểnđổi,và các businessdocuments(nhưExtensibleMarkup Language (XML) tmessages),trongcác ứng dụngkhác nhau.Nó cho phép giámsát và quảnlý business data, với sựthay đổi tối thiểulêncác ứngdụng hiệncó.Một ESB là cơ sở hạ tầng cơ bản để cung cấp một kiếntrúchướngdịch vụ(service-orientedarchitecture - SOA) vàkiếntrúchướngsự kiện( event- drivenarchitecture - EDA). + Start soa_domain ESS server: uses port 8005. Oracle Enterprise Scheduler. Enterprise applications require the abilitytorespondto manyreal-time transactionsrequestedbyonline usersorwebservices. However, they also require the ability to offload larger transactions to run at a future time or automate the running of application maintenance work based on a defined schedule. Oracle Enterprise Scheduler providesthe abilitytorundifferentjobtypes,including:Java,PL/SQL,andbinaryscripts,distributedacross the nodesinanOracle WebLogicServercluster.Oracle Enterprise Schedulerrunsthesejobssecurely,with high availability and scalability, with load balancing and provides monitoring and management through Fusion Applications Control. 4. Using Jdeveloper on the Appliance If you choose,youcan alsouse Jdeveloperthatisinstalledinthe VirtualBoxAppliance.Youcanlaunch Jdevloperbysimplydouble-clickingonthe Jdevelopericononthe desktop
- 71. Note:The applicationserverconnectionforSOA domainhasbeencreatedforyou.The integratedWeblogicServerdomainisnotconfigured,butyoucan create itby right-clickingandselecting “Create DefaultDomain” Part 5: Started BPM 12c 1. Install all componentsnecessaryfordevelopmentwiththe core of BPMSuite ( BPM, rules,mediator, humanwork flow,service bus,adapters) 2. Launch Jdeveloperafterthe installation,automaticall registeringthe IDEplugs-insforBPMand Service Bus 3. Create a JavaDBinstance includingthe SOA_INFRA schemaandthe necessarysampletablesforthe labs Your environmentwillbe asfollows,withBPM&Service Busrunningonthe embeddedWeblogicServer – the setupshouldtake approximately30 minutes Folders LabArtifacts- containsrequiredschemas,wsdls,testscripts,andtemplates LabDocs - labinstructions LabProjects – JDeveloperprojectstostartyour labs LabSolutions –JDeveloperprojectswithsolutionforeachlab Presentations –decksfor all sessionsinpdf format Software- containsthe requiredBPM12c software jarfilestoinstall BPM12c VM– BPM12c Virtual Box imag Part 6: Creating a SOA Composite Application with Oracle JDeveloper 12c 1.https://www.oracle.com/webfolder/technetwork/tutorials/obe/cloud/sscs/CreatingSO AComposite/creating-a-soa-composite-app.html
- 72. 1.1. Before youbegin: + Purpose This Oracle by Example (OBE) tutorial shows you how to develop a HelloWorld composite application from start to finish in Oracle SOA Suite 12c. + Time toComplete 30 minutes + Background Oracle SOA Suite provides an enterprise architecture that supports building connected enterprise applications to provide solutions to business problems. Using Oracle SOA Suite, you can create, manage, and orchestrate services into composite applications and business processes. You can then easily assemble multiple technology components into one SOA composite application. A SOA composite application is an assembly of services, service components, and references designed and deployed in a single application. Connections(wiring) between the services, service components, and references enable message communication. The details for a composite are stored in the composite.xml file. + Context This is the second tutorial of a series that shows you how to install Oracle SOA Suite 12c, develop a HelloWorld application from the beginning, and deploy an application locally and to the cloud. What Do You Need? Oracle SOA Suite QuickStart forDevelopers Basic knowledgeof Oracle JDeveloper 1.2. CreatingSOA Application Open Oracle JDeveloper 12c, click the Applications tab, and select New Application.
- 73. Descriptionof thisimage The New Gallery page appears. On the New Gallery page, select SOA Application, and click OK. - Descriptionof thisimage On the Create SOA Application - Step 1 of 3 page, in the Application Name field, enter SOACSdemo and click Next.
- 74. Descriptionof thisimage On the Create SOA Application - Step 2 of 3 page, in the Project Name field, enter SayHello. In the Project Features section, select SOA Suite and click Next.
- 75. Descriptionof thisimage On the Create SOA Application - Step 3 of 3 page, from the Project SOA Settings list, select Empty Composite and click Finish.
- 76. Descriptionof thisimage Wait until the application creation and configuration are complete. - On the Applications tab, you can examine the created SOACSdemo application files.
- 77. 1.3. AddingaBPEL process - On the SayHello page, drag and drop a BPEL Process component from the Components panel to the Components swimlane(colum). Descriptionof this image The Create BPEL Process page appears. - On the Create BPEL Process page, in the Name field enter MakeGreeting, from the Template list select Synchronous_BPEL Process, and then click OK.
- 78. Descriptionof this image Wait until the BPEL and SOAP Service components are created. On the SayHello page, you can examine the MakeGreeting and makegreeting_client_ep components.
- 79. Descriptionof this image 1.4. EditingaBPEL process 1.4.1. AddinganAssignActivity After you've added the BPEL process, you edit it to add the Assign activity using the following instructions: + On the SayHello page, right-click the MakeGreeting BPEL component and select Edit. Descriptionof this image
- 80. The MakeGreeting.bpel page appears. + On the MakeGreeting.bpel page, from the Basic Activities panel, drag and drop the Assign activity to the Main Process sequence, between receiveInput and replyOutput. Descriptionof this image Wait until the Assign activity is added to the Main Process sequence. On the MakeGreeting.bpel page, you can examine the Assign activity. By default it has the Assign1 name and shows a warning.
- 81. Descriptionof this image 1.4.2. EditinganAssignActivity After you've added the Assign activity, you can edit it to build the output message using the following instructions: + On the MakeGreeting.bpel page, right-click the Assign1 activity and select Edit.
- 82. Descriptionof this image The Edit Assign page appears. + On the Edit Assign page, click the Expression icon.
- 83. Descriptionof this image The Expression Builder page appears. + On the Expression Builder page, in the String Functions panel, select the concat function and then click Insert Into Expression.
- 84. Descriptionof this image Note: You can also drag and drop the concat function to the Expression text area. On the Expression panel, the concat() function appears. Descriptionof this image + On the Expression panel, between the parentheses of the function enter 'Hello ',.
- 85. Descriptionof this image + On the Expression panel, leave the cursor active after the comma. Expand inputVariable, payload, and client: process under the BPEL Variables panel, select client:input string, and click Insert Into Expression. Descriptionof this image Note: You can also drag and drop the client:input String to the Expression text area. + On the Expression panel, verify your expression, and click OK.
- 86. Descriptionof this image The Edit Assign page appears with the function added into the Drag panel. + On the right side panel of the Edit Assign page, expand the outputVariable client:MakeGreetingResponseMessage(x), payload, and client:processResponse, and then drag and drop the function to the client:result string.
- 87. Descriptionof this image The function wires(connects) the client: input string from the inputVariable and the client:result string from the outputVariable. Descriptionof this image + On the Edit Assign page, select the General tab, in the Name field enter Assign_Greeting, and click OK.
- 88. Descriptionof this image The Edit Assign page closes and the MakeGreeting.bpel page appears again. Verify your MakeGreeting.bpel page contains the Assign activity.
- 89. Descriptionof this image + On the main menu of Oracle JDeveloper, click Save All. Descriptionof this image The SayHello project is ready for deployment. You learn how to deploy the application in the next OBE.
- 90. 2. https://ariklalo.com/2015/06/10/create-and-run-a-soa-composite-with-a-simple-bpel- process-on-12c-development-environment/ June 10, 2015 by Arik Lalo In this post I will show how to create and deploy your composite with a simple BPEL process. The main goal is to describe the deployment process in the local SOA environment. The steps are very simple and almost the same as in 11g version. If you haven’t yet install the environment or started the server, go to my previous post Oracle SOA Suite 12c Installation. For this post I’ve create a SOA application with new project, and selected a BPEL component:
- 92. I’ve added a simple assign activity for the example:
- 93. Now we can deploy the process: 1. Rightclickthe projectanddeployit:
- 95. Last thing is to run the new process and monitor it. You can do that directly from the jdeveloper, or enter the EM and run it from there: From Jdeveloper: 1. Go to the ApplicationServertab,drill downfromthe SOAfolderuntil youwillreach yourproject and itsws file.
- 96. Rightclickit and “TestWeb Service”:
- 97. 2. Enter the payloadparameterand “SendRequest” From EM: 1. openEM fromyour local hostand login:
- 98. 2. Findyourprocessand testit: 3. Whendone,youcan go to “Flowinstances”taband monitorthe instances. Good Luck