This document provides an introduction to PHP, a widely-used, open-source scripting language for web development that executes on the server. It discusses various PHP features such as predefined variables, data handling through forms via GET and POST methods, and the concept of self-processing pages, along with examples. Additionally, it covers the importance of web technology and how forms interact with user data to generate dynamic content efficiently.

![Server Information
Element/Code Description
$_SERVER['PHP_SELF'] Returns the filename of the currently executing script
$_SERVER['GATEWAY_INTERFACE'] Returns the version of the Common Gateway Interface (CGI) the
server is using
$_SERVER['SERVER_ADDR'] Returns the IP address of the host server
$_SERVER['SERVER_NAME'] Returns the name of the host server (such as www.w3schools.com)
$_SERVER['SERVER_SOFTWARE'] Returns the server identification string (such as Apache/2.2.24)
$_SERVER['SERVER_PROTOCOL'] Returns the name and revision of the information protocol (such as
HTTP/1.1)
$_SERVER['REQUEST_METHOD'] Returns the request method used to access the page (such as
POST)](https://image.slidesharecdn.com/webtechniquesppt-241221093713-c081198d/75/Web-Techniques-like-Cookies-and-Sessions-5-2048.jpg)
![$_SERVER['REQUEST_TIME'] Returns the timestamp of the start of the request
(such as 1377687496)
$_SERVER['QUERY_STRING'] Returns the query string if the page is accessed via a
query string
$_SERVER['HTTP_ACCEPT'] Returns the Accept header from the current request
$_SERVER['HTTP_ACCEPT_CHARSET'] Returns the Accept_Charset header from the current
request (such as utf-8,ISO-8859-1)
$_SERVER['HTTP_HOST'] Returns the Host header from the current request
$_SERVER['HTTP_REFERER'] Returns the complete URL of the current page (not
reliable because not all user-agents support it)
$_SERVER['HTTPS'] Is the script queried through a secure HTTP protocol
$_SERVER['REMOTE_ADDR'] Returns the IP address from where the user is viewing
the current page](https://image.slidesharecdn.com/webtechniquesppt-241221093713-c081198d/75/Web-Techniques-like-Cookies-and-Sessions-6-2048.jpg)
![$_SERVER['REMOTE_HOST'] Returns the Host name from where the user is
viewing the current page
$_SERVER['REMOTE_PORT'] Returns the port being used on the user's machine
to communicate with the web server
$_SERVER['SCRIPT_FILENAME'] Returns the absolute pathname of the currently
executing script
$_SERVER['SERVER_ADMIN'] Returns the value given to the SERVER_ADMIN
directive in the web server configuration file (if
your script runs on a virtual host, it will be the
value defined for that virtual host) (such as
someone@w3schools.com)
$_SERVER['SERVER_PORT'] Returns the port on the server machine being used
by the web server for communication (such as 80)
$_SERVER['SERVER_SIGNATURE'] Returns the server version and virtual host name
which are added to server-generated pages
$_SERVER['PATH_TRANSLATED'] Returns the file system based path to the current
script
$_SERVER['SCRIPT_NAME'] Returns the path of the current script
$_SERVER['SCRIPT_URI'] Returns the URI of the current page](https://image.slidesharecdn.com/webtechniquesppt-241221093713-c081198d/75/Web-Techniques-like-Cookies-and-Sessions-7-2048.jpg)
![<?php
if( isset($_GET["s1"]) )
{
echo "Welcome ". $_GET['name']. "<br />";
echo "You are ". $_GET['age']. " years old.";
}
?>
<html>
<body>
<form action="<?php $_PHP_SELF?>" method="GET">
Name: <input type="text" name="name" /><br>
Age: <input type="text" name="age" /><br>
<input type="submit" name="s1" value="Ok"/>
</form>
</body>
</html>
After executing the program in the browser, HTML part will be
displayed first as follows as shown below:
Enter name and age and submit the form. Now PHP will
process the form and you will get the following output.](https://image.slidesharecdn.com/webtechniquesppt-241221093713-c081198d/75/Web-Techniques-like-Cookies-and-Sessions-10-2048.jpg)
![<?php
if( isset($_POST["s1"]) )
{
echo "Welcome ". $_POST['name']. "<br />";
echo "You are ". $_POST['age']. " years old.";
}
?>
<html>
<body>
<form action="<?php $_PHP_SELF?>" method="POST">
Name: <input type="text" name="name" /><br>
Age: <input type="text" name="age" /><br>
<input type="submit" name="s1" value="Ok"/>
</form>
</body>
</html>](https://image.slidesharecdn.com/webtechniquesppt-241221093713-c081198d/75/Web-Techniques-like-Cookies-and-Sessions-12-2048.jpg)
![Self Processing Pages
• A single PHP program can be used to both generate a form and process it, using
combination of HTML and PHP. This type of PHP page is known as self processing page.
For Example:
<html>
<head><title>Greet User</title></head>
<body>
<?php
if(isset($_GET['name1']))
{
$nm = $_GET['name1'];
echo "Hello " . $nm;
} else {
?>
<form action="<?php echo $_SERVER['PHP_SELF']?>" method="GET">
Enter Your Name:
<input type="text" name="name1" /> <br />
<input type="submit" name="Ok" />
</form>
<?php
}
?>
</body></html>](https://image.slidesharecdn.com/webtechniquesppt-241221093713-c081198d/75/Web-Techniques-like-Cookies-and-Sessions-15-2048.jpg)
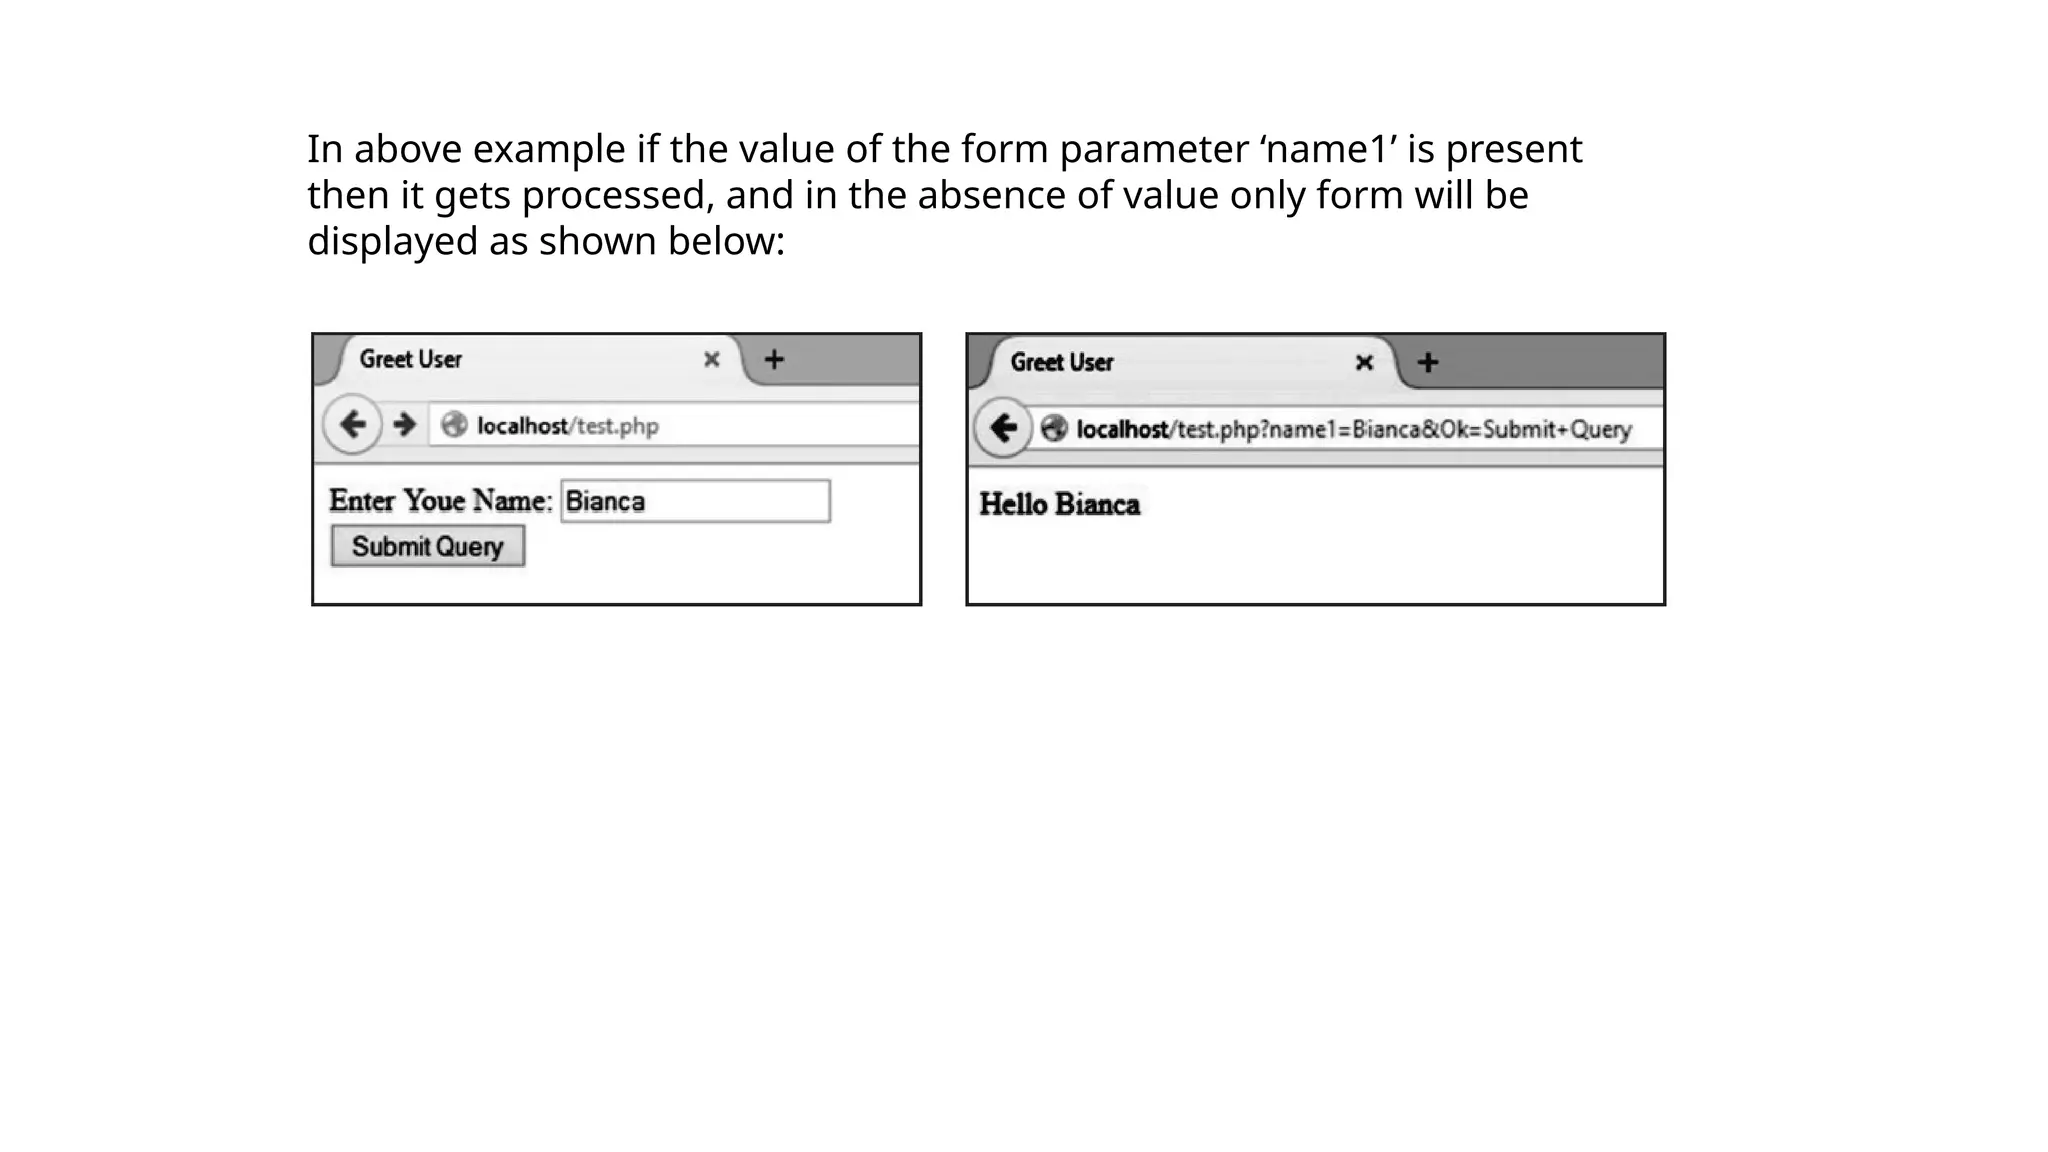
![Sticky Forms
In sticky forms the values entered by user remain displayed with the form component, if we display the
form after submit.
• For example: If we search Google (http://www.google.com) for “PHP Cookbook”, the top of the results
page contains another search box, which already contains “PHP Cookbook”. To refine the search to “PHP
Cookbook from O’Reilly”, we can simply add the extra keywords.
<html>
<head><title>Greet User</title></head>
<body>
<form action="<?php echo $_SERVER['PHP_SELF']?>"
method="GET">
Enter Your Name:
<input type="text" name="name1" /> <br />
<input type="submit" name="Ok" />
</form>
<?php
if(isset($_GET['name1']))
{
$nm = $_GET['name1'];
echo "Hello " . $nm;
}?>
</body></html>](https://image.slidesharecdn.com/webtechniquesppt-241221093713-c081198d/75/Web-Techniques-like-Cookies-and-Sessions-17-2048.jpg)
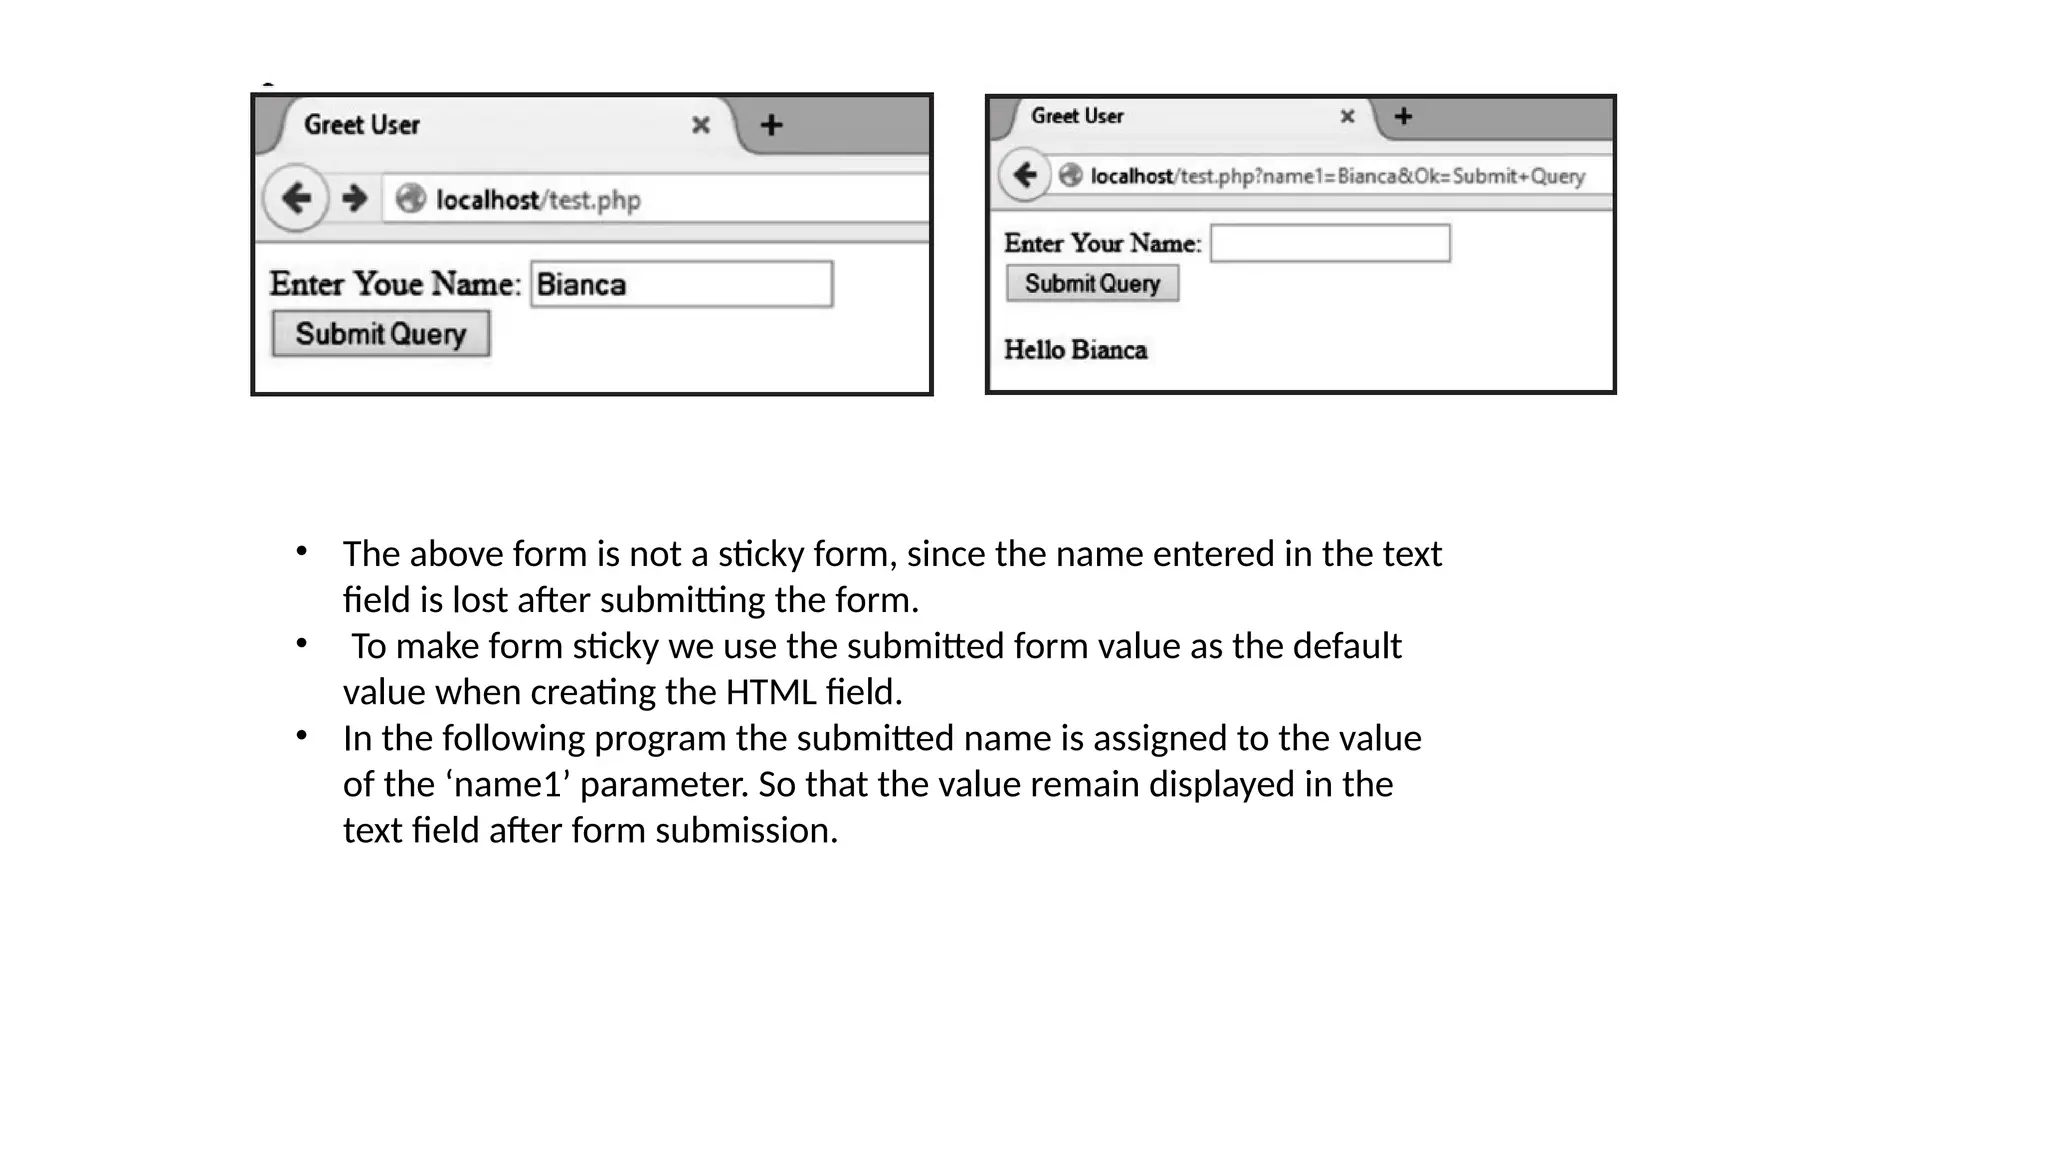
![<html>
<head><title>Greet User</title></head>
<body>
<form action="<?php echo $_SERVER['PHP_SELF']?>" method="GET">
Enter Youe Name:
<input type="text" name="name1" value="<?php echo $_GET['name1'];?>"/> <br />
<input type="submit" name="Ok" />
</form>
<?php
if(isset($_GET['name1']))
{
$nm = $_GET['name1'];
echo "Hello " . $nm;
}
?>
</body></html>](https://image.slidesharecdn.com/webtechniquesppt-241221093713-c081198d/75/Web-Techniques-like-Cookies-and-Sessions-19-2048.jpg)
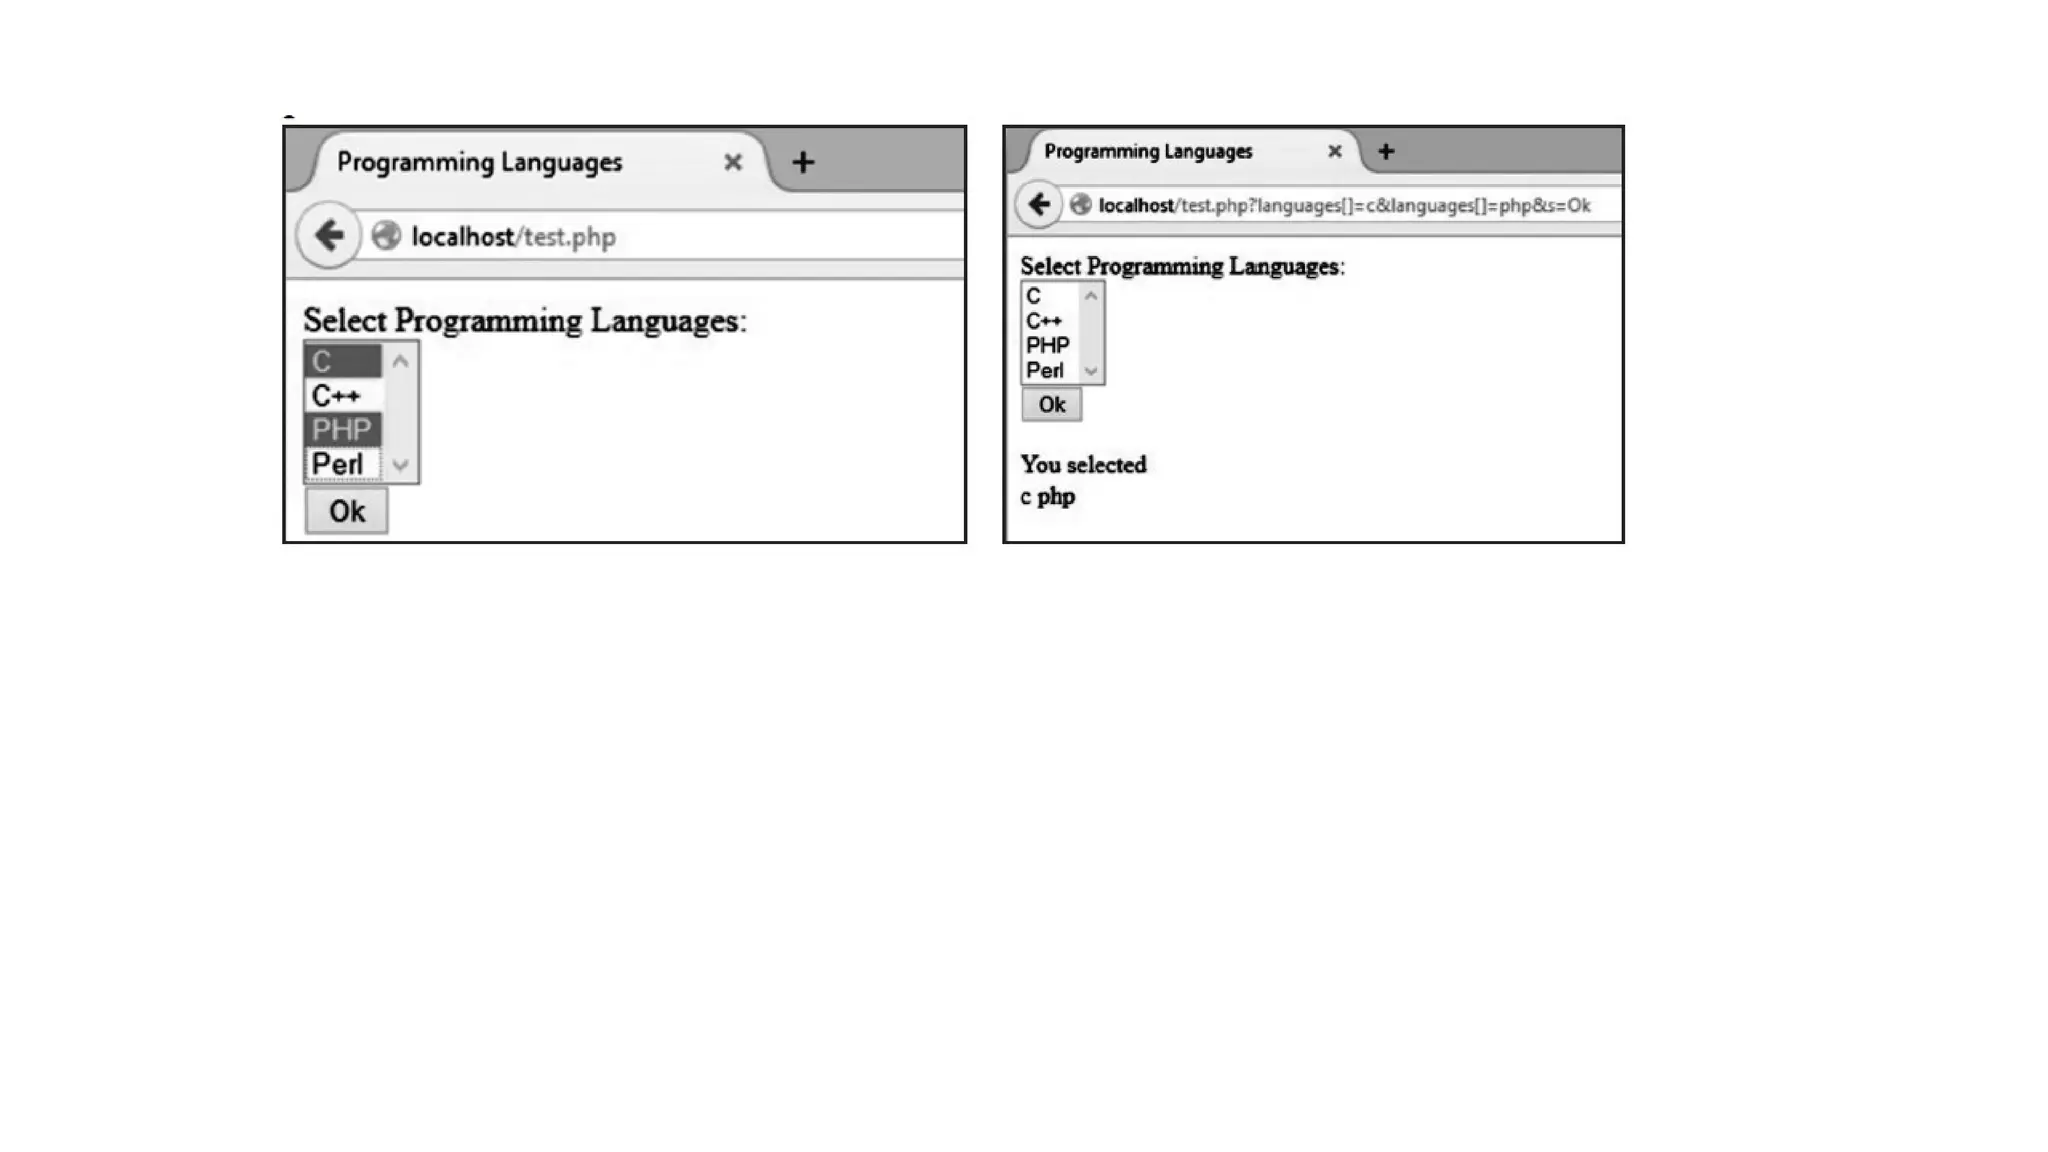
![Multivalued Parameters
• The HTML selection lists can allow multiple selections,
when name of the field in the HTML form end with [] and
the ‘multiple’ attribute is used.
• When the user submits the form, $_GET[‘ languages’]
contains an array instead of a simple string. This array
contains the values that were selected by the user.
• Following example shows multiple selections. The form
provides the user with a set of programming languages
name. When the user submits the form, he gets list of the
selected of programming languages.](https://image.slidesharecdn.com/webtechniquesppt-241221093713-c081198d/75/Web-Techniques-like-Cookies-and-Sessions-20-2048.jpg)
![<html><head>
<title>Programming Languages</title></head>
<body>
<form action="<?php echo $_SERVER['PHP_SELF']?>" method="GET">
Select Programming Languages:<br />
<select name="languages[]" multiple>
<option value="c">C</option>
<option value="c++">C++</option>
<option value="php">PHP</option>
<option value="perl">Perl</option>
</select><br>
<input type="submit" name="s" value="Ok" />
</form>
<?php
if(isset($_GET['s']))
{
$lan = $_GET['languages'];
echo "You selected<br>";
foreach($lan as $k=>$v)
echo "$v ";
}
?>
</body></html>](https://image.slidesharecdn.com/webtechniquesppt-241221093713-c081198d/75/Web-Techniques-like-Cookies-and-Sessions-21-2048.jpg)
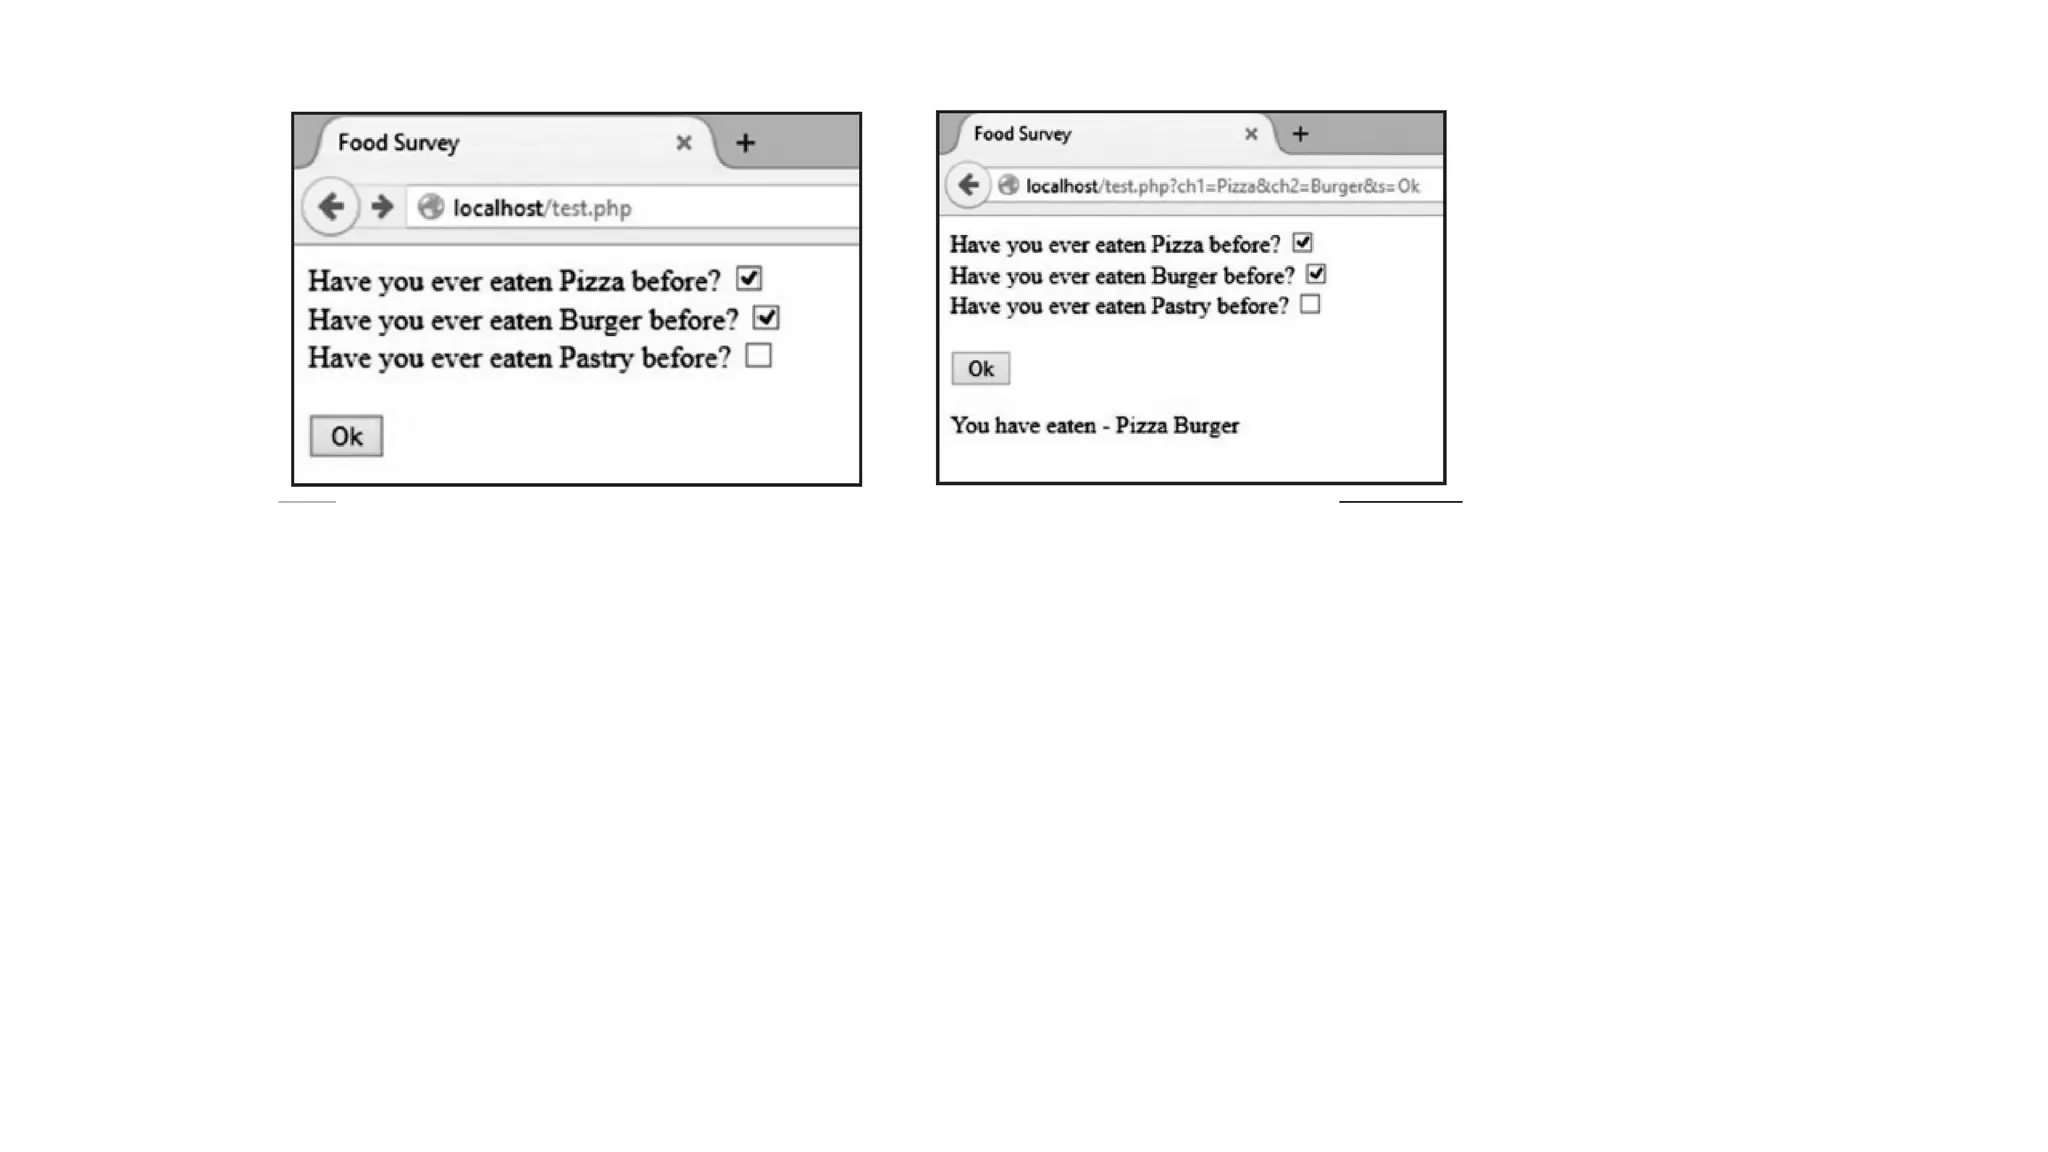
![<html>
<head><title>Food Survey</title></head>
<body>
<form action="<?php echo $_SERVER['PHP_SELF']?>" method="GET">
Have you ever eaten Pizza before?<input type="checkbox" name="ch1" value="Pizza" <?php
if(isset($_GET['ch1']) and isset($_GET['s'])) echo "checked";?>><br />
Have you ever eaten Burger before?
<input type="checkbox" name="ch2" value="Burger" <?php
if(isset($_GET['ch2']) and isset($_GET['s'])) echo "checked";?>><br />
Have you ever eaten Pastry before?
<input type="checkbox" name="ch3" value="Pastry" <?php
if(isset($_GET['ch3']) and isset($_GET['s'])) echo "checked";?>><br />
<input type="submit" name="s" value="Ok" />
</form>
<?php
if(isset($_GET['s']))
{
echo "You have eaten - ";
if(isset($_GET['ch1'])) echo "$_GET[ch1] ";
if(isset($_GET['ch2'])) echo "$_GET[ch2] ";
if(isset($_GET['ch3'])) echo "$_GET[ch3]";
}
?>
</body></html>](https://image.slidesharecdn.com/webtechniquesppt-241221093713-c081198d/75/Web-Techniques-like-Cookies-and-Sessions-24-2048.jpg)
![File Uploads
In PHP to handle file uploads, $_FILES array is used. The elements of the $_FILES array gives information about
the uploaded file.The keys are:
1. name: The name of the file, as supplied by the browser.
$_FILE[‘filename’][‘name’]
2. Type: The type of the uploaded file. For example, image/jpeg.
$_FILE[‘filename’][‘type’]
3. Size: The size of the uploaded file (in bytes). If the user attempted to upload a file that was too large, the size
is
reported as 0.
$_FILE[‘filename’][‘size’]
4. tmp_name: The name of the temporary file on the server that holds the uploaded file. If the user attempted
to upload a file that was too large, the name is reported as "none". $_FILE[‘filename’][‘tmp_name’]
5. Error: The error code resulting from the uploaded file. $_FILE[‘filename’][‘error’]
• To test whether a file was successfully uploaded or not use the function
is_uploaded_file(), as follows:
if (is_uploaded_file($_FILES['filename']['tmp_name'])
{
// successfully uploaded
}](https://image.slidesharecdn.com/webtechniquesppt-241221093713-c081198d/75/Web-Techniques-like-Cookies-and-Sessions-26-2048.jpg)
![• Files are stored in the server’s default temporary files directory,
which is specified in
php.ini with the upload_tmp_dir option.
• We can also move the file to a permanent location using
move_uploaded_file() function.
// move the file: move_uploaded_file() also does a check of the
file's
// legitimacy, so there's no need to also call is_uploaded_file()
move_uploaded_file($_FILES['filename']['tmp_name'],'/path/
to/file.txt');
• The value stored in tmp_name is the complete path to the file,
not just the base name.
• Use basename( ) to chop off the leading directories if needed.
• Second parameter of move_uploaded_file()is the target path
where the file is moved and stored permanentaly after
upload.](https://image.slidesharecdn.com/webtechniquesppt-241221093713-c081198d/75/Web-Techniques-like-Cookies-and-Sessions-27-2048.jpg)
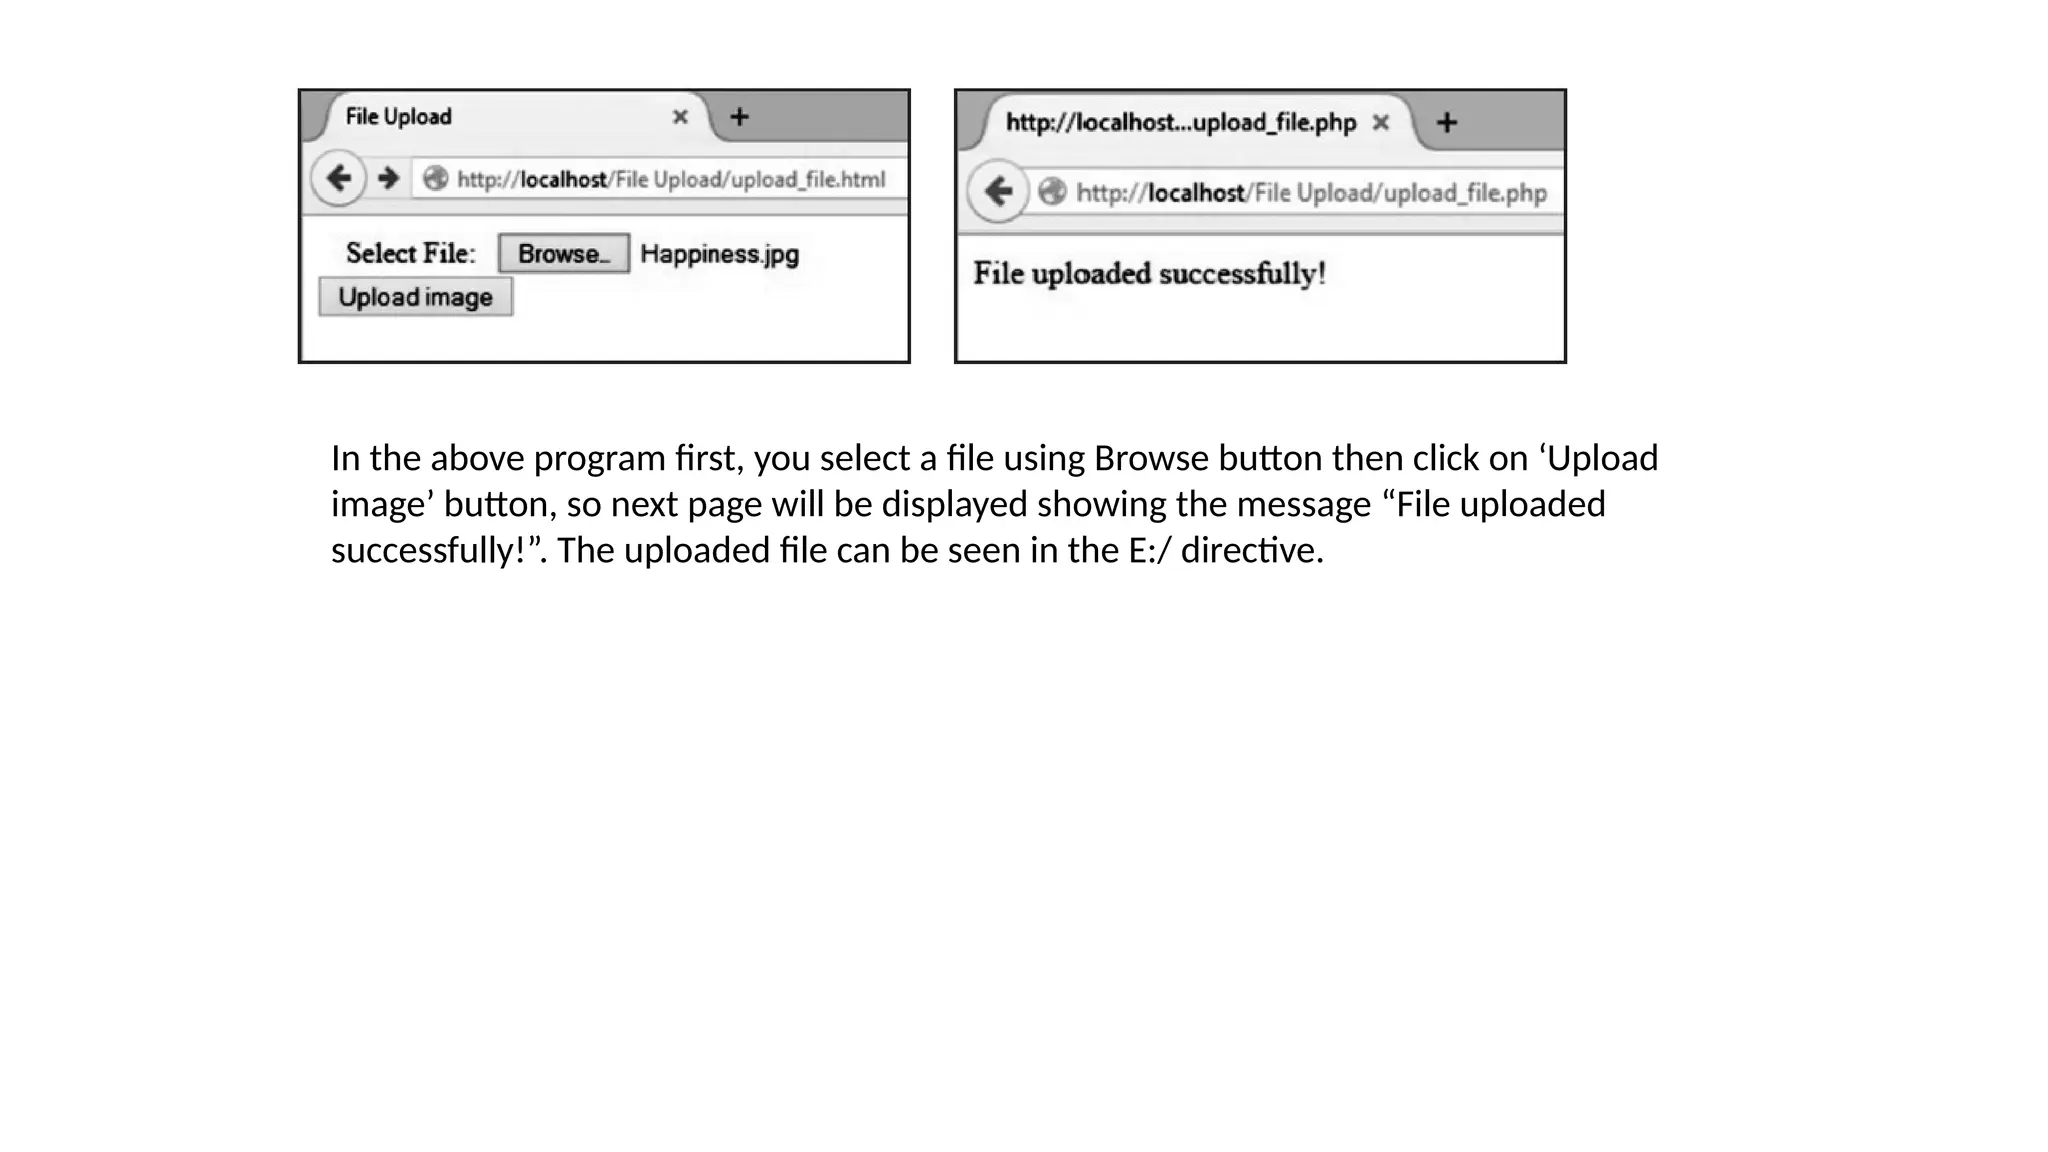
![upload.html file:
<html>
<head><title>File Upload</title></head>
<body>
<form action="upload.php" method="post"
enctype="multipart/form-data">
Select File:
<input type="file" name="fileToUpload"/>
<input type="submit" value="Upload Image" name="submit"/>
</form>
</body>
</html>
upload.php file:
<?php
$target_path = "E:/";
$target_path = $target_path.basename
($_FILES['fileToUpload']['name']);
if(move_uploaded_file($_FILES['fileToUpload']
['tmp_name'], $target_path))
{
echo "File uploaded successfully!";
} else {
echo "Sorry, file not uploaded, please try again!";
}
?>](https://image.slidesharecdn.com/webtechniquesppt-241221093713-c081198d/75/Web-Techniques-like-Cookies-and-Sessions-28-2048.jpg)
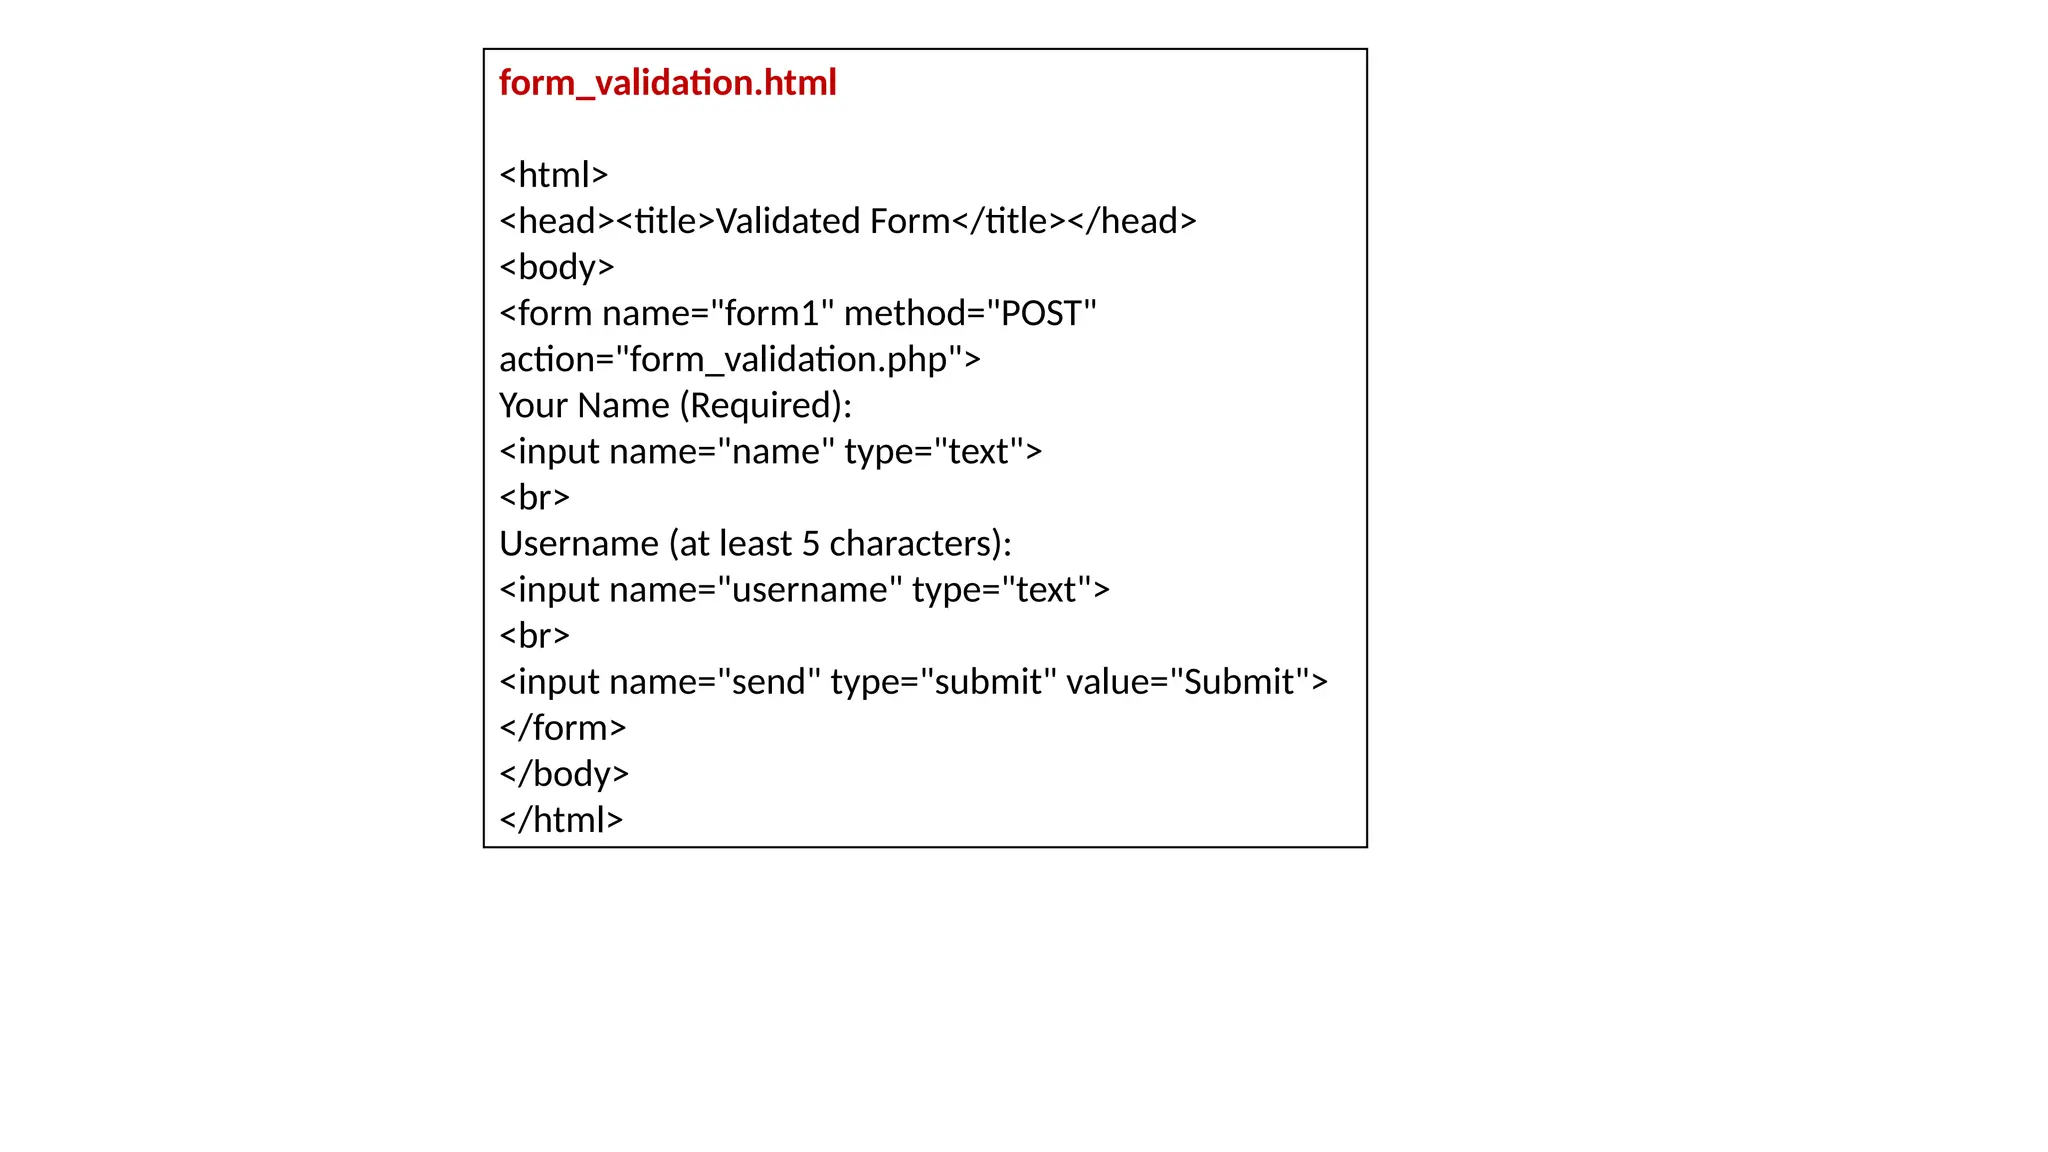
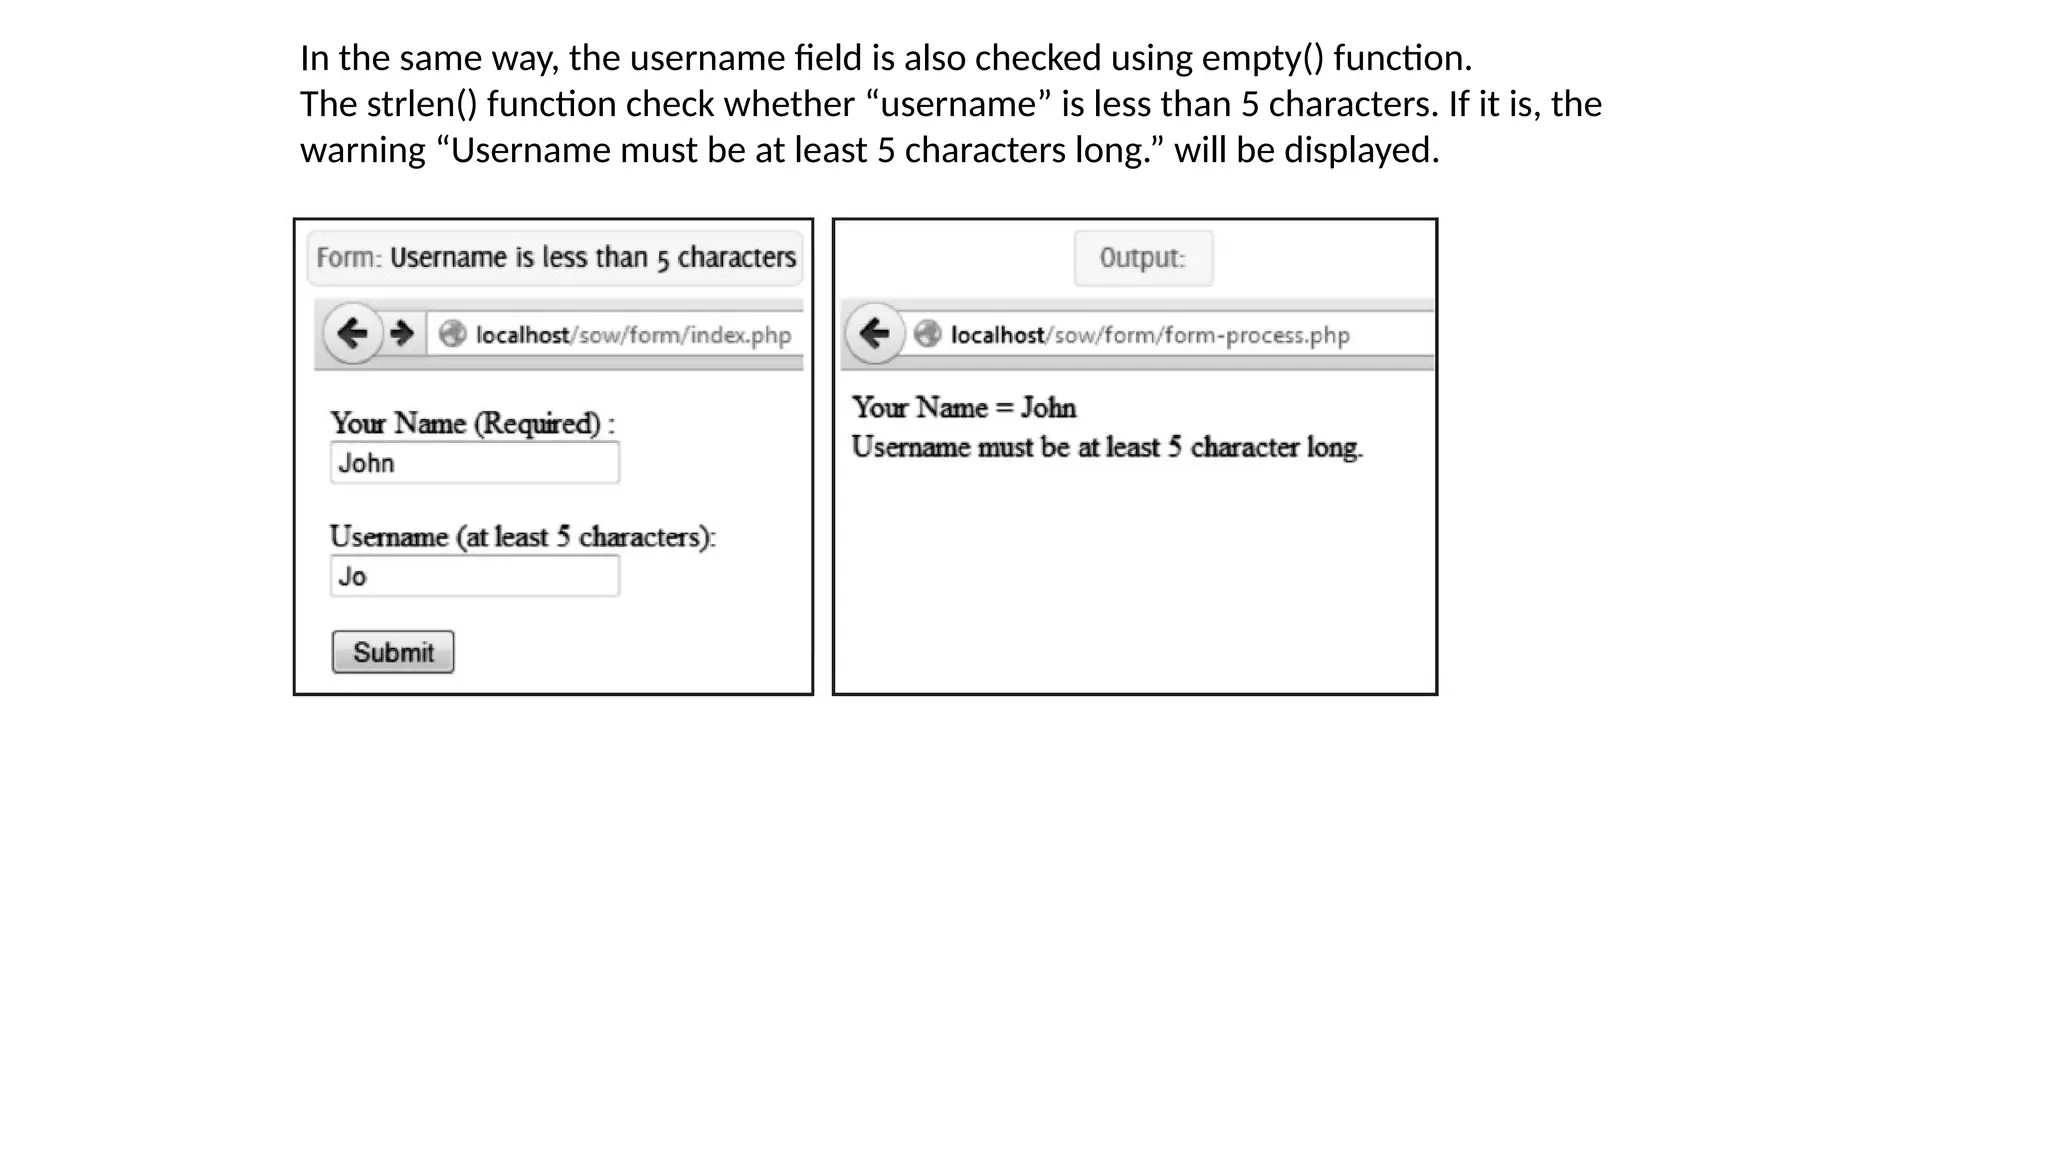
![form_validation.php
<?php
// First check if the form button has been submitted
if(isset($_POST['send'])){
if(!empty($_POST['name'])){ // Check if the name is empty
echo "Name: " . $_POST['name'] . "<br />";
}else{
echo "Name is missing.";
echo "<br />";
}
if(!empty ($_POST['username'])){// Check if the username is empty
if(strlen($_POST['username']) < 5 ){ // Check
if the username is at least 5 characters.
echo "Username must be at least 5 characters long.";
echo "<br />";
}else{
echo "User Name: " . $_POST['username'];
}
}else{
echo "Username is missing.";
echo "<br />";}
}else{
echo "Unauthorized access to this page.";
}?>](https://image.slidesharecdn.com/webtechniquesppt-241221093713-c081198d/75/Web-Techniques-like-Cookies-and-Sessions-32-2048.jpg)
![• In the above program there are two pages: HTML form to accept name and username from user and,
second page is PHP form processing page, is used to validate user’s data.
• Any user may come to this page directly. To prevent unauthorized access, we will check whether the user
comes to this page clicking the form button the following condition is used:
if(isset($_POST[‘send’]))
• If the user comes here directly the function will return false and the message “Unauthorized access to
this page.” is displayed.
• PHP has another function named empty() that can check whether a variable is empty.
• We will check whether the name field(“name”) in the form is empty.
• If the user has entered his name that means the field is not empty and in this case the function empty()
will return true, and the name prints.
• If the user didn’t enter his name, the function will return false and the else statement will be executed.
Then, the message “Name is missing.” will be printed.](https://image.slidesharecdn.com/webtechniquesppt-241221093713-c081198d/75/Web-Techniques-like-Cookies-and-Sessions-33-2048.jpg)
![Authentication:
• HTTP authentication works through request headers and response statuses.
• A browser can send a username and password in the request headers. If the username
and password aren't sent or aren't satisfactory, the server sends a "401 Unauthorized"
response and identifies a string (realm) via WWW-Authenticate header. This typically
pops up an "Enter username and password for ..." dialog box on the browser, and the
page is then re-requested with the updated username and password in the header.
• $_SERVER['PHP_AUTH_USER'] and $_SERVER['PHP_AUTH_PW'] global variables
contain the username and password supplied by the user, if any.
• To deny access to a page, send a WWW-Authenticate header identifying the
authentication realm as part of a response with status code 401:
header('WWW-Authenticate: Basic realm="My Website"');
header('HTTP/1.0 401 Unauthorized');
echo "You need to enter a valid username and password.";
exit;
• The header() function is used to send a message “Authentication required” to the client
browser causing it to pop up a username/password input window.
• Once, the user has entered username and password, the same URL will be called again
with the predefined variables PHP_AUTH_USER and PHP_AUTH_PW set with
username and password respectively.](https://image.slidesharecdn.com/webtechniquesppt-241221093713-c081198d/75/Web-Techniques-like-Cookies-and-Sessions-39-2048.jpg)
![<?php
if(!isset($_SERVER['PHP_AUTH_USER']))
{
header('WWW-Authenticate: Basic realm="My Website"');
header('HTTP/1.0 401 Unauthorized');
echo "You need to enter a valid username and password.";
exit;
}
else
{
echo "Hello ". $_SERVER['PHP_AUTH_USER'] . "<br>";
echo "You entered". $_SERVER['PHP_AUTH_PW'] . "as your
password";
}
?>](https://image.slidesharecdn.com/webtechniquesppt-241221093713-c081198d/75/Web-Techniques-like-Cookies-and-Sessions-40-2048.jpg)
![Some techniques are:
1. Hidden Fields: One session tracking technique is to use hidden form fields to pass
data from one page to another. PHP treats hidden form fields just like normal form
fields, so the values are available in the $_GET or $_POST arrays. So after
submitting a form, the form data can be fetched by the next page from $_GET or
$_POST arrays.
However, a more common and popular technique is to assign each user a unique
identifier using a single hidden form field.
For example, consider a form where a user selects a product from a drop-down
box. We can simply place the product ID into a hidden form field.
<form action=”myform.php” method=”post”>
<select name=”selected_product_id”>
<option value=”121”>Product 121</option>
<option value=”122”>Product 122</option>
</select>
<input type=”submit” value=”Select Product”>
</form>
We could return a page to him using the following code:
<input type=”hidden” name=”chosen_product_id” value=”<?php echo
$_POST[selected_product_id];?>”>
The chosen_product_id value can be fetched after submitting the form.
While hidden form fields work in all browsers, they work only for a sequence of
dynamically generated forms, so they aren't as generally useful as some other
techniques.](https://image.slidesharecdn.com/webtechniquesppt-241221093713-c081198d/75/Web-Techniques-like-Cookies-and-Sessions-42-2048.jpg)
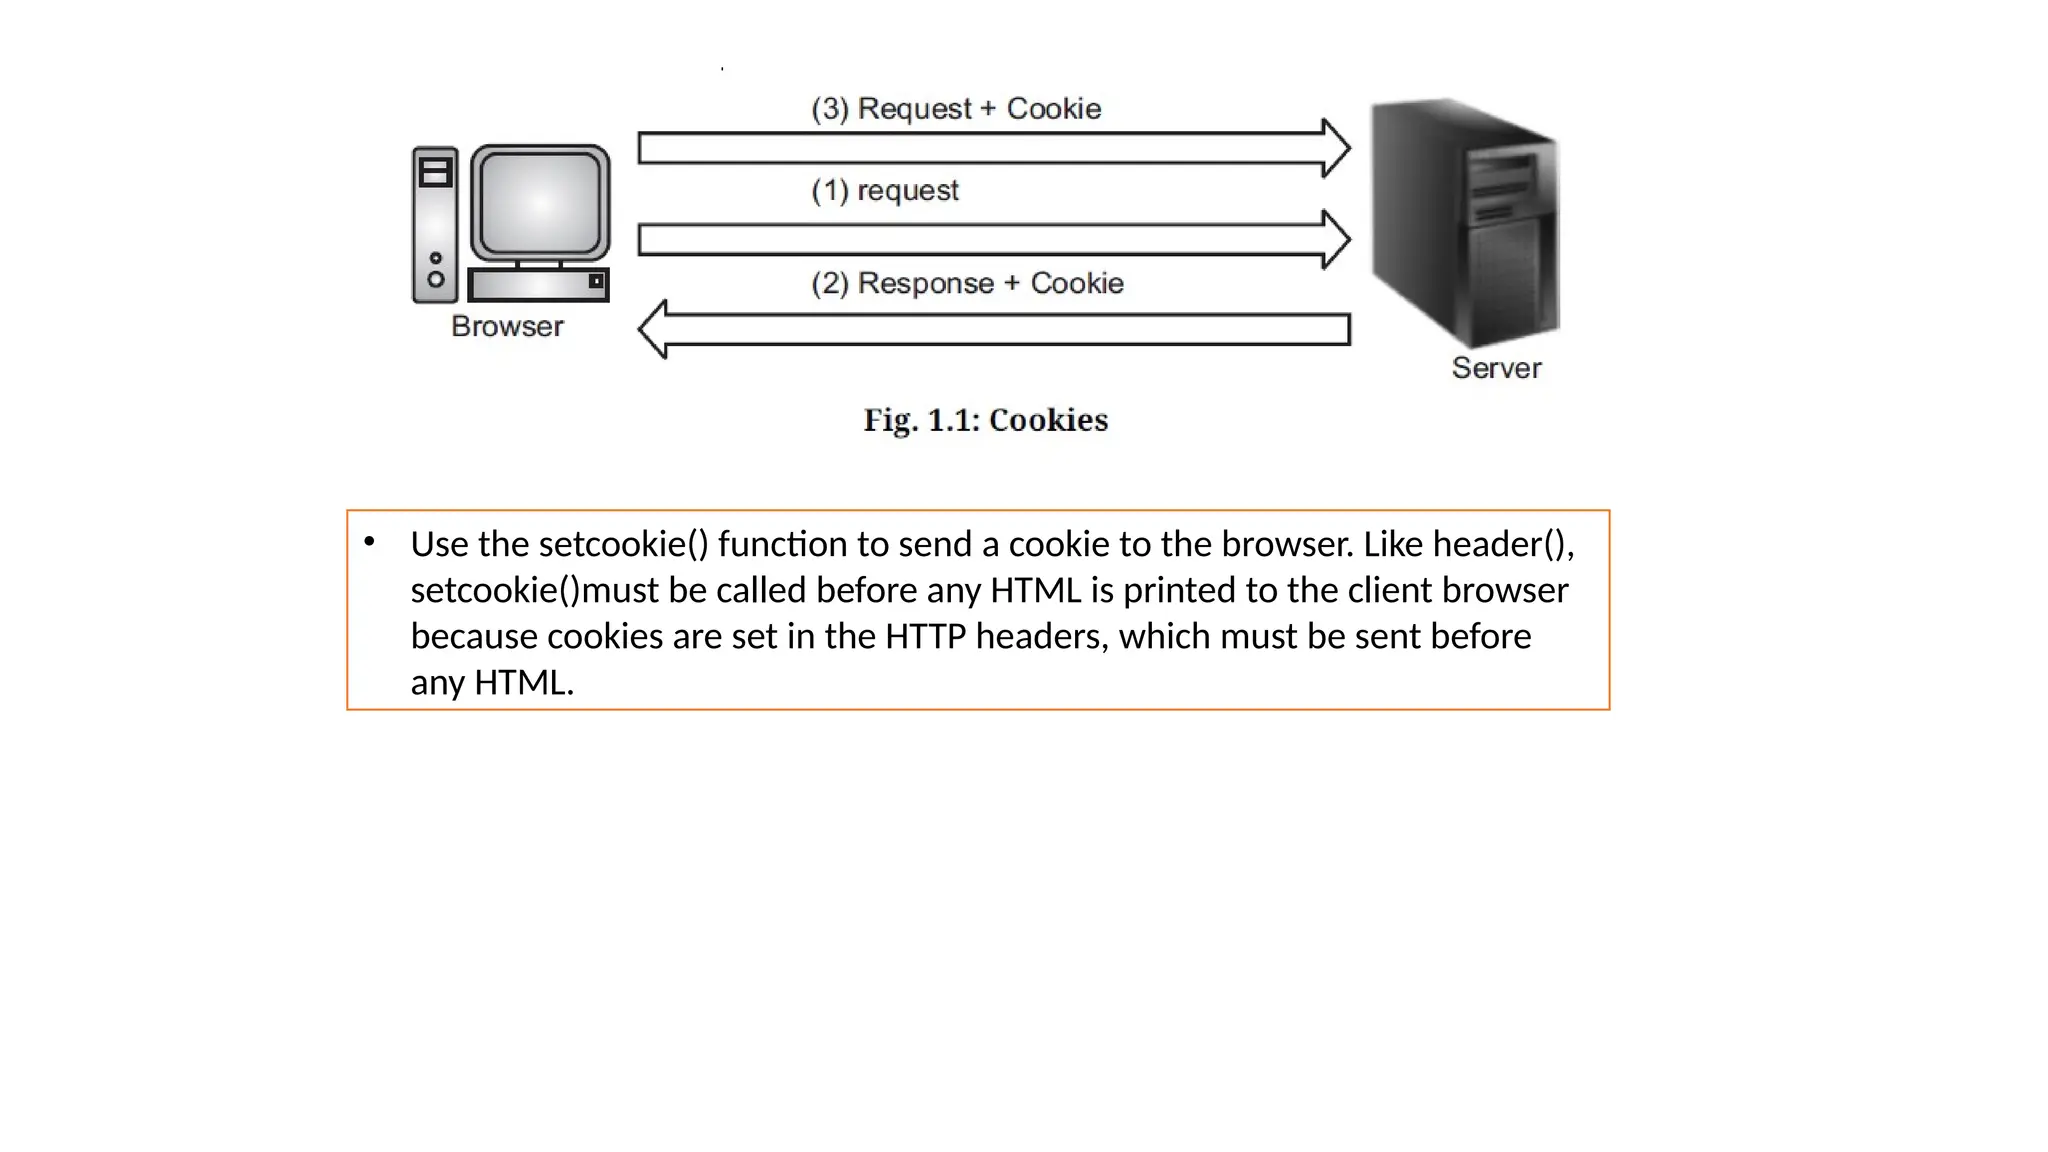
![The syntax is,
setcookie(name [, value [, expire [, path [, domain [, secure ]]]]]);
Here, is the detail of all the arguments in above syntax:
Name: Name of the cookie, stored in an environment variable called $_COOKIE. This
variable is used while accessing cookies.
Value: Value of the named variable.
Expiry: A UNIX timestamp denoting the time at which the cookie will expire.
Path: This specifies the directories for which the cookie is valid. A single forward
slash character permits the cookie to be valid for all directories.
Domain: The browser will return the cookie only for URLs within this domain. The
default is the server hostname.
Secure: This can be set to 1 to specify that the cookie should only be sent by secure
transmission using HTTPS otherwise set to 0 which mean cookie can be sent by
regular HTTP.
• When a browser sends a cookie back to the server, you can access that cookie through
the $_COOKIE array. The key is the cookie name, and the value is the cookie's value
field.](https://image.slidesharecdn.com/webtechniquesppt-241221093713-c081198d/75/Web-Techniques-like-Cookies-and-Sessions-46-2048.jpg)
![• For example, to set cookie in one page:
<?php
setcookie("ID", "121");
setcookie("name", "Laptop");
?>
• Can be access in another page as follows:
<?php
if( isset($_COOKIE["ID"]))
{
echo "Product ID: " . $_COOKIE["ID"] . "<br />";
echo "Product Name: " . $_COOKIE["name"];
}
else
echo "Sorry... Not recognized" . "<br />";
?>
Output:
Product ID: 121
Product Name: Laptop](https://image.slidesharecdn.com/webtechniquesppt-241221093713-c081198d/75/Web-Techniques-like-Cookies-and-Sessions-47-2048.jpg)
![For instance, the following code at the top of a page keeps track of the number of times
the page has been accessed by this client:
<?php
if(!isset($_COOKIE['accesses']))
setcookie('accesses', 0);
else{
$page_accesses = $_COOKIE['accesses'];
setcookie('accesses', ++$page_accesses);
echo "This page is accessed " . $_COOKIE['accesses']
. " times";
}
Initially the cookie named “accesses” is not set, so it is set to 0. After that every time
the page is accessed the program displays how many times the page is accessed.](https://image.slidesharecdn.com/webtechniquesppt-241221093713-c081198d/75/Web-Techniques-like-Cookies-and-Sessions-48-2048.jpg)
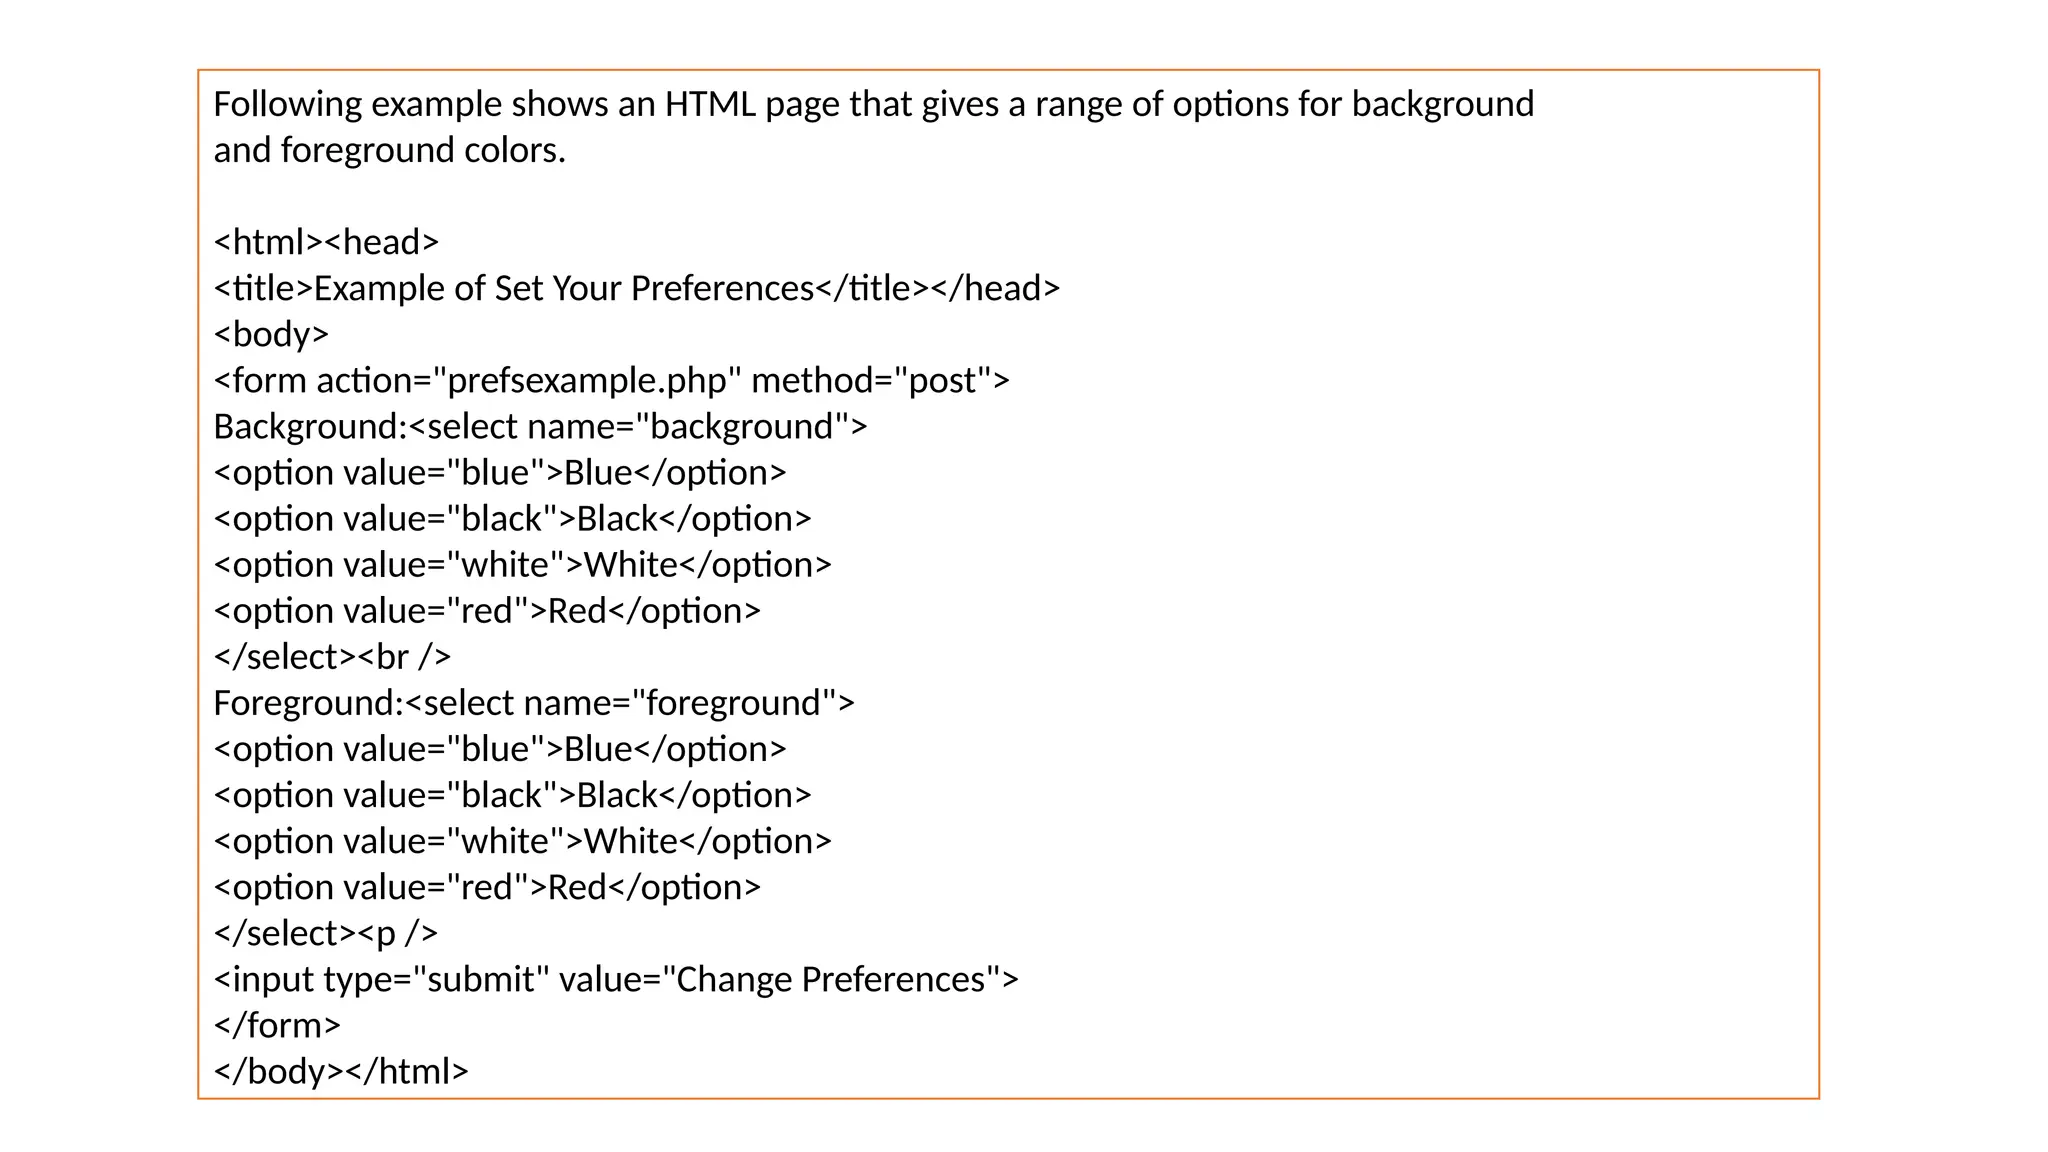
![• The form in above Example submits to the PHP script prefs.php, which is shown in
following Example.
• This script sets cookies for the color preferences specified in the form. Note that the
calls to setcookie() are made before the HTML page is started.
<?php
$colors = array('black' => '#000000',
'white' => '#ffffff',
'red' => '#ff0000',
'blue' => '#0000ff');
$bg_name = $_POST['background'];
$fg_name = $_POST['foreground'];
setcookie('bg', $colors[$bg_name]);
setcookie('fg', $colors[$fg_name]);
?>
<html>
<head><title>Example of Preferences Set</title></head>
<body>
Thank you. Your preferences have been changed to:<br />
Background: <?= $bg_name?><br />
Foreground: <?= $fg_name?><br />
Click <a href="prefs-demo.php">here</a>
to see the preferences in action.
</body></html>](https://image.slidesharecdn.com/webtechniquesppt-241221093713-c081198d/75/Web-Techniques-like-Cookies-and-Sessions-50-2048.jpg)
![The page created by above Example contains a link to another page, shown in
following Example, that uses the color preferences by accessing the $_COOKIE array.
<html>
<head>
<title>Example of Front Door</title>
</head>
<?php
$bg = $_COOKIE['bg'];
$fg = $_COOKIE['fg'];
?>
<body bgcolor="<?= $bg?>" text="<?= $fg?>">
<h1>Welcome to the Store</h1>
</body>
</html>](https://image.slidesharecdn.com/webtechniquesppt-241221093713-c081198d/75/Web-Techniques-like-Cookies-and-Sessions-51-2048.jpg)
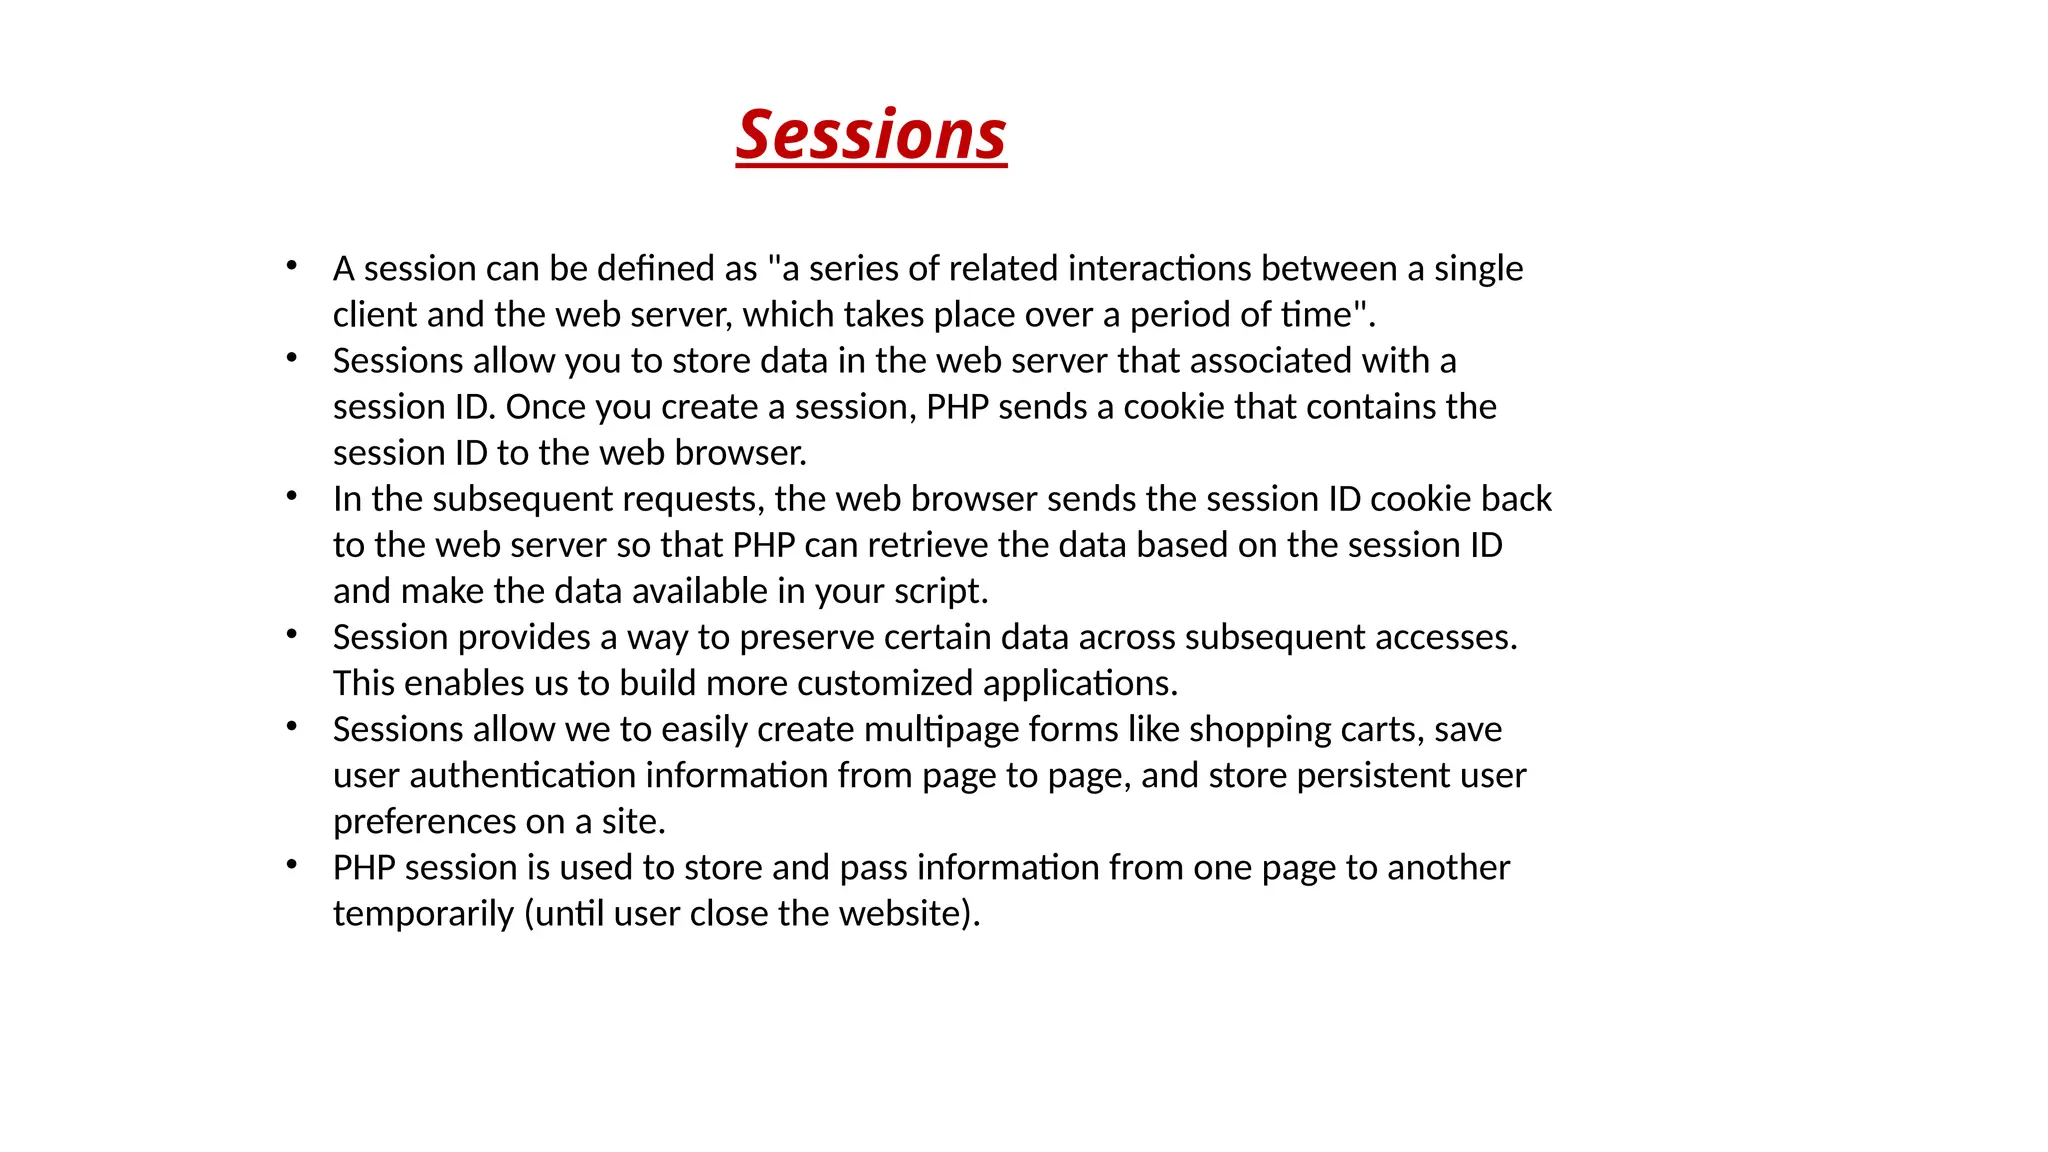
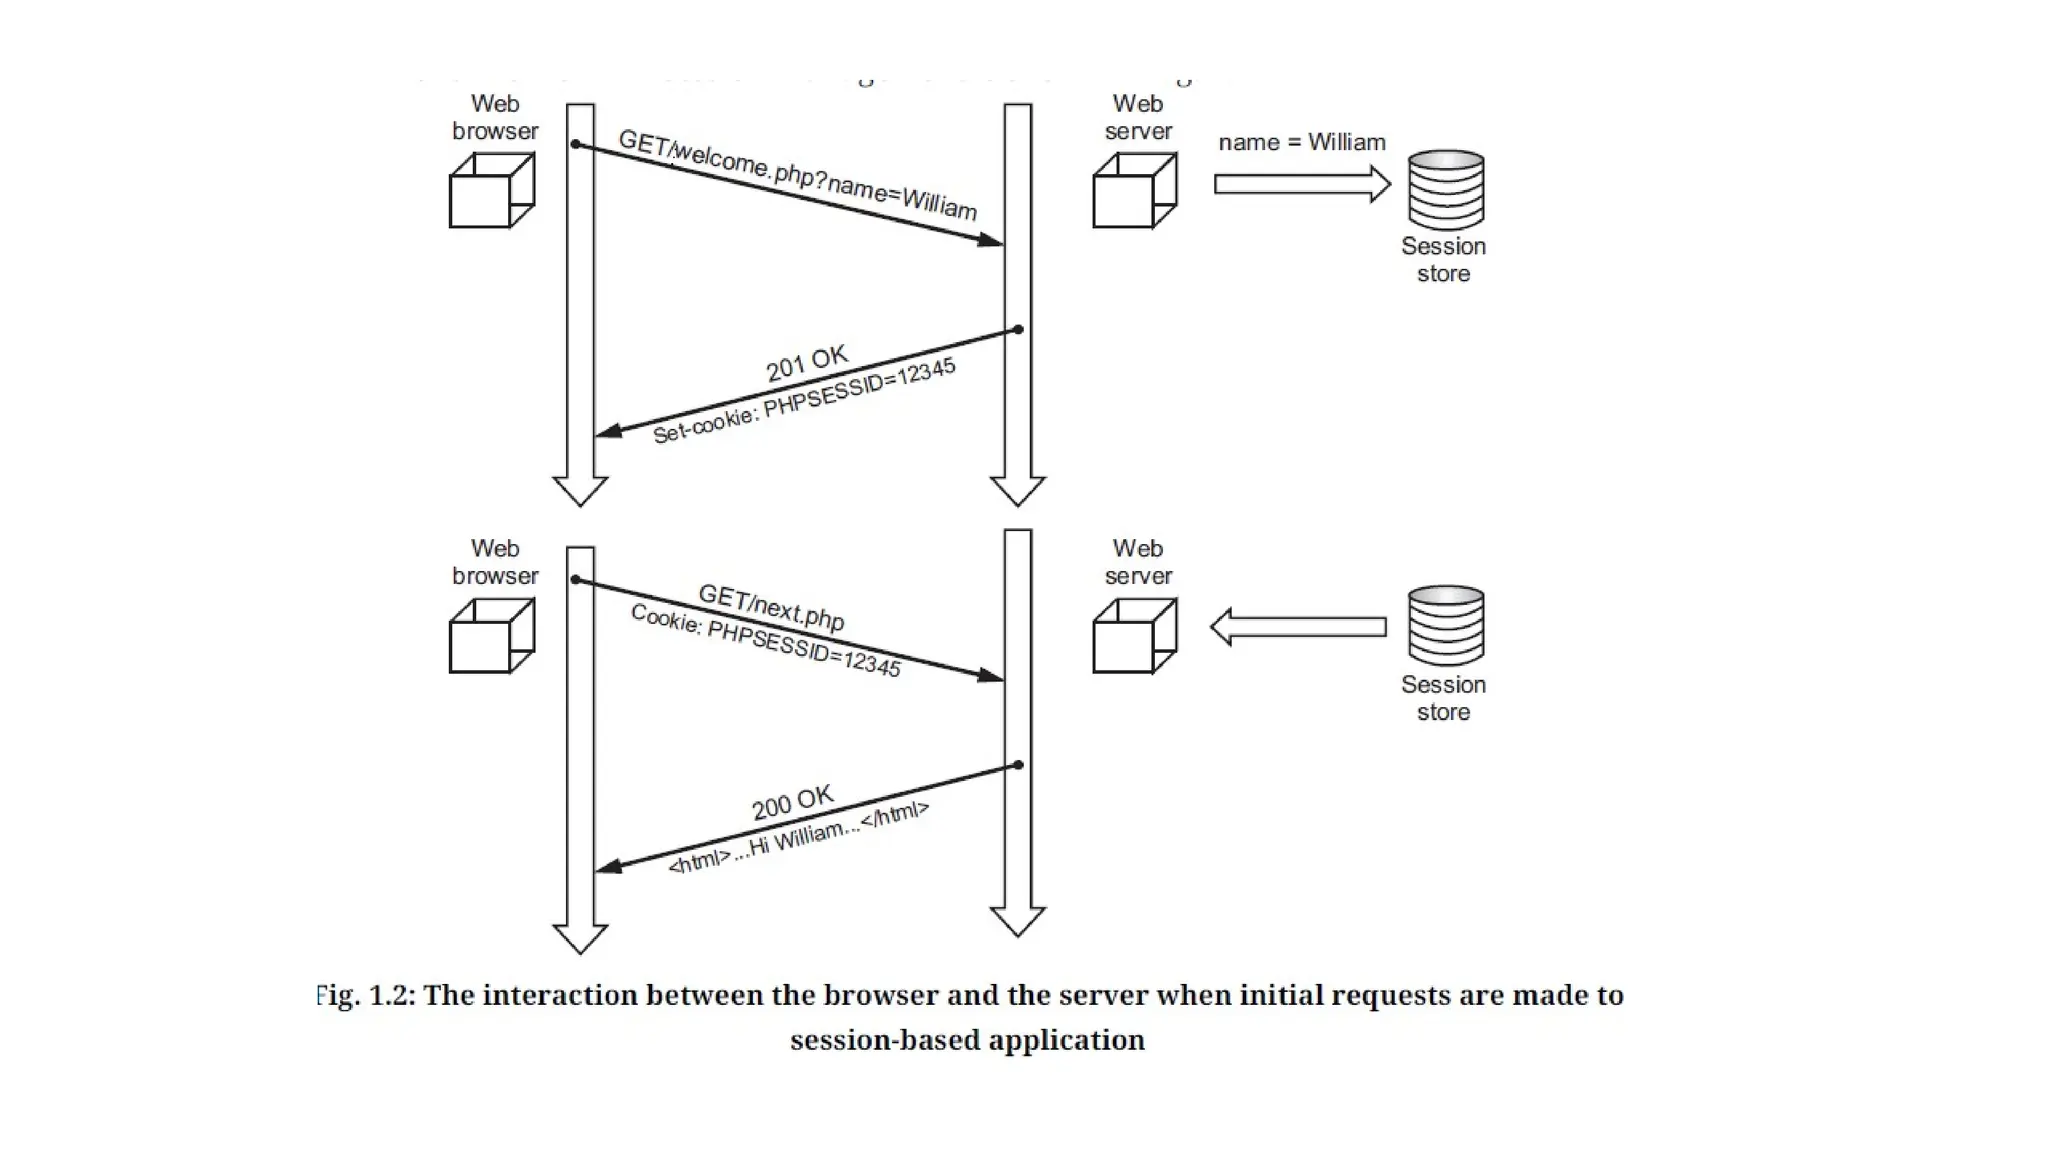
![• When user first enters the session-based application by making a request to a page that starts a
session, PHP generates a session and creates a file that stores the session related variables.
• PHP sets a cookie named PHPSESSID to hold the session ID in the response the script generates. If
the user’s browser does not support cookies or has cookies turned off, the session ID is added in
URLs within the web site. The browser then records the cookie and includes it in subsequent
requests.
• In the example shown above, the script welcome.php records session variables in the session store,
and a request to next.php then has access to those variables because of the session ID.
• A session ends when the user closes the browser or after leaving the site, the server will terminate
the session after a predetermined period of time.
• PHP session_start() function is used to start the session. It starts a new or resumes existing session.
It returns existing session if session is created already. If session is not available, it creates and
returns new session.
Syntax: bool session_start (void)
• $_SESSION is an associative array that contains all session variables. It is used to set and get session
variable values.
• Session variables are stored in associative array called $_SESSION[]. These variables can be accessed
during lifetime of a session.](https://image.slidesharecdn.com/webtechniquesppt-241221093713-c081198d/75/Web-Techniques-like-Cookies-and-Sessions-55-2048.jpg)
![<?php
session_start();
if(isset( $_SESSION['counter']))
{
$_SESSION['counter'] += 1;
}
else
{
$_SESSION['counter'] = 1;
}
$msg = "You have visited this page ". $_SESSION['counter']
. " in this session.";
?>
<html>
<head>
<title>Setting up a PHP session</title>
</head>
<body>
<?php echo ( $msg );?>
</body>
</html>](https://image.slidesharecdn.com/webtechniquesppt-241221093713-c081198d/75/Web-Techniques-like-Cookies-and-Sessions-56-2048.jpg)
![How to Access Data in the Session?
• Unlike a cookie, we can store any types of data in sessions. You store data as keys and
values in the $SESSION[] superglobal array.
• For example, in the index.php file, we store user string and roles array in the session as follows:
<?php
session_start();
$_SESSION['user'] = "admin";
$roles = array("admin", "approver", "editor");
$_SESSION['roles'] = $roles;
session_write_close();
?>
<a href="test1.php">Go to profile page</a>
• In the profile.php file, you can access session data as follows:
<?php
session_start();
if(isset($_SESSION['user']))
{
echo sprintf("Welcome %s!<br>",$_SESSION['user']);
}
if(isset($_SESSION['roles']))
{
echo sprintf('Your roles: %s', implode($_SESSION['roles'],','));
}?>](https://image.slidesharecdn.com/webtechniquesppt-241221093713-c081198d/75/Web-Techniques-like-Cookies-and-Sessions-57-2048.jpg)
![Destroy a PHP Session:
• To remove all global session variables and destroy the session, use session_unset() and
session_destroy() functions.
• A PHP session can be destroyed by session_destroy() function. This function does not
need any argument and a single call can destroy all the session variables.
• If you want to destroy a single session variable then you can use unset() function to
unset a session variable.
• Here, is the example to unset a single variable:
<?php
unset($_SESSION['counter']);
?>
• Here, is the call which will destroy all the session variables:
<?php
session_start();
?>
<html><body>
<?php
// remove all session variables session_unset();
// destroy the session session_destroy();
echo "All session variables are now removed
and the session is destroyed."
?></body></html>](https://image.slidesharecdn.com/webtechniquesppt-241221093713-c081198d/75/Web-Techniques-like-Cookies-and-Sessions-58-2048.jpg)

![Combining Cookies and Sessions:
• Using a combination of cookies and session, you can preserve state across visits.
• When a user leaves the site that state should be forgotten.
• Any state that should persist between user visits, such as a unique user ID, can be stored in a cookie.
• With the user's ID, we can retrieve the user's more permanent state, such as display preferences,
mailing address, and so on, from a permanent store, such as a database.
• Following example allows the user to select text and background colors and stores those values in a
cookie. Any visits to the page within the next week send the color values in the cookie.
<?php
if($_POST['bgcolor'])
{
setcookie('bgcolor', $_POST['bgcolor'], time()
+ (60 * 60 * 24 * 7));
}
$bgcolor = empty($bgcolor)? 'black': $bgcolor;
?>
<body bgcolor="<?= $bgcolor?>">
<form action="<?= $PHP_SELF?>" method="POST">
<select name="bgcolor"><option value="black">Black</option><option value="white">White</option>
<option value="gray">Gray</option><option value="blue">Blue</option>
<option value="green">Green</option><option value="red">Red</option>
</select>
<input type="submit" />
</form></body>](https://image.slidesharecdn.com/webtechniquesppt-241221093713-c081198d/75/Web-Techniques-like-Cookies-and-Sessions-61-2048.jpg)
![Example:
• A PHP script to create a login form with user name and password, once the user login, the second form should be
display to accept the user details (roll_no, name, city).If the user does not enter information within specified time
limit, expire his session and give the warning.
login.html File:
<html>
<head><title>login form </title></head>
<body>
<form method = "POST" action = "login.php">
Username :
<input type = "text" name = "user"><br>
Password :
<input type = "password" name = "pass"><br><br>
<input type = "submit" value="Submit">
</form>
</body>
</html>
login.php File:
<?php
session_start();
$_SESSION["tm"] = time();
?>
<form method = "GET" action = "new.php">
Roll No : <input type = "text" name = "rno"><br>
Name : <input type = "text" name = "nm"><br>
City : <input type = "text" name = "ct"><br><br>
<input type = "submit" value="Submit">
</form>](https://image.slidesharecdn.com/webtechniquesppt-241221093713-c081198d/75/Web-Techniques-like-Cookies-and-Sessions-62-2048.jpg)
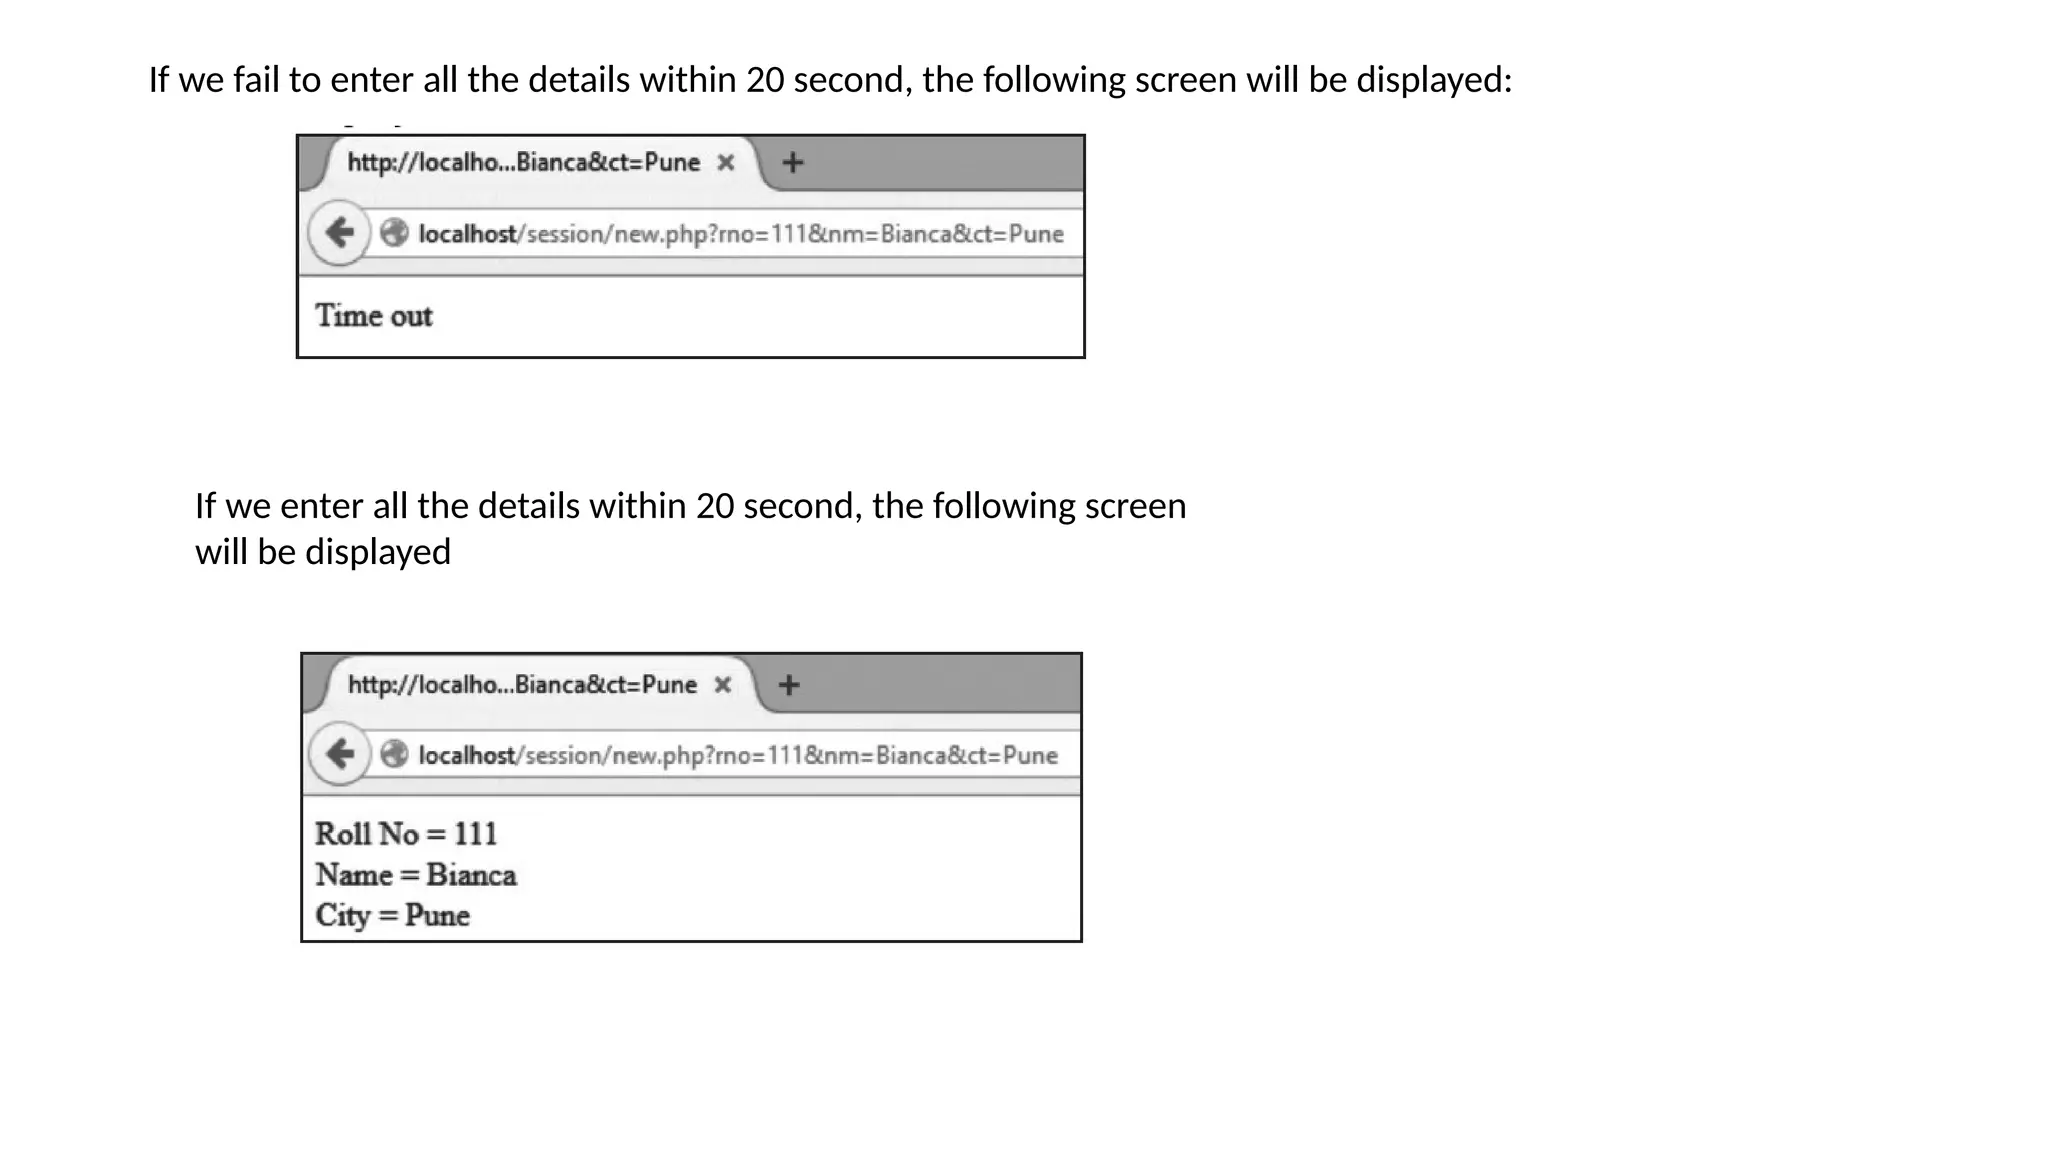
![new.php File:
<?php
session_start();
$newt=$_SESSION['tm'] + 20;
if($newt < time())
echo "Time out";
else
{
echo "Roll No = $_GET[rno] <br>";
echo "Name = $_GET[nm] <br>";
echo "City = $_GET[ct]";
}
session_destroy( );
?>
Output: When we run login.html file, the following screen will be
displayed which will ask us to enter username and password.
After we enter any username and password, the following
screen will be display:](https://image.slidesharecdn.com/webtechniquesppt-241221093713-c081198d/75/Web-Techniques-like-Cookies-and-Sessions-63-2048.jpg)
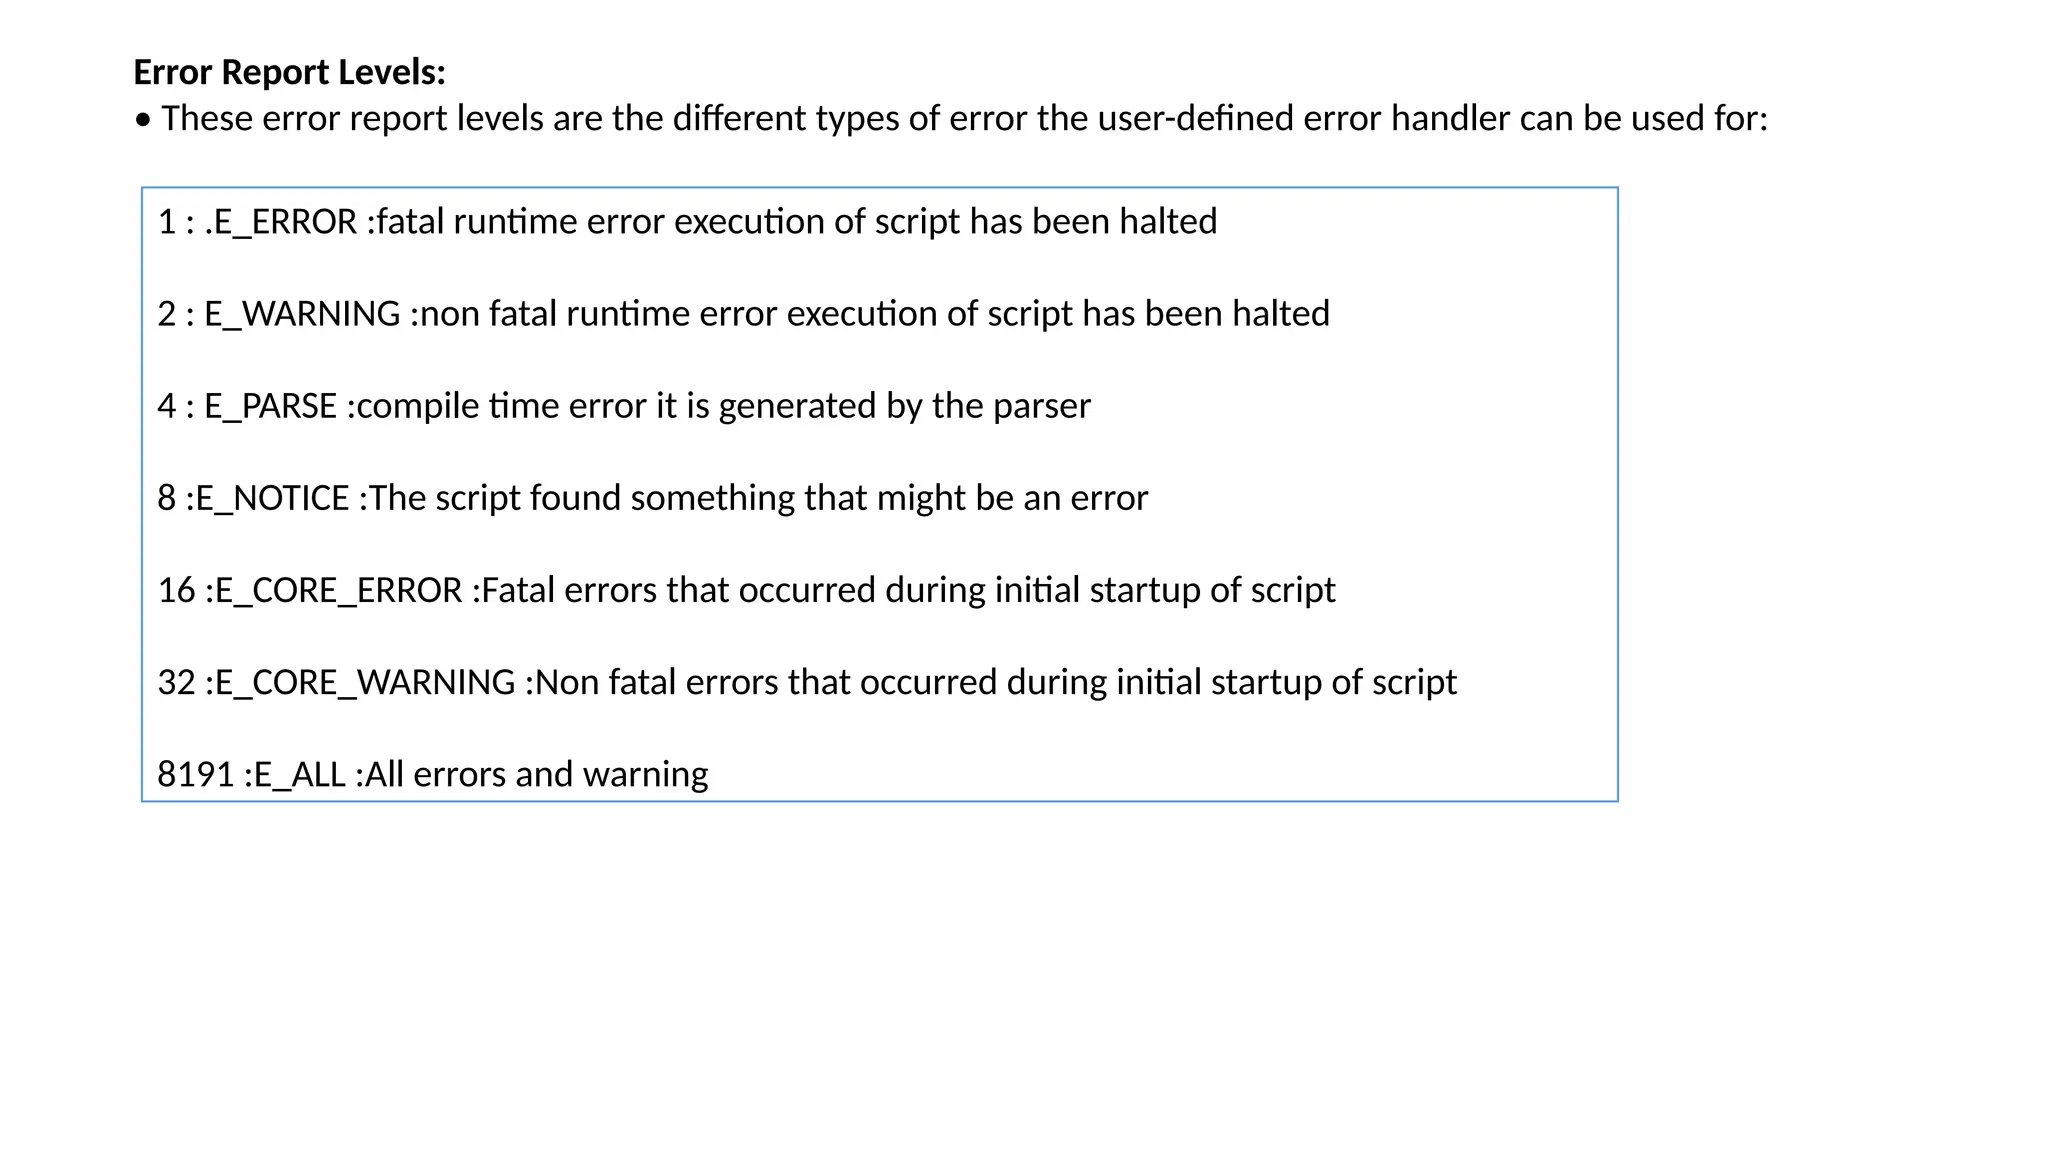
![Creating a Custom Error Handler
• In PHP we can define your own error handler function to handle any error. Creating a custom error
handler is quite simple. We simply create a special function that can be called when an error occurs
in PHP. To create custom error handler first use the library function set_error_handler(). This function
sets a user-defined error handler function.
Syntax:
mixed set_error_handler (callable $error_handler[,int $error_types = E_ALL | E_STRICT])
Here, $error_handler contains name of the user defined function, that is used to handle error. Second
parameter $error_types is optional.
• The syntax of the user defined function is:
bool handler (int $errno , string $errstr [, string $errfile[, int $errline [, array $errcontext ]]])
The parameters are described as follows:
$error_level: It is required parameter and it must be an integer.
There are predefined error levels.
$error_message: It is required parameter and it is the message
which user want to print.
$error_file: It is optional parameter and used to specify the file
in which error has been occurred.
$error_line: It is optional parameter and used to specify the
line number in which error has been occurred.
$error_context: It is optional parameter and used to specify an
array containing every variable and their value when error has
been occurred.](https://image.slidesharecdn.com/webtechniquesppt-241221093713-c081198d/75/Web-Techniques-like-Cookies-and-Sessions-66-2048.jpg)


![[DSBW Spring 2009] Unit 02: Web Technologies (2/2)](https://cdn.slidesharecdn.com/ss_thumbnails/unit02-2-tech-090302113937-phpapp01-thumbnail.jpg?width=640&height=640&fit=bounds)


