
![Volumetric Fog 2
3. 카메라부터의거리에따른산란누적
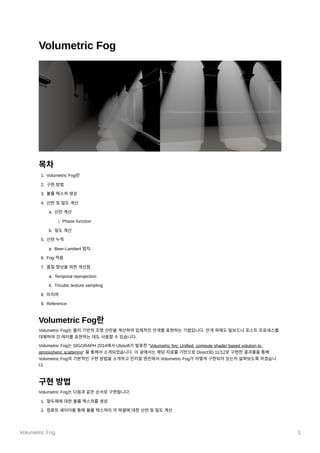
4. Scene에Fog적용
이후로각단계를좀더자세히알아보도록하겠습니다.
볼륨텍스쳐생성
가장먼저볼륨텍스쳐를생성할필요가있습니다. 볼륨텍스쳐는3D공간의산란및밀도정보를저장하는데사용됩니다.
발표자료에따르면볼륨텍스쳐의크기는720p기준으로플랫폼에따라160x90x64(가로x세로x깊이) 혹은160x90x128이며포맷으로
는16bit RGBA Float를사용하였다고합니다.
저는160x90x128 크기의볼륨텍스쳐를UAV와SRV로사용할수있도록하여생성하였습니다. 볼륨텍스쳐생성을위한설정은다음
과같습니다.
const std::array<uint32, 3>& frustumGridSize = Proxy()->FrustumGridSize();
agl::TextureTrait frustumVolumeTrait = {
.m_width = frustumGridSize[0], // 160
.m_height = frustumGridSize[1], // 90
.m_depth = frustumGridSize[2], // 128
.m_sampleCount = 1,
.m_sampleQuality = 0,
.m_mipLevels = 1,
.m_format = agl::ResourceFormat::R16G16B16A16_FLOAT,
.m_access = agl::ResourceAccessFlag::GpuRead | agl::ResourceAccessFlag::GpuWrite,
.m_bindType = agl::ResourceBindType::RandomAccess | agl::ResourceBindType::ShaderResource,
.m_miscFlag = agl::ResourceMisc::Texture3D
};
이렇게생성한볼륨텍스쳐의각텍셀은카메라공간의일정복셀영역에대한산란및밀도정보를저장하는데텍스쳐의크기에제약이
있기때문에카메라공간을균등하게분할하는것이아니라가까운곳에더높은해상도를제공하기위해z축이(카메라가보는방향) 지
수분포를따르도록분할합니다. 볼륨텍스쳐텍셀의id를받아월드공간좌표로변환하는함수를통해자세한공간분할과정을알아보
겠습니다.
/*
- input
id : 볼륨 텍스쳐 텍셀의 id (x,y,z)
dims : 볼륨 텍스쳐 크기 (width, height, depth)
- output
월드 공간 좌표
*/
float3 ConvertThreadIdToWorldPosition( uint3 id, uint3 dims )
{
// id -> ndc
float3 ndc = ConvertThreadIdToNdc( id, dims );
float depth = ConvertNdcZToDepth( ndc.z );
return ConvertToWorldPosition( ndc, depth );
}
먼저볼륨텍스쳐의텍셀id와텍스쳐크기를인자로받아NDC(Normalized Device Coordinate) 공간으로변경합니다. 이과정을담당
하는변환함수ConvertThreadIdToNdc는다음과같습니다.
/*
- input](data:image/gif;base64,R0lGODlhAQABAIAAAAAAAP///yH5BAEAAAAALAAAAAABAAEAAAIBRAA7)
Recommended
More Related Content
Similar to Volumetric Fog
Similar to Volumetric Fog (11)
More from Bongseok Cho
Volumetric Fog
- 1. Volumetric Fog 1 Volumetric Fog 목차 1. Volumetric Fog란 2. 구현방법 3. 볼륨텍스쳐생성 4. 산란및밀도계산 a. 산란계산 i. Phase function b. 밀도계산 5. 산란누적 a. Beer-Lambert 법칙 6. Fog 적용 7. 품질향상을위한개선점 a. Temporal reprojection b. Tricubic texture sampling 8. 마치며 9. Reference Volumetric Fog란 Volumetric Fog는물리기반의조명산란을계산하여입체적인안개를표현하는기법입니다. 안개외에도빌보드나포스트프로세스를 대체하여갓레이를표현하는데도사용할수있습니다. Volumetric Fog는SIGGRAPH 2014에서Ubisoft가발표한“Volumetric fog: Unified, compute shader based solution to atmospheric scattering” 을통해서소개되었습니다. 이글에서는해당자료를기반으로Direct3D 11/12로구현한결과물을통해 Volumetric Fog의기본적인구현방법을소개하고언리얼엔진에서Volumetric Fog가어떻게구현되어있는지살펴보도록하겠습니 다. 구현방법 Volumetric Fog는다음과같은순서로구현됩니다. 1. 절두체에대한볼륨텍스쳐를생성 2. 컴퓨트셰이더를통해볼륨텍스쳐의각텍셀에대한산란및밀도계산
- 2. Volumetric Fog 2 3. 카메라부터의거리에따른산란누적 4. Scene에Fog적용 이후로각단계를좀더자세히알아보도록하겠습니다. 볼륨텍스쳐생성 가장먼저볼륨텍스쳐를생성할필요가있습니다. 볼륨텍스쳐는3D공간의산란및밀도정보를저장하는데사용됩니다. 발표자료에따르면볼륨텍스쳐의크기는720p기준으로플랫폼에따라160x90x64(가로x세로x깊이) 혹은160x90x128이며포맷으로 는16bit RGBA Float를사용하였다고합니다. 저는160x90x128 크기의볼륨텍스쳐를UAV와SRV로사용할수있도록하여생성하였습니다. 볼륨텍스쳐생성을위한설정은다음 과같습니다. const std::array<uint32, 3>& frustumGridSize = Proxy()->FrustumGridSize(); agl::TextureTrait frustumVolumeTrait = { .m_width = frustumGridSize[0], // 160 .m_height = frustumGridSize[1], // 90 .m_depth = frustumGridSize[2], // 128 .m_sampleCount = 1, .m_sampleQuality = 0, .m_mipLevels = 1, .m_format = agl::ResourceFormat::R16G16B16A16_FLOAT, .m_access = agl::ResourceAccessFlag::GpuRead | agl::ResourceAccessFlag::GpuWrite, .m_bindType = agl::ResourceBindType::RandomAccess | agl::ResourceBindType::ShaderResource, .m_miscFlag = agl::ResourceMisc::Texture3D }; 이렇게생성한볼륨텍스쳐의각텍셀은카메라공간의일정복셀영역에대한산란및밀도정보를저장하는데텍스쳐의크기에제약이 있기때문에카메라공간을균등하게분할하는것이아니라가까운곳에더높은해상도를제공하기위해z축이(카메라가보는방향) 지 수분포를따르도록분할합니다. 볼륨텍스쳐텍셀의id를받아월드공간좌표로변환하는함수를통해자세한공간분할과정을알아보 겠습니다. /* - input id : 볼륨 텍스쳐 텍셀의 id (x,y,z) dims : 볼륨 텍스쳐 크기 (width, height, depth) - output 월드 공간 좌표 */ float3 ConvertThreadIdToWorldPosition( uint3 id, uint3 dims ) { // id -> ndc float3 ndc = ConvertThreadIdToNdc( id, dims ); float depth = ConvertNdcZToDepth( ndc.z ); return ConvertToWorldPosition( ndc, depth ); } 먼저볼륨텍스쳐의텍셀id와텍스쳐크기를인자로받아NDC(Normalized Device Coordinate) 공간으로변경합니다. 이과정을담당 하는변환함수ConvertThreadIdToNdc는다음과같습니다. /* - input
- 3. Volumetric Fog 3 id : 볼륨 텍스쳐 텍셀의 id (x,y,z) dims : 볼륨 텍스쳐 크기 (width, height, depth) - output Direct3D 왼손 좌표계를 따르므로 X,Y 가 -1 ~ 1 Z가 0 ~ 1 범위인 NDC 공간의 좌표 */ float3 ConvertThreadIdToNdc( uint3 id, uint3 dims ) { float3 ndc = id; ndc += 0.5f; ndc *= float3( 2.f / dims.x, -2.f / dims.y, 1.f / dims.z ); ndc += float3( -1.f, 1.f, 0.f ); return ndc; } NDC 공간의좌표를얻고나면Z좌표값을통해지수분포를따라는카메라공간깊이값을얻습니다. 이과정은 ConvertNdcZToDepth함수에서이뤄집니다. /* - input ndcZ : NDC 공간의 Z좌표 - global parameter VolumetricFogParam.DepthPackExponent : 지수 분포 변환을 위한 지수 VolumetricFogParam.NearPlaneDist : Fog에 대한 근평면까지의 거리 VolumetricFogParam.FarPlaneDist : Fog에 대한 원평면까지의 거리 - ouput 지수 분포를 따라는 카메라 공간의 깊이 */ float ConvertNdcZToDepth( float ndcZ ) { float depthPackExponent = VolumetricFogParam.DepthPackExponent; float nearPlaneDist = VolumetricFogParam.NearPlaneDist; float farPlaneDist = VolumetricFogParam.FarPlaneDist; return pow( ndcZ, depthPackExponent ) * ( farPlaneDist - nearPlaneDist ) + nearPlaneDist; } pow를통해ndcZ를지수분포로변환합니다. 지수는스크립트를통해조절할수있지만기본적으로2를사용하고있습니다. 이결과 ndcZ의분포는다음과같이변하게됩니다. 가로축을ndcZ라고할때낮은값에서는세로축의수치변화가완만하고높은값에서는급격해지는것을볼수있습니다. 이를통해카 메라에가까운위치에좀더높은해상도를제공하게됩니다. 이제앞에서얻은NDC 공간좌표와카메라공간의깊이값을통해월드위치를계산할수있습니다. /* - input ndc : NDC 공간 좌표 depth : 카메라 공간의 깊이 값
- 4. Volumetric Fog 4 - global parameter InvProjectionMatrix : 투영변환의 역행렬 InvViewMatrix : 카메라 변환의 역행렬 - output 월드 공간 좌표 */ float3 ConvertToWorldPosition( float3 ndc, float depth ) { // view ray // ndc좌표에 대한 카메라 공간 광선을 계산 float4 viewRay = mul( float4( ndc, 1.f ), InvProjectionMatrix ); viewRay /= viewRay.w; viewRay /= viewRay.z; // z값이 1이 되도록 // ndc -> world position float4 worldPosition = mul( float4( viewRay.xyz * depth, 1.f ), InvViewMatrix ); return worldPosition.xyz; } 산란및밀도계산 산란계산 산란은파동이입자와충돌하여주변으로흩어지는현상입니다. 빛이진공이아닌어떤매질을통과하면매질의입자와충돌하여여러 방향으로분산되거나흡수됩니다. 이단계에서는볼륨텍스쳐의각위치에서카메라까지얼마나많은양의빛이산란하는지를계산하고 산란누적단계에서사용될매질의밀도를기록합니다. Phase function 먼저빛이얼마나산란하는지계산하기위해서phase function을사용합니다. phase function은빛이모든방향으로얼마나산란하는지를나타내는함수입니다. 이함수는조명벡터와나가는방향벡터사이의각도 에대한함수인데에너지보존법칙을따르기때문에모든방향에대해적분하면1이됩니다. (phase function에흡수가고려되었다면1 보다작을수있습니다.) phase function은산란의종류에따라몇가지가있는데Volumetric Fog 구현에서는Henyey-Greenstein phase function 함수를사용 합니다. Henyey-Greenstein phase function 이방성계수g와각도에따른그래프 Henyey-Greenstein phase function은미(Mie) 산란과같은이방성산란을시뮬레이션하는가장일반적인phase function입니다. 미산란은빛의파장과크기가비슷한입자와충돌하여발생하는산란으로구름이나비가오기전하늘이뿌옇게보이는것은미산란에 의한현상입니다. /* - input wi : 빛이 들어오는 방향 wo : 빛이 나가는 방향 p(θ) = 4π 1 (1 + g − 2gcosθ) 2 2 3 1 − g2
- 5. Volumetric Fog 5 g : 이방성 계수 - output wi에서 들어와 wo로 나가는 빛의 양 */ float HenyeyGreensteinPhaseFunction( float3 wi, float3 wo, float g ) { float cosTheta = dot( wi, wo ); float g2 = g * g; float denom = pow( 1.f + g2 - 2.f * g * cosTheta, 3.f / 2.f ); return ( 1.f / ( 4.f * PI ) ) * ( ( 1.f - g2 ) / max( denom, EPSILON ) ); } HenyeyGreensteinPhaseFunction을이용해볼륨텍스쳐의각텍셀에서카메라방향으로산란하는빛의양을계산할수있습니다. 밀도계산 펄린노이즈텍스쳐를이용하거나높이에따라지수적으로분포하는함수를사용하여매질의불균등한밀도를표현할수있지만제결과 물에서는매질의밀도가균등한경우만을구현하였습니다. 따라서볼륨텍스쳐에기록될밀도는다음과같습니다. /* UniformDensity : 균등한 밀도 */ float density = UniformDensity; 산란계산과밀도계산을합친컴퓨트셰이더코드는다음과같습니다. 산란한빛의색상은볼륨텍스쳐의rgb채널에밀도는a채널에저장합니다. /* - global parameter FrustumVolume : 볼륨 텍스쳐 CameraPos : 카메라 위치 UniformDensity : 균등한 밀도 HemisphereUpperColor : Ambient로 사용하는 반구 조명 색상 Intensity : 빛 강도 조절을 위한 변수 */ [numthreads( 8, 8, 8 )] void main( uint3 DTid : SV_DispatchThreadId ) { uint3 dims; FrustumVolume.GetDimensions( dims.x, dims.y, dims.z ); if ( all( DTid < dims ) ) { float3 worldPosition = ConvertThreadIdToWorldPosition( DTid, dims ); float3 toCamera = normalize( CameraPos - worldPosition ); float density = UniformDensity; float3 lighting = HemisphereUpperColor.rgb * HemisphereUpperColor.a; [loop] for ( uint i = 0; i < NumLights; ++i ) { ForwardLightData light = GetLight( i ); float3 lightDirection = { 0.f, 0.f, 0.f }; if ( length( light.m_direction ) > 0.f ) // Directional Light의 경우 { lightDirection = normalize( light.m_direction ); } else // 그 외의 경우 (Point, Spot) { lightDirection = normalize( worldPosition - light.m_position ); } float3 toLight = -lightDirection; float visibility = Visibility( worldPosition, toLight ); // 섀도우 맵으로 가시성 검사 float phaseFunction = HenyeyGreensteinPhaseFunction( lightDirection, toCamera, AsymmetryParameterG ); lighting += visibility * light.m_diffuse.rgb * light.m_diffuse.a * phaseFunction; } FrustumVolume[DTid] = float4( lighting * Intensity * density, density )
- 6. Volumetric Fog 6 } } 산란누적 앞선단계에서는볼륨텍스쳐의각텍셀위치에서카메라방향으로산란하는빛의양과밀도를계산하였습니다. 지금까지볼륨텍스쳐에 저장된정보는아직3차원공간의한점에서의산란에지나지않습니다. 산란누적단계에서는텍셀위치에서카메라까지빛이이동하는경로의산란을누적하고빛이매질을통과하면서발생하는빛의감쇠현 상을시뮬레이션합니다. Beer-Lambert 법칙 Beer-Lambert 법칙은매질의성질과빛의감쇠현상에대한법칙입니다. 이법칙은투과율을정의하는데투과율은주어진방향에서들 어오는빛이매질을통해전달되는비율로A위치에서B까지의투과율은일반적으로다음과같이정의됩니다. 여기서 는산란과흡수의합으로정의되는소멸계수입니다. 이구현에서는밀도가 가됩니다. 또한투과율을그래프로그려보면아래와같이거리에따라지수적으로감소하는것을확인할수있습니다. Beer-Lambert 법칙을적용하여Ubisoft의발표자료에서는다음과같은누적코드를제시하고있습니다. T(A → B) = e− β (x)dx ∫B A e βe βe
- 7. Volumetric Fog 7 그러나SIGGRAPH 2015에서Frostbite가발표한“Physically Based and Unified Volumetric Rendering in Frostbite”에따르면이 러한누적방식은에너지보존법칙을준수하지않고있어새로운누적방식을제시하고있습니다. 산란계수 가커짐에따라점점밝아지는것을확인할수있습니다. Frostbite의누적식의각기호는다음을의미하니참고하시기바랍 니다. : 볼륨텍스쳐텍셀까지의깊이(= 매질안빛의이동거리) : 산란과흡수를합친소멸계수(= 구현코드에서는밀도) : 산란한조명 앞으로볼구현코드에서는Frostbite의누적방식을사용하였습니다. 누적방향은카메라위치에서가까운곳에서먼곳으로이동하며누적합니다. 즉볼륨텍스쳐의깊이0에서부터시작하게됩니다. σs D σt S
- 8. Volumetric Fog 8 이에따른컴퓨트셰이더코드는다음과같습니다. RWTexture3D<float4> FrustumVolume : register( t0 ); [numthreads( 8, 8, 1 )] void main( uint3 DTid : SV_DispatchThreadID ) { uint3 dims; FrustumVolume .GetDimensions( dims.x, dims.y, dims.z ); if ( all( DTid < dims ) ) { float4 accum = float4( 0.f, 0.f, 0.f, 1.f ); uint3 pos = uint3( DTid.xy, 0 ); [loop] for ( uint z = 0; z < dims.z; ++z ) { pos.z = z; float4 slice = FrustumVolume[pos]; float tickness = SliceTickness( (float)z / dims.z, dims.z ); accum = ScatterStep( accum.rgb, accum.a, slice.rgb, slice.a, tickness ); FrustumVolume [pos] = accum; } } } SliceTickness를통해서볼륨텍스쳐의현재위치와한칸앞의차이를통해지수분포가적용된깊이두께를계산합니다. 이두께가 입니다. /* - input ndc : NDC 공간 좌표 dimZ : 볼륨 텍스쳐의 깊이 - output 깊이 두께 */ float SliceTickness( float ndcZ, uint dimZ ) { return ConvertNdcZToDepth( ndcZ + 1.f / float( dimZ ) ) - ConvertNdcZToDepth( ndcZ ); } 실제누적이이뤄지는ScatterStep 함수는다음과같습니다. /* - input accumulatedLight : 누적된 조명 accumulatedTransmittance : 누적된 투과율 sliceLight : 현재 위치의 조명 sliceDensity : 현재 위치의 밀도 tickness : 깊이 두께 - global constant DensityScale : 밀도에 대한 스케일(균일한 밀도 파라미터를 소수점이 아닌 좀 더 큰 값으로 사용하기 위해 적절히 조정한 수치) - output 누적된 빛(rgb)과 투과율(a) */ D
- 9. Volumetric Fog 9 static const float DensityScale = 0.01f; float4 ScatterStep( float3 accumulatedLight, float accumulatedTransmittance, float3 sliceLight, float sliceDensity, float tickness ) { sliceDensity = max( sliceDensity, 0.000001f ); sliceDensity *= DensityScale; float sliceTransmittance = exp( -sliceDensity * tickness ); // Frostbite의 누적 방식 float3 sliceLightIntegral = sliceLight * ( 1.f - sliceTransmittance ) / sliceDensity; accumulatedLight += sliceLightIntegral * accumulatedTransmittance; accumulatedTransmittance *= sliceTransmittance; return float4( accumulatedLight, accumulatedTransmittance ); } Fog 적용 이제준비과정은모두끝났습니다. 적용단계에서는화면해상도만큼의사각형을그려장면에Fog를적용합니다. 이과정에서사용하는 주요렌더스테이트는다음과같습니다. // SrcAlpha로 블렌드 BlendOption volumetricFogDrawPassBlendOption; RenderTargetBlendOption& rt0BlendOption = volumetricFogDrawPassBlendOption.m_renderTarget[0]; rt0BlendOption.m_blendEnable = true; rt0BlendOption.m_srcBlend = agl::Blend::One; rt0BlendOption.m_destBlend = agl::Blend::SrcAlpha; rt0BlendOption.m_srcBlendAlpha = agl::Blend::Zero; rt0BlendOption.m_destBlendAlpha = agl::Blend::One; // 깊이 테스트 및 쓰기 OFF DepthStencilOption depthStencilOption; depthStencilOption.m_depth.m_enable = false; depthStencilOption.m_depth.m_writeDepth = false; 픽셀셰이더는각픽셀에대한카메라공간좌표를계산해서해당좌표를볼륨텍스쳐의UV로변경한뒤샘플링합니다. 블렌드스테이트 SrcAlpha로블렌드하도록설정하였기때문에투과율이담긴볼륨텍스쳐의알파채널을그대로사용하면투과율이1에가까울수록씬 의색상이투과율이0에가까울수록산란한빛의색상이반영됩니다. float4 main( PS_INPUT input ) : SV_Target0 { float viewSpaceDistance = ViewSpaceDistance.Sample( ViewSpaceDistanceSampler, input.uv ).x; if ( viewSpaceDistance <= 0.f ) { viewSpaceDistance = FarPlaneDist; } float3 viewPosition = normalize( input.viewRay ) * viewSpaceDistance; float3 uv = float3( input.uv, ConvertDepthToNdcZ( viewPosition.z ) ); float4 scatteringColorAndTransmittance = AccumulatedVolume.Sample( AccumulatedVolumeSampler, uv ); float3 scatteringColor = HDR( scatteringColorAndTransmittance.rgb ); return float4( scatteringColor, scatteringColorAndTransmittance.a ); } 품질향상을위한개선점 여기까지기본적인Volumetric Fog의구현방법을살펴보았습니다. 지금부터는품질향상을위한개선점2가지를소개하고적용전과 후를비교해보겠습니다. 1) Temporal reprojection Ubisoft의발표자료에서제시한볼륨텍스쳐의크기는720p 기준160x90x128입니다. 볼륨텍스쳐의해상도가화면의해상도보다작 기때문에필연적으로볼륨텍스쳐의텍셀하나가여러픽셀을커버하게됩니다. 720p의가로세로(1280 x 720)를볼륨텍스쳐의텍셀수로나눠보면가로세로8픽셀씩총64픽셀을커버하고있습니다. 64픽셀이모두 동일한산란값을사용해야하므로Volumetric Fog는언더샘플링으로인한아티팩트가발생합니다.
- 10. Volumetric Fog 10 Temporal reprojection은이런아티팩트를제거하기위해사용됩니다. Temporal 이라는단어에서알수있듯이Temporal Anti- Aliasing과마찬가지로이전프레임에계산했던결과를누적하여언더샘플링을해결하려는방식입니다. 따라서이전프레임의정보를 유지하기위해다수의텍스쳐가필요합니다. // 이전 프레임, 현재 프레임용 텍스쳐 2개, 스왑하면서 사용 for ( agl::RefHandle<agl::Texture>& frustumVolume : m_frustumVolume ) { frustumVolume = agl::Texture::Create( frustumVolumeTrait ); EnqueueRenderTask( [texture = frustumVolume]() { texture->Init(); } ); } // 산란 누적 단계에서 사용할 결과 텍스쳐 1개 m_accumulatedVolume = agl::Texture::Create( frustumVolumeTrait ); EnqueueRenderTask( [texture = m_accumulatedVolume]() { texture->Init(); } ); Temporal Anti-Aliasing이매프레임jitter를통해렌더링되는물체의위치를조금씩어긋나게했던것처럼Temporal reprojection도 jitter를통해볼륨텍스쳐텍셀의월드위치를조금씩어긋나게합니다. 여기에는Halton Sequence를사용하였습니다. (Halton Sequence의설명은이전Temporal Anti-Aliasing 페이지를참고부탁드립니 다.) 3차원공간에대한jitter를위해Halton Sequence도3차원으로확장하였습니다. // 2, 3, 5(소수)로 뽑은 수열 static const float3 HALTON_SEQUENCE[MAX_HALTON_SEQUENCE] = { float3( 0.5, 0.333333, 0.2 ), float3( 0.25, 0.666667, 0.4 ), float3( 0.75, 0.111111, 0.6 ), float3( 0.125, 0.444444, 0.8 ), float3( 0.625, 0.777778, 0.04 ), float3( 0.375, 0.222222, 0.24 ), float3( 0.875, 0.555556, 0.44 ) , float3( 0.0625, 0.888889, 0.64 ), float3( 0.5625, 0.037037, 0.84 ), float3( 0.3125, 0.37037, 0.08 ), float3( 0.8125, 0.703704, 0.28 ), float3( 0.1875, 0.148148, 0.48 ), float3( 0.6875, 0.481482, 0.68 ), float3( 0.4375, 0.814815, 0.88 ), float3( 0.9375, 0.259259, 0.12 ), float3( 0.03125, 0.592593, 0.32 ) }; 산란및밀도계산단계에서다음과같이jitter를추가합니다. float3 jitter = HALTON_SEQUENCE[( FrameCount + DTid.x + DTid.y * 2 ) % MAX_HALTON_SEQUENCE]; jitter.xyz -= 0.5f; // -0.5 ~ 0.5 범위로 조정 // jitter가 적용된 월드 위치 float3 worldPosition = ConvertThreadIdToWorldPosition( DTid, dims, jitter );
- 11. Volumetric Fog 11 그리고이전프레임의정보가현재도유효하다면(=카메라밖으로나가지않았다면) 현재프레임과섞습니다. /* - Global Parameter TemporalAccum : Temporal reprojection 사용 여부, 첫 프레임에 꺼야할 때 사용 ( 이전 프레임 정보가 없기 때문 ) PrevViewProjectionMatrix : 이전 프레임 카메라 투영 행렬 */ Texture3D HistoryVolume : register( t0 ); SamplerState HistorySampler : register( s0 ); // ... // Main 함수 내부 현재 프레임 산란 계산 후 curScattering = float4( lighting * Intensity * density, density ); if ( TemporalAccum > 0.f ) { float3 worldPosWithoutJitter = ConvertThreadIdToWorldPosition( DTid, dims ); // 이전 프레임의 UV 계산 float3 prevFrameUV = ConvertWorldPositionToUV( worldPosWithoutJitter, PrevViewProjectionMatrix ); // 0 ~ 1사이 범위면 유효 if ( all( prevFrameUV <= ( float3 )1.f ) && all( prevFrameUV >= ( float3 )0.f ) ) { float4 prevScattering = HistoryVolume.SampleLevel( HistorySampler, prevFrameUV, 0 ); curScattering = lerp( prevScattering, curScattering, 0.05f ); } } FrustumVolume[DTid] = curScattering; 산란누적단계는큰변화는없고별도의볼륨텍스쳐에출력하도록수정되었습니다. AccumulatedVolume[pos] = accum; 적용전후를비교해보면다음과같습니다. 2) Tricubic texture sampling 복셀데이터에대한샘플링방식을변경하는것으로추가적인품질향상을얻을수있습니다. Tricubic texture sampling은“CUDA Cubic B-Spline Interpolation”에따른방식으로볼륨텍스쳐를B-Spline을통해보간합니다. 선형샘플링보다더나은결과를관찰할 수있습니다.
- 12. Volumetric Fog 12 출처: https://twitter.com/FewesW/status/1300045087938879489 구현에는유니티용Tricubic sampling 코드를개인프로젝트상황에맞게약간수정하여Fog 적용단계에서사용하였습니다. #if TricubicTextureSampling == 1 float4 scatteringColorAndTransmittance = Tex3DTricubic( AccumulatedVolume, AccumulatedVolumeSampler, uv); #else float4 scatteringColorAndTransmittance = AccumulatedVolume.Sample( AccumulatedVolumeSampler, uv ); #endif 적용전후를비교해보면다음과같습니다. 마치며 언리얼엔진의Volumetric Fog구현도여기다룬내용과크게다르지않습니다. 몇가지개선점(Temporal reprojection 실패시루프를 돌아프레임을누적하여빠르게수렴할수있도록하는등)이있지만소개해드린내용을바탕으로충분히이해할수있을정도라고생각 합니다. 언리얼의구현도추가로살펴보고싶으신분을위해도움이될수있는진입점몇곳을여기에남기도록하겠습니다. VolumetricFog.cpp : 컴퓨트셰이더를사용하는Volumetric Fog 산란계산코드들이모여있음. ComputeVolumetricFog() : 가장처음진입점함수입니다. GetVolumetricFogGridSize() : 볼륨텍스쳐크기계산함수입니다. GetVolumetricFogGridZParams() : Z축분할에사용되는파라미터계산함수, 언리얼에서는다음과같은분포를따르도록Z 축을분할하는데근평면에너무많은해상도가할당되는것을방지하기위함으로생각합니다.
- 13. Volumetric Fog 13 VoxelizeFogVolumePrimitives() : Volume 머티리얼을통해렌더링하는프리미티브를복셀화해서Volumetric Fog 볼륨텍 스쳐에렌더링하는함수입니다. 이를통해다양한밀도를표현할수있습니다. 상자와구두가지Voxelize 모드가있습니다. FVolumetricFogLightScatteringCS : 산란계산컴퓨트셰이더클래스입니다. FVolumetricFogFinalIntegrationCS : 산란누적컴퓨트셰이더클래스입니다. RenderViewFog() : Fog를렌더링하는함수입니다. FExponentialHeightFogPS : Fog를렌더링하는픽셀셰이더클래스입니다. 준비한내용은여기까지입니다. 제개인프로젝트구현의전체코드는아래github를참고부탁드립니다. GitHub - xtozero/SSR at volumetric_fog Screen Space Reflection. Contribute to xtozero/SSR development by creating an account on GitHub. https://github.com/xtozero/SSR/tree/volumetric_fog 감사합니다. Reference https://github.com/diharaw/volumetric-fog : opengl 구현 https://github.com/bartwronski/CSharpRenderer : 원저자의구현 https://github.com/Unity-Technologies/VolumetricLighting/tree/master/Assets/VolumetricFog : Unity의구현