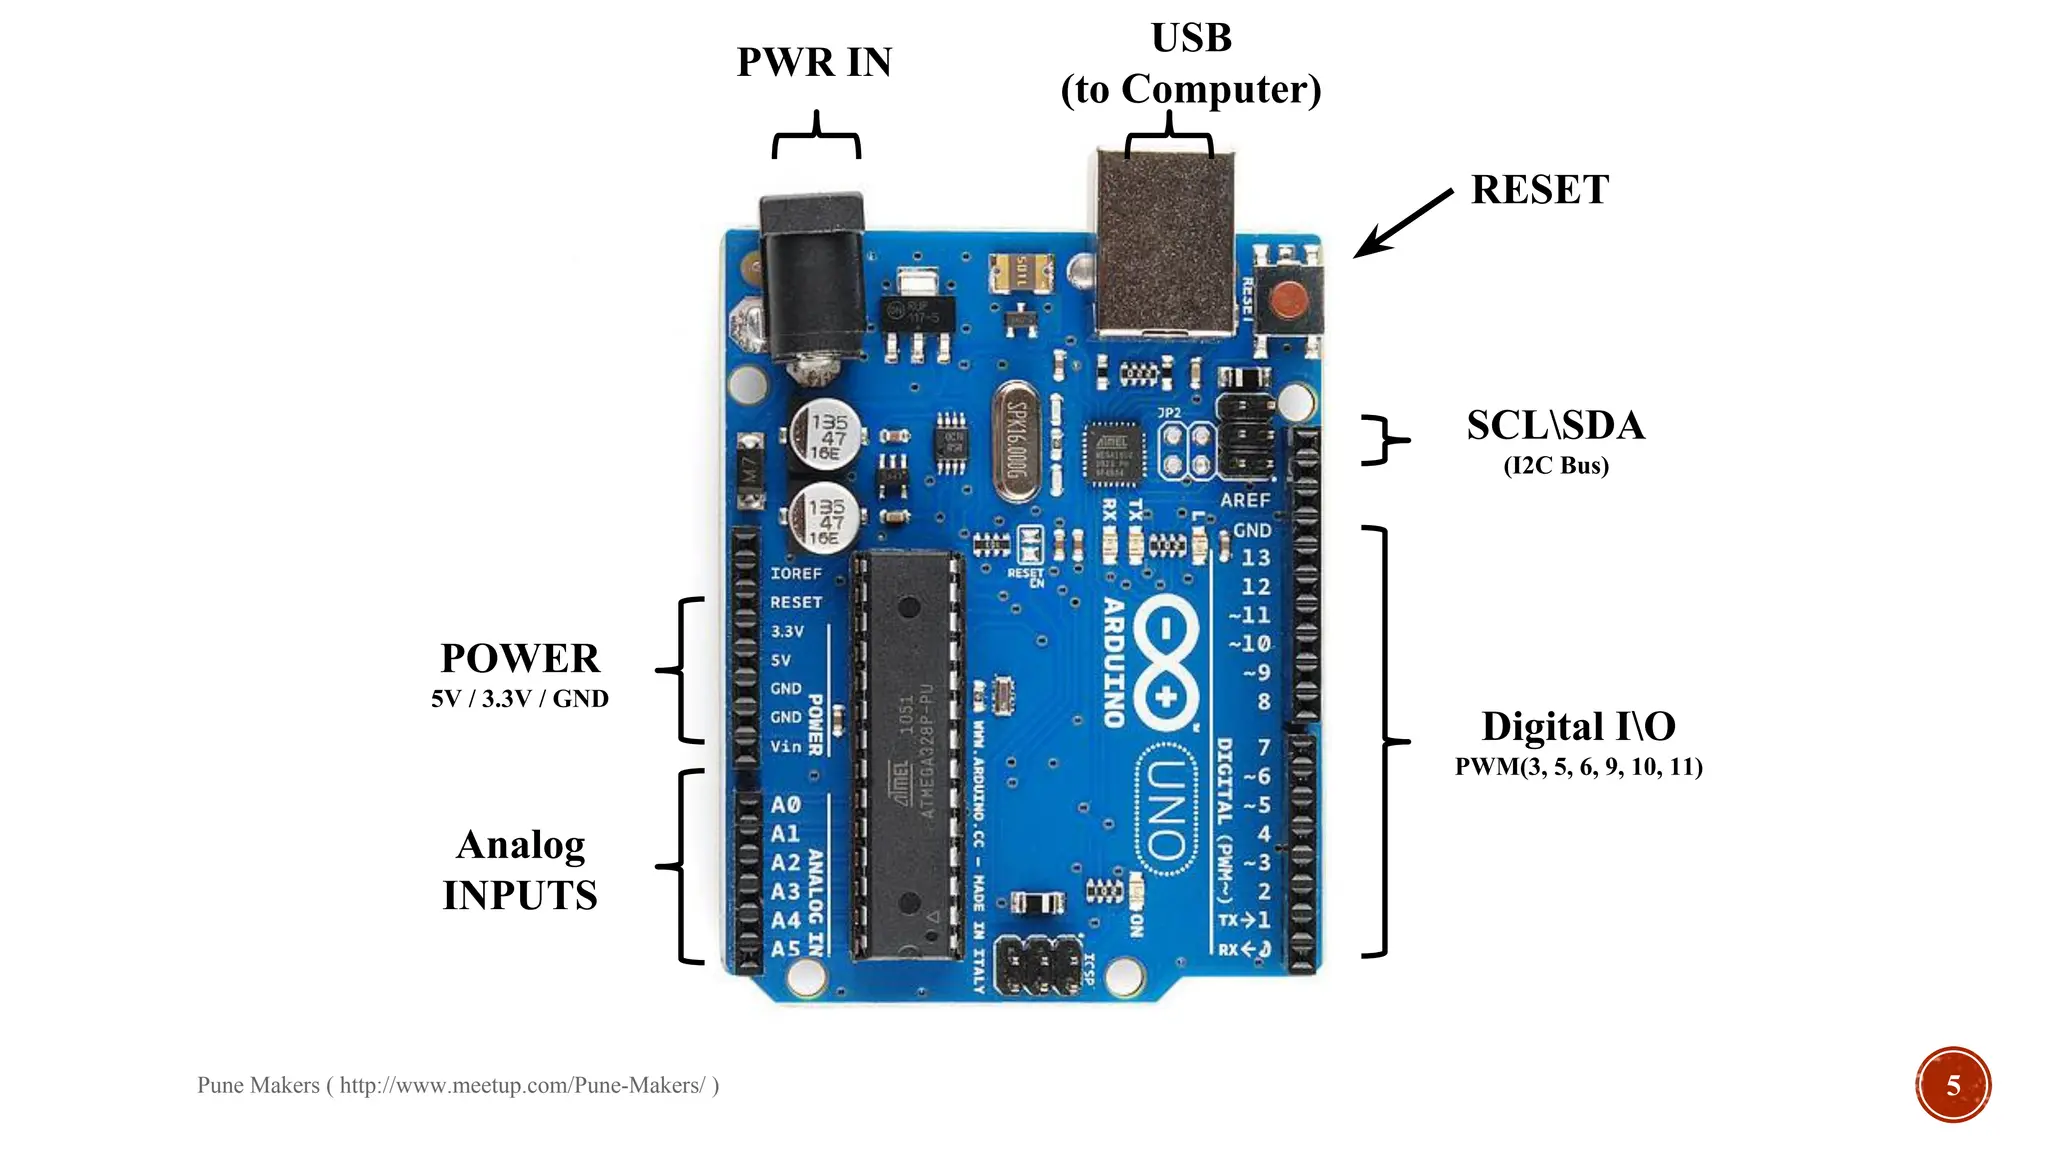
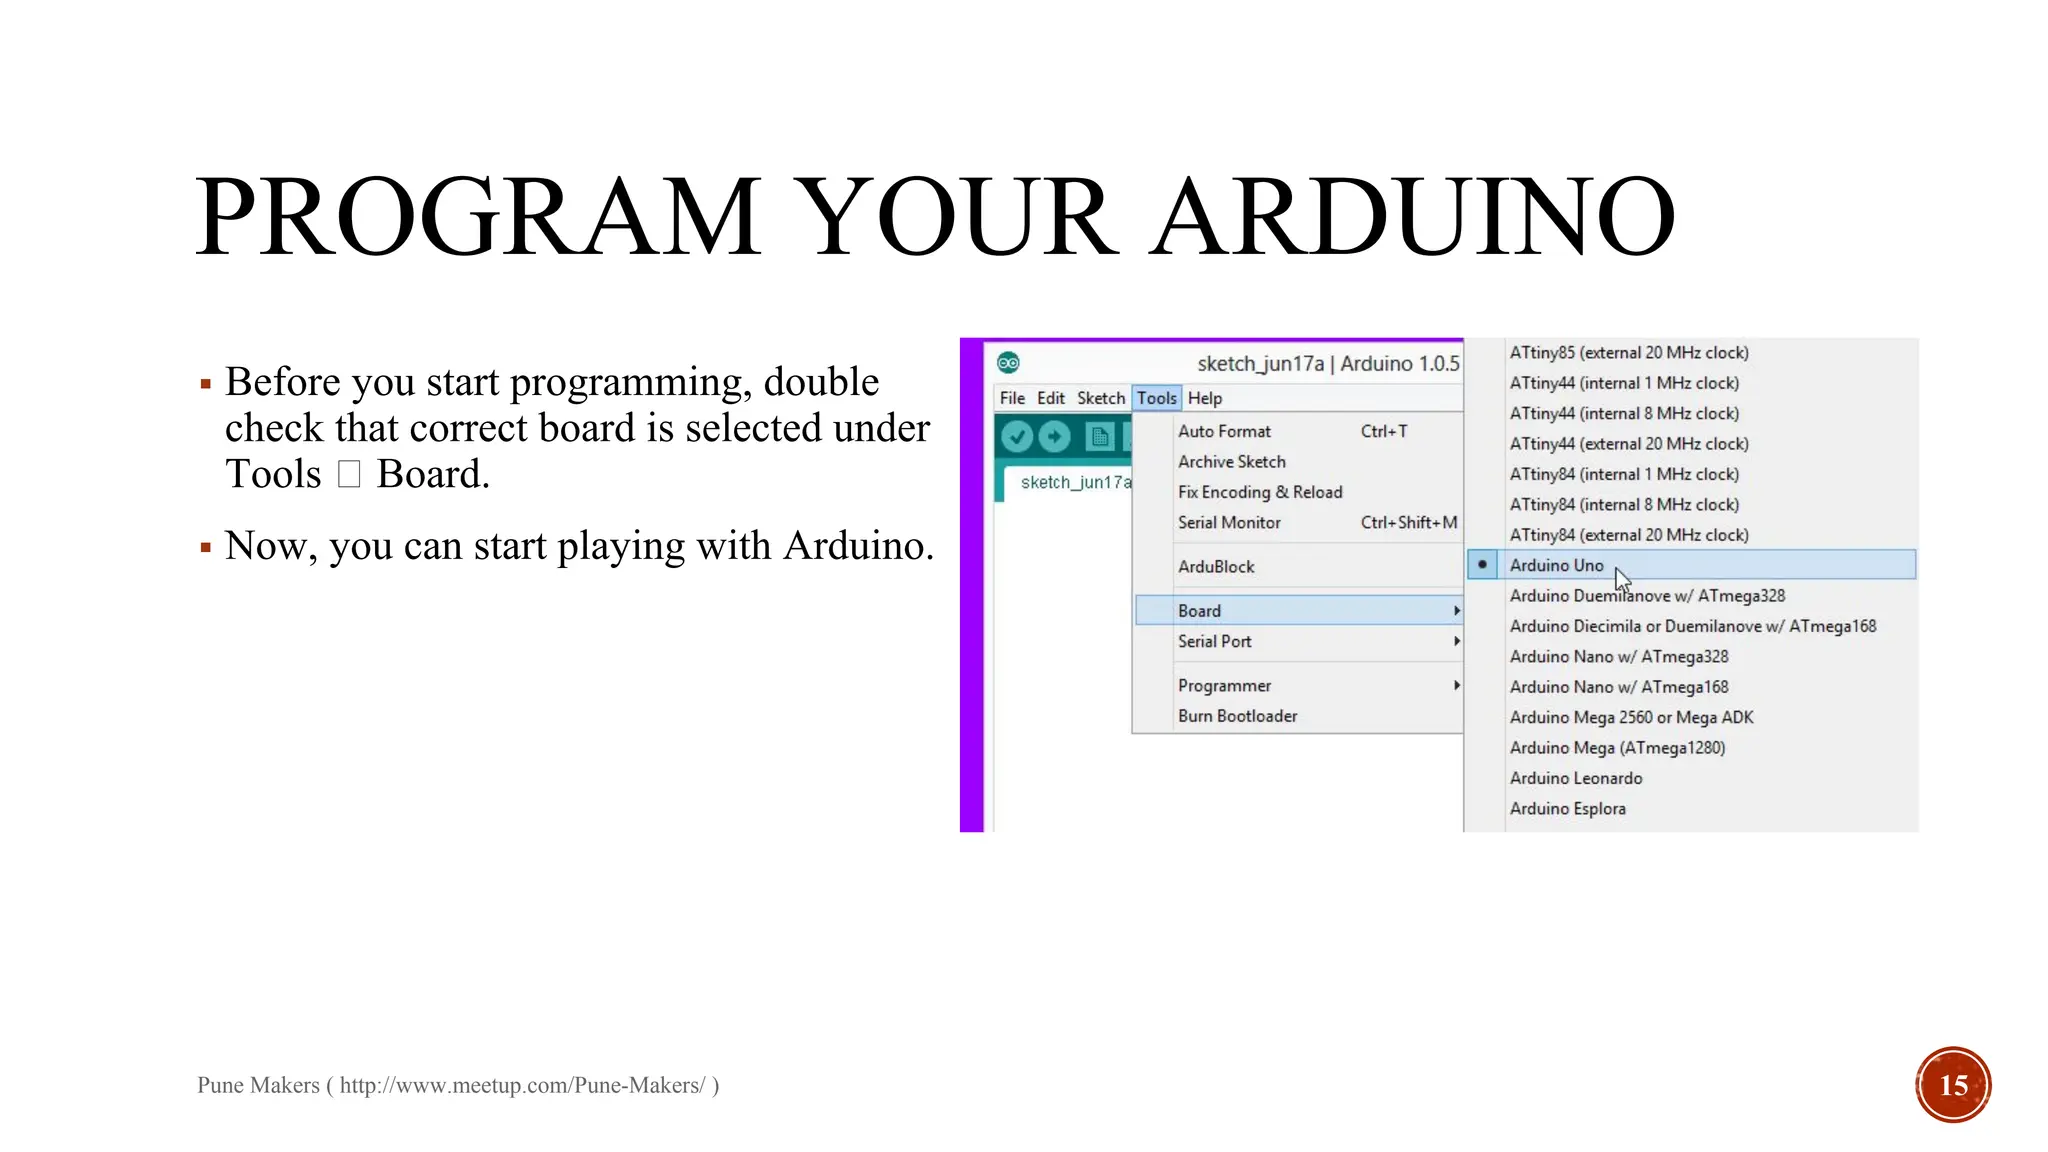
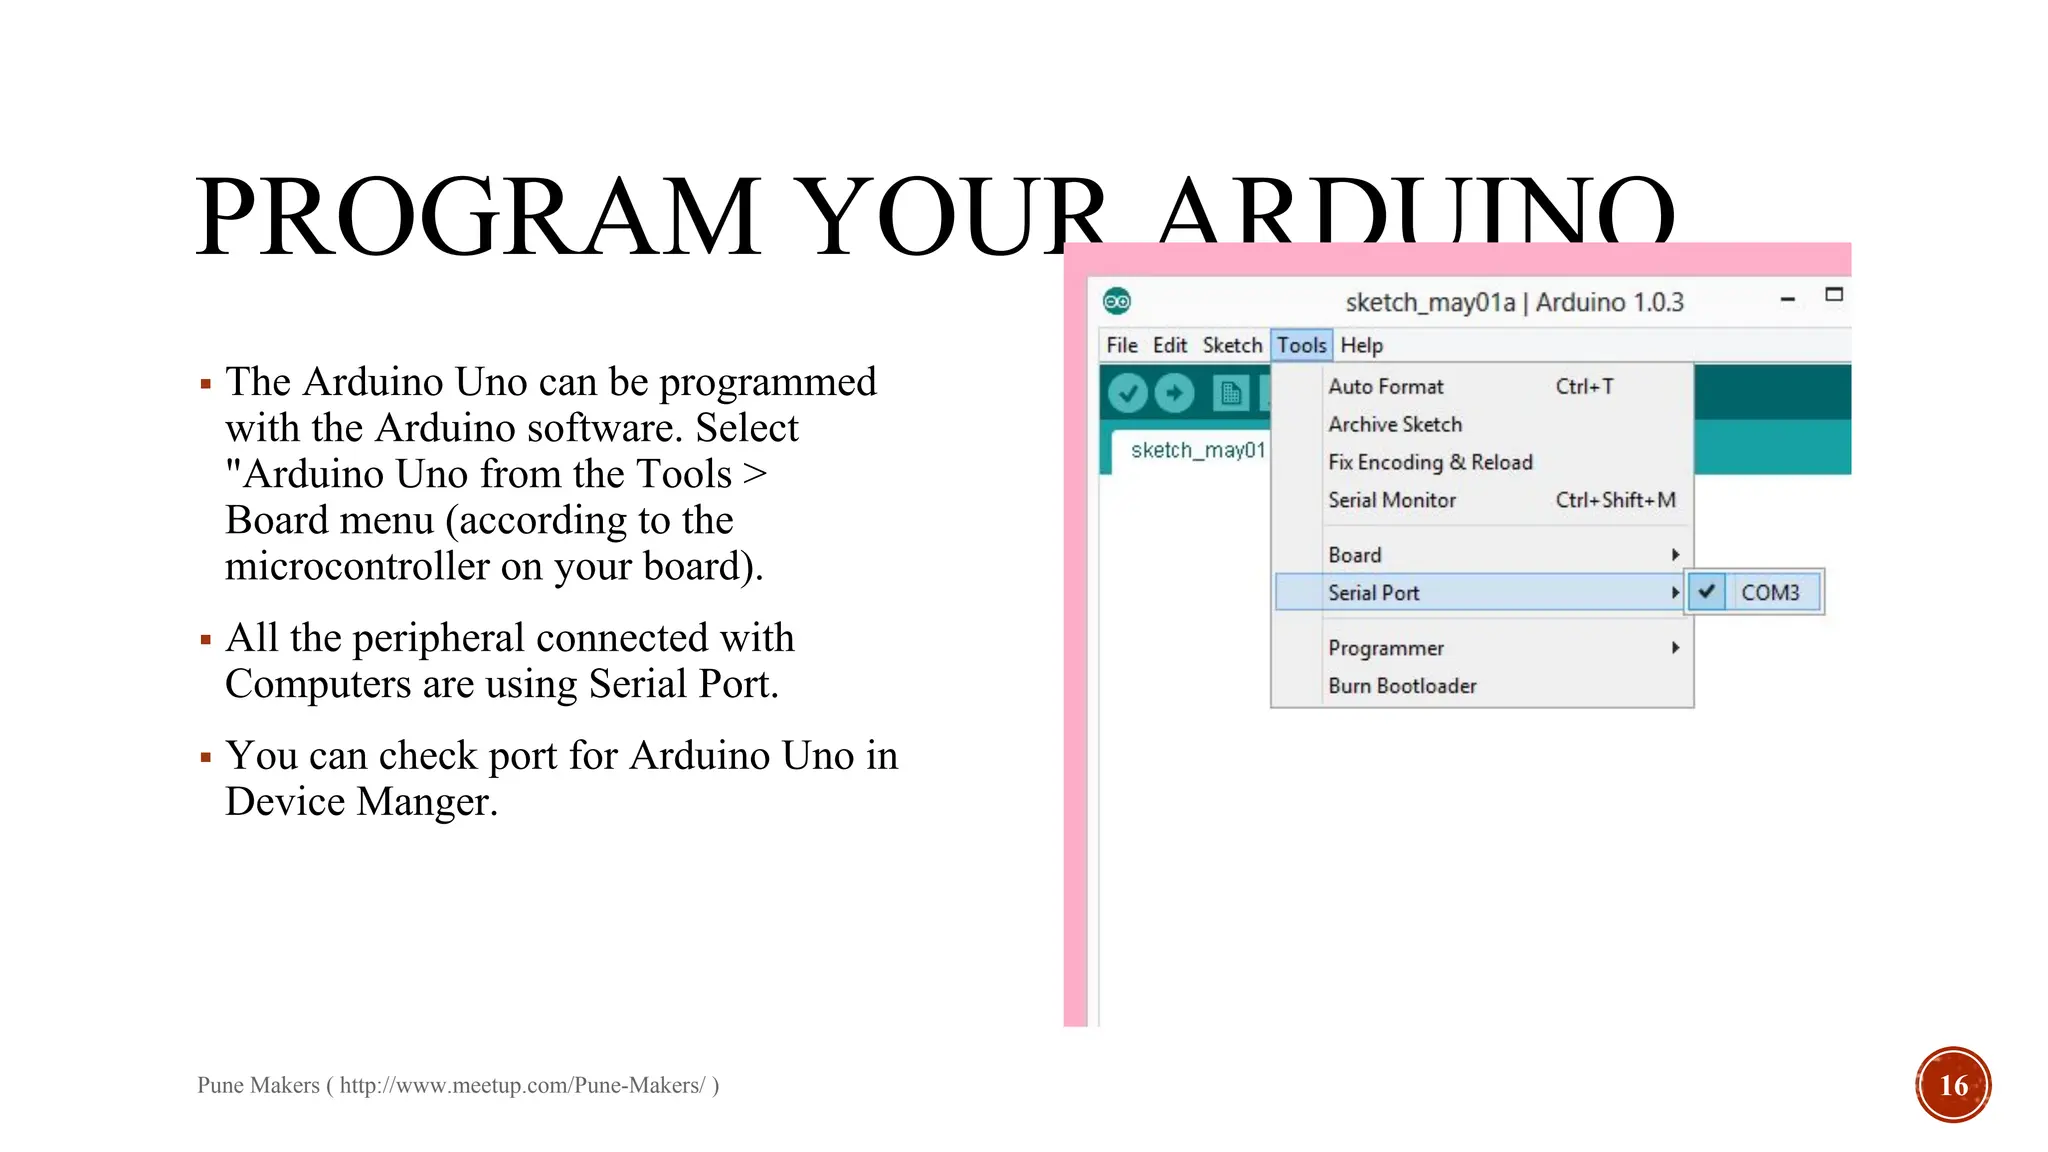
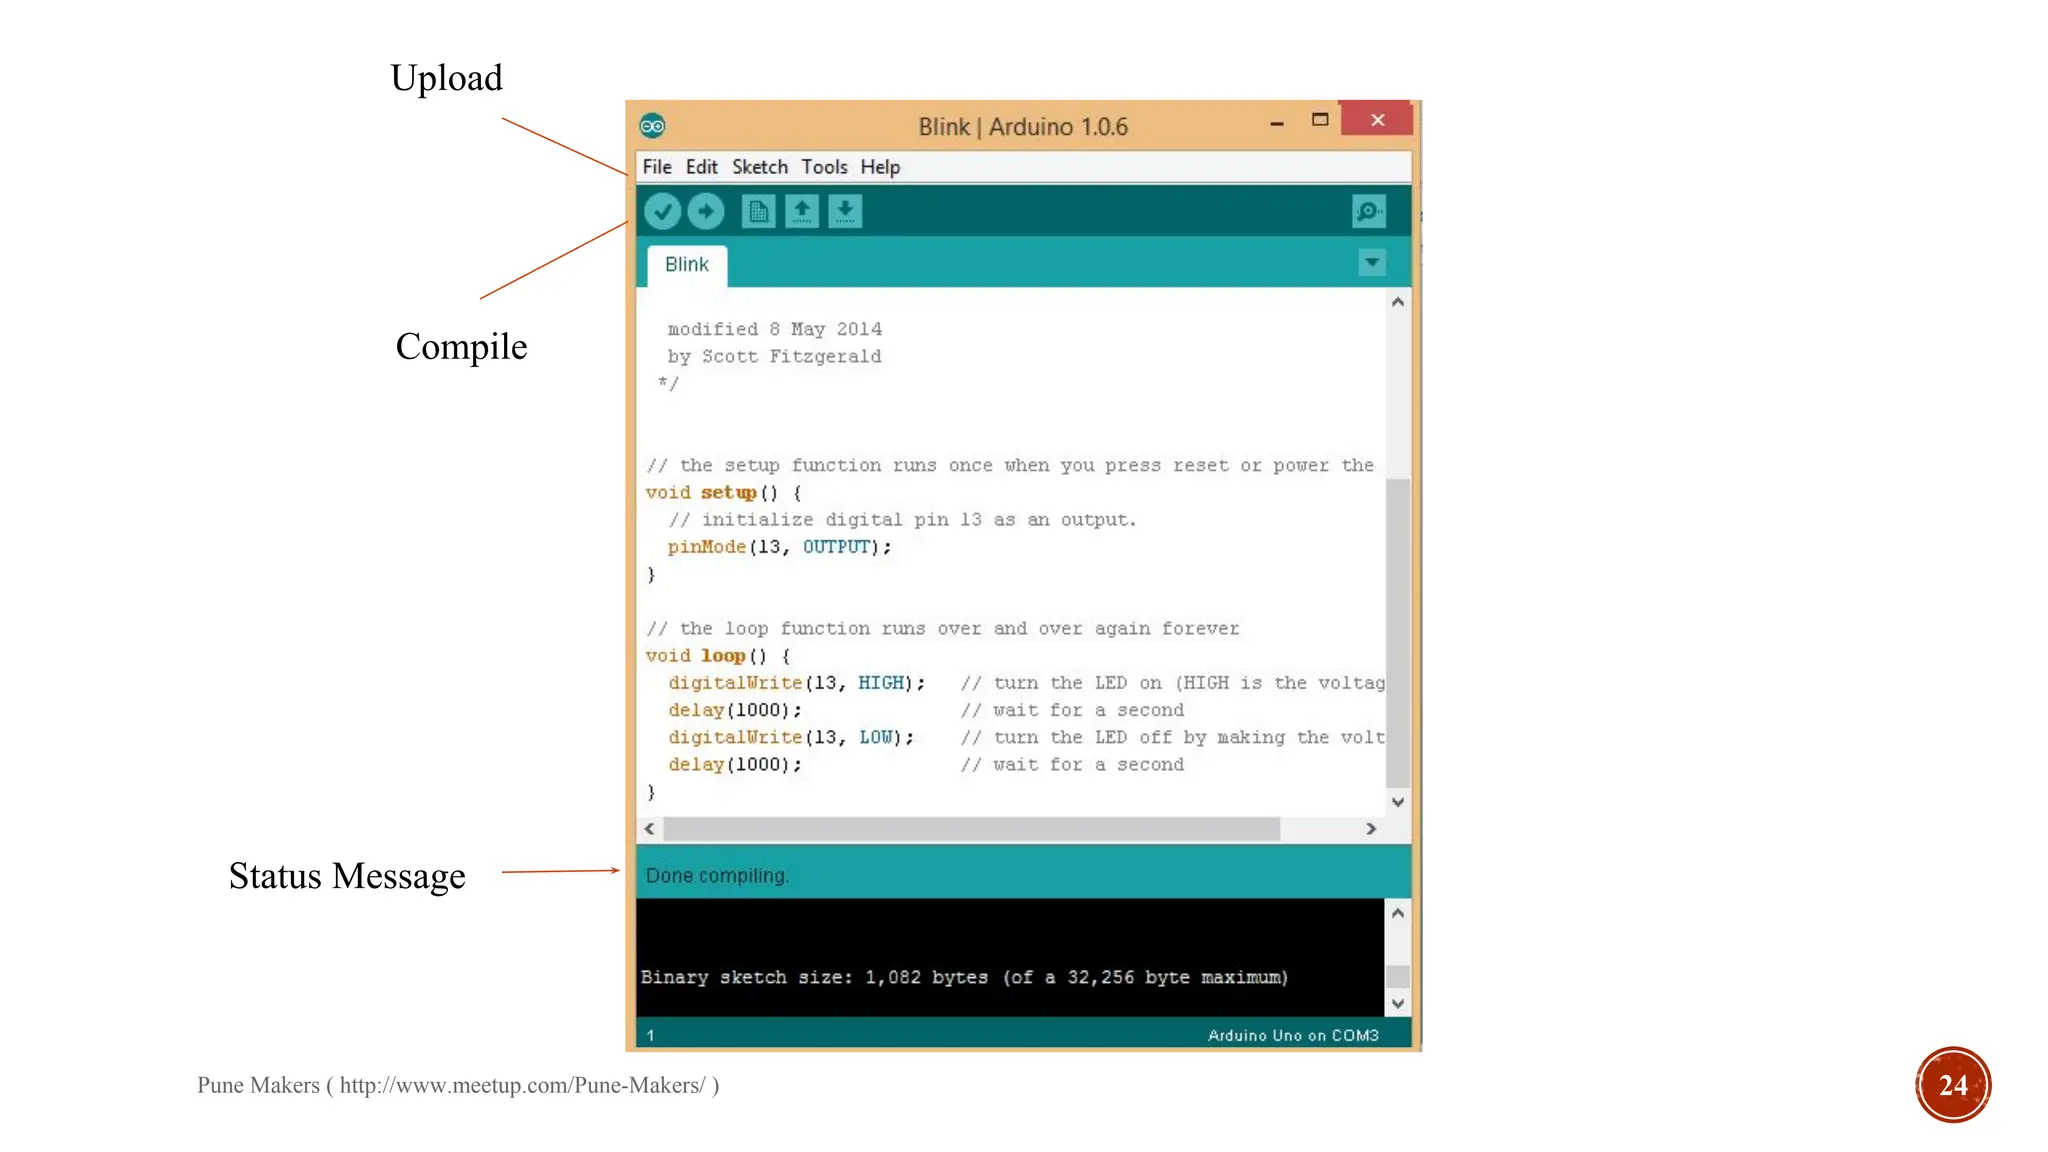
INTRODUCTION
TO ARDUINO
ARDUINO
▪ Basically Arduino is Microcontroller.
▪ Microcontroller is microprocessor with memory, RAM and some other peripheral connected
with it.
▪ The Arduino Uno is a microcontroller board based on the ATmega328 . The ATmega328 has
Flash memory of 32 KB (with 0.5 KB used for the bootloader). It also has 2 KB of SRAM and 1
KB of EEPROM
Pune Makers ( http://www.meetup.com/Pune-Makers/ ) 2
DIFFERENT TYPES OF
ARDUINO
Pune Makers ( http://www.meetup.com/Pune-Makers/ ) 3
Arduino Mega 2560
Arduino LilyPad
Arduino Uno
DIY Arduino
Boarduino Kit
ARDUINO UNO
▪ What does it have?
▪ 14 Digital In/Out pins (6 can be used as PWM)
▪ 6 Analog Inputs
▪ A USB Connection
▪ A Power Jack
▪ Reset Button
▪ On-board LED
▪ SCL/SDA pins (Serial Clock/ Serial Data pins)
▪ In short, it contains everything needed to support the microcontroller; simply connect it to a
computer with a USB cable or power it with a AC-to-DC adapter or battery to get started.
Pune Makers ( http://www.meetup.com/Pune-Makers/ ) 4
Pune Makers ( http://www.meetup.com/Pune-Makers/ ) 5
Digital IO
PWM(3, 5, 6, 9, 10, 11)
SCLSDA
(I2C Bus)
RESET
PWR IN
USB
(to Computer)
Analog
INPUTS
POWER
5V / 3.3V / GND
Pune Makers ( http://www.meetup.com/Pune-Makers/ ) 6
▪ Power USB :Arduino board can be powered by using the USB cable from
your computer. All you need to do is connect the USB cable to the USB
connection (1).
▪ Barrel Jack Power (Barrel Jack) Arduino boards can be powered directly
from the AC mains power supply by connecting it to the Barrel Jack (2).
▪ Voltage Regulator The function of the voltage regulator is to control the
voltage given to the Arduino board and stabilize the DC voltages used by the
processor and other elements.
▪ Crystal Oscillator: The crystal oscillator helps Arduino in dealing with time
issues. How does Arduino calculate time? The answer is, by using the crystal
oscillator. The number printed on top of the Arduino crystal is 16.000H9H. It
tells us that the frequency is 16,000,000 Hertz or 16 MHz.
Pune Makers ( http://www.meetup.com/Pune-Makers/ ) 7
▪ Arduino Reset : You can reset your Arduino board, i.e., start your
program from the beginning. You can reset the UNO board in two ways.
First, by using the reset button (17) on the board. Second, you can
connect an external reset button to the Arduino pin labelled RESET (5).
▪ Pins (3.3, 5, GND, Vin)
• 3.3V (6) − Supply 3.3 output volt
• 5V (7) − Supply 5 output volt
• Most of the components used with Arduino board works fine with 3.3
volt and 5 volt.
• GND (8)(Ground) − There are several GND pins on the Arduino, any of
which can be used to ground your circuit.
• Vin (9) − This pin also can be used to power the Arduino board from an
external power source, like AC mains power supply.
Pune Makers ( http://www.meetup.com/Pune-Makers/ ) 8
▪ Analog pins
▪ The Arduino UNO board has six analog input pins A0 through A5. These pins
can read the signal from an analog sensor like the humidity sensor or
temperature sensor and convert it into a digital value that can be read by the
microprocessor.
▪ Main microcontroller
▪ Each Arduino board has its own microcontroller (11). You can assume it as the
brain of your board. The main IC (integrated circuit) on the Arduino is slightly
different from board to board. The microcontrollers are usually of the ATMEL
Company. You must know what IC your board has before loading up a new
program from the Arduino IDE. This information is available on the top of the
IC. For more details about the IC construction and functions, you can refer to
the data sheet.
Pune Makers ( http://www.meetup.com/Pune-Makers/ ) 9
▪ ICSP pin
▪ Mostly, ICSP (12) is an AVR, a tiny programming header for the Arduino consisting of MOSI,
MISO, SCK, RESET, VCC, and GND. It is often referred to as an SPI (Serial Peripheral
Interface), which could be considered as an "expansion" of the output. Actually, you are
slaving the output device to the master of the SPI bus.
Pune Makers ( http://www.meetup.com/Pune-Makers/ ) 10
▪ Power LED indicator
▪ This LED should light up when you plug your Arduino into a power source to indicate that
your board is powered up correctly. If this light does not turn on, then there is something
wrong with the connection.
▪ TX and RX LEDs
▪ On your board, you will find two labels: TX (transmit) and RX (receive). They appear in
two places on the Arduino UNO board. First, at the digital pins 0 and 1, to indicate the pins
responsible for serial communication. Second, the TX and RX led (13). The TX led flashes
with different speed while sending the serial data. The speed of flashing depends on the
baud rate used by the board. RX flashes during the receiving process.
▪ Digital I/O
▪ The Arduino UNO board has 14 digital I/O pins (15) (of which 6 provide PWM (Pulse
Width Modulation) output. These pins can be configured to work as input digital pins to
read logic values (0 or 1) or as digital output pins to drive different modules like LEDs,
relays, etc. The pins labeled “~” can be used to generate PWM.
Pune Makers ( http://www.meetup.com/Pune-Makers/ ) 11
▪ Digital I/O
▪ The Arduino UNO board has 14 digital I/O pins (15) (of which 6 provide
PWM (Pulse Width Modulation) output. These pins can be configured to
work as input digital pins to read logic values (0 or 1) or as digital output
pins to drive different modules like LEDs, relays, etc. The pins labeled
“~” can be used to generate PWM.
Pune Makers ( http://www.meetup.com/Pune-Makers/ ) 12
HOW TO CODE IN ARDUINO
▪ You need to download Arduino IDE (Integrated Development Environment).
▪ Arduino IDE is available for all Mac, Windows.and Linux.
Pune Makers ( http://www.meetup.com/Pune-Makers/ ) 13
HOW TO CODE IN ARDUINO
▪ Once you have downloaded and
installed/extracted the folder, you can
directly run Arduino.exe, which will take
you to its IDE.
▪ The IDE will look like the shown
screenshot.
Pune Makers ( http://www.meetup.com/Pune-Makers/ ) 14
error & status messages
PROGRAM YOUR ARDUINO
▪ Before you start programming, double
check that correct board is selected under
Tools Board.
▪ Now, you can start playing with Arduino.
Pune Makers ( http://www.meetup.com/Pune-Makers/ ) 15
PROGRAM YOUR ARDUINO
▪ The Arduino Uno can be programmed
with the Arduino software. Select
"Arduino Uno from the Tools >
Board menu (according to the
microcontroller on your board).
▪ All the peripheral connected with
Computers are using Serial Port.
▪ You can check port for Arduino Uno in
Device Manger.
Pune Makers ( http://www.meetup.com/Pune-Makers/ ) 16
INPUT VS OUTPUT
Pune Makers ( http://www.meetup.com/Pune-Makers/ ) 17
Image from Theory and Practice of Tangible User Interfaces at UC Berkley
6 MAJOR CONCEPTS
Pune Makers ( http://www.meetup.com/Pune-Makers/ ) 18
▪ digitalWrite()
▪ analogWrite()
▪ digitalRead()
▪ If (statements) / Boolean
▪ analogRead
▪ Serial Communication
ANALOG VS DIGITAL
▪Microcontrollers are digital devices – ON or OFF. Also called – discrete.
▪Analog signals are anything that can be a full range of values.
Pune Makers ( http://www.meetup.com/Pune-Makers/ ) 19
5 V
0 V
5 V
0 V
ANALOG VS DIGITAL
▪Analog Sensors
Pune Makers ( http://www.meetup.com/Pune-Makers/ ) 20
Sensors Variables
Mic soundVolume
Photoresistor lightLevel
Potentiometer dialPosition
Temp Sensor temperature
Flex Sensor bend
Accelerometer tilt/acceleration
▪Digital Sensors
•Digital sensors are more straight
forward than Analog.
•No matter what the sensor there
are only two settings: On and Off
•Example, Push button, Switch
SERIAL COMMUNICATION
▪ “Serial” because data is broken into bits, each sent one after another in a single wire.
▪ Compiling turns your program into binary data (ones and zeros)
▪ Uploading sends the bits through USB cable to the Arduino
▪ The two LEDs near the USB connector blink when data is transmitted.
▪ RX blinks when the Arduino is receiving data.
▪ TX blinks when the Arduino is transmitting data
Pune Makers ( http://www.meetup.com/Pune-Makers/ ) 21
LET’S START
CODING
PROJECT #1 LED BLINK
Pune Makers ( http://www.meetup.com/Pune-Makers/ ) 23
▪ digitalWrite()
Pune Makers ( http://www.meetup.com/Pune-Makers/ ) 24
Compile
Upload
Status Message

VERY NICE FOR CSE 3RD YEAR AND IOT STUDENTS

  • 1.
  • 2.
    ARDUINO ▪ Basically Arduinois Microcontroller. ▪ Microcontroller is microprocessor with memory, RAM and some other peripheral connected with it. ▪ The Arduino Uno is a microcontroller board based on the ATmega328 . The ATmega328 has Flash memory of 32 KB (with 0.5 KB used for the bootloader). It also has 2 KB of SRAM and 1 KB of EEPROM Pune Makers ( http://www.meetup.com/Pune-Makers/ ) 2
  • 3.
    DIFFERENT TYPES OF ARDUINO PuneMakers ( http://www.meetup.com/Pune-Makers/ ) 3 Arduino Mega 2560 Arduino LilyPad Arduino Uno DIY Arduino Boarduino Kit
  • 4.
    ARDUINO UNO ▪ Whatdoes it have? ▪ 14 Digital In/Out pins (6 can be used as PWM) ▪ 6 Analog Inputs ▪ A USB Connection ▪ A Power Jack ▪ Reset Button ▪ On-board LED ▪ SCL/SDA pins (Serial Clock/ Serial Data pins) ▪ In short, it contains everything needed to support the microcontroller; simply connect it to a computer with a USB cable or power it with a AC-to-DC adapter or battery to get started. Pune Makers ( http://www.meetup.com/Pune-Makers/ ) 4
  • 5.
    Pune Makers (http://www.meetup.com/Pune-Makers/ ) 5 Digital IO PWM(3, 5, 6, 9, 10, 11) SCLSDA (I2C Bus) RESET PWR IN USB (to Computer) Analog INPUTS POWER 5V / 3.3V / GND
  • 6.
    Pune Makers (http://www.meetup.com/Pune-Makers/ ) 6
  • 7.
    ▪ Power USB:Arduino board can be powered by using the USB cable from your computer. All you need to do is connect the USB cable to the USB connection (1). ▪ Barrel Jack Power (Barrel Jack) Arduino boards can be powered directly from the AC mains power supply by connecting it to the Barrel Jack (2). ▪ Voltage Regulator The function of the voltage regulator is to control the voltage given to the Arduino board and stabilize the DC voltages used by the processor and other elements. ▪ Crystal Oscillator: The crystal oscillator helps Arduino in dealing with time issues. How does Arduino calculate time? The answer is, by using the crystal oscillator. The number printed on top of the Arduino crystal is 16.000H9H. It tells us that the frequency is 16,000,000 Hertz or 16 MHz. Pune Makers ( http://www.meetup.com/Pune-Makers/ ) 7
  • 8.
    ▪ Arduino Reset: You can reset your Arduino board, i.e., start your program from the beginning. You can reset the UNO board in two ways. First, by using the reset button (17) on the board. Second, you can connect an external reset button to the Arduino pin labelled RESET (5). ▪ Pins (3.3, 5, GND, Vin) • 3.3V (6) − Supply 3.3 output volt • 5V (7) − Supply 5 output volt • Most of the components used with Arduino board works fine with 3.3 volt and 5 volt. • GND (8)(Ground) − There are several GND pins on the Arduino, any of which can be used to ground your circuit. • Vin (9) − This pin also can be used to power the Arduino board from an external power source, like AC mains power supply. Pune Makers ( http://www.meetup.com/Pune-Makers/ ) 8
  • 9.
    ▪ Analog pins ▪The Arduino UNO board has six analog input pins A0 through A5. These pins can read the signal from an analog sensor like the humidity sensor or temperature sensor and convert it into a digital value that can be read by the microprocessor. ▪ Main microcontroller ▪ Each Arduino board has its own microcontroller (11). You can assume it as the brain of your board. The main IC (integrated circuit) on the Arduino is slightly different from board to board. The microcontrollers are usually of the ATMEL Company. You must know what IC your board has before loading up a new program from the Arduino IDE. This information is available on the top of the IC. For more details about the IC construction and functions, you can refer to the data sheet. Pune Makers ( http://www.meetup.com/Pune-Makers/ ) 9
  • 10.
    ▪ ICSP pin ▪Mostly, ICSP (12) is an AVR, a tiny programming header for the Arduino consisting of MOSI, MISO, SCK, RESET, VCC, and GND. It is often referred to as an SPI (Serial Peripheral Interface), which could be considered as an "expansion" of the output. Actually, you are slaving the output device to the master of the SPI bus. Pune Makers ( http://www.meetup.com/Pune-Makers/ ) 10
  • 11.
    ▪ Power LEDindicator ▪ This LED should light up when you plug your Arduino into a power source to indicate that your board is powered up correctly. If this light does not turn on, then there is something wrong with the connection. ▪ TX and RX LEDs ▪ On your board, you will find two labels: TX (transmit) and RX (receive). They appear in two places on the Arduino UNO board. First, at the digital pins 0 and 1, to indicate the pins responsible for serial communication. Second, the TX and RX led (13). The TX led flashes with different speed while sending the serial data. The speed of flashing depends on the baud rate used by the board. RX flashes during the receiving process. ▪ Digital I/O ▪ The Arduino UNO board has 14 digital I/O pins (15) (of which 6 provide PWM (Pulse Width Modulation) output. These pins can be configured to work as input digital pins to read logic values (0 or 1) or as digital output pins to drive different modules like LEDs, relays, etc. The pins labeled “~” can be used to generate PWM. Pune Makers ( http://www.meetup.com/Pune-Makers/ ) 11
  • 12.
    ▪ Digital I/O ▪The Arduino UNO board has 14 digital I/O pins (15) (of which 6 provide PWM (Pulse Width Modulation) output. These pins can be configured to work as input digital pins to read logic values (0 or 1) or as digital output pins to drive different modules like LEDs, relays, etc. The pins labeled “~” can be used to generate PWM. Pune Makers ( http://www.meetup.com/Pune-Makers/ ) 12
  • 13.
    HOW TO CODEIN ARDUINO ▪ You need to download Arduino IDE (Integrated Development Environment). ▪ Arduino IDE is available for all Mac, Windows.and Linux. Pune Makers ( http://www.meetup.com/Pune-Makers/ ) 13
  • 14.
    HOW TO CODEIN ARDUINO ▪ Once you have downloaded and installed/extracted the folder, you can directly run Arduino.exe, which will take you to its IDE. ▪ The IDE will look like the shown screenshot. Pune Makers ( http://www.meetup.com/Pune-Makers/ ) 14 error & status messages
  • 15.
    PROGRAM YOUR ARDUINO ▪Before you start programming, double check that correct board is selected under Tools Board. ▪ Now, you can start playing with Arduino. Pune Makers ( http://www.meetup.com/Pune-Makers/ ) 15
  • 16.
    PROGRAM YOUR ARDUINO ▪The Arduino Uno can be programmed with the Arduino software. Select "Arduino Uno from the Tools > Board menu (according to the microcontroller on your board). ▪ All the peripheral connected with Computers are using Serial Port. ▪ You can check port for Arduino Uno in Device Manger. Pune Makers ( http://www.meetup.com/Pune-Makers/ ) 16
  • 17.
    INPUT VS OUTPUT PuneMakers ( http://www.meetup.com/Pune-Makers/ ) 17 Image from Theory and Practice of Tangible User Interfaces at UC Berkley
  • 18.
    6 MAJOR CONCEPTS PuneMakers ( http://www.meetup.com/Pune-Makers/ ) 18 ▪ digitalWrite() ▪ analogWrite() ▪ digitalRead() ▪ If (statements) / Boolean ▪ analogRead ▪ Serial Communication
  • 19.
    ANALOG VS DIGITAL ▪Microcontrollersare digital devices – ON or OFF. Also called – discrete. ▪Analog signals are anything that can be a full range of values. Pune Makers ( http://www.meetup.com/Pune-Makers/ ) 19 5 V 0 V 5 V 0 V
  • 20.
    ANALOG VS DIGITAL ▪AnalogSensors Pune Makers ( http://www.meetup.com/Pune-Makers/ ) 20 Sensors Variables Mic soundVolume Photoresistor lightLevel Potentiometer dialPosition Temp Sensor temperature Flex Sensor bend Accelerometer tilt/acceleration ▪Digital Sensors •Digital sensors are more straight forward than Analog. •No matter what the sensor there are only two settings: On and Off •Example, Push button, Switch
  • 21.
    SERIAL COMMUNICATION ▪ “Serial”because data is broken into bits, each sent one after another in a single wire. ▪ Compiling turns your program into binary data (ones and zeros) ▪ Uploading sends the bits through USB cable to the Arduino ▪ The two LEDs near the USB connector blink when data is transmitted. ▪ RX blinks when the Arduino is receiving data. ▪ TX blinks when the Arduino is transmitting data Pune Makers ( http://www.meetup.com/Pune-Makers/ ) 21
  • 22.
  • 23.
    PROJECT #1 LEDBLINK Pune Makers ( http://www.meetup.com/Pune-Makers/ ) 23 ▪ digitalWrite()
  • 24.
    Pune Makers (http://www.meetup.com/Pune-Makers/ ) 24 Compile Upload Status Message