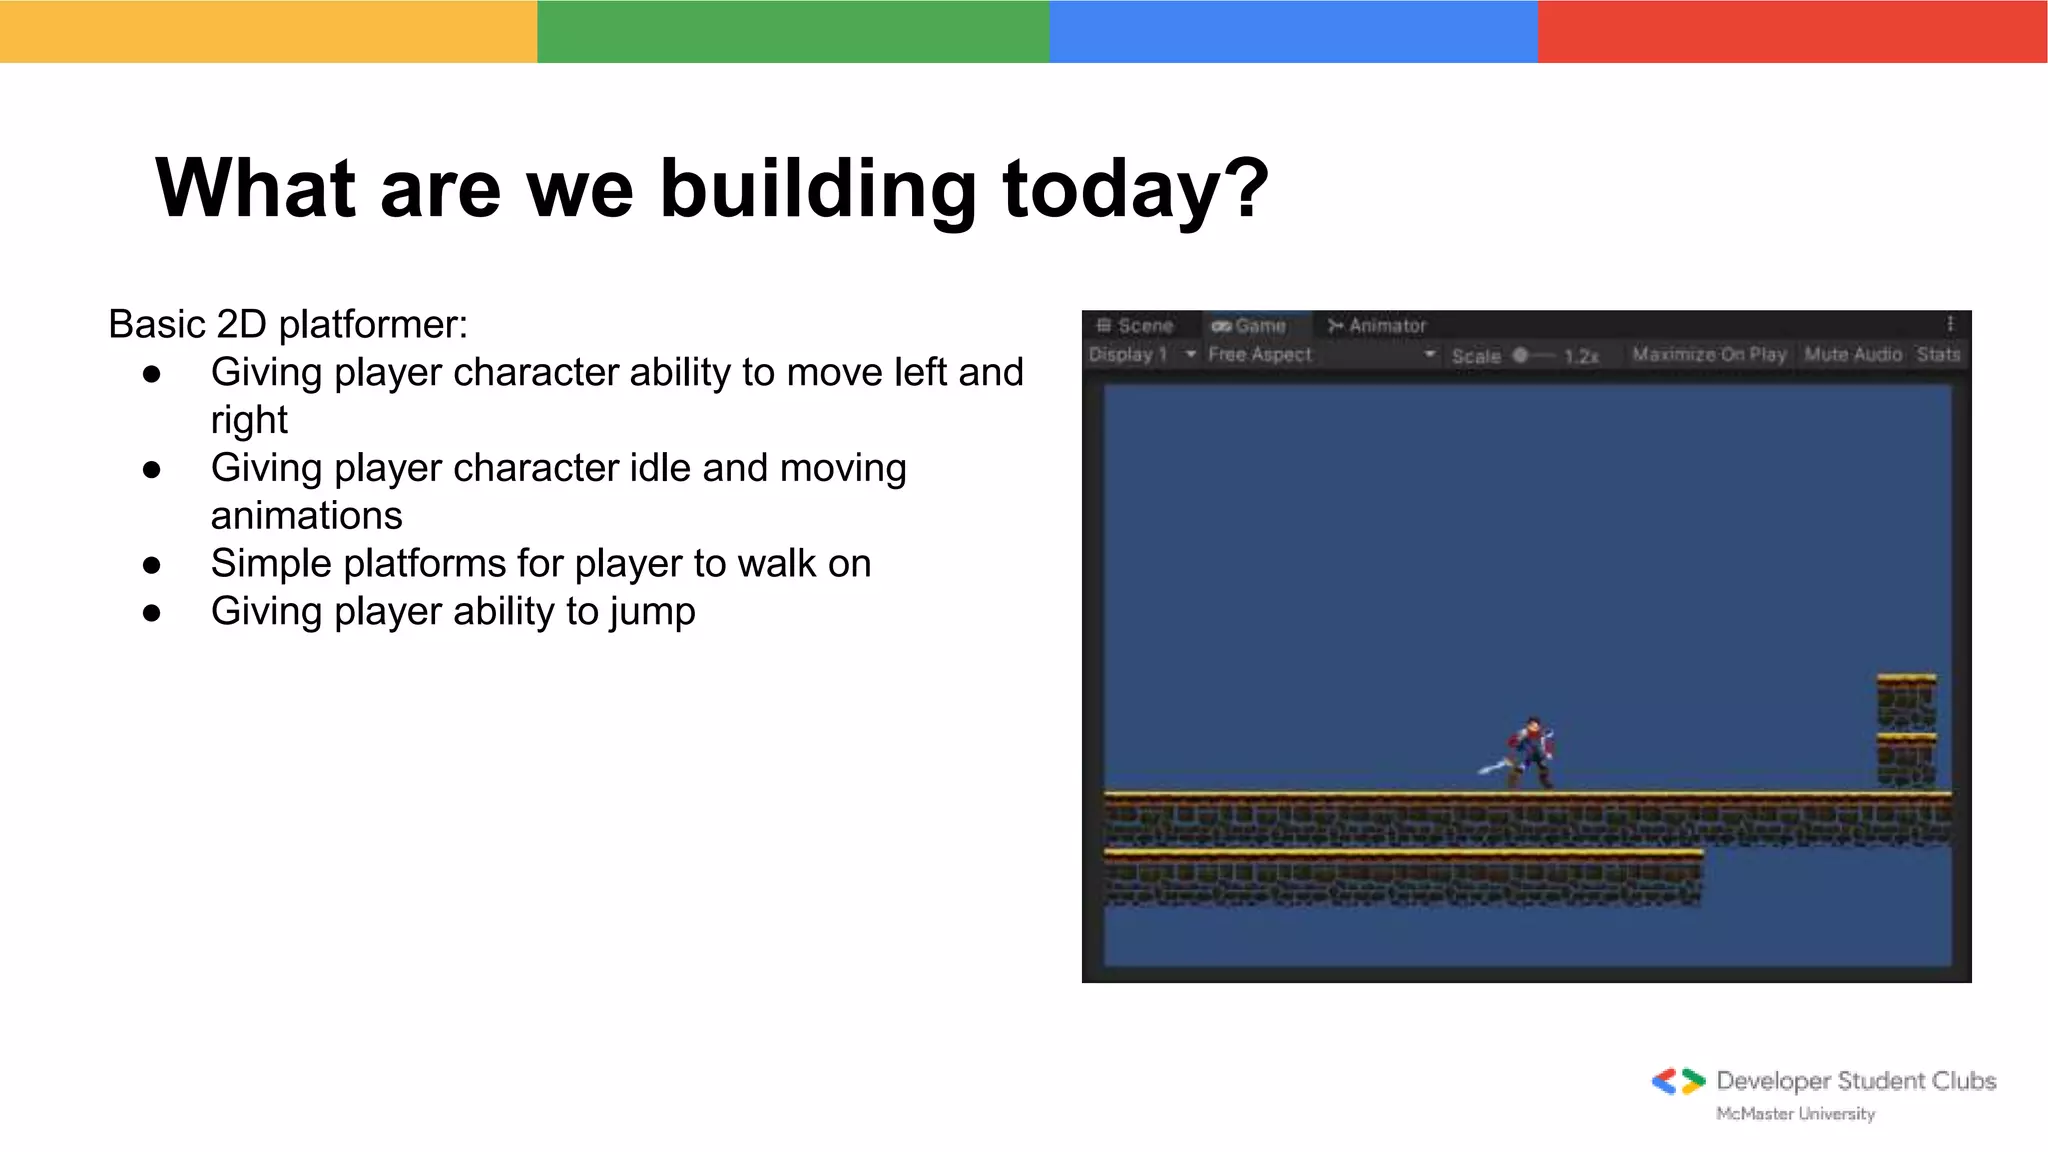
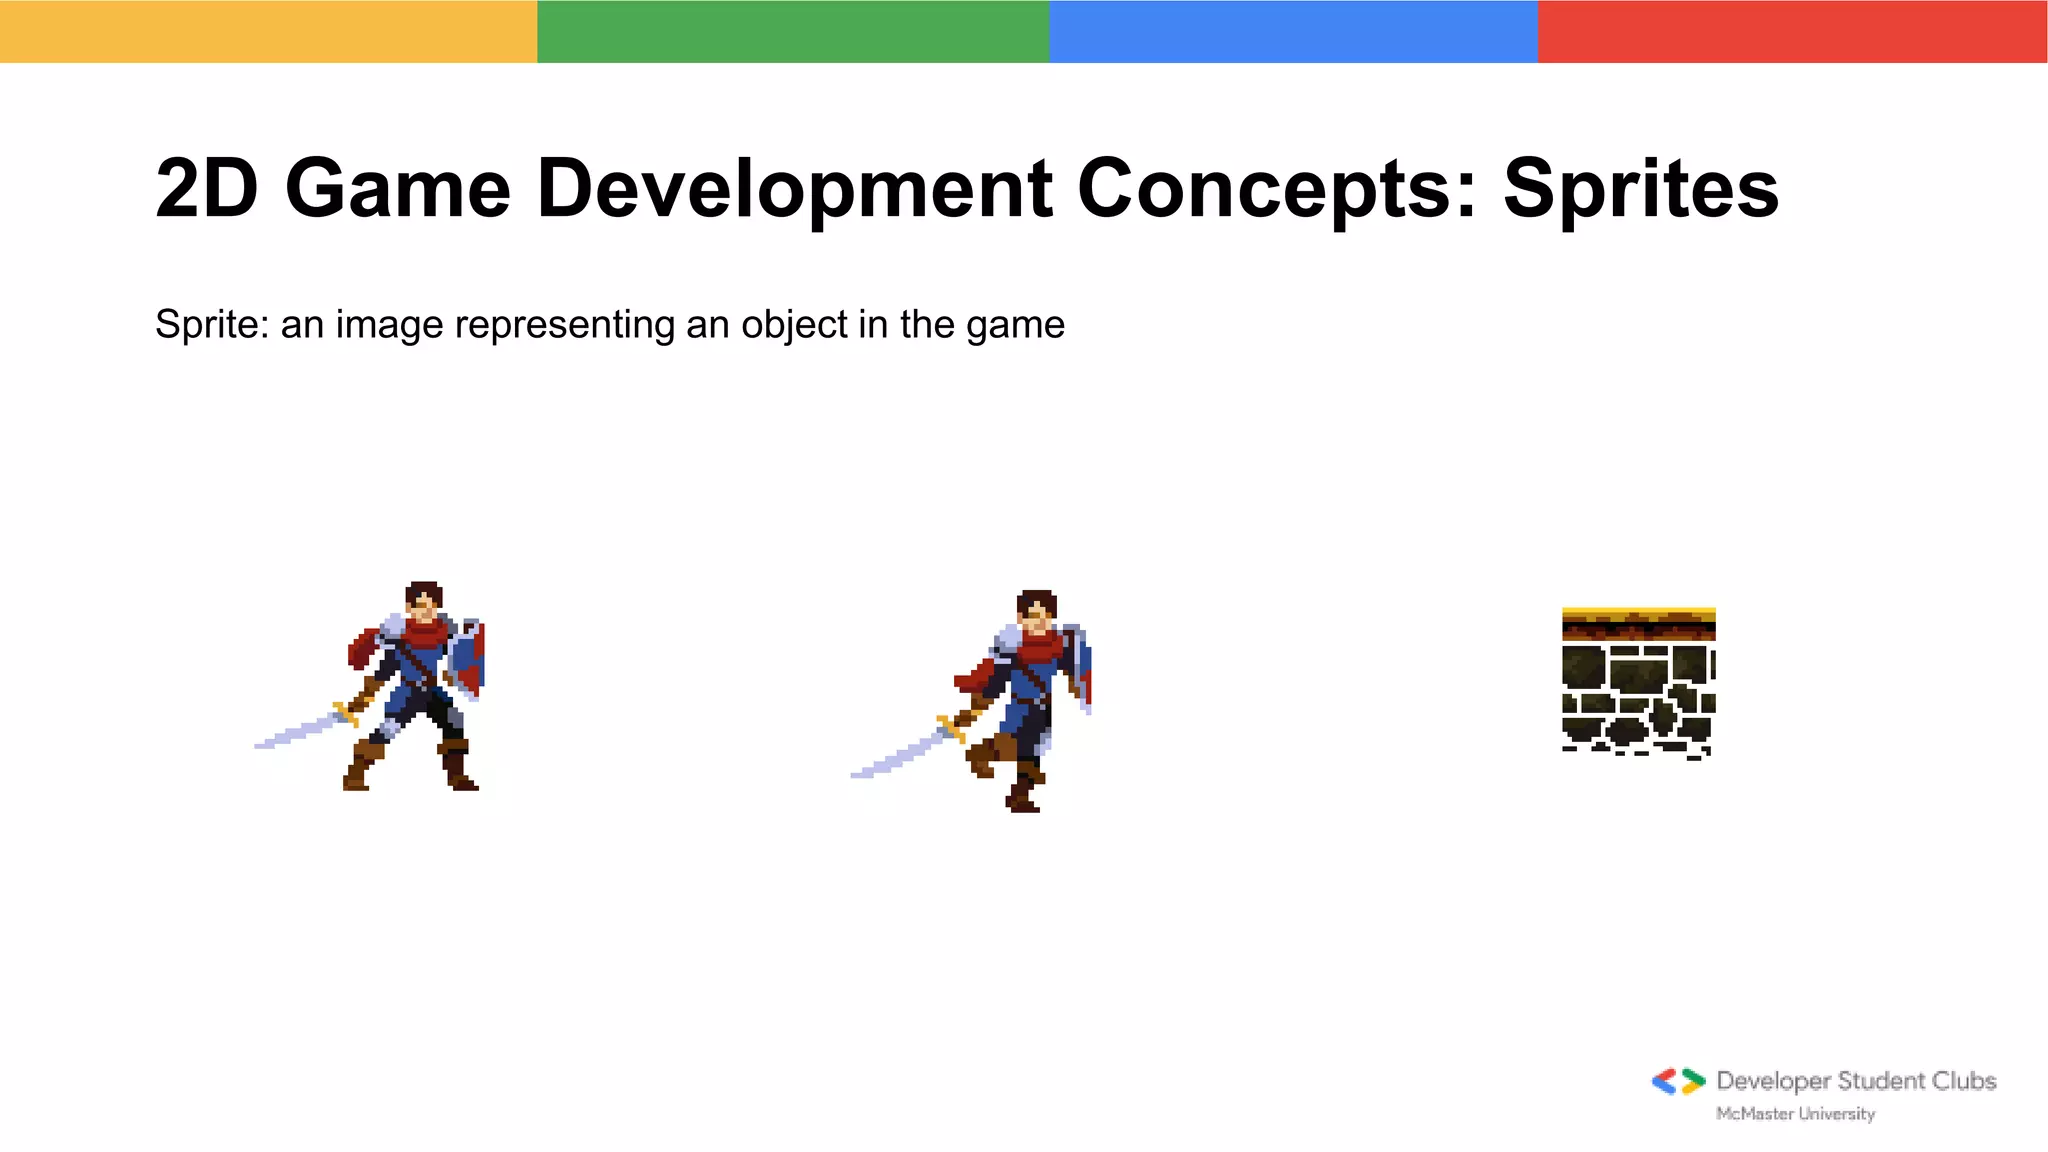
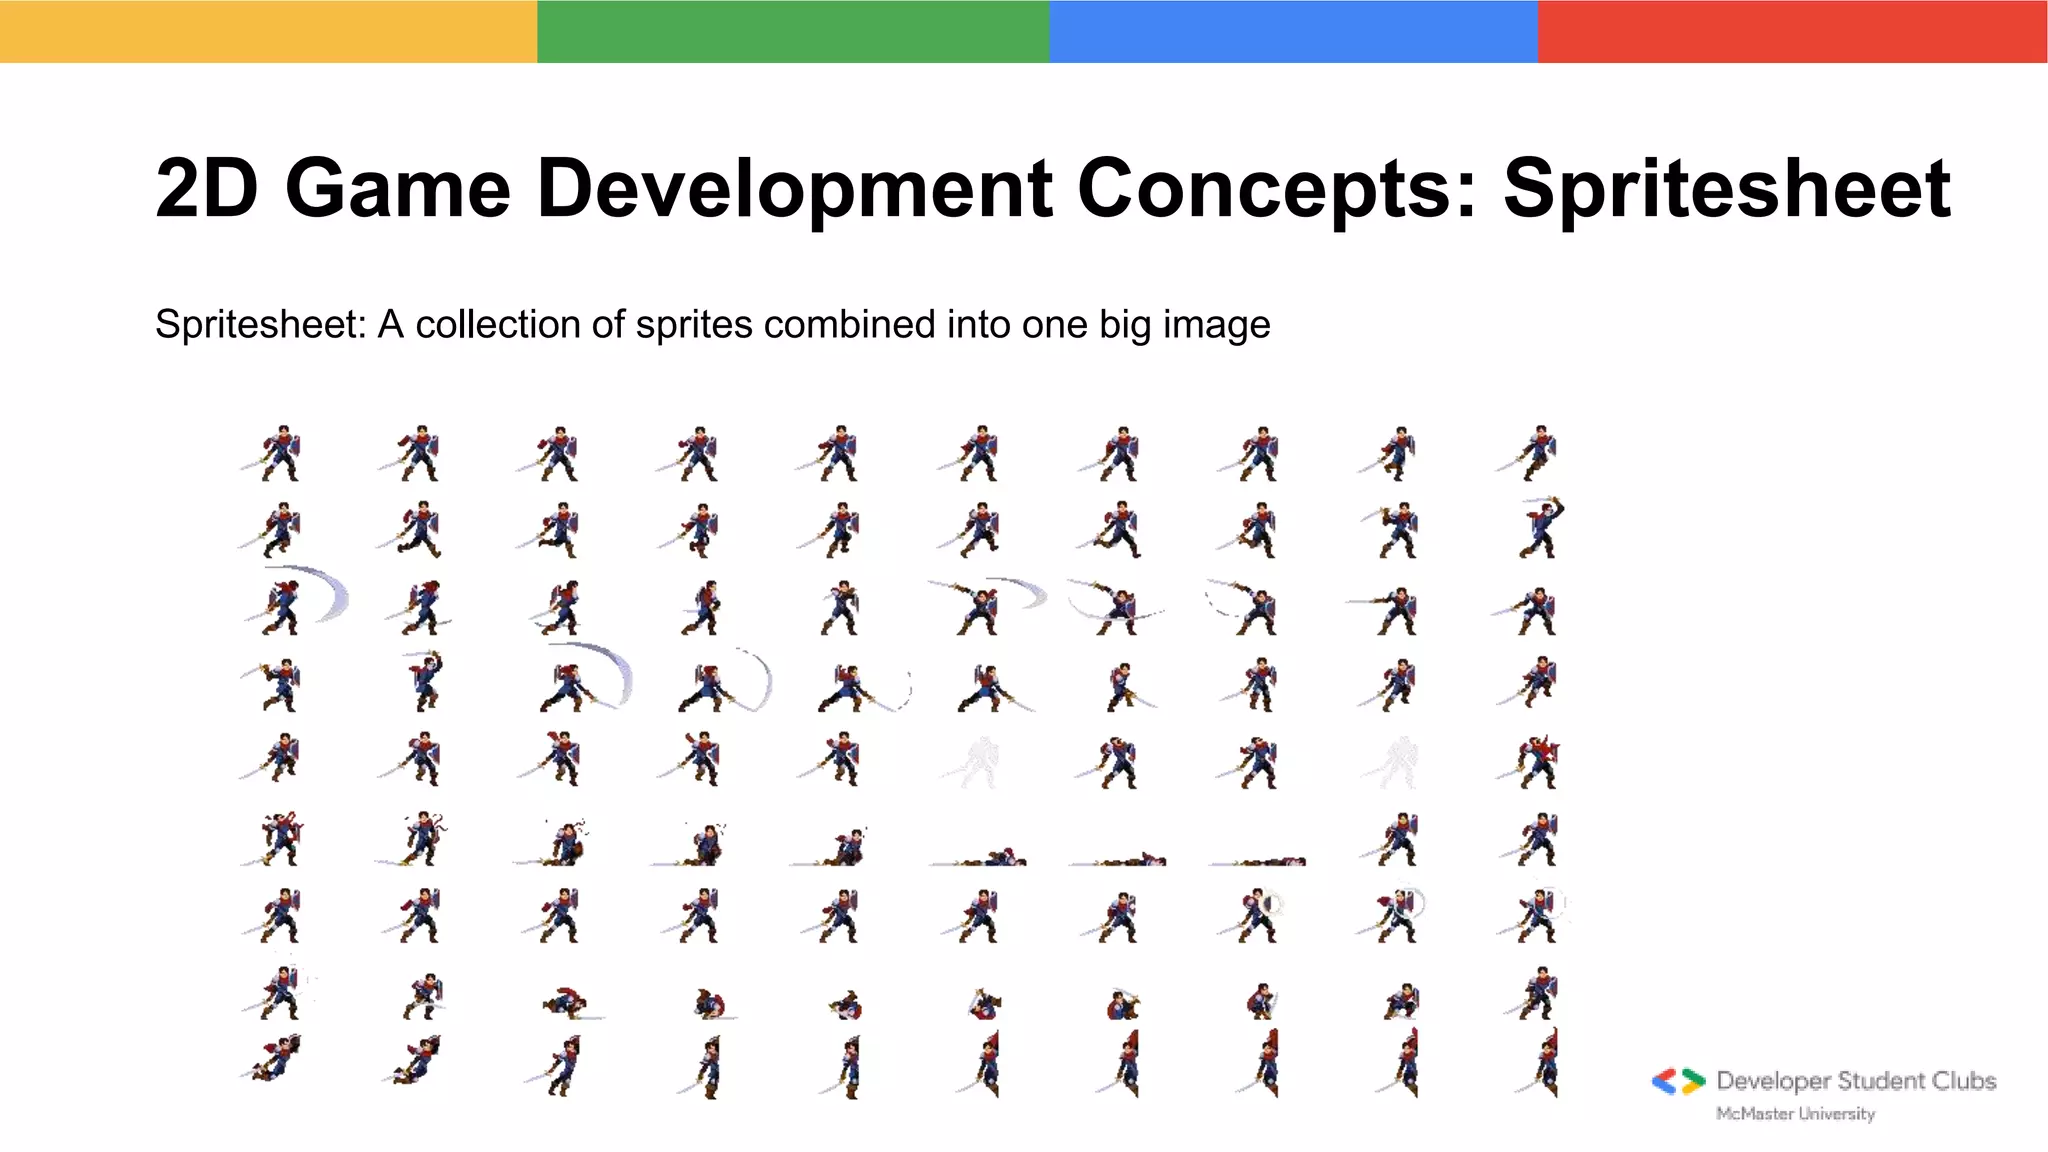
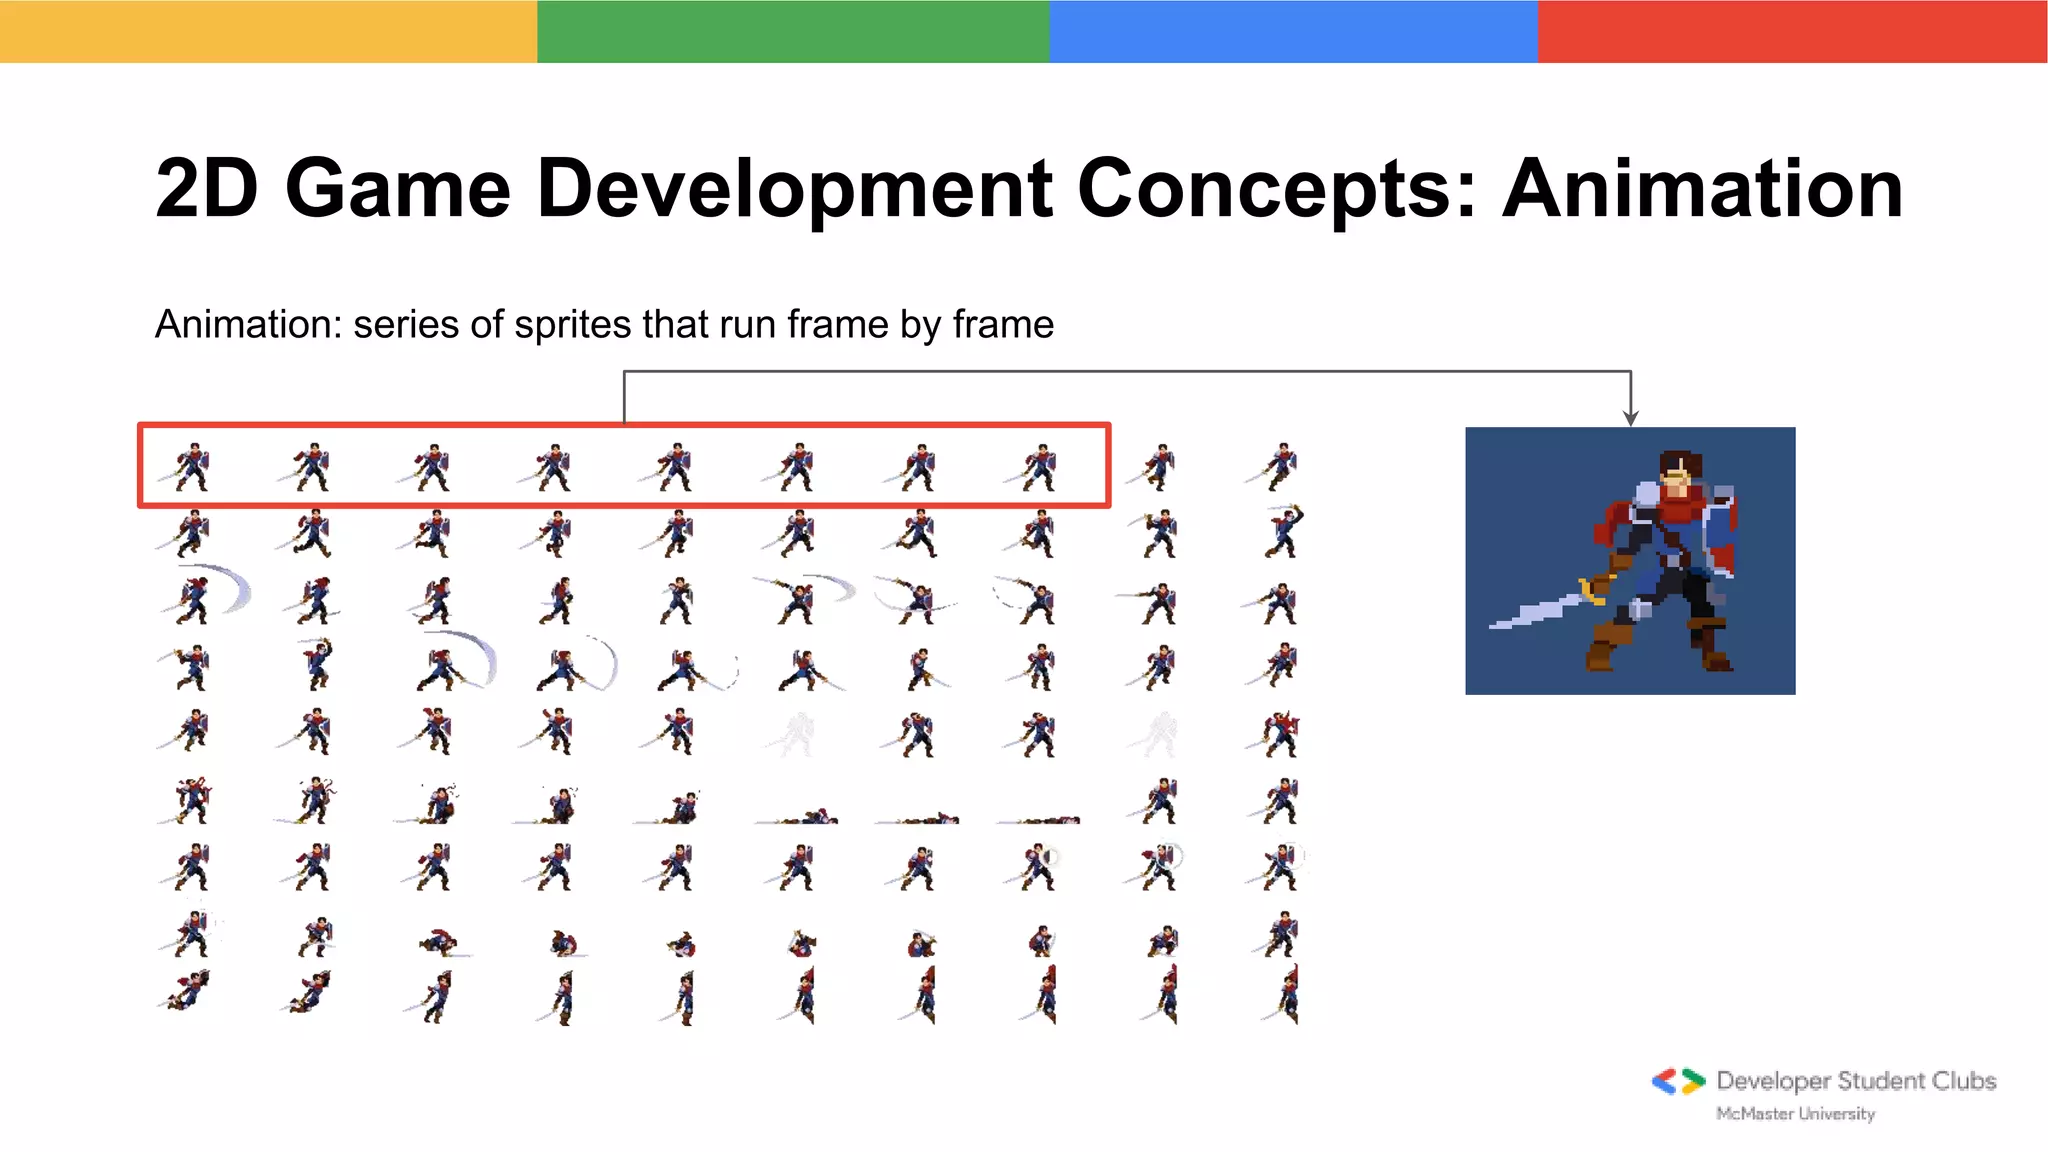
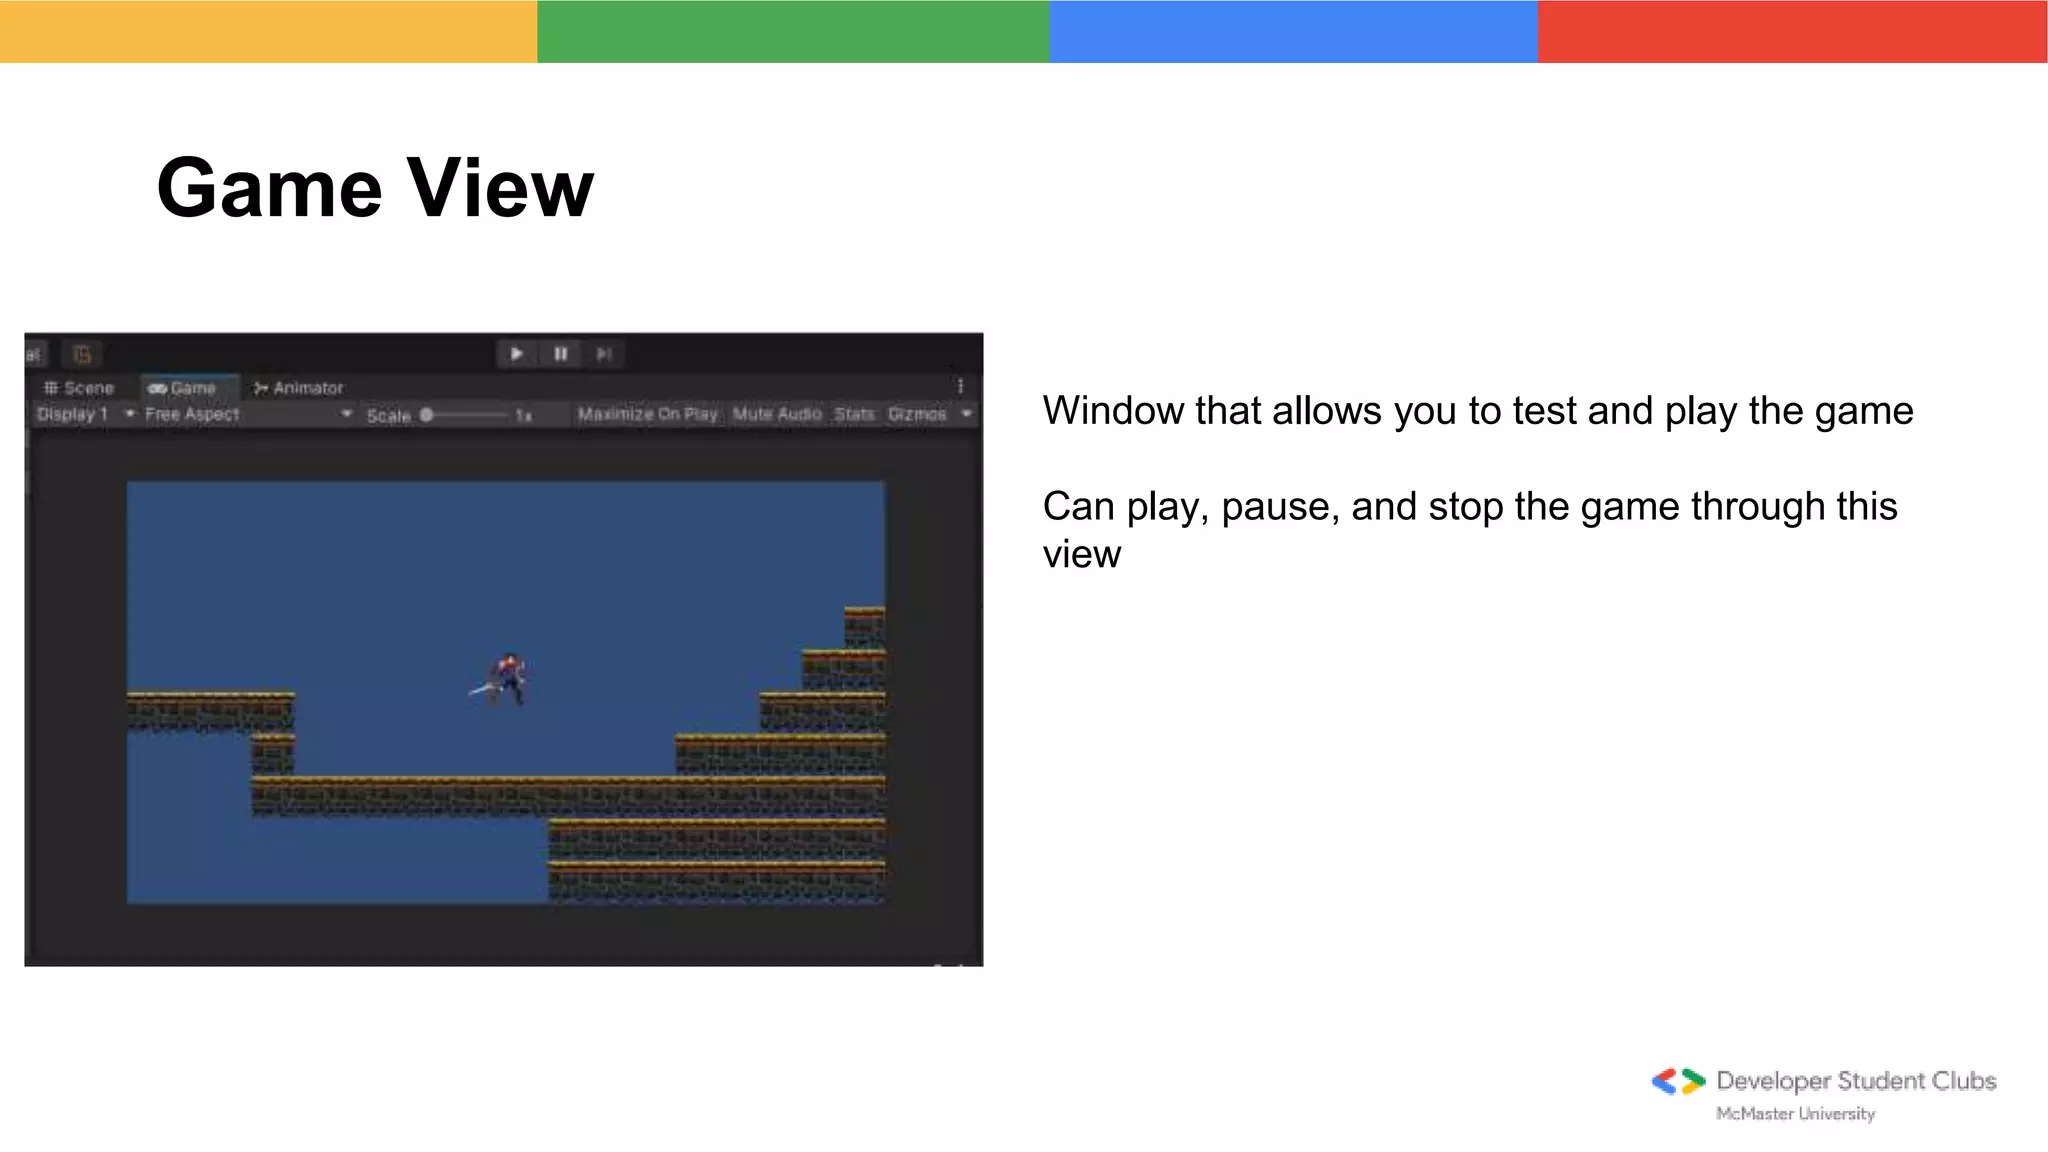
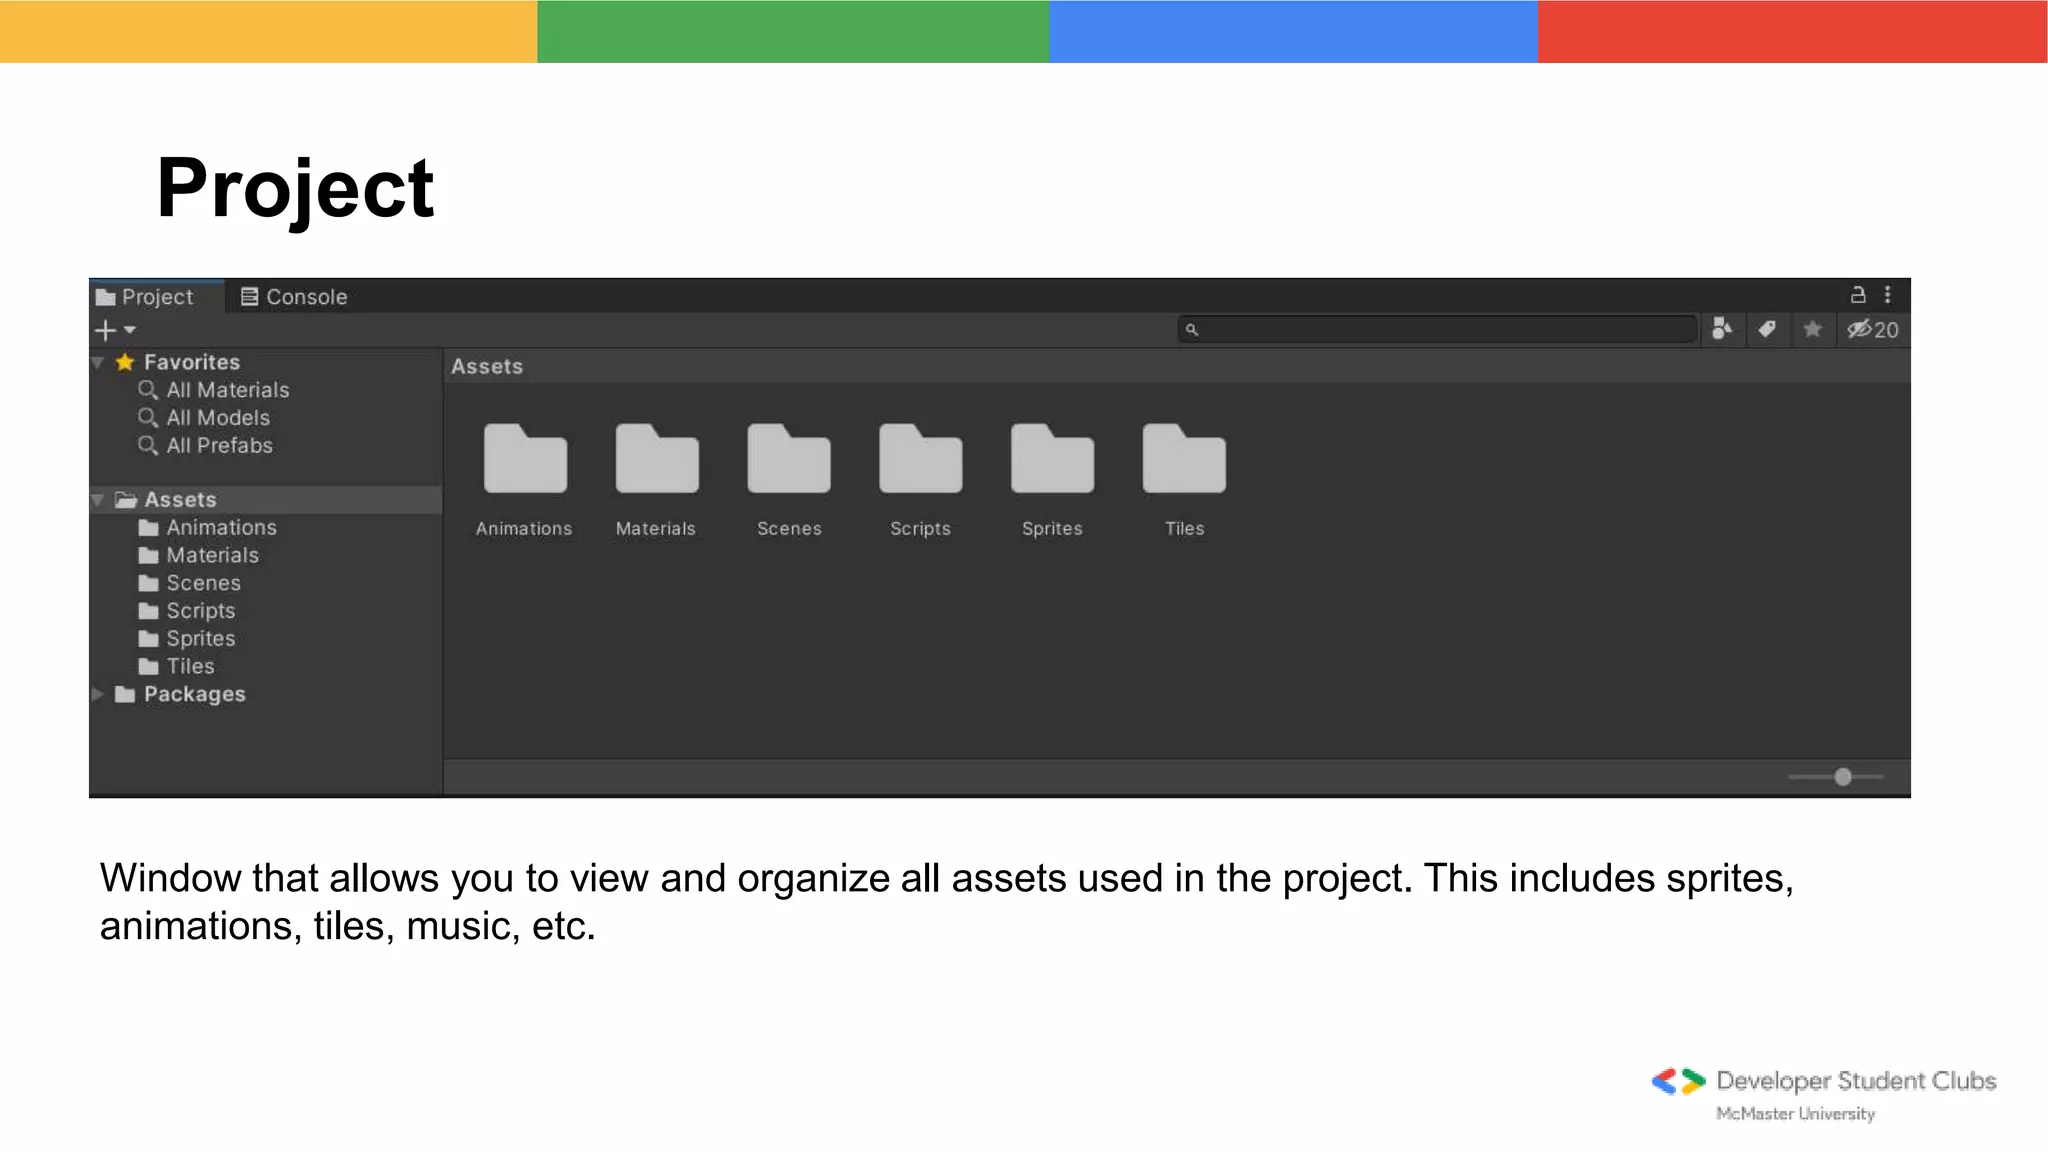
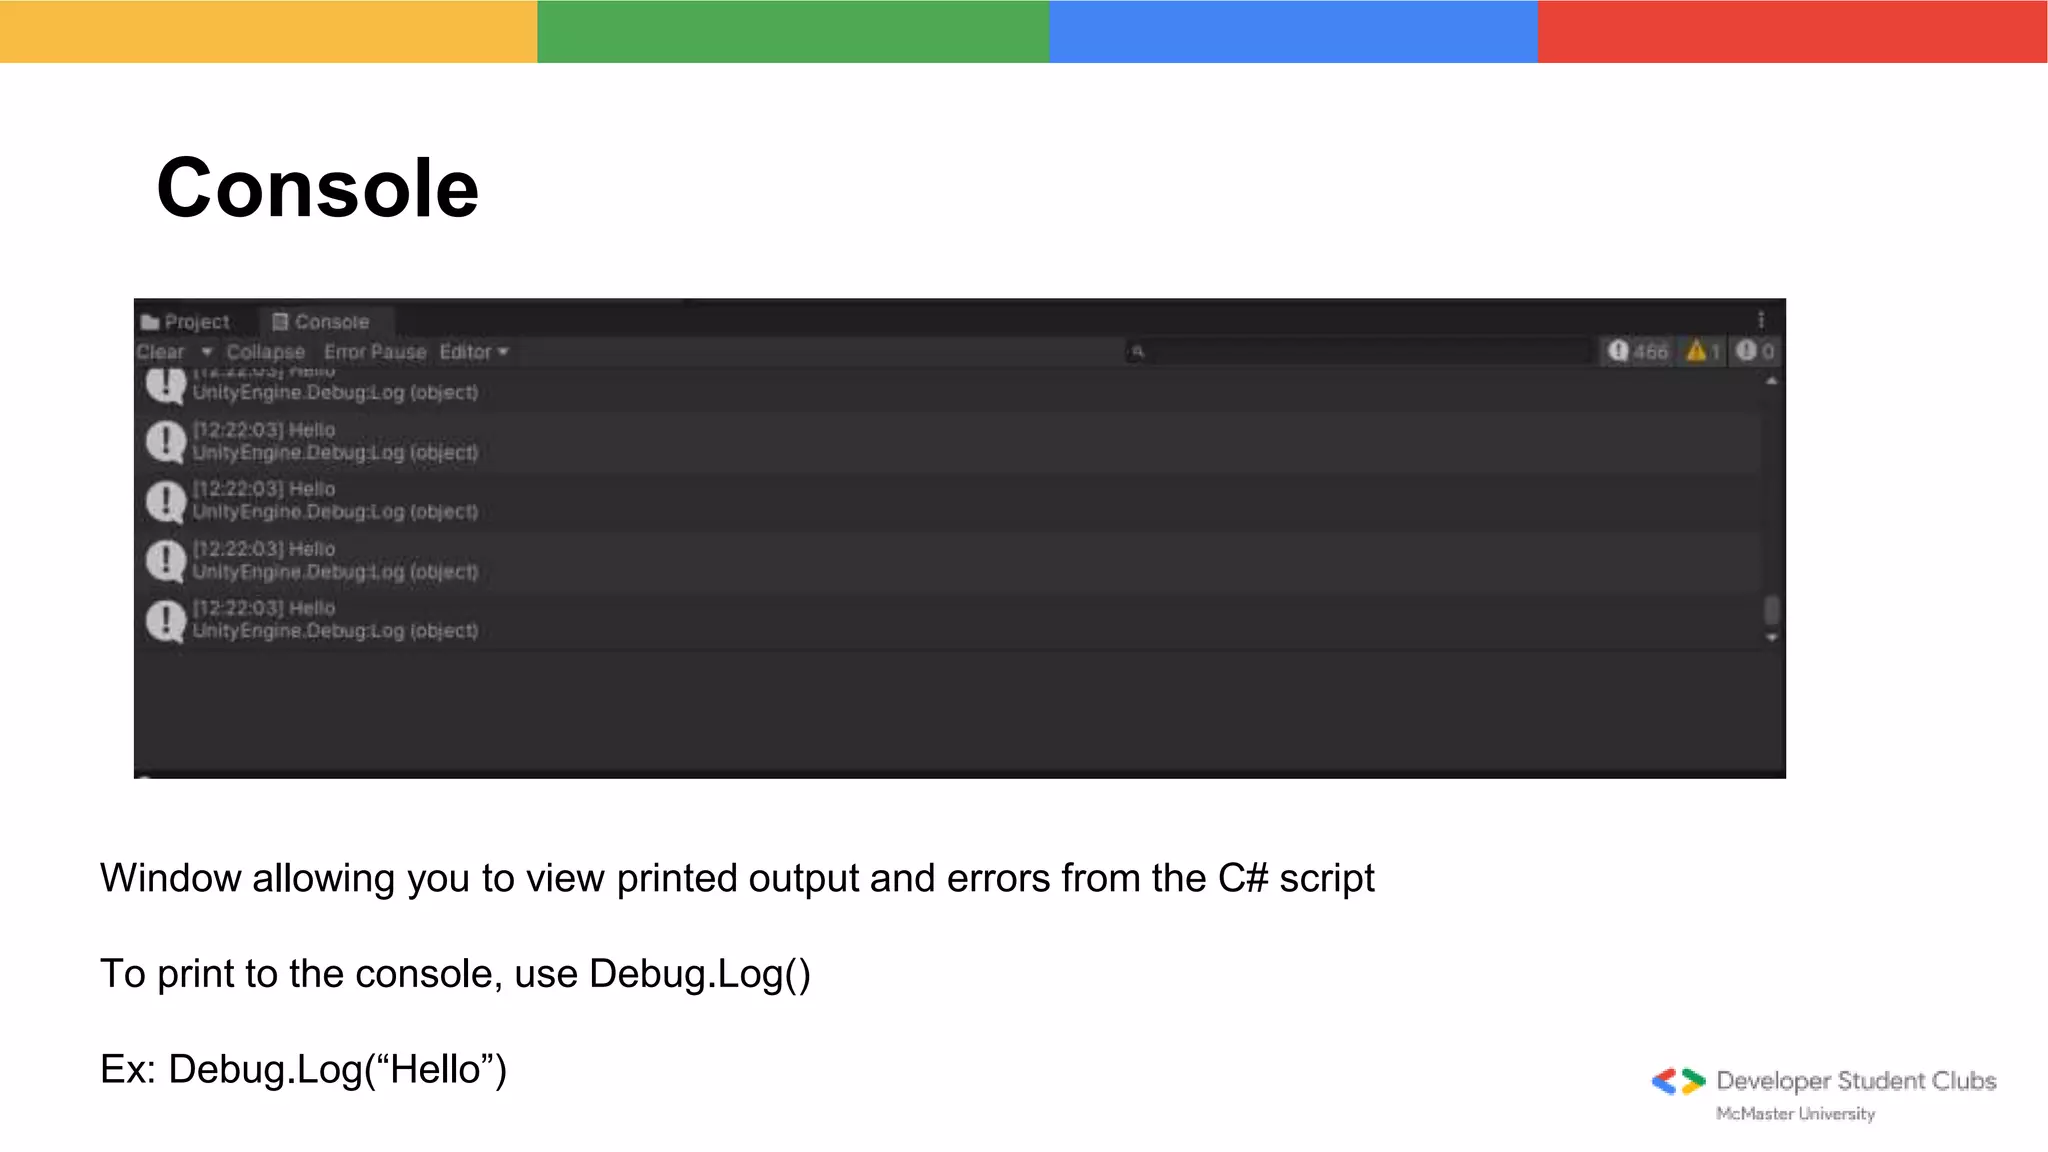
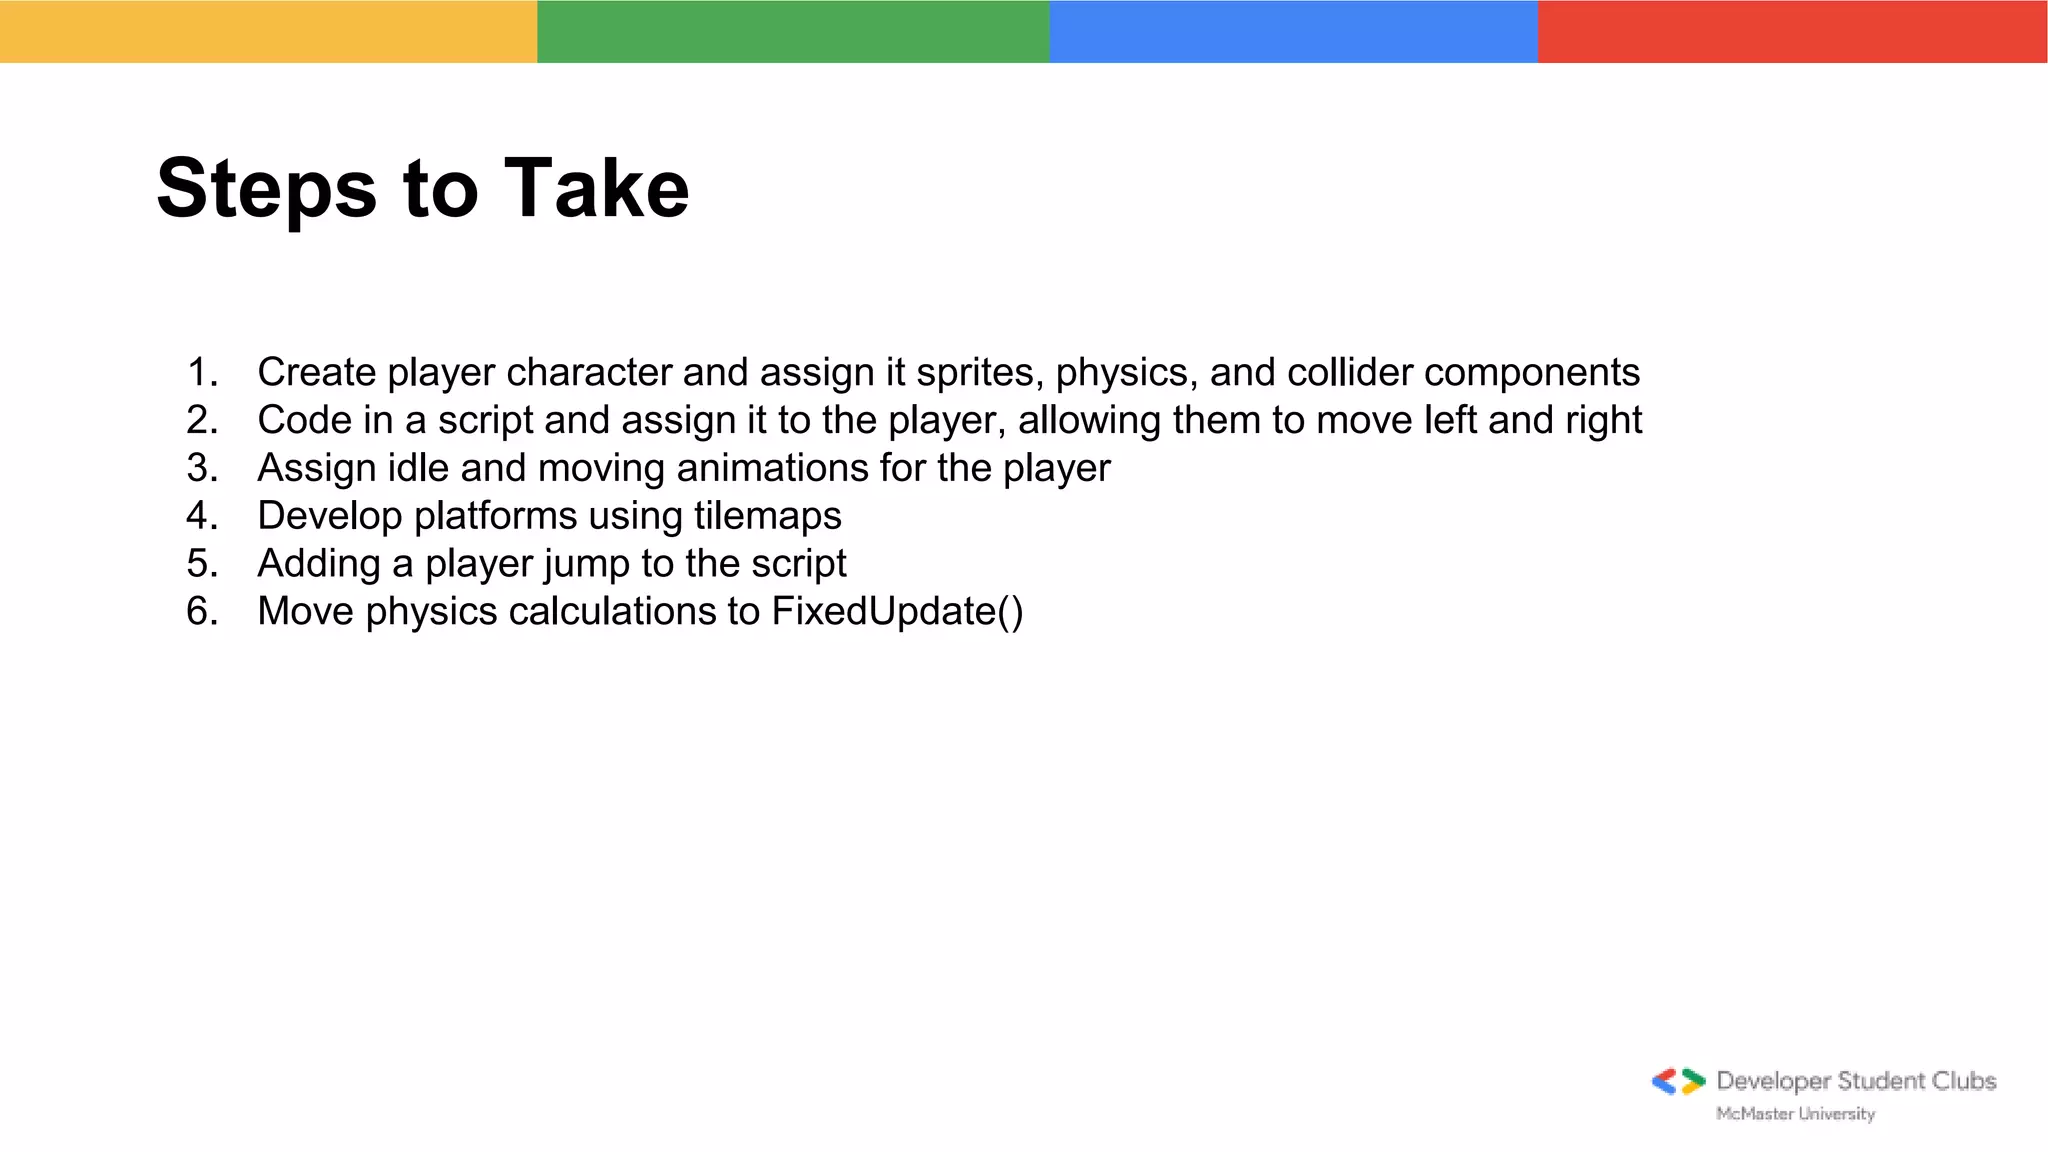
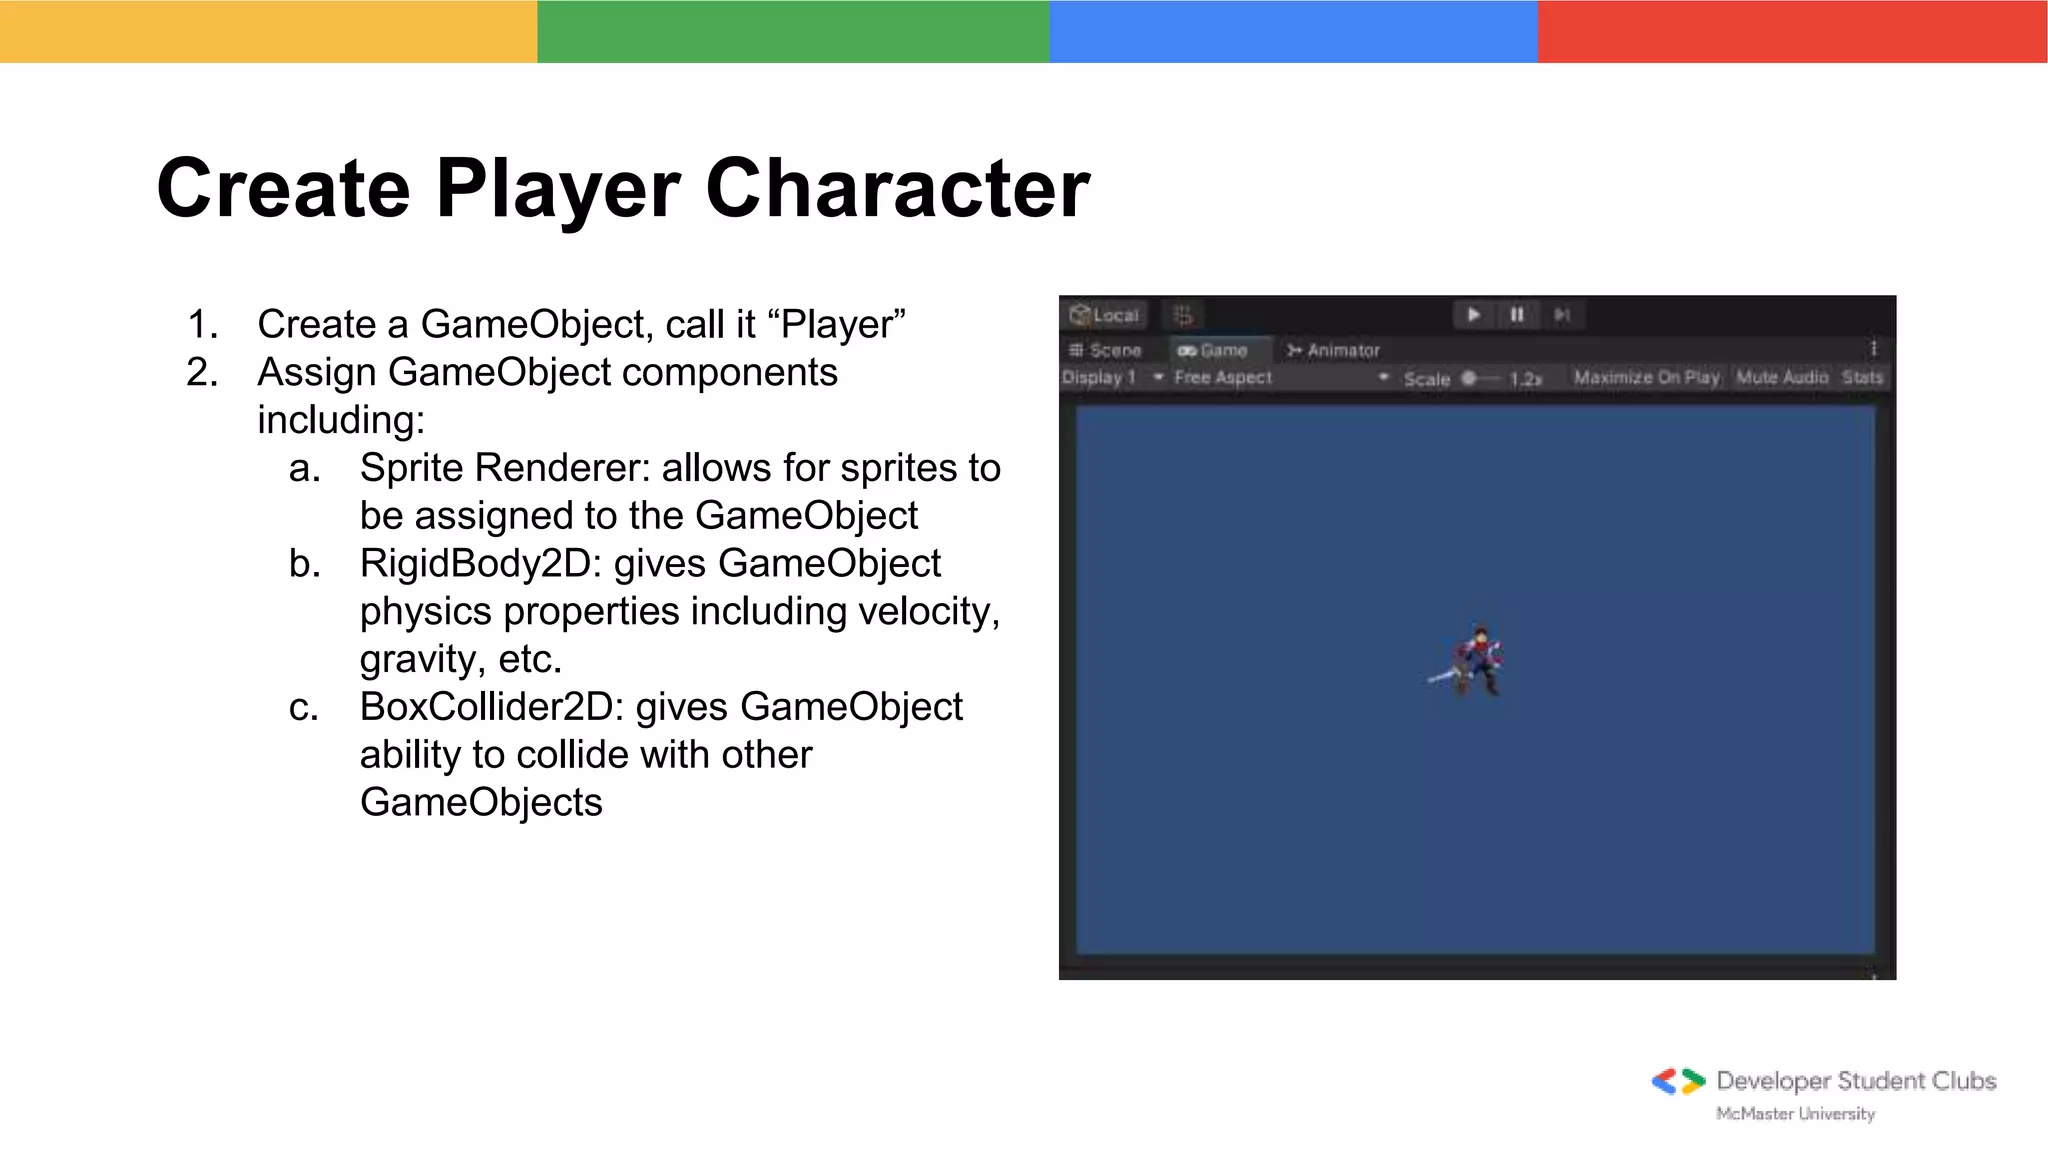
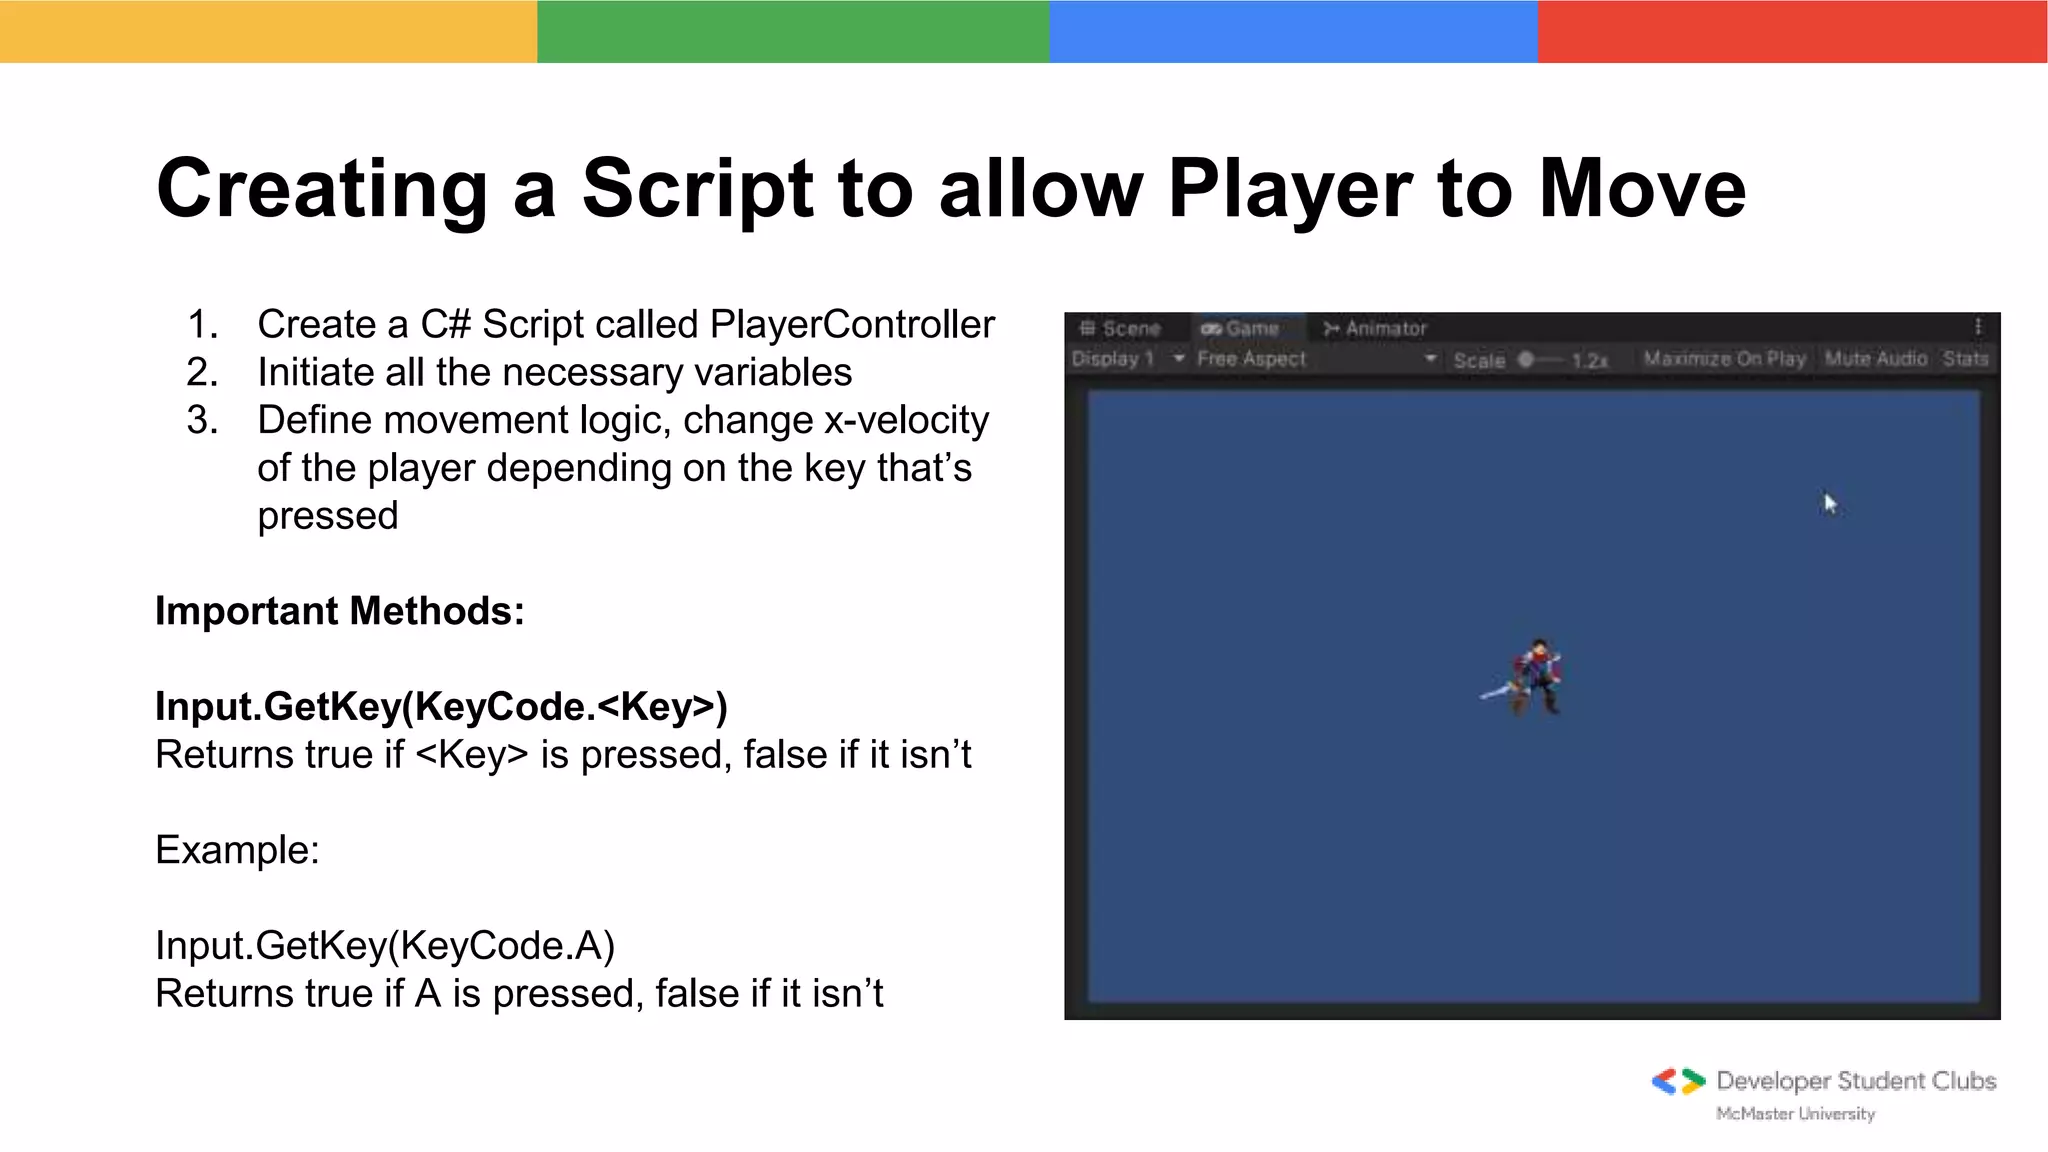
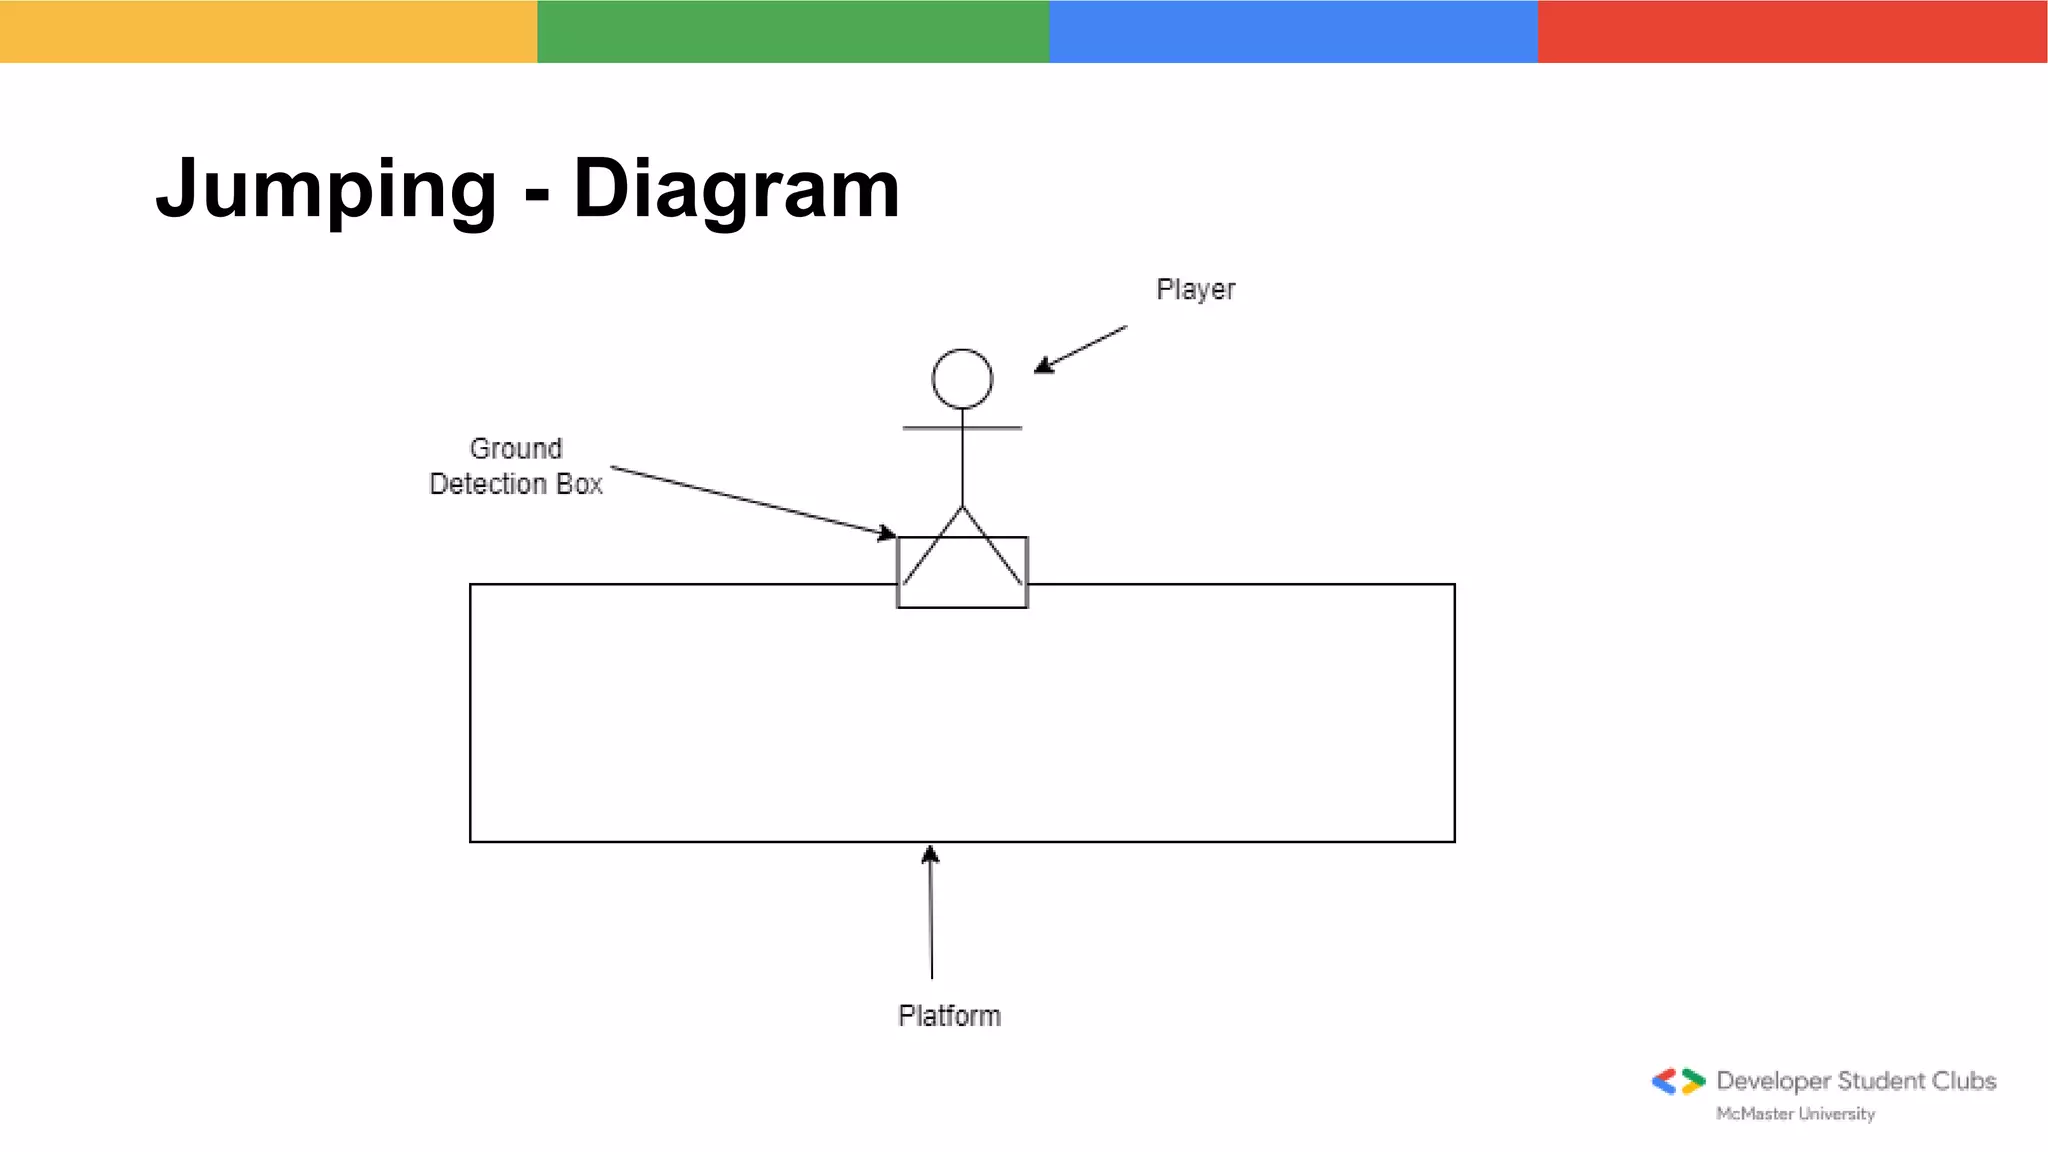
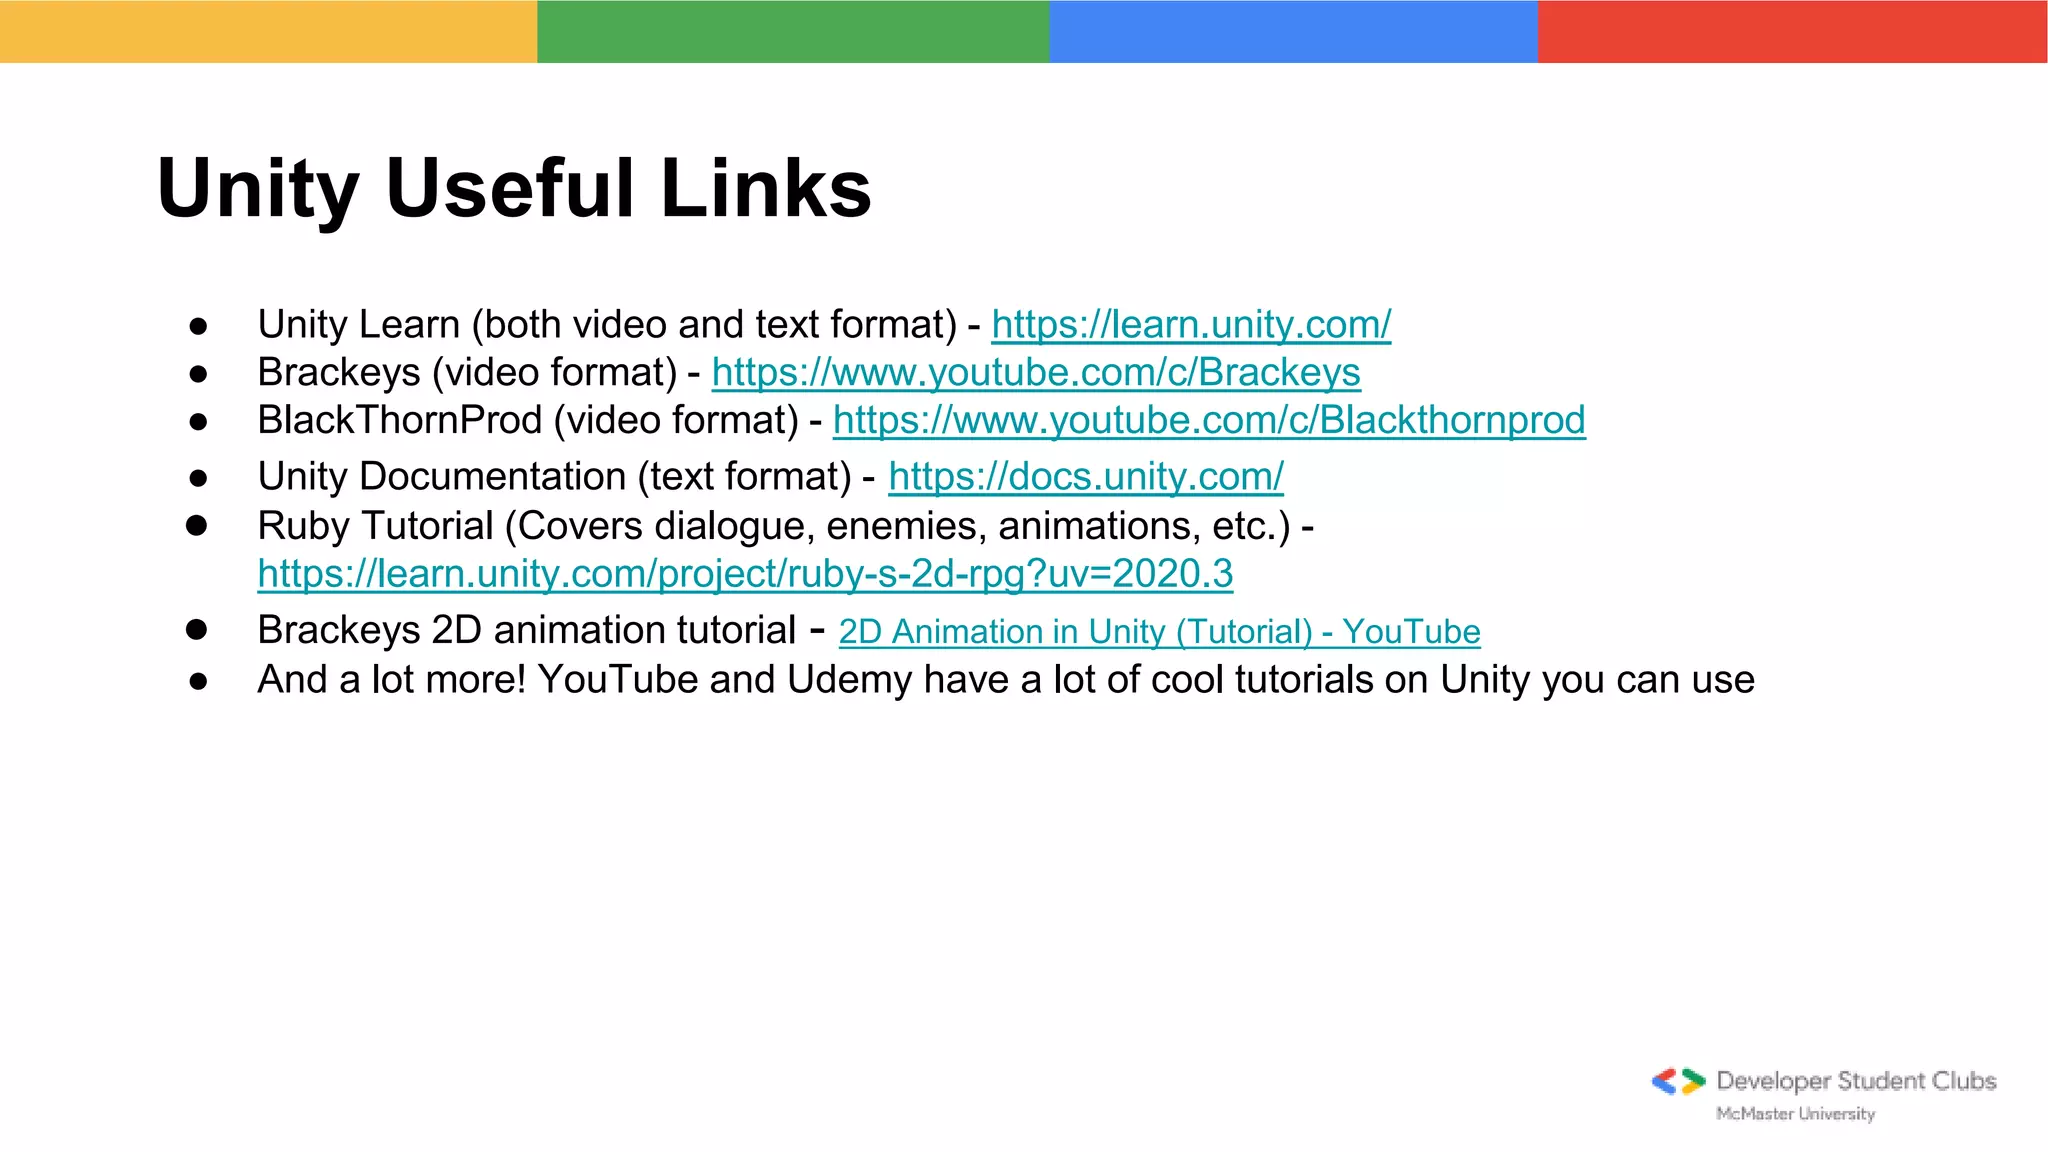
Introduction to 2D Game
Development with Unity
Workshop and Talks Lead
McMaster University
Zahid Mirza Bilal Shaikh
Speakers
Content Coordinator
McMaster University
Before we begin…
What is Unity?
● Popular engine used for:
○ Building 2D and 3D games for desktop platforms, consoles, mobile devices.
○ Film
○ Simulation of any kind, with AR/VR possibly.
● Uses Visual Studio
● Consists of:
○ A game engine
○ An application where the “visible pieces” of a game can be put together
○ Code editor
Motivation for using Unity
● Used to make popular games including:
○ Hollow Knight
○ CupHead
○ Fall Guys
○ Mario Kart Tour
○ And more!
● FREE to get started
● Scripting uses C# which is similar to Java
● Unity Asset Store consists of ready-to-go assets that you can drop straight into your game or
use to speed up your building process.
What are we building today?
Basic 2D platformer:
● Giving player character ability to move left and
right
● Giving player character idle and moving
animations
● Simple platforms for player to walk on
● Giving player ability to jump
2D Game Development Concepts: Physics
● Position: x and y coordinates
● Speed: how fast something will move (ex: 20 km/h)
● Velocity: speed with direction (ex: 20km/h to the right)
● Gravity: force that always applies downwards. Can be controlled in games (i.e. doesn’t have
to be 9.8!)
● Time between each frame (accessed in Unity via Time.deltaTime)
2D Game Development Concepts: Sprites
Sprite: an image representing an object in the game
2D Game Development Concepts: Spritesheet
Spritesheet: A collection of sprites combined into one big image
2D Game Development Concepts: Animation
Animation: series of sprites that run frame by frame
Important Unity Concepts: General
● Scenes: Essentially the “level” of the game.
● GameObjects: Every object in Unity is represented by a GameObject. This includes the
player, enemies, tilemaps, etc.
● Scripts: C# code that can be assigned to GameObjects. Use Visual Studio to edit them
Important Unity Concepts: Functions
● Start() - Called at the very start of the script, but only once.
● Update() - Called every frame. Majority of code goes here since the game runs every frame,
time between each call isn’t consistent.
● FixedUpdate() - Called at a fixed time interval, which is specified to 0.02s by default in Unity.
Physics stuff typically goes here.
Unity Menu Walkthrough
● Hierarchy
● Scene View
● Game View
● Inspector
● Project
● Console
Hierarchy
View all GameObjects in a specific scene
Create GameObjects by either right-clicking in
the hierarchy or by clicking the “+” button
Specify parent-child relationships between
GameObjects
Scene View
Specify where to place GameObjects in the
Scene
Can also resize and rotate GameObjects
Game View
Window that allows you to test and play the game
Can play, pause, and stop the game through this
view
Inspector
Window that lets you view, modify, and add
components of a GameObject (in this case the
GameObject is called PlayerCharacter)
Can modify components by either typing,
dragging and dropping, or selecting values on
them
Add components by clicking “Add Component”.
Some examples of components include:
RigidBody2D (physics of the GameObject),
Collider2D (allows GameObject to collide with
other GameObjects), etc.
Project
Window that allows you to view and organize all assets used in the project. This includes sprites,
animations, tiles, music, etc.
Console
Window allowing you to view printed output and errors from the C# script
To print to the console, use Debug.Log()
Ex: Debug.Log(“Hello”)
Creating the 2D Platformer
Import the Assets from this link:
HeroKnight_Assets - Google Drive
Final Script (w/o FixedUpdate):
ZahidMirza95/DSCUnityCodeNoFixed (github.com)
Steps to Take
1. Create player character and assign it sprites, physics, and collider components
2. Code in a script and assign it to the player, allowing them to move left and right
3. Assign idle and moving animations for the player
4. Develop platforms using tilemaps
5. Adding a player jump to the script
6. Move physics calculations to FixedUpdate()
Create Player Character
1. Create a GameObject, call it “Player”
2. Assign GameObject components
including:
a. Sprite Renderer: allows for sprites to
be assigned to the GameObject
b. RigidBody2D: gives GameObject
physics properties including velocity,
gravity, etc.
c. BoxCollider2D: gives GameObject
ability to collide with other
GameObjects
Creating a Script to allow Player to Move
1. Create a C# Script called PlayerController
2. Initiate all the necessary variables
3. Define movement logic, change x-velocity
of the player depending on the key that’s
pressed
Important Methods:
Input.GetKey(KeyCode.<Key>)
Returns true if <Key> is pressed, false if it isn’t
Example:
Input.GetKey(KeyCode.A)
Returns true if A is pressed, false if it isn’t
Assigning Idle and Moving Animations
1. Assign the player an animator controller
2. Assign the player the “Player Animation”
script
Important Methods:
animator.SetBool(“<name>”, <value>)
Sets a variable (<name>) in the animator to a
boolean value (<value>)
Example:
animator.SetBool(“movingX”, true);
Idle and Moving Animations: Logic
Is the player moving on the x-axis? (i.e is their velocity in the x direction NOT zero?)
Develop Platforms
1. Create a tilemap
2. Create a tile palette to allow for multiple
platforms to be placed with ease
3. Create a tile to represent the platform
4. Add colliders to the tiles
Jumping
1. Initialize variables in the PlayerController
script
2. Make player jump if Space Bar is pressed
3. Design a function to detect if player is on
the ground, and use it in the player jump
Important Functions:
Physics2D.OverlapBox(<point>, <size>,
<angle>, <layer mask>);
Creates a collider at <point>, returns null if it
does NOT overlap a specified <layer mask>
Gizmos.DrawWireCube(<point>, <size>);
Draws a cube at <point> when “Gizmos” is
selected. Only works when inside the
OnDrawGizmos() function
Jumping - Diagram
Move Physics Calculations to FixedUpdate()
1. Move all the physics-related code from Update() to FixedUpdate()
2. Create variables that keep track of the input values in the Update() function
3. Replace input values from the conditionals with their respective variables
Next Steps for the game
● Making a camera follow the player (look into Cinemachine)
● Adding an objective to the game (ex: how will the player win the game?)
● Replacing the sprites
● Adding more animations
● Adding combat
● Adding enemies
● And more!
Link to final project (includes fixed update code and one-line solution for moving left and right) -
ZahidMirza95/DSCUnityWorkshopFinal (github.com)
Resources Used
● Jumping Code: https://www.youtube.com/watch?v=ptvK4Fp5vRYbe
● Assets Used: https://assetstore.unity.com/packages/2d/characters/hero-knight-pixel-art-165188
● FixedUpdate() vs. Update(): https://www.youtube.com/watch?v=MfIsp28TYAQ&t=522s
Resources for Sprites
● Piskel (creating sprites and animations) - Piskel - Free online sprite editor (piskelapp.com)
● Spriters Resource (lots of sprites from existing video games on here) - The Spriters Resource
(spriters-resource.com)
● Unity Asset Store - Unity Asset Store - The Best Assets for Game Making
● Pinterest
Unity Useful Links
● Unity Learn (both video and text format) - https://learn.unity.com/
● Brackeys (video format) - https://www.youtube.com/c/Brackeys
● BlackThornProd (video format) - https://www.youtube.com/c/Blackthornprod
● Unity Documentation (text format) - https://docs.unity.com/
● Ruby Tutorial (Covers dialogue, enemies, animations, etc.) -
https://learn.unity.com/project/ruby-s-2d-rpg?uv=2020.3
● Brackeys 2D animation tutorial - 2D Animation in Unity (Tutorial) - YouTube
● And a lot more! YouTube and Udemy have a lot of cool tutorials on Unity you can use

Unity workshop

  • 1.
    Introduction to 2DGame Development with Unity
  • 2.
    Workshop and TalksLead McMaster University Zahid Mirza Bilal Shaikh Speakers Content Coordinator McMaster University
  • 3.
  • 4.
    What is Unity? ●Popular engine used for: ○ Building 2D and 3D games for desktop platforms, consoles, mobile devices. ○ Film ○ Simulation of any kind, with AR/VR possibly. ● Uses Visual Studio ● Consists of: ○ A game engine ○ An application where the “visible pieces” of a game can be put together ○ Code editor
  • 5.
    Motivation for usingUnity ● Used to make popular games including: ○ Hollow Knight ○ CupHead ○ Fall Guys ○ Mario Kart Tour ○ And more! ● FREE to get started ● Scripting uses C# which is similar to Java ● Unity Asset Store consists of ready-to-go assets that you can drop straight into your game or use to speed up your building process.
  • 6.
    What are webuilding today? Basic 2D platformer: ● Giving player character ability to move left and right ● Giving player character idle and moving animations ● Simple platforms for player to walk on ● Giving player ability to jump
  • 7.
    2D Game DevelopmentConcepts: Physics ● Position: x and y coordinates ● Speed: how fast something will move (ex: 20 km/h) ● Velocity: speed with direction (ex: 20km/h to the right) ● Gravity: force that always applies downwards. Can be controlled in games (i.e. doesn’t have to be 9.8!) ● Time between each frame (accessed in Unity via Time.deltaTime)
  • 8.
    2D Game DevelopmentConcepts: Sprites Sprite: an image representing an object in the game
  • 9.
    2D Game DevelopmentConcepts: Spritesheet Spritesheet: A collection of sprites combined into one big image
  • 10.
    2D Game DevelopmentConcepts: Animation Animation: series of sprites that run frame by frame
  • 11.
    Important Unity Concepts:General ● Scenes: Essentially the “level” of the game. ● GameObjects: Every object in Unity is represented by a GameObject. This includes the player, enemies, tilemaps, etc. ● Scripts: C# code that can be assigned to GameObjects. Use Visual Studio to edit them
  • 12.
    Important Unity Concepts:Functions ● Start() - Called at the very start of the script, but only once. ● Update() - Called every frame. Majority of code goes here since the game runs every frame, time between each call isn’t consistent. ● FixedUpdate() - Called at a fixed time interval, which is specified to 0.02s by default in Unity. Physics stuff typically goes here.
  • 14.
    Unity Menu Walkthrough ●Hierarchy ● Scene View ● Game View ● Inspector ● Project ● Console
  • 15.
    Hierarchy View all GameObjectsin a specific scene Create GameObjects by either right-clicking in the hierarchy or by clicking the “+” button Specify parent-child relationships between GameObjects
  • 16.
    Scene View Specify whereto place GameObjects in the Scene Can also resize and rotate GameObjects
  • 17.
    Game View Window thatallows you to test and play the game Can play, pause, and stop the game through this view
  • 18.
    Inspector Window that letsyou view, modify, and add components of a GameObject (in this case the GameObject is called PlayerCharacter) Can modify components by either typing, dragging and dropping, or selecting values on them Add components by clicking “Add Component”. Some examples of components include: RigidBody2D (physics of the GameObject), Collider2D (allows GameObject to collide with other GameObjects), etc.
  • 19.
    Project Window that allowsyou to view and organize all assets used in the project. This includes sprites, animations, tiles, music, etc.
  • 20.
    Console Window allowing youto view printed output and errors from the C# script To print to the console, use Debug.Log() Ex: Debug.Log(“Hello”)
  • 21.
    Creating the 2DPlatformer
  • 22.
    Import the Assetsfrom this link: HeroKnight_Assets - Google Drive Final Script (w/o FixedUpdate): ZahidMirza95/DSCUnityCodeNoFixed (github.com)
  • 23.
    Steps to Take 1.Create player character and assign it sprites, physics, and collider components 2. Code in a script and assign it to the player, allowing them to move left and right 3. Assign idle and moving animations for the player 4. Develop platforms using tilemaps 5. Adding a player jump to the script 6. Move physics calculations to FixedUpdate()
  • 24.
    Create Player Character 1.Create a GameObject, call it “Player” 2. Assign GameObject components including: a. Sprite Renderer: allows for sprites to be assigned to the GameObject b. RigidBody2D: gives GameObject physics properties including velocity, gravity, etc. c. BoxCollider2D: gives GameObject ability to collide with other GameObjects
  • 25.
    Creating a Scriptto allow Player to Move 1. Create a C# Script called PlayerController 2. Initiate all the necessary variables 3. Define movement logic, change x-velocity of the player depending on the key that’s pressed Important Methods: Input.GetKey(KeyCode.<Key>) Returns true if <Key> is pressed, false if it isn’t Example: Input.GetKey(KeyCode.A) Returns true if A is pressed, false if it isn’t
  • 26.
    Assigning Idle andMoving Animations 1. Assign the player an animator controller 2. Assign the player the “Player Animation” script Important Methods: animator.SetBool(“<name>”, <value>) Sets a variable (<name>) in the animator to a boolean value (<value>) Example: animator.SetBool(“movingX”, true);
  • 27.
    Idle and MovingAnimations: Logic Is the player moving on the x-axis? (i.e is their velocity in the x direction NOT zero?)
  • 28.
    Develop Platforms 1. Createa tilemap 2. Create a tile palette to allow for multiple platforms to be placed with ease 3. Create a tile to represent the platform 4. Add colliders to the tiles
  • 29.
    Jumping 1. Initialize variablesin the PlayerController script 2. Make player jump if Space Bar is pressed 3. Design a function to detect if player is on the ground, and use it in the player jump Important Functions: Physics2D.OverlapBox(<point>, <size>, <angle>, <layer mask>); Creates a collider at <point>, returns null if it does NOT overlap a specified <layer mask> Gizmos.DrawWireCube(<point>, <size>); Draws a cube at <point> when “Gizmos” is selected. Only works when inside the OnDrawGizmos() function
  • 30.
  • 31.
    Move Physics Calculationsto FixedUpdate() 1. Move all the physics-related code from Update() to FixedUpdate() 2. Create variables that keep track of the input values in the Update() function 3. Replace input values from the conditionals with their respective variables
  • 32.
    Next Steps forthe game ● Making a camera follow the player (look into Cinemachine) ● Adding an objective to the game (ex: how will the player win the game?) ● Replacing the sprites ● Adding more animations ● Adding combat ● Adding enemies ● And more! Link to final project (includes fixed update code and one-line solution for moving left and right) - ZahidMirza95/DSCUnityWorkshopFinal (github.com)
  • 33.
    Resources Used ● JumpingCode: https://www.youtube.com/watch?v=ptvK4Fp5vRYbe ● Assets Used: https://assetstore.unity.com/packages/2d/characters/hero-knight-pixel-art-165188 ● FixedUpdate() vs. Update(): https://www.youtube.com/watch?v=MfIsp28TYAQ&t=522s
  • 34.
    Resources for Sprites ●Piskel (creating sprites and animations) - Piskel - Free online sprite editor (piskelapp.com) ● Spriters Resource (lots of sprites from existing video games on here) - The Spriters Resource (spriters-resource.com) ● Unity Asset Store - Unity Asset Store - The Best Assets for Game Making ● Pinterest
  • 35.
    Unity Useful Links ●Unity Learn (both video and text format) - https://learn.unity.com/ ● Brackeys (video format) - https://www.youtube.com/c/Brackeys ● BlackThornProd (video format) - https://www.youtube.com/c/Blackthornprod ● Unity Documentation (text format) - https://docs.unity.com/ ● Ruby Tutorial (Covers dialogue, enemies, animations, etc.) - https://learn.unity.com/project/ruby-s-2d-rpg?uv=2020.3 ● Brackeys 2D animation tutorial - 2D Animation in Unity (Tutorial) - YouTube ● And a lot more! YouTube and Udemy have a lot of cool tutorials on Unity you can use