Downloaded 110 times


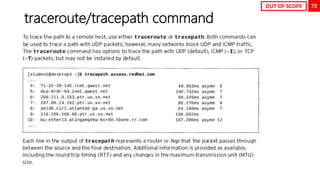
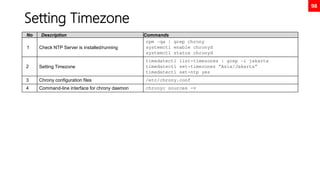
![10
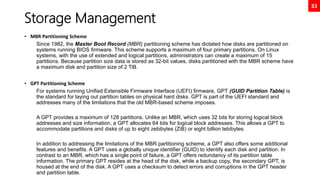
Bash Comparison and its confusing type
juggling comparison
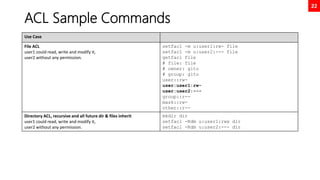
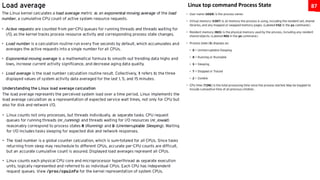
No Description Commands
1 Numeric comparison
[ 1 -eq 1 ]; echo $? # equal
[ 1 -ne 1 ]; echo $? # not equal
[ 8 -gt 2 ]; echo $? # greater than
[ 2 -ge 2 ]; echo $? # greater equal
[ 2 -lt 2 ]; echo $? # less than
2 String comparison
[ abc = abc ]; echo $?
[ abc == def ]; echo $?
[ abc != def ]; echo $?
3 Unary operators
STRING=‘’ ; [ -z "$STRING" ]; echo $?
STRING='abc'; [ -n "$STRING" ]; echo $?
4 File / Directory existence check
[ -d dirname ]; echo $? # dir check
[ -f filename ]; echo $? # file check
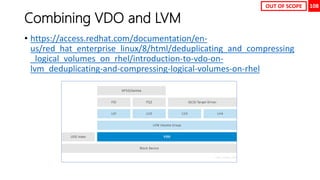
OUT OF SCOPE
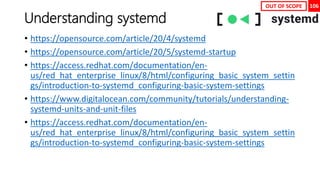
Note:
For heavy vi/vim users, I highly recommend to add set -o vi in ~/.bashrc or /etc/bashrc.
It will enable vi keybindings within your shell, and I think it will greatly enhance your shell command editing.](https://image.slidesharecdn.com/rhcsaex200-summary-220819174442-5b4ebd94/85/RHCSA-EX200-Summary-10-320.jpg)
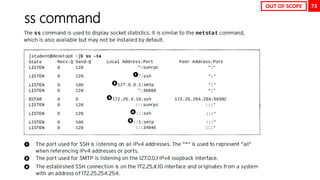
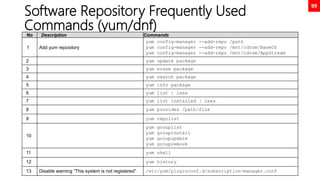
![11
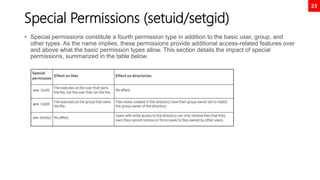
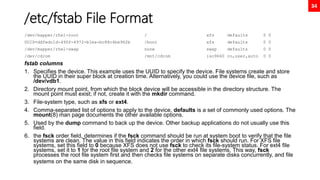
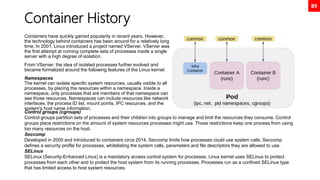
Regular Expressions, thou shalt remember
this holy symbols!
OPTION DESCRIPTION
. The period (.) matches any single character.
? The preceding item is optional and will be matched at most once.
* The preceding item will be matched zero or more times.
+ The preceding item will be matched one or more times.
{n} The preceding item is matched exactly n times.
{n,} The preceding item is matched n or more times.
{,m} The preceding item is matched at most m times.
{n,m} The preceding item is matched at least n times, but not more than m times.
[:alnum:] Alphanumeric characters: '[:alpha:]' and '[:digit:]'; in the 'C' locale and ASCII character encoding, this is the same as '[0-9A-Za-z]'.
[:alpha:] Alphabetic characters: '[:lower:]' and '[:upper:]'; in the 'C' locale and ASCII character encoding, this is the same as '[A-Za-z]'.
[:blank:] Blank characters: space and tab.
[:cntrl:] Control characters. In ASCII, these characters have octal codes 000 through 037, and 177 (DEL). In other character sets, these are the equivalent characters, if any.
[:digit:] Digits: 0 1 2 3 4 5 6 7 8 9.
[:graph:] Graphical characters: '[:alnum:]' and '[:punct:]'.
[:lower:] Lower-case letters; in the 'C' locale and ASCII character encoding, this is a b c d e f g h i j k l m n o p q r s t u v w x y z.
[:print:] Printable characters: '[:alnum:]', '[:punct:]', and space.
[:punct:] Punctuation characters; in the 'C' locale and ASCII character encoding, this is! " # $ % & ' ( ) * + , -. /: ; < = > ? @ []^ _ ' { | } ~. In other character sets, these are the equivalent characters, if any.
[:space:] Space characters: in the 'C' locale, this is tab, newline, vertical tab, form feed,carriage return, and space.
[:upper:] Upper-case letters: in the 'C' locale and ASCII character encoding, this is A B C D E F G H I J K L M N O P Q R S T U V W X Y Z.
[:xdigit:] Hexadecimal digits: 0 1 2 3 4 5 6 7 8 9 A B C D E F a b c d e f.
b Match the empty string at the edge of a word.
B Match the empty string provided it is not at the edge of a word.
< Match the empty string at the beginning of word.
> Match the empty string at the end of word.
w Match word constituent. Synonym for '[_[:alnum:]]'.
W Match non-word constituent. Synonym for '[^_[:alnum:]]'.
s Match white space. Synonym for '[[:space:]]'.
S Match non-whitespace. Synonym for '[^[:space:]]'.
OUT OF SCOPE](https://image.slidesharecdn.com/rhcsaex200-summary-220819174442-5b4ebd94/85/RHCSA-EX200-Summary-11-320.jpg)


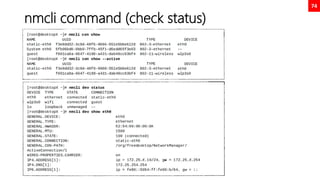
![35
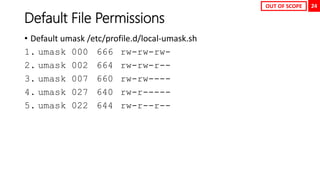
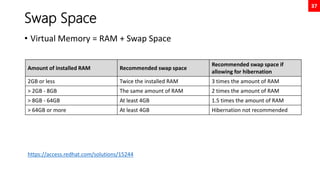
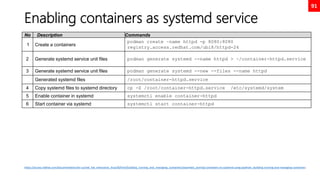
Disk Partition GPT Using fdisk
[root@neutrino ~]# fdisk /dev/nvme0n2
Welcome to fdisk (util-linux 2.32.1).
Changes will remain in memory only, until you decide to write them.
Be careful before using the write command.
Command (m for help): n
Partition number (1-128, default 1): 1
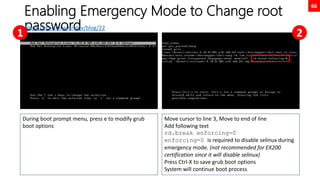
First sector (34-20971486, default 2048): 2048
Last sector, +sectors or +size{K,M,G,T,P} (2048-20971486, default
20971486): +1G
Created a new partition 1 of type 'Linux filesystem' and of size 1 GiB.
Command (m for help): w
The partition table has been altered.
Calling ioctl() to re-read partition table.
Syncing disks.
[root@neutrino ~]# mkfs.xfs /dev/nvme0n2p1
meta-data=/dev/nvme0n2p1 isize=512 agcount=4, agsize=65536 blks
= sectsz=512 attr=2, projid32bit=1
= crc=1 finobt=1, sparse=1, rmapbt=0
= reflink=1
data = bsize=4096 blocks=262144, imaxpct=25
= sunit=0 swidth=0 blks
naming =version 2 bsize=4096 ascii-ci=0, ftype=1
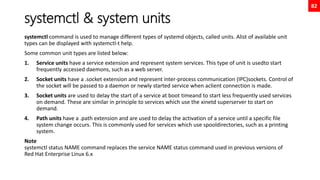
log =internal log bsize=4096 blocks=2560, version=2
= sectsz=512 sunit=0 blks, lazy-count=1
realtime =none extsz=4096 blocks=0, rtextents=0
[root@neutrino ~]# mkdir /mnt/test1
[root@neutrino ~]# mount /dev/nvme0n2p1 /mnt/test1
[root@neutrino ~]# df -h
Filesystem Size Used Avail Use% Mounted on
...
/dev/nvme0n2p1 1014M 40M 975M 4% /mnt/test1
[root@neutrino ~]# lsblk --output NAME,UUID,SIZE
NAME UUID SIZE
sr0 2021-05-03-15-21-56-00 9.4G
nvme0n1 20G
├─nvme0n1p1 ddfedc1d-490f-4972-b1ea-bc88c4be962b 1G
└─nvme0n1p2 rAEWPF-o610-hzVC-7nfr-oTFu-3J3k-TMUdNZ 19G
├─rhel-root 473359f4-a4de-474a-b117-2175a81ddaca 17G
└─rhel-swap 079e3b05-d843-4312-8cbd-1105839ad023 2G
nvme0n2 10G
├─nvme0n2p1 d7046b4d-70d9-4f23-a548-03c733cb432e 1G
└─nvme0n2p2 d1c88d5a-4f77-495c-93e4-63e8d9c4126f 1G
nvme0n3 10G
[root@neutrino ~]# echo “UUID=d7046b4d-70d9-4f23-a548-03c733cb432e
/mnt/test1 xfs defaults 0 0” >> /etc/fstab
[root@neutrino ~]# findmnt --verify
Success, no errors or warnings detected
[root@neutrino ~]# reboot](https://image.slidesharecdn.com/rhcsaex200-summary-220819174442-5b4ebd94/85/RHCSA-EX200-Summary-35-320.jpg)
![36
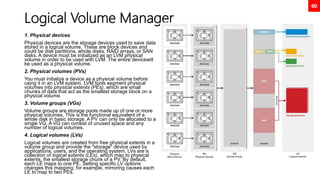
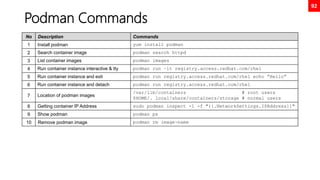
Disk Partition GPT Using parted
[root@neutrino ~]# lsblk
NAME MAJ:MIN RM SIZE RO TYPE MOUNTPOINT
sr0 11:0 1 9.4G 0 rom /mnt/cdrom
nvme0n1 259:0 0 20G 0 disk
├─nvme0n1p1 259:1 0 1G 0 part /boot
└─nvme0n1p2 259:2 0 19G 0 part
├─rhel-root 253:0 0 17G 0 lvm /
└─rhel-swap 253:1 0 2G 0 lvm [SWAP]
nvme0n2 259:3 0 10G 0 disk
nvme0n3 259:4 0 10G 0 disk
[root@neutrino ~]# parted /dev/nvme0n2
GNU Parted 3.2
Using /dev/nvme0n2
Welcome to GNU Parted! Type 'help' to view a list of commands.
(parted) mklabel gpt
(parted) print
Model: NVMe Device (nvme)
Disk /dev/nvme0n2: 10.7GB
Sector size (logical/physical): 512B/512B
Partition Table: gpt
Disk Flags:
Number Start End Size File system Name Flags
(parted) mkpart
Partition name? []? disk1
File system type? [ext2]? xfs
Start? 2048s
End? 1000MB
(parted) print
Model: NVMe Device (nvme)
Disk /dev/nvme0n2: 10.7GB
Sector size (logical/physical): 512B/512B
Partition Table: gpt
Disk Flags:
Number Start End Size File system Name Flags
1 1049kB 1000MB 999MB xfs disk1
OUT OF SCOPE](https://image.slidesharecdn.com/rhcsaex200-summary-220819174442-5b4ebd94/85/RHCSA-EX200-Summary-36-320.jpg)
![38
Swap Space
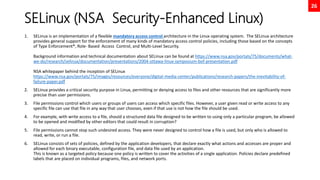
[root@neutrino ~]# fdisk /dev/nvme0n2
Welcome to fdisk (util-linux 2.32.1).
Changes will remain in memory only, until you decide to write them.
Be careful before using the write command.
Command (m for help): n
Partition number (3-128, default 3):
First sector (4196352-20971486, default 4196352):
Last sector, +sectors or +size{K,M,G,T,P} (4196352-20971486, default 20971486): +2G
Created a new partition 3 of type 'Linux filesystem' and of size 2 GiB.
Command (m for help): w
The partition table has been altered.
Syncing disks.
[root@neutrino ~]# mkswap /dev/nvme0n2p3
Setting up swapspace version 1, size = 2 GiB (2147479552 bytes)
no label, UUID=b2b9184f-5339-44bc-b756-6f03686be6d0
[root@neutrino ~]# swapon /dev/nvme0n2p3
[root@neutrino ~]# swapon
NAME TYPE SIZE USED PRIO
/dev/dm-1 partition 2G 0B -2
/dev/nvme0n2p3 partition 2G 0B -3
[root@neutrino ~]# echo “UUID=b2b9184f-5339-44bc-b756-6f03686be6d0 swap swap defaults 0 0” >> /etc/fstab
[root@neutrino ~]# findmnt --verify
Success, no errors or warnings detected](https://image.slidesharecdn.com/rhcsaex200-summary-220819174442-5b4ebd94/85/RHCSA-EX200-Summary-38-320.jpg)


![84
Adding custom systemd service (use case
tomcat)
useradd -r tomcat
chown -R tomcat:tomcat /usr/local/tomcat9
ls -l /usr/local/tomcat9
cat << EOF > /etc/systemd/system/tomcat.service
[Unit]
Description=Apache Tomcat Server
After=syslog.target network.target
[Service]
Type=forking
User=tomcat
Group=tomcat
Environment=CATALINA_PID=/usr/local/tomcat9/temp/tomcat.pid
Environment=CATALINA_HOME=/usr/local/tomcat9
Environment=CATALINA_BASE=/usr/local/tomcat9
ExecStart=/usr/local/tomcat9/bin/catalina.sh start
ExecStop=/usr/local/tomcat9/bin/catalina.sh stop
RestartSec=10
Restart=always
[Install]
WantedBy=multi-user.target
EOF
systemctl daemon-reload
systemctl start tomcat.service
systemctl enable tomcat.service
systemctl status tomcat.service
https://www.tecmint.com/install-apache-tomcat-in-rhel-8/](https://image.slidesharecdn.com/rhcsaex200-summary-220819174442-5b4ebd94/85/RHCSA-EX200-Summary-84-320.jpg)


This document serves as a comprehensive exam preparation guide for the Red Hat Certified System Administrator (EX200) exam, focusing on Red Hat Enterprise Linux 8. It covers exam topics, practical instructions, new commands learned, and critical system management concepts, such as user management, software management, and performance tuning. The author compiles various resources aimed at helping individuals memorize advanced RHEL features and successfully pass the exam.