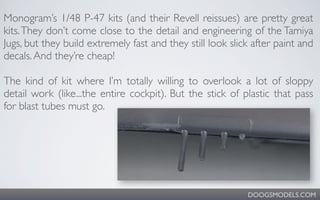
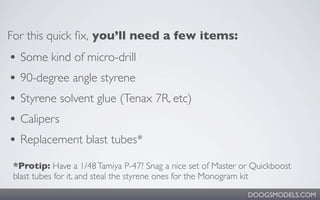
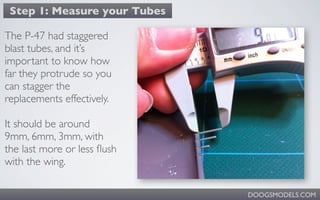
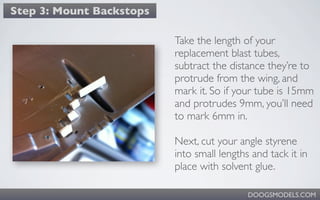
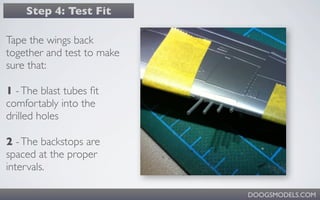
SCRATCHBUILDING | Replacing the
 Blast Tubes on a 1/48 Monogram P-47
                                DOOGSMODELS.COM
Monogram’s 1/48 P-47 kits (and their Revell reissues) are pretty great
kits. They don’t come close to the detail and engineering of the Tamiya
Jugs, but they build extremely fast and they still look slick after paint and
decals. And they’re cheap!

The kind of kit where I’m totally willing to overlook a lot of sloppy
detail work (like...the entire cockpit). But the stick of plastic that pass
for blast tubes must go.


                                                            DOOGSMODELS.COM
For this quick fix, you’ll need a few items:
• Some kind of micro-drill
• 90-degree angle styrene
• Styrene solvent glue (Tenax 7R, etc)
• Calipers
• Replacement blast tubes*
 *Protip: Have a 1/48 Tamiya P-47? Snag a nice set of Master or Quickboost
 blast tubes for it, and steal the styrene ones for the Monogram kit
                                                              DOOGSMODELS.COM
Step 1: Measure your Tubes

The P-47 had staggered
blast tubes, and it’s
important to know how
far they protrude so you
can stagger the
replacements effectively.

It should be around
9mm, 6mm, 3mm, with
the last more or less flush
with the wing.

                              DOOGSMODELS.COM
Step 2: Cut & Drill


After taping the wings together, cut off the kit’s sorry excuses for
blast tubes.

Then drill out the remnants.You may want to use a pin or old
airbrush needle to punch a small starter hole.


                                                         DOOGSMODELS.COM
Step 3: Mount Backstops

                          Take the length of your
                          replacement blast tubes,
                          subtract the distance they’re to
                          protrude from the wing, and
                          mark it. So if your tube is 15mm
                          and protrudes 9mm, you’ll need
                          to mark 6mm in.

                          Next, cut your angle styrene
                          into small lengths and tack it in
                          place with solvent glue.

                                            DOOGSMODELS.COM
Step 4: Test Fit

Tape the wings back
together and test to make
sure that:

1 - The blast tubes fit
comfortably into the
drilled holes

2 - The backstops are
spaced at the proper
intervals.

                            DOOGSMODELS.COM
That’s it! Now you can build the kit as
you would and install the blast tubes
   toward the end, all painted and
          pretty. Good hunting!


    That’s all there is to it! Remove the
    blast tubes, proceed with the build,
    and re-install them all painted and
    pretty at the end.
                       DOOGSMODELS.COM

Replacing the Blast Tubes on a Monogram P-47

  • 1.
    SCRATCHBUILDING | Replacingthe Blast Tubes on a 1/48 Monogram P-47 DOOGSMODELS.COM
  • 2.
    Monogram’s 1/48 P-47kits (and their Revell reissues) are pretty great kits. They don’t come close to the detail and engineering of the Tamiya Jugs, but they build extremely fast and they still look slick after paint and decals. And they’re cheap! The kind of kit where I’m totally willing to overlook a lot of sloppy detail work (like...the entire cockpit). But the stick of plastic that pass for blast tubes must go. DOOGSMODELS.COM
  • 3.
    For this quickfix, you’ll need a few items: • Some kind of micro-drill • 90-degree angle styrene • Styrene solvent glue (Tenax 7R, etc) • Calipers • Replacement blast tubes* *Protip: Have a 1/48 Tamiya P-47? Snag a nice set of Master or Quickboost blast tubes for it, and steal the styrene ones for the Monogram kit DOOGSMODELS.COM
  • 4.
    Step 1: Measureyour Tubes The P-47 had staggered blast tubes, and it’s important to know how far they protrude so you can stagger the replacements effectively. It should be around 9mm, 6mm, 3mm, with the last more or less flush with the wing. DOOGSMODELS.COM
  • 5.
    Step 2: Cut& Drill After taping the wings together, cut off the kit’s sorry excuses for blast tubes. Then drill out the remnants.You may want to use a pin or old airbrush needle to punch a small starter hole. DOOGSMODELS.COM
  • 6.
    Step 3: MountBackstops Take the length of your replacement blast tubes, subtract the distance they’re to protrude from the wing, and mark it. So if your tube is 15mm and protrudes 9mm, you’ll need to mark 6mm in. Next, cut your angle styrene into small lengths and tack it in place with solvent glue. DOOGSMODELS.COM
  • 7.
    Step 4: TestFit Tape the wings back together and test to make sure that: 1 - The blast tubes fit comfortably into the drilled holes 2 - The backstops are spaced at the proper intervals. DOOGSMODELS.COM
  • 8.
    That’s it! Nowyou can build the kit as you would and install the blast tubes toward the end, all painted and pretty. Good hunting! That’s all there is to it! Remove the blast tubes, proceed with the build, and re-install them all painted and pretty at the end. DOOGSMODELS.COM