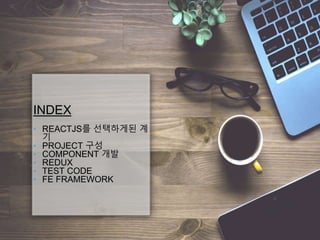
지원군 NODE-WEBKIT 등장
‣web application을 desktop application으로 만들어주는
라이브러리
‣ chromium기반의 패키징 application
‣ .exe, .app 으로 모두 생성 가능
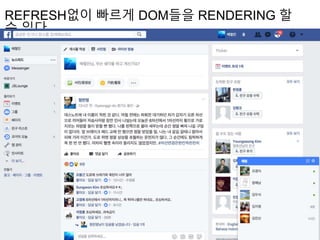
IE10 미만의 브라우저를 사용하는 사용자들에게 window application을 제공
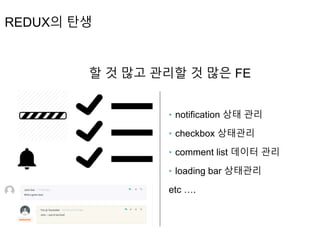
REDUX의 탄생
할 것많고 관리할 것 많은 FE
‣ notification 상태 관리
‣ checkbox 상태관리
‣ comment list 데이터 관리
‣ loading bar 상태관리
etc ….
34.
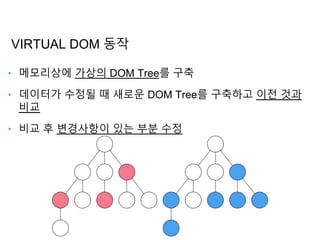
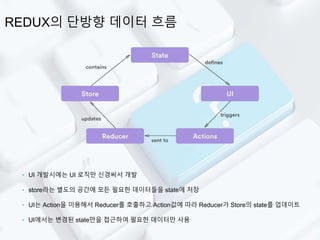
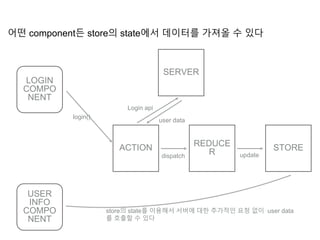
REDUX의 단방향 데이터흐름
‣ UI 개발시에는 UI 로직만 신경써서 개발
‣ store라는 별도의 공간에 모든 필요한 데이터들을 state에 저장
‣ UI는 Action을 이용해서 Reducer를 호출하고 Action값에 따라 Reducer가 Store의 state를 업데이트
‣ UI에서는 변경된 state만을 접근하여 필요한 데이터만 사용
어떤 component든 store의state에서 데이터를 가져올 수 있다
USER
INFO
COMPO
NENT
login()
LOGIN
COMPO
NENT
ACTION REDUCE
R STORE
SERVER
Login api
user data
dispatch update
store의 state를 이용해서 서버에 대한 추가적인 요청 없이 user data
를 호출할 수 있다
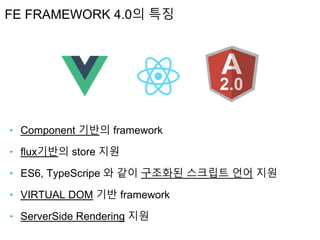
‣ Component 기반의framework
‣ flux기반의 store 지원
‣ ES6, TypeScripe 와 같이 구조화된 스크립트 언어 지원
‣ VIRTUAL DOM 기반 framework
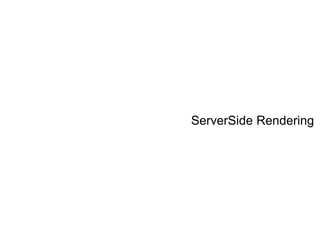
‣ ServerSide Rendering 지원
FE FRAMEWORK 4.0의 특징


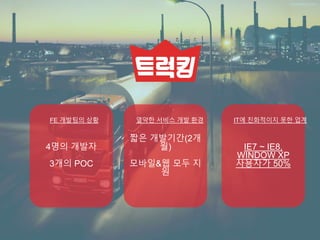


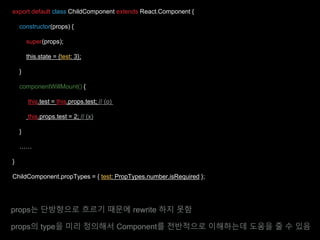
![import {React, PropTypes} from ‘react’;
export default class ListComponent extends React.Component { //React.Component 상속
constructor(props) {
super(props); // [필수] 부모 생성자 호출 시 props를 파라미터로 전달
this.state = {}; //[필수] component 내의 state 값들은 반드시 constructor 내에서 초기화
this.testMethod = this.testMethod.bind(this); //[필수] 사용자가 생성한 method들은 binding처리
}
componentWillMount() {} //component의 lifecycle에 의한 callback method
componentWillReceiveProps(nextProps) {} //component의 lifecycle에 의한 callback method
testMethod() {}
render() {
return (<div class=“wrapper”> </div>); //반드시 하나의 element만 return 가능
return (<div class=“first”> </div><div class=“second”></div>);
}
};](https://image.slidesharecdn.com/react-170616021616/85/React-23-320.jpg)


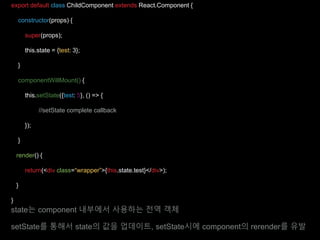


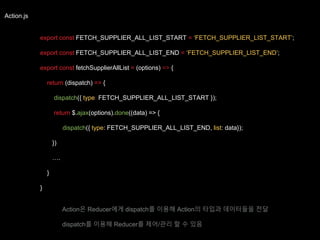
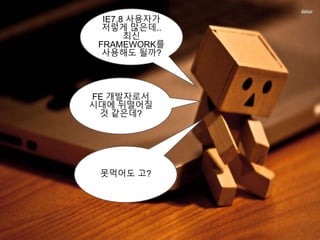
![Reducer.js
import * as SA from ‘./Action’;
export const INITIAL_STATE = {
allList: []
};
export default function supplierReducer (state = INITIAL_STATE, action) {
switch (action.type) {
case SA.FETCH_SUPPLIER_ALL_LIST_END:
return Object.assign({}, state, {
allList: action.list
});
default:
return state;
}
};
reducer는 action으로부터 전달받은 type, data를 이용해서 state를 업데이트 시켜줌
이 때, 초기값을 변경시키지 않기위해 Object.assign 등을 활용해주면 좋음](https://image.slidesharecdn.com/react-170616021616/85/React-37-320.jpg)
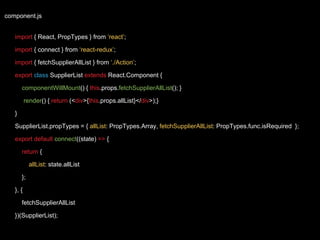

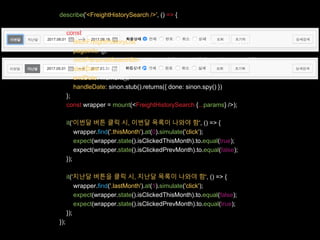
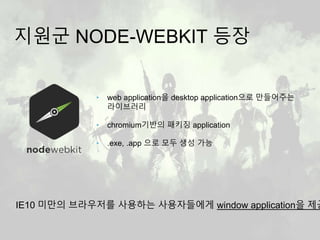
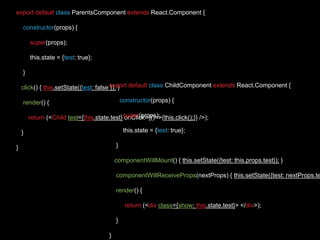
![export const FETCH_SUPPLIER_ALL_LIST_START = ‘FETCH_SUPPLIER_LIST_START’;
export const FETCH_SUPPLIER_ALL_LIST_END = ‘FETCH_SUPPLIER_LIST_END’;
export const fetchSupplierAllList = (options) => {
return (dispatch) => {
dispatch({ type: FETCH_SUPPLIER_ALL_LIST_START });
return $.ajax(options).done((data) => {
dispatch({ type: FETCH_SUPPLIER_ALL_LIST_END, list: data});
})
….
}
}
import * as SA from 'js/domain/supplier/supplierAction';
const middlewares = [thunk];
const mockStore = configureMockStore(middlewares);
describe('Supplier thunks', () => {
it('fetchSupplierAllList()이 정상적으로 끝나면 FETCH_SUPPLIER_ALL_LIST_END 액션이 호출되어야 함', (done
const expectedActions = [
{
type: SA.FETCH_SUPPLIER_ALL_LIST_START
}, {
type: SA.FETCH_SUPPLIER_ALL_LIST_END,
list: []
}
];
const server = sinon.fakeServer.create();
server.respondWith("GET", "/ext/agency/freight/shippers", [200, {"Content-Type": "application/json"}, '[]']);
const store = mockStore({});
store.dispatch(SA.fetchSupplierAllList())
.then(() => {
expect(store.getActions()).to.eql(expectedActions);
done();
});
server.respond();
server.restore();
});
});](https://image.slidesharecdn.com/react-170616021616/85/React-43-320.jpg)


![[국비지원교육/재직자/실업자환급교육/IT실무학원추천/스프링교육추천]#5.스프링프레임워크 & 마이바티스 (Spring Framework, M...](https://cdn.slidesharecdn.com/ss_thumbnails/5-170105091249-thumbnail.jpg?width=640&height=640&fit=bounds)


![[자바학원/스프링교육학원/마이바티스학원추천/구로IT학원_탑크리에듀]#7.스프링프레임워크 & 마이바티스 (Spring Framework, M...](https://cdn.slidesharecdn.com/ss_thumbnails/7-170105093131-thumbnail.jpg?width=640&height=640&fit=bounds)


![[#9.스프링프레임워크 & 마이바티스 (Spring Framework, MyBatis)]_재직자환급교육/실업자환급교육/구로IT학원/스프링교...](https://cdn.slidesharecdn.com/ss_thumbnails/9-170105095409-thumbnail.jpg?width=640&height=640&fit=bounds)
![[TECHCON 2019: MOBILE - Android]2.예제에서는 알려주지 않는 Model 이야기](https://cdn.slidesharecdn.com/ss_thumbnails/navertechconcertkimbeomjunpdf-190711081557-thumbnail.jpg?width=640&height=640&fit=bounds)


![[Codelab 2017] ReactJS 기초](https://cdn.slidesharecdn.com/ss_thumbnails/es6-171227074533-thumbnail.jpg?width=640&height=640&fit=bounds)


![XECon2015 :: [2-2] 박상현 - React로 개발하는 SPA 실무 이야기](https://cdn.slidesharecdn.com/ss_thumbnails/react1-160404022032-thumbnail.jpg?width=640&height=640&fit=bounds)


