BASICS OF PROJECTION OF PLANE 
WHAT IS USUALLY ASKED IN THE PROBLEM ? 
TO DRAW THEIR PROJECTIONS MEANS F.V, T.V. & S.V. 
WHAT WILL BE GIVEN IN THE PROBLEM ? 
 DESCRIPTION OF THE PLANE FIGURE. 
 IT’S POSITION WITH HP AND VP. 
 IN WHICH MANNER IT’S POSITION WITH HP & VP WILL BE DESCRIBED ? 
INCLINATION OF IT’S SURFACE WITH ONE OF THE REFERENCE PLANES WILL BE GIVEN. 
INCLINATION OF ONE OF IT’S EDGES WITH OTHER REFERENCE PLANE WILL BE GIVEN 
(HENCE THIS WILL BE A CASE OF AN OBJECT INCLINED TO BOTH REFERENCE PLANES.)
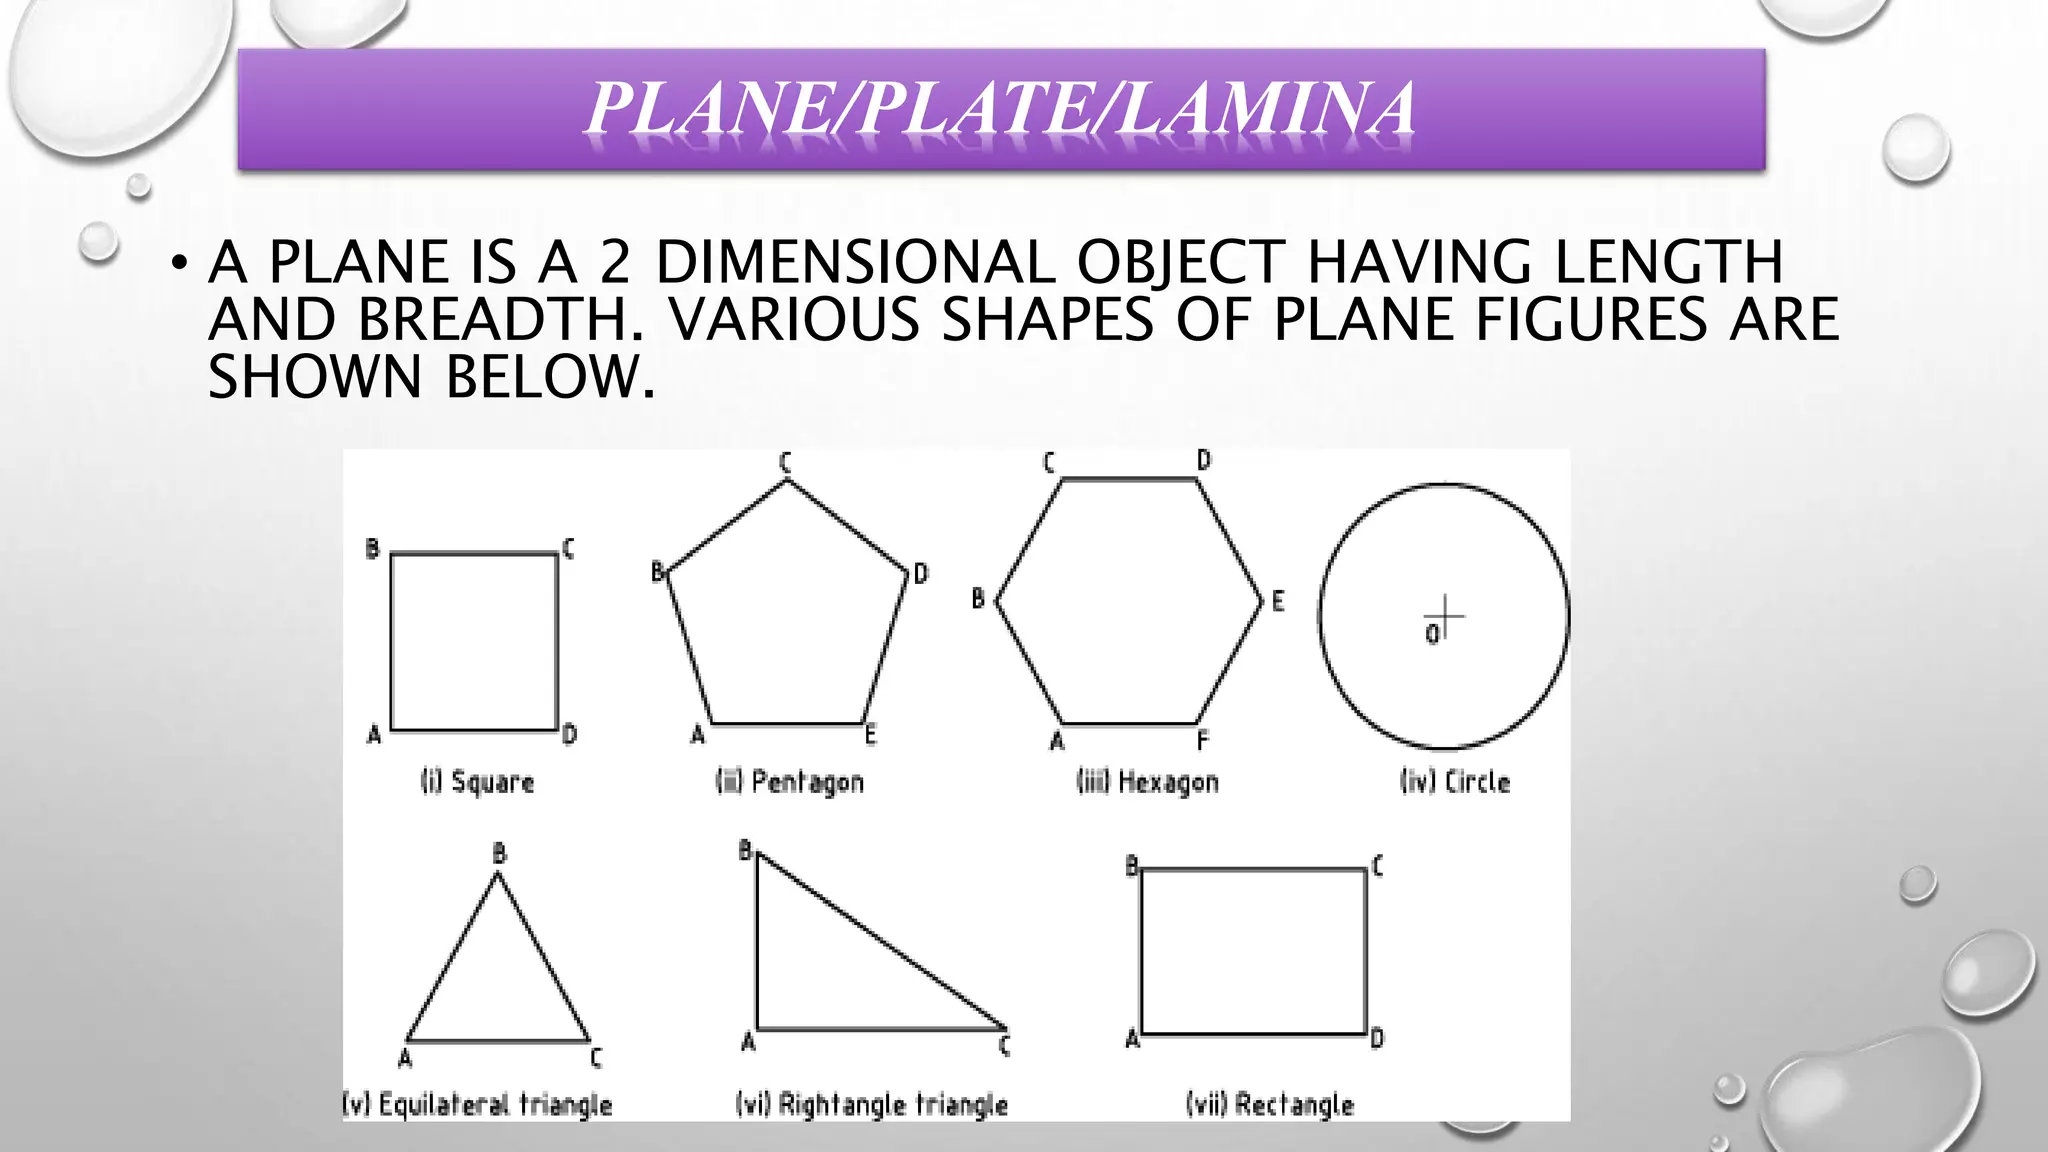
PLANE/PLATE/LAMINA 
• A PLANE IS A 2 DIMENSIONAL OBJECT HAVING LENGTH 
AND BREADTH. VARIOUS SHAPES OF PLANE FIGURES ARE 
SHOWN BELOW.
UNDERSTADING PROJECTION OF A PLANE 
AND ITS TRACES 
1) Any one of the planes given above is kept in first quadrant 
with reference to VP and HP. 
2) Trace of a plane is a line of intersection or meeting of the 
plane surface with the reference plane. 
3) There are six different positions in which a plane can be 
placed with reference to its surface and reference planes (VP 
& HP) and are discussed below.
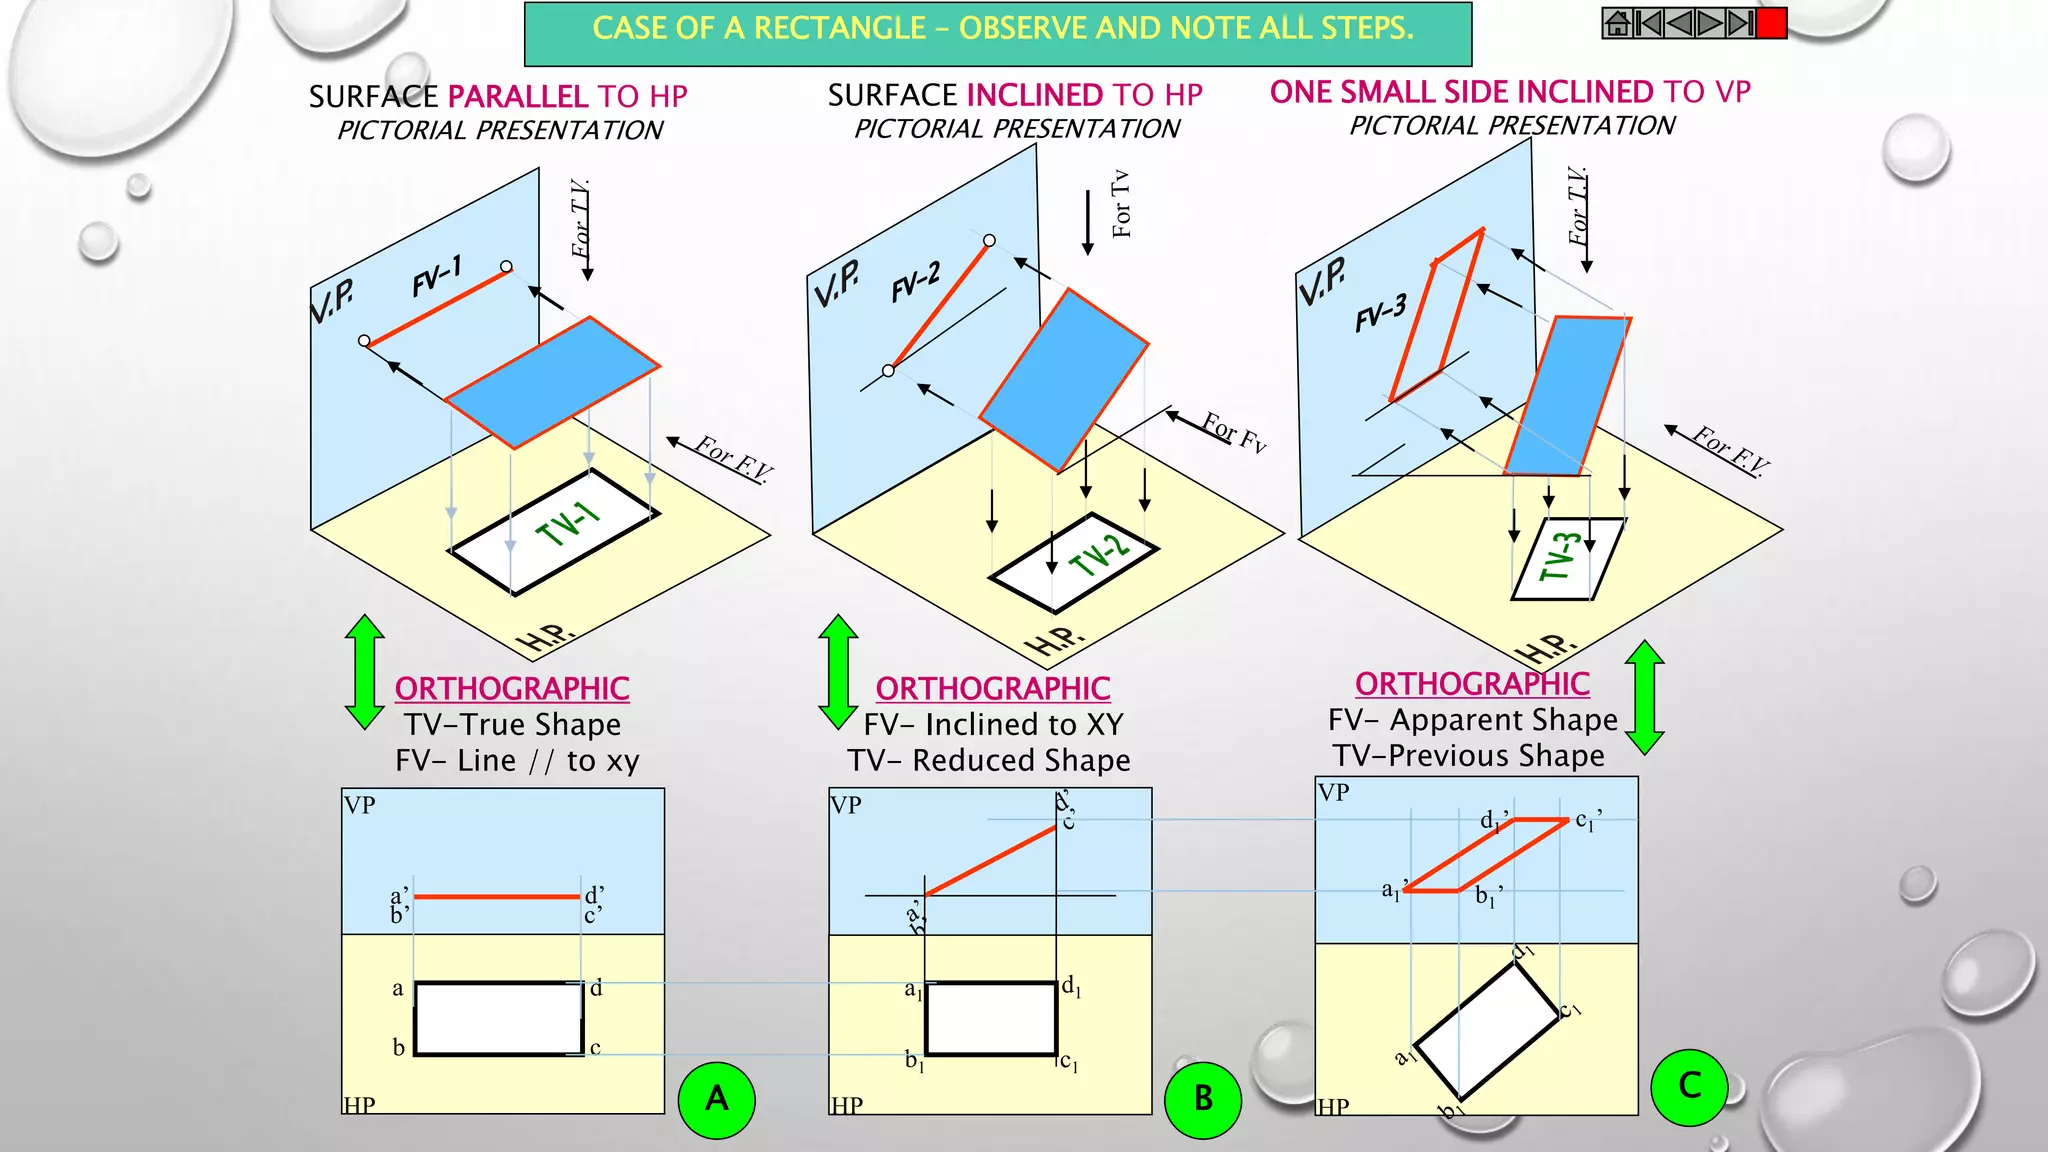
CASE OF A RECTANGLE – OBSERVE AND NOTE ALL STEPS. 
VP 
HP 
VP VP 
a’ d’ 
b’ c’ 
HP 
a 
d 
b c 
a1’ 
d1’ c1’ 
b1’ 
HP 
a1 
d1 
b1 c1 
SURFACE PARALLEL TO HP 
PICTORIAL PRESENTATION 
SURFACE INCLINED TO HP 
PICTORIAL PRESENTATION 
ONE SMALL SIDE INCLINED TO VP 
PICTORIAL PRESENTATION 
ORTHOGRAPHIC 
TV-True Shape 
FV- Line // to xy 
ORTHOGRAPHIC 
FV- Inclined to XY 
TV- Reduced Shape 
ORTHOGRAPHIC 
FV- Apparent Shape 
TV-Previous Shape 
A B C
PROCEDURE OF SOLVING THE 
PROBLEM 
 IN THREE STEPS EACH PROBLEM CAN BE SOLVED:( AS SHOWN IN 
PREVIOUS ILLUSTRATION ) 
• STEP 1. ASSUME SUITABLE CONDITIONS & DRAW FV & TV OF 
INITIAL POSITION. 
• STEP 2. NOW CONSIDER SURFACE INCLINATION & DRAW 2ND FV & 
TV. 
• STEP 3. AFTER THIS , CONSIDER SIDE/EDGE INCLINATION AND 
DRAW 3RD ( FINAL) FV & TV.
ASSUMPTIONS FOR INITIAL POSITION 
(INITIAL POSITION MEANS ASSUMING SURFACE // TO HP OR VP) 
• 1.IF IN PROBLEM SURFACE IS INCLINED TO HP – ASSUME IT // HP 
• OR IF SURFACE IS INCLINED TO VP – ASSUME IT // TO VP 
• 2. NOW IF SURFACE IS ASSUMED // TO HP- IT’S TV WILL SHOW TRUE SHAPE. 
• AND IF SURFACE IS ASSUMED // TO VP – IT’S FV WILL SHOW TRUE SHAPE. 
• 3. HENCE BEGIN WITH DRAWING TV OR FV AS TRUE SHAPE. 
• 4. WHILE DRAWING THIS TRUE SHAPE – 
• KEEP ONE SIDE/EDGE ( WHICH IS MAKING INCLINATION) PERPENDICULAR 
TO XY LINE 
• ( SIMILAR TO PAIR NO. A ON PREVIOUS PAGE ILLUSTRATION ).
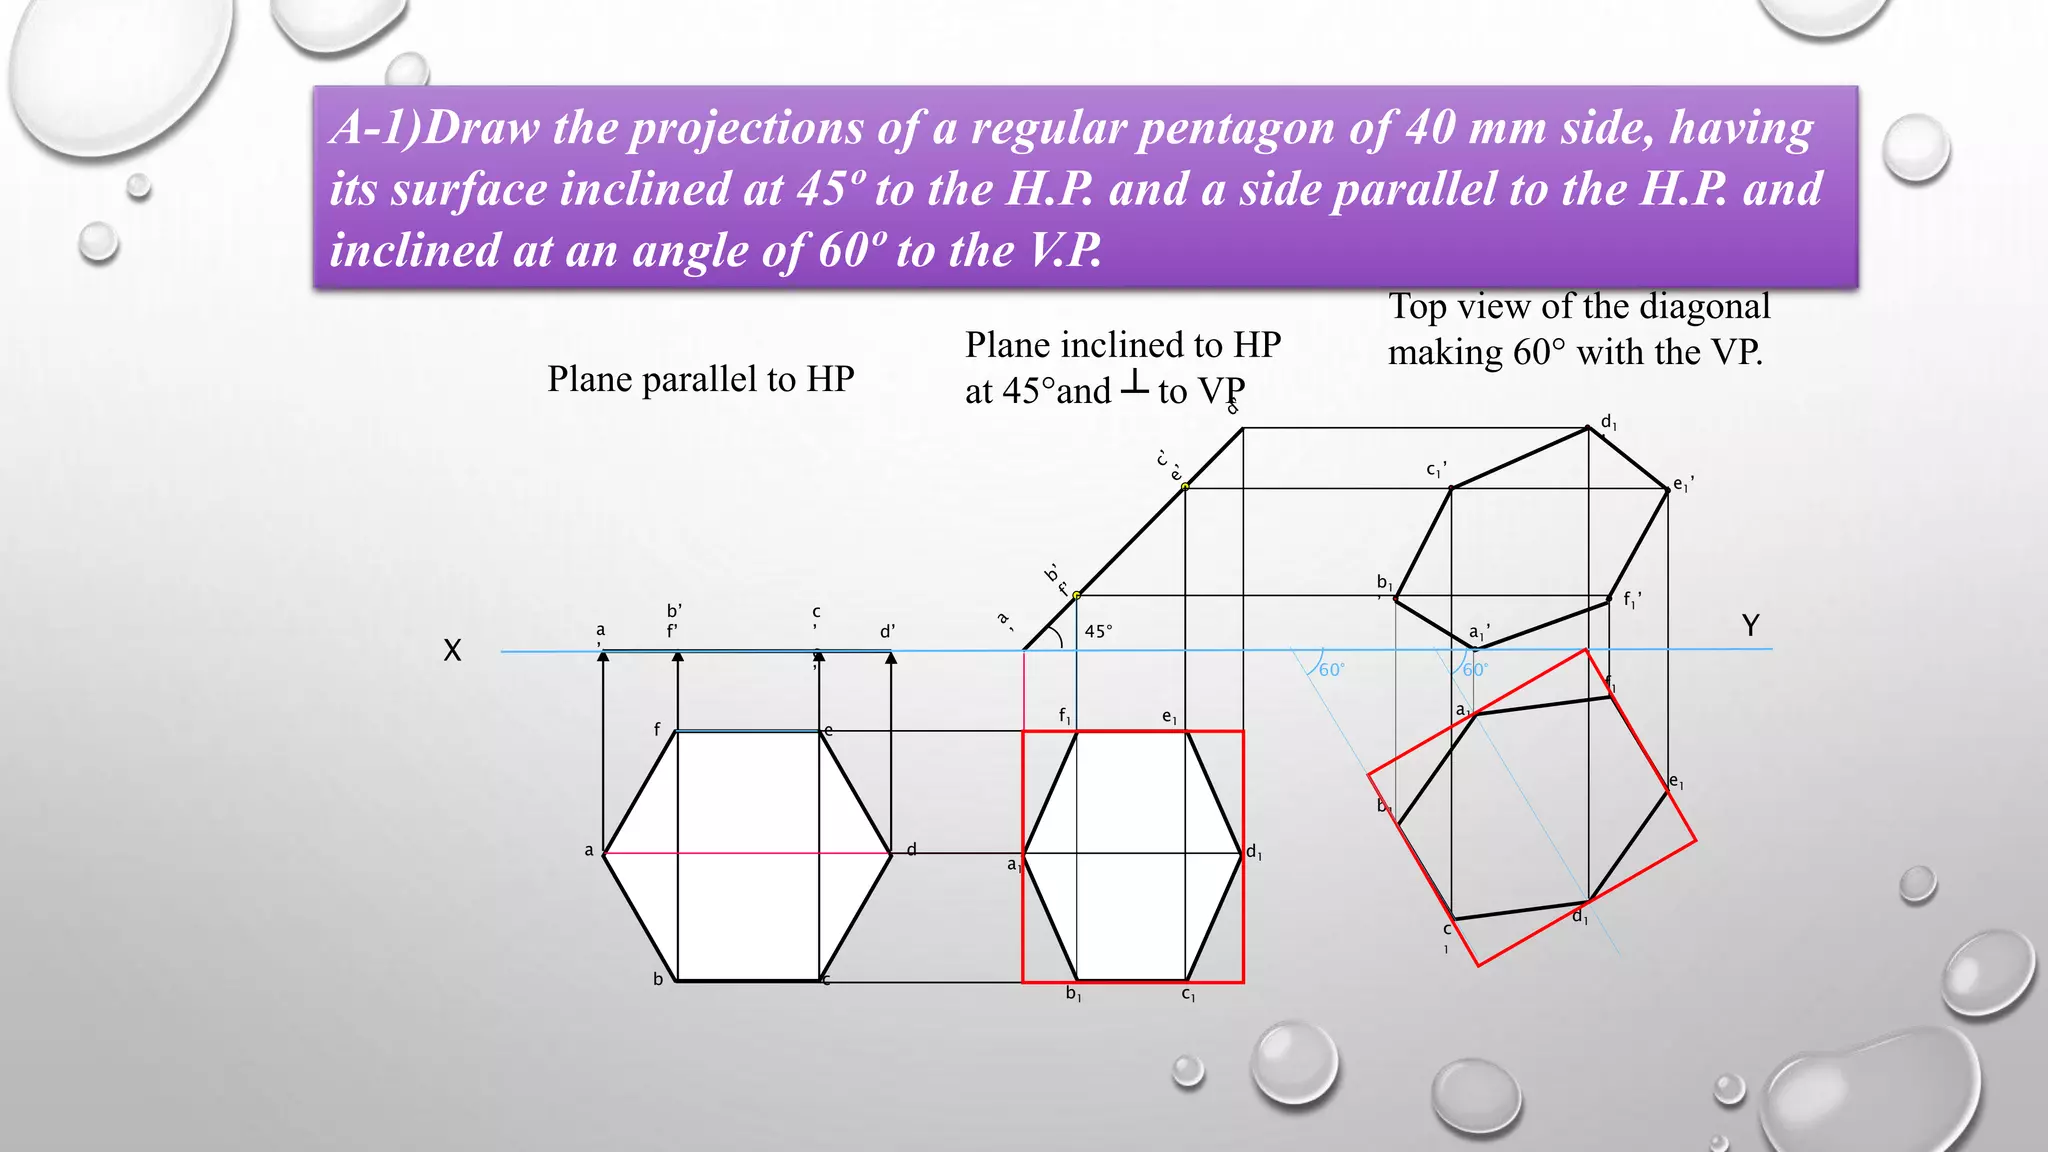
A-1)Draw the projections of a regular pentagon of 40 mm side, having 
its surface inclined at 45º to the H.P. and a side parallel to the H.P. and 
inclined at an angle of 60º to the V.P. 
a 
b c 
d 
f e 
a 
’ 
b’ 
f’ 
c 
’ 
e 
’ 
d’ 45° 
a1 
f1 e1 
d1 
b1 c1 
60° 
a1 
b1 
c 
1 
d1 
e1 
f1 
a1’ 
b1 
’ 
c1’ 
d1 
’ 
e1’ 
f1’ 
Plane parallel to HP 
Plane inclined to HP 
at 45°and ┴ to VP 
Top view of the diagonal 
making 60° with the VP. 
Y 
X 
60°
STEPS 
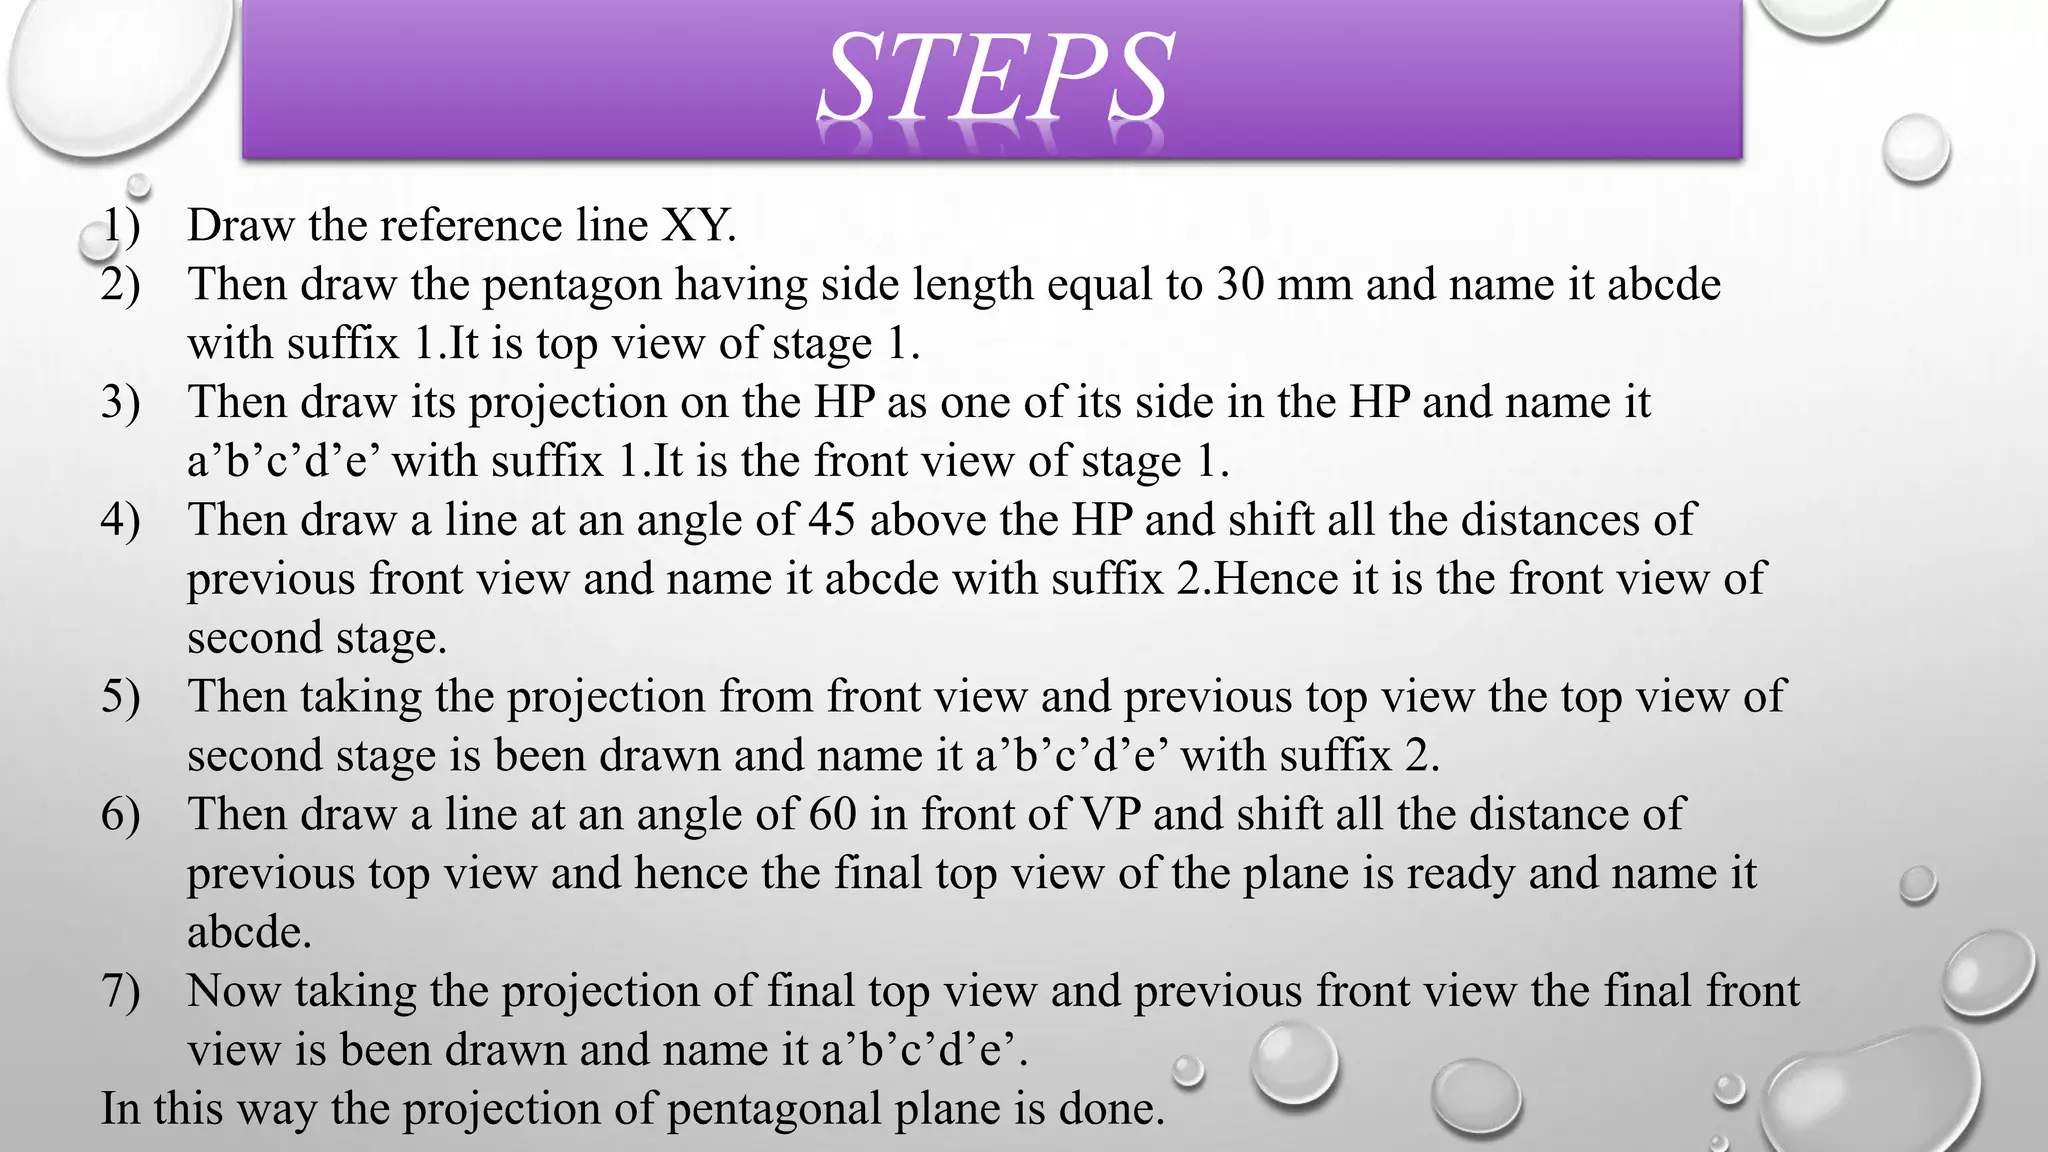
1) Draw the reference line XY. 
2) Then draw the pentagon having side length equal to 30 mm and name it abcde 
with suffix 1.It is top view of stage 1. 
3) Then draw its projection on the HP as one of its side in the HP and name it 
a’b’c’d’e’ with suffix 1.It is the front view of stage 1. 
4) Then draw a line at an angle of 45 above the HP and shift all the distances of 
previous front view and name it abcde with suffix 2.Hence it is the front view of 
second stage. 
5) Then taking the projection from front view and previous top view the top view of 
second stage is been drawn and name it a’b’c’d’e’ with suffix 2. 
6) Then draw a line at an angle of 60 in front of VP and shift all the distance of 
previous top view and hence the final top view of the plane is ready and name it 
abcde. 
7) Now taking the projection of final top view and previous front view the final front 
view is been drawn and name it a’b’c’d’e’. 
In this way the projection of pentagonal plane is done.
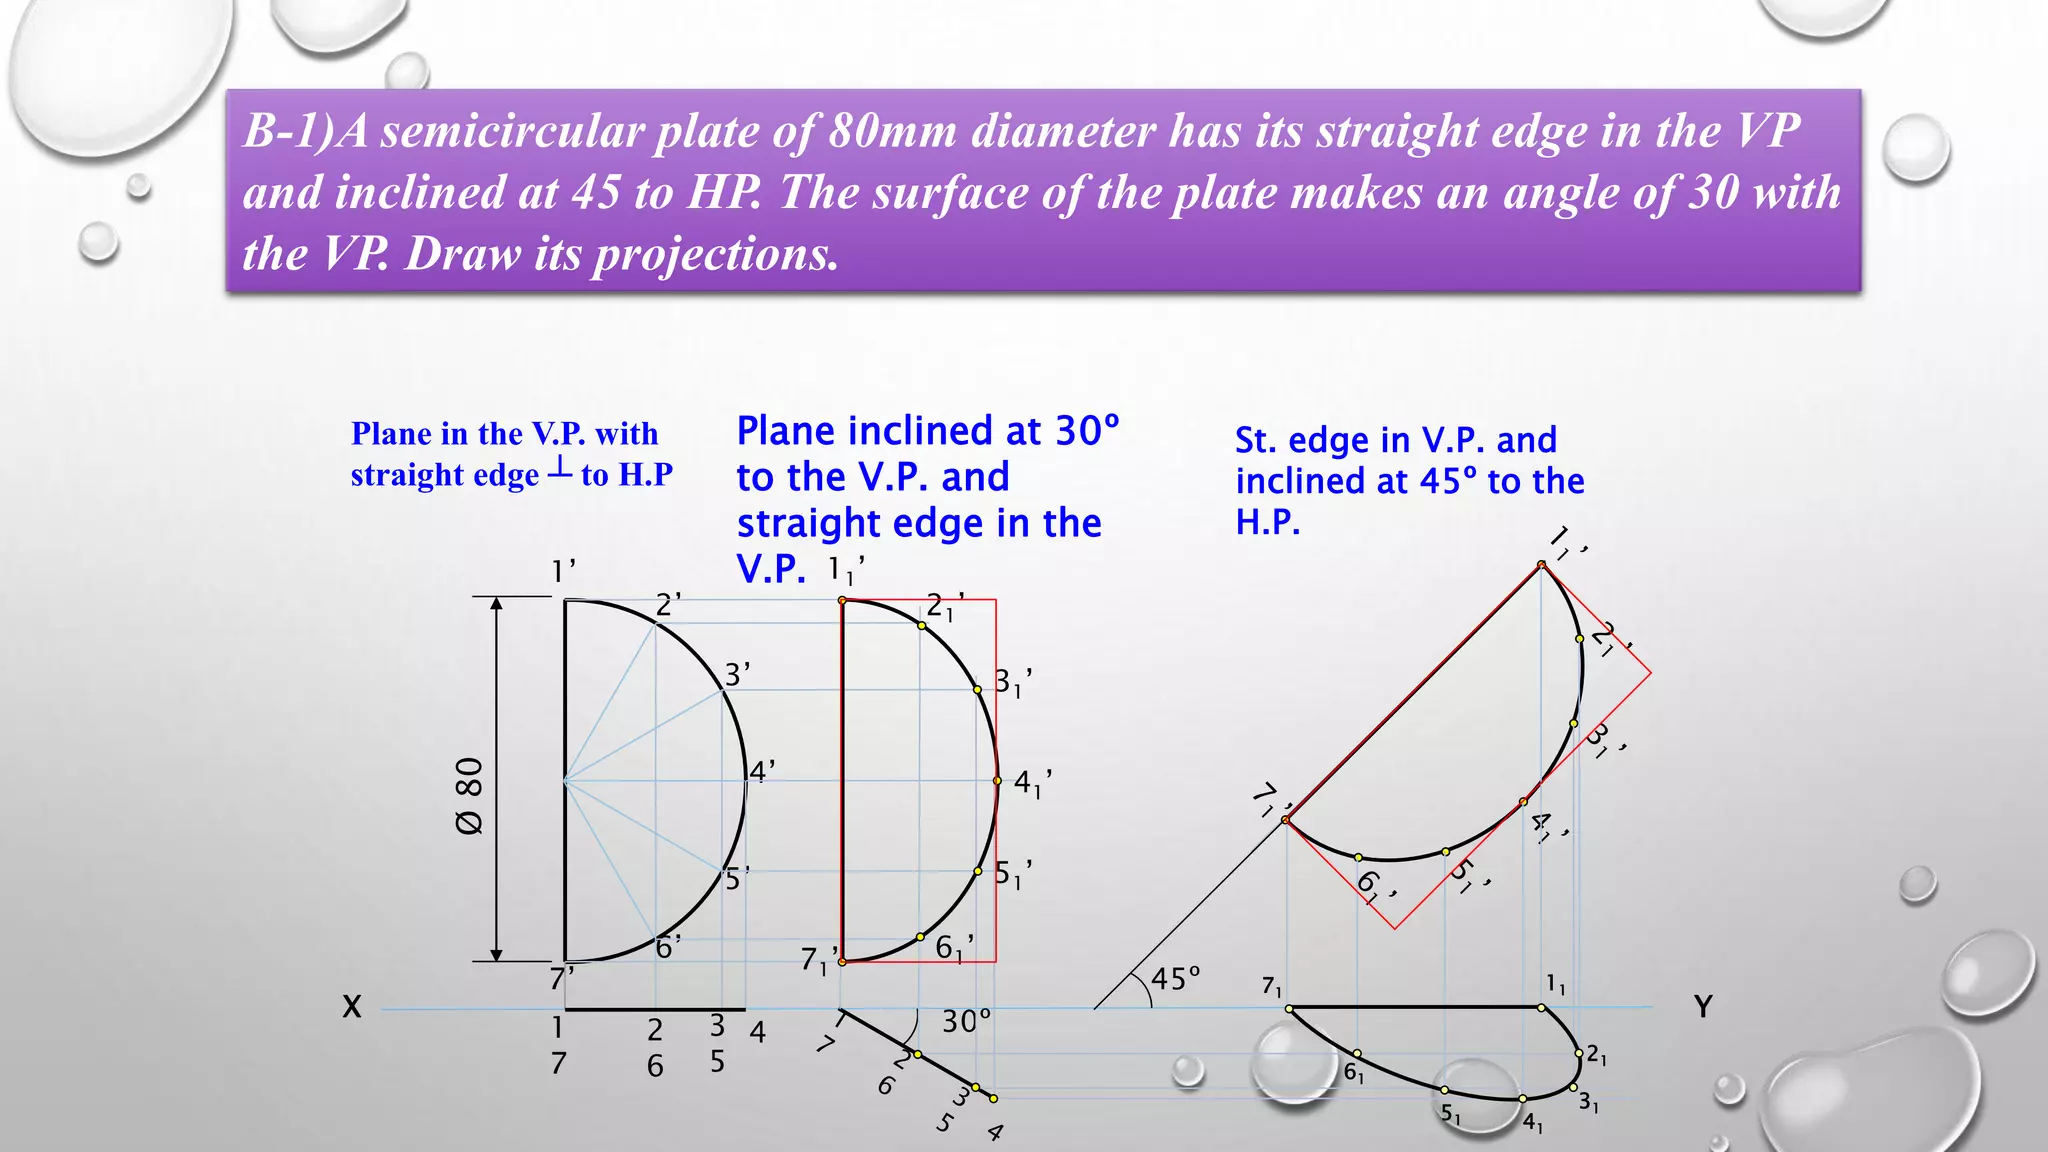
B-1)A semicircular plate of 80mm diameter has its straight edge in the VP 
and inclined at 45 to HP. The surface of the plate makes an angle of 30 with 
the VP. Draw its projections. 
Plane in the V.P. with 
straight edge ┴ to H.P 
1’ 
2’ 
3’ 
4’ 
5’ 
6’ 
7’ 
1 
7 
11’ 
21’ 
X Y 
2 
6 
3 
5 
4 30º 
31’ 
41’ 
51’ 
7 61’ 1’ 
45º 11 
21 
31 
41 
51 
61 
71 
Ø 80 
Plane inclined at 30º 
to the V.P. and 
straight edge in the 
V.P. 
St. edge in V.P. and 
inclined at 45º to the 
H.P.
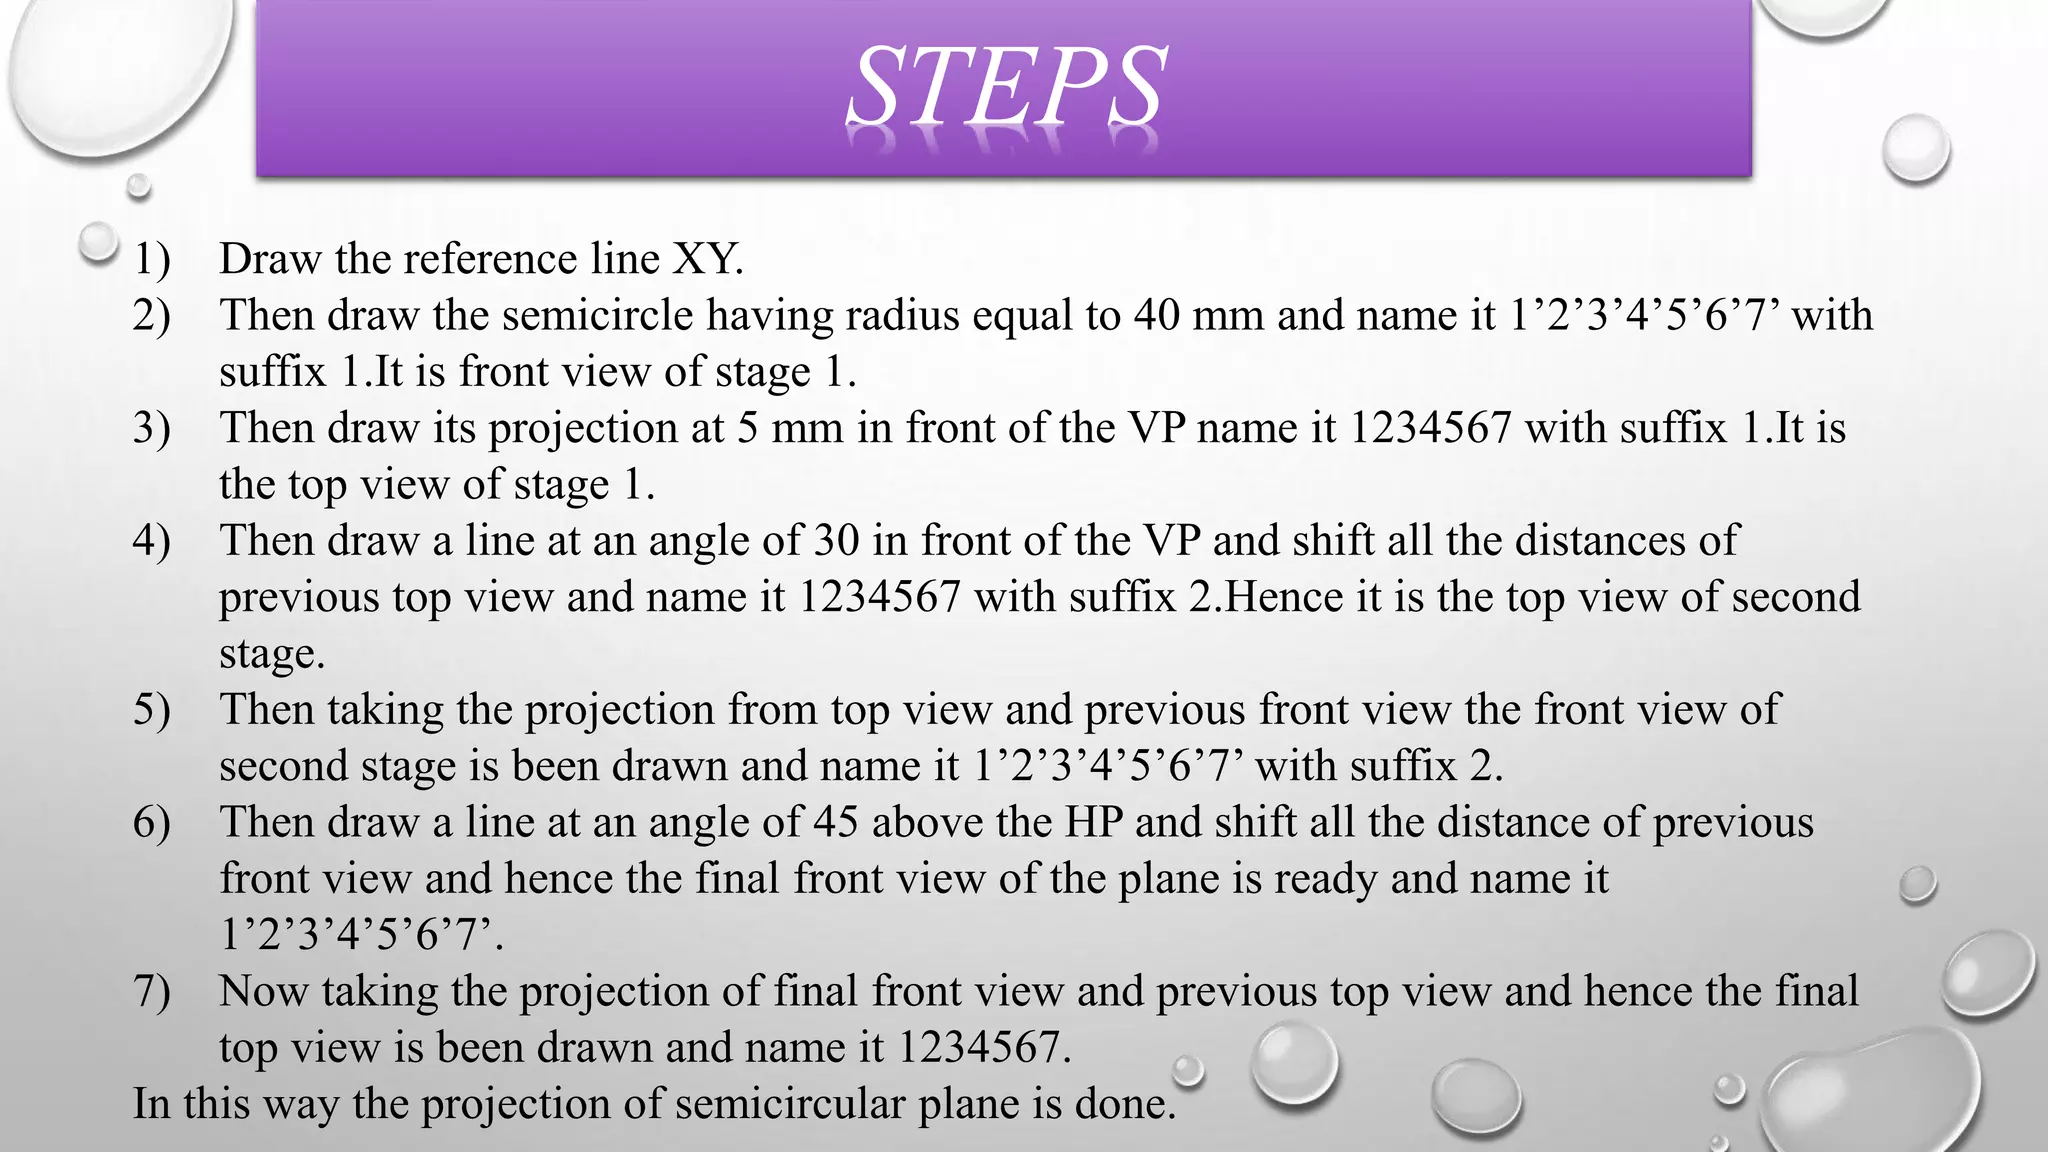
STEPS 
1) Draw the reference line XY. 
2) Then draw the semicircle having radius equal to 40 mm and name it 1’2’3’4’5’6’7’ with 
suffix 1.It is front view of stage 1. 
3) Then draw its projection at 5 mm in front of the VP name it 1234567 with suffix 1.It is 
the top view of stage 1. 
4) Then draw a line at an angle of 30 in front of the VP and shift all the distances of 
previous top view and name it 1234567 with suffix 2.Hence it is the top view of second 
stage. 
5) Then taking the projection from top view and previous front view the front view of 
second stage is been drawn and name it 1’2’3’4’5’6’7’ with suffix 2. 
6) Then draw a line at an angle of 45 above the HP and shift all the distance of previous 
front view and hence the final front view of the plane is ready and name it 
1’2’3’4’5’6’7’. 
7) Now taking the projection of final front view and previous top view and hence the final 
top view is been drawn and name it 1234567. 
In this way the projection of semicircular plane is done.
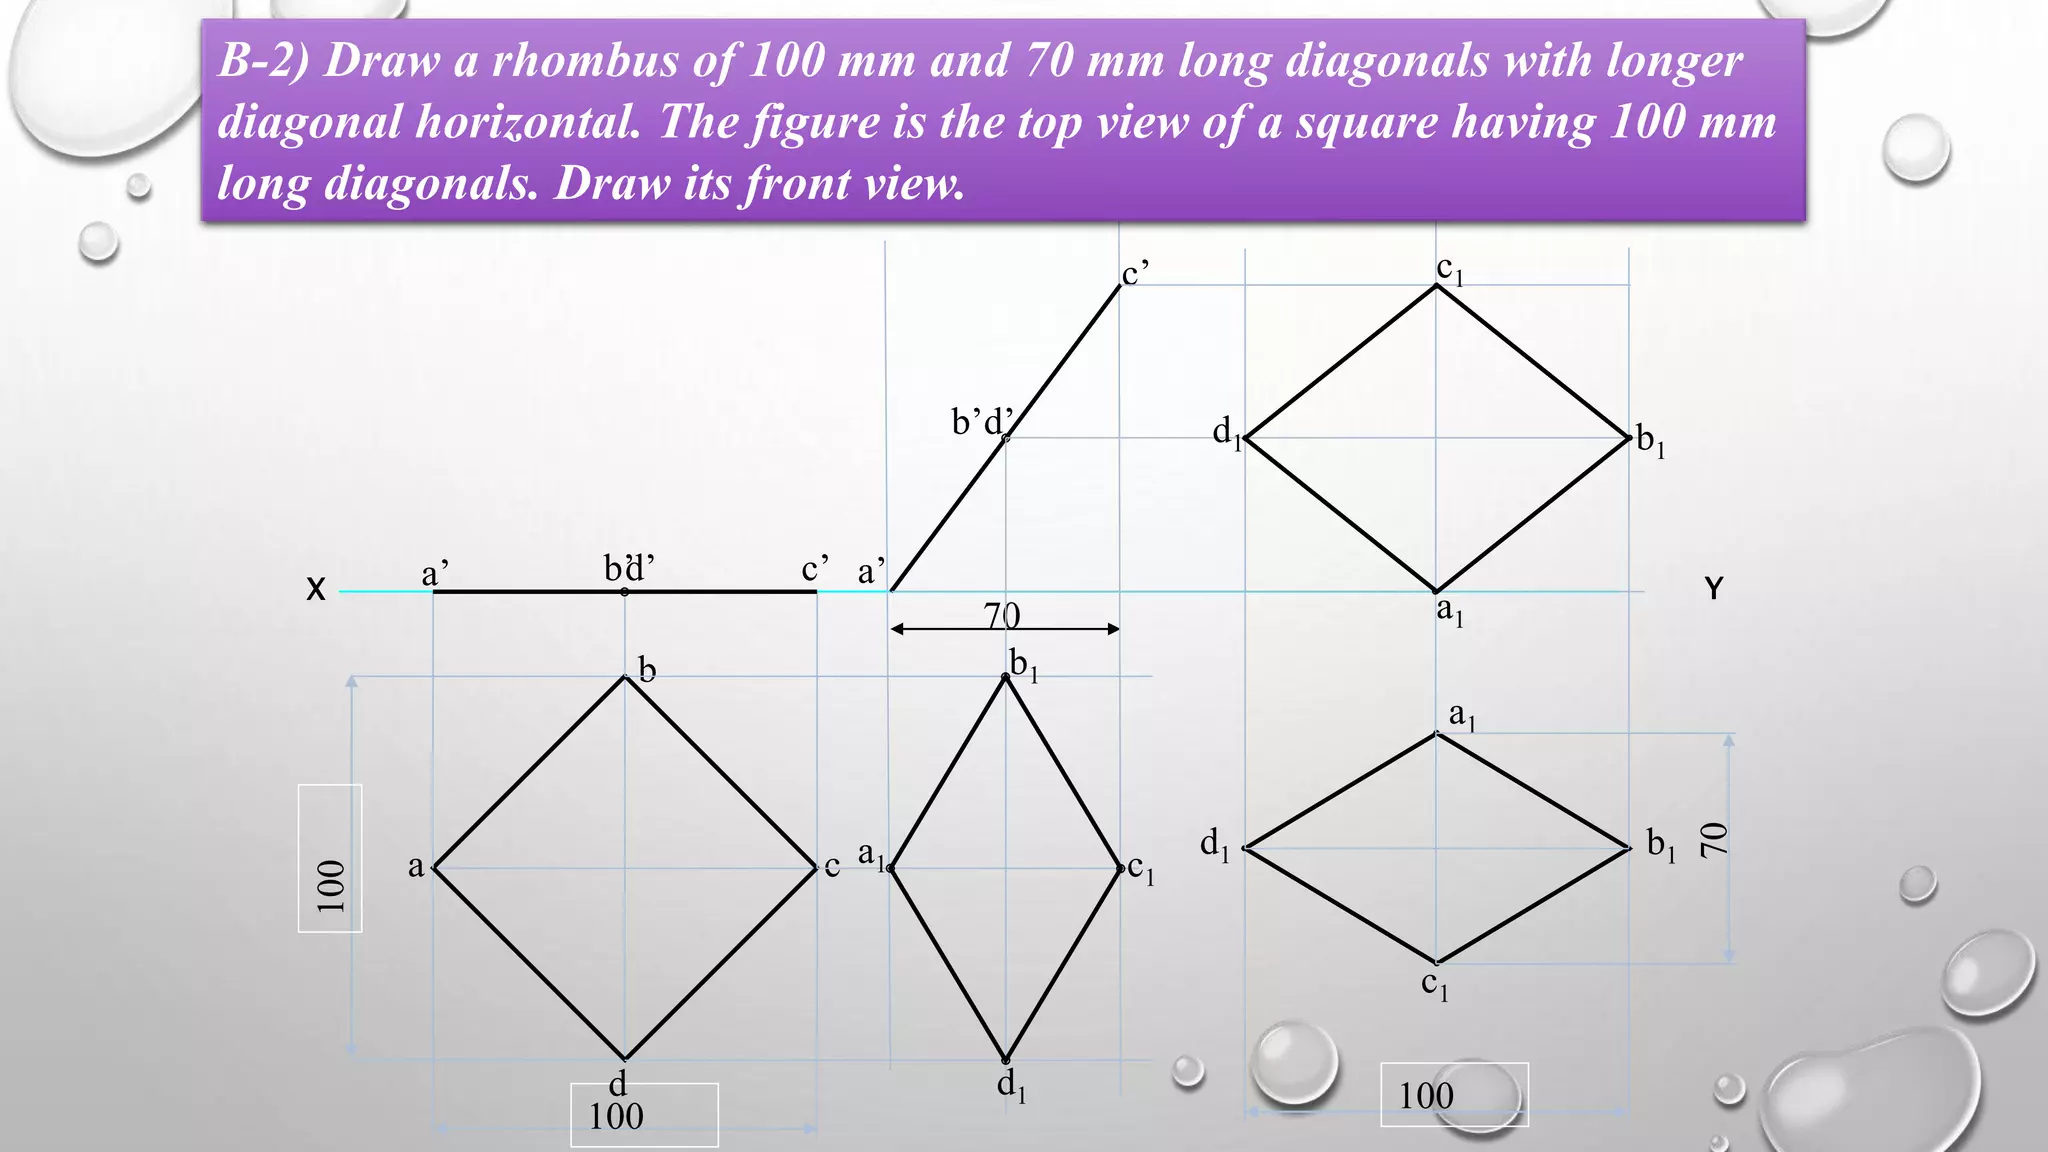
B-2) Draw a rhombus of 100 mm and 70 mm long diagonals with longer 
diagonal horizontal. The figure is the top view of a square having 100 mm 
long diagonals. Draw its front view. 
a’ b’d’ c’ 
c1 
d1 b1 
X Y 
100 
100 
a 
b 
c 
d 
70 
a’ 
b’ 
c’ 
d’ 
a1 
b1 
c1 
d1 
a1 
d1 b1 
c1 
100 
70 
a1
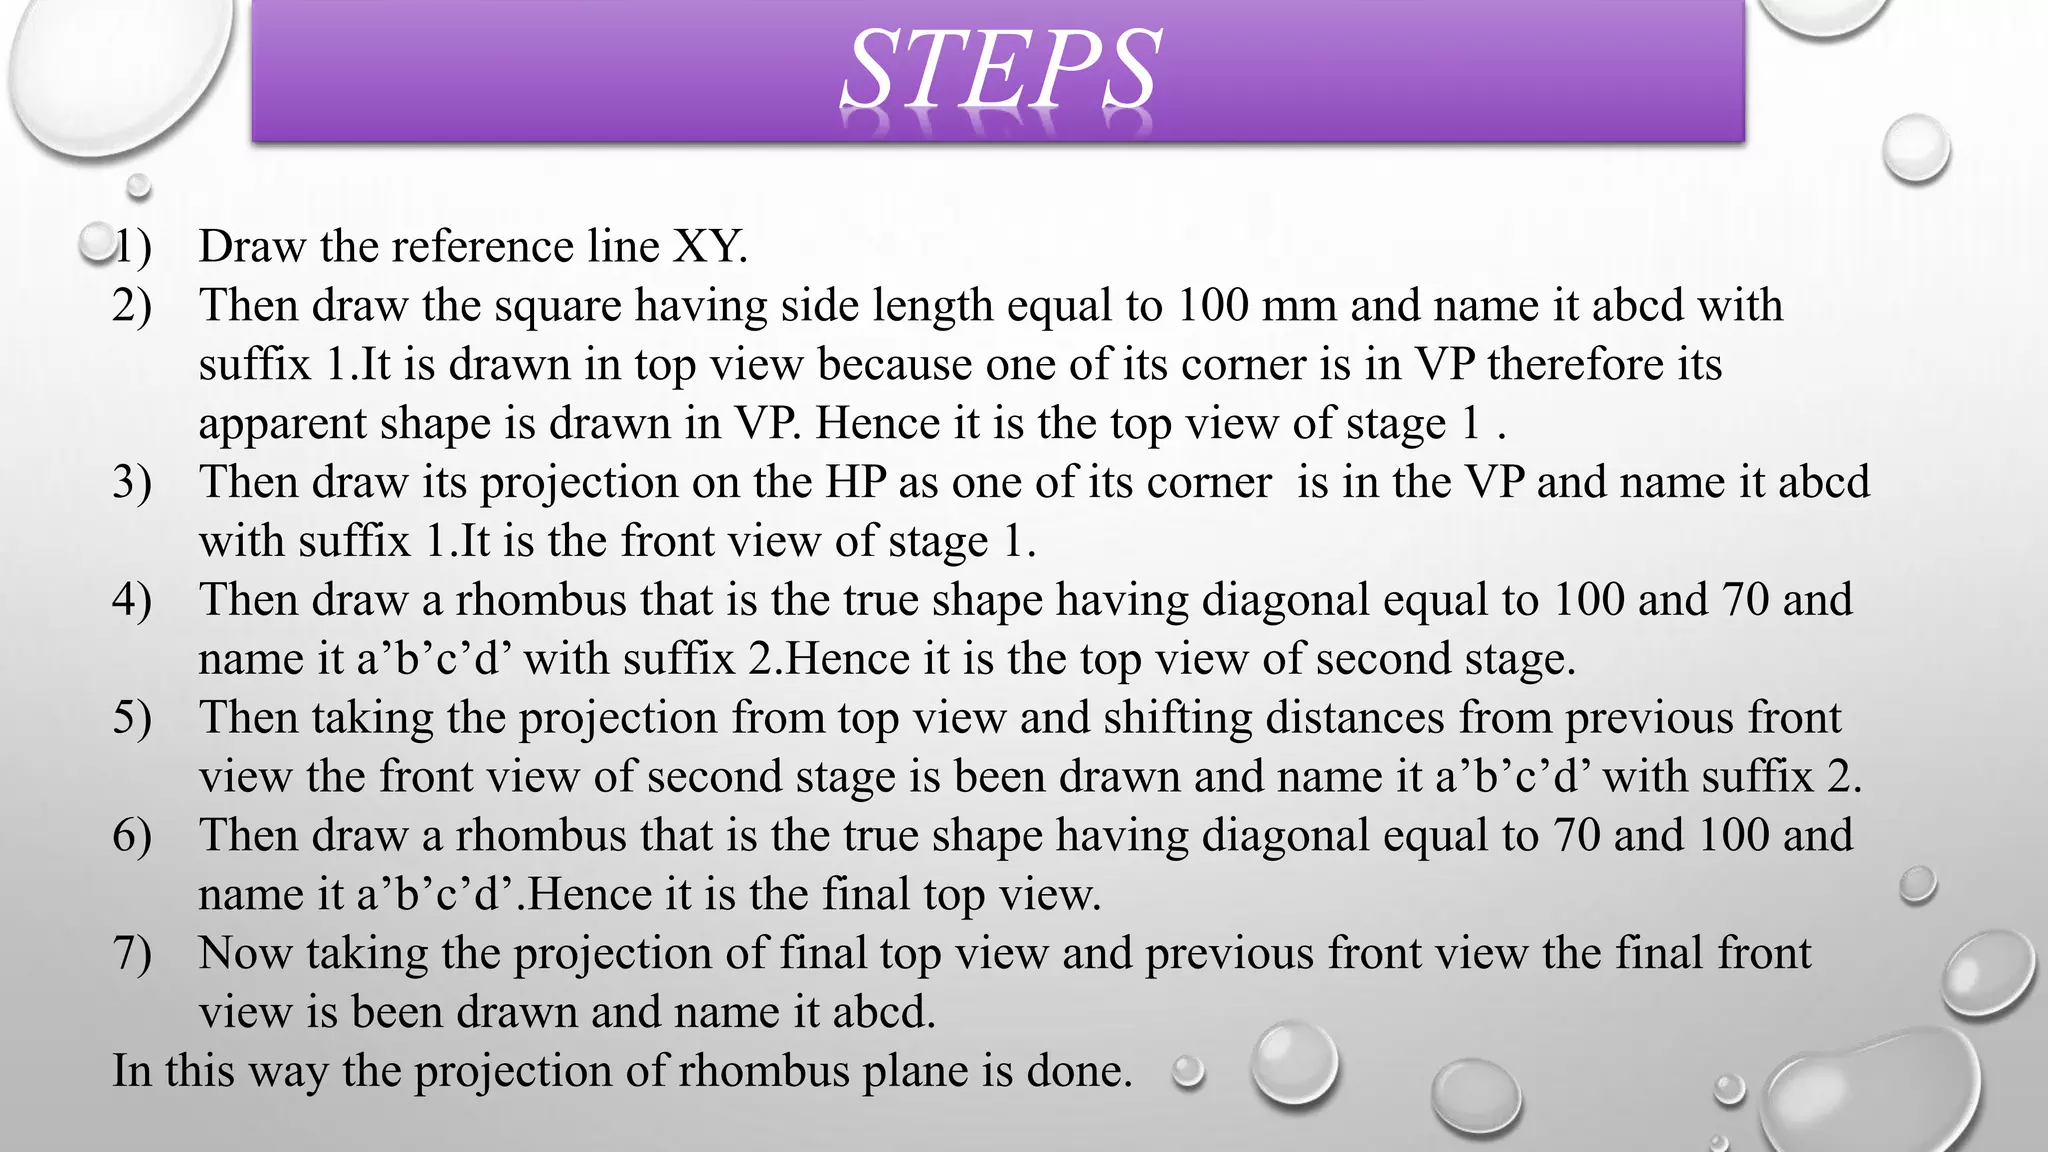
STEPS 
1) Draw the reference line XY. 
2) Then draw the square having side length equal to 100 mm and name it abcd with 
suffix 1.It is drawn in top view because one of its corner is in VP therefore its 
apparent shape is drawn in VP. Hence it is the top view of stage 1 . 
3) Then draw its projection on the HP as one of its corner is in the VP and name it abcd 
with suffix 1.It is the front view of stage 1. 
4) Then draw a rhombus that is the true shape having diagonal equal to 100 and 70 and 
name it a’b’c’d’ with suffix 2.Hence it is the top view of second stage. 
5) Then taking the projection from top view and shifting distances from previous front 
view the front view of second stage is been drawn and name it a’b’c’d’ with suffix 2. 
6) Then draw a rhombus that is the true shape having diagonal equal to 70 and 100 and 
name it a’b’c’d’.Hence it is the final top view. 
7) Now taking the projection of final top view and previous front view the final front 
view is been drawn and name it abcd. 
In this way the projection of rhombus plane is done.
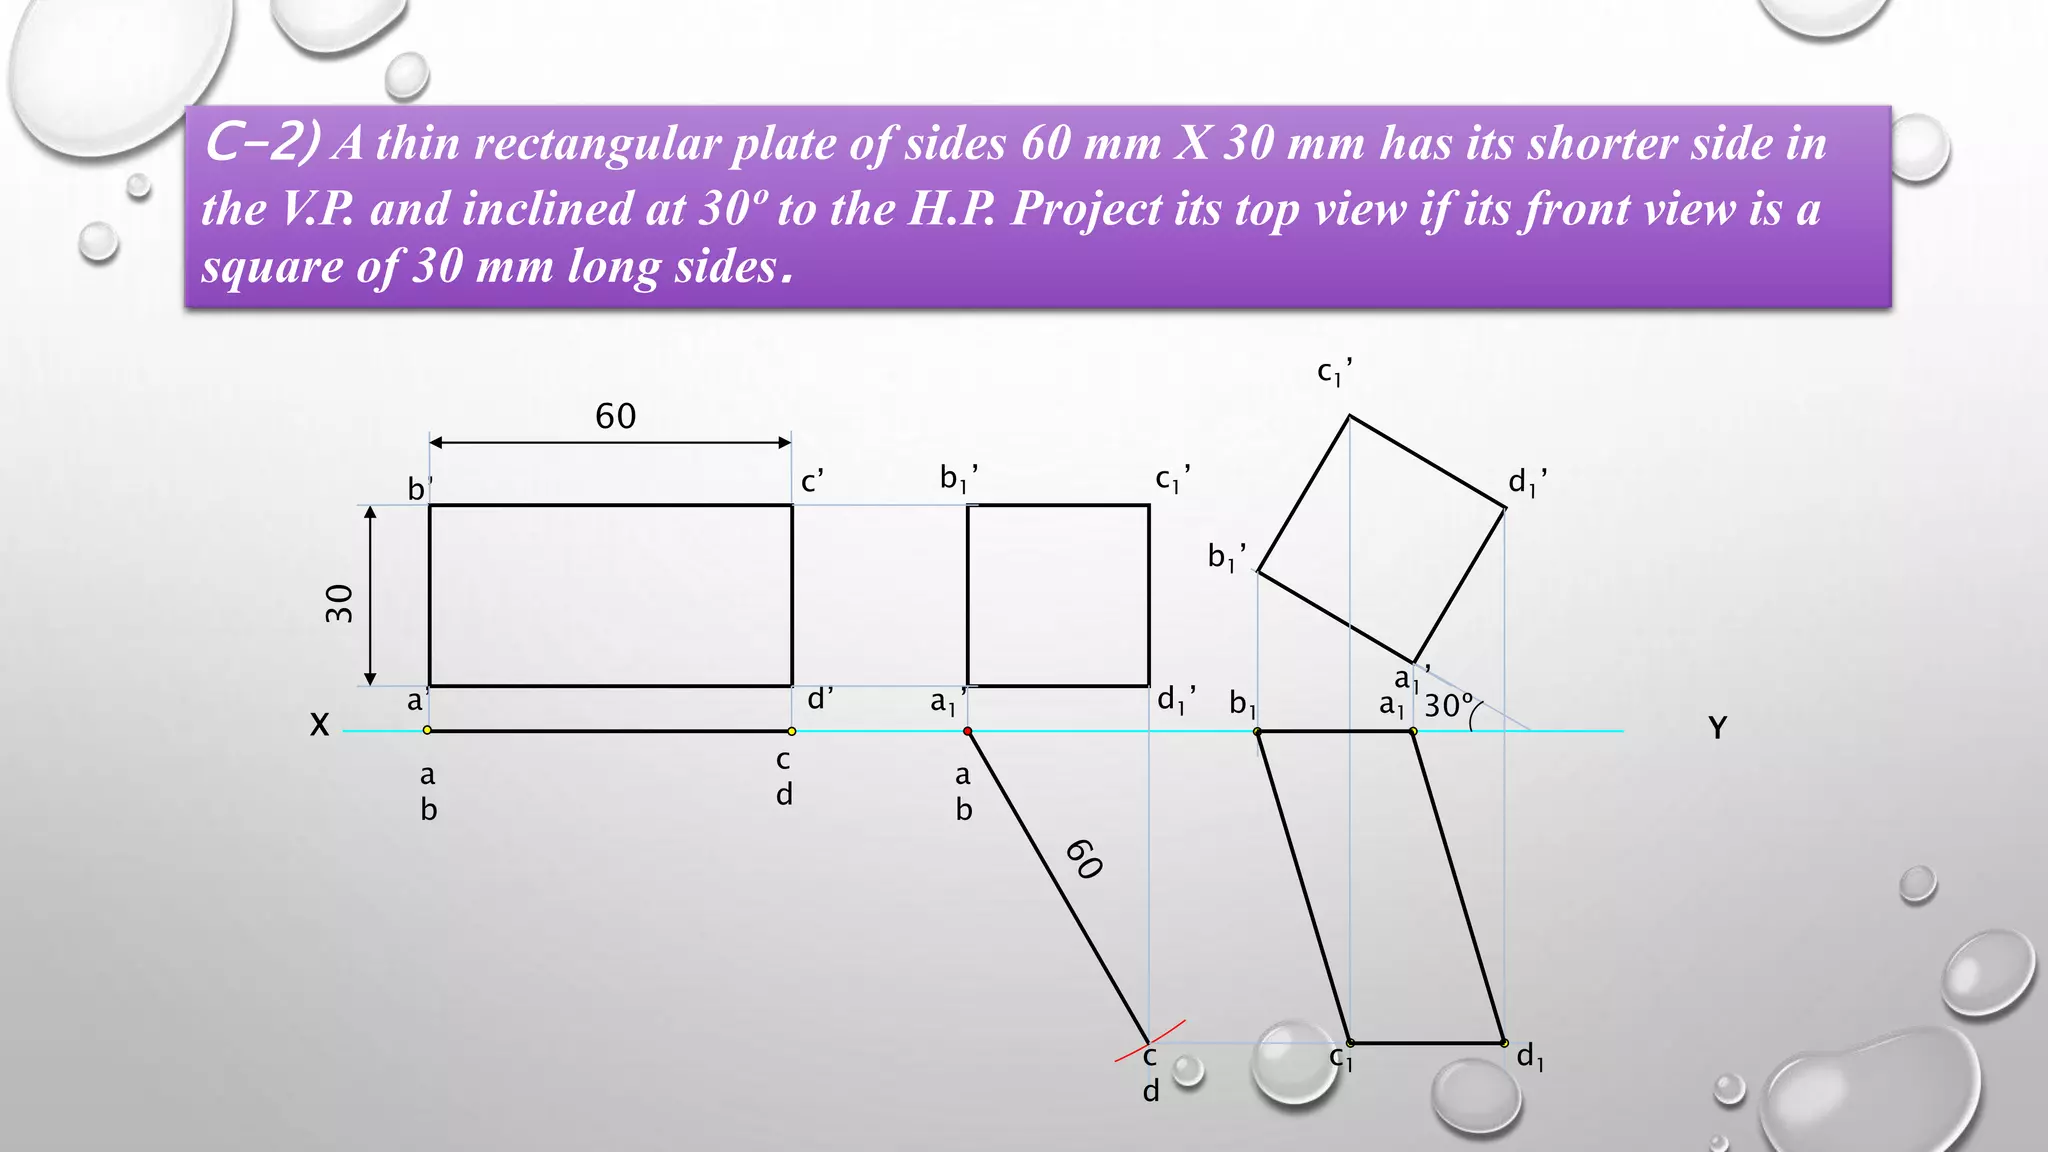
C-2) A thin rectangular plate of sides 60 mm X 30 mm has its shorter side in 
the V.P. and inclined at 30º to the H.P. Project its top view if its front view is a 
square of 30 mm long sides. 
b’ c’ 
b1’ c1’ 
X Y 
a 
b 
30 
a’ 
d’ 
60 
c 
d 
a 
b 
c 
d 
a1’ 
d1’ a 30º 1 b1 
c1 d1
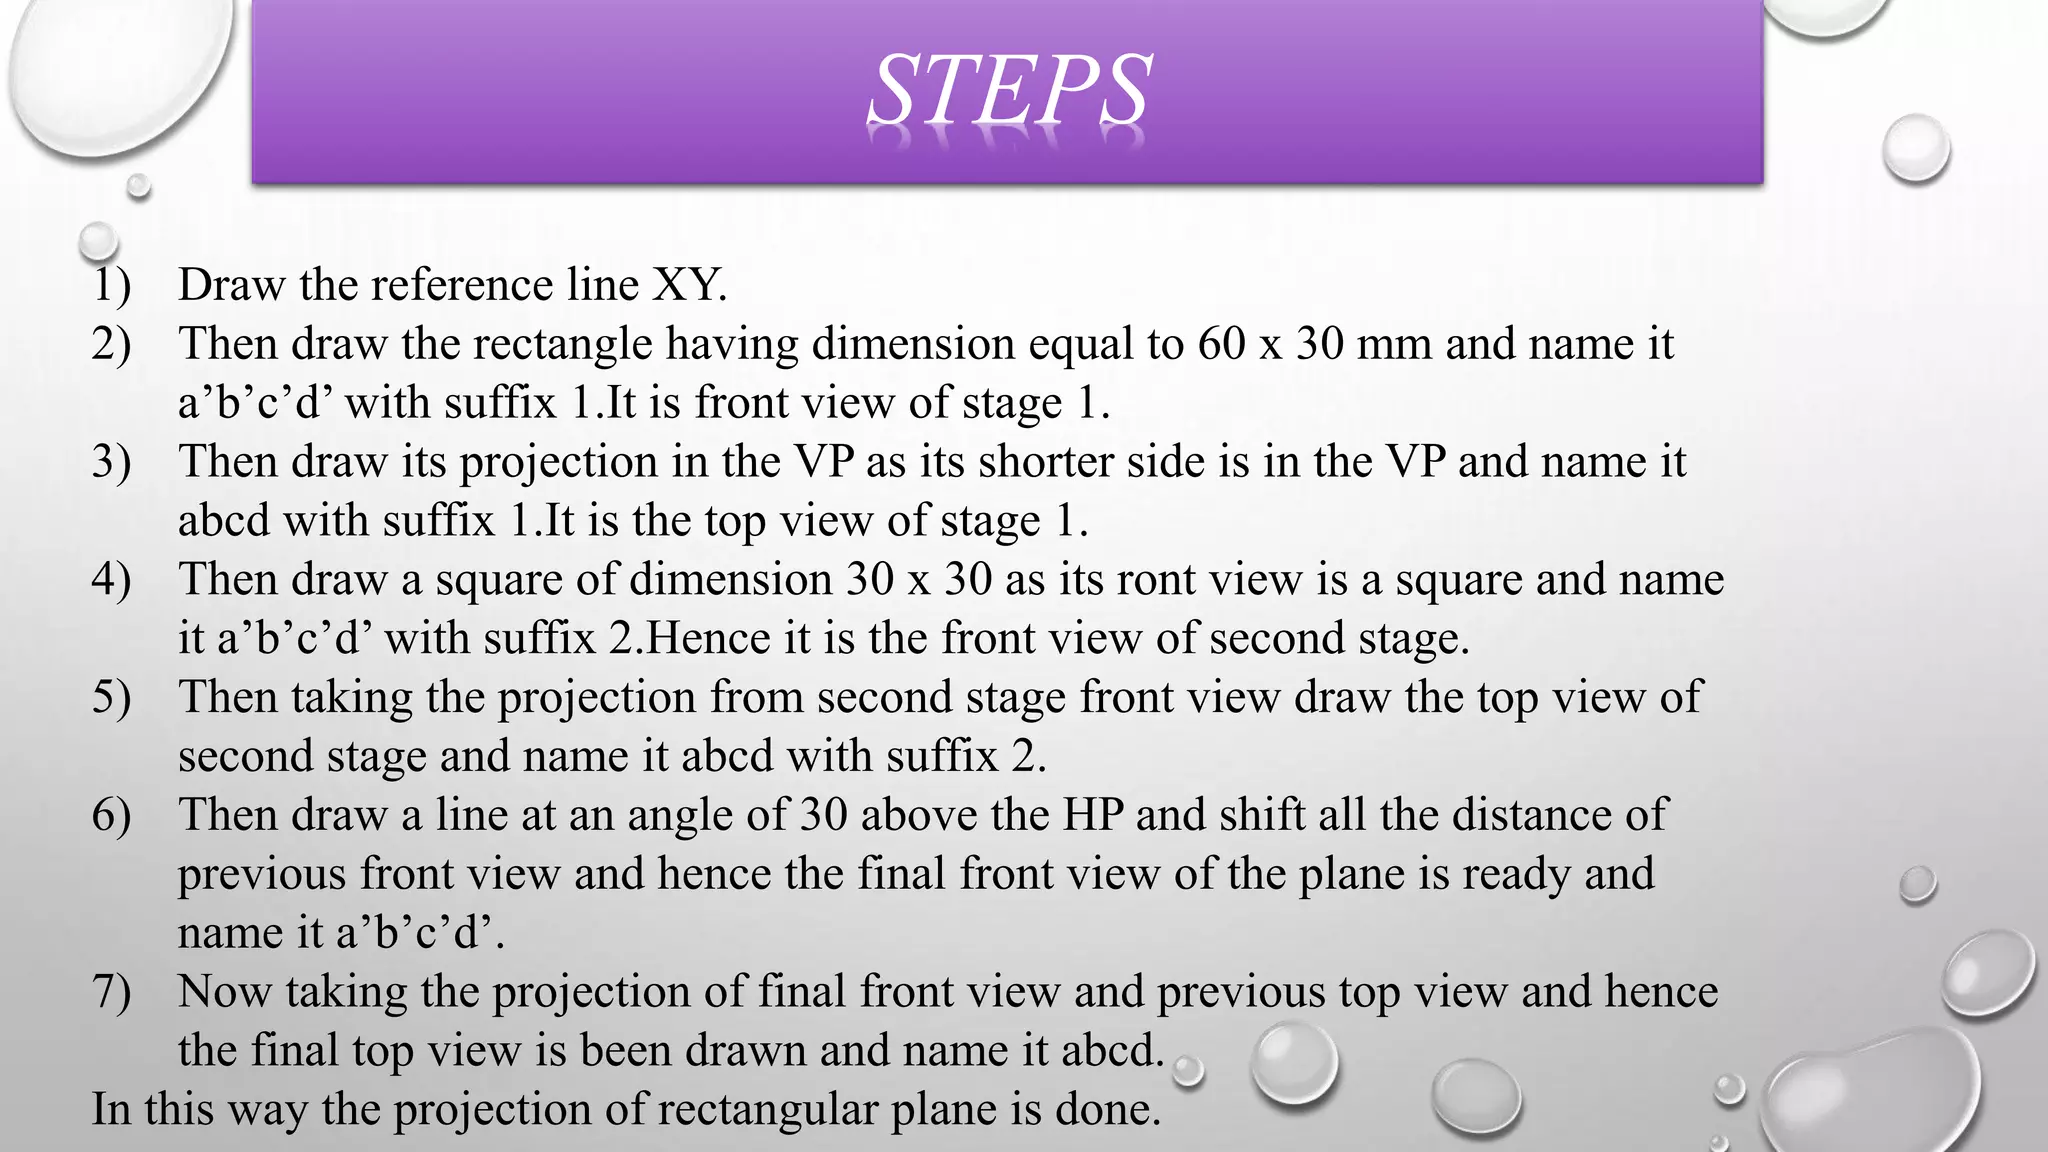
STEPS 
1) Draw the reference line XY. 
2) Then draw the rectangle having dimension equal to 60 x 30 mm and name it 
a’b’c’d’ with suffix 1.It is front view of stage 1. 
3) Then draw its projection in the VP as its shorter side is in the VP and name it 
abcd with suffix 1.It is the top view of stage 1. 
4) Then draw a square of dimension 30 x 30 as its ront view is a square and name 
it a’b’c’d’ with suffix 2.Hence it is the front view of second stage. 
5) Then taking the projection from second stage front view draw the top view of 
second stage and name it abcd with suffix 2. 
6) Then draw a line at an angle of 30 above the HP and shift all the distance of 
previous front view and hence the final front view of the plane is ready and 
name it a’b’c’d’. 
7) Now taking the projection of final front view and previous top view and hence 
the final top view is been drawn and name it abcd. 
In this way the projection of rectangular plane is done.
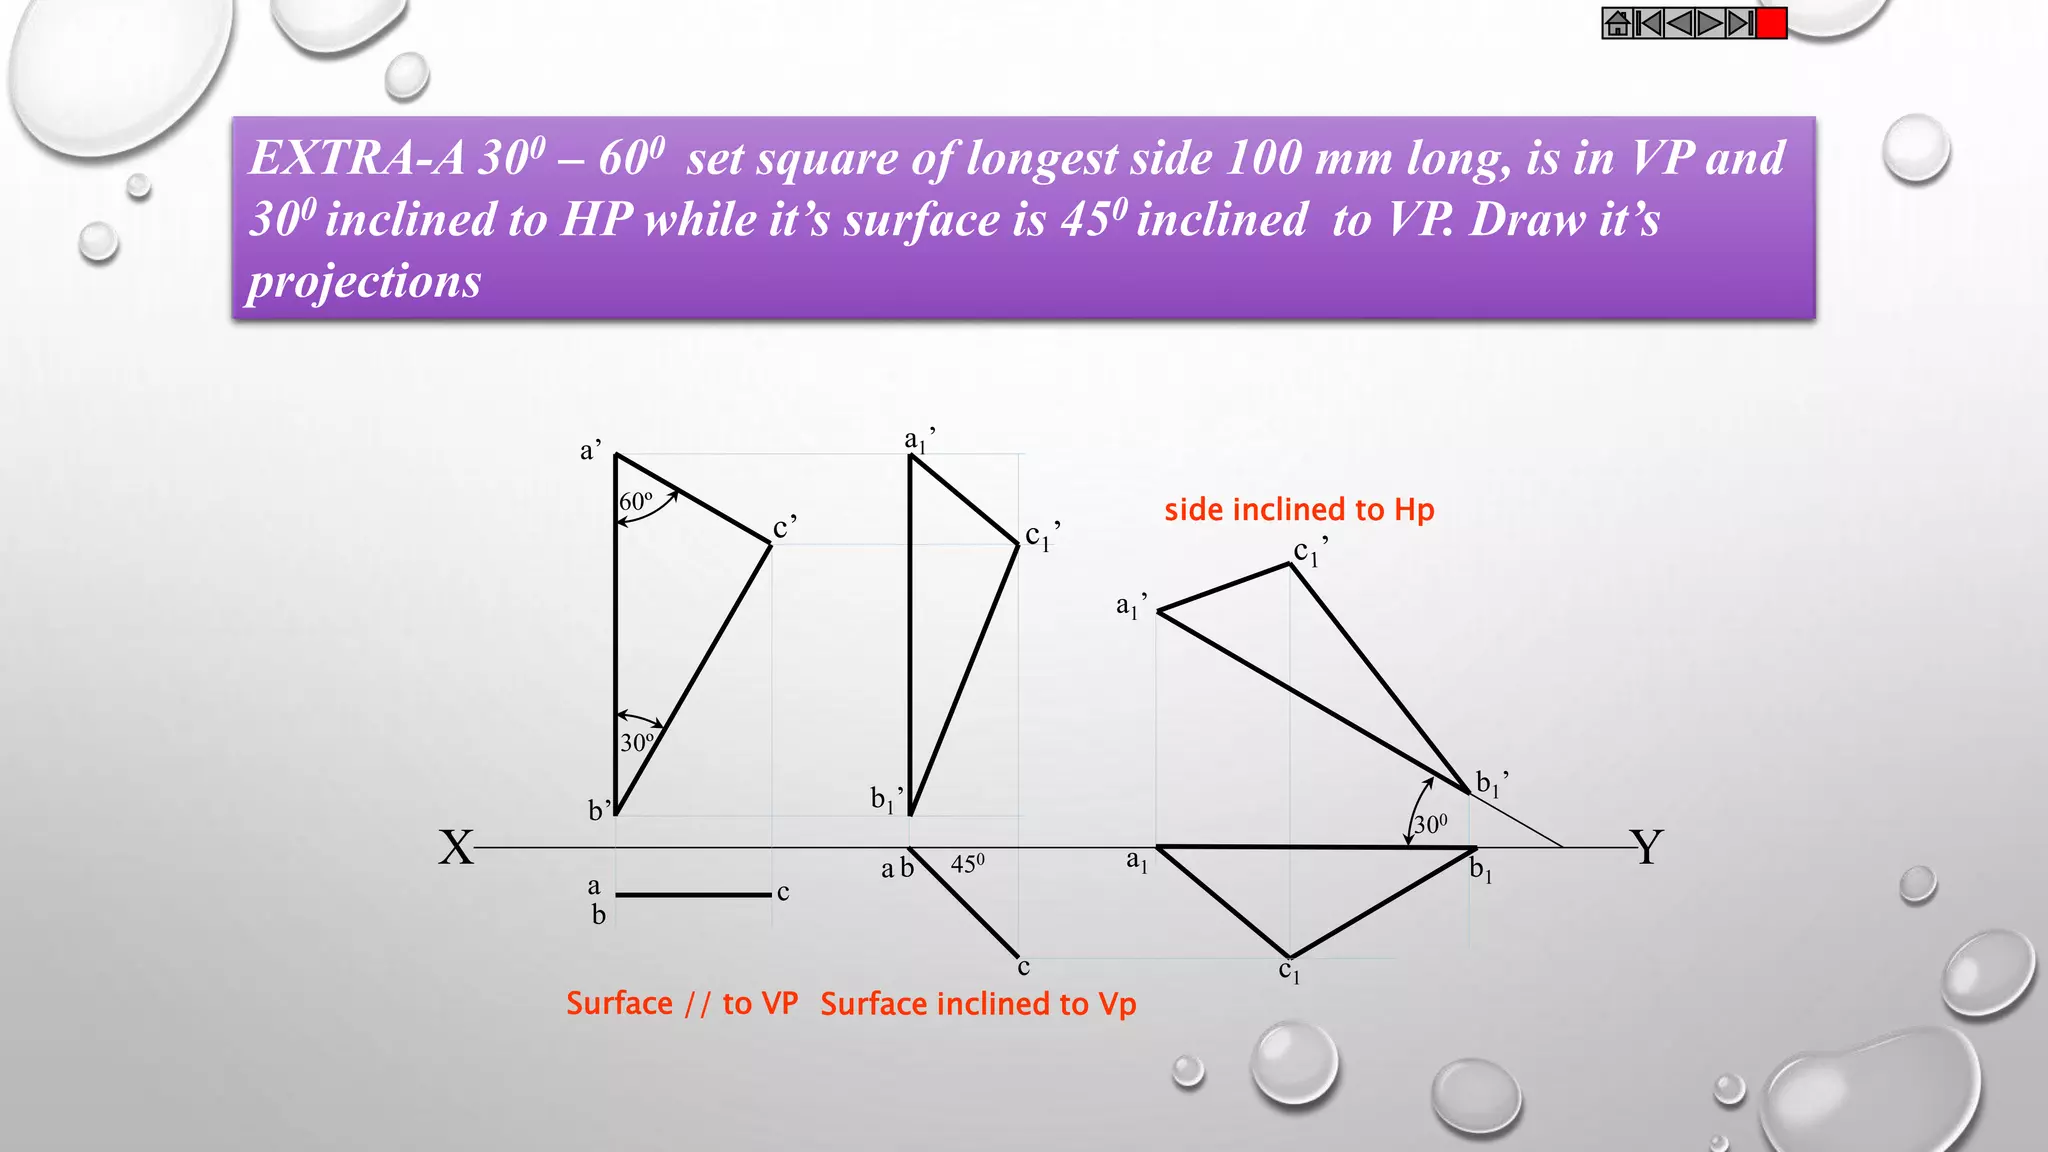
EXTRA-A 300 – 600 set square of longest side 100 mm long, is in VP and 
300 inclined to HP while it’s surface is 450 inclined to VP. Draw it’s 
projections 
X Y 
c1 
300 
450 
a1’ 
b1’ 
c1’ 
a 
c 
a’ 
a 
b1 
b’ 
b 
b a1 
c 
c’ 
Surface // to VP Surface inclined to Vp 
side inclined to Hp 
a1’ 
b1’ 
60º 
30º
Projection of planes

Projection of planes

  • 2.
    BASICS OF PROJECTIONOF PLANE WHAT IS USUALLY ASKED IN THE PROBLEM ? TO DRAW THEIR PROJECTIONS MEANS F.V, T.V. & S.V. WHAT WILL BE GIVEN IN THE PROBLEM ?  DESCRIPTION OF THE PLANE FIGURE.  IT’S POSITION WITH HP AND VP.  IN WHICH MANNER IT’S POSITION WITH HP & VP WILL BE DESCRIBED ? INCLINATION OF IT’S SURFACE WITH ONE OF THE REFERENCE PLANES WILL BE GIVEN. INCLINATION OF ONE OF IT’S EDGES WITH OTHER REFERENCE PLANE WILL BE GIVEN (HENCE THIS WILL BE A CASE OF AN OBJECT INCLINED TO BOTH REFERENCE PLANES.)
  • 3.
    PLANE/PLATE/LAMINA • APLANE IS A 2 DIMENSIONAL OBJECT HAVING LENGTH AND BREADTH. VARIOUS SHAPES OF PLANE FIGURES ARE SHOWN BELOW.
  • 4.
    UNDERSTADING PROJECTION OFA PLANE AND ITS TRACES 1) Any one of the planes given above is kept in first quadrant with reference to VP and HP. 2) Trace of a plane is a line of intersection or meeting of the plane surface with the reference plane. 3) There are six different positions in which a plane can be placed with reference to its surface and reference planes (VP & HP) and are discussed below.
  • 5.
    CASE OF ARECTANGLE – OBSERVE AND NOTE ALL STEPS. VP HP VP VP a’ d’ b’ c’ HP a d b c a1’ d1’ c1’ b1’ HP a1 d1 b1 c1 SURFACE PARALLEL TO HP PICTORIAL PRESENTATION SURFACE INCLINED TO HP PICTORIAL PRESENTATION ONE SMALL SIDE INCLINED TO VP PICTORIAL PRESENTATION ORTHOGRAPHIC TV-True Shape FV- Line // to xy ORTHOGRAPHIC FV- Inclined to XY TV- Reduced Shape ORTHOGRAPHIC FV- Apparent Shape TV-Previous Shape A B C
  • 6.
    PROCEDURE OF SOLVINGTHE PROBLEM  IN THREE STEPS EACH PROBLEM CAN BE SOLVED:( AS SHOWN IN PREVIOUS ILLUSTRATION ) • STEP 1. ASSUME SUITABLE CONDITIONS & DRAW FV & TV OF INITIAL POSITION. • STEP 2. NOW CONSIDER SURFACE INCLINATION & DRAW 2ND FV & TV. • STEP 3. AFTER THIS , CONSIDER SIDE/EDGE INCLINATION AND DRAW 3RD ( FINAL) FV & TV.
  • 7.
    ASSUMPTIONS FOR INITIALPOSITION (INITIAL POSITION MEANS ASSUMING SURFACE // TO HP OR VP) • 1.IF IN PROBLEM SURFACE IS INCLINED TO HP – ASSUME IT // HP • OR IF SURFACE IS INCLINED TO VP – ASSUME IT // TO VP • 2. NOW IF SURFACE IS ASSUMED // TO HP- IT’S TV WILL SHOW TRUE SHAPE. • AND IF SURFACE IS ASSUMED // TO VP – IT’S FV WILL SHOW TRUE SHAPE. • 3. HENCE BEGIN WITH DRAWING TV OR FV AS TRUE SHAPE. • 4. WHILE DRAWING THIS TRUE SHAPE – • KEEP ONE SIDE/EDGE ( WHICH IS MAKING INCLINATION) PERPENDICULAR TO XY LINE • ( SIMILAR TO PAIR NO. A ON PREVIOUS PAGE ILLUSTRATION ).
  • 8.
    A-1)Draw the projectionsof a regular pentagon of 40 mm side, having its surface inclined at 45º to the H.P. and a side parallel to the H.P. and inclined at an angle of 60º to the V.P. a b c d f e a ’ b’ f’ c ’ e ’ d’ 45° a1 f1 e1 d1 b1 c1 60° a1 b1 c 1 d1 e1 f1 a1’ b1 ’ c1’ d1 ’ e1’ f1’ Plane parallel to HP Plane inclined to HP at 45°and ┴ to VP Top view of the diagonal making 60° with the VP. Y X 60°
  • 9.
    STEPS 1) Drawthe reference line XY. 2) Then draw the pentagon having side length equal to 30 mm and name it abcde with suffix 1.It is top view of stage 1. 3) Then draw its projection on the HP as one of its side in the HP and name it a’b’c’d’e’ with suffix 1.It is the front view of stage 1. 4) Then draw a line at an angle of 45 above the HP and shift all the distances of previous front view and name it abcde with suffix 2.Hence it is the front view of second stage. 5) Then taking the projection from front view and previous top view the top view of second stage is been drawn and name it a’b’c’d’e’ with suffix 2. 6) Then draw a line at an angle of 60 in front of VP and shift all the distance of previous top view and hence the final top view of the plane is ready and name it abcde. 7) Now taking the projection of final top view and previous front view the final front view is been drawn and name it a’b’c’d’e’. In this way the projection of pentagonal plane is done.
  • 10.
    B-1)A semicircular plateof 80mm diameter has its straight edge in the VP and inclined at 45 to HP. The surface of the plate makes an angle of 30 with the VP. Draw its projections. Plane in the V.P. with straight edge ┴ to H.P 1’ 2’ 3’ 4’ 5’ 6’ 7’ 1 7 11’ 21’ X Y 2 6 3 5 4 30º 31’ 41’ 51’ 7 61’ 1’ 45º 11 21 31 41 51 61 71 Ø 80 Plane inclined at 30º to the V.P. and straight edge in the V.P. St. edge in V.P. and inclined at 45º to the H.P.
  • 11.
    STEPS 1) Drawthe reference line XY. 2) Then draw the semicircle having radius equal to 40 mm and name it 1’2’3’4’5’6’7’ with suffix 1.It is front view of stage 1. 3) Then draw its projection at 5 mm in front of the VP name it 1234567 with suffix 1.It is the top view of stage 1. 4) Then draw a line at an angle of 30 in front of the VP and shift all the distances of previous top view and name it 1234567 with suffix 2.Hence it is the top view of second stage. 5) Then taking the projection from top view and previous front view the front view of second stage is been drawn and name it 1’2’3’4’5’6’7’ with suffix 2. 6) Then draw a line at an angle of 45 above the HP and shift all the distance of previous front view and hence the final front view of the plane is ready and name it 1’2’3’4’5’6’7’. 7) Now taking the projection of final front view and previous top view and hence the final top view is been drawn and name it 1234567. In this way the projection of semicircular plane is done.
  • 12.
    B-2) Draw arhombus of 100 mm and 70 mm long diagonals with longer diagonal horizontal. The figure is the top view of a square having 100 mm long diagonals. Draw its front view. a’ b’d’ c’ c1 d1 b1 X Y 100 100 a b c d 70 a’ b’ c’ d’ a1 b1 c1 d1 a1 d1 b1 c1 100 70 a1
  • 13.
    STEPS 1) Drawthe reference line XY. 2) Then draw the square having side length equal to 100 mm and name it abcd with suffix 1.It is drawn in top view because one of its corner is in VP therefore its apparent shape is drawn in VP. Hence it is the top view of stage 1 . 3) Then draw its projection on the HP as one of its corner is in the VP and name it abcd with suffix 1.It is the front view of stage 1. 4) Then draw a rhombus that is the true shape having diagonal equal to 100 and 70 and name it a’b’c’d’ with suffix 2.Hence it is the top view of second stage. 5) Then taking the projection from top view and shifting distances from previous front view the front view of second stage is been drawn and name it a’b’c’d’ with suffix 2. 6) Then draw a rhombus that is the true shape having diagonal equal to 70 and 100 and name it a’b’c’d’.Hence it is the final top view. 7) Now taking the projection of final top view and previous front view the final front view is been drawn and name it abcd. In this way the projection of rhombus plane is done.
  • 14.
    C-2) A thinrectangular plate of sides 60 mm X 30 mm has its shorter side in the V.P. and inclined at 30º to the H.P. Project its top view if its front view is a square of 30 mm long sides. b’ c’ b1’ c1’ X Y a b 30 a’ d’ 60 c d a b c d a1’ d1’ a 30º 1 b1 c1 d1
  • 15.
    STEPS 1) Drawthe reference line XY. 2) Then draw the rectangle having dimension equal to 60 x 30 mm and name it a’b’c’d’ with suffix 1.It is front view of stage 1. 3) Then draw its projection in the VP as its shorter side is in the VP and name it abcd with suffix 1.It is the top view of stage 1. 4) Then draw a square of dimension 30 x 30 as its ront view is a square and name it a’b’c’d’ with suffix 2.Hence it is the front view of second stage. 5) Then taking the projection from second stage front view draw the top view of second stage and name it abcd with suffix 2. 6) Then draw a line at an angle of 30 above the HP and shift all the distance of previous front view and hence the final front view of the plane is ready and name it a’b’c’d’. 7) Now taking the projection of final front view and previous top view and hence the final top view is been drawn and name it abcd. In this way the projection of rectangular plane is done.
  • 16.
    EXTRA-A 300 –600 set square of longest side 100 mm long, is in VP and 300 inclined to HP while it’s surface is 450 inclined to VP. Draw it’s projections X Y c1 300 450 a1’ b1’ c1’ a c a’ a b1 b’ b b a1 c c’ Surface // to VP Surface inclined to Vp side inclined to Hp a1’ b1’ 60º 30º