Downloaded 12 times


![Administrator’s Guide SoundPoint IP / SoundStation IP
3 - 14
3. Copy all files from the distribution zip file to the phone home directory.
Maintain the same folder hierarchy.
The distribution zip file contains:
— sip.ld (including a separate one for every supported model)
— sip.cfg
— phone1.cfg
— 000000000000.cfg
— 000000000000-directory~.xml
— SoundPointIP-dictionary.xml
— SoundPointIPWelcome.wav
Refer to the Release Notes for a detailed description of each file in the
distribution.
Boot Server Security Policy
You must decide on a boot server security policy.
For organizational purposes, configuring a separate log file directory is
recommended, but not required. (For more information on
LOG_FILE_DIRECTORY, refer to Master Configuration Files on page A-2.)
File permissions should give the minimum access required and the account
used should have no other rights on the server.
The phone's server account needs to be able to add files to which it can write
in the log file directory and the root directory. It must also be able to list files
in all directories mentioned in the [mac].cfg file. All other files that the phone
needs to read, such as the application executable and the standard
configuration files, should be made read-only through file server file
permissions.
Deploying Phones From the Boot Server
You can successfully deploy SoundPoint IP and SoundStation IP phones from
one or more boot servers.
Polycom recommends allowing file uploads to the boot server where the security
environment permits. This allows event log files to be uploaded and changes made
by the phone user to the configuration (through the web server and local user
interface) and changes made to the directory to be backed up.](https://image.slidesharecdn.com/soundpointipsoundstationipadministratorsguidev22-131001135319-phpapp01/85/Polycom-ip-soundstation_ip_administrators_guide_v2_2-42-320.jpg)
![Setting up Your System
3 - 15
Multiple boot servers can be configured by having the boot server DNS name
map to multiple IP addresses. The default number of boot servers is one and
the maximum number is eight. HTTPS, HTTP, and FTP are supported for
redundant boot servers.
To deploy phones from the boot server:
1. (Optional) Create per-phone configuration files by performing the
following steps:
a Obtain a list of phone Ethernet addresses (barcoded label on
underside of phone and on the outside of the box).
b Create per-phone phone[MACaddress].cfg file by using the
phone1.cfg file from the distribution as templates.
For more information on the phone1.cfg file, refer to Per-Phone
Configuration on page A-82.
c Edit contents of phone[MACaddress].cfg if desired.
For example, edit the parameters.
2. (Optional) Create new configuration file(s) in the style of sip.cfg by
performing the following steps:
For more information, especially on the SIP server address, refer to SIP
<SIP/> on page A-10.
For more information on the sip.cfg file, refer to Application
Configuration on page A-4.
Most of the default settings are typically adequate, however, if SNTP
settings are not available through DHCP, the SNTP GMT offset and
(possibly) the SNTP server address will need to be edited for the correct
Note For more information on encrypting configuration files, refer to Encrypting
Configuration Files on page C-3.
Note This step may be omitted if per-phone configuration is not needed.
Note Throughout this guide, the terms Ethernet address and MAC address are used
interchangeable.
Note For more information on why to create another configuration file, refer to the
“Configuration File Management on SoundPoint IP Phones” whitepaper at
www.polycom.com/support/voice/ .](https://image.slidesharecdn.com/soundpointipsoundstationipadministratorsguidev22-131001135319-phpapp01/85/Polycom-ip-soundstation_ip_administrators_guide_v2_2-43-320.jpg)
![Administrator’s Guide SoundPoint IP / SoundStation IP
3 - 16
local conditions. Changing the default daylight savings parameters will
likely be necessary outside of North American locations.
a (Optional) Disable the local web (HTTP) server or change its
signalling port if local security policy dictates.
b Change the default location settings for user interface language and
time and date format.
3. (Optional) Create a master configuration file by performing the following
steps:
a Create per-phone or per-platform <Ethernet address>.cfg files by
using the 00000000000.cfg and files from the distribution as templates.
For more information, refer to Master Configuration Files on page
A-2.
b Edit the CONFIG_FILES attribute of the <Ethernet address>.cfg files
so that it references the appropriate phone[MACaddress].cfg file.
For example, replace the reference to phone1.cfg with
phone[MACaddress].cfg.
c Edit the CONFIG_FILES attribute of the <Ethernet address>.cfg files
so that it references the appropriate sipXXXX.cfg file.
For example, replace the reference to sip.cfg with sip650.cfg.
d Edit the LOG_FILE_DIRECTORY attribute of the <Ethernet
address>.cfg files so that it points to the log file directory.
e Edit the CONTACT_DIRECTORY attribute of the <Ethernet
address>.cfg files so that it points to the organization’s contact
directory.
4. Reboot the phones by pressing the reboot multiple key combination.
For more information, refer to Multiple Key Combinations on page C-9.
The bootROM and SIP application modify the APPLICATION
APP_FILE_PATH attribute of the <Ethernet address>.cfg files so that it
references the appropriate sip.ld files.
For example, the reference to sip.ld is changed to 2345-11605-001.sip.ld to
boot the SoundPoint IP 601 image.
Note At this point , the phone sends a DHCP Discover packet to the DHCP server. This
is found in the Bootstrap Protocol/option "Vendor Class Identifier" section of the
packet and includes the phone’s part number and the bootROM version.
For example, a SoundPoint IP 650 might send the following information:
5EL@
DC?5cSc52*46*(9N7*<u6=pPolycomSoundPointIP-SPIP_6502345-12600-001,1B
R/4.0.0.0155/23-May-07 13:35BR/4.0.0.0155/23-May-07 13:35
For more information, refer to Parsing Vendor ID Information on page C-16.](https://image.slidesharecdn.com/soundpointipsoundstationipadministratorsguidev22-131001135319-phpapp01/85/Polycom-ip-soundstation_ip_administrators_guide_v2_2-44-320.jpg)


![Setting up Your System
3 - 19
The following procedure must be used for upgrading to SIP 2.2.0 or later for
installations that have SoundPoint IP 300 and 500 phones deployed. It is also
recommended that this same approach be followed even if SoundPoint IP 300
and 500 phones are not part of the deployment as it will simplify management
of phone systems with future software releases.
To upgrade your SIP application:
1. Do one of the following steps:
a Place the bootrom.ld file corresponding to BootROM revision 4.0.0 (or
later) onto the boot server.
b Ensure that all phones are running BootROM 4.0.0 or later code.
2. Copy sip.ld, sip.cfg and phone1.cfg from the SIP2.2.0 or later release
distribution onto the boot server.
These are the relevant files for all phones except the SoundPoint IP 300 and
500 phones.
3. Copy sip_212.ld, sip_212.cfg, and phone1_212.cfg files from the SIP 2.2.0
or later release onto the boot server.
These are the relevant files for supporting the SoundPoint IP 300 and 500
phones.
4. Modify the 000000000000.cfg file, if required, to match your configuration
file structure.
For example:
<APPLICATION
APP_FILE_PATH="sip.ld"
APP_FILE_PATH_SPIP500="sip_212.ld"
APP_FILE_PATH_SPIP300="sip_212.ld"
CONFIG_FILES="[PHONE_MAC_ADDRESS]-user.cfg, phone1.cfg, sip.cfg"
CONFIG_FILES_SPIP500="[PHONE_MAC_ADDRESS]-user.cfg,
phone1_212.cfg, sip_212.cfg"
CONFIG_FILES_SPIP300="[PHONE_MAC_ADDRESS]-user.cfg,
phone1_212.cfg, sip_212.cfg"
MISC_FILES=""
LOG_FILE_DIRECTORY=""
OVERRIDES_DIRECTORY=""
CONTACTS_DIRECTORY=""
/>
5. Remove any <Ethernet address>.cfg files that may have been used with
earlier releases from the boot server.](https://image.slidesharecdn.com/soundpointipsoundstationipadministratorsguidev22-131001135319-phpapp01/85/Polycom-ip-soundstation_ip_administrators_guide_v2_2-47-320.jpg)
![Administrator’s Guide SoundPoint IP / SoundStation IP
3 - 20
For more information, refer to “Technical Bulletin 35311: Supporting
SoundPoint IP 300 and IP 500 Phones with SIP 2.2 and Later Releases“ at
http://www.polycom.com/support/voice/.
Note This approach takes advantage of an enhancement that was added in
SIP2.0.1/BootROM 3.2.1 that allows for the substitution of the phone specific
[MACADDRESS] inside configuration files. This avoids the need to create unique
<Ethernet address>.cfg files for each phone such that the default
000000000000.cfg file can be used for all phones in a deployment.
If this approach is not used, then changes will need to be made to all the <Ethernet
address>.cfg files for SoundPoint IP 300 and 500 phones or all of the <Ethernet
address>.cfg files if it is not explicitly known which phones are SoundPoint IP 300
and 500 phones.](https://image.slidesharecdn.com/soundpointipsoundstationipadministratorsguidev22-131001135319-phpapp01/85/Polycom-ip-soundstation_ip_administrators_guide_v2_2-48-320.jpg)


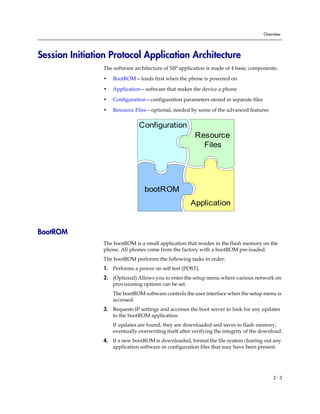
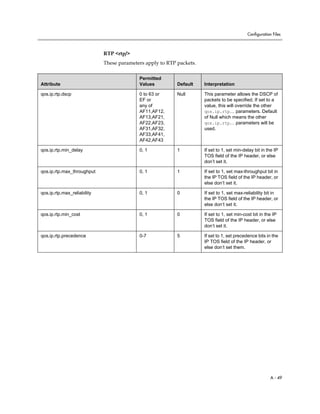
![Configuration Files
A - 3
• CONFIG_FILES—A comma-separated list of configuration files. Each file
name has a maximum length of 255 characters and the list of file names has
a maximum length of 2047 characters, including commas and white space.
Each configuration file can be specified as a URL with its own protocol,
user name and password, for example
ftp://usr:pwd@server/dir/phone2034.cfg.
• MISC_FILES—A comma-separated list of other required files. Dictionary
resource files listed here will be stored in the phone's flash file system. So
if the phone reboots at a time when the boot server is unavailable, it will
still be able to load the preferred language.
• LOG_FILE_DIRECTORY—An alternative directory to use for log files if
required. A URL can also be specified. This is blank by default.
• CONTACTS_DIRECTORY—An alternative directory to use for user
directory files if required. A URL can also be specified. This is blank by
default.
• OVERRIDES_DIRECTORY—An alternative directory to use for
configuration overrides files if required. A URL can also be specified. This
is blank by default.
• LICENSE_DIRECTORY—An alternative directory to use for license files if
required. A URL can also be specified. This is blank by default.
If you have a requirement for different application loads on different phones
on the same boot server, you can create a variable in the master configuration
file that is replaced by the MAC address of each phone when it reboots. An
example is shown below:
<?xml version=”1.0” standalone=”yes”?>
<!-- Default Master SIP Configuration File -->
<!-- edit and rename this file to <Ethernet-address>.cfg for
each phone. -->
<!-- $RCSfile: 000000000000.cfg,v $ $Revision:$ -->
< APPLICATION APP_FILE_PATH=”sip[MACADDRESS].ld”
Note On the SoundPoint IP 500, there is insufficient room for a language file. Specifying
one will cause a reboot loop
Warning The order of the configuration files listed in CONFIG_FILES is significant:
• The files are processed in the order listed (left to right).
• The same parameters may be included in more than one file.
• The parameter found first in the list of files will be the one that is effective.
This provides a convenient means of overriding the behavior of one or more phones
without changing the baseline configuration files for an entire system.
For more information, refer to the “Configuration File Management on SoundPoint
IP Phones” whitepaper at www.polycom.com/support/voice/](https://image.slidesharecdn.com/soundpointipsoundstationipadministratorsguidev22-131001135319-phpapp01/85/Polycom-ip-soundstation_ip_administrators_guide_v2_2-115-320.jpg)
![Administrator’s Guide SoundPoint IP / SoundStation IP
A - 4
CONFIG_FILES=”phone1[MACADDRESS].cfg, sip.cfg” MISC_FILES=””
LOG FILE DIRECTORY=”” OVERRIDES_DIRECTORY=””
CONTACTS_DIRECTORY=”” LICENSE_DIRECTORY=””/>
If you have a requirement for separate application loads on different phones
on the same boot server, you can modify the application that is loaded when
each phone reboots. An example is below:
<?xml version=”1.0” standalone=”yes”?>
<!-- Default Master SIP Configuration File -->
<!-- edit and rename this file to <Ethernet-address>.cfg for
each phone. -->
<!-- $RCSfile: 000000000000.cfg,v $ $Revision:$ -->
< APPLICATION APP_FILE_PATH=”sip[PHONE_PART_NUMBER].ld”
CONFIG_FILES=”phone1.cfg, sip.cfg” MISC_FILES=””
LOG FILE DIRECTORY=”” OVERRIDES_DIRECTORY=””
CONTACTS_DIRECTORY=”” LICENSE_DIRECTORY=””/>
You can also use the substitution strings PHONE_MODEL,
PHONE_PART_NUMBER, and PHONE_MAC_ADDRESS in the master
configuration file.
You can also direct phone upgrades to a software image and configuration
files based on the phone model number and part number. All XML attributes
can be modified in this manner. An example is below:
<?xml version=”1.0” standalone=”yes”?>
<!-- Default Master SIP Configuration File -->
<!-- edit and rename this file to <Ethernet-address>.cfg for
each phone. -->
<!-- $RCSfile: 000000000000.cfg,v $ $Revision:$ -->
<APPLICATION APP_FILE_PATH=”sip.ld” CONFIG_FILES=”phone1.cfg,
sip.cfg” MISC_FILES=”” LOG_FILE_DIRECTORY=””
OVERRIDES_DIRECTORY=””
CONTACTS_DIRECTORY=”” LICENSE_DIRECTORY=””
APP_FILE_PATH_SPIP330=”SPIP330.sip.ld”
CONFIG_FILES_SPIP330=”phone1_SPIP330.cfg, sip_SPIP330.cfg”
APP_FILE_PATH_SPIP501=”SPIP501.sip.ld”
CONFIG_FILES_SPIP501=”phone1_SPIP501.cfg, sip_SPIP501.cfg” />
For more information, refer to “Technical Bulletin 35361: Overriding
Parameters in Master Configuration File on SoundPoint IP Phones“ at
http://www.polycom.com/support/voice/.
Application Configuration
The configuration file sip.cfg contains SIP protocol and core configuration
settings that would typically apply to an entire installation and must be set
before the phones will be operational, unless changed through the local web](https://image.slidesharecdn.com/soundpointipsoundstationipadministratorsguidev22-131001135319-phpapp01/85/Polycom-ip-soundstation_ip_administrators_guide_v2_2-116-320.jpg)


![Configuration Files
A - 15
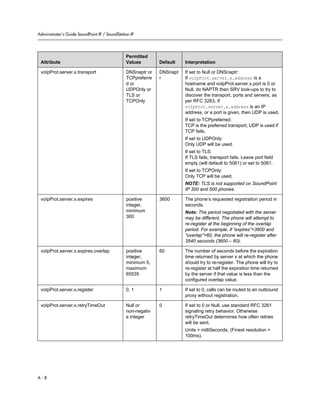
Special Events <specialEvent/>
This configuration attribute is defined as follows:
Conference Setup <conference/>
This configuration attribute is defined as follows:
voIpProt.SIP.requestValidation.x.req
uest.y.event
A valid string Null Determines which events specified with the
Event header should be validated; only
applicable when
voIpProt.SIP.requestValidation.x.re
quest is set to “SUBSCRIBE” or “NOTIFY”.
If set to Null, all events will be validated.
voIpProt.SIP.requestValidation.dige
st.realm
A valid string Polycom
SPIP
Determines string used for Realm.
Attribute
Permitted
Values Default Interpretation
Attribute
Permitted
Values Default Interpretation
voIpProt.SIP.specialEvent.lineSeize.n
onStandard
0, 1 1 If set to 1, process a 200 OK response for a
line-seize event SUBSCRIBE as though a
line-seize NOTIFY with Subscription State:
active header had been received, this speeds
up processing.
voIpProt.SIP.specialEvent.checkSync
.alwaysReboot
0, 1 0 If set to 1, always reboot when a NOTIFY
message is received from the server with
event equal to check-sync.
If set to 0, only reboot if any of the files listed
in [mac].cfg have changed on the FTP
server when a NOTIFY message is received
from the server with event equal to
check-sync.
Attribute
Permitted
Values Default Interpretation
voIpProt.SIP.conference.address ASCII string
up to 128
characters
long
Null If Null, conferences are set up on the phone
locally.
If set to some value, conferences are set up
by the server using the conferencing agent
specified by this address. The acceptable
values depend on the conferencing server
implementation policy.](https://image.slidesharecdn.com/soundpointipsoundstationipadministratorsguidev22-131001135319-phpapp01/85/Polycom-ip-soundstation_ip_administrators_guide_v2_2-127-320.jpg)

![Administrator’s Guide SoundPoint IP / SoundStation IP
A - 18
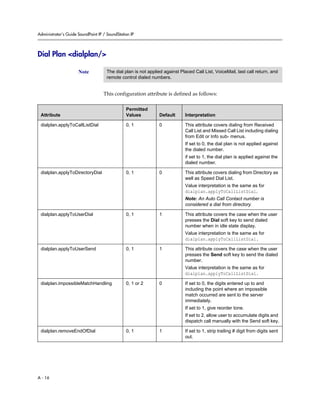
• There is no limitation on the number of R triplet sets in a digit map.
However, a digit map that contains less than full number of triplet sets (for
example, a total of 2Rs or 5Rs) is considered an invalid digit map.
• Using T in the left part of RRR syntax is not recommended. For example,
R0TR322R should be avoided.
This configuration attribute is defined as follows:
Routing <routing/>
This attribute allows the user to create a specific routing path for outgoing SIP
calls independent of other “default” configurations.
This attribute also includes:
• Server <server/>
• Emergency <emergency/>
Attribute Permitted Values Default Interpretation
dialplan.digitmap string compatible with the
digit map feature of
MGCP described in 2.1.5
of RFC 3435. String is
limited to 768 bytes and
30 segments; a comma is
also allowed; when
reached in the digit map,
a comma will turn dial
tone back on;’+’ is allowed
as a valid digit; extension
letter ‘R’ is used as
defined above.
[2-9]11|0T|
+011xxx.T|
0[2-9]xxxxxxxxx|
+1[2-9]xxxxxxxx|
[2-9]xxxxxxxxx|
[2-9]xxxT
When this attribute is
present, number-only dialing
during the setup phase of
new calls will be compared
against the patterns therein
and if a match is found, the
call will be initiated
automatically eliminating the
need to press Send.
Attributes
dialplan.applyToCallLis
tDial,
dialplan.applyToDirecto
ryDial,
dialplan.applyToUserDia
l, and
dialplan.applyToUserSen
d control the use of match
and replace in the dialed
number in the different
scenarios.
dialplan.digitmap.timeOut string of positive integers
separated by ‘|’
3 | 3 | 3 | 3 | 3 | 3 Timeout in seconds for each
segment of digit map.
Note: If there are more digit
maps than timeout values,
the default value of 3 will be
used. If there are more
timeout values than digit
maps, the extra timeout
values are ignored.](https://image.slidesharecdn.com/soundpointipsoundstationipadministratorsguidev22-131001135319-phpapp01/85/Polycom-ip-soundstation_ip_administrators_guide_v2_2-130-320.jpg)


![Administrator’s Guide SoundPoint IP / SoundStation IP
A - 28
In the following table, x is the sampled audio file number.
The following table defines the default usage of the sampled audio files with
the phone:
Sound Effects <se/>
The phone uses both synthesized (based on the chord-sets, refer to Chord-Sets
<chord/> on page A-26) and sampled audio sound effects. Sound effects are
defined by patterns: rudimentary sequences of chord-sets, silence periods, and
wave files.
Attribute Permitted Values Interpretation
saf.x Null OR valid path name
OR an RFC
1738-compliant URL to a
HTTP, FTP, or TFTP
wave file resource.
Note: Refer to the above
wave file format
restrictions.
If Null, the phone will use a built-in file.
If set to a path name, the phone will attempt to download this file
at boot time from the boot server.
If set to a URL, the phone will attempt to download this file at boot
time from the Internet.
Note: A TFTP URL is expected to be in the format:
tftp://<host>/[pathname]<filename>, for example:
tftp://somehost.example.com/sounds/example.wav .
Sampled Audio File Default use within phone (pattern reference)
1 Welcome Sound Effect (se.pat.misc.7)
2 Ringer 13 (se.pat.ringer.13)
3 Ringer 14 (se.pat.ringer.14)
4 Ringer 15 (se.pat.ringer.15)
5 Ringer 16 (se.pat.ringer.16)
6 Ringer 17 (se.pat.ringer.17)
7 Ringer 18 (se.pat.ringer.18)
8 Ringer 19 (se.pat.ringer.19)
9 Ringer 20 (se.pat.ringer.20)
10 Ringer 21 (se.pat.ringer.21)
11 Ringer 22 (se.pat.ringer.22)
12-24 Not used.](https://image.slidesharecdn.com/soundpointipsoundstationipadministratorsguidev22-131001135319-phpapp01/85/Polycom-ip-soundstation_ip_administrators_guide_v2_2-140-320.jpg)


![Third Party Software
D - 3
and/or other materials provided with the distribution.
3. All advertising materials mentioning features or use of this software must
display the following acknowledgement: "This product includes
cryptographic software written by Eric Young (eay@cryptsoft.com)"
The word 'cryptographic' can be left out if the routines from the library being
used are not cryptographic related.
4. If you include any Windows specific code (or a derivative thereof) from the
apps directory (application code) you must include an acknowledgement:
"This product includes software written by Tim Hudson (tjh@cryptsoft.com)"
THIS SOFTWARE IS PROVIDED BY ERIC YOUNG ``AS IS'' AND ANY
EXPRESS OR IMPLIED WARRANTIES, INCLUDING, BUT NOT LIMITED
TO, THE IMPLIED WARRANTIES OF MERCHANTABILITY AND FITNESS
FOR A PARTICULAR PURPOSE ARE DISCLAIMED. IN NO EVENT SHALL
THE AUTHOR OR CONTRIBUTORS BE LIABLE FOR ANY DIRECT,
INDIRECT, INCIDENTAL, SPECIAL, EXEMPLARY, OR CONSEQUENTIAL
DAMAGES (INCLUDING, BUT NOT LIMITED TO, PROCUREMENT OF
SUBSTITUTE GOODS OR SERVICES; LOSS OF USE, DATA, OR PROFITS;
OR BUSINESS INTERRUPTION) HOWEVER CAUSED AND ON ANY
THEORY OF LIABILITY, WHETHER IN CONTRACT, STRICT LIABILITY,
OR TORT (INCLUDING NEGLIGENCE OR OTHERWISE) ARISING IN ANY
WAY OUT OF THE USE OF THIS SOFTWARE, EVEN IF ADVISED OF THE
POSSIBILITY OF SUCH DAMAGE.
The licence and distribution terms for any publicly available version or
derivative of this code cannot be changed. i.e. this code cannot simply be
copied and put under another distribution licence [including the GNU Public
Licence.]
zlib
(C) 1995-2002 Jean-loup Gailly and Mark Adler
This software is provided 'as-is', without any express or implied warranty. In
no event will the authors be held liable for any damages arising from the use
of this software. Permission is granted to anyone to use this software for any
purpose, including commercial applications, and to alter it and redistribute it
freely, subject to the following restrictions:
1. The origin of this software must not be misrepresented; you must not claim
that you wrote the original software. If you use this software in a product, an
acknowledgment in the product documentation would be appreciated but is
not required.
2. Altered source versions must be plainly marked as such, and must not be
misrepresented as being the original software.
3. This notice may not be removed or altered from any source distribution.
Jean-loup Gailly Mark Adler
jloup@gzip.org madler@alumni.caltech.edu](https://image.slidesharecdn.com/soundpointipsoundstationipadministratorsguidev22-131001135319-phpapp01/85/Polycom-ip-soundstation_ip_administrators_guide_v2_2-245-320.jpg)


The document is the August 2007 Administrator's Guide for the SoundPoint IP and SoundStation IP family of phones. It provides information to help administrators configure, customize, manage, and troubleshoot SoundPoint IP and SoundStation IP phone systems. The guide covers topics such as setting up the network, deploying phones from a boot server, upgrading phone software, and configuring basic and advanced phone features.