OSG i 動態服務模組 開發實作 詹景逸 Ching Yi, Chan. aka qrtt1 [email_address]
Agenda 開發環境準備 JDK Maven Felix 練習主題介紹 Felix – OSGi Container  的使用 Bundle –  建立  OSGi  模組 Service –  建立  OSGi  服務
開發環境準備 JDK  #2 Java SE http://java.sun.com/javase/downloads/index.jsp 檢查環境變數 JAVA_HOME CLASSPATH PATH
開發環境準備 Maven  #3 取得檔案 http://maven.apache.org/download.html 解壓縮 ~/app c:\app 修改  PATH  變數 export PATH=$PATH:~/app/apache-maven- x.y.z /bin set PATH=%PATH%;c:\app\apache-maven- x.y.z \bin 執行測試 mvn -v
開發環境準備 Felix – OSGi Container  #5 取得檔案 http://apache.stu.edu.tw/felix/felix-1.4.1.zip 解壓縮 ~/app c:\app 啟動  Felix java -jar bin/felix.jar 停止  Felix stop 0  或是  shutdown
Felix  基本操作 啟動  Felix  #6 java -jar bin/felix.jar 常用指令 help  ps –  列出已安裝  Bundle install –  安裝  Bundle start –  啟動  Bundle stop –  停止  Bundle update –  更新  Bundle  uninstall –  移除  Bundle  ( 請先別執行 ) shutdown –  離開  felix
PART 1 Everything  is  Bundle
安裝  Bundle File Install Bundle  #7 功能:在  Felix  執行目錄下建立  load   資料夾。定期監看  load  資料夾的檔案,若是  OSGi Bundle  就 自動安裝 。 使用  Install  指令安裝  Bundle 透過網路檔案安裝 透過檔案系統安裝 測試  File Install Bundle ( 需先啟動  Bundle) 複製  hello.service-1.0.0.jar  至  load  資料夾 install  http:// apache.ntu.edu.tw/felix/org.apache.felix.fileinstall-0.9.0.jar install  file:// /c:/temp /org.apache.felix.fileinstall-0.9.0.jar install  file:// /home/qrtt1/temp/ org.apache.felix.fileinstall-0.9.0.jar
建立  Bundle 使用  Maven  建立新的專案  #9 for unix-like for windows mvn archetype:create \ -Dversion=1.0.0 \ -DgroupId=javatwo2009 \ -DartifactId=hello.bundle mvn archetype:create ^ -Dversion=1.0.0 ^ -DgroupId=javatwo2009 ^ -DartifactId=hello.bundle
Maven  專案導覽 專案目錄  #9 Artifact  名稱 hello.bundle 編譯並打包專案 ( 請先執行這個步驟 ) cd hello.bundle mvn clean package
使用  Maven-Bundle-Plugin (1) 修改  pom.xml  檔案  #10 改變  <packaging />  為  bundle 增加  OSGi Framework  的  Dependency 設定  Maven-Bundle-Plugin ( 接續下頁 ) <dependency> <groupId>org.apache.felix</groupId> <artifactId>org.osgi.core</artifactId> <version>1.0.0</version> </dependency>
使用  Maven-Bundle-Plugin (2) <build> <plugins> <plugin> <groupId>org.apache.felix</groupId> <artifactId>maven-bundle-plugin</artifactId> <extensions>true</extensions> <configuration> <instructions> <Export-Package>${pom.groupId}</Export-Package> <Bundle-SymbolicName>${pom.artifactId}</Bundle-SymbolicName> <Bundle-Activator>${pom.groupId}.Activator</Bundle-Activator> </instructions> </configuration> </plugin> </plugins> </build> Manifest-Version: 1.0 Export-Package: javatwo2009;uses:=&quot;org.osgi.framework&quot; Built-By: Administrator Tool: Bnd-0.0.308 Bundle-Name: hello.bundle Created-By: Apache Maven Bundle Plugin Bundle-Version: 1.0.0 Build-Jdk: 1.6.0_06 Bnd-LastModified: 1235833008625 Bundle-ManifestVersion: 2 Bundle-Activator: javatwo2009.Activator Import-Package: javatwo2009,org.osgi.framework;version=&quot;1.3&quot; Bundle-SymbolicName: hello.bundle
建立  Bundle Activator package  javatwo2009; import  org.osgi.framework.BundleActivator; import  org.osgi.framework.BundleContext; /** * Hello world! */ public   class  Activator  implements  BundleActivator { public   void  start(BundleContext context)  throws  Exception { System. out .println(&quot;Hey!&quot;); } public   void  stop(BundleContext context)  throws  Exception { System. out .println(&quot;Bye!&quot;); } } #12 .. #13
編譯與安裝  bundle 使用  Maven  編譯並打包專案  #14 mvn clean package 安裝  bundle 將  target/hello.bundle-1.0.0.jar  複製到  FELIX_HOME/load  資料夾
OSGi  怎麼跑? System  Bundle B B B PID  永遠為 0 JVM OSGi Framework Module Life Cycle Service
OSGi  怎麼跑? Installed Resolving & Loading Classes Resolved JVM OSGi Framework System  Bundle M O D U L E Export-Package: org.osgi.framework, org.osgi.framework.hooks.service, org.osgi.service.packageadmin, org.osgi.service.startlevel, org.osgi.service.url, org.osgi.util.tracker
OSGi  怎麼跑? Resolved public   class  Activator  implements  BundleActivator { public   void  start(BundleContext context)  throws  Exception { System. out .println(&quot;Hey!&quot;); } public   void  stop(BundleContext context)  throws  Exception { System. out .println(&quot;Bye!&quot;); } } JVM OSGi Framework System  Bundle L I F E C Y C L E Starting Active Stopping Activator.stop() Activator.start()
PART 2 Service  is  Everything
OSGi Service  在哪裡? JVM OSGi Framework SERVICE REGISTRY Bundle Activator Bundle Activator Bundle Activator publish publish publish find & bind find & bind find & bind unpublish unpublish unpublish
服務與實作角色  (1) Service Provider Interface , SPI  #16 Export-Package Bundle Activator
服務與實作角色  (2) Application Programming Interface , API  Import-Package Bundle Activator
服務與實作角色  (3) Service Provider Import-Package ServiceRegistration registration =  bundleContext. registerService (  ServiceA .class.getName(),  new  ConcreteServiceA() , prop); Bundle Activator
服務與實作角色  (4) Service Consumer Import-Package ServiceReference ref = bundleContext . getServiceReference ( ServiceA .class.getName()); ServiceA service =  (ServiceA) bundleContext.getService(ref); Bundle Activator
實作  TinyURL Command(1) 擴充  Felix Shell  指令 Apache Felix Shell Service Activator Apache Felix Shell TUI Activator Tinyurl Command Activator
實作  TinyURL Command(2) org.apache.felix.shell Export-Package Import-Package //  發佈  Service bundleContext.registerService( org.apache.felix.shell. Command .class.getName(), new  TinyURLCommand (), null); Apache Felix Shell Service Activator Apache Felix Shell TUI Activator Tinyurl Command Activator 實作  Service
實作  TinyURL Command(3) publish publish 追蹤  Command  服務 加入新增的  Command  服務 使用  ShellService  擁有的  Command Apache Felix Shell Service Activator Apache Felix Shell TUI Activator Tinyurl Command Activator
動手做看看 實作  TinyurlCommand  替  Felix  增加指令 See TODO 2 &  #17..#21 tinyurl http://very_long_url.com.tw
詹景逸 Ching Yi, Chan. aka qrtt1 [email_address] Thank You

OSGi Small Lab

  • 1.
    OSG i 動態服務模組開發實作 詹景逸 Ching Yi, Chan. aka qrtt1 [email_address]
  • 2.
    Agenda 開發環境準備 JDKMaven Felix 練習主題介紹 Felix – OSGi Container 的使用 Bundle – 建立 OSGi 模組 Service – 建立 OSGi 服務
  • 3.
    開發環境準備 JDK #2 Java SE http://java.sun.com/javase/downloads/index.jsp 檢查環境變數 JAVA_HOME CLASSPATH PATH
  • 4.
    開發環境準備 Maven #3 取得檔案 http://maven.apache.org/download.html 解壓縮 ~/app c:\app 修改 PATH 變數 export PATH=$PATH:~/app/apache-maven- x.y.z /bin set PATH=%PATH%;c:\app\apache-maven- x.y.z \bin 執行測試 mvn -v
  • 5.
    開發環境準備 Felix –OSGi Container #5 取得檔案 http://apache.stu.edu.tw/felix/felix-1.4.1.zip 解壓縮 ~/app c:\app 啟動 Felix java -jar bin/felix.jar 停止 Felix stop 0 或是 shutdown
  • 6.
    Felix 基本操作啟動 Felix #6 java -jar bin/felix.jar 常用指令 help ps – 列出已安裝 Bundle install – 安裝 Bundle start – 啟動 Bundle stop – 停止 Bundle update – 更新 Bundle uninstall – 移除 Bundle ( 請先別執行 ) shutdown – 離開 felix
  • 7.
  • 8.
    安裝 BundleFile Install Bundle #7 功能:在 Felix 執行目錄下建立 load 資料夾。定期監看 load 資料夾的檔案,若是 OSGi Bundle 就 自動安裝 。 使用 Install 指令安裝 Bundle 透過網路檔案安裝 透過檔案系統安裝 測試 File Install Bundle ( 需先啟動 Bundle) 複製 hello.service-1.0.0.jar 至 load 資料夾 install http:// apache.ntu.edu.tw/felix/org.apache.felix.fileinstall-0.9.0.jar install file:// /c:/temp /org.apache.felix.fileinstall-0.9.0.jar install file:// /home/qrtt1/temp/ org.apache.felix.fileinstall-0.9.0.jar
  • 9.
    建立 Bundle使用 Maven 建立新的專案 #9 for unix-like for windows mvn archetype:create \ -Dversion=1.0.0 \ -DgroupId=javatwo2009 \ -DartifactId=hello.bundle mvn archetype:create ^ -Dversion=1.0.0 ^ -DgroupId=javatwo2009 ^ -DartifactId=hello.bundle
  • 10.
    Maven 專案導覽專案目錄 #9 Artifact 名稱 hello.bundle 編譯並打包專案 ( 請先執行這個步驟 ) cd hello.bundle mvn clean package
  • 11.
    使用 Maven-Bundle-Plugin(1) 修改 pom.xml 檔案 #10 改變 <packaging /> 為 bundle 增加 OSGi Framework 的 Dependency 設定 Maven-Bundle-Plugin ( 接續下頁 ) <dependency> <groupId>org.apache.felix</groupId> <artifactId>org.osgi.core</artifactId> <version>1.0.0</version> </dependency>
  • 12.
    使用 Maven-Bundle-Plugin(2) <build> <plugins> <plugin> <groupId>org.apache.felix</groupId> <artifactId>maven-bundle-plugin</artifactId> <extensions>true</extensions> <configuration> <instructions> <Export-Package>${pom.groupId}</Export-Package> <Bundle-SymbolicName>${pom.artifactId}</Bundle-SymbolicName> <Bundle-Activator>${pom.groupId}.Activator</Bundle-Activator> </instructions> </configuration> </plugin> </plugins> </build> Manifest-Version: 1.0 Export-Package: javatwo2009;uses:=&quot;org.osgi.framework&quot; Built-By: Administrator Tool: Bnd-0.0.308 Bundle-Name: hello.bundle Created-By: Apache Maven Bundle Plugin Bundle-Version: 1.0.0 Build-Jdk: 1.6.0_06 Bnd-LastModified: 1235833008625 Bundle-ManifestVersion: 2 Bundle-Activator: javatwo2009.Activator Import-Package: javatwo2009,org.osgi.framework;version=&quot;1.3&quot; Bundle-SymbolicName: hello.bundle
  • 13.
    建立 BundleActivator package javatwo2009; import org.osgi.framework.BundleActivator; import org.osgi.framework.BundleContext; /** * Hello world! */ public class Activator implements BundleActivator { public void start(BundleContext context) throws Exception { System. out .println(&quot;Hey!&quot;); } public void stop(BundleContext context) throws Exception { System. out .println(&quot;Bye!&quot;); } } #12 .. #13
  • 14.
    編譯與安裝 bundle使用 Maven 編譯並打包專案 #14 mvn clean package 安裝 bundle 將 target/hello.bundle-1.0.0.jar 複製到 FELIX_HOME/load 資料夾
  • 15.
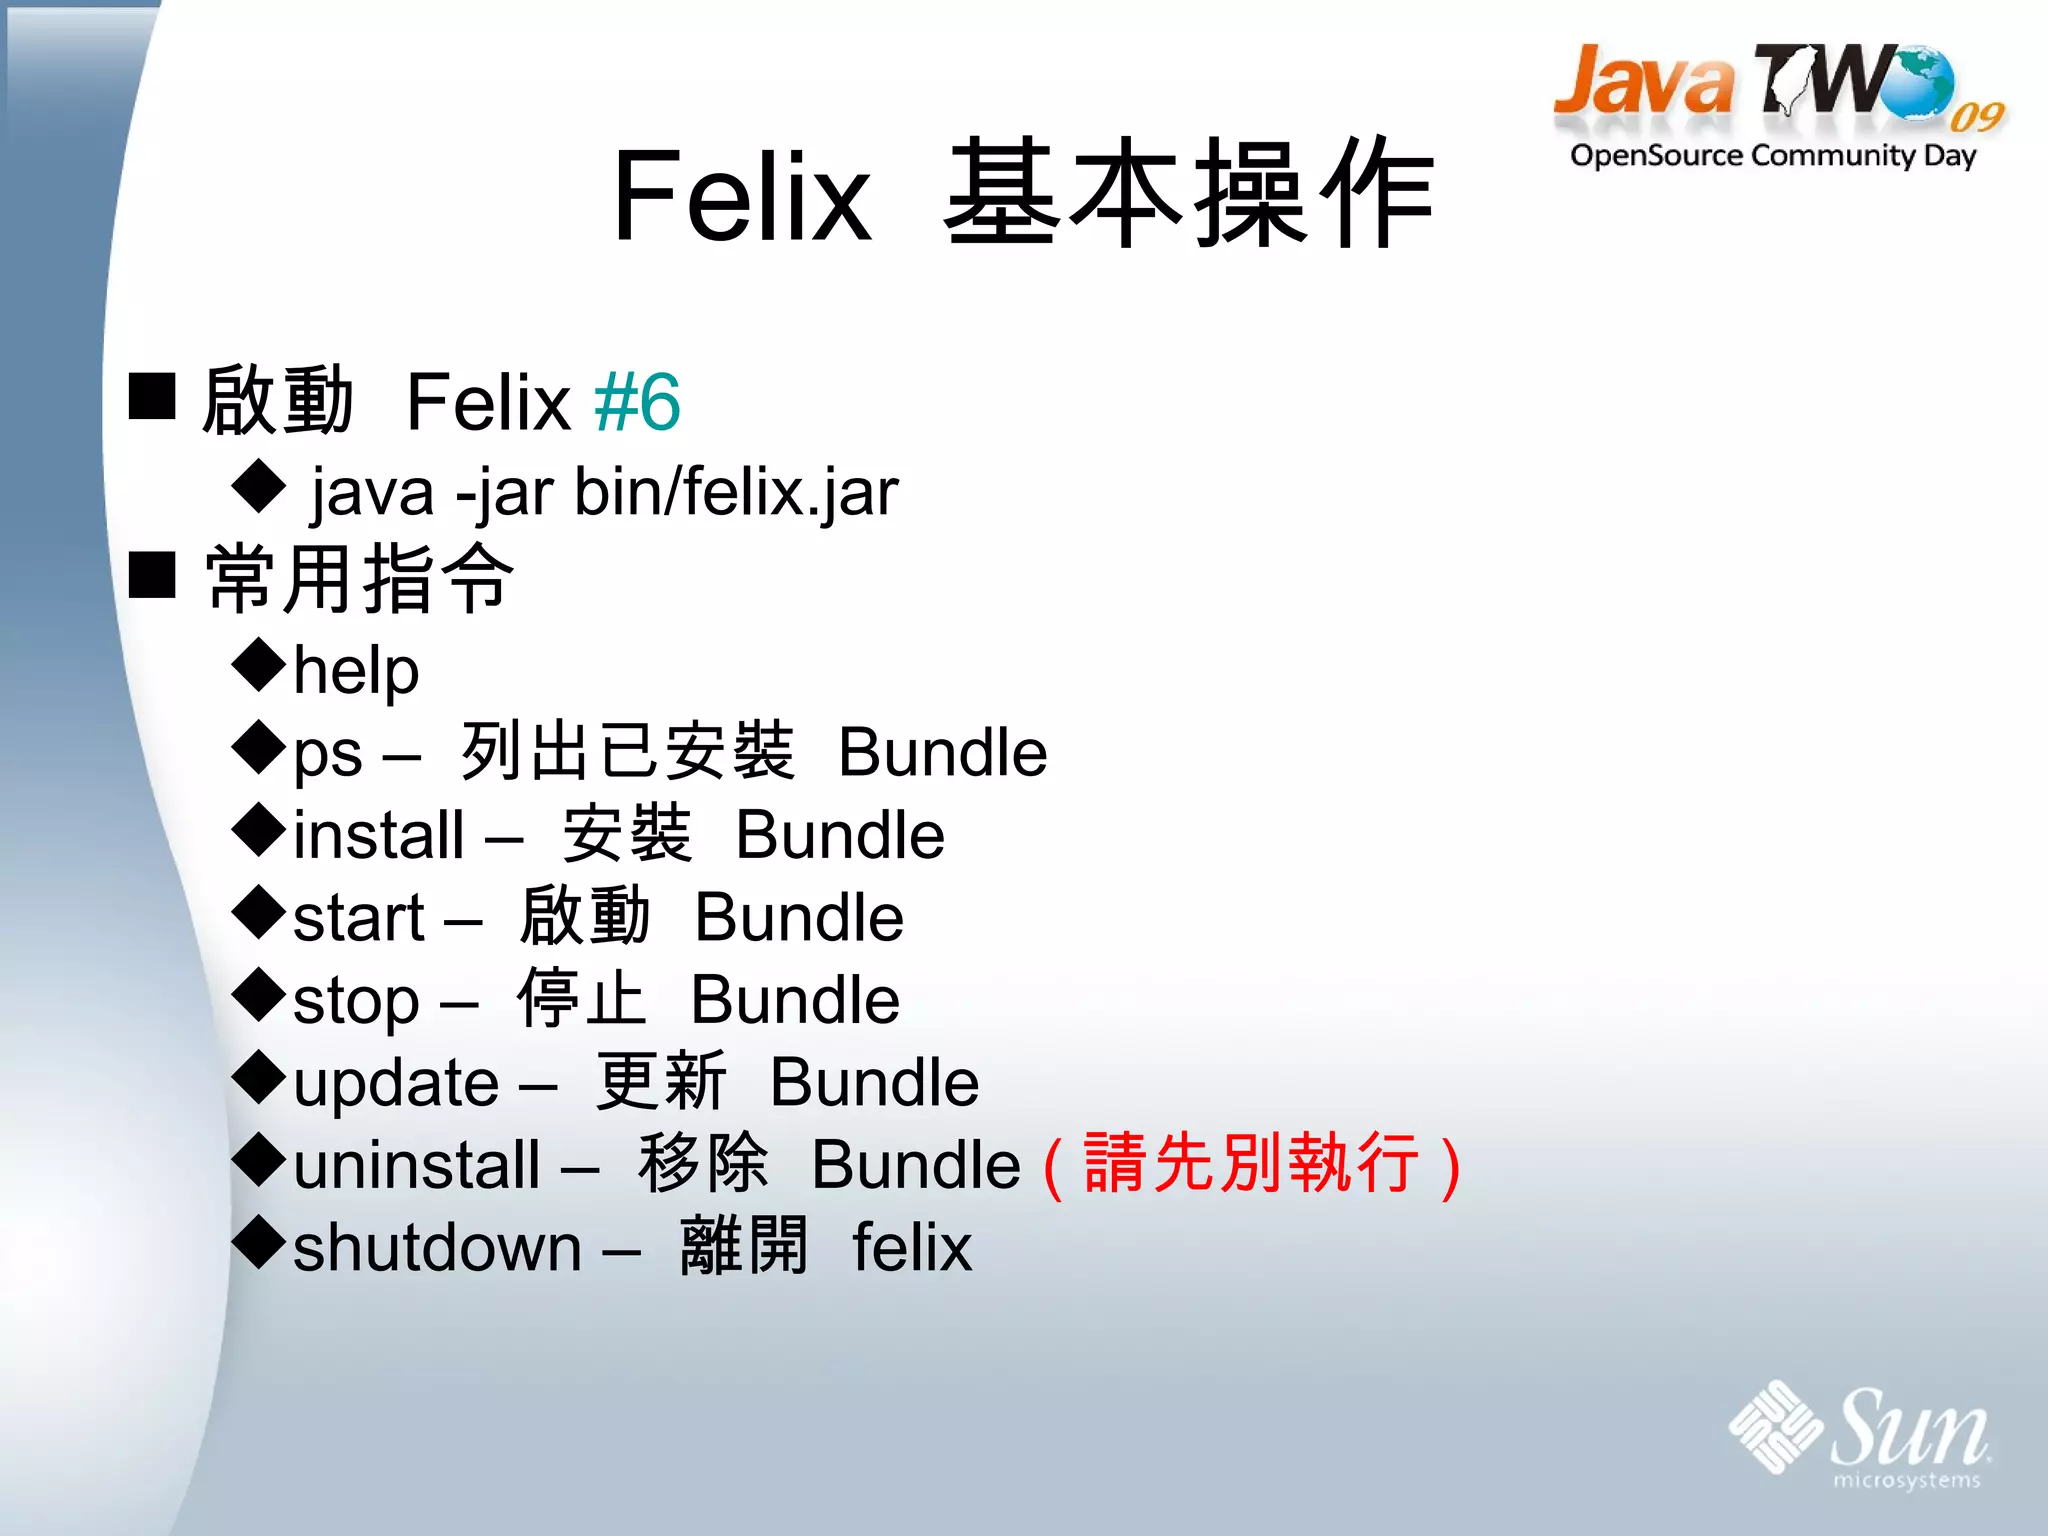
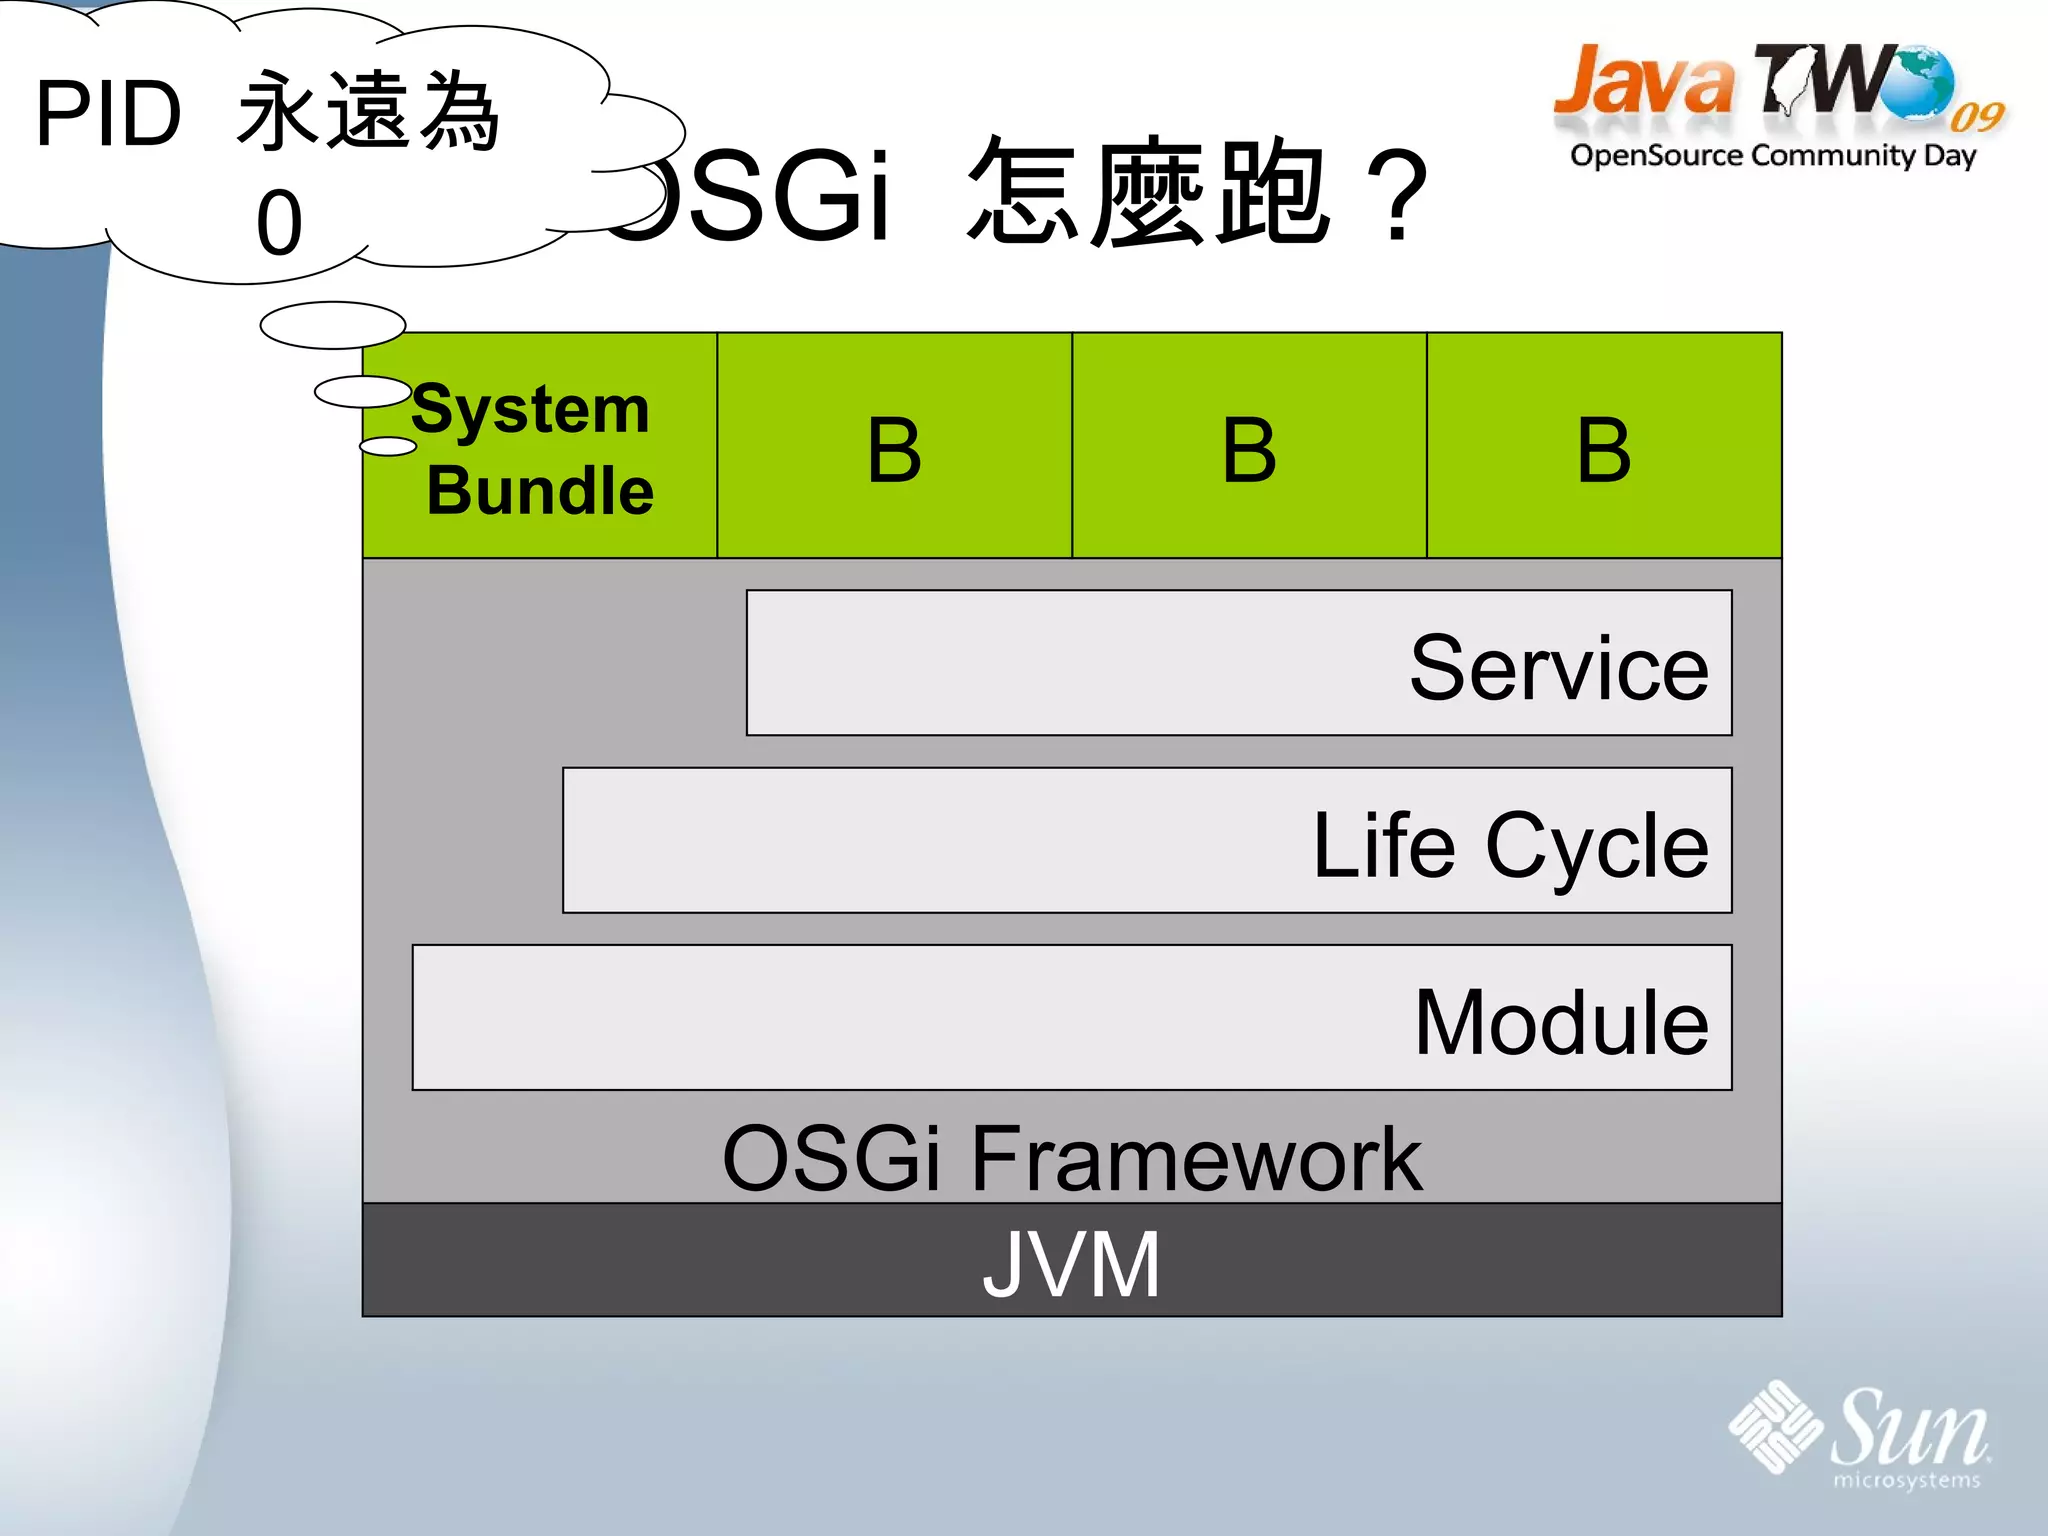
    OSGi 怎麼跑?System Bundle B B B PID 永遠為 0 JVM OSGi Framework Module Life Cycle Service
  • 16.
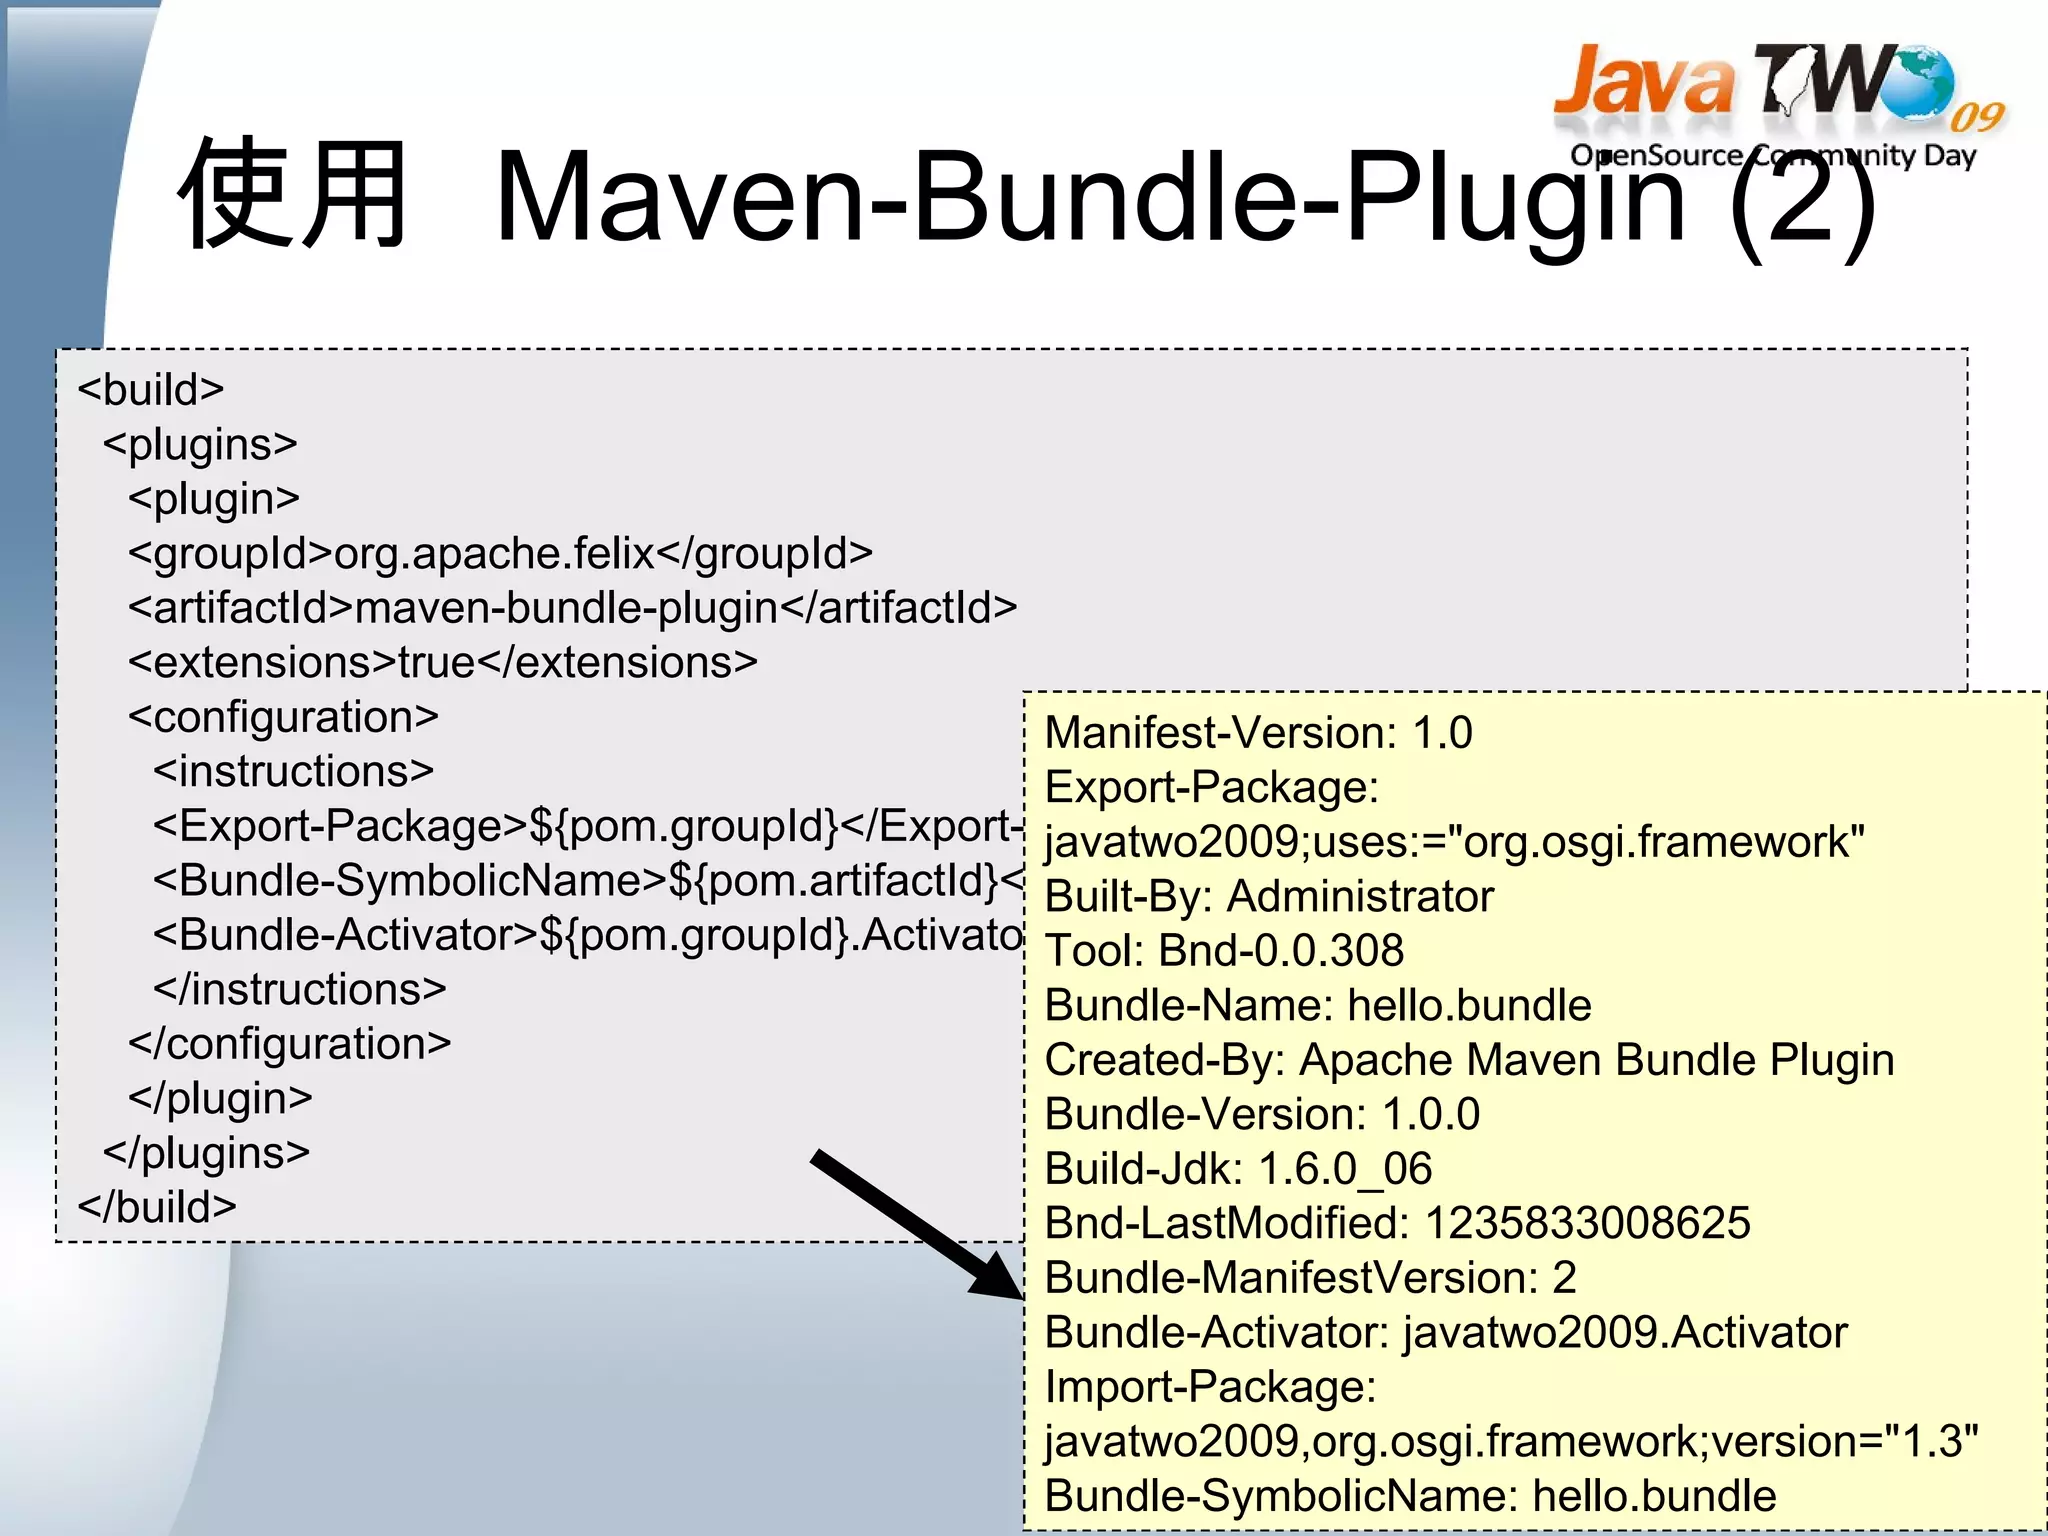
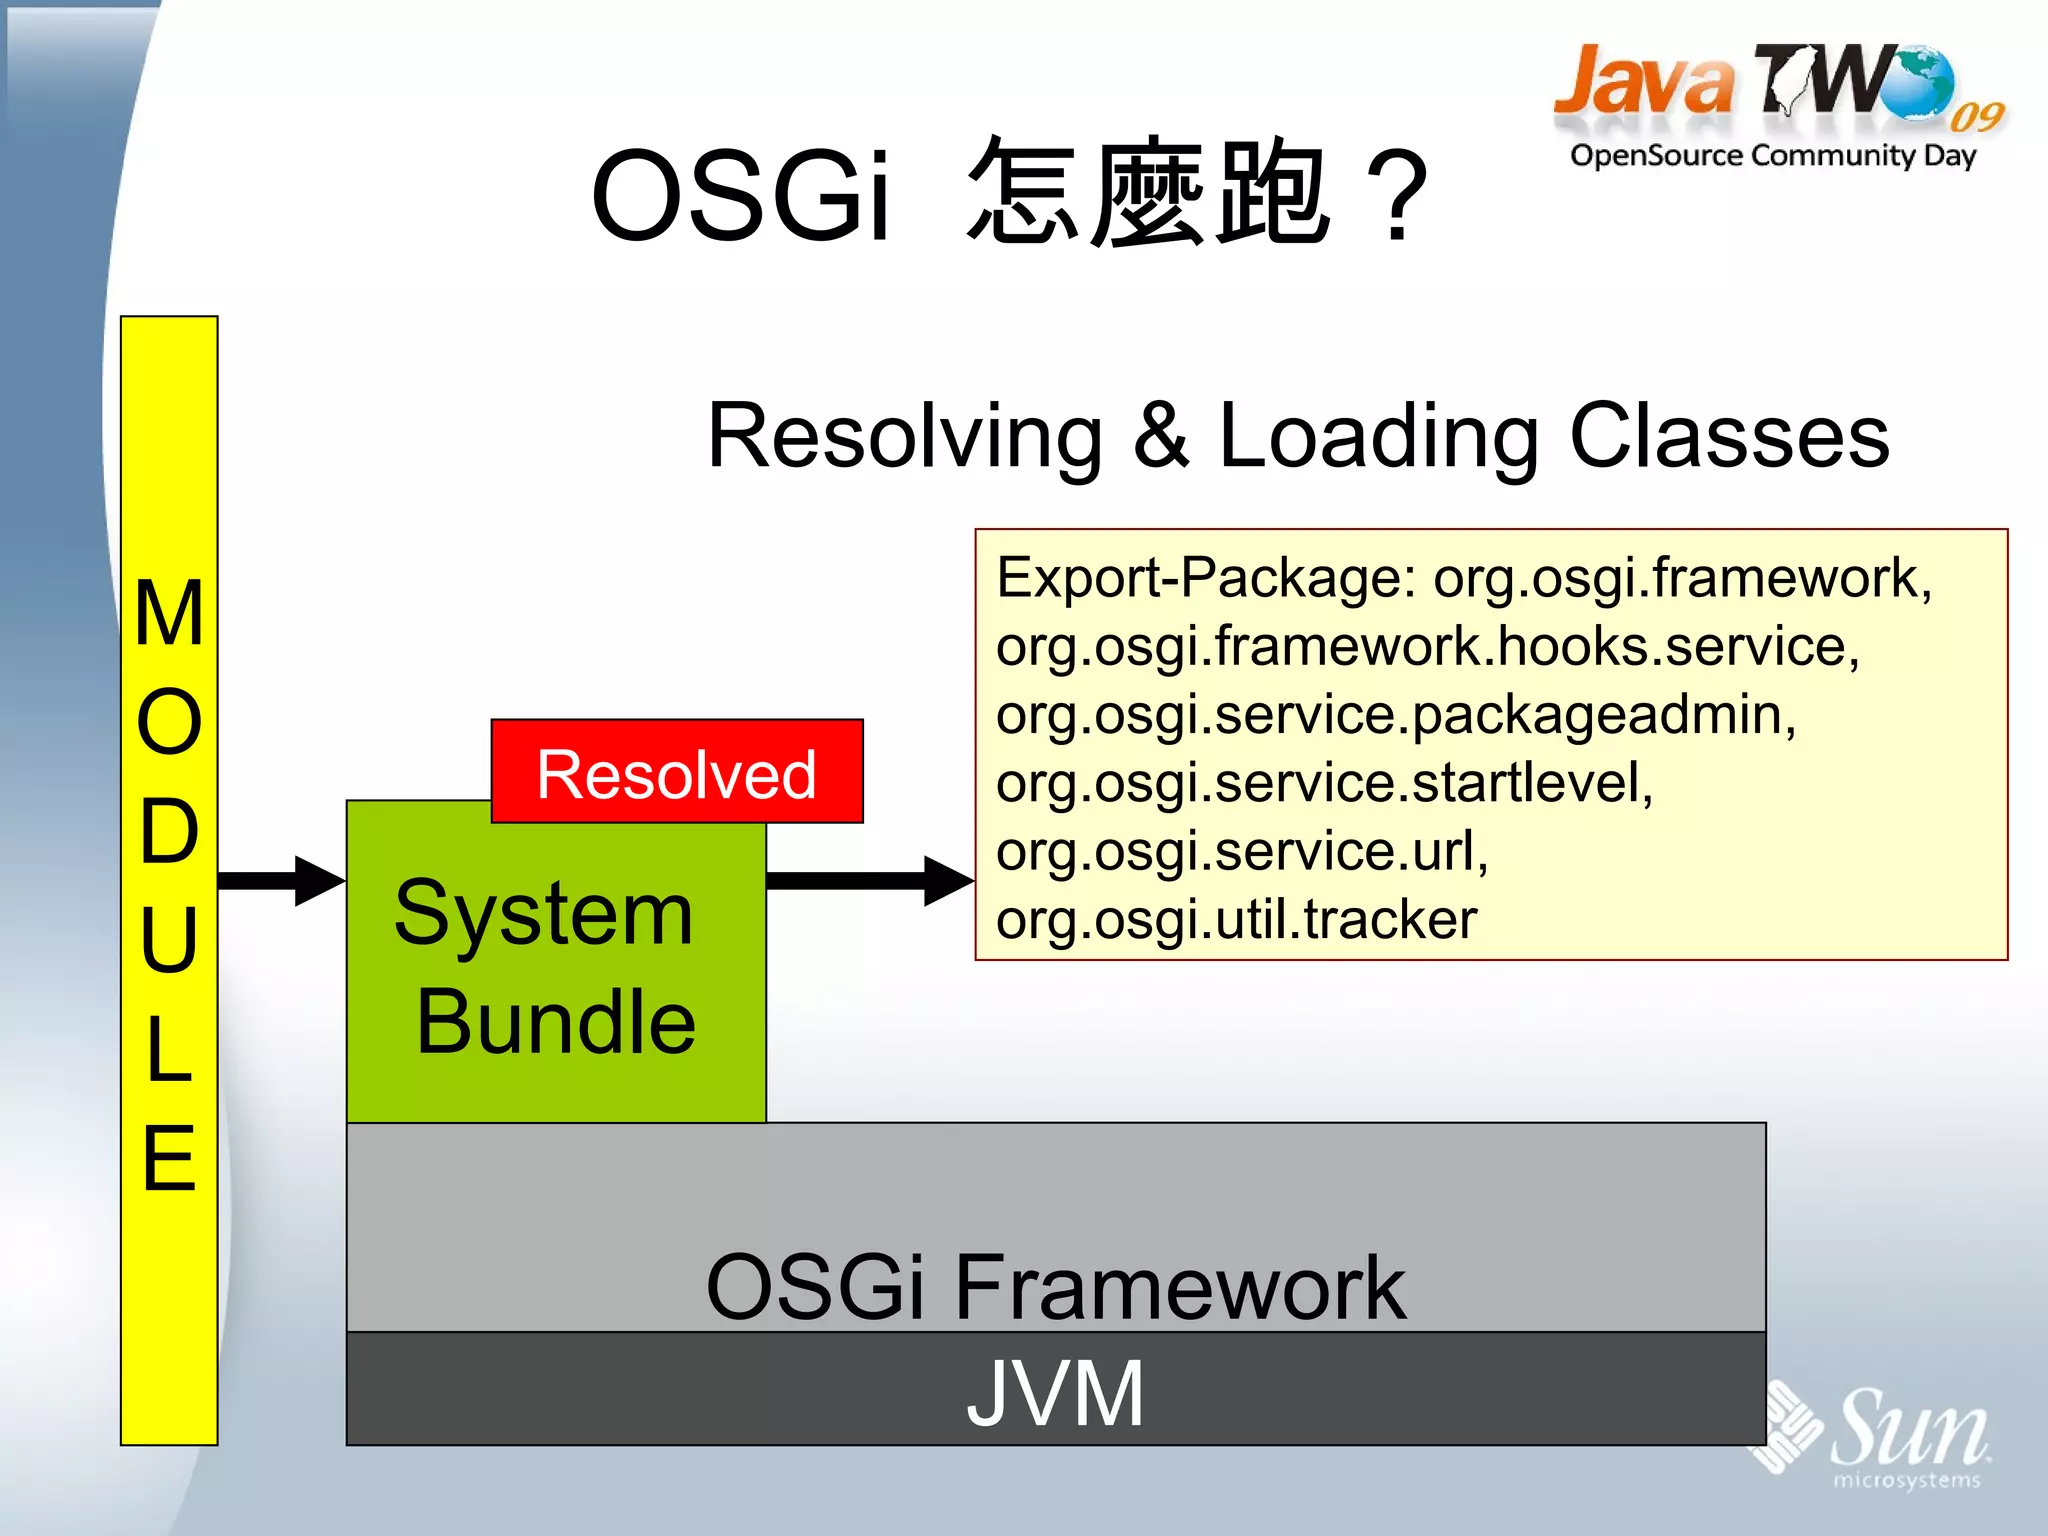
    OSGi 怎麼跑?Installed Resolving & Loading Classes Resolved JVM OSGi Framework System Bundle M O D U L E Export-Package: org.osgi.framework, org.osgi.framework.hooks.service, org.osgi.service.packageadmin, org.osgi.service.startlevel, org.osgi.service.url, org.osgi.util.tracker
  • 17.
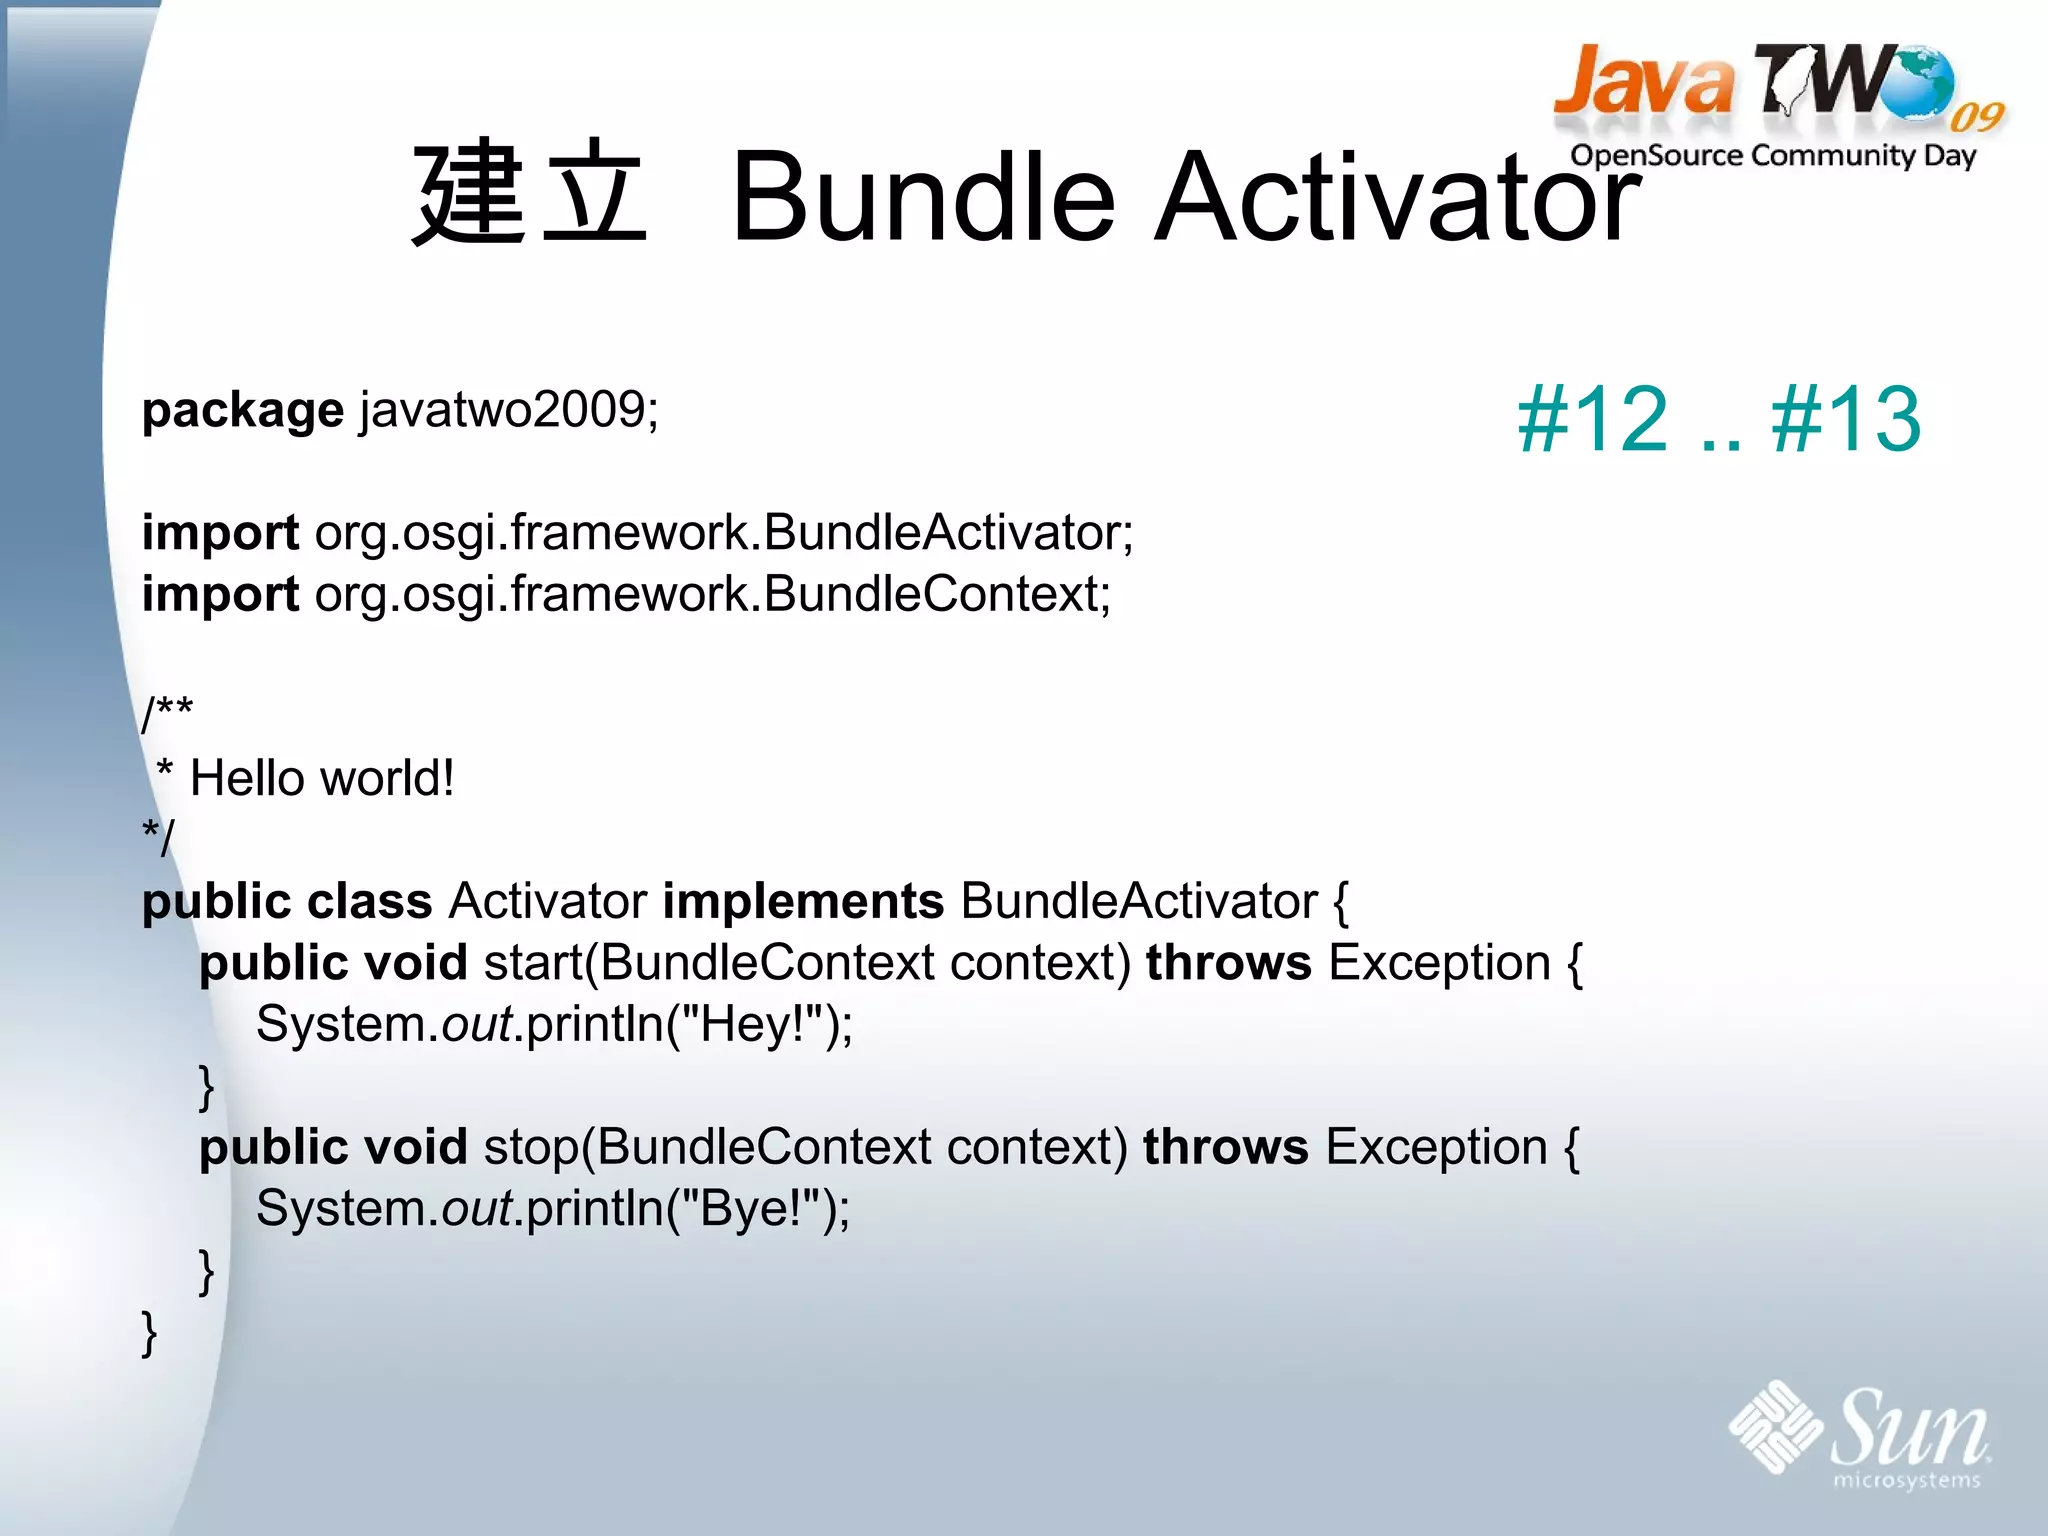
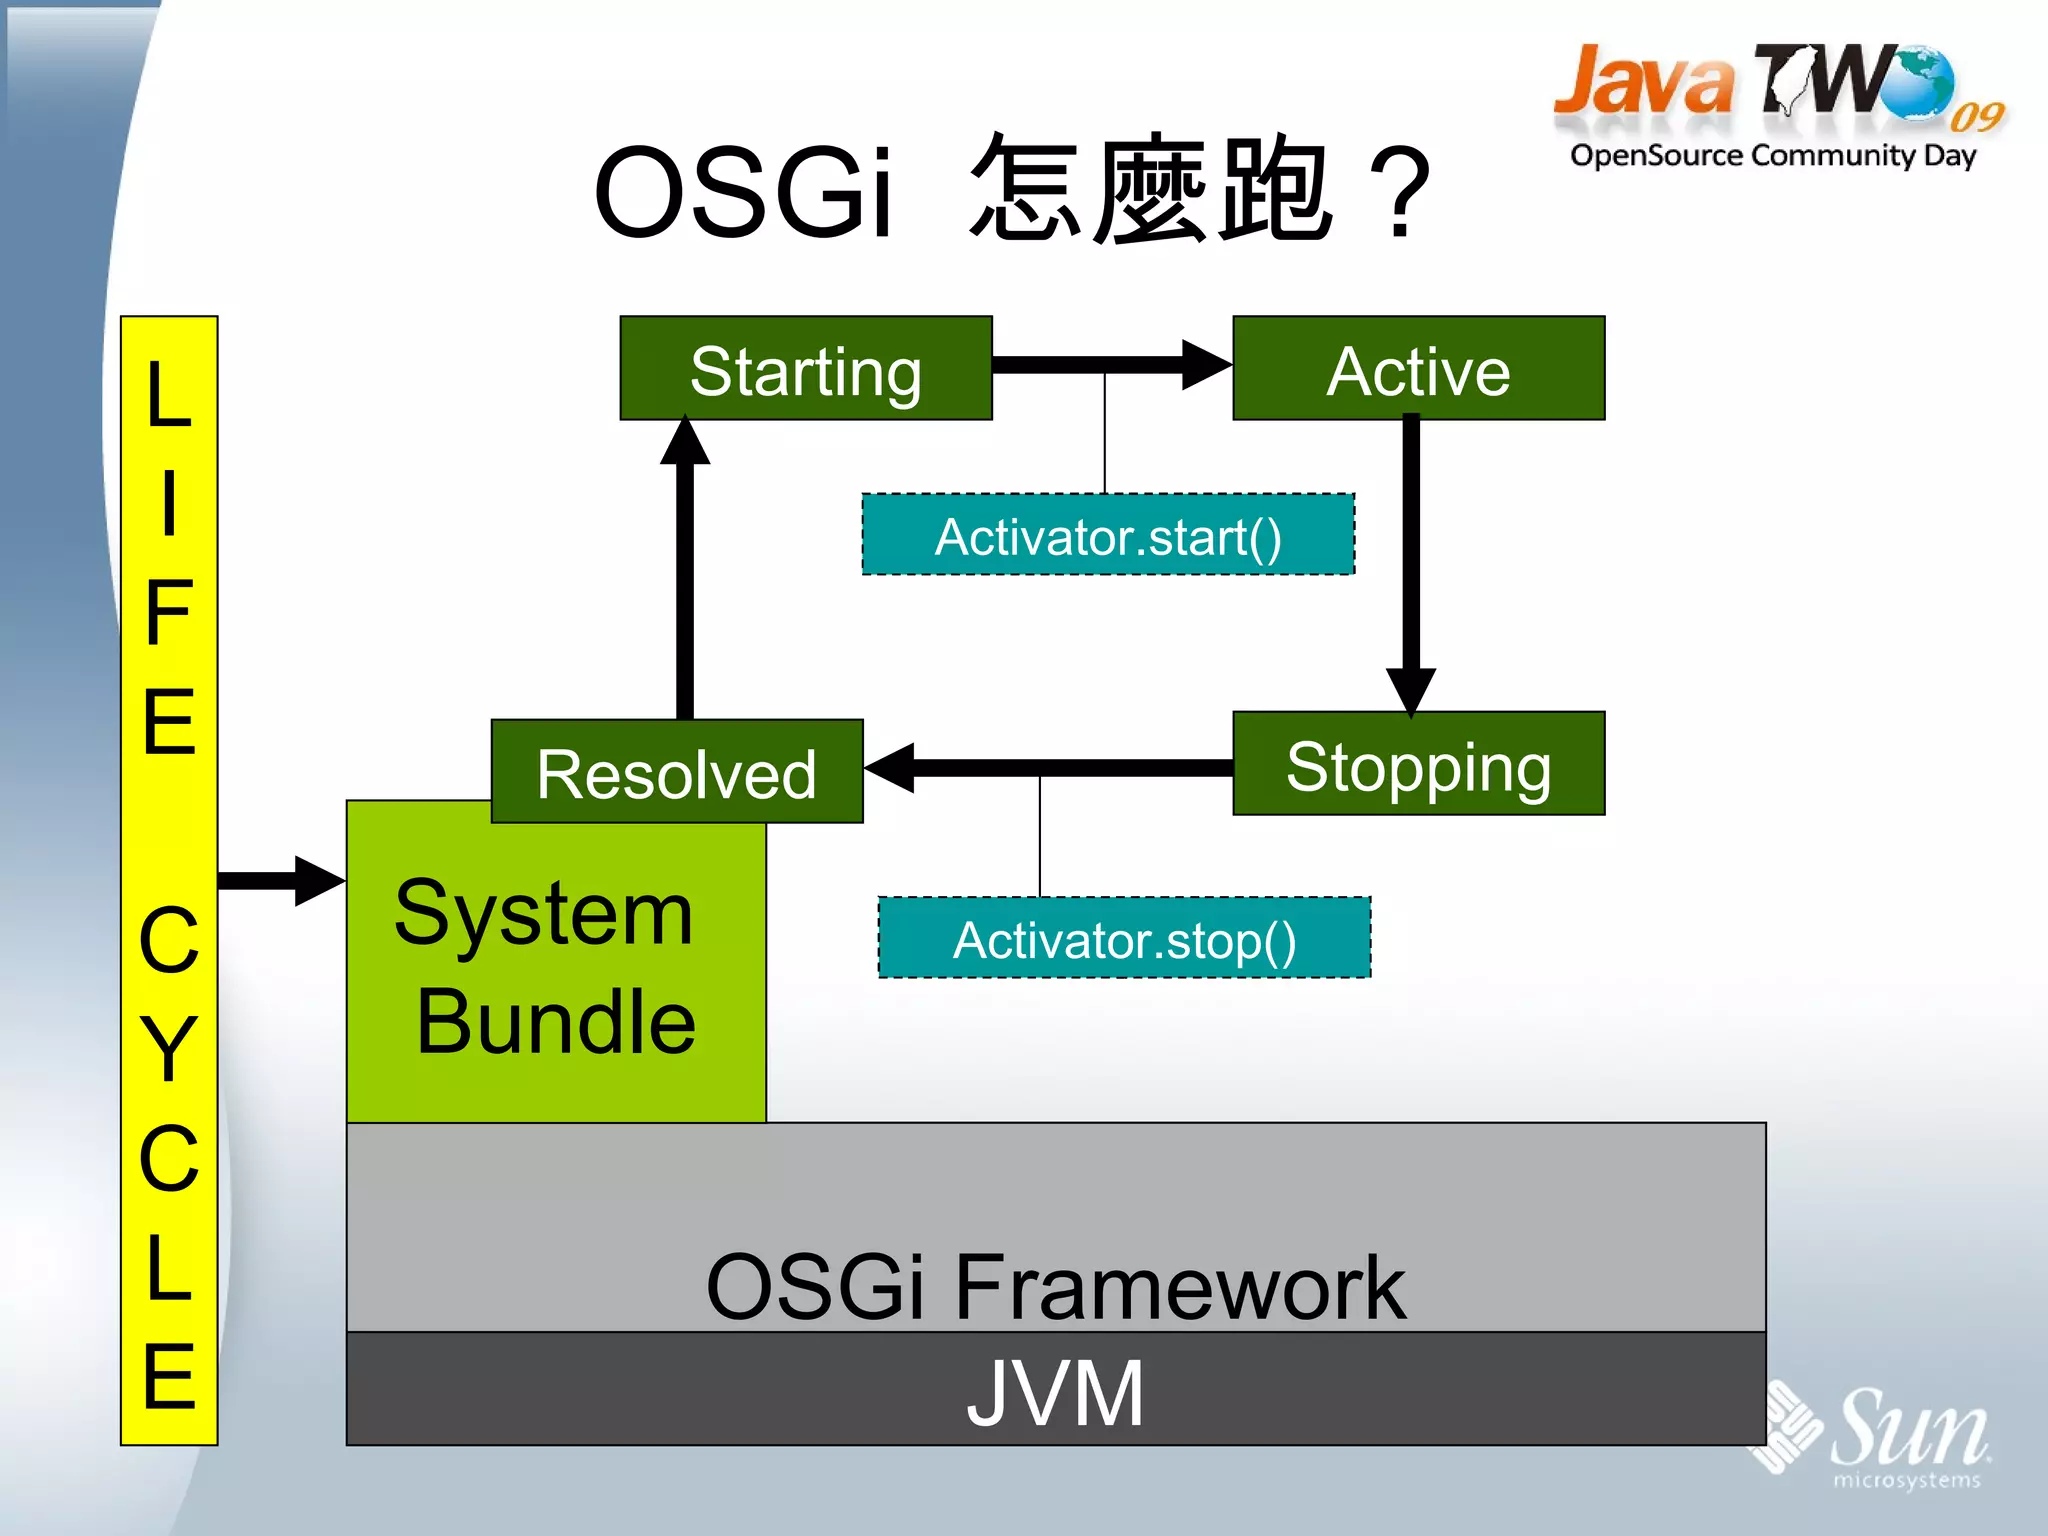
    OSGi 怎麼跑?Resolved public class Activator implements BundleActivator { public void start(BundleContext context) throws Exception { System. out .println(&quot;Hey!&quot;); } public void stop(BundleContext context) throws Exception { System. out .println(&quot;Bye!&quot;); } } JVM OSGi Framework System Bundle L I F E C Y C L E Starting Active Stopping Activator.stop() Activator.start()
  • 18.
    PART 2 Service is Everything
  • 19.
    OSGi Service 在哪裡? JVM OSGi Framework SERVICE REGISTRY Bundle Activator Bundle Activator Bundle Activator publish publish publish find & bind find & bind find & bind unpublish unpublish unpublish
  • 20.
    服務與實作角色 (1)Service Provider Interface , SPI #16 Export-Package Bundle Activator
  • 21.
    服務與實作角色 (2)Application Programming Interface , API Import-Package Bundle Activator
  • 22.
    服務與實作角色 (3)Service Provider Import-Package ServiceRegistration registration = bundleContext. registerService ( ServiceA .class.getName(), new ConcreteServiceA() , prop); Bundle Activator
  • 23.
    服務與實作角色 (4)Service Consumer Import-Package ServiceReference ref = bundleContext . getServiceReference ( ServiceA .class.getName()); ServiceA service = (ServiceA) bundleContext.getService(ref); Bundle Activator
  • 24.
    實作 TinyURLCommand(1) 擴充 Felix Shell 指令 Apache Felix Shell Service Activator Apache Felix Shell TUI Activator Tinyurl Command Activator
  • 25.
    實作 TinyURLCommand(2) org.apache.felix.shell Export-Package Import-Package // 發佈 Service bundleContext.registerService( org.apache.felix.shell. Command .class.getName(), new TinyURLCommand (), null); Apache Felix Shell Service Activator Apache Felix Shell TUI Activator Tinyurl Command Activator 實作 Service
  • 26.
    實作 TinyURLCommand(3) publish publish 追蹤 Command 服務 加入新增的 Command 服務 使用 ShellService 擁有的 Command Apache Felix Shell Service Activator Apache Felix Shell TUI Activator Tinyurl Command Activator
  • 27.
    動手做看看 實作 TinyurlCommand 替 Felix 增加指令 See TODO 2 & #17..#21 tinyurl http://very_long_url.com.tw
  • 28.
    詹景逸 Ching Yi,Chan. aka qrtt1 [email_address] Thank You