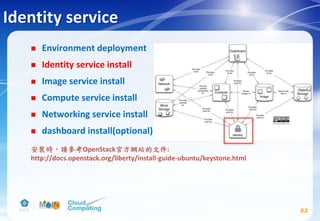
This document discusses learning objectives related to OpenStack architecture and installation. It will describe OpenStack architecture and components. It will also cover how to install the OpenStack Liberty release. The document provides an outline and introduces concepts such as virtualization technologies, OpenStack introduction, and installing OpenStack.


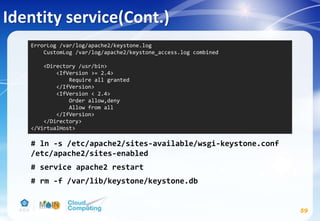
![Identity service(Cont.)
55
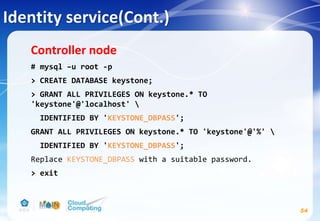
# openssl rand -hex 10
→ 記下這個random value
# echo "manual" > /etc/init/keystone.override
# apt-get install keystone apache2 libapache2-mod-wsgi
memcached python-memcache
# vim /etc/keystone/keystone.conf
Replace ADMIN_TOKEN with the random value that you
generated in a previous step.
[DEFAULT]
...
admin_token = ADMIN_TOKEN
verbose = True](https://image.slidesharecdn.com/openstackinstallationliberty-170302070405/85/Openstack-Installation-ver-liberty-55-320.jpg)
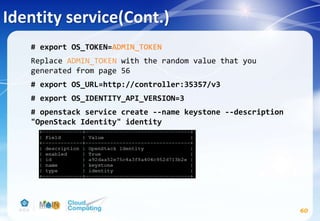
![Identity service(Cont.)
56
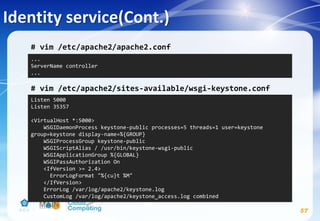
Replace KEYSTONE_DBPASS with the password you chose for
the database.
# su -s /bin/sh -c "keystone-manage db_sync" keystone
[database]
...
connection = mysql+pymysql://keystone:KEYSTONE_DBPASS@controller/keystone
[memcache]
...
servers = localhost:11211
[token]
...
provider = uuid
driver = memcache
[revoke]
...
driver = sql](https://image.slidesharecdn.com/openstackinstallationliberty-170302070405/85/Openstack-Installation-ver-liberty-56-320.jpg)
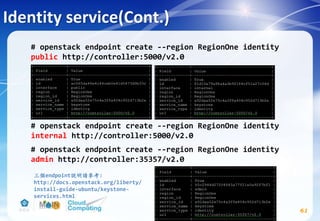
![Identity service-Verify operation
66
# vim /etc/keystone/keystone-paste.ini
remove admin_token_auth from the [pipeline:public_api],
[pipeline:admin_api], and [pipeline:api_v3] sections.](https://image.slidesharecdn.com/openstackinstallationliberty-170302070405/85/Openstack-Installation-ver-liberty-66-320.jpg)

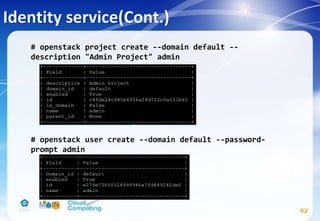
![Image service(Cont.)
74
# apt-get install glance python-glanceclient
# vim /etc/glance/glance-api.conf
Replace GLANCE_DBPASS with the password you chose for the
Image service database & Replace GLANCE_PASS with the
password you chose for the glance user in the Identity
service.
[database]
...
connection = mysql+pymysql://glance:GLANCE_DBPASS@controller/glance
[keystone_authtoken] #註解掉[keystone_authtoken] section中其他設定
...
auth_uri = http://controller:5000
auth_url = http://controller:35357
auth_plugin = password
project_domain_id = default
user_domain_id = default
project_name = service
username = glance
password = GLANCE_PASS](https://image.slidesharecdn.com/openstackinstallationliberty-170302070405/85/Openstack-Installation-ver-liberty-74-320.jpg)
![Image service(Cont.)
75
[paste_deploy]
...
flavor = keystone
[glance_store]
...
default_store = file
filesystem_store_datadir = /var/lib/glance/images/
[DEFAULT]
...
notification_driver = noop
verbose = True](https://image.slidesharecdn.com/openstackinstallationliberty-170302070405/85/Openstack-Installation-ver-liberty-75-320.jpg)
![Image service(Cont.)
76
# vim /etc/glance/glance-registry.conf
Replace GLANCE_DBPASS with the password you chose for the
Image service database & Replace GLANCE_PASS with the
password you chose for the glance user in the Identity
service.
[database]
...
connection = mysql+pymysql://glance:GLANCE_DBPASS@controller/glance
[keystone_authtoken] #註解掉[keystone_authtoken] section中其他設定
...
auth_uri = http://controller:5000
auth_url = http://controller:35357
auth_plugin = password
project_domain_id = default
user_domain_id = default
project_name = service
username = glance
password = GLANCE_PASS](https://image.slidesharecdn.com/openstackinstallationliberty-170302070405/85/Openstack-Installation-ver-liberty-76-320.jpg)
![# su -s /bin/sh -c "glance-manage db_sync" glance
# service glance-registry restart
# service glance-api restart
# rm -f /var/lib/glance/glance.sqlite
Image service(Cont.)
77
[paste_deploy]
...
flavor = keystone
[DEFAULT]
...
notification_driver = noop
verbose = True](https://image.slidesharecdn.com/openstackinstallationliberty-170302070405/85/Openstack-Installation-ver-liberty-77-320.jpg)

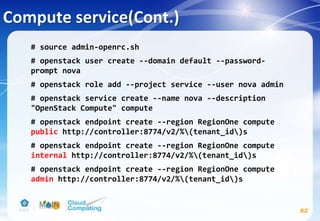
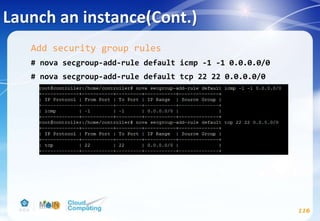
![Compute service(Cont.)
83
# apt-get install nova-api nova-cert nova-conductor nova-
consoleauth nova-novncproxy nova-scheduler python-
novaclient
# vim /etc/nova/nova.conf
CONTROLLER_IP_ADDRESS在本投影片範例應設為192.168.174.143
參考投影片 p.33 網路環境
[DEFAULT]
...
rpc_backend = rabbit
auth_strategy = keystone
my_ip = CONTROLLER_IP_ADDRESS
network_api_class = nova.network.neutronv2.api.API
security_group_api = neutron
linuxnet_interface_driver =
nova.network.linux_net.NeutronLinuxBridgeInterfaceDriver
firewall_driver = nova.virt.firewall.NoopFirewallDriver
enabled_apis=osapi_compute,metadata
verbose = True](https://image.slidesharecdn.com/openstackinstallationliberty-170302070405/85/Openstack-Installation-ver-liberty-83-320.jpg)
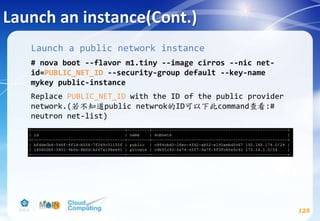
![Compute service(Cont.)
84
Replace NOVA_DBPASS with the password you chose for the
Compute database.
Replace RABBIT_PASS with the password you chose for the
openstack account in RabbitMQ.
[database]
...
connection = mysql+pymysql://nova:NOVA_DBPASS@controller/nova
[oslo_messaging_rabbit]
...
rabbit_host = controller
rabbit_userid = openstack
rabbit_password = RABBIT_PASS](https://image.slidesharecdn.com/openstackinstallationliberty-170302070405/85/Openstack-Installation-ver-liberty-84-320.jpg)
![Compute service(Cont.)
85
Replace NOVA_PASS with the password you chose for the
nova user in the Identity service.
[keystone_authtoken] #註解掉[keystone_authtoken] section中其他設定
...
auth_uri = http://controller:5000
auth_url = http://controller:35357
auth_plugin = password
project_domain_id = default
user_domain_id = default
project_name = service
username = nova
password = NOVA_PASS
[vnc]
...
vncserver_listen = $my_ip
vncserver_proxyclient_address = $my_ip](https://image.slidesharecdn.com/openstackinstallationliberty-170302070405/85/Openstack-Installation-ver-liberty-85-320.jpg)
![Compute service(Cont.)
86
# su -s /bin/sh -c "nova-manage db sync" nova
# service nova-api restart
# service nova-cert restart
# service nova-consoleauth restart
# service nova-scheduler restart
# service nova-conductor restart
# service nova-novncproxy restart
# rm -f /var/lib/nova/nova.sqlite
[glance]
...
host = controller
[oslo_concurrency]
...
lock_path = /var/lib/nova/tmp](https://image.slidesharecdn.com/openstackinstallationliberty-170302070405/85/Openstack-Installation-ver-liberty-86-320.jpg)
![Compute service(Cont.)
87
Compute node
# apt-get install nova-compute sysfsutils
# vim /etc/nova/nova.conf
COMPUTE_IP_ADDRESS在本投影片範例應設為192.168.174.144
(參考投影片 p.33 網路環境)
[DEFAULT]
...
rpc_backend = rabbit
auth_strategy = keystone
my_ip = COMPUTE_IP_ADDRESS
network_api_class = nova.network.neutronv2.api.API
security_group_api = neutron
linuxnet_interface_driver =
nova.network.linux_net.NeutronLinuxBridgeInterfaceDriver
firewall_driver = nova.virt.firewall.NoopFirewallDriver
verbose = True](https://image.slidesharecdn.com/openstackinstallationliberty-170302070405/85/Openstack-Installation-ver-liberty-87-320.jpg)
![Compute service(Cont.)
88
Replace RABBIT_PASS with the password you chose for the
openstack account in RabbitMQ.
Replace NOVA_PASS with the password you chose for the
nova user in the Identity service.
[oslo_messaging_rabbit]
...
rabbit_host = controller
rabbit_userid = openstack
rabbit_password = RABBIT_PASS
[keystone_authtoken] #註解掉[keystone_authtoken] section中其他設定
...
auth_uri = http://controller:5000
auth_url = http://controller:35357
auth_plugin = password
project_domain_id = default
user_domain_id = default
project_name = service
username = nova
password = NOVA_PASS](https://image.slidesharecdn.com/openstackinstallationliberty-170302070405/85/Openstack-Installation-ver-liberty-88-320.jpg)
![Compute service(Cont.)
89
[vnc]
...
enabled = True
vncserver_listen = 0.0.0.0
vncserver_proxyclient_address = $my_ip
novncproxy_base_url = http://controller:6080/vnc_auto.html
[glance]
...
host = controller
[oslo_concurrency]
...
lock_path = /var/lib/nova/tmp](https://image.slidesharecdn.com/openstackinstallationliberty-170302070405/85/Openstack-Installation-ver-liberty-89-320.jpg)
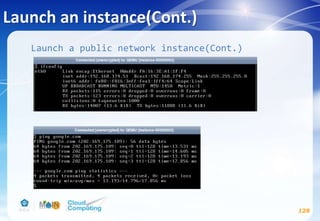
![Compute service(Cont.)
# egrep -c '(vmx|svm)' /proc/cpuinfo
→若輸出數值大於等於1則不需做額外設定,若數值等於0:
# vim /etc/nova/nova-compute.conf
kvm改為qemu
# service nova-compute restart
# rm -f /var/lib/nova/nova.sqlite
90
[DEFAULT]
compute_driver=libvirt.LibvirtDriver
[libvirt]
virt_type=kvm](https://image.slidesharecdn.com/openstackinstallationliberty-170302070405/85/Openstack-Installation-ver-liberty-90-320.jpg)
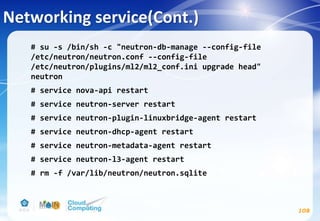
![Networking service(Cont.)
98
Controller node
# apt-get install neutron-server neutron-plugin-ml2
neutron-plugin-linuxbridge-agent neutron-l3-agent
neutron-dhcp-agent neutron-metadata-agent python-
neutronclient conntrack
# vim /etc/neutron/neutron.conf
[DEFAULT]
...
core_plugin = ml2
service_plugins = router
allow_overlapping_ips = True
rpc_backend = rabbit
auth_strategy = keystone
notify_nova_on_port_status_changes = True
notify_nova_on_port_data_changes = True
nova_url = http://controller:8774/v2
verbose = True](https://image.slidesharecdn.com/openstackinstallationliberty-170302070405/85/Openstack-Installation-ver-liberty-98-320.jpg)
![Networking service(Cont.)
99
Replace NEUTRON_PASS with the password you chose for the
neutron user in the Identity service.
[keystone_authtoken] #註解掉[keystone_authtoken] section中其他設定
...
auth_uri = http://controller:5000
auth_url = http://controller:35357
auth_plugin = password
project_domain_id = default
user_domain_id = default
project_name = service
username = neutron
password = NEUTRON_PASS](https://image.slidesharecdn.com/openstackinstallationliberty-170302070405/85/Openstack-Installation-ver-liberty-99-320.jpg)
![Networking service(Cont.)
100
Replace NEUTRON_DBPASS with the password you chose for
the database.
Replace NOVA_PASS with the password you chose for the
nova user in the Identity service.
[database]
...
connection = mysql+pymysql://neutron:NEUTRON_DBPASS@controller/neutron
[nova]
...
auth_url = http://controller:35357
auth_plugin = password
project_domain_id = default
user_domain_id = default
region_name = RegionOne
project_name = service
username = nova
password = NOVA_PASS](https://image.slidesharecdn.com/openstackinstallationliberty-170302070405/85/Openstack-Installation-ver-liberty-100-320.jpg)
![Networking service(Cont.)
101
Replace RABBIT_PASS with the password you chose for the
openstack account in RabbitMQ.
[oslo_messaging_rabbit]
...
rabbit_host = controller
rabbit_userid = openstack
rabbit_password = RABBIT_PASS](https://image.slidesharecdn.com/openstackinstallationliberty-170302070405/85/Openstack-Installation-ver-liberty-101-320.jpg)
![Networking service(Cont.)
102
# vim /etc/neutron/plugins/ml2/ml2_conf.ini
[ml2]
...
type_drivers = flat,vlan,vxlan
tenant_network_types = vxlan
mechanism_drivers = linuxbridge,l2population
extension_drivers = port_security
[ml2_type_flat]
...
flat_networks = public
[securitygroup]
...
enable_ipset = True
[ml2_type_vxlan]
...
vni_ranges = 1:1000](https://image.slidesharecdn.com/openstackinstallationliberty-170302070405/85/Openstack-Installation-ver-liberty-102-320.jpg)
![Networking service(Cont.)
103
# vim /etc/neutron/plugins/ml2/linuxbridge_agent.ini
Replace PUBLIC_INTERFACE_NAME with the name of the
underlying physical public network interface.
PUBLIC_INTERFACE_NAME在本投影片範例應設為 eth0 (參考投影片
p.33 網路環境)
Replace PUBLIC_INTERFACE_IP_ADDRESS with the name of the
underlying physical public network interface.
PUBLIC_INTERFACE_IP_ADDRESS在本投影片範例應設為
192.168.174.143 (參考投影片 p.33 網路環境)
[linux_bridge]
...
physical_interface_mappings = public:PUBLIC_INTERFACE_NAME
[vxlan]
enable_vxlan = True
local_ip = OVERLAY_INTERFACE_IP_ADDRESS
l2_population = True](https://image.slidesharecdn.com/openstackinstallationliberty-170302070405/85/Openstack-Installation-ver-liberty-103-320.jpg)
![Networking service(Cont.)
104
[agent]
...
prevent_arp_spoofing = True
[securitygroup]
...
enable_security_group = True
firewall_driver = neutron.agent.linux.iptables_firewall.IptablesFirewallDriver](https://image.slidesharecdn.com/openstackinstallationliberty-170302070405/85/Openstack-Installation-ver-liberty-104-320.jpg)
![Networking service(Cont.)
105
# vim /etc/neutron/l3_agent.ini
# vim /etc/neutron/dhcp_agent.ini
# vim /etc/neutron/dnsmasq-neutron.conf
[DEFAULT]
...
verbose = True
interface_driver = neutron.agent.linux.interface.BridgeInterfaceDriver
dhcp_driver = neutron.agent.linux.dhcp.Dnsmasq
enable_isolated_metadata = True
dnsmasq_config_file = /etc/neutron/dnsmasq-neutron.conf
[DEFAULT]
...
interface_driver = neutron.agent.linux.interface.BridgeInterfaceDriver
external_network_bridge =
verbose = True
dhcp-option-force=26,1450](https://image.slidesharecdn.com/openstackinstallationliberty-170302070405/85/Openstack-Installation-ver-liberty-105-320.jpg)
![Networking service(Cont.)
106
# vim /etc/neutron/metadata_agent.ini
Replace NEUTRON_PASS with the password you chose for the
neutron user in the Identity service & Replace
METADATA_SECRET with a suitable secret for the metadata
proxy.
[DEFAULT]
...
auth_uri = http://controller:5000
auth_url = http://controller:35357
auth_region = RegionOne
auth_plugin = password
project_domain_id = default
user_domain_id = default
project_name = service
username = neutron
password = NEUTRON_PASS
nova_metadata_ip = controller
metadata_proxy_shared_secret = METADATA_SECRET
verbose = True](https://image.slidesharecdn.com/openstackinstallationliberty-170302070405/85/Openstack-Installation-ver-liberty-106-320.jpg)
![Networking service(Cont.)
107
# vim /etc/nova/nova.conf
Replace NEUTRON_PASS with the password you chose for the
neutron user in the Identity service & Replace
METADATA_SECRET with the secret you chose for the
metadata proxy.
[neutron]
...
url = http://controller:9696
auth_url = http://controller:35357
auth_plugin = password
project_domain_id = default
user_domain_id = default
region_name = RegionOne
project_name = service
username = neutron
password = NEUTRON_PASS
service_metadata_proxy = True
metadata_proxy_shared_secret = METADATA_SECRET](https://image.slidesharecdn.com/openstackinstallationliberty-170302070405/85/Openstack-Installation-ver-liberty-107-320.jpg)
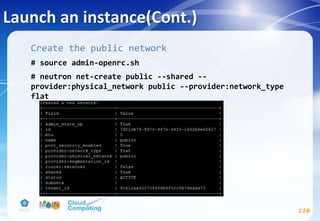
![Networking service
109
Compute node
# apt-get install neutron-plugin-linuxbridge-agent
conntrack
# vim /etc/neutron/neutron.conf
In the [database] section, comment out any connection
options because compute nodes do not directly access the
database.
[DEFAULT]
...
rpc_backend = rabbit
auth_strategy = keystone
verbose = True](https://image.slidesharecdn.com/openstackinstallationliberty-170302070405/85/Openstack-Installation-ver-liberty-109-320.jpg)
![Networking service(Cont.)
110
Replace RABBIT_PASS with the password you chose for the
openstack account in RabbitMQ & Replace NEUTRON_PASS with
the password you chose for the neutron user in the
Identity service.
[oslo_messaging_rabbit]
...
rabbit_host = controller
rabbit_userid = openstack
rabbit_password = RABBIT_PASS
[keystone_authtoken] #註解掉[keystone_authtoken] section中其他設定
...
auth_uri = http://controller:5000
auth_url = http://controller:35357
auth_plugin = password
project_domain_id = default
user_domain_id = default
project_name = service
username = neutron
password = NEUTRON_PASS](https://image.slidesharecdn.com/openstackinstallationliberty-170302070405/85/Openstack-Installation-ver-liberty-110-320.jpg)
![Networking service(Cont.)
111
# vim /etc/neutron/plugins/ml2/linuxbridge_agent.ini
Replace PUBLIC_INTERFACE_NAME with the name of the
underlying physical public network interface.
PUBLIC_INTERFACE_NAME在本投影片範例應設為 eth0 (參考投影片
p.33 網路環境)
Replace OVERLAY_INTERFACE_IP_ADDRESS with the name of the
underlying physical public network interface.
PUBLIC_INTERFACE_IP_ADDRESS在本投影片範例應設為
192.168.174.144 (參考投影片 p.33 網路環境)
[linux_bridge]
...
physical_interface_mappings = public:PUBLIC_INTERFACE_NAME
[vxlan]
enable_vxlan = True
local_ip = OVERLAY_INTERFACE_IP_ADDRESS
l2_population = True](https://image.slidesharecdn.com/openstackinstallationliberty-170302070405/85/Openstack-Installation-ver-liberty-111-320.jpg)
![Networking service(Cont.)
112
[agent]
...
prevent_arp_spoofing = True
[securitygroup]
...
enable_security_group = True
firewall_driver = neutron.agent.linux.iptables_firewall.IptablesFirewallDriver](https://image.slidesharecdn.com/openstackinstallationliberty-170302070405/85/Openstack-Installation-ver-liberty-112-320.jpg)
![Networking service(Cont.)
113
# vim /etc/nova/nova.conf
Replace NEUTRON_PASS with the password you chose for the
neutron user in the Identity service.
# service nova-compute restart
# service neutron-plugin-linuxbridge-agent restart
[neutron]
...
url = http://controller:9696
auth_url = http://controller:35357
auth_plugin = password
project_domain_id = default
user_domain_id = default
region_name = RegionOne
project_name = service
username = neutron
password = NEUTRON_PASS](https://image.slidesharecdn.com/openstackinstallationliberty-170302070405/85/Openstack-Installation-ver-liberty-113-320.jpg)


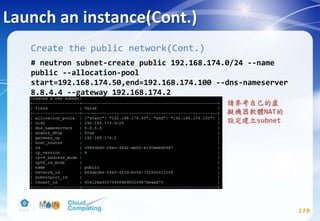


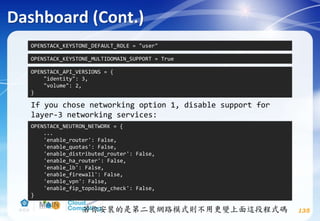
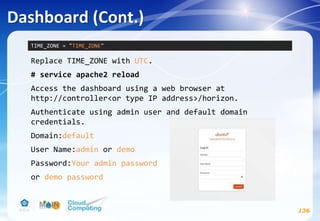
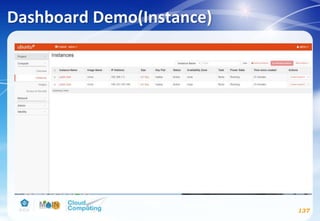
![Dashboard(optional)
134
Controller node
# apt-get install openstack-dashboard
# vim /etc/openstack-dashboard/local_settings.py
Comment out any other session storage configuration.
OPENSTACK_HOST = "controller"
ALLOWED_HOSTS = ['*', ]
CACHES = {
'default': {
'BACKEND': 'django.core.cache.backends.memcached.MemcachedCache',
'LOCATION': '127.0.0.1:11211',
}
}](https://image.slidesharecdn.com/openstackinstallationliberty-170302070405/85/Openstack-Installation-ver-liberty-134-320.jpg)