Download as PDF, PPTX

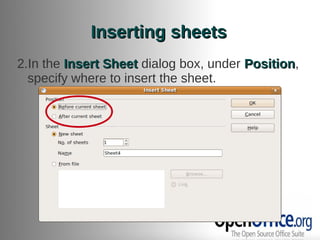


![Exercises
Put in borders on cells A1 to D7.
From the sheet 'Class 05' link cells D8 to D11
to cells C4 to F4 in the sheet 'Summary'.
Save this document with the following
specifications:
File Name: Calc [Surname]
Folder: Documents folder
File Type: Microsoft Excel 97/2000/XP (.xls)](https://image.slidesharecdn.com/ooocalc-100628200731-phpapp02/85/OpenOffice-org-Walc-40-320.jpg)
![Exercises
In Calc [Surname].xls, open the sheet Database.
Sort the database by Class # then by Name of
Trainee.
Filter the visible data to those who have taken the
exam.
Of these who took the exam, filter the rows and limit
visibility to those who have achieved greater than 70.
Save changes and close this document.](https://image.slidesharecdn.com/ooocalc-100628200731-phpapp02/85/OpenOffice-org-Walc-44-320.jpg)
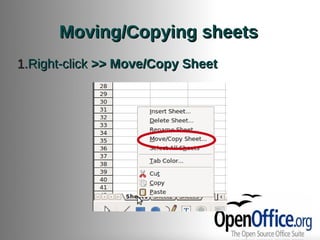
![Exercises
In Calc [Surname].xls, open the sheet
'Database'.
Insert Header with the following specifications:
Left Area: Date today
● Center Area: UNIVERSITY OF THE PHILIPPINES
LOS BAÑOS
Right Area: Your Surname
For printing, repeat Row 1 every page.
Save changes to this document.](https://image.slidesharecdn.com/ooocalc-100628200731-phpapp02/85/OpenOffice-org-Walc-48-320.jpg)


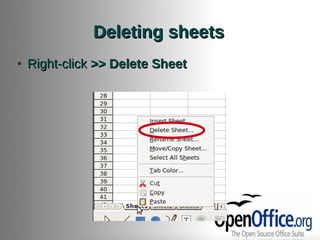
This document provides an introduction to Calc, the spreadsheet component of OpenOffice. It discusses how to get started with Calc, manage files, work with sheets, cells, rows and columns. It also covers entering and formatting data, using formulas and functions, sorting and filtering data. The document contains exercises for students to practice these skills.