Downloaded 72 times

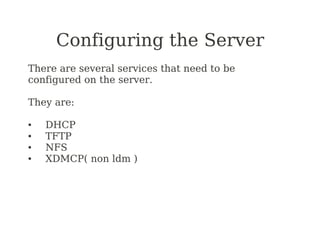
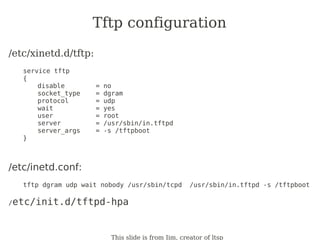
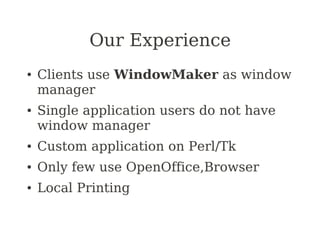
![XDMCP configuration?
The display manager must be configured to accept remote connections
xdm-config:
# DisplayManager.requestPort: 0
kdmrc:
[Xdmcp]
Enable=true
#Port=177
gdm.conf:
[xdmcp]
Enable=true
MaxSessions=100
.
.
.
[servers]
0=/usr/bin/X11/X
This slide is from Jim, creator of ltsp](https://image.slidesharecdn.com/ltsptalk-100726134849-phpapp02/85/Ltsp-talk-12-320.jpg)
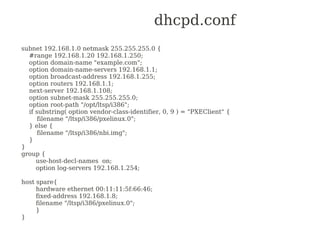
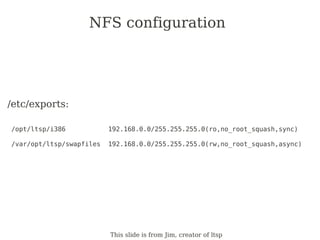
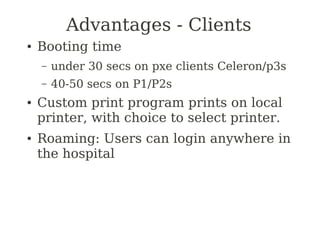
![Workstation Configuration
lts.conf
[Default]
SERVER = 192.168.0.254
X_MOUSE_PROTOCOL = "IMPS/2"
X_MOUSE_DEVICE = "/dev/psaux"
SCREEN_01 = startx
[ws001]
PRINTER_0_DEVICE = "/dev/lp0"
PRINTER_0_TYPE = "P"
[ws002]
USE_NFS_SWAP = Y
SWAPFILE_SIZE = 64m
SCREEN_01 = shell
[ws003]
XSERVER = ati
X_MODE_0 = 1600x1200
This slide is from Jim, creator of ltsp](https://image.slidesharecdn.com/ltsptalk-100726134849-phpapp02/85/Ltsp-talk-13-320.jpg)


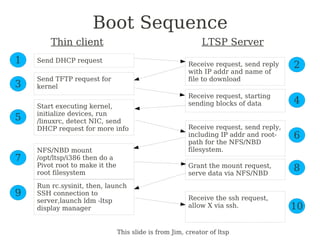
The Linux Terminal Server Project (LTSP) allows inexpensive thin client computers to connect to a server running Linux, distributing the server's processing power to multiple desktop clients over the network; it works by booting the thin clients from the server using PXE, NFS and NBD to access the server's filesystem and run applications remotely; the document provides information on installing, configuring and troubleshooting an LTSP server and thin clients.