The document provides instructions for removing and installing a final drive assembly on a tractor. It involves draining the oil, removing mounting hardware, using lifting eyes to remove the assembly, cleaning mating surfaces, applying sealant, and reinstalling mounting hardware. The process is reversed to install the final drive assembly. Proper torque specifications are listed for fasteners.
Why Is Your BMW X3 Hood Not Responding To Release CommandsDart Auto
Experiencing difficulty opening your BMW X3's hood? This guide explores potential issues like mechanical obstruction, hood release mechanism failure, electrical problems, and emergency release malfunctions. Troubleshooting tips include basic checks, clearing obstructions, applying pressure, and using the emergency release.
Comprehensive program for Agricultural Finance, the Automotive Sector, and Empowerment . We will define the full scope and provide a detailed two-week plan for identifying strategic partners in each area within Limpopo, including target areas.:
1. Agricultural : Supporting Primary and Secondary Agriculture
• Scope: Provide support solutions to enhance agricultural productivity and sustainability.
• Target Areas: Polokwane, Tzaneen, Thohoyandou, Makhado, and Giyani.
2. Automotive Sector: Partnerships with Mechanics and Panel Beater Shops
• Scope: Develop collaborations with automotive service providers to improve service quality and business operations.
• Target Areas: Polokwane, Lephalale, Mokopane, Phalaborwa, and Bela-Bela.
3. Empowerment : Focusing on Women Empowerment
• Scope: Provide business support support and training to women-owned businesses, promoting economic inclusion.
• Target Areas: Polokwane, Thohoyandou, Musina, Burgersfort, and Louis Trichardt.
We will also prioritize Industrial Economic Zone areas and their priorities.
Sign up on https://profilesmes.online/welcome/
To be eligible:
1. You must have a registered business and operate in Limpopo
2. Generate revenue
3. Sectors : Agriculture ( primary and secondary) and Automative
Women and Youth are encouraged to apply even if you don't fall in those sectors.
What Exactly Is The Common Rail Direct Injection System & How Does It WorkMotor Cars International
Learn about Common Rail Direct Injection (CRDi) - the revolutionary technology that has made diesel engines more efficient. Explore its workings, advantages like enhanced fuel efficiency and increased power output, along with drawbacks such as complexity and higher initial cost. Compare CRDi with traditional diesel engines and discover why it's the preferred choice for modern engines.
In this presentation, we have discussed a very important feature of BMW X5 cars… the Comfort Access. Things that can significantly limit its functionality. And things that you can try to restore the functionality of such a convenient feature of your vehicle.
Core technology of Hyundai Motor Group's EV platform 'E-GMP'Hyundai Motor Group
What’s the force behind Hyundai Motor Group's EV performance and quality?
Maximized driving performance and quick charging time through high-density battery pack and fast charging technology and applicable to various vehicle types!
Discover more about Hyundai Motor Group’s EV platform ‘E-GMP’!
Ever been troubled by the blinking sign and didn’t know what to do?
Here’s a handy guide to dashboard symbols so that you’ll never be confused again!
Save them for later and save the trouble!
𝘼𝙣𝙩𝙞𝙦𝙪𝙚 𝙋𝙡𝙖𝙨𝙩𝙞𝙘 𝙏𝙧𝙖𝙙𝙚𝙧𝙨 𝙞𝙨 𝙫𝙚𝙧𝙮 𝙛𝙖𝙢𝙤𝙪𝙨 𝙛𝙤𝙧 𝙢𝙖𝙣𝙪𝙛𝙖𝙘𝙩𝙪𝙧𝙞𝙣𝙜 𝙩𝙝𝙚𝙞𝙧 𝙥𝙧𝙤𝙙𝙪𝙘𝙩𝙨. 𝙒𝙚 𝙝𝙖𝙫𝙚 𝙖𝙡𝙡 𝙩𝙝𝙚 𝙥𝙡𝙖𝙨𝙩𝙞𝙘 𝙜𝙧𝙖𝙣𝙪𝙡𝙚𝙨 𝙪𝙨𝙚𝙙 𝙞𝙣 𝙖𝙪𝙩𝙤𝙢𝙤𝙩𝙞𝙫𝙚 𝙖𝙣𝙙 𝙖𝙪𝙩𝙤 𝙥𝙖𝙧𝙩𝙨 𝙖𝙣𝙙 𝙖𝙡𝙡 𝙩𝙝𝙚 𝙛𝙖𝙢𝙤𝙪𝙨 𝙘𝙤𝙢𝙥𝙖𝙣𝙞𝙚𝙨 𝙗𝙪𝙮 𝙩𝙝𝙚 𝙜𝙧𝙖𝙣𝙪𝙡𝙚𝙨 𝙛𝙧𝙤𝙢 𝙪𝙨.
Over the 10 years, we have gained a strong foothold in the market due to our range's high quality, competitive prices, and time-lined delivery schedules.
Things to remember while upgrading the brakes of your carjennifermiller8137
Upgrading the brakes of your car? Keep these things in mind before doing so. Additionally, start using an OBD 2 GPS tracker so that you never miss a vehicle maintenance appointment. On top of this, a car GPS tracker will also let you master good driving habits that will let you increase the operational life of your car’s brakes.
5 Warning Signs Your BMW's Intelligent Battery Sensor Needs AttentionBertini's German Motors
IBS monitors and manages your BMW’s battery performance. If it malfunctions, you will have to deal with an array of electrical issues in your vehicle. Recognize warning signs like dimming headlights, frequent battery replacements, and electrical malfunctions to address potential IBS issues promptly.
Fleet management these days is next to impossible without connected vehicle solutions. Why? Well, fleet trackers and accompanying connected vehicle management solutions tend to offer quite a few hard-to-ignore benefits to fleet managers and businesses alike. Let’s check them out!
What Does the PARKTRONIC Inoperative, See Owner's Manual Message Mean for You...Autohaus Service and Sales
Learn what "PARKTRONIC Inoperative, See Owner's Manual" means for your Mercedes-Benz. This message indicates a malfunction in the parking assistance system, potentially due to sensor issues or electrical faults. Prompt attention is crucial to ensure safety and functionality. Follow steps outlined for diagnosis and repair in the owner's manual.
"Trans Failsafe Prog" on your BMW X5 indicates potential transmission issues requiring immediate action. This safety feature activates in response to abnormalities like low fluid levels, leaks, faulty sensors, electrical or mechanical failures, and overheating.
Bài tập - Tiếng anh 11 Global Success UNIT 1 - Bản HS.doc
John Deere 6130D (Tier 0 - Tier 3Stage IIIA) Tractors Service Repair Technical Manual (TM608819).pdf
1. TM608819 - 6100D, 6110D, 6115D, 6125D and 6130D(Tier 0 —Tier 3/Stage IIIA)
Tractors Repair Technical Manual(60000—), 11/2014—
Remove and Install Final Drive Assembly
Remove and Install Final Drive Assembly
1. NOTE:
It is not necessary to remove fuel tank, but doing so may ease removal and installation of left-hand final drive.
(See Remove and Install Fuel Tank in Section 30, Group 05.)
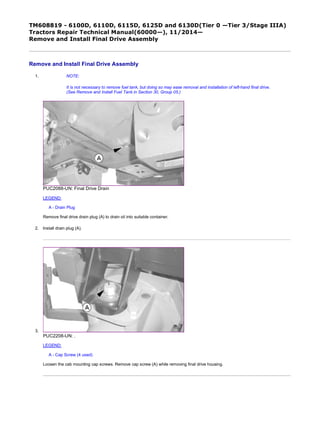
PUC2088-UN: Final Drive Drain
LEGEND:
A - Drain Plug
Remove final drive drain plug (A) to drain oil into suitable container.
2. Install drain plug (A).
3.
PUC2208-UN: .
LEGEND:
A - Cap Screw (4 used)
Loosen the cab mounting cap screws. Remove cap screw (A) while removing final drive housing.
1/9
2020/7/11
file:///C:/ProgramData/Service%20ADVISOR/Temp/TM608819_09001faa829...
2. 4.
PUC3808-UN: Right-Hand Side Half Axle
LEGEND:
B - Screw (2 used)
C - SCV Mounting Braket
Loosen SCV mounting bracket (C) by removing cap screws (B) while removing final drive housing.
5.
PY20649-UN: Left Hand Side Half Axle
LEGEND:
D - Cap Screws
E - Transmission Harness
F - Bracket
Loosen transmission harness bracket (F) by removing cap screws (D) while removing the final drive housing.
6.
CAUTION:
Prevent bodily injury caused by accidental dropping of tractor when removing wheel. Use jack and floor
stands with a minimum capacity of 4540 kg (10,000 lb.).
2/9
2020/7/11
file:///C:/ProgramData/Service%20ADVISOR/Temp/TM608819_09001faa829...
3. PUC2089-UN: Jacking of Tractor
Jack tractor from under drawbar support and set jack stands under front of drawbar.
7.
CAUTION:
The approximate weight of the wheel and tire assembly is 260 kg (573.20 lb.).
Remove left-hand wheel assembly. (See Remove and Install Front and Rear Wheels in Section 80, Group 15.)
8.
PY20651-UN: .
Item Measurement Specification
Wheel and Tire Weight 260 kg
(573.20 lb.)
3/9
2020/7/11
file:///C:/ProgramData/Service%20ADVISOR/Temp/TM608819_09001faa829...
4. PY20650-UN: .
LEGEND:
A - Cotter Pin
B - Pin
C - Bracket, Link Arm
D - Cap Screw (3 used)
Remove cotter pin (A) and pin (B).
9. Remove cap screws (D) and link arm bracket (C).
10.
PUC2092-UN: .
LEGEND:
A - Lifting Device
B - Eyebolt (2 used)
C - Cap Screw (10 used)
Install eyebolts (B) into existing holes.
11. Attach a suitable lifting device (A).
12. Remove cap screws (C) and final drive from transaxle.
4/9
2020/7/11
file:///C:/ProgramData/Service%20ADVISOR/Temp/TM608819_09001faa829...
5. 13.
PUC2093-UN: Final Drive Axle
Remove pinion shaft.
14. Inspect all parts for wear or damage. Replace as necessary.
15. Install pinion shaft.
16.
PUC2094-UN: Final Drive Mating Surface
LEGEND:
A - Transaxle Housing
Clean mating surfaces of final drive and transaxle housing (A) using TY16285 Cure Primer.
17. Apply TY6304 Flexible Sealant to mating surfaces.
18. NOTE:
Gently rotate axle while positioning the final drive pinion into the planetary gears.
Install final drive assembly onto transaxle housing.
19. NOTE:
Tighten all cap screws, using a crisscross pattern, when housings are mated.
Tighten cap screws to specification.
Item Measurement Specification
5/9
2020/7/11
file:///C:/ProgramData/Service%20ADVISOR/Temp/TM608819_09001faa829...
6. 20.
PY20651-UN: .
PY20650-UN: .
LEGEND:
A - Cotter Pin
B - Pin
C - Bracket, Link Arm
D - Cap Screw (3 used)
Install link arm bracket (C) and cap screws (D).
21. Install pin (B) and cotter pin (A).
22.
CAUTION:
The approximate weight of the wheel and tire assembly is 260 kg (573.20 lb.).
Final Drives
Final Drive Assembly Cap Screw Torque 345 N·m
(255 lb.-ft.)
Item Measurement Specification
Wheel and Tire Weight 260 kg
(573.20 lb.)
6/9
2020/7/11
file:///C:/ProgramData/Service%20ADVISOR/Temp/TM608819_09001faa829...
7. Install wheel assembly. (See Remove and Install Front and Rear Wheels in Section 80, Group 15.)
23.
PUC2089-UN: Jacking of Tractor
Raise tractor using a floor jack under drawbar support; then remove jack stands under front of drawbar.
24. Install fuel tank if previously removed. (See Remove and Install Fuel Tank in Section 30, Group 05.)
25.
PUC3808-UN: Right-Hand Side Half Axle
LEGEND:
B - Screw (2 used)
C - SCV Mounting Braket
Install screws (B) to install SCV bracket mounting (C).
7/9
2020/7/11
file:///C:/ProgramData/Service%20ADVISOR/Temp/TM608819_09001faa829...
8. 26.
PY20649-UN: Left Hand Side Half Axle
LEGEND:
D - Cap Screws
E - Transmission Harness
F - Bracket
Install cap screws (D) to install transmission harness bracket (F).
27.
PUC2208-UN: .
LEGEND:
A - Cap Screw (4 used)
Install cab mounting cap screws (A). Tighten to specification.
Item Measurement Specification
Cab Mounting Cap Screw Torque 610 N·m (450 lb.-ft.)
8/9
2020/7/11
file:///C:/ProgramData/Service%20ADVISOR/Temp/TM608819_09001faa829...
9. 28.
P9073-UN: Sight Glass
LEGEND:
A - Sight Glass
Fill transaxle housing until fluid level is visible between two marks on sight glass (A) with specified transmission/hydraulic oil. (See
Section 10 for recommended oil.)
29. Start engine and run for 5 min.
30. Shut off engine and wait 5 min. before rechecking oil level in sight glass.
31. Add additional oil as necessary.
Loctite is a trademark of Henkel Corporation AK50421,0000121-19-20141001
9/9
2020/7/11
file:///C:/ProgramData/Service%20ADVISOR/Temp/TM608819_09001faa829...
10. TM608819 - 6100D, 6110D, 6115D, 6125D and 6130D(Tier 0 —Tier
3/Stage IIIA) Tractors Repair Technical Manual(60000—), 11/2014—
Remove, Inspect and Install MFWD Drive Shaft
Remove, Inspect and Install MFWD Drive Shaft
1.
PUC2096-UN: Rear Shield
LEGEND:
A - Cap Screw (2 used)
B - Shield
Loosen cap screws (A) and remove rear shield (B).
2.
PUC2097-UN: Front Shield
LEGEND:
A - Cap Screw (2 used)
B - Shield
Remove cap screws (A) and front shield (B).
1/4
2020/7/11
file:///C:/ProgramData/Service%20ADVISOR/Temp/TM608819_09001faa826...
11. 3.
PUC2098-UN: Cap Screw
LEGEND:
A - Cap Screw (4 used)
Remove cap screws (A) and lower shaft to ground. Slide drive shaft off splined output shaft of MFWD drop
gearbox.
4. Inspect for wear or damage. Check drive shaft for straightness. Replace as necessary.
5. Apply TY6341 Multi-Purpose SD Polyurea Grease to internal splines of drive shaft end.
6.
PUC2099-UN: Drive Shaft
LEGEND:
A - MFWD Output Shaft
B - Drive Shaft
Install drive shaft (B) onto MFWD output shaft (A).
2/4
2020/7/11
file:///C:/ProgramData/Service%20ADVISOR/Temp/TM608819_09001faa826...
12. 7.
PUC2098-UN: .
LEGEND:
A - Cap Screw (4 used)
Install flange to shaft using cap screws (A).
8.
PUC2097-UN: Front Shield
LEGEND:
A - Cap Screw (2 used)
B - Shield
Install front shield (B) using cap screws (A).
3/4
2020/7/11
file:///C:/ProgramData/Service%20ADVISOR/Temp/TM608819_09001faa826...
13. 9.
PUC2096-UN: Rear Shield
LEGEND:
A - Cap Screw (2 used)
B - Shield
Install rear shield (B) and tighten cap screws (A).
OURX984,0000131-19-20140326
4/4
2020/7/11
file:///C:/ProgramData/Service%20ADVISOR/Temp/TM608819_09001faa826...
14. TM608819 - 6100D, 6110D, 6115D, 6125D and 6130D(Tier 0 —Tier
3/Stage IIIA) Tractors Repair Technical Manual(60000—), 11/2014—
Remove and Install MFWD Drop Gearbox
Remove and Install MFWD Drop Gearbox
1.
PUC2085-UN: MFWD Drop Box Drain
PUC2100-UN: .
PUC2101-UN: .
LEGEND:
A - Plug, Drop Gearbox
1/2
2020/7/11
file:///C:/ProgramData/Service%20ADVISOR/Temp/TM608819_09001faa829...
15. B - Cotter Pin (2 used)
C - Linkage
D - Cap Screw (8 used)
Remove drive shaft. (See Remove, Inspect and Install MFWD Drive Shaft in this group.)
2. Remove plug (A) and drain oil.
3. Remove cotter pins (B), and disconnect mechanical front wheel drive engagement linkage (C).
4. Remove cap screws (D) and remove drop gearbox.
5. Make repairs as necessary. (See procedures in this section.)
6. Clean mating surfaces of drop gearbox case and transaxle housing using TY16285 Cure Primer.
7. Apply a coat of TY6304 Flexible Form-in-Place Gasket.
8. Install drop gearbox. Tighten cap screws (D) to specification.
9. Install mechanical front wheel drive engagement linkage (C) using cotter pin (B).
10. Install drive shaft. (See Remove, Inspect and Install MFWD Drive Shaft in this group.)
11.
P9073-UN: Sight Glass
LEGEND:
A - Sight Glass
Fill transaxle housing until fluid level is visible between two marks on sight glass (A). (See Section 10 for
recommended oil.)
12. Start engine and run for 5 min.
13. Shut off engine and wait 5 min. before rechecking oil level in sight glass.
14. Add additional oil as necessary.
Item Measurement Specification
Drop Gearbox Mounting Cap
Screws
Torque 100—150 N·m
(47—111 lb.-ft.)
Loctite is a trademark of Henkel Corporation AK50421,00000FE-19-20141001
2/2
2020/7/11
file:///C:/ProgramData/Service%20ADVISOR/Temp/TM608819_09001faa829...
16. TM608819 - 6100D, 6110D, 6115D, 6125D and 6130D(Tier 0 —Tier
3/Stage IIIA) Tractors Repair Technical Manual(60000—), 11/2014—
Split Tractor
Split Tractor
1.
PY20652-UN: Steering Lines
LEGEND:
A - Steering Line
B - Oil Cooler Line
C - Clamp
D - Cap Screw
E - Mid Frame
Block front wheels.
2. Block front wheel axle.
3. Cab Tractor: Remove cab. (See Remove Operator Cab, in Section 95, Group 00.)
4. OOS Tractor: Remove open operator's station. (See Remove Operator Station, in Section 90, Group 15.)
5. Remove MFWD drive shaft, if equipped. (See Remove, Inspect, and Install MFWD Drive Shaft, in Section 50, Group
05.)
6. Remove fuel tank (See Remove and Install Fuel Tank, Section 30, Group 05.)
7. Drain transmission oil.
8. Perform the following steps on right-hand side of tractor: Identify, label, and disconnect steering oil supply line (A)
and oil cooler line (B from mid frame (E).
9. Remove clamp (C) by removing cap screw (D) and remove oil lines (A and B)..
1/5
2020/7/11
file:///C:/ProgramData/Service%20ADVISOR/Temp/TM608819_09001faa829...
17. 10.
RXA0128540-UN: Support Stands
LEGEND:
A - Support Stands
Place support stands (A) on tractor for stability when separating.
11.
PY20653-UN: JDG19 Lifting Brackets
2/5
2020/7/11
file:///C:/ProgramData/Service%20ADVISOR/Temp/TM608819_09001faa829...
18. PY20657-UN: .
LEGEND:
A - JDG19 Lifting Eyes
B - Cap Screws (9 used)
C - Cap Screw (1 used)
Install JDG19 Lifting Eyes (A) onto clutch housing on both sides of tractor.
12. Attach chains or lift straps to lifting eyes and an overhead lifting device.
13. Remove cap screws (B) attaching mid-frame to fly wheel housing.
14. Remove cap screw (C) from clutch housing side as shown.
15.
PY20654-UN: Drive Train Assembly
3/5
2020/7/11
file:///C:/ProgramData/Service%20ADVISOR/Temp/TM608819_09001faa829...
19. LEGEND:
A - Drive Train Assembly
Carefully separate drive train assembly (A) from fly wheel housing.
16. Install in reverse order.
PY20655-UN: Cap Screws
PY20656-UN: .
LEGEND:
A - M20 x 2.5 x 110 Cap Screw (4 used)
B - M16 x 2 x 90 Cap Screw (3 used)
C - M20 x 2.5 x 90 Cap Screw (2 used)
D - M16 x 2 x 70 Cap Screw (1 used)
Install cap screws (A, B, C and D) and tighten to specification.
Item Measurement Specification
Flywheel Housing-to-Clutch
Housing Mounting Bolts
Torque 542 N·m
(400 lb.-ft.)
4/5
2020/7/11
file:///C:/ProgramData/Service%20ADVISOR/Temp/TM608819_09001faa829...
20. Thank you very much for
your reading. Please Click
Here. Then Get COMPLETE
MANUAL. NO WAITING
NOTE:
If there is no response to
click on the link above,
please download the PDF
document first and then
click on it.
21. TM608819 - 6100D, 6110D, 6115D, 6125D and 6130D(Tier 0 —Tier
3/Stage IIIA) Tractors Repair Technical Manual(60000—), 11/2014—
PTO Repair—Use CTM
PTO Repair—Use CTM
For complete repair information use component technical manual (CTM). Use the appropriate component manual in
conjunction with this machine manual.
OURX984,000141C-19-20120914
1/1
2020/7/11
file:///C:/ProgramData/Service%20ADVISOR/Temp/TM608819_09001faa81d...
22. TM608819 - 6100D, 6110D, 6115D, 6125D and 6130D(Tier 0 —Tier
3/Stage IIIA) Tractors Repair Technical Manual(60000—), 11/2014—
Other Material
Other Material
Number Name Use
Petroleum Jelly Lubricate PTO Shaft
TY6333 (U.S.) Special Purpose HD Moly Grease Lubricate Splines on End of PTO
Shaft
AC20456,0001890-19-20120828
1/1
2020/7/11
file:///C:/ProgramData/Service%20ADVISOR/Temp/TM608819_09001faa81d...