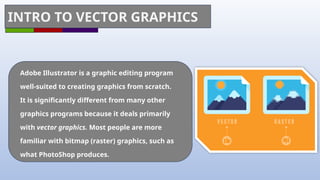
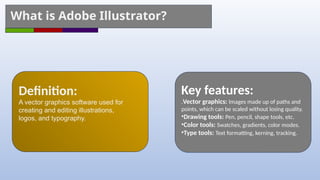
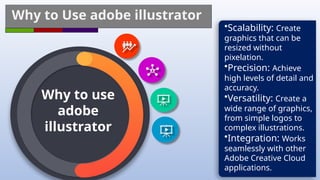
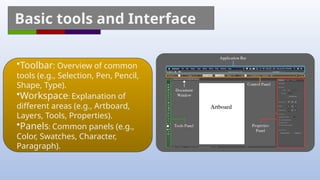
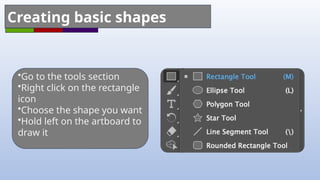
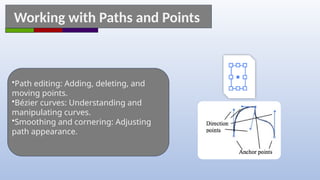
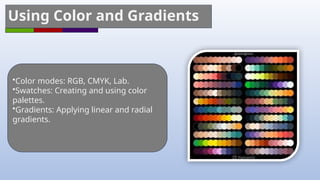
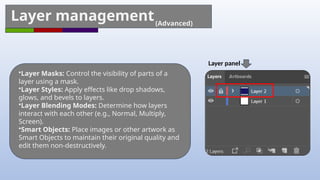
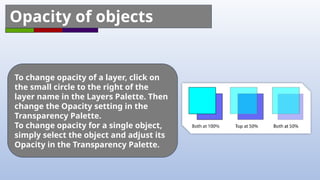
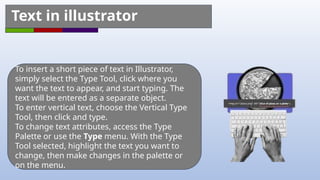
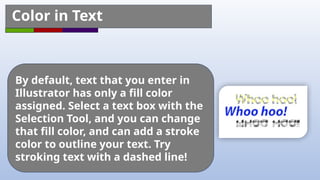
Introduction
to adobe
illustrator
INTRO TO VECTOR GRAPHICS
Adobe Illustrator is a graphic editing program
well-suited to creating graphics from scratch.
It is significantly different from many other
graphics programs because it deals primarily
with vector graphics. Most people are more
familiar with bitmap (raster) graphics, such as
what PhotoShop produces.
What is Adobe Illustrator?
Key features:
.Vector graphics: Images made up of paths and
points, which can be scaled without losing quality.
•Drawing tools: Pen, pencil, shape tools, etc.
•Color tools: Swatches, gradients, color modes.
•Type tools: Text formatting, kerning, tracking.
Definition:
A vector graphics software used for
creating and editing illustrations,
logos, and typography.
Why to Use adobe illustrator
Why to use
adobe
illustrator
•Scalability: Create
graphics that can be
resized without
pixelation.
•Precision: Achieve
high levels of detail and
accuracy.
•Versatility: Create a
wide range of graphics,
from simple logos to
complex illustrations.
•Integration: Works
seamlessly with other
Adobe Creative Cloud
applications.
Basic tools and Interface
•Toolbar: Overview of common
tools (e.g., Selection, Pen, Pencil,
Shape, Type).
•Workspace: Explanation of
different areas (e.g., Artboard,
Layers, Tools, Properties).
•Panels: Common panels (e.g.,
Color, Swatches, Character,
Paragraph).
Creating basic shapes
•Go to the tools section
•Right click on the rectangle
icon
•Choose the shape you want
•Hold left on the artboard to
draw it
Working with Paths and Points
•Path editing: Adding, deleting, and
moving points.
•Bézier curves: Understanding and
manipulating curves.
•Smoothing and cornering: Adjusting
path appearance.
Using Color and Gradients
•Color modes: RGB, CMYK, Lab.
•Swatches: Creating and using color
palettes.
•Gradients: Applying linear and radial
gradients.
Strokes
In addition to the color of
a line, you can also
change several other
properties. The Stroke
Palette lets you change a
number of things about
your Stroke
:
Weight: how thick your line appears
Cap: how the ends of your line appear
Join: how your line joins at corners
Miter Limit: how far the joined lines project at corners
Dashed Line: check this box to create a dashed line. In
the boxes below, specify how long each dash should be,
and how long the gaps between dashes should be
.
Brushes
Brushes can be applied to
the stroke of any object, to
significantly change the
appearance of the line.
There are four basic types of
brushes
.
Calligraphic: makes your lines resemble those drawn
with a calligraphy pen
Scatter: scatters copies of an object along your line
Art: stretches a single copy of an object along your line
Pattern: applies a repeating pattern to your line
You can create new brushes yourself, when you become
more familiar with Illustrator.
Tips and Tricks
•Keyboard shortcuts: Common shortcuts
for efficiency.
•Layer management: Organizing and
controlling elements.
•Smart Guides: Aligning and positioning
objects.
•Symbol libraries: Creating and using
reusable elements.
Layer management(Basics)
Key Concepts
•Visibility: Turn layers on or off to show or hide
their contents.
•Order: Determine which layers appear on top of
others.
•Grouping: Combine multiple layers into a single
group for easier management.
•Locking: Prevent changes to layers to avoid
accidental modifications.
•Color Coding: Assign colors to layers for visual
organization.
Layer management(Basics)
1.Creating Layers:
New Layer: Go to Layer > New or click the New Layer button in the Layers panel.
Duplicate Layer: Right-click a layer and select Duplicate Layer.
2.Managing Layer Order:
Drag and Drop: Drag layers up or down in the Layers panel to change their order.
Bring Forward/Send Backward: Use these commands in the Layer menu or right-click menu.
3.Grouping and Ungrouping:
Group: Select multiple layers and go to Object > Group.
Ungroup: Select a group and go to Object > Ungroup.
4.Locking and Unlocking:
Lock: Right-click a layer and select Lock.
Unlock: Right-click a layer and select Unlock.
5.Color Coding:
Assign Color: Right-click a layer and select Layer Options. Choose a color for the layer.
Layer management(Advanced)
•Layer Masks: Control the visibility of parts of a
layer using a mask.
•Layer Styles: Apply effects like drop shadows,
glows, and bevels to layers.
•Layer Blending Modes: Determine how layers
interact with each other (e.g., Normal, Multiply,
Screen).
•Smart Objects: Place images or other artwork as
Smart Objects to maintain their original quality and
edit them non-destructively.
Layer panel
To change opacity of a layer, click on
the small circle to the right of the
layer name in the Layers Palette. Then
change the Opacity setting in the
Transparency Palette.
To change opacity for a single object,
simply select the object and adjust its
Opacity in the Transparency Palette.
Opacity of objects
To insert a short piece of text in Illustrator,
simply select the Type Tool, click where you
want the text to appear, and start typing. The
text will be entered as a separate object.
To enter vertical text, choose the Vertical Type
Tool, then click and type.
To change text attributes, access the Type
Palette or use the Type menu. With the Type
Tool selected, highlight the text you want to
change, then make changes in the palette or
on the menu.
Text in illustrator
By default, text that you enter in
Illustrator has only a fill color
assigned. Select a text box with the
Selection Tool, and you can change
that fill color, and can add a stroke
color to outline your text. Try
stroking text with a dashed line!
Color in Text
Illustrator contain such text
effects that enrich the app
with its abilities
Text Effects
You can wrap text around any object.
Make sure that the object you want to
wrap around is above the text you want
to wrap (you may need to select the
object and bring it to the front).
Then select both the text and the object,
and go to the menu and choose Type >
Wrap > Make.
Wrapping around objects
To fit text inside an object, you must use the
Area Type Tool. First, draw the object. Then
select the Area Type Tool, and click on the
object’s path (note: the path is the line around
most objects, so clicking in the center of the
object doesn’t work – click right on the edge of
the object.) A type cursor will appear inside your
path. Start typing, or paste type from another
source.
Fitting text inside an object
Use the Path Type Tool to type along any
path you have drawn. You can type along a
curved line you’ve drawn with the pencil, or
along the outline of a shape you created.
First, draw the object you want to type
along. Then select the Path Type Tool, and
click on the path. Then start typing, or
paste text from another source.
Path Type
Symbol libraries (definition)
Symbol Libraries in Adobe Illustrator are
a powerful tool for creating and
managing reusable elements within your
designs. Symbols are essentially objects
that can be duplicated and edited across
multiple documents without affecting
the original. This makes them ideal for
creating consistent branding elements,
icons, and other recurring design
components.
Symbol libraries (creating symbols)
•Select an Object: Choose the object you
want to turn into a symbol.
•Create Symbol: Go to Window > Symbols
to open the Symbols panel. Click the New
Symbol button or drag the selected object
to the Symbols panel.
•Name and Define: Give your symbol a
descriptive name and choose whether to
define it in the current document or
globally (across all documents).
Symbol libraries (using symbols)
•Place Symbol: Drag a symbol from the Symbols
panel onto your artboard.
•Edit Symbol: To edit the original symbol,
double-click it in the Symbols panel. Any
changes you make will be reflected in all
instances of the symbol in your document.
•Break Apart Symbol: If you no longer need the
symbol's link to the original, you can break it
apart to edit individual elements.
Symbol libraries (Symbol libraries)
•Built-in Libraries: Illustrator comes with
several built-in symbol libraries that offer a
variety of pre-designed elements.
•Creating Custom Libraries: You can create
your own symbol libraries to store and
organize your frequently used symbols.
•Importing and Exporting Libraries: Share
symbol libraries with others by exporting them
or importing them from other sources.
Symbol libraries (benefits)
•Consistency: Maintain consistent branding and
design elements across multiple projects.
•Efficiency: Save time by reusing symbols
instead of recreating them.
•Organization: Keep your design assets
organized and easily accessible.
•Non-Destructive Editing: Edit the original
symbol to update all instances simultaneously.
tools
Shape Tools
The easiest thing to draw in Illustrator is an enclosed
shape, such as a rectangle, ellipse, or polygon. Click the
Shape tool (usually set to Rectangle ) to begin drawing,
or select another shape: Rounded Rectangle, Ellipse,
Polygon, or Star .
To draw the shape, just click and drag on your
workspace. Thin lines will appear indicating the outline
of your shape, and the shape will be completed when
you release the mouse button.
Note: holding down the Shift key as you draw a
Rectangle or Ellipse will restrict you to a perfect square
or circle!
Pencil Tools
Use the Pencil tool to create free-flowing lines and
shapes. As you draw, a thin lines will appear
indicating the outline of your shape, and the
shape will be completed when you release the
mouse button.
Re-tracing an existing shape with the Pencil tool
to redraw sections of the line, or the whole thing.
Alternatively, you can use the Smooth tool to
automatically smooth zig and zags out of your
lines.
The Smooth tool is located under the Pencil tool in
your toolbox. Click-and-hold on the Pencil tool to
see the icon for the Smooth tool.
Selection tools
Once you have created an object, the
Selection tool lets you select the entire
object for further manipulation.
The Direct-Selection tool lets you select
parts of an
object, individual anchor points, direction
points, and
segments.
Use the Direct-Selection tool to “morph”
shapes, or to adjust direction points.
Keyboard shortcuts
introduction for adobe illustrator .pptx

introduction for adobe illustrator .pptx

  • 1.
  • 2.
    INTRO TO VECTORGRAPHICS Adobe Illustrator is a graphic editing program well-suited to creating graphics from scratch. It is significantly different from many other graphics programs because it deals primarily with vector graphics. Most people are more familiar with bitmap (raster) graphics, such as what PhotoShop produces.
  • 3.
    What is AdobeIllustrator? Key features: .Vector graphics: Images made up of paths and points, which can be scaled without losing quality. •Drawing tools: Pen, pencil, shape tools, etc. •Color tools: Swatches, gradients, color modes. •Type tools: Text formatting, kerning, tracking. Definition: A vector graphics software used for creating and editing illustrations, logos, and typography.
  • 4.
    Why to Useadobe illustrator Why to use adobe illustrator •Scalability: Create graphics that can be resized without pixelation. •Precision: Achieve high levels of detail and accuracy. •Versatility: Create a wide range of graphics, from simple logos to complex illustrations. •Integration: Works seamlessly with other Adobe Creative Cloud applications.
  • 5.
    Basic tools andInterface •Toolbar: Overview of common tools (e.g., Selection, Pen, Pencil, Shape, Type). •Workspace: Explanation of different areas (e.g., Artboard, Layers, Tools, Properties). •Panels: Common panels (e.g., Color, Swatches, Character, Paragraph).
  • 6.
    Creating basic shapes •Goto the tools section •Right click on the rectangle icon •Choose the shape you want •Hold left on the artboard to draw it
  • 7.
    Working with Pathsand Points •Path editing: Adding, deleting, and moving points. •Bézier curves: Understanding and manipulating curves. •Smoothing and cornering: Adjusting path appearance.
  • 8.
    Using Color andGradients •Color modes: RGB, CMYK, Lab. •Swatches: Creating and using color palettes. •Gradients: Applying linear and radial gradients.
  • 9.
    Strokes In addition tothe color of a line, you can also change several other properties. The Stroke Palette lets you change a number of things about your Stroke : Weight: how thick your line appears Cap: how the ends of your line appear Join: how your line joins at corners Miter Limit: how far the joined lines project at corners Dashed Line: check this box to create a dashed line. In the boxes below, specify how long each dash should be, and how long the gaps between dashes should be .
  • 10.
    Brushes Brushes can beapplied to the stroke of any object, to significantly change the appearance of the line. There are four basic types of brushes . Calligraphic: makes your lines resemble those drawn with a calligraphy pen Scatter: scatters copies of an object along your line Art: stretches a single copy of an object along your line Pattern: applies a repeating pattern to your line You can create new brushes yourself, when you become more familiar with Illustrator.
  • 11.
    Tips and Tricks •Keyboardshortcuts: Common shortcuts for efficiency. •Layer management: Organizing and controlling elements. •Smart Guides: Aligning and positioning objects. •Symbol libraries: Creating and using reusable elements.
  • 12.
    Layer management(Basics) Key Concepts •Visibility:Turn layers on or off to show or hide their contents. •Order: Determine which layers appear on top of others. •Grouping: Combine multiple layers into a single group for easier management. •Locking: Prevent changes to layers to avoid accidental modifications. •Color Coding: Assign colors to layers for visual organization.
  • 13.
    Layer management(Basics) 1.Creating Layers: NewLayer: Go to Layer > New or click the New Layer button in the Layers panel. Duplicate Layer: Right-click a layer and select Duplicate Layer. 2.Managing Layer Order: Drag and Drop: Drag layers up or down in the Layers panel to change their order. Bring Forward/Send Backward: Use these commands in the Layer menu or right-click menu. 3.Grouping and Ungrouping: Group: Select multiple layers and go to Object > Group. Ungroup: Select a group and go to Object > Ungroup. 4.Locking and Unlocking: Lock: Right-click a layer and select Lock. Unlock: Right-click a layer and select Unlock. 5.Color Coding: Assign Color: Right-click a layer and select Layer Options. Choose a color for the layer.
  • 14.
    Layer management(Advanced) •Layer Masks:Control the visibility of parts of a layer using a mask. •Layer Styles: Apply effects like drop shadows, glows, and bevels to layers. •Layer Blending Modes: Determine how layers interact with each other (e.g., Normal, Multiply, Screen). •Smart Objects: Place images or other artwork as Smart Objects to maintain their original quality and edit them non-destructively. Layer panel
  • 15.
    To change opacityof a layer, click on the small circle to the right of the layer name in the Layers Palette. Then change the Opacity setting in the Transparency Palette. To change opacity for a single object, simply select the object and adjust its Opacity in the Transparency Palette. Opacity of objects
  • 16.
    To insert ashort piece of text in Illustrator, simply select the Type Tool, click where you want the text to appear, and start typing. The text will be entered as a separate object. To enter vertical text, choose the Vertical Type Tool, then click and type. To change text attributes, access the Type Palette or use the Type menu. With the Type Tool selected, highlight the text you want to change, then make changes in the palette or on the menu. Text in illustrator
  • 17.
    By default, textthat you enter in Illustrator has only a fill color assigned. Select a text box with the Selection Tool, and you can change that fill color, and can add a stroke color to outline your text. Try stroking text with a dashed line! Color in Text
  • 18.
    Illustrator contain suchtext effects that enrich the app with its abilities Text Effects
  • 19.
    You can wraptext around any object. Make sure that the object you want to wrap around is above the text you want to wrap (you may need to select the object and bring it to the front). Then select both the text and the object, and go to the menu and choose Type > Wrap > Make. Wrapping around objects
  • 20.
    To fit textinside an object, you must use the Area Type Tool. First, draw the object. Then select the Area Type Tool, and click on the object’s path (note: the path is the line around most objects, so clicking in the center of the object doesn’t work – click right on the edge of the object.) A type cursor will appear inside your path. Start typing, or paste type from another source. Fitting text inside an object
  • 21.
    Use the PathType Tool to type along any path you have drawn. You can type along a curved line you’ve drawn with the pencil, or along the outline of a shape you created. First, draw the object you want to type along. Then select the Path Type Tool, and click on the path. Then start typing, or paste text from another source. Path Type
  • 22.
    Symbol libraries (definition) SymbolLibraries in Adobe Illustrator are a powerful tool for creating and managing reusable elements within your designs. Symbols are essentially objects that can be duplicated and edited across multiple documents without affecting the original. This makes them ideal for creating consistent branding elements, icons, and other recurring design components.
  • 23.
    Symbol libraries (creatingsymbols) •Select an Object: Choose the object you want to turn into a symbol. •Create Symbol: Go to Window > Symbols to open the Symbols panel. Click the New Symbol button or drag the selected object to the Symbols panel. •Name and Define: Give your symbol a descriptive name and choose whether to define it in the current document or globally (across all documents).
  • 24.
    Symbol libraries (usingsymbols) •Place Symbol: Drag a symbol from the Symbols panel onto your artboard. •Edit Symbol: To edit the original symbol, double-click it in the Symbols panel. Any changes you make will be reflected in all instances of the symbol in your document. •Break Apart Symbol: If you no longer need the symbol's link to the original, you can break it apart to edit individual elements.
  • 25.
    Symbol libraries (Symbollibraries) •Built-in Libraries: Illustrator comes with several built-in symbol libraries that offer a variety of pre-designed elements. •Creating Custom Libraries: You can create your own symbol libraries to store and organize your frequently used symbols. •Importing and Exporting Libraries: Share symbol libraries with others by exporting them or importing them from other sources.
  • 26.
    Symbol libraries (benefits) •Consistency:Maintain consistent branding and design elements across multiple projects. •Efficiency: Save time by reusing symbols instead of recreating them. •Organization: Keep your design assets organized and easily accessible. •Non-Destructive Editing: Edit the original symbol to update all instances simultaneously.
  • 27.
  • 28.
    Shape Tools The easiestthing to draw in Illustrator is an enclosed shape, such as a rectangle, ellipse, or polygon. Click the Shape tool (usually set to Rectangle ) to begin drawing, or select another shape: Rounded Rectangle, Ellipse, Polygon, or Star . To draw the shape, just click and drag on your workspace. Thin lines will appear indicating the outline of your shape, and the shape will be completed when you release the mouse button. Note: holding down the Shift key as you draw a Rectangle or Ellipse will restrict you to a perfect square or circle!
  • 29.
    Pencil Tools Use thePencil tool to create free-flowing lines and shapes. As you draw, a thin lines will appear indicating the outline of your shape, and the shape will be completed when you release the mouse button. Re-tracing an existing shape with the Pencil tool to redraw sections of the line, or the whole thing. Alternatively, you can use the Smooth tool to automatically smooth zig and zags out of your lines. The Smooth tool is located under the Pencil tool in your toolbox. Click-and-hold on the Pencil tool to see the icon for the Smooth tool.
  • 30.
    Selection tools Once youhave created an object, the Selection tool lets you select the entire object for further manipulation. The Direct-Selection tool lets you select parts of an object, individual anchor points, direction points, and segments. Use the Direct-Selection tool to “morph” shapes, or to adjust direction points.
  • 31.