SlideShare a Scribd company logo
1 of 2
Download to read offline
2) Insert the “L” shaped bracket into the Notched jaw of the Mount
Plate with the round edge facing the sight and the dovetail side
of the “L” Bracket facing down. Slightly tighten the horizontal
Adjustment Screw on the Mount Plate to keep the “L” Bracket in
place. (Fig. 2)
Adjustments to the horizontal position of the Vendetta2 can
be made by loosening the Horizontal Adjustment Screw on the
Mount Plate and sliding the L Bracket back and forth. Align the
Vendetta2 directly over the sight pins, or as close as possible and
tighten to 90 in/lbs.
3) Slide the notched jaw of the Socket Base Bracket with the
Vendetta2 attached to it, onto the dovetail side of the L Bracket with
the battery cover facing up toward the top of the riser and the LED
display facing the bowstring. Adjust the position of the Vendetta2
so that the bottom of the Vendetta2 socket base bracket is above
your sight pins and the optical lenses are not obscured by the bow or
sight. Tighten the Vertical Adjustment Screw to 90 in/lbs. (Fig.3)
Crossbow Installation
Locate a section of the crossbow scope maintube that can
accommodate the Vendetta2 Ringmount. If needed, remove the scope
to install the Ringmount. Install the Ringmount with the dovetail
portion on the bottom, The Vendetta2 can be mounted on either side
of the scope. Loosely attach the Ringmount and reinstall the scope.
Level the Ringmount and tighten the ring top to 22 in/lbs. Install the
Socket Base Bracket on to the Ringmount dovetail and tighten to 90
in/lbs.
Securing the Power Button
Once the Vendetta2 has been properly mounted and secured, the
power button will need to be secured to the grip in a position that is
comfortable for you. We recommend using cloth tape to secure the
button to the front portion of the grip. Be sure to secure all portions
of the wire in a manner that will eliminate any contact with all
moving bow components such as the arrow, arrow rest, bow string
and drop-away rest trigger cord.
INSTALLING THE VENDETTA2
Bow Installation
The Vendetta2 mounting system is reversible and can be
mounted on either side of the riser to accommodate right or left
handed shooters. Adjustment to the location of the Vendetta2
in relation to your bow/sight can be made using the mounting
system, however final alignment with your sight/pins will be
covered in the next section.
Please refer to the following diagrams when mounting the Vendetta2
to your bow. We recommend placing the Vendetta2 as close to your
sight as possible without obstructing the view of your pins, the
target, or obstructing the front of the Vendetta2.
1) Attach the Mounting Plate to your bow’s riser or directly to your
sight, as far forward as possible, with the notched jaw facing the
sight. Secure it with the included #10-24 Allen screws using a
torque value of 35 in/lbs. (Fig.1) Your quiver can be attached to the
Mounting Plate in the same manner as it would attach to a sight.
BOW-MOUNTED LASER RANGEFINDER
Complete Operation & Installation Manual
NOTICE OF USE RESTRICTIONS
As is the case for all electronic hunting products, there may be
restrictions on the use of the Leupold Vendetta2 for hunting in your
area. Please consult local regulations before heading into the field.
SAFETY AND OPERATION PRECAUTIONS
The Leupold Vendetta2 rangefinder employs an eye safe FDA Class
1 and CE Class 3R laser in its operation. Even so, there are a few
precautions that are important to remember:
Do not depress the POWER button while aiming at a human eye or
while looking into the optics from the objective side.
Do not leave the Vendetta2 within the reach of small children.
Do not take the product apart as it has a self-protection device in the
electronic control module and may cause an electric shock.
Do not attempt to use any power source other than a CR2 battery
(or equivalent) — the Vendetta2 is designed to prohibit accessing
any other external power supply.
DAMAGE WARNING:
When selecting the final placement of the Vendetta2
Rangefinder, make sure to locate it where the bow
string will not come in contact with it after firing.
SPECIFICATIONS
Angle Compensation Yes
One-Touch Scan Mode Yes
Battery Life >3000 Actuations
Weight 10 oz
Dimensions 3.8” L x 2.8” H x 1.3” W
Low Battery Indicator Yes
Warranty 2 year
Weatherproof Yes
Distance Min/Max 10 / 70 yards
FIG. 1
FIG. 2
FIG. 3
Completed Installation
Micro Windage R L
Micro Elevation DOWN UP
Mounting Plate
Vertical
Adjustment
Screw
Horizontal
Adjustment
Screw
L Bracket
Battery Cover
Ringmount
Socket Base
Bracket
Notched
Jaw
ALIGNING THE VENDETTA2 WITH YOUR SIGHT
Read this entire section thoroughly prior to proceeding. Aligning
the Vendetta2 at distances greater than 20 yards can significantly
improve performance in the field.
Proper alignment of the Vendetta2 with your sight is absolutely
critical to proper performance in the field. To ensure exact alignment
and compensate for the offset between the Vendetta2 and your sight,
be sure to read and understand the entire alignment process before
beginning.
To properly align the Vendetta2 with your sight, two measurements
must be taken and applied during the alignment process. The goal is
to align the Vendetta2 visible alignment laser with your top sight pin,
so that your top pin becomes your alignment mark to range targets.
Calculating Your Total Offset:
Use a ruler to measure the Vendetta2 offsets. The first measurement
is the horizontal offset between the Vendetta2’s visible alignment
laser (bottom most lens) and the center of the top pin of your
sight. In the graphic below (Fig.7), this measurement is 1.25”. The
second measurement is the vertical offset between the Vendetta2’s
visible alignment laser and the top pin of your sight. In the graphic
below, this measurement is 2.60”. The combination of these two
measurements shows the total offset between the visible alignment
laser and the top pin of your sight. These measurements will be
critical to achieving proper alignment of your Vendetta2 and should
be taken as carefully as possible.
Recreating your total offset on the alignment aid
To accurately align the Vendetta2 with your bow, you must first
determine the offset of the Vendetta2 to the sight pins. Using the
included alignment aid and a permanent marker, draw a 2”circle
recreating the total offset between the visible laser channel and the
top pin of your sight. (Fig.8) In the example, the center of this circle
would be exactly 1.25” LEFT, and 2.60” ABOVE the center of the pre-
marked black dot on the alignment aid. The total offset will vary with
each bow/sight combination and the measurements above are for
explanation purposes only.
Note: When recreating your total offset on the alignment aid,
remember that the horizontal distance should be marked as though
you were behind the bow/sight. Using the example above, the
Vendetta2 would be to the left of the top pin when viewed from
behind in a firing position.
MEASURING DISTANCE WITH THE VENDETTA2
Measurement of distance with the Vendetta2 is a very simple operation:
Depress the POWER button on the pressure pad to power up the
unit. (Fig.10)
Come to full draw and align your top pin with the target you intend
to range.
Depress the POWER button again – this will cause the invisible
ranging laser to activate and take a distance reading.
Read the distance as shown on the LED display.
Note: For best results, always aim at the center of the intended
target when determining range. (Fig.10)
Scan Mode (continuous measurement of a moving target)

Scan mode can only be used after the Vendetta2 has been powered up.
When the Vendetta2 is activated, press and hold the POWER button
for at least 2 seconds. Once the display begins blinking, SCAN mode
has been activated. Follow the object as it moves. SCAN mode can
be activated prior to drawing the bow.

The distance will automatically update for 40 seconds. Press and
release the POWER button to exit SCAN mode.

This procedure can also be used to obtain the range of multiple animals
or objects; simply move your sight pin from one target to another.
CLEARING THE LAST DISTANCE OBTAINED
The last range reading taken does not need to be cleared before reading
another object’s distance. For that reason, there is no reset button.
The ranging accuracy of the Leupold Vendetta2 rangefinder is ±1 yard.
LOW BATTERY INDICATOR
When your battery reaches 1/4 capacity and will soon need to be
replaced, the distance readout will blink quickly each time you range
a target. The Vendetta2 will continue to function normally and provide
optimal performance until the battery has reached zero capacity.
CLEANING / MAINTENANCE
Blow away dust or debris on lenses, or use a soft lens brush (such
as the one found on the Leupold LensPen®
). To remove fingerprints,
water spots or tougher dirt, use a soft cotton cloth or the cleaning
end of the Leupold LensPen. A lens tissue with lens cleaning fluid
may be used for more stubborn dirt. Always apply cleaning fluid to
the cleaning cloth, never directly to the lens.
To insert a new battery, remove battery cover and remove exhausted
battery. Insert new CR-2 battery, negative terminal first, into the battery
compartment. Close battery cover. The Vendetta2 is weatherproof.
Laser Aligning The Vendetta2
Place the alignment aid on a large, safe backstop and position
yourself an appropriate distance from the backstop. We recommend
making initial alignment corrections at 20 yards, then verifying
alignment at 40 yards if possible.
Activate the visible alignment laser by pressing and holding the
power pad for 10 seconds. A count-down timer will be shown on the
Vendetta2’s display and the visible laser will activate when the timer
reaches zero. If the Vendetta2 has previously been activated, allow
it to sit idle until it has powered down, then begin the activation
process for the visible alignment laser. Safely come to full draw and
aim your top pin at the center of the alignment aid. Using the red dot
created by the visible alignment laser, make note of which direction
the Vendetta2 must be adjusted to place the red dot in the center of
the circle you created on the alignment aid. (Fig.9)
Proper alignment has been obtained when you can aim (at full
draw) your top pin at the center of the black dot, and the red dot
produced by the visible alignment laser is located in the center of
the circle you created during “recreating your total offset” on the
alignment aid process above. Once the Vendetta2 had been properly
aligned, tighten the Micro Adjustment Screws to 23 in/lbs and verify
alignment one more time.
To deactivate the visible alignment laser, press and hold the power
button for 5 seconds. The visible alignment laser will automatically
deactivate 5 minutes after activation.
Note: For best results, align the Vendetta2 at the longest distance
possible. Since the purpose of measuring the total offset between the
visible laser and your top pin is to ensure the Vendetta2 is aligned
parallel to your sight, you can place the alignment aid at any distance
and continue to use your 20-yard pin for alignment.
WARRANTY / REPAIR
Your Leupold Vendetta2 digital laser rangefinder is warranted by the
Leupold Electronics Warranty, and is protected from defects in materials
and workmanship for TWO YEARS from the date of purchase. In event of
a need for service or repair, please contact Leupold Product Service at:
BY PARCEL SERVICE:	 BY POSTAL SERVICE:
Leupold Product Service	 Leupold Product Service
14400 NW Greenbrier Parkway	 P.O. Box 688
Beaverton, OR 97006-5791 USA	 Beaverton, OR 97075-0688 USA
For product questions, consult the Leupold Web site at:
www.leupold.com, or call (503) 526-1400 or (800) LEUPOLD (538-7653).
LEUPOLD, GOLDEN RING, MARK 4, the Golden Ring design, the circle-L reticle logo
design, and various other marks are registered trademarks of Leupold  Stevens, Inc. All
marks, including corporate logos and emblems, are subject to Leupold’s rights and may not
be used in connection with any product or service that is not Leupold’s, or in any manner
that disparages or discredits Leupold, or in a manner likely to cause confusion.
Certain other trademarks used in connection with Leupold products and services are
the property of their respective owners, and are used with permission. BOONE AND
CROCKETT CLUB and BOONE AND CROCKETT are registered trademarks of the
Boone and Crockett Club. RMEF and ROCKY MOUNTAIN ELK FOUNDATION are reg-
istered trademarks of the Rocky Mountain Elk Foundation. ADVANTAGE TIMBER and
ADVANTAGE TIMBER HD are trademarks or registered trademarks of Jordan Outdoor
Enterprises Ltd. MOSSY OAK BREAK-UP, MOSSY OAK BRUSH, MOSSY OAK OBSESSION,
and MOSSY OAK TREESTAND are trademarks or registered trademarks of HAAS Outdoors,
Inc. A.R.M.S. is a registered trademark of Atlantic Research Marketing Systems, Inc.
We reserve the right to make design and/or material modifications
without prior notice.
Copyright © 2016 Leupold+Stevens, Inc. All rights reserved.
Laser Alignment Dot
Drawn Circle
Black
Dot
FIG. 9
Fig.10
Top Pin Aligned
to Center of Target
LEUPOLD+STEVENS, INC.	 LEUPOLD+STEVENS, INC.
P.O. Box 688	 14400 NW Greenbrier Parkway
Beaverton, OR 97075 U.S.A.	 Beaverton, OR 97075-0688 U.S.A.
1 (800) LEUPOLD (538-7653)	 (503) 526-1400
www.leupold.com
Part #170314 Artwork # 170319B
HELPFUL HINTS FOR USING THE VENDETTA2
How do I activate angle compensation?
Angle compensation is always activated on the Vendetta2.
How do I activate the visible alignment laser?
Make sure the Vendetta2 has powered down and the display has not
been activated. Press and hold the Power button for 10 seconds (a
count-down timer will appear on the display).
How do I deactivate the visible alignment laser?
Press and hold the Power button for 5 seconds (a count-down timer
will appear on the display).
The Vendetta2 does not provide range.
Make sure that the POWER button is being pressed and released.
Make sure that nothing, such as your hand, sight, or riser is blocking
the lenses; as this could interfere with the emission and reception of
the laser pulses. Make sure unit is held steadily while depressing the
POWER button.
The target may be farther than 70 yards.
Make sure the target is at least 10 yards away.
Should you need assistance with your Vendetta2 product do not
return it to the dealer, contact Leupold Technical Services at
(800) LEUPOLD (538-7653).
SAFETY WARNING:
Never aim your bow at anything you do not intend
to shoot.
FIG. 7
Top Pin
1.25” your results will vary
2.60” your results will vary
Visible
Alignment Laser
1.25”
2.60”
2”Drawn
Circle
FIG. 8

More Related Content

Similar to Instruction manual | Leupold Vendetta 2 Rangefinders | Optics Trade

Similar to Instruction manual | Leupold Vendetta 2 Rangefinders | Optics Trade (20)

Instruction Manual | EO Tech 2.5-10x FFP | Optics Trade
Instruction Manual | EO Tech 2.5-10x FFP | Optics TradeInstruction Manual | EO Tech 2.5-10x FFP | Optics Trade
Instruction Manual | EO Tech 2.5-10x FFP | Optics Trade
 
Instructions AIMPOINT CompM3, CompML3 | Optics Trade
Instructions AIMPOINT CompM3, CompML3 | Optics TradeInstructions AIMPOINT CompM3, CompML3 | Optics Trade
Instructions AIMPOINT CompM3, CompML3 | Optics Trade
 
Instruction Manual | C-More RTS2B Red Dots | Optics Trade
Instruction Manual | C-More RTS2B Red Dots | Optics TradeInstruction Manual | C-More RTS2B Red Dots | Optics Trade
Instruction Manual | C-More RTS2B Red Dots | Optics Trade
 
Instruction Manual | Maven RF1 Rangefinders | Optics Trade
 Instruction Manual | Maven RF1 Rangefinders  | Optics Trade Instruction Manual | Maven RF1 Rangefinders  | Optics Trade
Instruction Manual | Maven RF1 Rangefinders | Optics Trade
 
Instruction Manual | Vector Optics Sable 1x25x34 | Optics Trade
Instruction Manual | Vector Optics Sable 1x25x34 | Optics TradeInstruction Manual | Vector Optics Sable 1x25x34 | Optics Trade
Instruction Manual | Vector Optics Sable 1x25x34 | Optics Trade
 
Instruction Manual | Vector Optics Scrapper Red Dot Sights | Optics Trade
Instruction Manual | Vector Optics Scrapper Red Dot Sights | Optics TradeInstruction Manual | Vector Optics Scrapper Red Dot Sights | Optics Trade
Instruction Manual | Vector Optics Scrapper Red Dot Sights | Optics Trade
 
Instruction Manual ATN X-Sight HD Series Weapon Sights | Optics Trade
Instruction Manual ATN X-Sight HD Series Weapon Sights | Optics TradeInstruction Manual ATN X-Sight HD Series Weapon Sights | Optics Trade
Instruction Manual ATN X-Sight HD Series Weapon Sights | Optics Trade
 
Instruction Manual C-MORE Scout | Optics Trade
Instruction Manual C-MORE Scout | Optics TradeInstruction Manual C-MORE Scout | Optics Trade
Instruction Manual C-MORE Scout | Optics Trade
 
Holosun 508T X2 Instruction Manual - Optics Trade
Holosun 508T X2 Instruction Manual - Optics TradeHolosun 508T X2 Instruction Manual - Optics Trade
Holosun 508T X2 Instruction Manual - Optics Trade
 
Instructions AIMPOINT Micro T-2 | Optics Trade
Instructions AIMPOINT Micro T-2 | Optics TradeInstructions AIMPOINT Micro T-2 | Optics Trade
Instructions AIMPOINT Micro T-2 | Optics Trade
 
Instruction Manual | Aimpoint Acro P-2 | Optics Trade
 Instruction Manual | Aimpoint Acro P-2 | Optics Trade Instruction Manual | Aimpoint Acro P-2 | Optics Trade
Instruction Manual | Aimpoint Acro P-2 | Optics Trade
 
Instruction Manual C-MORE Tactical | Optics Trade
Instruction Manual C-MORE Tactical | Optics TradeInstruction Manual C-MORE Tactical | Optics Trade
Instruction Manual C-MORE Tactical | Optics Trade
 
Instructions AIMPOINT Carbine Optic | Optics Trade
Instructions AIMPOINT Carbine Optic | Optics TradeInstructions AIMPOINT Carbine Optic | Optics Trade
Instructions AIMPOINT Carbine Optic | Optics Trade
 
Instruction Manual | C-More Tactical Railway Red Dot Sights | Optics Trade
Instruction Manual | C-More Tactical Railway Red Dot Sights | Optics TradeInstruction Manual | C-More Tactical Railway Red Dot Sights | Optics Trade
Instruction Manual | C-More Tactical Railway Red Dot Sights | Optics Trade
 
Instruction Manual | Aimpoint Acro C-1 | Optics Trade
Instruction Manual | Aimpoint Acro C-1 | Optics TradeInstruction Manual | Aimpoint Acro C-1 | Optics Trade
Instruction Manual | Aimpoint Acro C-1 | Optics Trade
 
Instruction Manual C-MORE Slideride | Optics Trade
Instruction Manual C-MORE Slideride | Optics TradeInstruction Manual C-MORE Slideride | Optics Trade
Instruction Manual C-MORE Slideride | Optics Trade
 
Instruction Manual C-MORE Railway | Optics Trade
Instruction Manual C-MORE Railway | Optics TradeInstruction Manual C-MORE Railway | Optics Trade
Instruction Manual C-MORE Railway | Optics Trade
 
Instruction manual | Aimpoint Micro S-1 | Optics Trade
Instruction manual | Aimpoint Micro S-1 | Optics TradeInstruction manual | Aimpoint Micro S-1 | Optics Trade
Instruction manual | Aimpoint Micro S-1 | Optics Trade
 
Instruction Manual | Burris Eliminator IV Laserscope Series | Optics Trade
 Instruction Manual | Burris Eliminator IV Laserscope Series | Optics Trade Instruction Manual | Burris Eliminator IV Laserscope Series | Optics Trade
Instruction Manual | Burris Eliminator IV Laserscope Series | Optics Trade
 
Instruction Manual ATN NVB8X Series NV Bi-ocular | Optics Trade
Instruction Manual ATN NVB8X Series NV Bi-ocular | Optics TradeInstruction Manual ATN NVB8X Series NV Bi-ocular | Optics Trade
Instruction Manual ATN NVB8X Series NV Bi-ocular | Optics Trade
 

More from Optics-Trade

More from Optics-Trade (20)

Technical Data | Sig Sauer Easy6 BDX 1-6x24 | Optics Trade
Technical Data | Sig Sauer Easy6 BDX 1-6x24 | Optics TradeTechnical Data | Sig Sauer Easy6 BDX 1-6x24 | Optics Trade
Technical Data | Sig Sauer Easy6 BDX 1-6x24 | Optics Trade
 
Technical Data | ThermTec Wild 650L | Optics Trade
Technical Data | ThermTec Wild 650L | Optics TradeTechnical Data | ThermTec Wild 650L | Optics Trade
Technical Data | ThermTec Wild 650L | Optics Trade
 
Technical Data | ThermTec Wild 635L | Optics Trade
Technical Data | ThermTec Wild 635L | Optics TradeTechnical Data | ThermTec Wild 635L | Optics Trade
Technical Data | ThermTec Wild 635L | Optics Trade
 
Technical Data | ThermTec Wild 650 | Optics Trade
Technical Data | ThermTec Wild 650 | Optics TradeTechnical Data | ThermTec Wild 650 | Optics Trade
Technical Data | ThermTec Wild 650 | Optics Trade
 
Technical Data | ThermTec Wild 635 | Optics Trade
Technical Data | ThermTec Wild 635 | Optics TradeTechnical Data | ThermTec Wild 635 | Optics Trade
Technical Data | ThermTec Wild 635 | Optics Trade
 
Technical Data | ThermTec Wild 335 | Optics Trade
Technical Data | ThermTec Wild 335 | Optics TradeTechnical Data | ThermTec Wild 335 | Optics Trade
Technical Data | ThermTec Wild 335 | Optics Trade
 
Technical Data | ThermTec Wild 325 | Optics Trade
Technical Data | ThermTec Wild 325 | Optics TradeTechnical Data | ThermTec Wild 325 | Optics Trade
Technical Data | ThermTec Wild 325 | Optics Trade
 
Instruction Manual | ThermTec Wild Thermal Monoculars | Optics Trade
Instruction Manual | ThermTec Wild Thermal Monoculars | Optics TradeInstruction Manual | ThermTec Wild Thermal Monoculars | Optics Trade
Instruction Manual | ThermTec Wild Thermal Monoculars | Optics Trade
 
Technical Data | ThermTec Hunt 335 | Optics Trade
Technical Data | ThermTec Hunt 335 | Optics TradeTechnical Data | ThermTec Hunt 335 | Optics Trade
Technical Data | ThermTec Hunt 335 | Optics Trade
 
Instruction Manual | ThermTec Hunt Thermal Clip-On Series | Optics Trade
Instruction Manual | ThermTec Hunt Thermal Clip-On Series | Optics TradeInstruction Manual | ThermTec Hunt Thermal Clip-On Series | Optics Trade
Instruction Manual | ThermTec Hunt Thermal Clip-On Series | Optics Trade
 
Instruction Manual | Steiner eRanger LRF 10x42 | Optics Trade
Instruction Manual | Steiner eRanger LRF 10x42 | Optics TradeInstruction Manual | Steiner eRanger LRF 10x42 | Optics Trade
Instruction Manual | Steiner eRanger LRF 10x42 | Optics Trade
 
Flyer | Guide DN Series Handheld Digital Binoculars | Optics Trade
Flyer | Guide DN Series Handheld Digital Binoculars | Optics TradeFlyer | Guide DN Series Handheld Digital Binoculars | Optics Trade
Flyer | Guide DN Series Handheld Digital Binoculars | Optics Trade
 
Quick Start Guide | Guide TB Series | Optics Trade
Quick Start Guide | Guide TB Series | Optics TradeQuick Start Guide | Guide TB Series | Optics Trade
Quick Start Guide | Guide TB Series | Optics Trade
 
Instruction Manual | Pard FD1 Digital NV Front Attachment | Optics Trade
Instruction Manual | Pard FD1 Digital NV Front Attachment | Optics TradeInstruction Manual | Pard FD1 Digital NV Front Attachment | Optics Trade
Instruction Manual | Pard FD1 Digital NV Front Attachment | Optics Trade
 
Instruction Manual | EOTech Vudu X 2-12x40 | Optics Trade
Instruction Manual | EOTech Vudu X 2-12x40 | Optics TradeInstruction Manual | EOTech Vudu X 2-12x40 | Optics Trade
Instruction Manual | EOTech Vudu X 2-12x40 | Optics Trade
 
Instruction Manual | EOTech Vudu X 1-6x24 | Optics Trade
Instruction Manual | EOTech Vudu X 1-6x24 | Optics TradeInstruction Manual | EOTech Vudu X 1-6x24 | Optics Trade
Instruction Manual | EOTech Vudu X 1-6x24 | Optics Trade
 
Instruction Manual | Nightforce CFS 6-36x50 F1 | Optics Trade
Instruction Manual | Nightforce CFS 6-36x50 F1 | Optics TradeInstruction Manual | Nightforce CFS 6-36x50 F1 | Optics Trade
Instruction Manual | Nightforce CFS 6-36x50 F1 | Optics Trade
 
Instruction Manual | Athlon Cronus Tactical G2 ED 7-42x60 | Optics Trade
Instruction Manual | Athlon Cronus Tactical G2 ED 7-42x60 | Optics TradeInstruction Manual | Athlon Cronus Tactical G2 ED 7-42x60 | Optics Trade
Instruction Manual | Athlon Cronus Tactical G2 ED 7-42x60 | Optics Trade
 
Insrtuction Manual | Swarovski CL Companion Habicht | Optics Trade
Insrtuction Manual | Swarovski CL Companion Habicht | Optics TradeInsrtuction Manual | Swarovski CL Companion Habicht | Optics Trade
Insrtuction Manual | Swarovski CL Companion Habicht | Optics Trade
 
Technical Data | Swarovski CL Companion Habicht | Optics Trade
Technical Data | Swarovski CL Companion Habicht | Optics TradeTechnical Data | Swarovski CL Companion Habicht | Optics Trade
Technical Data | Swarovski CL Companion Habicht | Optics Trade
 

Recently uploaded

🔝|97111༒99012🔝 Call Girls In {Delhi} Cr Park ₹5.5k Cash Payment With Room De...
🔝|97111༒99012🔝 Call Girls In  {Delhi} Cr Park ₹5.5k Cash Payment With Room De...🔝|97111༒99012🔝 Call Girls In  {Delhi} Cr Park ₹5.5k Cash Payment With Room De...
🔝|97111༒99012🔝 Call Girls In {Delhi} Cr Park ₹5.5k Cash Payment With Room De...
Diya Sharma
 
+971565801893>>SAFE AND ORIGINAL ABORTION PILLS FOR SALE IN DUBAI AND ABUDHAB...
+971565801893>>SAFE AND ORIGINAL ABORTION PILLS FOR SALE IN DUBAI AND ABUDHAB...+971565801893>>SAFE AND ORIGINAL ABORTION PILLS FOR SALE IN DUBAI AND ABUDHAB...
+971565801893>>SAFE AND ORIGINAL ABORTION PILLS FOR SALE IN DUBAI AND ABUDHAB...
Health
 

Recently uploaded (20)

Sports Writing (Rules,Tips, Examples, etc)
Sports Writing (Rules,Tips, Examples, etc)Sports Writing (Rules,Tips, Examples, etc)
Sports Writing (Rules,Tips, Examples, etc)
 
Personal Brand Exploration - By Bradley Dennis
Personal Brand Exploration - By Bradley DennisPersonal Brand Exploration - By Bradley Dennis
Personal Brand Exploration - By Bradley Dennis
 
WhatsApp Chat: 📞 8617697112 Birbhum Call Girl available for hotel room package
WhatsApp Chat: 📞 8617697112 Birbhum  Call Girl available for hotel room packageWhatsApp Chat: 📞 8617697112 Birbhum  Call Girl available for hotel room package
WhatsApp Chat: 📞 8617697112 Birbhum Call Girl available for hotel room package
 
Unveiling the Mystery of Main Bazar Chart
Unveiling the Mystery of Main Bazar ChartUnveiling the Mystery of Main Bazar Chart
Unveiling the Mystery of Main Bazar Chart
 
08448380779 Call Girls In International Airport Women Seeking Men
08448380779 Call Girls In International Airport Women Seeking Men08448380779 Call Girls In International Airport Women Seeking Men
08448380779 Call Girls In International Airport Women Seeking Men
 
ALL NFL NETWORK CONTACTS- April 29, 2024
ALL NFL NETWORK CONTACTS- April 29, 2024ALL NFL NETWORK CONTACTS- April 29, 2024
ALL NFL NETWORK CONTACTS- April 29, 2024
 
Hire 💕 8617697112 Kasauli Call Girls Service Call Girls Agency
Hire 💕 8617697112 Kasauli Call Girls Service Call Girls AgencyHire 💕 8617697112 Kasauli Call Girls Service Call Girls Agency
Hire 💕 8617697112 Kasauli Call Girls Service Call Girls Agency
 
Ramban Escorts ☎️8617697112 Starting From 5K to 15K High Profile Escorts In...
Ramban  Escorts ☎️8617697112  Starting From 5K to 15K High Profile Escorts In...Ramban  Escorts ☎️8617697112  Starting From 5K to 15K High Profile Escorts In...
Ramban Escorts ☎️8617697112 Starting From 5K to 15K High Profile Escorts In...
 
08448380779 Call Girls In Karol Bagh Women Seeking Men
08448380779 Call Girls In Karol Bagh Women Seeking Men08448380779 Call Girls In Karol Bagh Women Seeking Men
08448380779 Call Girls In Karol Bagh Women Seeking Men
 
JORNADA 5 LIGA MURO 2024INSUGURACION.pdf
JORNADA 5 LIGA MURO 2024INSUGURACION.pdfJORNADA 5 LIGA MURO 2024INSUGURACION.pdf
JORNADA 5 LIGA MURO 2024INSUGURACION.pdf
 
08448380779 Call Girls In IIT Women Seeking Men
08448380779 Call Girls In IIT Women Seeking Men08448380779 Call Girls In IIT Women Seeking Men
08448380779 Call Girls In IIT Women Seeking Men
 
TAM Sports_IPL 17 Till Match 37_Celebrity Endorsement _Report.pdf
TAM Sports_IPL 17 Till Match 37_Celebrity Endorsement _Report.pdfTAM Sports_IPL 17 Till Match 37_Celebrity Endorsement _Report.pdf
TAM Sports_IPL 17 Till Match 37_Celebrity Endorsement _Report.pdf
 
🔝|97111༒99012🔝 Call Girls In {Delhi} Cr Park ₹5.5k Cash Payment With Room De...
🔝|97111༒99012🔝 Call Girls In  {Delhi} Cr Park ₹5.5k Cash Payment With Room De...🔝|97111༒99012🔝 Call Girls In  {Delhi} Cr Park ₹5.5k Cash Payment With Room De...
🔝|97111༒99012🔝 Call Girls In {Delhi} Cr Park ₹5.5k Cash Payment With Room De...
 
Croatia vs Italy Euro Cup 2024 Three pitfalls for Spalletti’s Italy in Group ...
Croatia vs Italy Euro Cup 2024 Three pitfalls for Spalletti’s Italy in Group ...Croatia vs Italy Euro Cup 2024 Three pitfalls for Spalletti’s Italy in Group ...
Croatia vs Italy Euro Cup 2024 Three pitfalls for Spalletti’s Italy in Group ...
 
Slovenia Vs Serbia UEFA Euro 2024 Fixture Guide Every Fixture Detailed.docx
Slovenia Vs Serbia UEFA Euro 2024 Fixture Guide Every Fixture Detailed.docxSlovenia Vs Serbia UEFA Euro 2024 Fixture Guide Every Fixture Detailed.docx
Slovenia Vs Serbia UEFA Euro 2024 Fixture Guide Every Fixture Detailed.docx
 
Trossard's Message Bridging Celebrities and Sports in Euro Cup 2024.docx
Trossard's Message Bridging Celebrities and Sports in Euro Cup 2024.docxTrossard's Message Bridging Celebrities and Sports in Euro Cup 2024.docx
Trossard's Message Bridging Celebrities and Sports in Euro Cup 2024.docx
 
UEFA Euro 2024 Squad Check-in Who is Most Favorite.docx
UEFA Euro 2024 Squad Check-in Who is Most Favorite.docxUEFA Euro 2024 Squad Check-in Who is Most Favorite.docx
UEFA Euro 2024 Squad Check-in Who is Most Favorite.docx
 
+971565801893>>SAFE AND ORIGINAL ABORTION PILLS FOR SALE IN DUBAI AND ABUDHAB...
+971565801893>>SAFE AND ORIGINAL ABORTION PILLS FOR SALE IN DUBAI AND ABUDHAB...+971565801893>>SAFE AND ORIGINAL ABORTION PILLS FOR SALE IN DUBAI AND ABUDHAB...
+971565801893>>SAFE AND ORIGINAL ABORTION PILLS FOR SALE IN DUBAI AND ABUDHAB...
 
Who Is Emmanuel Katto Uganda? His Career, personal life etc.
Who Is Emmanuel Katto Uganda? His Career, personal life etc.Who Is Emmanuel Katto Uganda? His Career, personal life etc.
Who Is Emmanuel Katto Uganda? His Career, personal life etc.
 
Spain Vs Italy 20 players confirmed for Spain's Euro 2024 squad, and three po...
Spain Vs Italy 20 players confirmed for Spain's Euro 2024 squad, and three po...Spain Vs Italy 20 players confirmed for Spain's Euro 2024 squad, and three po...
Spain Vs Italy 20 players confirmed for Spain's Euro 2024 squad, and three po...
 

Instruction manual | Leupold Vendetta 2 Rangefinders | Optics Trade

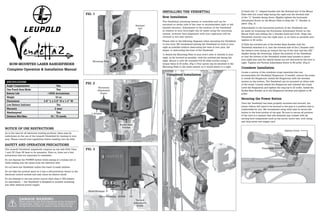
  • 1. 2) Insert the “L” shaped bracket into the Notched jaw of the Mount Plate with the round edge facing the sight and the dovetail side of the “L” Bracket facing down. Slightly tighten the horizontal Adjustment Screw on the Mount Plate to keep the “L” Bracket in place. (Fig. 2) Adjustments to the horizontal position of the Vendetta2 can be made by loosening the Horizontal Adjustment Screw on the Mount Plate and sliding the L Bracket back and forth. Align the Vendetta2 directly over the sight pins, or as close as possible and tighten to 90 in/lbs. 3) Slide the notched jaw of the Socket Base Bracket with the Vendetta2 attached to it, onto the dovetail side of the L Bracket with the battery cover facing up toward the top of the riser and the LED display facing the bowstring. Adjust the position of the Vendetta2 so that the bottom of the Vendetta2 socket base bracket is above your sight pins and the optical lenses are not obscured by the bow or sight. Tighten the Vertical Adjustment Screw to 90 in/lbs. (Fig.3) Crossbow Installation Locate a section of the crossbow scope maintube that can accommodate the Vendetta2 Ringmount. If needed, remove the scope to install the Ringmount. Install the Ringmount with the dovetail portion on the bottom, The Vendetta2 can be mounted on either side of the scope. Loosely attach the Ringmount and reinstall the scope. Level the Ringmount and tighten the ring top to 22 in/lbs. Install the Socket Base Bracket on to the Ringmount dovetail and tighten to 90 in/lbs. Securing the Power Button Once the Vendetta2 has been properly mounted and secured, the power button will need to be secured to the grip in a position that is comfortable for you. We recommend using cloth tape to secure the button to the front portion of the grip. Be sure to secure all portions of the wire in a manner that will eliminate any contact with all moving bow components such as the arrow, arrow rest, bow string and drop-away rest trigger cord. INSTALLING THE VENDETTA2 Bow Installation The Vendetta2 mounting system is reversible and can be mounted on either side of the riser to accommodate right or left handed shooters. Adjustment to the location of the Vendetta2 in relation to your bow/sight can be made using the mounting system, however final alignment with your sight/pins will be covered in the next section. Please refer to the following diagrams when mounting the Vendetta2 to your bow. We recommend placing the Vendetta2 as close to your sight as possible without obstructing the view of your pins, the target, or obstructing the front of the Vendetta2. 1) Attach the Mounting Plate to your bow’s riser or directly to your sight, as far forward as possible, with the notched jaw facing the sight. Secure it with the included #10-24 Allen screws using a torque value of 35 in/lbs. (Fig.1) Your quiver can be attached to the Mounting Plate in the same manner as it would attach to a sight. BOW-MOUNTED LASER RANGEFINDER Complete Operation & Installation Manual NOTICE OF USE RESTRICTIONS As is the case for all electronic hunting products, there may be restrictions on the use of the Leupold Vendetta2 for hunting in your area. Please consult local regulations before heading into the field. SAFETY AND OPERATION PRECAUTIONS The Leupold Vendetta2 rangefinder employs an eye safe FDA Class 1 and CE Class 3R laser in its operation. Even so, there are a few precautions that are important to remember: Do not depress the POWER button while aiming at a human eye or while looking into the optics from the objective side. Do not leave the Vendetta2 within the reach of small children. Do not take the product apart as it has a self-protection device in the electronic control module and may cause an electric shock. Do not attempt to use any power source other than a CR2 battery (or equivalent) — the Vendetta2 is designed to prohibit accessing any other external power supply. DAMAGE WARNING: When selecting the final placement of the Vendetta2 Rangefinder, make sure to locate it where the bow string will not come in contact with it after firing. SPECIFICATIONS Angle Compensation Yes One-Touch Scan Mode Yes Battery Life >3000 Actuations Weight 10 oz Dimensions 3.8” L x 2.8” H x 1.3” W Low Battery Indicator Yes Warranty 2 year Weatherproof Yes Distance Min/Max 10 / 70 yards FIG. 1 FIG. 2 FIG. 3 Completed Installation Micro Windage R L Micro Elevation DOWN UP Mounting Plate Vertical Adjustment Screw Horizontal Adjustment Screw L Bracket Battery Cover Ringmount Socket Base Bracket Notched Jaw
  • 2. ALIGNING THE VENDETTA2 WITH YOUR SIGHT Read this entire section thoroughly prior to proceeding. Aligning the Vendetta2 at distances greater than 20 yards can significantly improve performance in the field. Proper alignment of the Vendetta2 with your sight is absolutely critical to proper performance in the field. To ensure exact alignment and compensate for the offset between the Vendetta2 and your sight, be sure to read and understand the entire alignment process before beginning. To properly align the Vendetta2 with your sight, two measurements must be taken and applied during the alignment process. The goal is to align the Vendetta2 visible alignment laser with your top sight pin, so that your top pin becomes your alignment mark to range targets. Calculating Your Total Offset: Use a ruler to measure the Vendetta2 offsets. The first measurement is the horizontal offset between the Vendetta2’s visible alignment laser (bottom most lens) and the center of the top pin of your sight. In the graphic below (Fig.7), this measurement is 1.25”. The second measurement is the vertical offset between the Vendetta2’s visible alignment laser and the top pin of your sight. In the graphic below, this measurement is 2.60”. The combination of these two measurements shows the total offset between the visible alignment laser and the top pin of your sight. These measurements will be critical to achieving proper alignment of your Vendetta2 and should be taken as carefully as possible. Recreating your total offset on the alignment aid To accurately align the Vendetta2 with your bow, you must first determine the offset of the Vendetta2 to the sight pins. Using the included alignment aid and a permanent marker, draw a 2”circle recreating the total offset between the visible laser channel and the top pin of your sight. (Fig.8) In the example, the center of this circle would be exactly 1.25” LEFT, and 2.60” ABOVE the center of the pre- marked black dot on the alignment aid. The total offset will vary with each bow/sight combination and the measurements above are for explanation purposes only. Note: When recreating your total offset on the alignment aid, remember that the horizontal distance should be marked as though you were behind the bow/sight. Using the example above, the Vendetta2 would be to the left of the top pin when viewed from behind in a firing position. MEASURING DISTANCE WITH THE VENDETTA2 Measurement of distance with the Vendetta2 is a very simple operation: Depress the POWER button on the pressure pad to power up the unit. (Fig.10) Come to full draw and align your top pin with the target you intend to range. Depress the POWER button again – this will cause the invisible ranging laser to activate and take a distance reading. Read the distance as shown on the LED display. Note: For best results, always aim at the center of the intended target when determining range. (Fig.10) Scan Mode (continuous measurement of a moving target) Scan mode can only be used after the Vendetta2 has been powered up. When the Vendetta2 is activated, press and hold the POWER button for at least 2 seconds. Once the display begins blinking, SCAN mode has been activated. Follow the object as it moves. SCAN mode can be activated prior to drawing the bow. The distance will automatically update for 40 seconds. Press and release the POWER button to exit SCAN mode. This procedure can also be used to obtain the range of multiple animals or objects; simply move your sight pin from one target to another. CLEARING THE LAST DISTANCE OBTAINED The last range reading taken does not need to be cleared before reading another object’s distance. For that reason, there is no reset button. The ranging accuracy of the Leupold Vendetta2 rangefinder is ±1 yard. LOW BATTERY INDICATOR When your battery reaches 1/4 capacity and will soon need to be replaced, the distance readout will blink quickly each time you range a target. The Vendetta2 will continue to function normally and provide optimal performance until the battery has reached zero capacity. CLEANING / MAINTENANCE Blow away dust or debris on lenses, or use a soft lens brush (such as the one found on the Leupold LensPen® ). To remove fingerprints, water spots or tougher dirt, use a soft cotton cloth or the cleaning end of the Leupold LensPen. A lens tissue with lens cleaning fluid may be used for more stubborn dirt. Always apply cleaning fluid to the cleaning cloth, never directly to the lens. To insert a new battery, remove battery cover and remove exhausted battery. Insert new CR-2 battery, negative terminal first, into the battery compartment. Close battery cover. The Vendetta2 is weatherproof. Laser Aligning The Vendetta2 Place the alignment aid on a large, safe backstop and position yourself an appropriate distance from the backstop. We recommend making initial alignment corrections at 20 yards, then verifying alignment at 40 yards if possible. Activate the visible alignment laser by pressing and holding the power pad for 10 seconds. A count-down timer will be shown on the Vendetta2’s display and the visible laser will activate when the timer reaches zero. If the Vendetta2 has previously been activated, allow it to sit idle until it has powered down, then begin the activation process for the visible alignment laser. Safely come to full draw and aim your top pin at the center of the alignment aid. Using the red dot created by the visible alignment laser, make note of which direction the Vendetta2 must be adjusted to place the red dot in the center of the circle you created on the alignment aid. (Fig.9) Proper alignment has been obtained when you can aim (at full draw) your top pin at the center of the black dot, and the red dot produced by the visible alignment laser is located in the center of the circle you created during “recreating your total offset” on the alignment aid process above. Once the Vendetta2 had been properly aligned, tighten the Micro Adjustment Screws to 23 in/lbs and verify alignment one more time. To deactivate the visible alignment laser, press and hold the power button for 5 seconds. The visible alignment laser will automatically deactivate 5 minutes after activation. Note: For best results, align the Vendetta2 at the longest distance possible. Since the purpose of measuring the total offset between the visible laser and your top pin is to ensure the Vendetta2 is aligned parallel to your sight, you can place the alignment aid at any distance and continue to use your 20-yard pin for alignment. WARRANTY / REPAIR Your Leupold Vendetta2 digital laser rangefinder is warranted by the Leupold Electronics Warranty, and is protected from defects in materials and workmanship for TWO YEARS from the date of purchase. In event of a need for service or repair, please contact Leupold Product Service at: BY PARCEL SERVICE: BY POSTAL SERVICE: Leupold Product Service Leupold Product Service 14400 NW Greenbrier Parkway P.O. Box 688 Beaverton, OR 97006-5791 USA Beaverton, OR 97075-0688 USA For product questions, consult the Leupold Web site at: www.leupold.com, or call (503) 526-1400 or (800) LEUPOLD (538-7653). LEUPOLD, GOLDEN RING, MARK 4, the Golden Ring design, the circle-L reticle logo design, and various other marks are registered trademarks of Leupold Stevens, Inc. All marks, including corporate logos and emblems, are subject to Leupold’s rights and may not be used in connection with any product or service that is not Leupold’s, or in any manner that disparages or discredits Leupold, or in a manner likely to cause confusion. Certain other trademarks used in connection with Leupold products and services are the property of their respective owners, and are used with permission. BOONE AND CROCKETT CLUB and BOONE AND CROCKETT are registered trademarks of the Boone and Crockett Club. RMEF and ROCKY MOUNTAIN ELK FOUNDATION are reg- istered trademarks of the Rocky Mountain Elk Foundation. ADVANTAGE TIMBER and ADVANTAGE TIMBER HD are trademarks or registered trademarks of Jordan Outdoor Enterprises Ltd. MOSSY OAK BREAK-UP, MOSSY OAK BRUSH, MOSSY OAK OBSESSION, and MOSSY OAK TREESTAND are trademarks or registered trademarks of HAAS Outdoors, Inc. A.R.M.S. is a registered trademark of Atlantic Research Marketing Systems, Inc. We reserve the right to make design and/or material modifications without prior notice. Copyright © 2016 Leupold+Stevens, Inc. All rights reserved. Laser Alignment Dot Drawn Circle Black Dot FIG. 9 Fig.10 Top Pin Aligned to Center of Target LEUPOLD+STEVENS, INC. LEUPOLD+STEVENS, INC. P.O. Box 688 14400 NW Greenbrier Parkway Beaverton, OR 97075 U.S.A. Beaverton, OR 97075-0688 U.S.A. 1 (800) LEUPOLD (538-7653) (503) 526-1400 www.leupold.com Part #170314 Artwork # 170319B HELPFUL HINTS FOR USING THE VENDETTA2 How do I activate angle compensation? Angle compensation is always activated on the Vendetta2. How do I activate the visible alignment laser? Make sure the Vendetta2 has powered down and the display has not been activated. Press and hold the Power button for 10 seconds (a count-down timer will appear on the display). How do I deactivate the visible alignment laser? Press and hold the Power button for 5 seconds (a count-down timer will appear on the display). The Vendetta2 does not provide range. Make sure that the POWER button is being pressed and released. Make sure that nothing, such as your hand, sight, or riser is blocking the lenses; as this could interfere with the emission and reception of the laser pulses. Make sure unit is held steadily while depressing the POWER button. The target may be farther than 70 yards. Make sure the target is at least 10 yards away. Should you need assistance with your Vendetta2 product do not return it to the dealer, contact Leupold Technical Services at (800) LEUPOLD (538-7653). SAFETY WARNING: Never aim your bow at anything you do not intend to shoot. FIG. 7 Top Pin 1.25” your results will vary 2.60” your results will vary Visible Alignment Laser 1.25” 2.60” 2”Drawn Circle FIG. 8