Hifi Laxmi Nagar Call Girls Service WhatsApp -> 9999965857 Available 24x7 ^ D...
Iluminar un disco duro (ingles)
1. Well kids, here is the mod you have not yet seen posted on GT -- The Hard Drive window mod. I will take you through the steps so that you can mod
your own hard drive and make it look real slick for those LAN-Parties.
Needed Materials:
• Lexan or Plexi sheet, at least 3.5"x6"
• Old Hard Drive
• Wires/Solder
• LED or 12V Lamp to light the hard drive (if you want it lit that is).
• Heat shrink
• Silicone sealant/shoe goo/ household goop/contact cement
• Saran Wrap
Tools you will need to do this mod:
• Dremel or something else to cut the hole in the hard drive casing
• Philips or Torx screwdriver to get the hard drive open
• Power supply to test.
All of the stuff you see listed here I had lying around the house, if you don't have it handy, it shouldn't be too hard to find. I completed this mod for
about $3 worth of equipment and only took about 2 hours of time.
Before we start, let's go over some of the basics though. By doing this mod, you may kill your hard drive. If you don't want to risk killing the hard
drive, don't do it! You also must understand that you cannot let any dust/water/dirt come in contact with the drive heads or platters. If something hits
the head it will probably kill your hard drive.
Now let's get on to business. First find a suitable hard drive to mod. I will be using a Quantum Maverick 540MB Hard drive from my first ever
computer. Here is what it looks like originally:
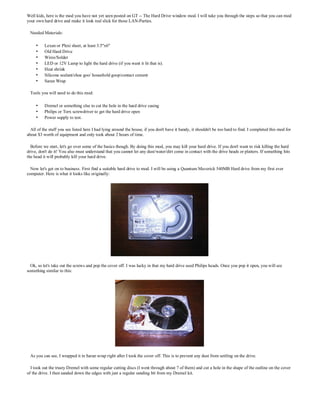
Ok, so let's take out the screws and pop the cover off. I was lucky in that my hard drive used Philips heads. Once you pop it open, you will see
something similar to this:
As you can see, I wrapped it in Saran wrap right after I took the cover off. This is to prevent any dust from settling on the drive.
I took out the trusty Dremel with some regular cutting discs (I went through about 7 of them) and cut a hole in the shape of the outline on the cover
of the drive. I then sanded down the edges with just a regular sanding bit from my Dremel kit.
2. I was fairly pleased with the cut. Next, I had a sheet of 15"x15" Lexan that is about 1/8" thick. I found this to be the perfect size to stick on the top.
I didn't use the Dremel for this, I actually used a pair of Tin Snips, they cut through the Lexan rather easily, without cracking it. If you are using
Plexi, or Acrylic sheeting, I suggest you use the Dremel with cutting bits, as it cracks less than Lexan. When I was done cutting with the Tin Snips, I
took out the Dremel, again with the sanding disc and smoothed out the edges:
I found this bottle of "Household GOOP" lying around the house. It says "Contact Adhesive and Sealant" on the label, so I instantly thought it was
the perfect candidate for the job. It's also waterproof, just in case you want to submerse your hard drive. USE IN A WELL VENTILATED AREA. I
took this stuff and spread it around the edge of the cut I had made in the cover, it went on quite nice, and it blends in with the drive cause it's see
through.
3. I stuck my sheet of Lexan on top and it created a tight seal. I left it to dry for about 40 minutes. I then took the hard drive and put the cover on to
check the fit.
The next step was the lighting. I had originally put a ultra bright blue LED in there, but unfortunately, the AT PSU I tested the unit on actually put
out about 5.8 Volts on the 5V line. This fried the LED. I took a 12V lamp I had and wired it up. If you plan on using a LED, you will need a
resistor. A LED is recommended since it emits little to no heat. The lamp was used mainly because it was readily available in the house.
4. It fit perfectly in the space that was free. (Don't worry, that dust is on the outside of the drive) The wires I used were very small (24G) so I did not
have to worry about cutting a hole in the end to accommodate them, as the foam seal around the drive did a good job. Now here's the part you have
all been waiting for: The finished product:
So all powered up, the lights come on, and it looks marvelous. The orange/red lamp did a much better job of lighting the drive than I thought it
would. As for the drive still working, I stuck it in my rig, booted up, and it detected fine. Booted to Windows, ran scandisk and did a surface scan, a
total of 0 bad sectors. Pretty good considering my working environment. Now see all that dirt on my desk? That would be from the hole cutting.
Don't worry, none of it got in the drive.
Final Thoughts:
Overall I am extremely pleased with this mod, it turned out much better than I expected it would, and the drive still works! The time it takes and the
effort I put in are way worth the outcome.
Have fun people, and remember, keep on modding!