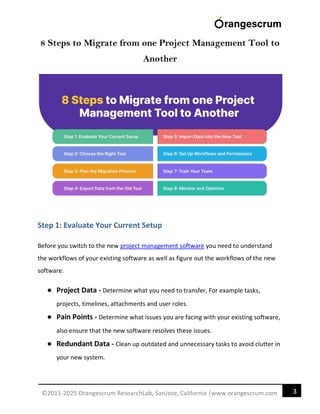
1
©2011-2025 Orangescrum ResearchLab, SanJose, California |www.orangescrum.com
How to Move Projects Between Tools
Without Losing Data?
Switching project management tools may feel like a daunting task. You are leaving
behind a familiar setup and moving into a new space. You might question if it works as
seamlessly as before.
Whether you are upgrading to a more sophisticated tool, seeking better integrations or
addressing inefficiencies, project migration unlocks new opportunities for productivity
and collaboration.
The process can be challenging! From transferring data and maintaining team workflows
to tracking tasks and planning a migration it can lead to disruption, frustration and
2
©2011-2025 Orangescrum ResearchLab, SanJose, California |www.orangescrum.com
missed deadlines. But if you use the right strategy you can migrate your projects
seamlessly to a new tool.
In this blog we will walk you through the process of migrating projects without making it
a burden on your team.
Why Migrate Your Project Management Tool?
Before diving into how you can migrate to a new tool let’s talk about why you should do
it. Here are 5 common reasons to migrate to a new project management software.
 Scalability: Your existing PMS no longer supports your team size or projects.
 Features: The new software provides advanced features like integrations,
automation and faster reporting.
 Cost: The new tools gives you a better value for the budget
 Usability: Get a more user-friendly interface which improves team acceptance.
 Customization: Enhance your flexibility with customized workflows and
dashboards which your organization needs.
Understanding your business goal will keep you focused and enable you to choose the
right project management software.
3
©2011-2025 Orangescrum ResearchLab, SanJose, California |www.orangescrum.com
8 Steps to Migrate from one Project Management Tool to
Another
Step 1: Evaluate Your Current Setup
Before you switch to the new project management software you need to understand
the workflows of your existing software as well as figure out the workflows of the new
software.
● Project Data - Determine what you need to transfer, For example tasks,
projects, timelines, attachments and user roles.
● Pain Points - Determine what issues you are facing with your existing software,
also ensure that the new software resolves these issues.
● Redundant Data - Clean up outdated and unnecessary tasks to avoid clutter in
your new system.
4
©2011-2025 Orangescrum ResearchLab, SanJose, California |www.orangescrum.com
Pro Tip: Keep a list of features and workflow you want to improve during the migration
process.
Step 2: Choose the Right Tool
Selecting the right project management software is necessary. Consider the following
factors:
● Core Features - Checkout if the new project management software has task
management, reporting and automation.
● Integration - Ensure that it syncs with the tools you are already using.
● Scalability - Scalability is essential as your brand needs to grow with your team
and projects.
● Ease of Use - Determine if the interface is intuitive for your team.
Compare your options thoroughly. Check some of the best PMS such as Orangescrum,
JIRA and Asana to ensure you meet your needs.
Step 3: Plan the Migration Process
Proper planning is essential for a seamless migration. Here’s how to prepare:
● Create a Migration Team - Assign a team to oversee the migration. Include
representatives from various departments to meet various needs.
● Set Clear Goals - Determine what a successful migration is such as zero data
loss, minimal downtime and full team adoption.
● Set a Timeline - Plan the migration during a period with minimal project
activity to reduce disruptions.
5
©2011-2025 Orangescrum ResearchLab, SanJose, California |www.orangescrum.com
● Notify Stakeholder - Let you team members know beforehand about the
upcoming migration such as timelines and changes which they can expect.
Step 4: Export Data from the Old Tool
Most project management software enables you to export your data in various formats
such as CSV, Excel and JSON. Here are the important considerations:
● Export All Relevant Data - Ensure your tasks, projects, milestones, user-roles,
deadlines, attachments and comments are aligned with your project goals.
● Check for Limitations - Some apps might have export restrictions such as
attachment size and task limits.
● Backup Everything - Create a backup of the data in case issues arise such as
during the import process.
Step 5: Import Data into the New Tool
Once your data is ready, start importing it to the new software. Most tools provide
native import options such as integration features to simplify the process. Follow these
steps:
● Map Fields - Match the fields in your exported data with the right fields in the
new software such as task titles, deadlines, assignees.
● Test with a Sample - Import a part of your data to identify if any issues persist.
● Full Import - Once you are satisfied with the test you should proceed to import
the full dataset.
● Verify Data Integrity - Check that everything including attachments and
dependencies has been transferred correctly.
6
©2011-2025 Orangescrum ResearchLab, SanJose, California |www.orangescrum.com
Pro Tip: Some softwares provides 3rd party migration services and plugins to simplify
complex imports.
Step 6: Set Up Workflows and Permissions
After you migrate your data you should set up workflows, permissions, and configure to
ensure everything functions smoothly:
● Customize Workflows - Adjust templates, task boards and various other
processes to meet your team’s needs.
● Assign Permissions - Ensure that your team members have the right access
levels.
● Integrate Tools - Connect the new systems with your existing applications such
as Slack, Google Drive, and email.
Step 7: Train Your Team
Migration is only successful if the team embraces the new software. You can provide the
right training and resources in order to ensure smooth adoption:
● Host Training Sessions - Walk your teams through key features and
workflows.
● Create User Guides - Share step-by-step guides and tutorials.
● Encourage Questions - Encourage open communication to address concerns.
7
©2011-2025 Orangescrum ResearchLab, SanJose, California |www.orangescrum.com
Step 8: Monitor and Optimize
After migration you should monitor the performance of the new software as well as
ensure team adoption. Make sure to check these:
● Data Accuracy - Ensure that there’s no missing or duplicated data.
● Team Feedback - You should gather feedback from team members to address
pain points.
● Process Efficiency - Encourage workflows and configurations based on real-
world use.
Common Challenges (and How to Overcome Them)
Data Loss: Create backups before starting the migration.
Resistance to Change: Highlight the benefits of the new tool and involve
your team early into the decision making process.
Downtime: Schedule your migrations to minimize disruptions during off-peak
periods.
Integration Issues: Test your integrations before the rollout to avoid any
compatibility issues.
8
©2011-2025 Orangescrum ResearchLab, SanJose, California |www.orangescrum.com
Final Takeaway
Migrating your projects from one tool to another doesn’t have to be an overwhelming
experience. With the right planning, communication, and approach you can ensure a
smooth transition that benefits your team and organization.
Migration is not just about transferring your data, it’s an opportunity to optimize your
workflows. You can improve collaboration and unlock the full potential of the new
project management tool. The process requires time and effort as well as long-term
gains. It’s worth investing in a product that is efficient, productive and scalable.

How to Switch from One Project Management Tool to Another

  • 1.
    1 ©2011-2025 Orangescrum ResearchLab,SanJose, California |www.orangescrum.com How to Move Projects Between Tools Without Losing Data? Switching project management tools may feel like a daunting task. You are leaving behind a familiar setup and moving into a new space. You might question if it works as seamlessly as before. Whether you are upgrading to a more sophisticated tool, seeking better integrations or addressing inefficiencies, project migration unlocks new opportunities for productivity and collaboration. The process can be challenging! From transferring data and maintaining team workflows to tracking tasks and planning a migration it can lead to disruption, frustration and
  • 2.
    2 ©2011-2025 Orangescrum ResearchLab,SanJose, California |www.orangescrum.com missed deadlines. But if you use the right strategy you can migrate your projects seamlessly to a new tool. In this blog we will walk you through the process of migrating projects without making it a burden on your team. Why Migrate Your Project Management Tool? Before diving into how you can migrate to a new tool let’s talk about why you should do it. Here are 5 common reasons to migrate to a new project management software.  Scalability: Your existing PMS no longer supports your team size or projects.  Features: The new software provides advanced features like integrations, automation and faster reporting.  Cost: The new tools gives you a better value for the budget  Usability: Get a more user-friendly interface which improves team acceptance.  Customization: Enhance your flexibility with customized workflows and dashboards which your organization needs. Understanding your business goal will keep you focused and enable you to choose the right project management software.
  • 3.
    3 ©2011-2025 Orangescrum ResearchLab,SanJose, California |www.orangescrum.com 8 Steps to Migrate from one Project Management Tool to Another Step 1: Evaluate Your Current Setup Before you switch to the new project management software you need to understand the workflows of your existing software as well as figure out the workflows of the new software. ● Project Data - Determine what you need to transfer, For example tasks, projects, timelines, attachments and user roles. ● Pain Points - Determine what issues you are facing with your existing software, also ensure that the new software resolves these issues. ● Redundant Data - Clean up outdated and unnecessary tasks to avoid clutter in your new system.
  • 4.
    4 ©2011-2025 Orangescrum ResearchLab,SanJose, California |www.orangescrum.com Pro Tip: Keep a list of features and workflow you want to improve during the migration process. Step 2: Choose the Right Tool Selecting the right project management software is necessary. Consider the following factors: ● Core Features - Checkout if the new project management software has task management, reporting and automation. ● Integration - Ensure that it syncs with the tools you are already using. ● Scalability - Scalability is essential as your brand needs to grow with your team and projects. ● Ease of Use - Determine if the interface is intuitive for your team. Compare your options thoroughly. Check some of the best PMS such as Orangescrum, JIRA and Asana to ensure you meet your needs. Step 3: Plan the Migration Process Proper planning is essential for a seamless migration. Here’s how to prepare: ● Create a Migration Team - Assign a team to oversee the migration. Include representatives from various departments to meet various needs. ● Set Clear Goals - Determine what a successful migration is such as zero data loss, minimal downtime and full team adoption. ● Set a Timeline - Plan the migration during a period with minimal project activity to reduce disruptions.
  • 5.
    5 ©2011-2025 Orangescrum ResearchLab,SanJose, California |www.orangescrum.com ● Notify Stakeholder - Let you team members know beforehand about the upcoming migration such as timelines and changes which they can expect. Step 4: Export Data from the Old Tool Most project management software enables you to export your data in various formats such as CSV, Excel and JSON. Here are the important considerations: ● Export All Relevant Data - Ensure your tasks, projects, milestones, user-roles, deadlines, attachments and comments are aligned with your project goals. ● Check for Limitations - Some apps might have export restrictions such as attachment size and task limits. ● Backup Everything - Create a backup of the data in case issues arise such as during the import process. Step 5: Import Data into the New Tool Once your data is ready, start importing it to the new software. Most tools provide native import options such as integration features to simplify the process. Follow these steps: ● Map Fields - Match the fields in your exported data with the right fields in the new software such as task titles, deadlines, assignees. ● Test with a Sample - Import a part of your data to identify if any issues persist. ● Full Import - Once you are satisfied with the test you should proceed to import the full dataset. ● Verify Data Integrity - Check that everything including attachments and dependencies has been transferred correctly.
  • 6.
    6 ©2011-2025 Orangescrum ResearchLab,SanJose, California |www.orangescrum.com Pro Tip: Some softwares provides 3rd party migration services and plugins to simplify complex imports. Step 6: Set Up Workflows and Permissions After you migrate your data you should set up workflows, permissions, and configure to ensure everything functions smoothly: ● Customize Workflows - Adjust templates, task boards and various other processes to meet your team’s needs. ● Assign Permissions - Ensure that your team members have the right access levels. ● Integrate Tools - Connect the new systems with your existing applications such as Slack, Google Drive, and email. Step 7: Train Your Team Migration is only successful if the team embraces the new software. You can provide the right training and resources in order to ensure smooth adoption: ● Host Training Sessions - Walk your teams through key features and workflows. ● Create User Guides - Share step-by-step guides and tutorials. ● Encourage Questions - Encourage open communication to address concerns.
  • 7.
    7 ©2011-2025 Orangescrum ResearchLab,SanJose, California |www.orangescrum.com Step 8: Monitor and Optimize After migration you should monitor the performance of the new software as well as ensure team adoption. Make sure to check these: ● Data Accuracy - Ensure that there’s no missing or duplicated data. ● Team Feedback - You should gather feedback from team members to address pain points. ● Process Efficiency - Encourage workflows and configurations based on real- world use. Common Challenges (and How to Overcome Them) Data Loss: Create backups before starting the migration. Resistance to Change: Highlight the benefits of the new tool and involve your team early into the decision making process. Downtime: Schedule your migrations to minimize disruptions during off-peak periods. Integration Issues: Test your integrations before the rollout to avoid any compatibility issues.
  • 8.
    8 ©2011-2025 Orangescrum ResearchLab,SanJose, California |www.orangescrum.com Final Takeaway Migrating your projects from one tool to another doesn’t have to be an overwhelming experience. With the right planning, communication, and approach you can ensure a smooth transition that benefits your team and organization. Migration is not just about transferring your data, it’s an opportunity to optimize your workflows. You can improve collaboration and unlock the full potential of the new project management tool. The process requires time and effort as well as long-term gains. It’s worth investing in a product that is efficient, productive and scalable.