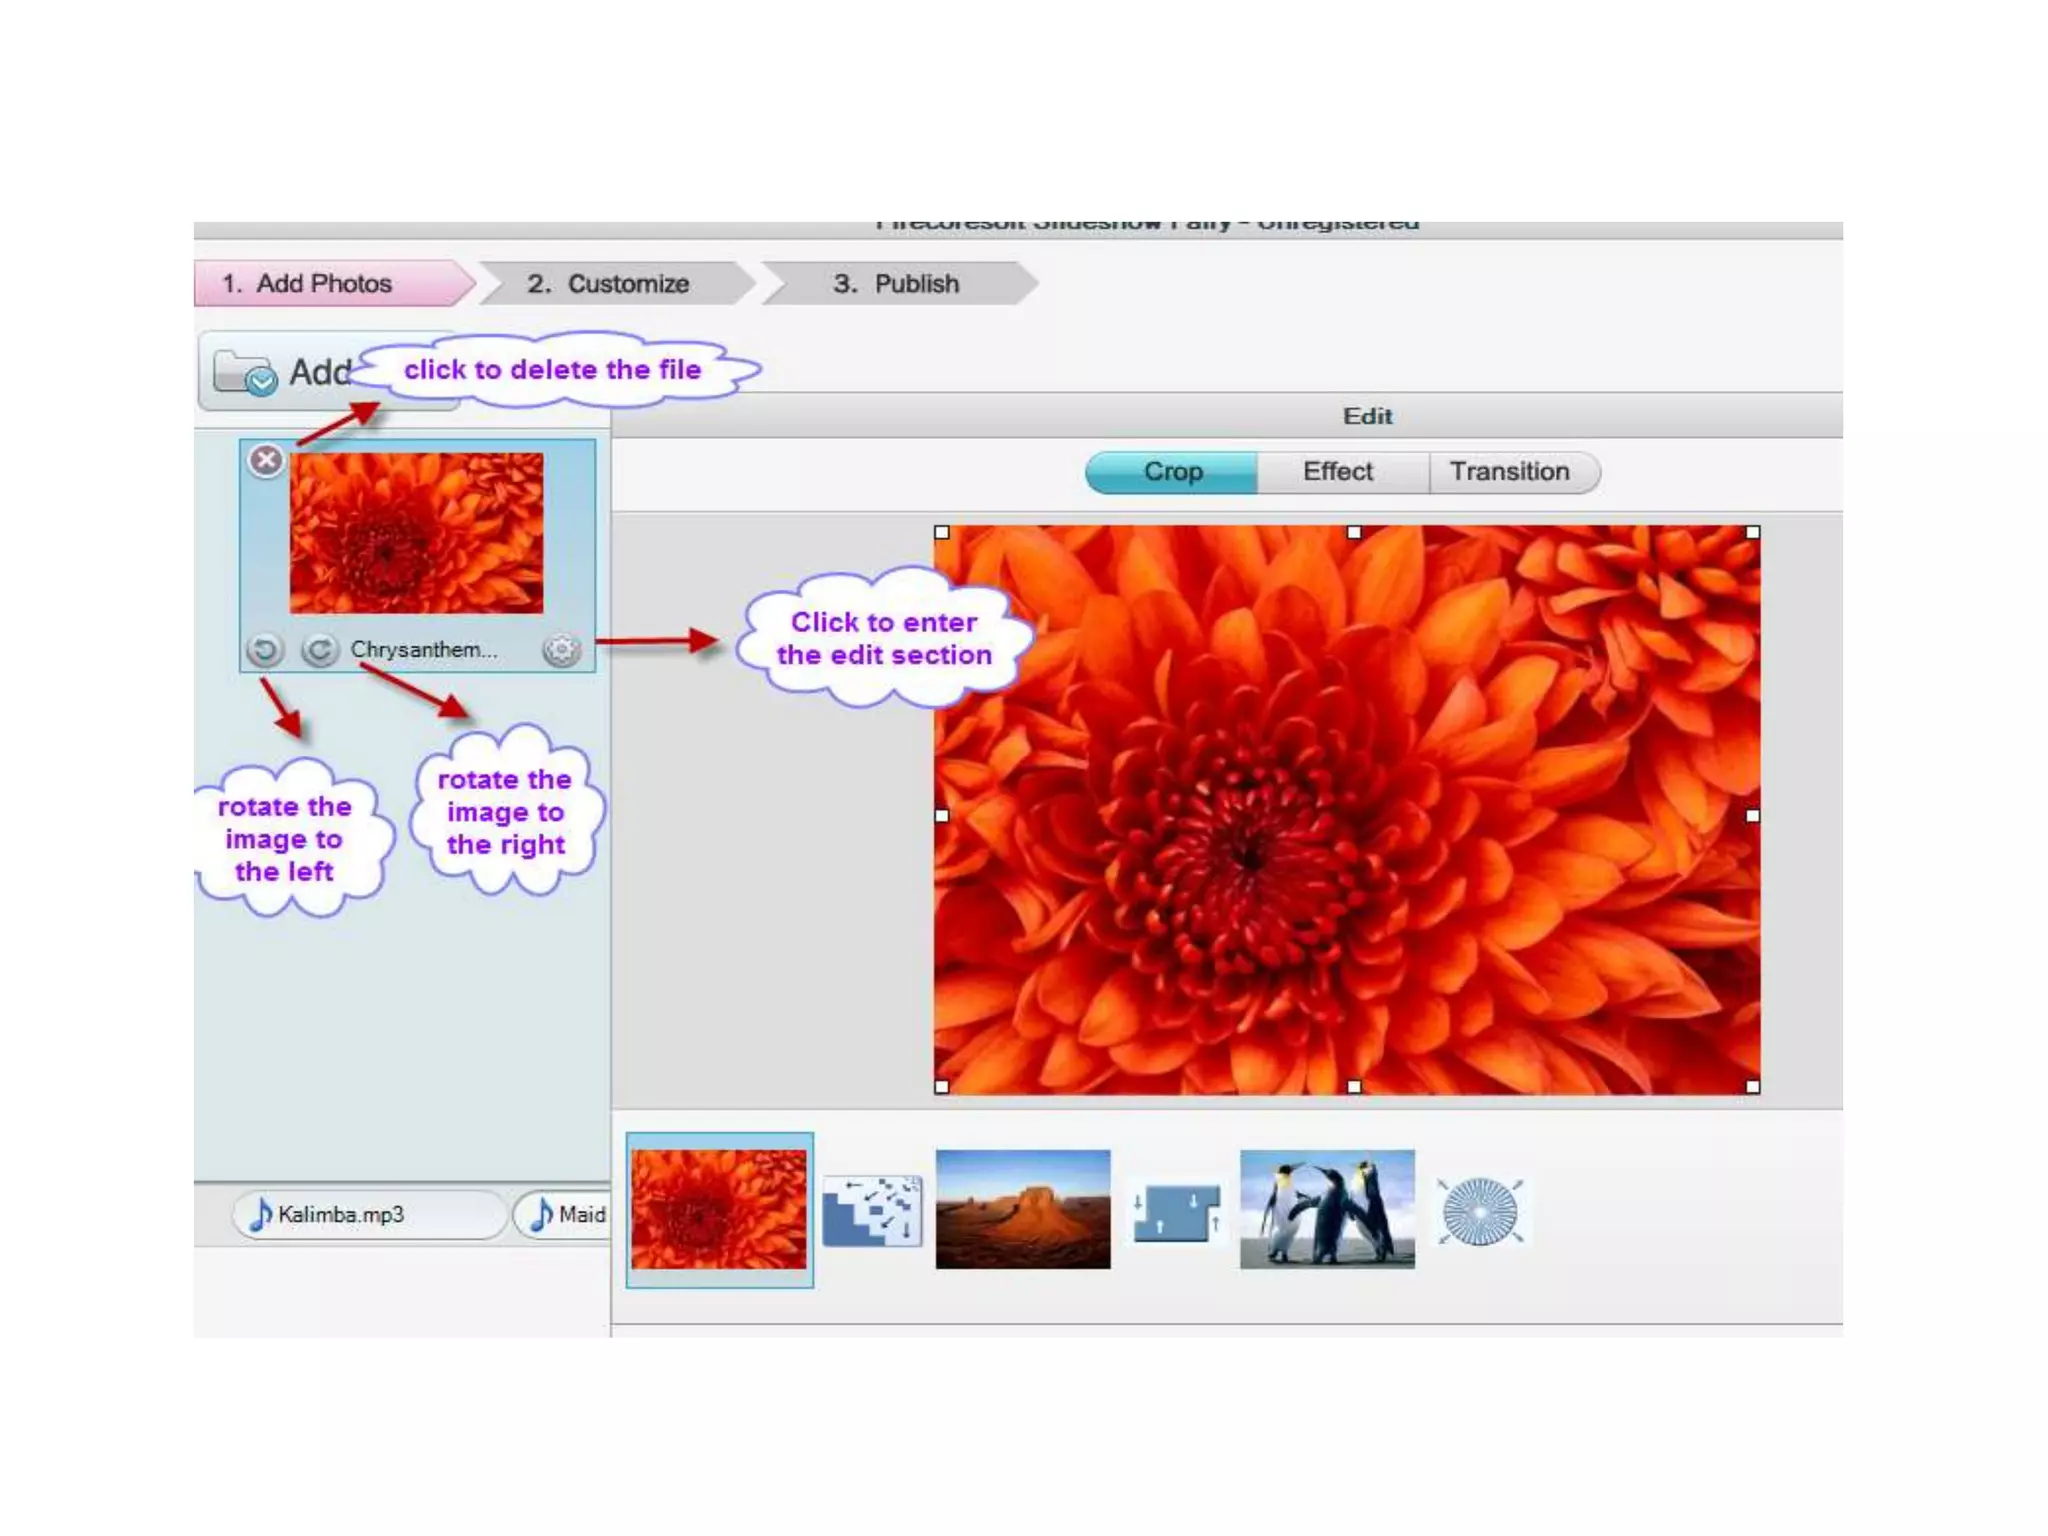
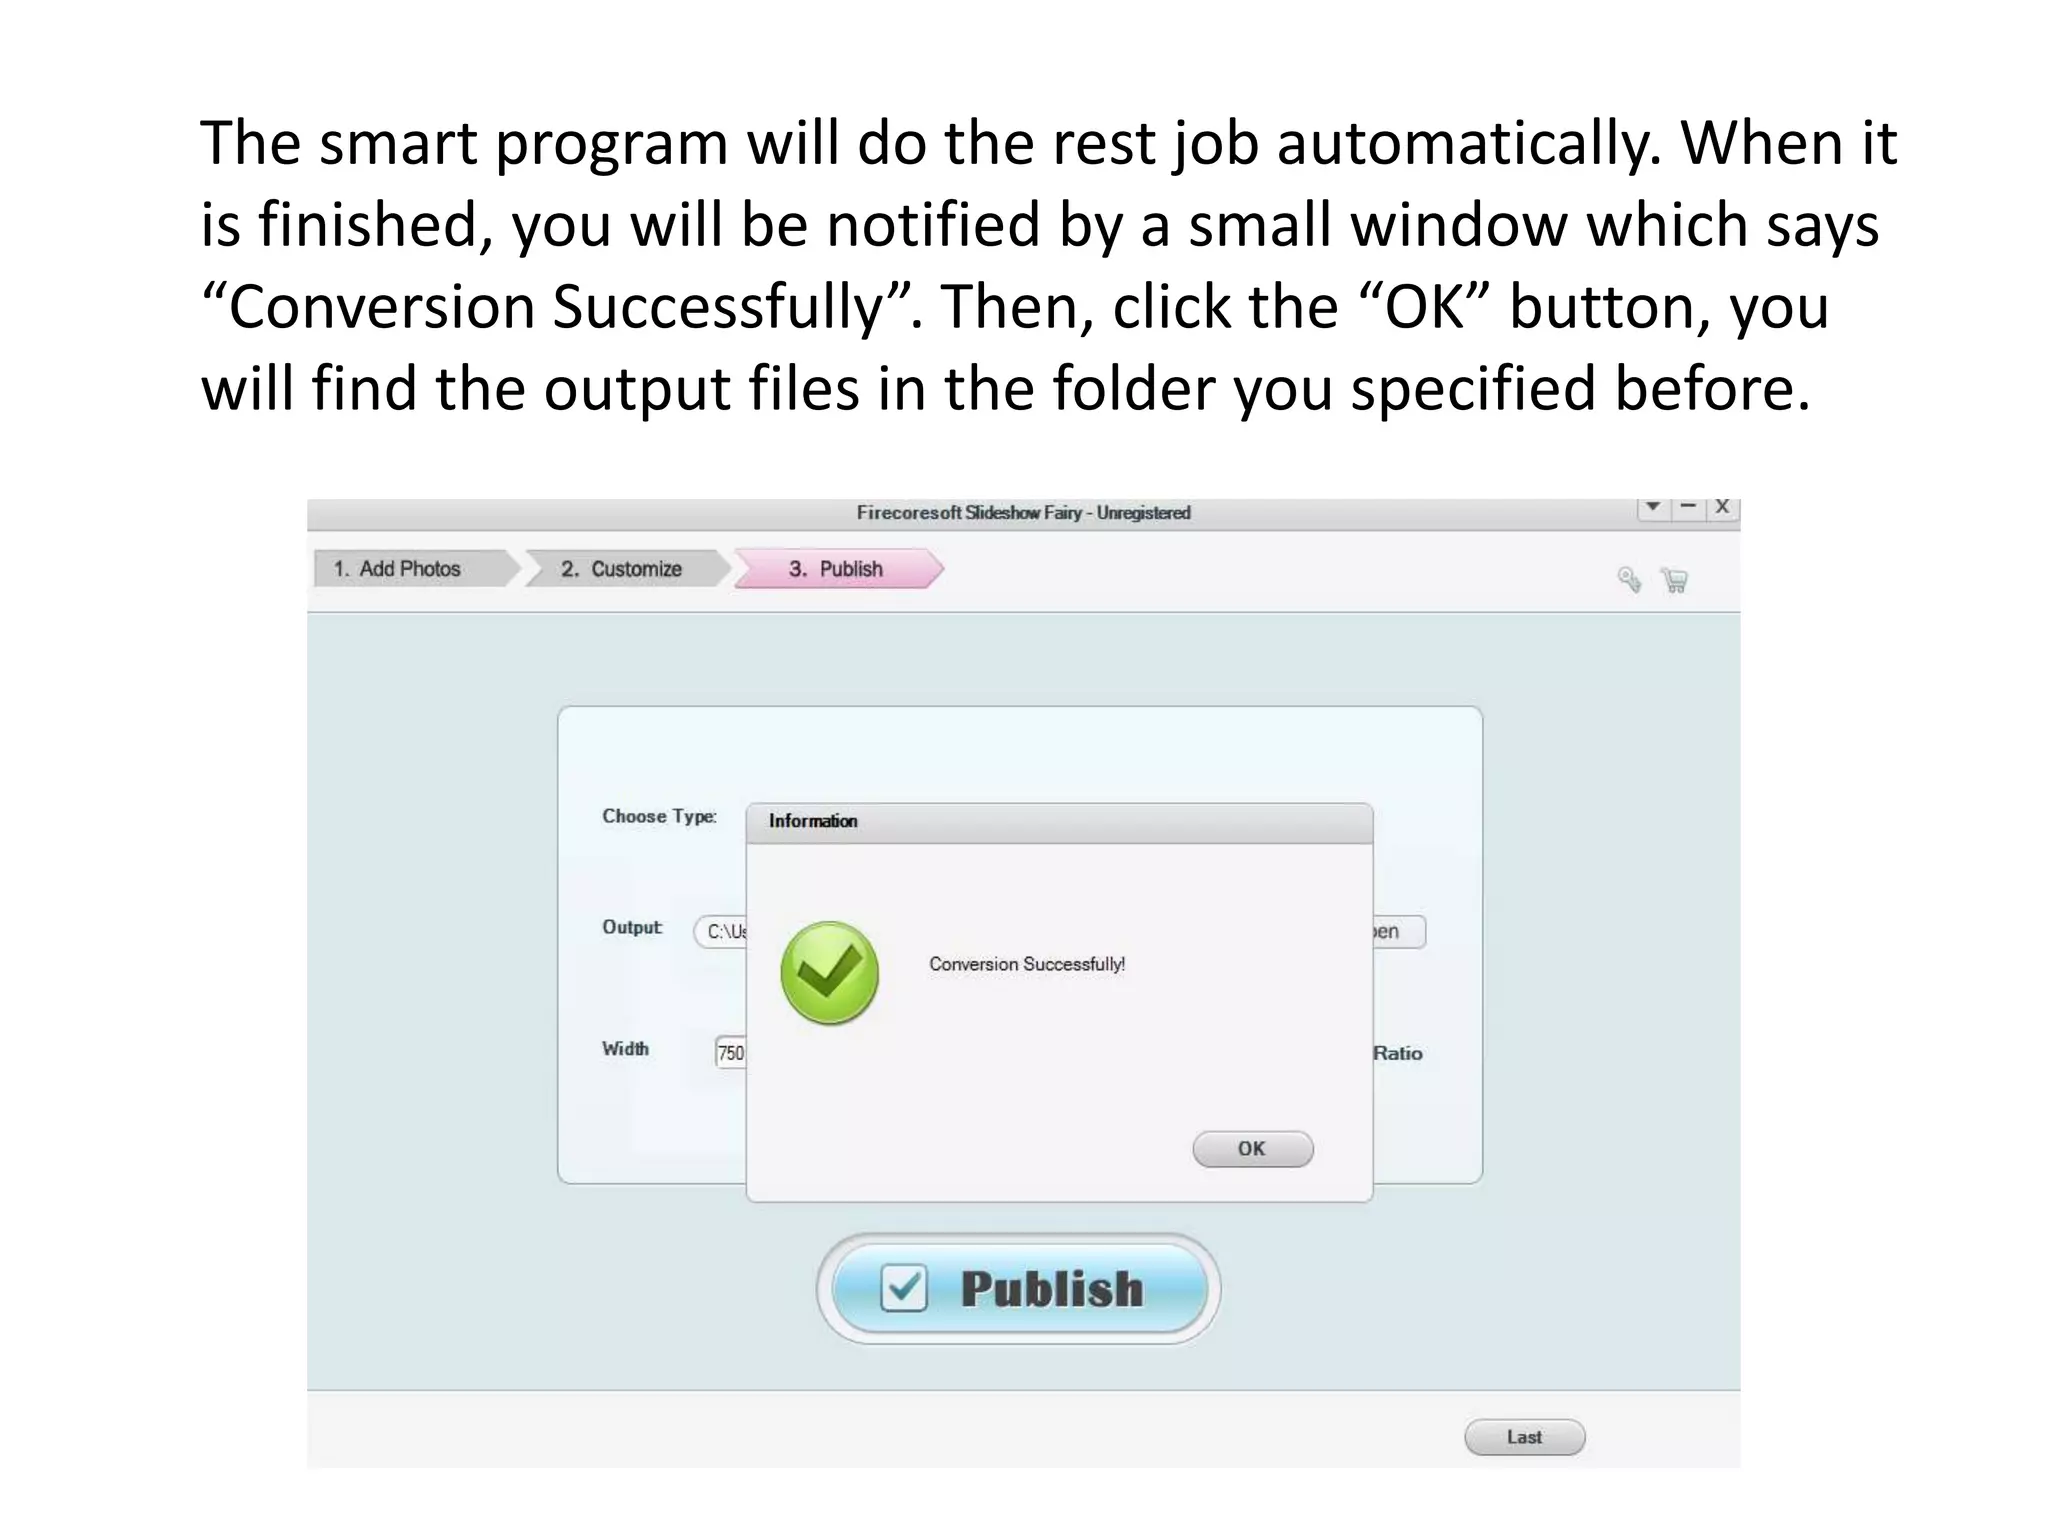
Firecoresoft Slideshow Fairy
User Guide
--Firecoresoft Studio
Would like to find a powerful yet simple-to-use photo
slideshow tool? Stop struggling to search on the web,
Firecoresoft Slideshow Fairy (Slideshow Fairy for Mac) is the
wisest choice for you. As a professional Flash photo slideshow
builder, it helps you to create stunning Flash picture gallery
with your favorite images and music easily. This program takes
the title of “Best Photo Slideshow Maker” because of its
simplicity and functionality with array of embellishment
options & design tools.
Key Features of Firecoresoft Slideshow Fairy/ Slideshow
Fairy for Mac
1. Well compatible with Window 8, 7, XP, Vista/Mac OS X 10.9, 10.8, 10.7
and 10.6
2. Allow importing popular image formats such as JPG/BMP/PNG, etc and
MP3 music file
3. Support batch file importing at one time
4. Create stylish photo slideshow and export it as .swf or .html file as per
your requirement
5. Array of rich built-in 2D & 3D templates for choice
6. Enable users to customize the templates freely
7. Perfect choice to share the Flash photo slideshow on websites, blogs,
SNS websites like Facebook, Twitter and more.
System Requirements:
512 MB physical RAM (memory) or above
Miscrosoft® Windows 8, Windows 7, Windows XP, Windows
Vista.
Detailed Guidelines of Using Firecoresoft Slideshow Fairy:
Frankly, it is quite easy to make a cool photo slideshow by
using this all-in-one program. You can achieve your goal with
several mouse clicks. Now, we will allocate the guidelines step
by step as described in the following. Please note that the
demonstration is based on Windows platform. As to the Mac
OS, the instruction is pretty much the same.
How to Create Gorgeous Photo Slideshow
Effortlessly
The process of creating your photo slideshow requires
several simple steps, which will be illustrated in details
here.
Step 1. Preparations Needed
To give you a first hand-on experience, a free trial version of
Firecoresoft Slideshow Fairy is provided. Feel free to
download the program package, and then follow the online
installation guidelines to set the app onto your computer.
Lastly, click “run” button to launch the program. Noting that
this program is 100% clean, you don’t have to worry about the
virus issues. As you can see in the picture below, the interface
is very clear, simple and friendly.
Step 2. Select Desired Files to Load into the Program
You will see three main options on the menu bar of the
interface. Beneath the first one “Add Photos” lays the “Add
Files”, click it, navigate to the file folder where you save the
source files. You can select the image you like and click “OK”
to add it into the app. Please note that you can load multiple
images in the same way. By the way, you can also open the
folder, highlight the source file and drag it into the app
directly.
In the meanwhile, you are allowed to import your favorite
MP3 music into the program. Roughly, you can do the job in
the same way as importing image file as described above.
That is to say, you can either click the “Add Files” to load the
file or you can select the music and then drag and drop it
directly into the app.
When you have imported the source files (picture & music),
you will see them displayed in the workbench window which’s
shown as below:
Step 3. Customize Source Files Optionally
As mentioned previously, this photo slideshow maker
provides a slew of options, allowing users to do customization
freely. You can do basic customization such as delete the file
and rotate the file to the left/right as well as some advanced
editing based on your need.
After finishing the basic customization, click the gear icon to
enter the advanced edit section. Right there, you will see a
small window with three options – “Crop”, “Effect” and
“Transition”. In the “Crop” tab, you can customize the
dimension of the source file by dragging the frame freely.
Once determined, please remember to hit the “Apply”
button.
Click the “Effect” option, you will see eight types of cool
artistic effects including Normal, Gray Film, Sharpen, Rand,
Linear, Gamma, Box and Color mask. All you should do is to
choose the one you like best and then click “OK” button.
To make the photo vivid and fun, you can apply the stunning
transition to it. Simply click the “transition” tab and you will
be surprised to find over 40 different transition effects. Please
feel free to click each of them on the right panel to preview
and decide which one to choose. Again, don’t forget to click
“OK” button.
Step 4. Customize the Built-in Slideshow Templates
This powerful Flash photo slideshow comes with dozens of
great 2D & 3D templates. Click “Customize” button on the
menu bar of the interface, you will them displayed one by one
as below:
1. How to Customize 2D Template
Now, choose your favorite template like the first one
“Childhood”, then click the gear icon to enter the Customize
section. Refer to the picture below:
In the Customize part, you will the imported files displayed on
the left side of the window. When you click each of them, it
will appear in the middle of the interface.
On the right side of the window, there are four options. You
can customize the “Background Color” and music playback
mode such as “Music Loop”, “Auto Play Music” and “Auto
Transition” if you have embedded audio into the program
before. Once done, please click “OK” button.
2.How to Customize 3D Template
Click the “3D Templates” tab, you will see eight cool 3D
templates: Circle, Convex, Cube, Cylinder, Hexagon, Pentagon,
Prism and Tetrahedron.
Now, feel free to choose the template you like the best. Click
the gear button and you will enter the “Customize” section.
You are free to customize the Background Color, selected
color, boarder color or customize the music playback mode
freely. After finishing, please click “OK” button.
Step 5. Publish the Flash Photo Slideshow
When you have finished all of the steps above, it is time to
export the slideshow. Reverting to the interface of the
program, click the “Publish” button, after that, a small
window will show up. In the “Choose Type” column, you can
select “Publish as .swf” or “Publish as .html” according to
your demand. For example, if you would like to upload the
slideshow to website, you should choose the latter one. Click
the file folder icon of “Output” tab, you are allowed to
designate a location to save the slideshow. Besides, you can
modify the width & height of the slideshow if necessary.
Finally, remember to click the big “Publish” button.
NOTES: Choose "Publish as .swf", you will get the stand-alone
swf file. While selecting the "Publish as .html" means you can
not only obtain the .swf file, but the embed code will be auto
generated in the HTML file as well, enabling you to publish
the slideshow to various websites freely.
The smart program will do the rest job automatically. When it
is finished, you will be notified by a small window which says
“Conversion Successfully”. Then, click the “OK” button, you
will find the output files in the folder you specified before.
See more info please visit
http://www.firecoresoft.com/flash-photo-slideshow.html
Mac version:
http://www.firecoresoft.com/flash-photo-slideshow-mac.html
For more info you can follow us at:
http://www.facebook.com/Firecoresoft
http://www.twitter.com/firecoresoft

Firecoresoft slideshow fairy user guide

  • 1.
    Firecoresoft Slideshow Fairy UserGuide --Firecoresoft Studio
  • 2.
    Would like tofind a powerful yet simple-to-use photo slideshow tool? Stop struggling to search on the web, Firecoresoft Slideshow Fairy (Slideshow Fairy for Mac) is the wisest choice for you. As a professional Flash photo slideshow builder, it helps you to create stunning Flash picture gallery with your favorite images and music easily. This program takes the title of “Best Photo Slideshow Maker” because of its simplicity and functionality with array of embellishment options & design tools.
  • 3.
    Key Features ofFirecoresoft Slideshow Fairy/ Slideshow Fairy for Mac 1. Well compatible with Window 8, 7, XP, Vista/Mac OS X 10.9, 10.8, 10.7 and 10.6 2. Allow importing popular image formats such as JPG/BMP/PNG, etc and MP3 music file 3. Support batch file importing at one time 4. Create stylish photo slideshow and export it as .swf or .html file as per your requirement 5. Array of rich built-in 2D & 3D templates for choice 6. Enable users to customize the templates freely 7. Perfect choice to share the Flash photo slideshow on websites, blogs, SNS websites like Facebook, Twitter and more.
  • 4.
    System Requirements: 512 MBphysical RAM (memory) or above Miscrosoft® Windows 8, Windows 7, Windows XP, Windows Vista.
  • 5.
    Detailed Guidelines ofUsing Firecoresoft Slideshow Fairy: Frankly, it is quite easy to make a cool photo slideshow by using this all-in-one program. You can achieve your goal with several mouse clicks. Now, we will allocate the guidelines step by step as described in the following. Please note that the demonstration is based on Windows platform. As to the Mac OS, the instruction is pretty much the same.
  • 6.
    How to CreateGorgeous Photo Slideshow Effortlessly The process of creating your photo slideshow requires several simple steps, which will be illustrated in details here.
  • 7.
    Step 1. PreparationsNeeded To give you a first hand-on experience, a free trial version of Firecoresoft Slideshow Fairy is provided. Feel free to download the program package, and then follow the online installation guidelines to set the app onto your computer. Lastly, click “run” button to launch the program. Noting that this program is 100% clean, you don’t have to worry about the virus issues. As you can see in the picture below, the interface is very clear, simple and friendly.
  • 9.
    Step 2. SelectDesired Files to Load into the Program You will see three main options on the menu bar of the interface. Beneath the first one “Add Photos” lays the “Add Files”, click it, navigate to the file folder where you save the source files. You can select the image you like and click “OK” to add it into the app. Please note that you can load multiple images in the same way. By the way, you can also open the folder, highlight the source file and drag it into the app directly.
  • 11.
    In the meanwhile,you are allowed to import your favorite MP3 music into the program. Roughly, you can do the job in the same way as importing image file as described above. That is to say, you can either click the “Add Files” to load the file or you can select the music and then drag and drop it directly into the app.
  • 13.
    When you haveimported the source files (picture & music), you will see them displayed in the workbench window which’s shown as below:
  • 14.
    Step 3. CustomizeSource Files Optionally As mentioned previously, this photo slideshow maker provides a slew of options, allowing users to do customization freely. You can do basic customization such as delete the file and rotate the file to the left/right as well as some advanced editing based on your need.
  • 16.
    After finishing thebasic customization, click the gear icon to enter the advanced edit section. Right there, you will see a small window with three options – “Crop”, “Effect” and “Transition”. In the “Crop” tab, you can customize the dimension of the source file by dragging the frame freely. Once determined, please remember to hit the “Apply” button.
  • 18.
    Click the “Effect”option, you will see eight types of cool artistic effects including Normal, Gray Film, Sharpen, Rand, Linear, Gamma, Box and Color mask. All you should do is to choose the one you like best and then click “OK” button.
  • 20.
    To make thephoto vivid and fun, you can apply the stunning transition to it. Simply click the “transition” tab and you will be surprised to find over 40 different transition effects. Please feel free to click each of them on the right panel to preview and decide which one to choose. Again, don’t forget to click “OK” button.
  • 22.
    Step 4. Customizethe Built-in Slideshow Templates This powerful Flash photo slideshow comes with dozens of great 2D & 3D templates. Click “Customize” button on the menu bar of the interface, you will them displayed one by one as below:
  • 24.
    1. How toCustomize 2D Template Now, choose your favorite template like the first one “Childhood”, then click the gear icon to enter the Customize section. Refer to the picture below:
  • 25.
    In the Customizepart, you will the imported files displayed on the left side of the window. When you click each of them, it will appear in the middle of the interface.
  • 26.
    On the rightside of the window, there are four options. You can customize the “Background Color” and music playback mode such as “Music Loop”, “Auto Play Music” and “Auto Transition” if you have embedded audio into the program before. Once done, please click “OK” button.
  • 27.
    2.How to Customize3D Template Click the “3D Templates” tab, you will see eight cool 3D templates: Circle, Convex, Cube, Cylinder, Hexagon, Pentagon, Prism and Tetrahedron.
  • 28.
    Now, feel freeto choose the template you like the best. Click the gear button and you will enter the “Customize” section. You are free to customize the Background Color, selected color, boarder color or customize the music playback mode freely. After finishing, please click “OK” button.
  • 29.
    Step 5. Publishthe Flash Photo Slideshow When you have finished all of the steps above, it is time to export the slideshow. Reverting to the interface of the program, click the “Publish” button, after that, a small window will show up. In the “Choose Type” column, you can select “Publish as .swf” or “Publish as .html” according to your demand. For example, if you would like to upload the slideshow to website, you should choose the latter one. Click the file folder icon of “Output” tab, you are allowed to designate a location to save the slideshow. Besides, you can modify the width & height of the slideshow if necessary. Finally, remember to click the big “Publish” button.
  • 30.
    NOTES: Choose "Publishas .swf", you will get the stand-alone swf file. While selecting the "Publish as .html" means you can not only obtain the .swf file, but the embed code will be auto generated in the HTML file as well, enabling you to publish the slideshow to various websites freely.
  • 31.
    The smart programwill do the rest job automatically. When it is finished, you will be notified by a small window which says “Conversion Successfully”. Then, click the “OK” button, you will find the output files in the folder you specified before.
  • 32.
    See more infoplease visit http://www.firecoresoft.com/flash-photo-slideshow.html Mac version: http://www.firecoresoft.com/flash-photo-slideshow-mac.html For more info you can follow us at: http://www.facebook.com/Firecoresoft http://www.twitter.com/firecoresoft