#Gerekli veritabanı vesunucu yazılımları
yum install *jdk*
yum install postgres*
yum install git
yum install httpd
#Maven Kurulumu
sudo wget http://repos.fedorapeople.org/repos/dchen/apache-maven/epel-apache-maven.repo -O
/etc/yum.repos.d/epel-apache-maven.repo
sudo sed -i s/$releasever/6/g /etc/yum.repos.d/epel-apache-maven.repo
sudo yum install -y apache-maven
mvn –version
#Mirage 2 Teması gereklilikleri kurulumu
curl https://raw.githubusercontent.com/creationix/nvm/v0.5.1/install.sh | sh
nvm install 0.10.31
nvm alias default 0.10.31
npm install -g bower
curl -sSL https://rvm.io/mpapis.asc | gpg2 --import -
curl -sSL https://get.rvm.io | bash -s stable –ruby
useradd -m dspace
su dspace
cd /home/dspace
wget https://github.com/DSpace/DSpace/releases/download/dspace-5.5/dspace-5.5-
src-release.zip
unzip dspace-5.5-src-release.zip
nano build.properties
#database setup
service postgresql initdb
service postgresql start
su postgres
createuser --username=postgres --no-superuser --pwprompt dspace
createdb --username=postgres --owner=dspace --encoding=UNICODE dspace
exit diyerek root kullanıcısına geç ve
nano /var/lib/pgsql/data/postgresql.conf listen localhost un diyezini kaldır.
nano /var/lib/pgsql/data/pg_hba.conf u açarak aşağıdaki satırı en üste ekliyoruz.
host dspace dspace 127.0.0.1/32 md5
service postgresql restart
#tomcat kurulumu
cd /tmp
wget http://ftp.itu.edu.tr/Mirror/Apache/tomcat/tomcat-7/v7.0.69/bin/apache-tomcat-7.0.69.zip
unzip apache-tomcat-7.0.69.zip
mv apache-tomcat-7.0.69 /usr/local/tomcat7
/etc/init.d/iptables stop
2.
nano /etc/init.d/tomcat dosyasınaaşağıdaki satırları ekliyoruz.
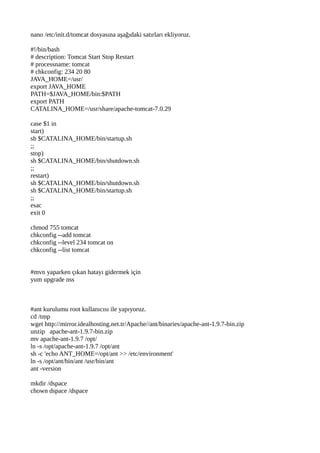
#!/bin/bash
# description: Tomcat Start Stop Restart
# processname: tomcat
# chkconfig: 234 20 80
JAVA_HOME=/usr/
export JAVA_HOME
PATH=$JAVA_HOME/bin:$PATH
export PATH
CATALINA_HOME=/usr/share/apache-tomcat-7.0.29
case $1 in
start)
sh $CATALINA_HOME/bin/startup.sh
;;
stop)
sh $CATALINA_HOME/bin/shutdown.sh
;;
restart)
sh $CATALINA_HOME/bin/shutdown.sh
sh $CATALINA_HOME/bin/startup.sh
;;
esac
exit 0
chmod 755 tomcat
chkconfig --add tomcat
chkconfig --level 234 tomcat on
chkconfig --list tomcat
#mvn yaparken çıkan hatayı gidermek için
yum upgrade nss
#ant kurulumu root kullanıcısı ile yapıyoruz.
cd /tmp
wget http://mirror.idealhosting.net.tr/Apache//ant/binaries/apache-ant-1.9.7-bin.zip
unzip apache-ant-1.9.7-bin.zip
mv apache-ant-1.9.7 /opt/
ln -s /opt/apache-ant-1.9.7 /opt/ant
sh -c 'echo ANT_HOME=/opt/ant >> /etc/environment'
ln -s /opt/ant/bin/ant /usr/bin/ant
ant -version
mkdir /dspace
chown dspace /dspace
3.
#Mirage2 temasını kullanmakistiyorsak varsayılan xmlui teması olan Mirage temasını comment
leyip Mirage2 tema satırını ekliyoruz.
nano /dspace/config/xmlui.xconf
<!--<theme name="Atmire Mirage Theme" regex=".*" path="Mirage/" />-->
<theme name="Mirage2" regex=".*" path="Mirage2/" />
#build işlemlerini yapmak için dpsace kullanıcısına geçiyoruz.
su dspace
cd /home/dspace/dspace-5.5-src-release
mvn package -Dmirage2.on=true
cd /home/dspace/dspace-5.5-src-release/dspace/target/dspace-installer
ant fresh_install
#tomcat yapılandırma
nano /usr/local/tomcat7/conf/server.xml dosyasına aşağıdaki satırları ekliyoruz. </Host> tagından
hemen önce
<Context path="/xmlui" docBase="/dspace/webapps/xmlui" allowLinking="false"/>
<Context path="/sword" docBase="/dspace/webapps/sword" allowLinking="false"/>
<Context path="/swordv2" docBase="/dspace/webapps/swordv2" allowLinking="false"/>
<Context path="/oai" docBase="/dspace/webapps/oai" allowLinking="false"/>
<Context path="/jspui" docBase="/dspace/webapps/jspui" allowLinking="true"/>
<Context path="/solr" docBase="/dspace/webapps/solr" allowLinking="false"/>
<Context path="/rdf" docBase="/dspace/webapps/rdf" allowLinking="false"/>
<Context path="/rest" docBase="/dspace/webapps/rest" allowLinking="false"/>
</Host>
service tomcat start
#Dspace eski sistemdeki bütün öğeleri export alma
/dspace/bin/dspace packager -d -a -t AIP -e openaccess@iyte.edu.tr -i 11147/0 sitewide-aip.zip
#Import için /dspace/bin/dspace dosyasında JAVA_OPTS değerini 4096m ya çekiyoruz.
nohup /dspace/bin/dspace packager -u --o skipIfParentMissing=true -r -a -f -t AIP -e openaccess@iyte.edu.tr -i 11147/0 openaccess_yedek-aip.zip &
Solr istatistiklerini aktarmak için
postgres kullanıcısında psql yardımı ile
copy (SELECT handle,resource_type_id,resource_id FROM handle) TO '/tmp/handle-old.csv'
WITH CSV HEADER;
copy (SELECT bitstream_id,checksum FROM bitstream WHERE checksum IS NOT NULL) TO
'/tmp/bitstream-old.csv' WITH CSV HEADER;
oluşturulan dosyaları yeni sunucuya gönderme
scp *.csv root@openaccess.iyte.edu.tr:/home/dspace
4.
opy (SELECT handle,resource_type_id,resource_idFROM handle) TO '/tmp/handle-
new.csv' WITH CSV HEADER;
Dspace 5.4 de admin create edilmezse yapılması gereken.
1. Stop Tomcat
2. Clean the database (./dspace database clean)...which resets it to an entirely empty database. (Warning, this
will wipe all data from your database, but since this is a fresh install, there shouldn't be anything in there yet)
3. Create the Administrator account first (./dspace create-administrator)
4. Then restart Tomcat
#Ön yüzdeki recently added makale sayısını 5 ten 20 ye çıkarmak için
nano ./spring/api/discovery.xml
<!-- Limit recent submissions on homepage to only 5 (default is 20) -->
<property name="recentSubmissionConfiguration">
<bean
class="org.dspace.discovery.configuration.DiscoveryRecentSubmissionsConfiguration">
<property name="metadataSortField" value="dc.date.accessioned" />
<property name="type" value="date"/>
<property name="max" value="20"/>
<property name="useAsHomePage" value="false"/>
</bean>
</property>
oai de kullanıcı locale si utf-8 yapılır /etc/default/locale dosyasına en.en_UTF8 yazılıkdıktan sonra
reboot edilir ve /dspace/bin/dspace oai import -c komutu çalıştırılır bozuk Türkçe karakterler
düzelir.