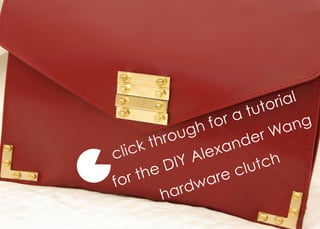
DIY Alexander wang hardware clutch - steps
•
0 likes•23,677 views
Report
Share
Report
Share
Download to read offline

Recommended
Neon lace clutch steps
This document provides instructions for a DIY craft project that involves clicking pieces together to create a shape or design. The pieces have painted and non-painted sides to allow for assembly in different configurations. The instructions are brief, suggesting the assembly is straightforward.
Studded nails steps
This 3-step process summarizes how to do a DIY nail art design using nail polish and a dotting tool:
1. Apply two coats of base polish on nails and allow to dry.
2. Use the dotting tool to apply dots of different colored polish onto nails in a pattern or design.
3. Once complete, apply a top coat of polish to seal the design in place.
Cupcak nails steps
This document provides instructions for a DIY nail art project using glitter nails:
1. Use a thin brush or dotting tool to apply white stripes on pink nail polish as it dries.
2. Allow the nails to dry thoroughly, then coat with a top clear polish and let dry.
3. Sprinkle glitter onto the wet top coat and shake off excess for a glittered nail finish.
Cupcak nails steps
This document provides instructions for a DIY nail art project using glitter nails:
1. Use a thin brush or toothpick to apply white stripes on pink nail polish after it has dried.
2. Allow the nails to dry thoroughly before adding a top coat and sprinkling glitter onto the stripes.
3. Finish by adding a flat-back pearl accent liner using the glitter. Shake off excess glitter.
Golen lace cuff steps
This 3-step process allows you to make a DIY gold cuff:
1. Roll up and mold a piece of paper around your wrist to create a mold of your wrist shape.
2. Cut off a short piece of lace and wrap it tightly around the paper mold, securing it with dental floss.
3. Allow the wrapped mold to dry thoroughly before removing it from the paper to reveal your new gold cuff.
Huff post runway diy prom 2012 dress steps op
The document provides instructions for making a simple DIY peekaboo dress in 3 sentences or less:
Sew the front and back pieces of the dress together along the shoulders and sides, leaving an opening for the skirt on one side. Fold the remaining tulle in half width-wise and sew it to the bottom of the dress opening to create the skirt. Slip the dress on and tie the ribbon around the waist to finish the peekaboo dress.
Stella mvp shorts steps op
The document provides instructions for making DIY Stella shorts by cutting fabric pieces, gluing appliques to the front and back of the shorts, and gluing the appliques along the seams and hems. Steps include cutting fabric according to a pattern, gluing appliques to the fabric pieces, gluing the fabric pieces together at the seams and hems, and allowing the glue to dry. The instructions direct the reader to the Runway.com website for a full tutorial on making the Stella shorts.
Huff post prom 2012 heels steps
The document provides instructions for making lace-up shoes by hand, starting with cutting out shoe parts and placing 8 dots on both sides, then using a yarn needle to thread lace through each hole and tying knots on both sides to complete the shoes. Key steps mentioned include cutting out shoe parts, placing dots for lace holes, threading lace through the holes, and tying knots to finish the shoes.
Prom 2012 ring - steps
The document provides instructions for making a homemade ring sculpture out of clay in 3 steps:
1) Break off small pieces of clay and mold them into a flat snake-like shape to fit around your finger loosely.
2) Use tools and fingers to shape the clay into an abstract sculpture with a flat bottom while it is still loose.
3) Allow the ring to cool completely before spraying it with a sealer.
Doctrine denim steps op
This document provides instructions for making DIY festive jeans:
1) Cut and wash jeans to remove fraying, then apply fabric glue and fringe trim around pockets and seams.
2) Apply a line of glue and attach trim around the inside leg opening, repeating for each leg.
3) Finish by attaching trim around the back waistband.
Runway DIY Portable peplum steps xs
This document provides instructions for making a DIY portable pouch in 3 steps or less:
1. Cut fabric into two pieces measuring 5 yards wide by the desired length and fold each in half lengthwise.
2. Apply glue along the folded edges and sides of one piece and attach the other piece of fabric on top to form the pouch.
3. Reinforce the inside seam with additional glue or stitching to complete the portable pouch.
Nuts about you links steps
This document provides instructions for a DIY project involving tape. It advises the reader to click a link for supplies, use tape to cover exposed painful areas, and allow the pain to subside before removing the tape.
X out steps
The document provides instructions for making a paper weaving project in 3 steps:
1. Cut small slits in a piece of fabric to create strips.
2. Repeat to create 20 strips total by cutting more strips and slits.
3. Thread the strips through each other, leaving some hanging in front and back, then repeat the process for a second layer.
Book clutch steps
The document provides instructions for making a DIY book by having the reader cut, glue, and assemble pages and covers from paper to form a hand-bound book. Steps include cutting pages from blue paper, brushing glue on the outside edges and spine, and pressing pages together to form the book which can then be kept together using an attached clasps.
Givenchy horn earrings steps
The document provides instructions for making a snake sculpture out of clay:
1. Roll out balls of clay to form the snake's body and tail sections and attach them with a pointed tool.
2. Curve the top edge and leave the bottom edge flat to form the snake.
3. Push a hole into the tail section and sculpt details like scales.
4. Bake the sculpture for 15-25 minutes at 275 degrees and then allow it to cool before painting and gluing on magnets to the underside.
Louis Vuitton Spring 2012 DIY
The document provides instructions for dyeing a girly girl shirt and collar pink using a little dye. It instructs to follow the dyeing instructions for the shirt and collar, allowing the shirt to dry slightly before dyeing the collar twice. Finally, it details removing the original collar, replacing it with a new flat-front collar, and sewing it on.
Scarf kilt steps
This document is unintelligible as it contains random characters and formatting with no discernible words or meaning. It does not provide any essential information that could be summarized in 3 sentences or less.
DIY Fruit headbands steps
This document appears to be gibberish without any coherent meaning or essential information to summarize in 3 sentences or less. The text is nonsensical and does not communicate any clear ideas or topics that could be condensed into a high-level summary.
Gold stella sweater steps
This document does not contain any meaningful information that can be summarized in 3 sentences or less. The text is random characters and does not form words or sentences.
Chan luu steps
This document provides instructions for a DIY craft project but is unintelligible as the text is jumbled and nonsensical, making it impossible to understand or summarize the content. The document appears to be corrupted or not actually contain any useful information.
Sheer sleeve sweater steps
The document provides instructions for a DIY project involving clicking through to a tutorial for a swivel eater that mounts on a wall or ceiling. The tutorial guides making a mount and attachment for a food item to spin or rotate. The end result is an interactive decoration or amusement for eating.
More Related Content
More from runwaydiy
Huff post runway diy prom 2012 dress steps op
The document provides instructions for making a simple DIY peekaboo dress in 3 sentences or less:
Sew the front and back pieces of the dress together along the shoulders and sides, leaving an opening for the skirt on one side. Fold the remaining tulle in half width-wise and sew it to the bottom of the dress opening to create the skirt. Slip the dress on and tie the ribbon around the waist to finish the peekaboo dress.
Stella mvp shorts steps op
The document provides instructions for making DIY Stella shorts by cutting fabric pieces, gluing appliques to the front and back of the shorts, and gluing the appliques along the seams and hems. Steps include cutting fabric according to a pattern, gluing appliques to the fabric pieces, gluing the fabric pieces together at the seams and hems, and allowing the glue to dry. The instructions direct the reader to the Runway.com website for a full tutorial on making the Stella shorts.
Huff post prom 2012 heels steps
The document provides instructions for making lace-up shoes by hand, starting with cutting out shoe parts and placing 8 dots on both sides, then using a yarn needle to thread lace through each hole and tying knots on both sides to complete the shoes. Key steps mentioned include cutting out shoe parts, placing dots for lace holes, threading lace through the holes, and tying knots to finish the shoes.
Prom 2012 ring - steps
The document provides instructions for making a homemade ring sculpture out of clay in 3 steps:
1) Break off small pieces of clay and mold them into a flat snake-like shape to fit around your finger loosely.
2) Use tools and fingers to shape the clay into an abstract sculpture with a flat bottom while it is still loose.
3) Allow the ring to cool completely before spraying it with a sealer.
Doctrine denim steps op
This document provides instructions for making DIY festive jeans:
1) Cut and wash jeans to remove fraying, then apply fabric glue and fringe trim around pockets and seams.
2) Apply a line of glue and attach trim around the inside leg opening, repeating for each leg.
3) Finish by attaching trim around the back waistband.
Runway DIY Portable peplum steps xs
This document provides instructions for making a DIY portable pouch in 3 steps or less:
1. Cut fabric into two pieces measuring 5 yards wide by the desired length and fold each in half lengthwise.
2. Apply glue along the folded edges and sides of one piece and attach the other piece of fabric on top to form the pouch.
3. Reinforce the inside seam with additional glue or stitching to complete the portable pouch.
Nuts about you links steps
This document provides instructions for a DIY project involving tape. It advises the reader to click a link for supplies, use tape to cover exposed painful areas, and allow the pain to subside before removing the tape.
X out steps
The document provides instructions for making a paper weaving project in 3 steps:
1. Cut small slits in a piece of fabric to create strips.
2. Repeat to create 20 strips total by cutting more strips and slits.
3. Thread the strips through each other, leaving some hanging in front and back, then repeat the process for a second layer.
Book clutch steps
The document provides instructions for making a DIY book by having the reader cut, glue, and assemble pages and covers from paper to form a hand-bound book. Steps include cutting pages from blue paper, brushing glue on the outside edges and spine, and pressing pages together to form the book which can then be kept together using an attached clasps.
Givenchy horn earrings steps
The document provides instructions for making a snake sculpture out of clay:
1. Roll out balls of clay to form the snake's body and tail sections and attach them with a pointed tool.
2. Curve the top edge and leave the bottom edge flat to form the snake.
3. Push a hole into the tail section and sculpt details like scales.
4. Bake the sculpture for 15-25 minutes at 275 degrees and then allow it to cool before painting and gluing on magnets to the underside.
Louis Vuitton Spring 2012 DIY
The document provides instructions for dyeing a girly girl shirt and collar pink using a little dye. It instructs to follow the dyeing instructions for the shirt and collar, allowing the shirt to dry slightly before dyeing the collar twice. Finally, it details removing the original collar, replacing it with a new flat-front collar, and sewing it on.
Scarf kilt steps
This document is unintelligible as it contains random characters and formatting with no discernible words or meaning. It does not provide any essential information that could be summarized in 3 sentences or less.
DIY Fruit headbands steps
This document appears to be gibberish without any coherent meaning or essential information to summarize in 3 sentences or less. The text is nonsensical and does not communicate any clear ideas or topics that could be condensed into a high-level summary.
Gold stella sweater steps
This document does not contain any meaningful information that can be summarized in 3 sentences or less. The text is random characters and does not form words or sentences.
Chan luu steps
This document provides instructions for a DIY craft project but is unintelligible as the text is jumbled and nonsensical, making it impossible to understand or summarize the content. The document appears to be corrupted or not actually contain any useful information.
Sheer sleeve sweater steps
The document provides instructions for a DIY project involving clicking through to a tutorial for a swivel eater that mounts on a wall or ceiling. The tutorial guides making a mount and attachment for a food item to spin or rotate. The end result is an interactive decoration or amusement for eating.
More from runwaydiy (20)
DIY Alexander wang hardware clutch - steps
- 1. l t oria for a tu h ang t h ro u g der W c lick le xan D IY A l utch r the re c fo har dwa
- 11. diy .com run way