Download to read offline

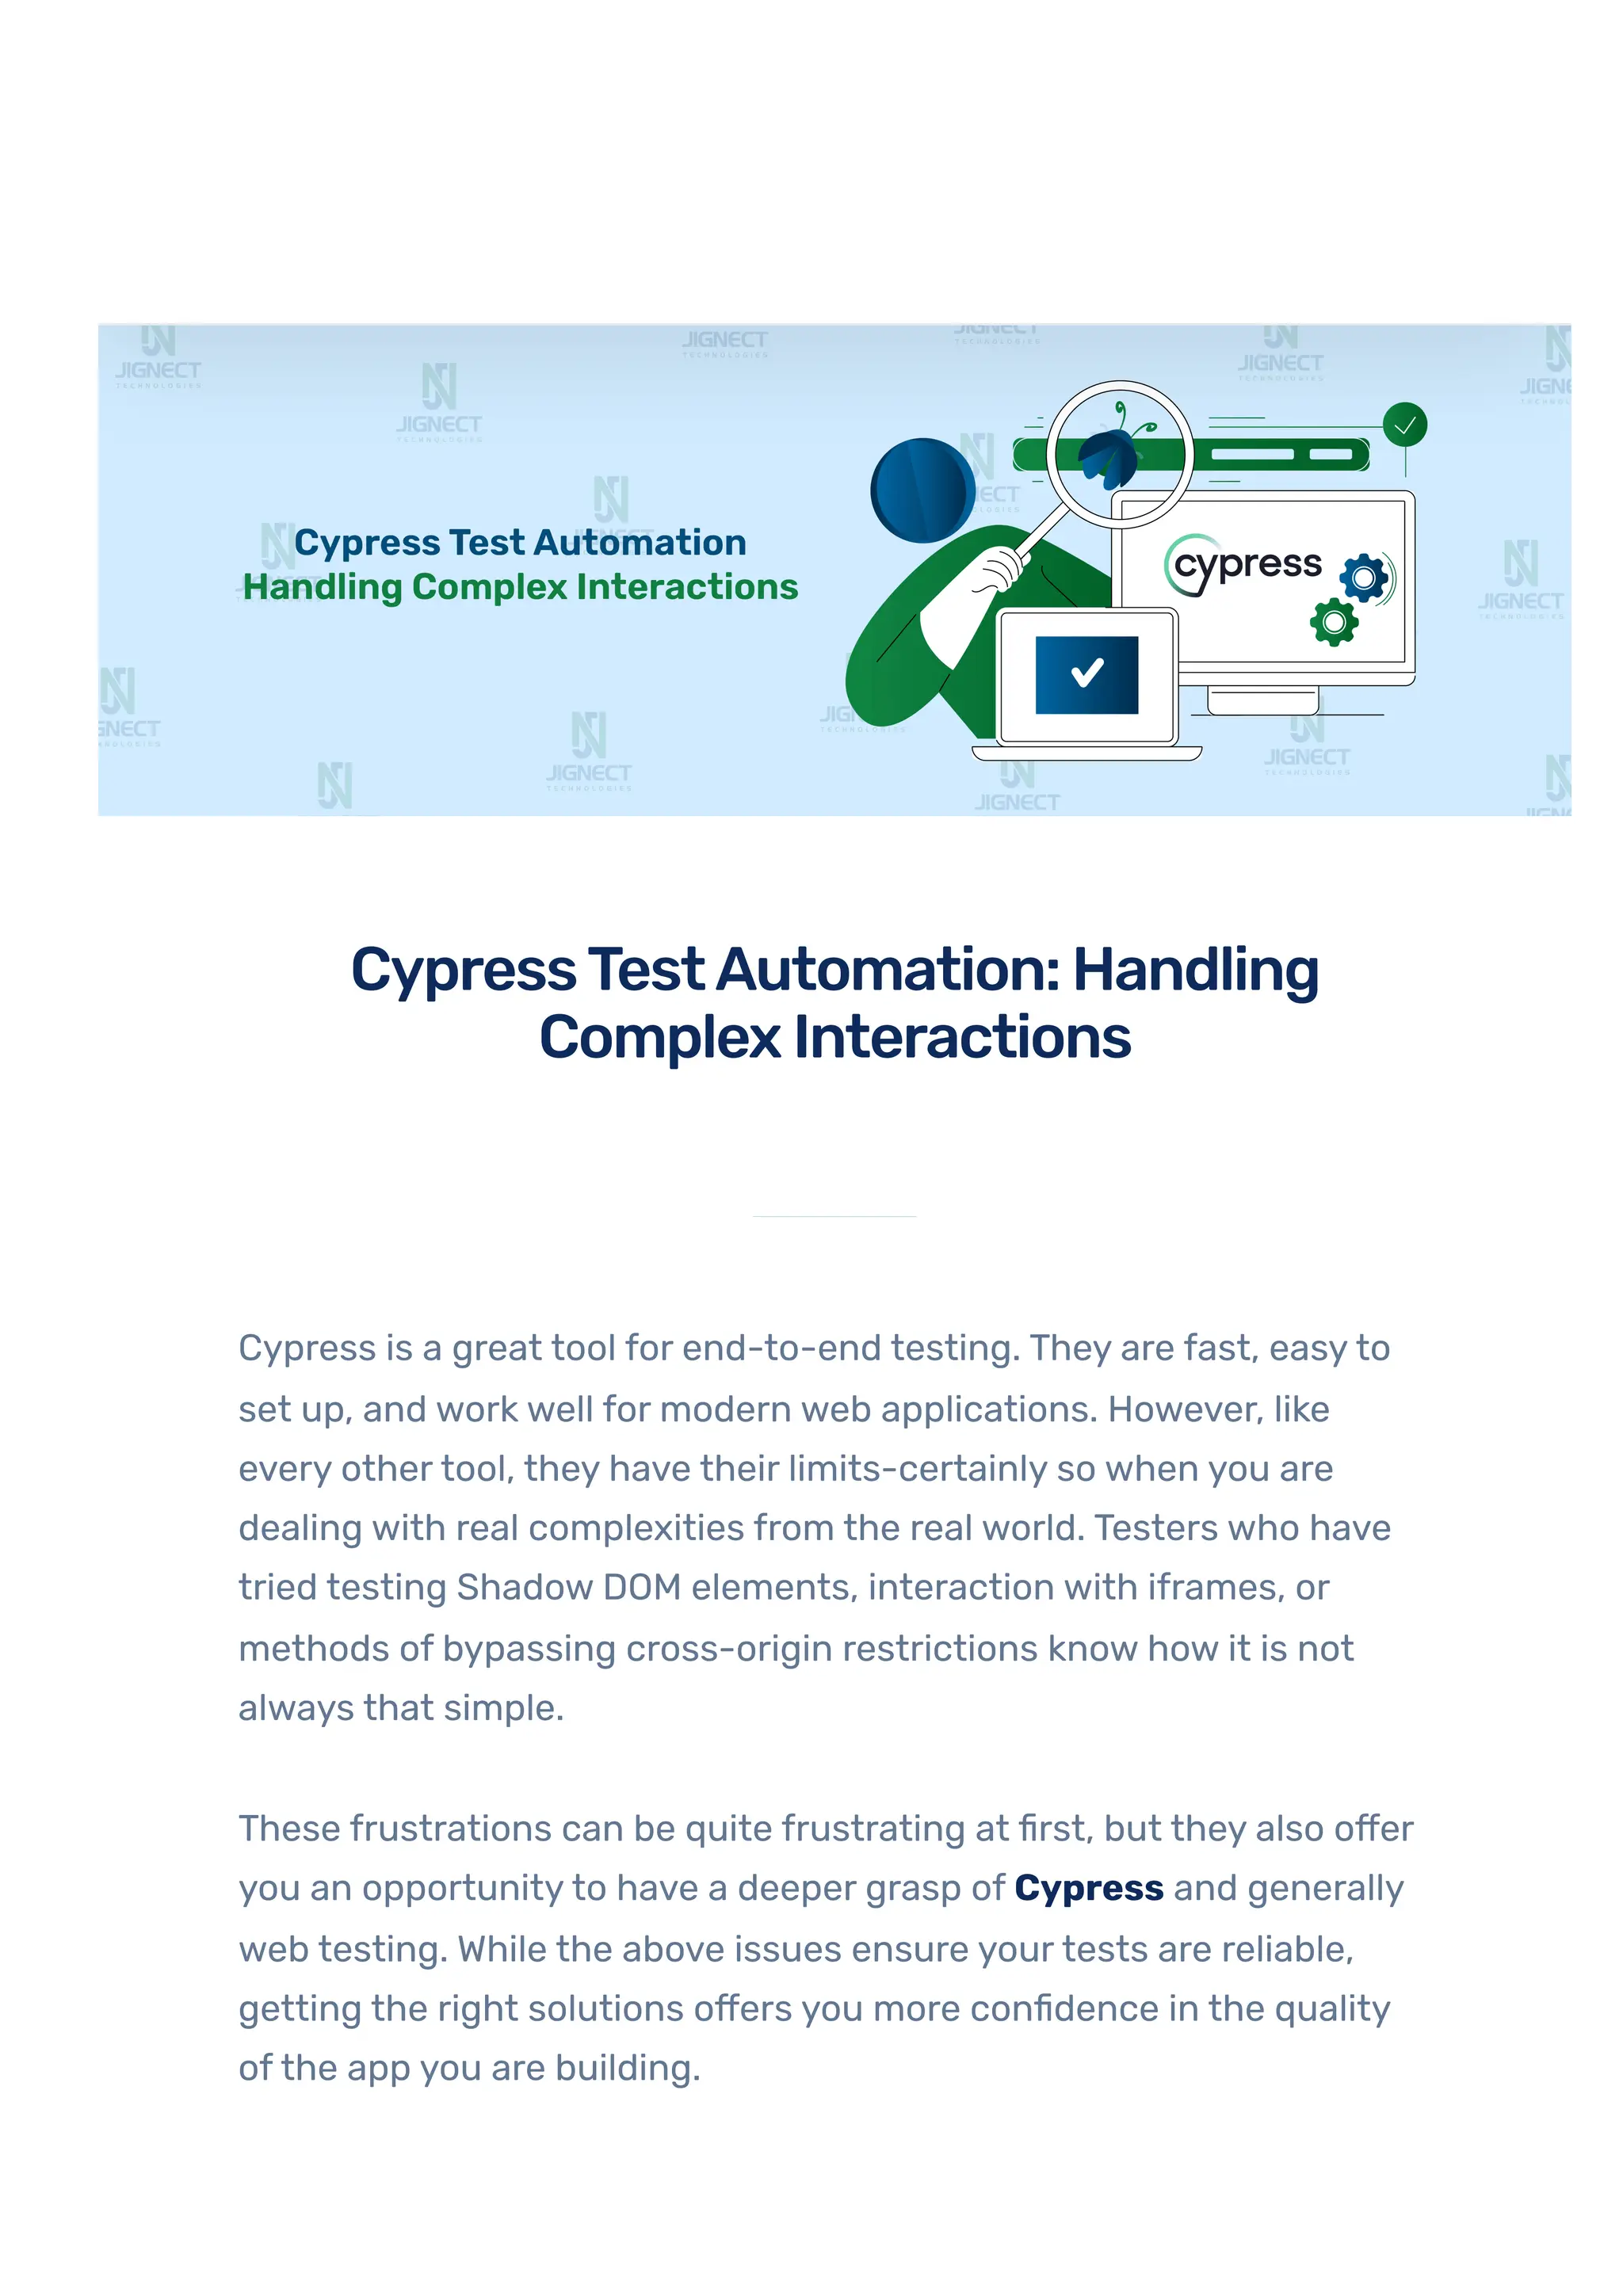
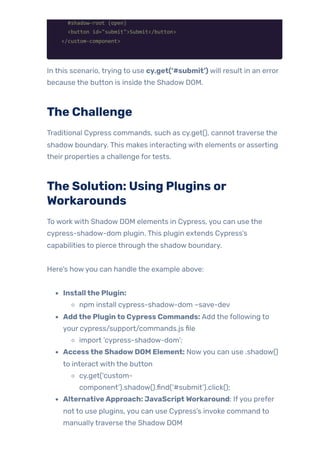

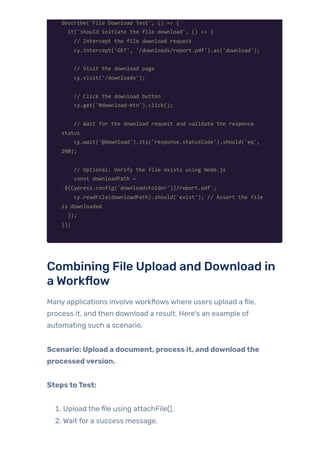


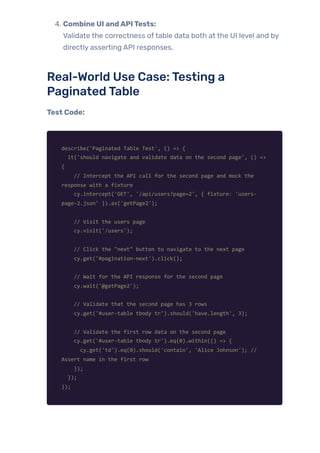
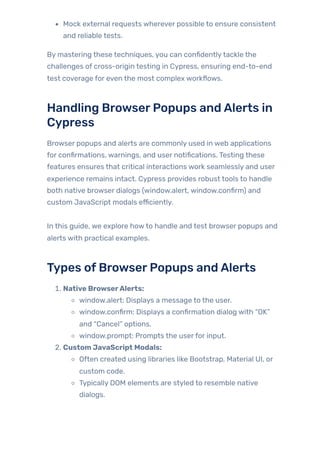
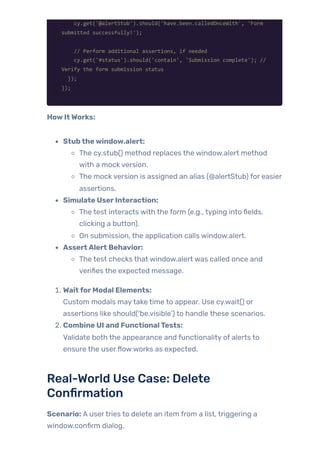
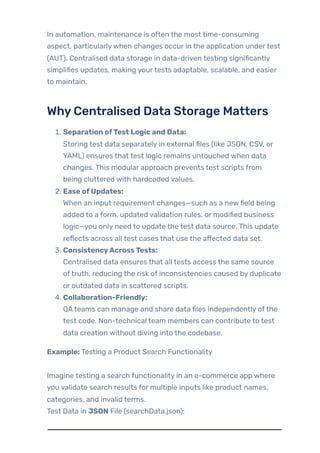
![WritingAssertionsforSpecific Rows, Columns, orCellValues
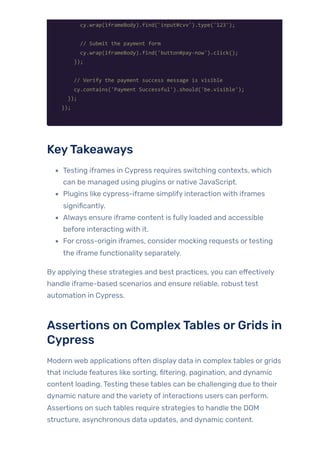
To target specific table elements, use a combination of cy.get() and
within().
Example: Testing cell values for a specific row.
cy.get('#user-table tbody tr').each(($row) => {
// Wrap the row and assert that the name column (first td) is
not empty
cy.wrap($row).find('td').eq(0).should('not.be.empty');
});
Verifying Sorting and Filtering
Sorting orfiltering involves asserting that the data displayed in the
table matches the expected order or criteria.
Example: Verifying sorting by name.
describe('Table Sorting', () => {
it('should sort the table alphabetically by name', () => {
// Click the sort button to sort the table by name
cy.get('#sort-name-btn').click();
// Get all the name cells in the first column and check the
sorting
cy.get('#user-table tbody tr td:nth-child(1)').then(($cells)
=> {
// Extract text content from each cell
const names = [...$cells].map((cell) =>
cell.textContent.trim());
// Create a sorted version of the names array
const sortedNames = [...names].sort(); // Sort names
alphabetically](https://image.slidesharecdn.com/jignect-tech-cypress-test-automation-handling-complex-interactions-250702122459-56b0db9b/85/Cypress-Test-Automation-Managing-Complex-Interactions-19-320.jpg)
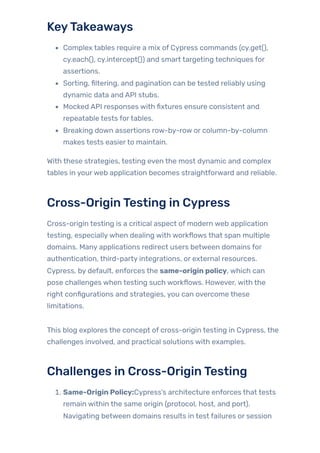
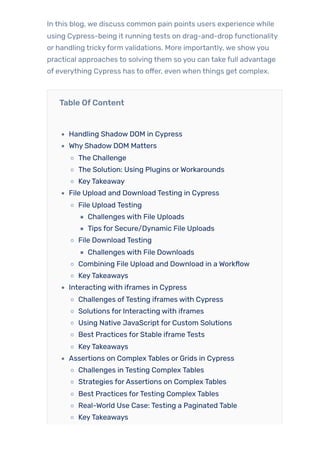
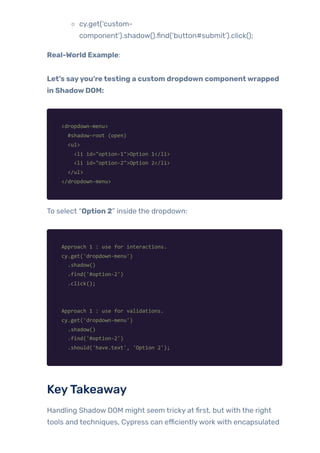
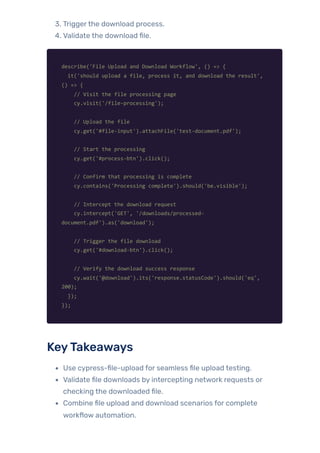
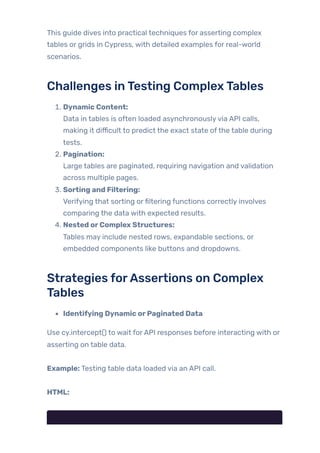
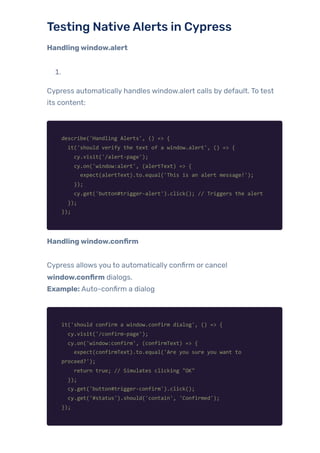
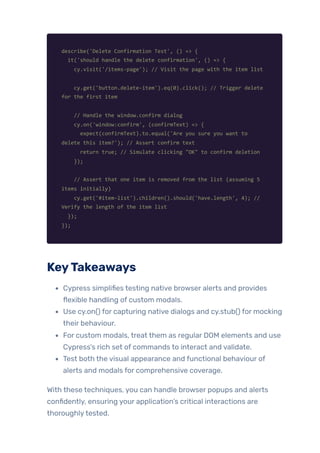
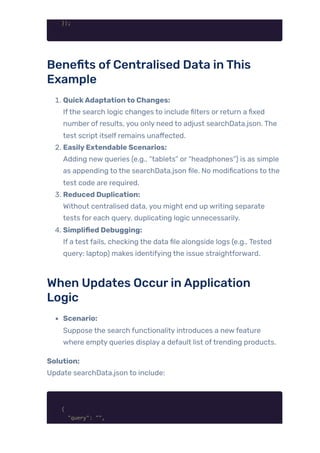
![Scenario: A user logs into a web app using Google OAuth. After
successful authentication, they are redirected back to the main
application.
describe('Cross-Origin Authentication', () => {
it('should log in using Google OAuth and return to the app', ()
=> {
// Visit the app's login page
cy.visit('/login');
// Click the Google OAuth login button
cy.get('button#google-login').click();
// Switch to Google domain for authentication
cy.origin('https://accounts.google.com', () => {
cy.get('input[type="email"]').type('testuser@gmail.com{enter}');
cy.get('input[type="password"]').type('securePassword123{enter}');
});
// Back to the main application
cy.url().should('include', '/dashboard'); // Verify
redirection
cy.get('#welcome-message').should('contain', 'Welcome, Test
User');
});
});
Retaining StateAcross Origins
1.
Use the cy.session() command to preserve cookies, local storage, and
session data when navigating across origins.
Example:
Testing a shopping cart that requires interactions on two different
subdomains.](https://image.slidesharecdn.com/jignect-tech-cypress-test-automation-handling-complex-interactions-250702122459-56b0db9b/85/Cypress-Test-Automation-Managing-Complex-Interactions-24-320.jpg)

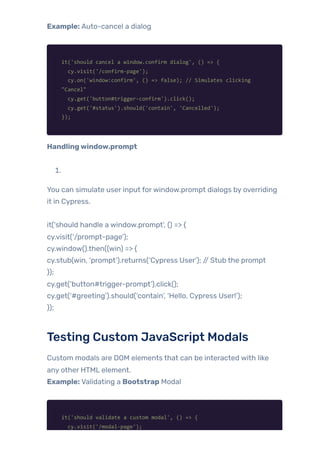
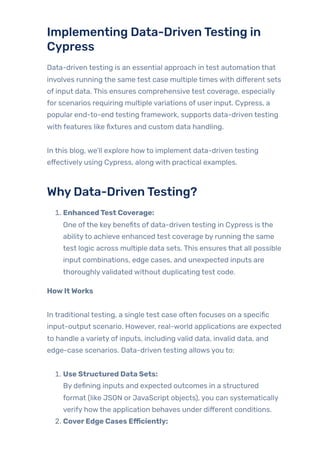
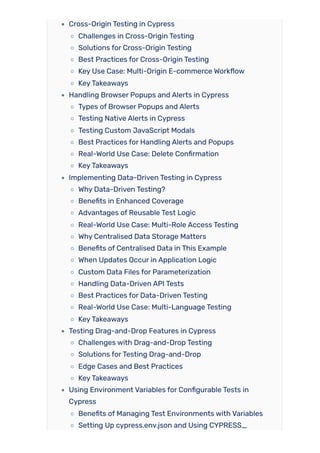
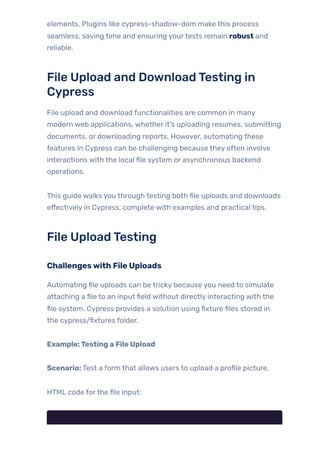
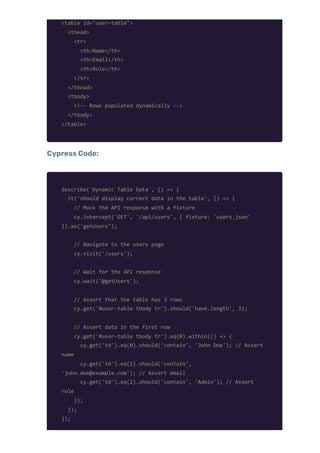
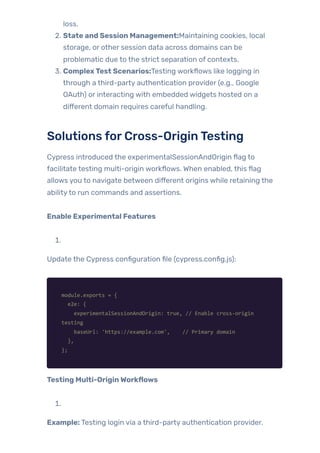
![Instead ofwriting separate test cases for edge cases (e.g.,
minimum or maximum input lengths, special characters), you
can include these cases directly in the test data.
3. Simulate Real-World Scenarios:
You can mimic user behaviours with varying input combinations,
such as different usernames, roles, or language preferences.
Example: Validating a Login Form
Test Scenario: Verifythat a login form accepts valid credentials and
rejects invalid ones.
[
{
"username": "validUser",
"password": "validPass",
"expectedMessage": "Welcome validUser!"
},
{
"username": "validUser",
"password": "wrongPass",
"expectedMessage": "Invalid credentials"
},
{
"username": "short",
"password": "validPass",
"expectedMessage": "Username must be at least 6 characters"
},
{
"username": "validUser",
"password": "",
"expectedMessage": "Password cannot be empty"
}
]
Test Implementation in Cypress:](https://image.slidesharecdn.com/jignect-tech-cypress-test-automation-handling-complex-interactions-250702122459-56b0db9b/85/Cypress-Test-Automation-Managing-Complex-Interactions-34-320.jpg)
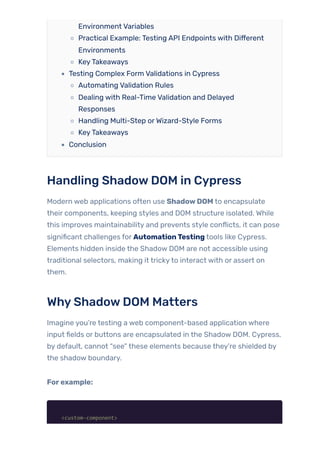
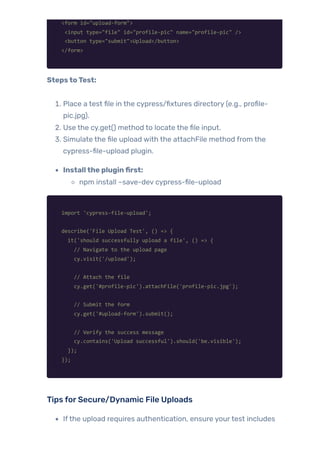
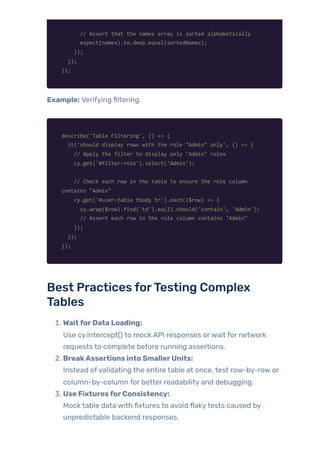
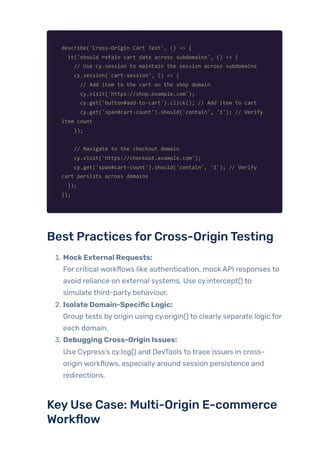
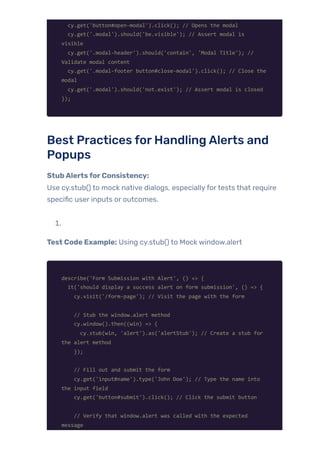
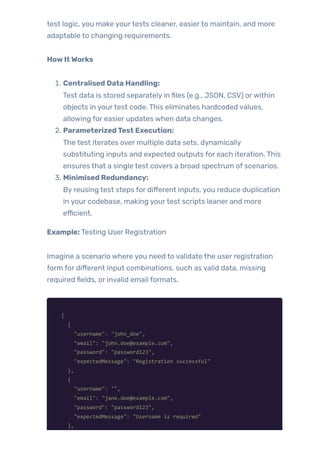
![describe('Login Form Tests', () => {
beforeEach(() => {
cy.visit('/login');
});
it('should validate login form with multiple data sets', () => {
cy.fixture('loginTestData').then((testData) => {
testData.forEach((test) => {
// Enter credentials
cy.get('input[name="username"]').type(test.username);
cy.get('input[name="password"]').type(test.password);
cy.get('button[type="submit"]').click();
// Verify the result
cy.get('.message').should('contain',
test.expectedMessage);
// Reset the form for the next iteration
cy.get('button[type="reset"]').click();
});
});
});
});
Benefits in Enhanced Coverage
1. Efficiency:
A single test dynamically adapts to different input scenarios,
eliminating redundant code and saving time.
2. Reliability:
The application is tested against diverse inputs, ensuring
robustness in real-world usage.
3. Consistency:
Centralised data reduces the risk of inconsistent test logic or
input variations.
ReusableTest Logic in Data-DrivenTesting
Data-driven testing emphasises reusing the same test logic across
multiple data sets, streamlining the process ofvalidating different
inputs without duplicating test code. By decoupling test data from](https://image.slidesharecdn.com/jignect-tech-cypress-test-automation-handling-complex-interactions-250702122459-56b0db9b/85/Cypress-Test-Automation-Managing-Complex-Interactions-35-320.jpg)
![{
"username": "jane_doe",
"email": "invalid-email",
"password": "password123",
"expectedMessage": "Enter a valid email"
}
]
Test Implementation in Cypress:
describe('User Registration Tests', () => {
it('should test registration with multiple data sets', () => {
cy.fixture('registrationData').then((data) => {
data.forEach((user) => {
cy.visit('/register');
// Fill the form
if (user.username)
cy.get('#username').type(user.username);
if (user.email) cy.get('#email').type(user.email);
if (user.password)
cy.get('#password').type(user.password);
// Submit the form
cy.get('button[type="submit"]').click();
// Validate the response message
cy.get('.message').should('contain',
user.expectedMessage);
});
});
});
});
Advantages ofReusableTest Logic
1. EfficiencyGains:
Writing one reusable test for all scenarios saves significant time
compared to creating individual tests for each data set.
2. Simplified Maintenance:](https://image.slidesharecdn.com/jignect-tech-cypress-test-automation-handling-complex-interactions-250702122459-56b0db9b/85/Cypress-Test-Automation-Managing-Complex-Interactions-37-320.jpg)
![When requirements change, you only need to update the test
data, leaving the test logic untouched. For example, ifthe
registration form introduces a newfield, you update the data set
to include it, and the same test adapts to the change.
3. Scalability:
Adding more test cases is as simple as appending new entries to
the data source. There’s no need to write newtest functions for
every new scenario.
4. ConsistencyinValidation:
Reusable logic ensures the same testing steps and validations
are applied consistently across all data sets.
Real-World Use Case: Multi-RoleAccess
Testing
In an application where different user roles (e.g., Admin, User, Guest)
have varying permissions, you can use reusable test logic to validate
access controls for all roles.
Test Data:
[
{
"role": "Admin",
"accessLevel": "Full",
"expectedPages": ["Dashboard", "Settings", "Reports"]
},
{
"role": "User",
"accessLevel": "Limited",
"expectedPages": ["Dashboard", "Reports"]
},
{
"role": "Guest",
"accessLevel": "Read-Only",
"expectedPages": ["Dashboard"]](https://image.slidesharecdn.com/jignect-tech-cypress-test-automation-handling-complex-interactions-250702122459-56b0db9b/85/Cypress-Test-Automation-Managing-Complex-Interactions-38-320.jpg)
![}
]
Test Code:
describe('Role-Based Access Control Tests', () => {
it('should validate access levels for different roles', () => {
cy.fixture('roleData').then((roles) => {
roles.forEach((role) => {
cy.loginAs(role.role); // Custom command for logging in as
a specific role
// Validate accessible pages for the given role
role.expectedPages.forEach((page) => {
cy.visit(`/${page.toLowerCase()}`);
cy.get('h1').should('contain', page); // Check if the
page title matches the expected one
});
// Attempt access to restricted pages and verify access is
denied
const restrictedPages = ['Dashboard', 'Settings',
'Reports'].filter(
(page) => !role.expectedPages.includes(page) // Filter
out pages the role is allowed to access
);
restrictedPages.forEach((page) => {
cy.visit(`/${page.toLowerCase()}`);
cy.get('.error-message').should('contain', 'Access
Denied'); // Ensure access is blocked
});
});
});
});
});
Improved Maintenancewith Data-DrivenTesting
1.](https://image.slidesharecdn.com/jignect-tech-cypress-test-automation-handling-complex-interactions-250702122459-56b0db9b/85/Cypress-Test-Automation-Managing-Complex-Interactions-39-320.jpg)
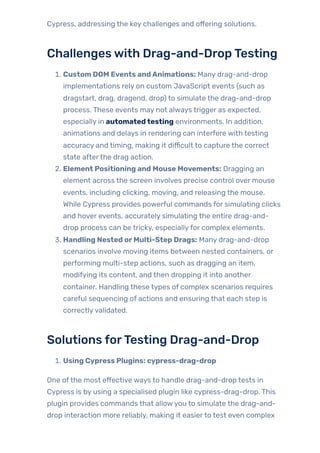
![[
{
"query": "laptop",
"expectedResultsCount": 5
},
{
"query": "smartphone",
"expectedResultsCount": 8
},
{
"query": "randomItem123",
"expectedResultsCount": 0
}
]
Test Implementation in Cypress:
describe('Product Search Tests', () => {
beforeEach(() => {
cy.visit('/search'); // Visit the search page before each test
});
it('should verify search results for multiple queries', () => {
cy.fixture('searchData').then((searchQueries) => {
searchQueries.forEach((data) => {
// Perform search
cy.get('#search-input').clear().type(data.query);
cy.get('#search-button').click();
// Assert that the number of search results matches the
expected count
cy.get('.results-item').should('have.length',
data.expectedResultsCount);
// Optionally, log data for debugging
cy.log(`Tested query: ${data.query} with expected result
count: ${data.expectedResultsCount}`);
});
});
});](https://image.slidesharecdn.com/jignect-tech-cypress-test-automation-handling-complex-interactions-250702122459-56b0db9b/85/Cypress-Test-Automation-Managing-Complex-Interactions-41-320.jpg)
!["expectedResultsCount": 10
}
The existing Cypress script will automatically handle this case
without requiring any changes to the test logic.
Custom Data Filesfor
Parameterization
Sometimes, data needs to be dynamically generated or retrieved from
external sources (e.g., databases, APIs). You can define custom data
objects or import data from external files.
Example: Using JavaScript Objects forTest Data
const userData = [
{ username: 'admin', password: 'admin123', expectedRole: 'Admin'
},
{ username: 'guest', password: 'guest123', expectedRole: 'Guest'
}
];
describe('Parameterized Role Tests', () => {
userData.forEach((user) => {
it(`should validate the role for ${user.username}`, () => {
cy.visit('/login');
cy.get('input[name="username"]').type(user.username);
cy.get('input[name="password"]').type(user.password);
cy.get('button[type="submit"]').click();
cy.get('#role').should('contain', user.expectedRole);
});
});
});
Handling Data-DrivenAPITests](https://image.slidesharecdn.com/jignect-tech-cypress-test-automation-handling-complex-interactions-250702122459-56b0db9b/85/Cypress-Test-Automation-Managing-Complex-Interactions-43-320.jpg)
![Cypress can be used forAPI testing as well. By parameterizing
requests with multiple data sets, you can validate backend behaviour.
Example: Testing API Responses with Dynamic Data
const apiTestData = [
{ userId: 1, expectedName: 'John Doe' },
{ userId: 2, expectedName: 'Jane Doe' }
];
describe('API Data-Driven Tests', () => {
apiTestData.forEach((test) => {
it(`should verify the user name for userId ${test.userId}`, ()
=> {
cy.request(`/api/users/${test.userId}`).then((response) => {
expect(response.status).to.eq(200);
expect(response.body.name).to.eq(test.expectedName);
});
});
});
});
Best Practices forData-DrivenTesting
1. CentralizeTest Data:
Keep test data in a dedicated folder (fixtures or external data
sources) for easier maintenance.
2. Validate Data Completeness:
Ensure all required data fields are present and properly
formatted.
3. Leverage Dynamic Data:
Use tools like faker.js to generate random but realistic test data
for complex scenarios.
4. Separate DatafromTest Logic:
This enhances code readability and makes tests more modular.](https://image.slidesharecdn.com/jignect-tech-cypress-test-automation-handling-complex-interactions-250702122459-56b0db9b/85/Cypress-Test-Automation-Managing-Complex-Interactions-44-320.jpg)
![Real-World Use Case: Multi-Language
Testing
Scenario:
Awebsite supports multiple languages, and you need to test the login
page’s language localization.
Fixture File (languages.json):
[
{
"language": "en",
"usernamePlaceholder": "Username",
"passwordPlaceholder": "Password"
},
{
"language": "es",
"usernamePlaceholder": "Usuario",
"passwordPlaceholder": "Contraseña"
}
]
Test Code:
describe('Multi-Language Login Page Tests', () => {
it('should validate placeholders in different languages', () =>
{
cy.fixture('languages').then((languages) => {
languages.forEach((lang) => {
cy.visit(`/login?lang=${lang.language}`); // Visit the
login page with the current language query param
// Validate the placeholder for the username field
cy.get('input[name="username"]')
.should('have.attr', 'placeholder',
lang.usernamePlaceholder);](https://image.slidesharecdn.com/jignect-tech-cypress-test-automation-handling-complex-interactions-250702122459-56b0db9b/85/Cypress-Test-Automation-Managing-Complex-Interactions-45-320.jpg)
![// Validate the placeholder for the password field
cy.get('input[name="password"]')
.should('have.attr', 'placeholder',
lang.passwordPlaceholder);
});
});
});
});
KeyTakeaways
Data-driven testing simplifies and scales yourtest cases, making
them reusable and maintainable.
Cypress’s built-in support forfixtures and dynamic
parameterization makes implementing this strategy
straightforward.
Always separate test logic and data for cleaner code and better
test organisation.
Incorporate data-driven testing into both UI and API tests for
comprehensive test coverage.
By adopting these techniques, you can ensure your automation
framework is both robust and efficient, capable of handling diverse
testing requirements seamlessly.
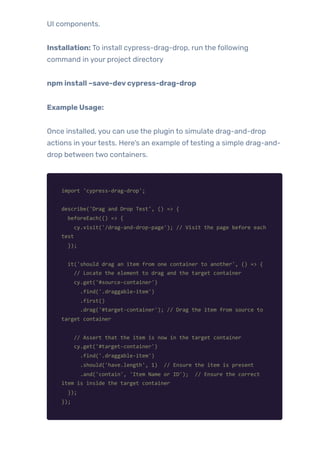
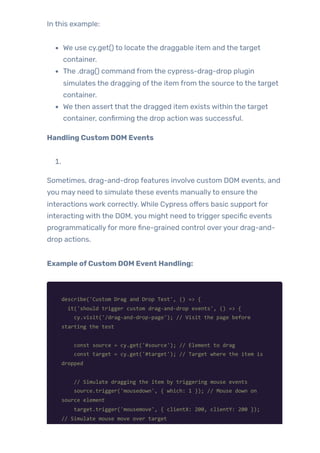
Testing Drag-and-Drop Features in
Cypress
Drag-and-drop functionality is a critical interaction in manyweb
applications, particularlythose involving UI elements such as file
uploads, list rearrangements, or even complex data manipulation
interfaces. However, testing drag-and-drop features presents unique
challenges due to the involvement of custom DOM events,
animations, and the need for precise mouse movements. This article
explores howto effectivelytest drag-and-drop interactions in](https://image.slidesharecdn.com/jignect-tech-cypress-test-automation-handling-complex-interactions-250702122459-56b0db9b/85/Cypress-Test-Automation-Managing-Complex-Interactions-46-320.jpg)


![environment variables passed during the test run.
Using cypress.env.json File:
1.
The cypress.env.json file is the simplest wayto store environment
variables for local testing. This file contains key-value pairs where you
can define variables specific to your environment.
Example cypress.env.json:
{
"baseUrl": "https://staging.example.com",
"env": {
"username": "testUser",
"password": "testPassword123",
"apiUrl": "https://api.staging.example.com"
}
}
By defining these variables, you can access them in yourtest scripts
like so:
describe('Login Test', () => {
it('should log in with valid credentials', () => {
cy.visit(Cypress.env('baseUrl'));
cy.get('input[name="username"]').type(Cypress.env('username'));
cy.get('input[name="password"]').type(Cypress.env('password'));
cy.get('button[type="submit"]').click();
cy.url().should('include', '/dashboard');
});
});](https://image.slidesharecdn.com/jignect-tech-cypress-test-automation-handling-complex-interactions-250702122459-56b0db9b/85/Cypress-Test-Automation-Managing-Complex-Interactions-54-320.jpg)
![typicallytriggered via API calls or client-side JavaScript. When
automating tests for such forms, it’s important to handle
asynchronous actions and delays.
Example: Real-Time Validation for Email Field
describe('Email Validation', () => {
it('should show error message if email is invalid', () => {
cy.visit('/register');
// Type an invalid email
cy.get('input[name="email"]').type('invalid-email');
// Assert real-time validation error
cy.get('.email-error').should('contain', 'Please enter a valid
email address');
});
});
In this example, the test simulates typing an invalid email address and
checks forthe real-time error message that appears. Cypress
automaticallywaits forthe element to appear, so the test is more
stable in handling delayed responses.
Handling Multi-Step orWizard-Style
Forms
Multi-step forms orwizard-style forms (where the user completes a
series of steps to fill out a form) require additional attention in
automation. Each step might have its own validation rules, and some
fields might depend on the values entered in previous steps.
Example: Multi-Step Form Validation](https://image.slidesharecdn.com/jignect-tech-cypress-test-automation-handling-complex-interactions-250702122459-56b0db9b/85/Cypress-Test-Automation-Managing-Complex-Interactions-59-320.jpg)
![describe('Multi-Step Form', () => {
it('should validate each step before moving to the next', () =>
{
cy.visit('/multi-step-form');
// Step 1: Fill out first page
cy.get('input[name="username"]').type('testuser');
cy.get('input[name="password"]').type('password123');
cy.get('button[type="submit"]').click();
// Assert that the form moves to the next step
cy.url().should('include', '/step-2');
// Step 2: Fill out second page
cy.get('input[name="email"]').type('invalid-email');
cy.get('button[type="submit"]').click();
// Assert that the second step fails due to invalid email
cy.get('.email-error').should('contain', 'Please enter a valid
email address');
});
});
In this test, the form goes through two steps:
In Step 1, the user enters a username and password.
In Step 2, the user provides an invalid email, and the test ensures
the form validation is triggered.
Cypress makes it easyto handle this type oftesting because it waits
forthe elements to load before moving on, which is particularly useful
when dealing with multi-step forms orthose that depend on previous
data.
KeyTakeaways
ComprehensiveValidation: It’s essential to test all validation
rules—required fields, regex patterns, and dynamic rules—across
all form fields.](https://image.slidesharecdn.com/jignect-tech-cypress-test-automation-handling-complex-interactions-250702122459-56b0db9b/85/Cypress-Test-Automation-Managing-Complex-Interactions-60-320.jpg)


Cypress is a great tool for end-to-end testing. They are fast, easy to set up, and work well for modern web applications. However, like every other tool, they have their limits-certainly so when you are dealing with real complexities from the real world. Testers who have tried testing Shadow DOM elements, interaction with iframes, or methods of bypassing cross-origin restrictions know how it is not always that simple. These frustrations can be quite frustrating at first, but they also offer you an opportunity to have a deeper grasp of Cypress and generally web testing. While the above issues ensure your tests are reliable, getting the right solutions offers you more confidence in the quality of the app you are building. In this blog, we discuss common pain points users experience while using Cypress-being it running tests on drag-and-drop functionality or handling tricky form validations. More importantly, we show you practical approaches to solving them so you can take full advantage of everything Cypress has to offer, even when things get complex.


![[English][Test Girls] Zero to Hero: Start Test automation with Cypress](https://cdn.slidesharecdn.com/ss_thumbnails/entestgirlstestingwithcypress-191024022807-thumbnail.jpg?width=640&height=640&fit=bounds)