SlideShare a Scribd company logo
US-EN
US-EN US-EN US-EN US-EN US-EN US-EN US-EN US-EN
US-EN
US-EN
US-EN
US-EN
US-EN US-EN US-EN
US-EN
US-EN
US-EN
US-EN
US-EN
US-EN
US-EN
US-EN
US-EN
US-EN
US-EN
US-EN
US-EN US-EN US-EN US-EN US-EN US-EN US-EN US-EN
US-EN
US-ENUS-EN
How does state law relate to this
warranty?
Any State Laws that contradict or modify the warranty
listed here to the consumer’s benefit will be followed.
· Call customer service at 1 (844) 543-5872
· Visit the Website Customer Service Platform at
www.lidl.com/contact-us
· Visit a LIDL store for further assistance
To ensure the quickest warranty return process,
please have the following available:
· The original sales receipt that includes the date
purchased;
· The product and manual in the original package;
· A statement of the problem.
What must you do to keep the warranty
in effect?
· Retain the original receipt;
· Follow all product instructions;
· Do not repair or modify the product.
US-ENUS-ENUS-EN
· Improper use or transport;
· Disregarding safety and maintenance instructions;
· Accidents or acts of nature (e.g. lightning, fire,
water, etc.).
· Tampering with the product (such as removing
cover, unscrewing screws etc.)
What is the period of coverage and
warranty resolution?
The warranty is for 3 years from the date of purchase.
At our discretion, product will either be refunded or
replaced.
What will we not do?
We will not:
· Start a new warranty period upon product exchange;
· We will not repair product.
How to process the warranty?
We recommend first either:
Never throw batteries in the garbage. They may
contain toxic heavy metals and must be handled as
special waste. The chemical symbols of heavy met-
als are: Cd = cadmium, Hg = mercury, Pb = lead.
Used batteries should therefore be disposed of
through a local collection point.
Warranty
What does this warranty cover?
The warranty covers:
· Damage, breakage or inoperability due to defect.
· Damage not accounted for by normal wear and
tear or following the safety and maintenance
instructions provided in the user manual.
What is not covered by the warranty?
The warranty does not cover damage caused by:
· Normal wear and tear of the product, including
fragile parts (such as switches, glass, etc.);
Disposal
Dispose of the packaging through
your local recycling facilities and in
compliance with all federal, state
and local regulations.
Contact your local waste management
authority for additional information on
how to dispose of the used product.
To help protect the environment, please dispose of
the product properly when it has reached the end
of its useful life, do not throw in the garbage. Infor-
mation on collection sites and their opening hours
is available from your local authority.
Improper disposal of batteries can
damage the environment!
Cleaning and care
Do not use any liquids or cleaning agents for
cleaning. Otherwise there is a risk of damaging
the product.
The product should only be cleaned on the
outside with a soft, dry cloth.
Maintenance
Remove the battery when the product will not
be used for longer period of time.
Check regularly the cable and components for
any damage and safe fit.
US-ENUS-EN
Problem Solution
Speed or distance are
not displayed.
Adjust magnet and
sensor correctly.
- Check that the battery
is inserted with the poles
arranged the right way
round.
Display is black The ambient temperature
is too high or the bike
computer was exposed
to direct sunlight for too
long. Remove product
from direct sunlight and
let it cool off for a while.
The LC-display shows
irregular symbols.
Remove battery and
replace it again.
US-ENUS-ENUS-EN
- If errors occur in the display, remove any such prod-
ucts from the vicinity of the product. In the case of
such malfunctions, remove the battery briefly and
then reinsert again.
Problem Solution
Empty LC-display or no
response after putting
the batteries in again
Remove battery. Insert
a sharp object (e.g.
screwdriver) into the hole
marked with “RESET”.
Insert a 3V battery into
the battery compartment
in such a way that the +
terminal points upwards.
Replace the battery cover
on the battery compart-
ment. The microprocessor
is reset and restarted.
To close the battery compartment cover, use a
coin to assist you to turn the battery compartment
cover in clockwise direction.
Press any button and keep it pressed to return
to normal operating mode.
Note: Once the battery is removed, all stored data
will be erased after approx. 20 seconds.
Removing the bike computer
from the bike
Turn the bike computer anticlockwise to detach
the bike computer.
Cut off the protruding tails of the cable ties 2
with a suitable tool such as diagonal pliers.
Troubleshooting
Note: This product has delicate electronic compo-
nents. Therefore interference may occur when it is
near products which transmit radio signals.
Changing the batteries
Note: The battery of the bike computer must be
replaced when the battery state indicator 19 appears
on the LC display 13 .
Press the MODE button 14 and the SET button
15 at the same time and keep them pressed
until the battery symbol and {{----}} appears in
the LC display 13 .
To replace the battery, proceed as shown in
figure A.
To open the battery compartment cover, use a
coin to assist you to turn the battery compart-
ment cover in anti-clockwise direction. Take out
the old battery and replace with a new battery.
Make sure you fit the battery the right way round
(polarity). This is shown inside the battery com-
partment.
Adjust the sealing ring before inserting the
battery.
Resetting the bike computer
Press the MODE button 14 and + button 22
at the same time and keep them pressed until
RESET appears in the LC display 13 .
Now press the SET button 15 . This allows you
to adjust the previously set basic setting data
(language, age, weight, time). The rest of the
stored data will be deleted.
Using the backlight
Press the SET button 15 to switch on the back-
light temporarily. The backlight automatically
extinguishes after a short period.
CUSTOMIZE mode
Apart from the ADVANCE and EASY mode, you
can make your individual adjustments in the
CUSTOMIZE mode (see procedure).
Press the Set button 15 to enter the
CUSTOMIZE mode.
Note: By repeatedly pressing the + button 22
and – button 21 , you can toggle between the
ADVANCE and EASY mode. In the EASY
mode, press and hold the SET button 15 . Press
the + button 22 and – button 21 to switch the
settings on or off (e.g. time). Choose “On”, to
add the chosen adjustment to the EASY modes.
Choose “Off“, if you do not want to add the
adjustments.
Press the SET button 15 , to confirm your entry.
Repeat this process for another function.
Press the SET button 15 enter the setting process.
Press the + button 22 and – button 21 repeat-
edly until the desired symbol is shown.
Press the MODE button 14 to move on to setting
the timer and press the + button 22 and – but-
ton 21 repeatedly until the desired number
appears as the first digit. Repeat this process
for all the remaining digits.
Confirm your choice by pressing the SET button
15 and press the MODE button 14 back to
current page.
SCAN: Scan
Note: The scan mode automatically switches
between the trip distance, highest speed, average
speed and trip time displays.
Note: Refer to the section on “Basic settings” to
see how you make or change settings.
Note: To turn off the SCAN function, press the
+ button 22 to return to clock mode.
counting forwards or backwards (+ or - respec-
tively) and 5-digit number.
Press the SET button 15 for edit.
Press the + button 22 and – button 21 repeat-
edly until the desired symbol is shown.
Press the MODE button 14 to move on to set-
ting the distance on the odometer and press the
+ button 22 and – button 21 repeatedly until
the desired number appears as the first digit.
Repeat this process for all the remaining digits.
Confirm your choice by pressing the SET button
15 and press the MODE button 14 back to
current page.
TIME: Timer
Press the SET button 15 and keep it pressed
for 3 seconds to change the timer settings. The
LC display shows the symbol for counting for-
wards or backwards (+ or - respectively) and
5-digit number.
Press the SET button 15 again to stop the stop-
watch.
Press the SET button 15 and keep it pressed
for 3 seconds to reset the stopwatch to 0.
CAL RATE: Current calorie consumption
CALORIE: Calorie meter
Press the SET button 15 and keep it pressed
for 3 seconds to reset the calorie counter to 0.
FAT-BURN: Fat burning in grams
Press the SET button 15 and keep it pressed for
3 seconds to reset the fat burning value to 0.
CO2 KG: CO2 Saving:
Press the SET button 15 and keep it pressed
for 3 seconds to access the CO2 saving refer-
ence value.
KM: Odometer
Press the SET button 15 and keep it pressed
for 3 seconds to change the odometer settings.
The LC display 13 shows the symbol for
Press the SET button 15 and keep it pressed
for 3 seconds to reset the maximum speed dis-
play to 0.
AVGSPEED: Average speed
Press the SET button 15 and keep it pressed
for 3 seconds to reset the average speed dis-
play to 0.
TEMP: Thermometer
Press the SET button 15 and keep it pressed
for 3 seconds to switch between °C and °F.
Press the SET button 15 to display the highest
temperature (HI) measured so far.
Press the SET button 15 again to display the
lowest temperature (LO) measured so far.
Press the SET button 15 and keep it pressed
while the highest or lowest temperature is dis-
played to switch back to the current tempera-
ture to reset the saved data.
STPWATCH: Stopwatch
Press the SET button 15 to start the stopwatch.
Using functions
Note: All the functions and secondary functions
are described in the following list.
CLOCK: Displays the time
Press the SET button 15 and keep it pressed
for 3 seconds to access the time settings.
TOTALODO: Total odometer
Press the SET button 15 and keep it pressed
for 3 seconds to access the wheel size settings,
total distance and servicing interval.
TOTAL-TM: Total time cycling
Press the SET button 15 and keep it pressed
for 3 seconds to make changes to the saved
total time cycling.
TRIPDIST: Trip distance
Press the SET button 15 and keep it pressed
for 3 seconds to reset the trip distance, the
average speed and the trip time displays to 0.
MAXSPEED: Maximum speed
any vibration made to reactivate the computer.
The function indicator 11 shows the current mode.
Press the + button 22 or MODE button 14
repeatedly to page through the various modes.
Press the SET button 15 to change into the sec-
ondary function for any function.
Press the SET button 15 and keep it pressed to
call or reset up any saved values.
The bike computer has the following
functions:
ADVANCE mode:
CLOCK > TOTALODO > TOTAL-TM > TRIPDIST >
MAXSPEED > AVGSPEED > TRIPTIME > TEMP >
STPWATCH > CAL RATE > CALORIE > FAT-BURN
> CO2 KG > KM+/- > TIME+/- > SCAN
EASY mode:
Press the MODE button 14 you can choose function
display:
TRIPDIST > MAXSPEED > AVGSPEED > TRIPTIME
You have now completed the basic settings. If you
want to change the basic setting data, follow the
steps in “Resetting the bike computer” section and
reset all basic setting data again.
Connect the bike computer
and sensor
Use the magnet 1 to trigger the sensor 6 , the
speed tendency indicator 20 will show a graph to
indicate a successful connection. Now the bike
computer 8 is ready for use. If connection fails,
follow the steps in “Changing the batteries” section
and reset all basic setting data again.
You will need to re-connect the bike computer 8
and sensor 6 again.
Using the bike computer
Note: If the bike computer remains unused for
more than 5 minutes, it automatically switches
into the stand-by mode. Press any button or
Note: You have the choice of 0-620.75 miles
(0–999km) or miles. After the setting is confirmed,
the bike computer will count the trip distance.
When the servicing interval indicator 18 shows
on LC display, you need to check the condition
of your bike (wear, adjustment of brakes, etc.).
Then press the down button 21 to reset the
service interval and this indicator to disappear.
The bike computer will start counting the trip
distance again.
Confirm your choice by pressing the
SET button 15 .
Press the MODE button 14 to move to the unit
of temperature and press the SET button 15 for
edit. Press the + button 22 or – button 21 repeat-
edly until °C or °F appears in the LC display.
Confirm your choice by pressing the
SET button 15 .
Press the MODE button 14 to close the setting
page.
Press the MODE button 14 to move to CO2
saving. A three-digit number appears in the
LC display. Press the SET button 15 for edit
and press the + button 22 and – button 21
repeatedly until the desired number appears
as the first digit. Confirm your choice by press-
ing the MODE button 14 . Repeat this process
for all the remaining digits.
Confirm your choice by pressing the
SET button 15 .
Press the MODE button 14 to move to the ser-
vicing interval. A three-digit number appears in
the LC display. Press the SET button 15 for edit
and press the + button 22 or – button 21
repeatedly until the desired number of units of
distance to your next intended bicycle servicing
(servicing interval indicator 18 ) appears in the
LC display. Confirm your choice by pressing the
MODE button 14 . Repeat this process for all
the remaining digits.
Confirm your choice by pressing the
SET button 15 .
Press the MODE button 14 to move to the time
format and press the SET button 15 for edit.
Press the + button 22 or – button 21 repeat-
edly until 12 Hr (12-hour format) or 24 Hr
(24-hour format) appears in the LC display.
Confirm your choice by pressing the
SET button 15 .
Press the MODE button 14 to move to the clock.
A four-digit number appears in the LC display.
Press the SET button 15 for edit and press the
+ button 22 or – button 21 repeatedly until
the desired number appears as the first digit.
Confirm your choice by pressing the MODE
button 14 . Repeat this process for all the
remaining digits.
Confirm your choice by pressing the
SET button 15 .
the desired number appears as the first digit.
Confirm your choice by pressing the MODE
button 14 . Repeat this process for the remain-
ing digit.
Confirm your choice by pressing the
SET button 15 .
Press the MODE button 14 to move to the unit
of weight and press the SET button 15 for edit.
Press the + button 22 or – button 21 repeatedly
until SET KG or SET LB appears in the LC display.
Confirm your choice by pressing the
SET button 15 .
Press the MODE button 14 to move to weight.
A three-digit number appears in the LC display.
Press the SET button 15 for edit and press the
+ button 22 or – button 21 repeatedly until
the desired number appears as the first digit.
Confirm your choice by pressing the MODE
button 14 . Repeat this process for all the
remaining digits.
the MODE button 14 . Repeat this process for
all the remaining digits.
Confirm your choice by pressing the
SET button 15 .
Note: You can calculate your tyre circumfer-
ence (U) by multiplying your tyre diameter (D)
by 3.1416 (Fig. M). The list (Fig. N) contains
the tyre circumferences (U) of the most common
tyre diameters (D).
Press the MODE button 14 to move to the unit
of distance and press the SET button 15 for
edit. Press the + button 22 or – button 21
repeatedly until SET KM KMH or SET MILE
MPH appears in the LC display.
Confirm your choice by pressing the SET
button 15 .
Press the MODE button 14 to move to the age.
A two-digit number appears in the LC display.
Press the SET button 15 for edit and press the
+ button 22 or – button 21 repeatedly until
Press the Set button 15 for edit.
Press the + button 22 or – button 21 repeatedly
until the desired language appears.
Confirm your choice by pressing the SET
button 15 .
Press the MODE button 14 to move to the user
profile and press the SET button 15 for edit.
Press + button 22 or – button 21 repeatedly
until the desired user profile (ADVANCE or
EASY) appears.
Confirm your choice by pressing the SET
button 15 .
Press the MODE button 14 to move to the wheel
size (SET WS). A four-digit number appears in
the LC display. Now enter the tyre circumference
of your wheel in mm. Press the SET button 15
for edit and press + button 22 or – button 21
repeatedly until the desired number appears as
the first digit. Confirm your choice by pressing
Note: Make sure that the bike computer 8 is
attached with less than 27.56 in (70cm) distance
to the sensor 6 . Fix the bike computer 8 to the sen-
sor 6 within a 30° angle as shown in Fig. B.
Preparing for use
Basic settings
Basic setting: Language > User profile > Wheel
size > Unit of distance and speed > Age > Unit of
weigh > Weight > Time format > Time > CO2 saving >
Servicing interval > Unit of temperature
Key functions: MODE button for selection/
+ button 22 or – button 21 for setting values/
SET button for edit and confirmation
Note: The LC display 13 comes on automatically
approx. 2 seconds after the battery 3 is inserted.
You are immediately offered a choice of languages.
Inserting the battery
To insert the battery 3 , proceed as shown in Fig. A.
To open the battery compartment cover, use a
coin to assist you to turn the battery compartment
cover in anti-clockwise direction. Make sure
you fit the battery the right way round (polarity).
This is shown on the back side of the product.
To close the battery compartment cover, use a
coin to assist you to turn the battery compart-
ment cover in clockwise direction.
Scan the QR code with your
smartphone and watch the
video to find out how to assem-
ble the product.
Attaching the bike computer
To attach the product, proceed as shown in
Figs. B to I.
batteries from the product
immediately.
SAVE THESE
INSTRUCTIONS
Before use
Note: Remove all packaging materials from the
product.
Remove the protective foil from the LC display 13
before first use.
Note: This product is not recommended to use
with E-bikes. Interference from the motor may affect
the performance of the product.
according to polarity
marks (+) and (-) on the
battery/rechargeable
battery and the product.
Clean the contacts on
the battery/recharge-
able battery and in the
battery compartment
before inserting!
Remove exhausted
batteries/rechargeable
Remove batteries/
rechargeable batteries if
the product will not be
used for a longer period.
Risk of damage of the
product
Only use the specified
type of battery/
rechargeable battery!
Insert batteries/rechar-
geable batteries
In the event of a leakage
of batteries/rechargeable
batteries, immediately
remove them from the prod-
uct to prevent damage.
Only use the same type
of batteries/recharge-
able batteries. Do not
mix used and new bat-
teries/rechargeable
batteries.
and seek immediate
medical attention.
WEAR PROTEC-
TIVE GLOVES!
Leaked or damaged bat-
teries/rechargeable bat-
teries can cause burns
on contact with the skin.
Wear suitable protective
gloves at all times if such
an event occurs.
temperatures, which could
affect batteries/recharge-
able batteries, e.g. radi-
ators/direct sunlight.
Avoid contact with the
skin, eyes and mucous
membranes. In the event
of contact with battery
acid, thoroughly flush
the affected area with
plenty of clean water
Never throw batteries/
rechargeable batteries
into fire or water.
Do not exert mechanical
loads to batteries/
rechargeable batteries.
Risk of leakage of
batteries/recharge-
able batteries
Avoid extreme environ-
mental conditions and
DANGER OF
EXPLOSION!
Never recharge non-re-
chargeable batteries.
Do not short-circuit bat-
teries/rechargeable
batteries and/or open
them. Overheating, fire or
bursting can be the result.
Safety
instructions for
batteries/
rechargeable
batteries
DANGER TO LIFE!
Keep batteries/recharge-
able batteries out of reach
of children. If accidentally
swallowed seek immedi-
ate medical attention.
non-observance of the
operating instructions
and safety advice or
unauthorised use.
The RF Exposure Com-
pliance distance is 20
mm.
(2) this product must
accept any interference
received, including inter-
ference that may cause
undesired operation.
Please note that the
warranty does not cover
damage arising from
improper treatment,
• Consult the dealer or
an experienced radio/
TV technician for help.
This product complies
with part 15 of the FCC
Rules. Operation is sub-
ject to the following two
conditions:
(1) This product may not
cause harmful interfer-
ence, and
by one or more of the
following measures:
• Reorient or relocate
the receiving antenna.
• Increase the separation
between the equipment
and receiver.
• Connect the equipment
into an outlet on a dif-
ferent circuit from the
circuit the receiver is
connected to.
interference will not
occur in a particular
installation. If this prod-
uct causes harmful inter-
ference to radio or
television reception,
which can be determined
by turning the product
off and on, the user is
encouraged to try and
correct the interference
interference in a residen-
tial installation. This
product generates, uses
and can radiate radio
frequency energy and, if
not installed and used in
accordance with the
instructions, may cause
harmful interference to
radio communications.
However, there is no
guarantee that
compliance could void
the user‘s authority to
operate the product.
Note: This product has
been tested and complies
with the limits for a Class
B digital device, pursuant
to Part 15 of the FCC
Rules. These limits are
designed to provide
reasonable protection
against harmful
person responsible for
their safety. Children
should be supervised to
ensure that they do not
play with the product.
Changes or modifica-
tions to this product not
expressly approved by
the party responsible for
This product is not intended
for use by persons (includ-
ing children) with reduced
physical, sensory or men-
tal capabilities, or lack of
experience and knowl-
edge, unless they have
been given supervision
or instruction concerning
use of the product by a
IMPORTANT
SAFETY
INSTRUCTIONS
READ ALL INSTRUCTIONS.
KEEP FOR FUTURE REFER-
ENCE. IF PASSING THIS
PRODUCT ON TO A THIRD
PARTY ALSO INCLUDE ALL
DOCUMENTS.
Model: HG00734A-TX, HG00734B-TX
FCC-ID: 2AJ9O-HG734TX
Model: HG00734A-RX, HG00734B-RX
Included items
1 Bike computer
1 Bracket for bike
computer
1 Cushion for bike
computer bracket
1 Bracket with sensor
1 Magnet
6 Cable ties
2 Batteries 3V
(Direct current), type
CR2032 button cell
2 Spare seal ring for bike
computer and sensor
1 Operating instructions
16 Speed comparison indicator:
Compares your current speed against the
average speed
▲ higher than your average speed
▼ lower than your average speed
17 SCAN indicator
18 Servicing interval indicator
19 Battery state indicator
20 Speed tendency indicator:
Indicates speed trend
Acceleration – anticlockwise rotation
Deceleration – clockwise rotation
21 Down button (-)
22 Up button (+)
Technical data
Battery: 3V (Direct current)
(CR2032 button cell)
Operating temperature: 0–122°F (0–50°C)
IP44 (splash proof): Suitable for wet locations
– Scan indicator (functions displayed in
continuous loop)
– Backlight
Description of parts
1 Magnet
2 Cable tie
3 Battery
4 Cushion for bike computer bracket
5 Bracket
6 Sensor
7 Bike computer’s battery compartment cover
8 Bike computer
9 Sensor battery compartment cover
10 Primary function value display
11 Function indicator
12 Secondary function value display
13 LC display
14 MODE button (M)
15 SET button (S)
Functions
– Menu languages: GB, DE, FR, NL, IT, ES
– Clock
– Stopwatch
– Temperature °C/°F
– Memory function for min. and max. temperature
– Current speed (0–62mph (0–99.9km/h))
– Average speed (0–62mph (0–99.9km/h))
– Maximum speed (0–62mph (0–99.9km/h))
– Speed comparison
– Speed tendency
– Trip timer (max. 9:59:59) (count backwards or
forwards)
– Odometer (count backwards or forwards)
– Total odometer and total cycling time display
– Calories
– Fat-burnt
– CO2 saving
Bike Computer
Introduction
Congratulations on your purchase. You have selected
a quality product. The instructions for use are a part
of the product. They contain important information
about the safety, use and disposal of the product.
Before using the product, please learn about all the
safety information and usage instructions. Only use
the product as described and for the specified appli-
cations. If you lend the product to someone else,
please also give all the instructions.
Proper use
The product is intended for use as a bike computer.
Not for commercial use.
BIKE COMPUTER/
COMPUTADORA
PARA BICICLETA
COMPUTADORA PARA BICICLETA
Instrucciones de utilización y de seguridad
BIKE COMPUTER
Operation and Safety Notes
IAN 286004
D
U
NM D U
20in 1598mm
22in 1759mm
24in 1916mm
26in (650A) 2073mm
26,5in (Tubular) 2117mm
26,6in (700 x 25C) 2124mm
26,8in (700 x 28C) 2136mm
27in (700 x 32C) 2155mm
28in (700B) 2237mm
ATB24in x 1,75 1888mm
ATB26 x1,4 1995mm
ATB26 x1,5 2030mm
ATB26 x1,75 2045mm
ATB26 x 2 (650B) 2099mm
27in x 1 2138mm
27in x 1 1/4 2155mm
L
K
G
F
E
DB
A I
H J
10
11
12
1415
16
17
18
19
20
22
5
3
4
6 C1
2
7
3
86
3
9
8
1
6
5 2
4
2
6
6
2
1
1 6
0,079in
(max. 2mm)
6
1
8
5
21
13
Distributed by/Distribuido por:
Lidl US LLC., Arlington, VA 22202
Model No./Modelo Núm.:
HG00734A/HG00734B
Version/Versión: 02/2017
Made in/Hecho en: China
Last Information Update · Estado de las
informaciones: 03/2017 · Ident.-No.:
HG00734A/B-US032017-9
WARNING indicates a hazardous
situation that, if not avoided, could
result in death or serious injury.
NOTICE indicates information considered
important, but not hazard related (e.g.
messages related to property damage).
DESCRIPTION OF
SIGNAL WORDS
Call customer service at
1 (844) 543-5872
Visit the Website Customer
Service Platform at
www.lidl.com/contact-us
Visit a LIDL store for further assistance.
IAN 286004
Please have your IAN number ready.
CUSTOMER SERVICE
286004_cri_Fahrradcomputer_660x444mm_US.indd 1 31.03.17 10:39

More Related Content

Similar to Crevit user manual-3377843

Bpm 210 ul blood pressure monitor
Bpm 210 ul blood pressure monitorBpm 210 ul blood pressure monitor
Bpm 210 ul blood pressure monitor
Devendra Tiwari 7838896746
 
Bpm 210 ul blood pressure monitor
Bpm 210 ul blood pressure monitorBpm 210 ul blood pressure monitor
Bpm 210 ul blood pressure monitor
Devendra Tiwari 7838896746
 
Boat storm-manual
Boat storm-manualBoat storm-manual
Boat storm-manual
Amit Kumawat
 
Ytesonhuong huong-dan-su-dung-may-dem-buoc-omron hj-321
Ytesonhuong huong-dan-su-dung-may-dem-buoc-omron hj-321Ytesonhuong huong-dan-su-dung-may-dem-buoc-omron hj-321
Ytesonhuong huong-dan-su-dung-may-dem-buoc-omron hj-321
Son Huong Medical Equipment
 
Roller Team Zefiro 675 | TMC Motorhomes
Roller Team Zefiro 675 | TMC MotorhomesRoller Team Zefiro 675 | TMC Motorhomes
Roller Team Zefiro 675 | TMC Motorhomes
TMC Motorhomes
 
Roller Team T-Line 740
Roller Team T-Line 740Roller Team T-Line 740
Roller Team T-Line 740
TMC Motorhomes
 
550user
550user550user
Hướng dẫn sử dụng máy đo nhiệt độ Testo 610
Hướng dẫn sử dụng máy đo nhiệt độ Testo 610Hướng dẫn sử dụng máy đo nhiệt độ Testo 610
Hướng dẫn sử dụng máy đo nhiệt độ Testo 610
Tenmars Việt Nam
 
Datavideo RMC-190 PTZ camara control unit
Datavideo RMC-190 PTZ camara control unitDatavideo RMC-190 PTZ camara control unit
Datavideo RMC-190 PTZ camara control unit
AV ProfShop
 
Online Programming Tutorial
Online Programming TutorialOnline Programming Tutorial
Online Programming Tutorial
westarenergy
 
YL80C Manual x5.pdf
YL80C Manual x5.pdfYL80C Manual x5.pdf
YL80C Manual x5.pdf
GetOurData
 
Como | Motorhome User Manual | Freedhome
Como | Motorhome User Manual | FreedhomeComo | Motorhome User Manual | Freedhome
Como | Motorhome User Manual | Freedhome
Freedhome Luxury Motorhome Hire
 
Lugano | Motorhome User Manual | Freedhome
Lugano | Motorhome User Manual | Freedhome Lugano | Motorhome User Manual | Freedhome
Lugano | Motorhome User Manual | Freedhome
Freedhome Luxury Motorhome Hire
 
Da Vinci | Motorhome User Manual | Freedhome
Da Vinci | Motorhome User Manual | FreedhomeDa Vinci | Motorhome User Manual | Freedhome
Da Vinci | Motorhome User Manual | Freedhome
Freedhome Luxury Motorhome Hire
 
Instruction Manual | Burris BTC 35 / BTC 50 | Optics Trade
Instruction Manual | Burris BTC 35 / BTC 50 | Optics TradeInstruction Manual | Burris BTC 35 / BTC 50 | Optics Trade
Instruction Manual | Burris BTC 35 / BTC 50 | Optics Trade
Optics-Trade
 
Roller Team Auto-Roller 707 | TMC Motorhomes
Roller Team Auto-Roller 707 | TMC MotorhomesRoller Team Auto-Roller 707 | TMC Motorhomes
Roller Team Auto-Roller 707 | TMC Motorhomes
TMC Motorhomes
 
Roller Team Auto-Roller 694 Manual | TMC Motorhomes
Roller Team Auto-Roller 694 Manual | TMC MotorhomesRoller Team Auto-Roller 694 Manual | TMC Motorhomes
Roller Team Auto-Roller 694 Manual | TMC Motorhomes
TMC Motorhomes
 
Lomond | Motorhome User Manual | Freedhome
Lomond | Motorhome User Manual | FreedhomeLomond | Motorhome User Manual | Freedhome
Lomond | Motorhome User Manual | Freedhome
Freedhome Luxury Motorhome Hire
 
Roller Team Auto-Roller 746 | TMC Motorhomes
Roller Team Auto-Roller 746 | TMC MotorhomesRoller Team Auto-Roller 746 | TMC Motorhomes
Roller Team Auto-Roller 746 | TMC Motorhomes
TMC Motorhomes
 
Garda | Motorhome User Manual | Freedhome
Garda | Motorhome User Manual | FreedhomeGarda | Motorhome User Manual | Freedhome
Garda | Motorhome User Manual | Freedhome
Freedhome Luxury Motorhome Hire
 

Similar to Crevit user manual-3377843 (20)

Bpm 210 ul blood pressure monitor
Bpm 210 ul blood pressure monitorBpm 210 ul blood pressure monitor
Bpm 210 ul blood pressure monitor
 
Bpm 210 ul blood pressure monitor
Bpm 210 ul blood pressure monitorBpm 210 ul blood pressure monitor
Bpm 210 ul blood pressure monitor
 
Boat storm-manual
Boat storm-manualBoat storm-manual
Boat storm-manual
 
Ytesonhuong huong-dan-su-dung-may-dem-buoc-omron hj-321
Ytesonhuong huong-dan-su-dung-may-dem-buoc-omron hj-321Ytesonhuong huong-dan-su-dung-may-dem-buoc-omron hj-321
Ytesonhuong huong-dan-su-dung-may-dem-buoc-omron hj-321
 
Roller Team Zefiro 675 | TMC Motorhomes
Roller Team Zefiro 675 | TMC MotorhomesRoller Team Zefiro 675 | TMC Motorhomes
Roller Team Zefiro 675 | TMC Motorhomes
 
Roller Team T-Line 740
Roller Team T-Line 740Roller Team T-Line 740
Roller Team T-Line 740
 
550user
550user550user
550user
 
Hướng dẫn sử dụng máy đo nhiệt độ Testo 610
Hướng dẫn sử dụng máy đo nhiệt độ Testo 610Hướng dẫn sử dụng máy đo nhiệt độ Testo 610
Hướng dẫn sử dụng máy đo nhiệt độ Testo 610
 
Datavideo RMC-190 PTZ camara control unit
Datavideo RMC-190 PTZ camara control unitDatavideo RMC-190 PTZ camara control unit
Datavideo RMC-190 PTZ camara control unit
 
Online Programming Tutorial
Online Programming TutorialOnline Programming Tutorial
Online Programming Tutorial
 
YL80C Manual x5.pdf
YL80C Manual x5.pdfYL80C Manual x5.pdf
YL80C Manual x5.pdf
 
Como | Motorhome User Manual | Freedhome
Como | Motorhome User Manual | FreedhomeComo | Motorhome User Manual | Freedhome
Como | Motorhome User Manual | Freedhome
 
Lugano | Motorhome User Manual | Freedhome
Lugano | Motorhome User Manual | Freedhome Lugano | Motorhome User Manual | Freedhome
Lugano | Motorhome User Manual | Freedhome
 
Da Vinci | Motorhome User Manual | Freedhome
Da Vinci | Motorhome User Manual | FreedhomeDa Vinci | Motorhome User Manual | Freedhome
Da Vinci | Motorhome User Manual | Freedhome
 
Instruction Manual | Burris BTC 35 / BTC 50 | Optics Trade
Instruction Manual | Burris BTC 35 / BTC 50 | Optics TradeInstruction Manual | Burris BTC 35 / BTC 50 | Optics Trade
Instruction Manual | Burris BTC 35 / BTC 50 | Optics Trade
 
Roller Team Auto-Roller 707 | TMC Motorhomes
Roller Team Auto-Roller 707 | TMC MotorhomesRoller Team Auto-Roller 707 | TMC Motorhomes
Roller Team Auto-Roller 707 | TMC Motorhomes
 
Roller Team Auto-Roller 694 Manual | TMC Motorhomes
Roller Team Auto-Roller 694 Manual | TMC MotorhomesRoller Team Auto-Roller 694 Manual | TMC Motorhomes
Roller Team Auto-Roller 694 Manual | TMC Motorhomes
 
Lomond | Motorhome User Manual | Freedhome
Lomond | Motorhome User Manual | FreedhomeLomond | Motorhome User Manual | Freedhome
Lomond | Motorhome User Manual | Freedhome
 
Roller Team Auto-Roller 746 | TMC Motorhomes
Roller Team Auto-Roller 746 | TMC MotorhomesRoller Team Auto-Roller 746 | TMC Motorhomes
Roller Team Auto-Roller 746 | TMC Motorhomes
 
Garda | Motorhome User Manual | Freedhome
Garda | Motorhome User Manual | FreedhomeGarda | Motorhome User Manual | Freedhome
Garda | Motorhome User Manual | Freedhome
 

Recently uploaded

美洲杯投注冠军赔率揭晓!谁将问鼎南美之王?|【​网址​🎉ac22.net🎉​】
美洲杯投注冠军赔率揭晓!谁将问鼎南美之王?|【​网址​🎉ac22.net🎉​】美洲杯投注冠军赔率揭晓!谁将问鼎南美之王?|【​网址​🎉ac22.net🎉​】
美洲杯投注冠军赔率揭晓!谁将问鼎南美之王?|【​网址​🎉ac22.net🎉​】
callottermanha18096
 
一比一原版(UoL毕业证)伦敦大学毕业证如何办理
一比一原版(UoL毕业证)伦敦大学毕业证如何办理一比一原版(UoL毕业证)伦敦大学毕业证如何办理
一比一原版(UoL毕业证)伦敦大学毕业证如何办理
qghuhwa
 
欧洲杯赌钱-欧洲杯赌钱比赛投注-欧洲杯赌钱比赛投注官网|【​网址​🎉ac22.net🎉​】
欧洲杯赌钱-欧洲杯赌钱比赛投注-欧洲杯赌钱比赛投注官网|【​网址​🎉ac22.net🎉​】欧洲杯赌钱-欧洲杯赌钱比赛投注-欧洲杯赌钱比赛投注官网|【​网址​🎉ac22.net🎉​】
欧洲杯赌钱-欧洲杯赌钱比赛投注-欧洲杯赌钱比赛投注官网|【​网址​🎉ac22.net🎉​】
arcosarturo900
 
一比一原版美国俄亥俄大学毕业证(OU学位证)如何办理
一比一原版美国俄亥俄大学毕业证(OU学位证)如何办理一比一原版美国俄亥俄大学毕业证(OU学位证)如何办理
一比一原版美国俄亥俄大学毕业证(OU学位证)如何办理
mjjbdpo2
 
一比一原版塔夫斯大学毕业证Tufts成绩单一模一样
一比一原版塔夫斯大学毕业证Tufts成绩单一模一样一比一原版塔夫斯大学毕业证Tufts成绩单一模一样
一比一原版塔夫斯大学毕业证Tufts成绩单一模一样
stgq9v39
 
MISS RAIPUR 2024 - WINNER POONAM BHARTI.
MISS RAIPUR 2024 - WINNER POONAM BHARTI.MISS RAIPUR 2024 - WINNER POONAM BHARTI.
MISS RAIPUR 2024 - WINNER POONAM BHARTI.
DK PAGEANT
 
2024欧洲杯比分投注-2024欧洲杯比分投注推荐-2024欧洲杯比分投注|【​网址​🎉ac99.net🎉​】
2024欧洲杯比分投注-2024欧洲杯比分投注推荐-2024欧洲杯比分投注|【​网址​🎉ac99.net🎉​】2024欧洲杯比分投注-2024欧洲杯比分投注推荐-2024欧洲杯比分投注|【​网址​🎉ac99.net🎉​】
2024欧洲杯比分投注-2024欧洲杯比分投注推荐-2024欧洲杯比分投注|【​网址​🎉ac99.net🎉​】
ramaysha335
 
Stag Elevators | Leading Home Elevator Company in India
Stag Elevators | Leading Home Elevator Company in IndiaStag Elevators | Leading Home Elevator Company in India
Stag Elevators | Leading Home Elevator Company in India
Stag Elevators
 
欧洲杯下注-欧洲杯下注买球网-欧洲杯下注买球网站|【​网址​🎉ac10.net🎉​】
欧洲杯下注-欧洲杯下注买球网-欧洲杯下注买球网站|【​网址​🎉ac10.net🎉​】欧洲杯下注-欧洲杯下注买球网-欧洲杯下注买球网站|【​网址​🎉ac10.net🎉​】
欧洲杯下注-欧洲杯下注买球网-欧洲杯下注买球网站|【​网址​🎉ac10.net🎉​】
brendonbrash97589
 
快速办理(加拿大CBU毕业证书)卡普顿大学毕业证毕业完成信一模一样
快速办理(加拿大CBU毕业证书)卡普顿大学毕业证毕业完成信一模一样快速办理(加拿大CBU毕业证书)卡普顿大学毕业证毕业完成信一模一样
快速办理(加拿大CBU毕业证书)卡普顿大学毕业证毕业完成信一模一样
ubopub
 
MISS TEEN HYDERABAD 2024 - WINNER RYKA TANDON
MISS TEEN HYDERABAD 2024 - WINNER RYKA TANDONMISS TEEN HYDERABAD 2024 - WINNER RYKA TANDON
MISS TEEN HYDERABAD 2024 - WINNER RYKA TANDON
DK PAGEANT
 
The Uttoxeter and Cheadle Voice Issue 123
The Uttoxeter and Cheadle Voice Issue 123The Uttoxeter and Cheadle Voice Issue 123
The Uttoxeter and Cheadle Voice Issue 123
Noel Sergeant
 
Navigating the World of Topsoil: A Guide to the Right Choice for Your Garden
Navigating the World of Topsoil: A Guide to the Right Choice for Your GardenNavigating the World of Topsoil: A Guide to the Right Choice for Your Garden
Navigating the World of Topsoil: A Guide to the Right Choice for Your Garden
nerissacampuzano
 

Recently uploaded (13)

美洲杯投注冠军赔率揭晓!谁将问鼎南美之王?|【​网址​🎉ac22.net🎉​】
美洲杯投注冠军赔率揭晓!谁将问鼎南美之王?|【​网址​🎉ac22.net🎉​】美洲杯投注冠军赔率揭晓!谁将问鼎南美之王?|【​网址​🎉ac22.net🎉​】
美洲杯投注冠军赔率揭晓!谁将问鼎南美之王?|【​网址​🎉ac22.net🎉​】
 
一比一原版(UoL毕业证)伦敦大学毕业证如何办理
一比一原版(UoL毕业证)伦敦大学毕业证如何办理一比一原版(UoL毕业证)伦敦大学毕业证如何办理
一比一原版(UoL毕业证)伦敦大学毕业证如何办理
 
欧洲杯赌钱-欧洲杯赌钱比赛投注-欧洲杯赌钱比赛投注官网|【​网址​🎉ac22.net🎉​】
欧洲杯赌钱-欧洲杯赌钱比赛投注-欧洲杯赌钱比赛投注官网|【​网址​🎉ac22.net🎉​】欧洲杯赌钱-欧洲杯赌钱比赛投注-欧洲杯赌钱比赛投注官网|【​网址​🎉ac22.net🎉​】
欧洲杯赌钱-欧洲杯赌钱比赛投注-欧洲杯赌钱比赛投注官网|【​网址​🎉ac22.net🎉​】
 
一比一原版美国俄亥俄大学毕业证(OU学位证)如何办理
一比一原版美国俄亥俄大学毕业证(OU学位证)如何办理一比一原版美国俄亥俄大学毕业证(OU学位证)如何办理
一比一原版美国俄亥俄大学毕业证(OU学位证)如何办理
 
一比一原版塔夫斯大学毕业证Tufts成绩单一模一样
一比一原版塔夫斯大学毕业证Tufts成绩单一模一样一比一原版塔夫斯大学毕业证Tufts成绩单一模一样
一比一原版塔夫斯大学毕业证Tufts成绩单一模一样
 
MISS RAIPUR 2024 - WINNER POONAM BHARTI.
MISS RAIPUR 2024 - WINNER POONAM BHARTI.MISS RAIPUR 2024 - WINNER POONAM BHARTI.
MISS RAIPUR 2024 - WINNER POONAM BHARTI.
 
2024欧洲杯比分投注-2024欧洲杯比分投注推荐-2024欧洲杯比分投注|【​网址​🎉ac99.net🎉​】
2024欧洲杯比分投注-2024欧洲杯比分投注推荐-2024欧洲杯比分投注|【​网址​🎉ac99.net🎉​】2024欧洲杯比分投注-2024欧洲杯比分投注推荐-2024欧洲杯比分投注|【​网址​🎉ac99.net🎉​】
2024欧洲杯比分投注-2024欧洲杯比分投注推荐-2024欧洲杯比分投注|【​网址​🎉ac99.net🎉​】
 
Stag Elevators | Leading Home Elevator Company in India
Stag Elevators | Leading Home Elevator Company in IndiaStag Elevators | Leading Home Elevator Company in India
Stag Elevators | Leading Home Elevator Company in India
 
欧洲杯下注-欧洲杯下注买球网-欧洲杯下注买球网站|【​网址​🎉ac10.net🎉​】
欧洲杯下注-欧洲杯下注买球网-欧洲杯下注买球网站|【​网址​🎉ac10.net🎉​】欧洲杯下注-欧洲杯下注买球网-欧洲杯下注买球网站|【​网址​🎉ac10.net🎉​】
欧洲杯下注-欧洲杯下注买球网-欧洲杯下注买球网站|【​网址​🎉ac10.net🎉​】
 
快速办理(加拿大CBU毕业证书)卡普顿大学毕业证毕业完成信一模一样
快速办理(加拿大CBU毕业证书)卡普顿大学毕业证毕业完成信一模一样快速办理(加拿大CBU毕业证书)卡普顿大学毕业证毕业完成信一模一样
快速办理(加拿大CBU毕业证书)卡普顿大学毕业证毕业完成信一模一样
 
MISS TEEN HYDERABAD 2024 - WINNER RYKA TANDON
MISS TEEN HYDERABAD 2024 - WINNER RYKA TANDONMISS TEEN HYDERABAD 2024 - WINNER RYKA TANDON
MISS TEEN HYDERABAD 2024 - WINNER RYKA TANDON
 
The Uttoxeter and Cheadle Voice Issue 123
The Uttoxeter and Cheadle Voice Issue 123The Uttoxeter and Cheadle Voice Issue 123
The Uttoxeter and Cheadle Voice Issue 123
 
Navigating the World of Topsoil: A Guide to the Right Choice for Your Garden
Navigating the World of Topsoil: A Guide to the Right Choice for Your GardenNavigating the World of Topsoil: A Guide to the Right Choice for Your Garden
Navigating the World of Topsoil: A Guide to the Right Choice for Your Garden
 

Crevit user manual-3377843

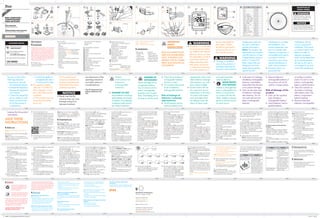
  • 1. US-EN US-EN US-EN US-EN US-EN US-EN US-EN US-EN US-EN US-EN US-EN US-EN US-EN US-EN US-EN US-EN US-EN US-EN US-EN US-EN US-EN US-EN US-EN US-EN US-EN US-EN US-EN US-EN US-EN US-EN US-EN US-EN US-EN US-EN US-EN US-EN US-EN US-EN US-EN US-EN US-EN US-EN US-EN US-EN US-EN US-ENUS-EN How does state law relate to this warranty? Any State Laws that contradict or modify the warranty listed here to the consumer’s benefit will be followed. · Call customer service at 1 (844) 543-5872 · Visit the Website Customer Service Platform at www.lidl.com/contact-us · Visit a LIDL store for further assistance To ensure the quickest warranty return process, please have the following available: · The original sales receipt that includes the date purchased; · The product and manual in the original package; · A statement of the problem. What must you do to keep the warranty in effect? · Retain the original receipt; · Follow all product instructions; · Do not repair or modify the product. US-ENUS-ENUS-EN · Improper use or transport; · Disregarding safety and maintenance instructions; · Accidents or acts of nature (e.g. lightning, fire, water, etc.). · Tampering with the product (such as removing cover, unscrewing screws etc.) What is the period of coverage and warranty resolution? The warranty is for 3 years from the date of purchase. At our discretion, product will either be refunded or replaced. What will we not do? We will not: · Start a new warranty period upon product exchange; · We will not repair product. How to process the warranty? We recommend first either: Never throw batteries in the garbage. They may contain toxic heavy metals and must be handled as special waste. The chemical symbols of heavy met- als are: Cd = cadmium, Hg = mercury, Pb = lead. Used batteries should therefore be disposed of through a local collection point. Warranty What does this warranty cover? The warranty covers: · Damage, breakage or inoperability due to defect. · Damage not accounted for by normal wear and tear or following the safety and maintenance instructions provided in the user manual. What is not covered by the warranty? The warranty does not cover damage caused by: · Normal wear and tear of the product, including fragile parts (such as switches, glass, etc.); Disposal Dispose of the packaging through your local recycling facilities and in compliance with all federal, state and local regulations. Contact your local waste management authority for additional information on how to dispose of the used product. To help protect the environment, please dispose of the product properly when it has reached the end of its useful life, do not throw in the garbage. Infor- mation on collection sites and their opening hours is available from your local authority. Improper disposal of batteries can damage the environment! Cleaning and care Do not use any liquids or cleaning agents for cleaning. Otherwise there is a risk of damaging the product. The product should only be cleaned on the outside with a soft, dry cloth. Maintenance Remove the battery when the product will not be used for longer period of time. Check regularly the cable and components for any damage and safe fit. US-ENUS-EN Problem Solution Speed or distance are not displayed. Adjust magnet and sensor correctly. - Check that the battery is inserted with the poles arranged the right way round. Display is black The ambient temperature is too high or the bike computer was exposed to direct sunlight for too long. Remove product from direct sunlight and let it cool off for a while. The LC-display shows irregular symbols. Remove battery and replace it again. US-ENUS-ENUS-EN - If errors occur in the display, remove any such prod- ucts from the vicinity of the product. In the case of such malfunctions, remove the battery briefly and then reinsert again. Problem Solution Empty LC-display or no response after putting the batteries in again Remove battery. Insert a sharp object (e.g. screwdriver) into the hole marked with “RESET”. Insert a 3V battery into the battery compartment in such a way that the + terminal points upwards. Replace the battery cover on the battery compart- ment. The microprocessor is reset and restarted. To close the battery compartment cover, use a coin to assist you to turn the battery compartment cover in clockwise direction. Press any button and keep it pressed to return to normal operating mode. Note: Once the battery is removed, all stored data will be erased after approx. 20 seconds. Removing the bike computer from the bike Turn the bike computer anticlockwise to detach the bike computer. Cut off the protruding tails of the cable ties 2 with a suitable tool such as diagonal pliers. Troubleshooting Note: This product has delicate electronic compo- nents. Therefore interference may occur when it is near products which transmit radio signals. Changing the batteries Note: The battery of the bike computer must be replaced when the battery state indicator 19 appears on the LC display 13 . Press the MODE button 14 and the SET button 15 at the same time and keep them pressed until the battery symbol and {{----}} appears in the LC display 13 . To replace the battery, proceed as shown in figure A. To open the battery compartment cover, use a coin to assist you to turn the battery compart- ment cover in anti-clockwise direction. Take out the old battery and replace with a new battery. Make sure you fit the battery the right way round (polarity). This is shown inside the battery com- partment. Adjust the sealing ring before inserting the battery. Resetting the bike computer Press the MODE button 14 and + button 22 at the same time and keep them pressed until RESET appears in the LC display 13 . Now press the SET button 15 . This allows you to adjust the previously set basic setting data (language, age, weight, time). The rest of the stored data will be deleted. Using the backlight Press the SET button 15 to switch on the back- light temporarily. The backlight automatically extinguishes after a short period. CUSTOMIZE mode Apart from the ADVANCE and EASY mode, you can make your individual adjustments in the CUSTOMIZE mode (see procedure). Press the Set button 15 to enter the CUSTOMIZE mode. Note: By repeatedly pressing the + button 22 and – button 21 , you can toggle between the ADVANCE and EASY mode. In the EASY mode, press and hold the SET button 15 . Press the + button 22 and – button 21 to switch the settings on or off (e.g. time). Choose “On”, to add the chosen adjustment to the EASY modes. Choose “Off“, if you do not want to add the adjustments. Press the SET button 15 , to confirm your entry. Repeat this process for another function. Press the SET button 15 enter the setting process. Press the + button 22 and – button 21 repeat- edly until the desired symbol is shown. Press the MODE button 14 to move on to setting the timer and press the + button 22 and – but- ton 21 repeatedly until the desired number appears as the first digit. Repeat this process for all the remaining digits. Confirm your choice by pressing the SET button 15 and press the MODE button 14 back to current page. SCAN: Scan Note: The scan mode automatically switches between the trip distance, highest speed, average speed and trip time displays. Note: Refer to the section on “Basic settings” to see how you make or change settings. Note: To turn off the SCAN function, press the + button 22 to return to clock mode. counting forwards or backwards (+ or - respec- tively) and 5-digit number. Press the SET button 15 for edit. Press the + button 22 and – button 21 repeat- edly until the desired symbol is shown. Press the MODE button 14 to move on to set- ting the distance on the odometer and press the + button 22 and – button 21 repeatedly until the desired number appears as the first digit. Repeat this process for all the remaining digits. Confirm your choice by pressing the SET button 15 and press the MODE button 14 back to current page. TIME: Timer Press the SET button 15 and keep it pressed for 3 seconds to change the timer settings. The LC display shows the symbol for counting for- wards or backwards (+ or - respectively) and 5-digit number. Press the SET button 15 again to stop the stop- watch. Press the SET button 15 and keep it pressed for 3 seconds to reset the stopwatch to 0. CAL RATE: Current calorie consumption CALORIE: Calorie meter Press the SET button 15 and keep it pressed for 3 seconds to reset the calorie counter to 0. FAT-BURN: Fat burning in grams Press the SET button 15 and keep it pressed for 3 seconds to reset the fat burning value to 0. CO2 KG: CO2 Saving: Press the SET button 15 and keep it pressed for 3 seconds to access the CO2 saving refer- ence value. KM: Odometer Press the SET button 15 and keep it pressed for 3 seconds to change the odometer settings. The LC display 13 shows the symbol for Press the SET button 15 and keep it pressed for 3 seconds to reset the maximum speed dis- play to 0. AVGSPEED: Average speed Press the SET button 15 and keep it pressed for 3 seconds to reset the average speed dis- play to 0. TEMP: Thermometer Press the SET button 15 and keep it pressed for 3 seconds to switch between °C and °F. Press the SET button 15 to display the highest temperature (HI) measured so far. Press the SET button 15 again to display the lowest temperature (LO) measured so far. Press the SET button 15 and keep it pressed while the highest or lowest temperature is dis- played to switch back to the current tempera- ture to reset the saved data. STPWATCH: Stopwatch Press the SET button 15 to start the stopwatch. Using functions Note: All the functions and secondary functions are described in the following list. CLOCK: Displays the time Press the SET button 15 and keep it pressed for 3 seconds to access the time settings. TOTALODO: Total odometer Press the SET button 15 and keep it pressed for 3 seconds to access the wheel size settings, total distance and servicing interval. TOTAL-TM: Total time cycling Press the SET button 15 and keep it pressed for 3 seconds to make changes to the saved total time cycling. TRIPDIST: Trip distance Press the SET button 15 and keep it pressed for 3 seconds to reset the trip distance, the average speed and the trip time displays to 0. MAXSPEED: Maximum speed any vibration made to reactivate the computer. The function indicator 11 shows the current mode. Press the + button 22 or MODE button 14 repeatedly to page through the various modes. Press the SET button 15 to change into the sec- ondary function for any function. Press the SET button 15 and keep it pressed to call or reset up any saved values. The bike computer has the following functions: ADVANCE mode: CLOCK > TOTALODO > TOTAL-TM > TRIPDIST > MAXSPEED > AVGSPEED > TRIPTIME > TEMP > STPWATCH > CAL RATE > CALORIE > FAT-BURN > CO2 KG > KM+/- > TIME+/- > SCAN EASY mode: Press the MODE button 14 you can choose function display: TRIPDIST > MAXSPEED > AVGSPEED > TRIPTIME You have now completed the basic settings. If you want to change the basic setting data, follow the steps in “Resetting the bike computer” section and reset all basic setting data again. Connect the bike computer and sensor Use the magnet 1 to trigger the sensor 6 , the speed tendency indicator 20 will show a graph to indicate a successful connection. Now the bike computer 8 is ready for use. If connection fails, follow the steps in “Changing the batteries” section and reset all basic setting data again. You will need to re-connect the bike computer 8 and sensor 6 again. Using the bike computer Note: If the bike computer remains unused for more than 5 minutes, it automatically switches into the stand-by mode. Press any button or Note: You have the choice of 0-620.75 miles (0–999km) or miles. After the setting is confirmed, the bike computer will count the trip distance. When the servicing interval indicator 18 shows on LC display, you need to check the condition of your bike (wear, adjustment of brakes, etc.). Then press the down button 21 to reset the service interval and this indicator to disappear. The bike computer will start counting the trip distance again. Confirm your choice by pressing the SET button 15 . Press the MODE button 14 to move to the unit of temperature and press the SET button 15 for edit. Press the + button 22 or – button 21 repeat- edly until °C or °F appears in the LC display. Confirm your choice by pressing the SET button 15 . Press the MODE button 14 to close the setting page. Press the MODE button 14 to move to CO2 saving. A three-digit number appears in the LC display. Press the SET button 15 for edit and press the + button 22 and – button 21 repeatedly until the desired number appears as the first digit. Confirm your choice by press- ing the MODE button 14 . Repeat this process for all the remaining digits. Confirm your choice by pressing the SET button 15 . Press the MODE button 14 to move to the ser- vicing interval. A three-digit number appears in the LC display. Press the SET button 15 for edit and press the + button 22 or – button 21 repeatedly until the desired number of units of distance to your next intended bicycle servicing (servicing interval indicator 18 ) appears in the LC display. Confirm your choice by pressing the MODE button 14 . Repeat this process for all the remaining digits. Confirm your choice by pressing the SET button 15 . Press the MODE button 14 to move to the time format and press the SET button 15 for edit. Press the + button 22 or – button 21 repeat- edly until 12 Hr (12-hour format) or 24 Hr (24-hour format) appears in the LC display. Confirm your choice by pressing the SET button 15 . Press the MODE button 14 to move to the clock. A four-digit number appears in the LC display. Press the SET button 15 for edit and press the + button 22 or – button 21 repeatedly until the desired number appears as the first digit. Confirm your choice by pressing the MODE button 14 . Repeat this process for all the remaining digits. Confirm your choice by pressing the SET button 15 . the desired number appears as the first digit. Confirm your choice by pressing the MODE button 14 . Repeat this process for the remain- ing digit. Confirm your choice by pressing the SET button 15 . Press the MODE button 14 to move to the unit of weight and press the SET button 15 for edit. Press the + button 22 or – button 21 repeatedly until SET KG or SET LB appears in the LC display. Confirm your choice by pressing the SET button 15 . Press the MODE button 14 to move to weight. A three-digit number appears in the LC display. Press the SET button 15 for edit and press the + button 22 or – button 21 repeatedly until the desired number appears as the first digit. Confirm your choice by pressing the MODE button 14 . Repeat this process for all the remaining digits. the MODE button 14 . Repeat this process for all the remaining digits. Confirm your choice by pressing the SET button 15 . Note: You can calculate your tyre circumfer- ence (U) by multiplying your tyre diameter (D) by 3.1416 (Fig. M). The list (Fig. N) contains the tyre circumferences (U) of the most common tyre diameters (D). Press the MODE button 14 to move to the unit of distance and press the SET button 15 for edit. Press the + button 22 or – button 21 repeatedly until SET KM KMH or SET MILE MPH appears in the LC display. Confirm your choice by pressing the SET button 15 . Press the MODE button 14 to move to the age. A two-digit number appears in the LC display. Press the SET button 15 for edit and press the + button 22 or – button 21 repeatedly until Press the Set button 15 for edit. Press the + button 22 or – button 21 repeatedly until the desired language appears. Confirm your choice by pressing the SET button 15 . Press the MODE button 14 to move to the user profile and press the SET button 15 for edit. Press + button 22 or – button 21 repeatedly until the desired user profile (ADVANCE or EASY) appears. Confirm your choice by pressing the SET button 15 . Press the MODE button 14 to move to the wheel size (SET WS). A four-digit number appears in the LC display. Now enter the tyre circumference of your wheel in mm. Press the SET button 15 for edit and press + button 22 or – button 21 repeatedly until the desired number appears as the first digit. Confirm your choice by pressing Note: Make sure that the bike computer 8 is attached with less than 27.56 in (70cm) distance to the sensor 6 . Fix the bike computer 8 to the sen- sor 6 within a 30° angle as shown in Fig. B. Preparing for use Basic settings Basic setting: Language > User profile > Wheel size > Unit of distance and speed > Age > Unit of weigh > Weight > Time format > Time > CO2 saving > Servicing interval > Unit of temperature Key functions: MODE button for selection/ + button 22 or – button 21 for setting values/ SET button for edit and confirmation Note: The LC display 13 comes on automatically approx. 2 seconds after the battery 3 is inserted. You are immediately offered a choice of languages. Inserting the battery To insert the battery 3 , proceed as shown in Fig. A. To open the battery compartment cover, use a coin to assist you to turn the battery compartment cover in anti-clockwise direction. Make sure you fit the battery the right way round (polarity). This is shown on the back side of the product. To close the battery compartment cover, use a coin to assist you to turn the battery compart- ment cover in clockwise direction. Scan the QR code with your smartphone and watch the video to find out how to assem- ble the product. Attaching the bike computer To attach the product, proceed as shown in Figs. B to I. batteries from the product immediately. SAVE THESE INSTRUCTIONS Before use Note: Remove all packaging materials from the product. Remove the protective foil from the LC display 13 before first use. Note: This product is not recommended to use with E-bikes. Interference from the motor may affect the performance of the product. according to polarity marks (+) and (-) on the battery/rechargeable battery and the product. Clean the contacts on the battery/recharge- able battery and in the battery compartment before inserting! Remove exhausted batteries/rechargeable Remove batteries/ rechargeable batteries if the product will not be used for a longer period. Risk of damage of the product Only use the specified type of battery/ rechargeable battery! Insert batteries/rechar- geable batteries In the event of a leakage of batteries/rechargeable batteries, immediately remove them from the prod- uct to prevent damage. Only use the same type of batteries/recharge- able batteries. Do not mix used and new bat- teries/rechargeable batteries. and seek immediate medical attention. WEAR PROTEC- TIVE GLOVES! Leaked or damaged bat- teries/rechargeable bat- teries can cause burns on contact with the skin. Wear suitable protective gloves at all times if such an event occurs. temperatures, which could affect batteries/recharge- able batteries, e.g. radi- ators/direct sunlight. Avoid contact with the skin, eyes and mucous membranes. In the event of contact with battery acid, thoroughly flush the affected area with plenty of clean water Never throw batteries/ rechargeable batteries into fire or water. Do not exert mechanical loads to batteries/ rechargeable batteries. Risk of leakage of batteries/recharge- able batteries Avoid extreme environ- mental conditions and DANGER OF EXPLOSION! Never recharge non-re- chargeable batteries. Do not short-circuit bat- teries/rechargeable batteries and/or open them. Overheating, fire or bursting can be the result. Safety instructions for batteries/ rechargeable batteries DANGER TO LIFE! Keep batteries/recharge- able batteries out of reach of children. If accidentally swallowed seek immedi- ate medical attention. non-observance of the operating instructions and safety advice or unauthorised use. The RF Exposure Com- pliance distance is 20 mm. (2) this product must accept any interference received, including inter- ference that may cause undesired operation. Please note that the warranty does not cover damage arising from improper treatment, • Consult the dealer or an experienced radio/ TV technician for help. This product complies with part 15 of the FCC Rules. Operation is sub- ject to the following two conditions: (1) This product may not cause harmful interfer- ence, and by one or more of the following measures: • Reorient or relocate the receiving antenna. • Increase the separation between the equipment and receiver. • Connect the equipment into an outlet on a dif- ferent circuit from the circuit the receiver is connected to. interference will not occur in a particular installation. If this prod- uct causes harmful inter- ference to radio or television reception, which can be determined by turning the product off and on, the user is encouraged to try and correct the interference interference in a residen- tial installation. This product generates, uses and can radiate radio frequency energy and, if not installed and used in accordance with the instructions, may cause harmful interference to radio communications. However, there is no guarantee that compliance could void the user‘s authority to operate the product. Note: This product has been tested and complies with the limits for a Class B digital device, pursuant to Part 15 of the FCC Rules. These limits are designed to provide reasonable protection against harmful person responsible for their safety. Children should be supervised to ensure that they do not play with the product. Changes or modifica- tions to this product not expressly approved by the party responsible for This product is not intended for use by persons (includ- ing children) with reduced physical, sensory or men- tal capabilities, or lack of experience and knowl- edge, unless they have been given supervision or instruction concerning use of the product by a IMPORTANT SAFETY INSTRUCTIONS READ ALL INSTRUCTIONS. KEEP FOR FUTURE REFER- ENCE. IF PASSING THIS PRODUCT ON TO A THIRD PARTY ALSO INCLUDE ALL DOCUMENTS. Model: HG00734A-TX, HG00734B-TX FCC-ID: 2AJ9O-HG734TX Model: HG00734A-RX, HG00734B-RX Included items 1 Bike computer 1 Bracket for bike computer 1 Cushion for bike computer bracket 1 Bracket with sensor 1 Magnet 6 Cable ties 2 Batteries 3V (Direct current), type CR2032 button cell 2 Spare seal ring for bike computer and sensor 1 Operating instructions 16 Speed comparison indicator: Compares your current speed against the average speed ▲ higher than your average speed ▼ lower than your average speed 17 SCAN indicator 18 Servicing interval indicator 19 Battery state indicator 20 Speed tendency indicator: Indicates speed trend Acceleration – anticlockwise rotation Deceleration – clockwise rotation 21 Down button (-) 22 Up button (+) Technical data Battery: 3V (Direct current) (CR2032 button cell) Operating temperature: 0–122°F (0–50°C) IP44 (splash proof): Suitable for wet locations – Scan indicator (functions displayed in continuous loop) – Backlight Description of parts 1 Magnet 2 Cable tie 3 Battery 4 Cushion for bike computer bracket 5 Bracket 6 Sensor 7 Bike computer’s battery compartment cover 8 Bike computer 9 Sensor battery compartment cover 10 Primary function value display 11 Function indicator 12 Secondary function value display 13 LC display 14 MODE button (M) 15 SET button (S) Functions – Menu languages: GB, DE, FR, NL, IT, ES – Clock – Stopwatch – Temperature °C/°F – Memory function for min. and max. temperature – Current speed (0–62mph (0–99.9km/h)) – Average speed (0–62mph (0–99.9km/h)) – Maximum speed (0–62mph (0–99.9km/h)) – Speed comparison – Speed tendency – Trip timer (max. 9:59:59) (count backwards or forwards) – Odometer (count backwards or forwards) – Total odometer and total cycling time display – Calories – Fat-burnt – CO2 saving Bike Computer Introduction Congratulations on your purchase. You have selected a quality product. The instructions for use are a part of the product. They contain important information about the safety, use and disposal of the product. Before using the product, please learn about all the safety information and usage instructions. Only use the product as described and for the specified appli- cations. If you lend the product to someone else, please also give all the instructions. Proper use The product is intended for use as a bike computer. Not for commercial use. BIKE COMPUTER/ COMPUTADORA PARA BICICLETA COMPUTADORA PARA BICICLETA Instrucciones de utilización y de seguridad BIKE COMPUTER Operation and Safety Notes IAN 286004 D U NM D U 20in 1598mm 22in 1759mm 24in 1916mm 26in (650A) 2073mm 26,5in (Tubular) 2117mm 26,6in (700 x 25C) 2124mm 26,8in (700 x 28C) 2136mm 27in (700 x 32C) 2155mm 28in (700B) 2237mm ATB24in x 1,75 1888mm ATB26 x1,4 1995mm ATB26 x1,5 2030mm ATB26 x1,75 2045mm ATB26 x 2 (650B) 2099mm 27in x 1 2138mm 27in x 1 1/4 2155mm L K G F E DB A I H J 10 11 12 1415 16 17 18 19 20 22 5 3 4 6 C1 2 7 3 86 3 9 8 1 6 5 2 4 2 6 6 2 1 1 6 0,079in (max. 2mm) 6 1 8 5 21 13 Distributed by/Distribuido por: Lidl US LLC., Arlington, VA 22202 Model No./Modelo Núm.: HG00734A/HG00734B Version/Versión: 02/2017 Made in/Hecho en: China Last Information Update · Estado de las informaciones: 03/2017 · Ident.-No.: HG00734A/B-US032017-9 WARNING indicates a hazardous situation that, if not avoided, could result in death or serious injury. NOTICE indicates information considered important, but not hazard related (e.g. messages related to property damage). DESCRIPTION OF SIGNAL WORDS Call customer service at 1 (844) 543-5872 Visit the Website Customer Service Platform at www.lidl.com/contact-us Visit a LIDL store for further assistance. IAN 286004 Please have your IAN number ready. CUSTOMER SERVICE 286004_cri_Fahrradcomputer_660x444mm_US.indd 1 31.03.17 10:39